To avoid troubles during operation, you need to carefully consider thermal protection building. Very often when designing, a decision is made to use prefabricated or monolithic reinforced concrete floors. If the building does not have a heated basement or basement, it will be necessary to insulate the concrete floor on the ground floor in a private house.
Why is insulation performed?
Before insulating a concrete floor, it is necessary to understand the feasibility of this measure. Concrete has high thermal conductivity. This means that it transmits heat well through itself and removes it from the room. To prevent heat losses use materials with best performance thermal conductivity.
Laying insulation as an additional layer in a private house on the ground floor floor prevents the following problems:
- condensation on the cold surface from the side warm air;
- the appearance of mold, mildew and other microorganisms dangerous to humans;
- violation of the temperature and humidity conditions of the room;
- high heating costs.
If you leave a concrete floor in a private house without insulation, then in addition to the fact that it will be uncomfortable to use, the structure will soon require serious repairs.
Methods for insulating a concrete floor
Insulation of a concrete floor on the ground floor can be carried out both from above and from below the ceiling. The most commonly used method is from above. You can understand why this is so by considering the disadvantages and advantages of each of them.
Insulation concrete floor from below (from the basement or underground)
Advantages insulation from below:
- high efficiency;
- protection concrete structure floors from freezing;
- Condensation is expected to occur from the basement side;
- does not reduce the height of the room on the ground floor when clean;
- base under flooring becomes strong concrete slab, and not porous insulation.
Insulation of a concrete floor from the cold air side is more efficient, but in the case of a horizontal structure it becomes more complicated. It is quite difficult to carry out work in low technical underground, constantly raising his head up. Because of this drawback, in the vast majority of cases, the floors in the house are insulated from the warm air side.

Insulation over the ceiling has the following features:
- the dew point (condensation) is located inside the floor structure;
- the supporting structure is not protected from freezing;
- in addition to the vapor barrier of the insulation on the warm air side, waterproofing will be required on the cold air side;
- it is necessary to install a reinforced cement-sand screed on top of the insulation;
- The clean height of the first floor premises is significantly reduced.
Currently, screed reinforcement can be avoided by using insulation materials with increased strength, specifically designed for use in floor construction.
Materials for insulating concrete floors
The most common thermal insulation materials include mineral wool And expanded polystyrene. IN Lately Sprayed compounds have begun to gain popularity as an additional layer in a private home. When choosing an insulating material, more attention should be paid to the purpose of the room and the planned loads, since their thermal insulating properties are almost the same.
Features of using mineral wool
 Manufacturers produce slabs designed specifically for floor insulation that are highly durable. Mineral wool has the following advantages:
- Resistant to high temperatures and fire.
- Vapor permeability.
- Resistance to fungus, mold and other microorganisms.
It is important that mineral wool is not highly resistant to water, so its use in wet areas is not recommended. When wet, the insulation sags and loses its useful properties.
Mineral wool is a soft material, so it is best to lay it between joists so that the insulation does not take on the load.
 Insulation of the ceiling from above ( special case with lags)
 Depending on the source raw material, mineral wool is divided into:
- glass;
- stone;
- slag
It is important to take precautions when working: small particles of material can enter the lungs and skin and cause health problems. When working with mineral wool, builders must be provided with protective clothing, gloves and masks.
Types of expanded polystyrene and its application


The cheapest option for insulation in a private house on the ground floor, not counting the simplest materials such as expanded clay, is Styrofoam. He has high efficiency, resistant to moisture, but has its disadvantages:
- If the wetted foam is exposed to low temperatures, it will crumble into small balls and cease to perform its function.
- The material has a fairly low strength, so when insulating the floor, a reinforced cement-sand screed is used over it.
- Polystyrene foam is a moderately and slightly flammable material and, when burned, releases substances harmful to humans.
- Use with caution in damp areas.
The use of polystyrene foam insulation eliminates many of the disadvantages extruded polystyrene foam. In appearance it is similar to polystyrene foam, but differs in manufacturing technology.
 The advantages of this material include:
- Increased strength characteristics.
- Long service life.
- Zero moisture absorption.
- With the help of special additives, manufacturers obtain products belonging to the class fire safety NG (non-flammable).
The main obstacle to insulation with extruded polystyrene foam in a private home can be its fairly high cost. But despite this, the material is the best solution.
To reduce cost and save high performance sometimes they use insulation of a concrete floor with polystyrene foam in two layers: the bottom one is made of foam plastic, the top one is made of extruded material. Such a solution in private construction will be the best compromise between price and quality. A layer of dense extruded polystyrene foam is taken 30-50 mm thick. It is advisable to select the required foam layer using thermal engineering calculations. If this is not possible, approximately take a thickness of 70-100 mm depending on the climate of the construction area.
Laying insulation
Before starting work with expanded polystyrene you will need to prepare everything necessary tools. For installation you will need:
- knife for cutting material;
- glue;
- polyurethane foam;
- foil polyethylene as a vapor barrier;
- metal tape for gluing polyethylene sheets together.
How to insulate a concrete floor on the first floor correctly? It is important to carefully prepare the base for the insulation and clean it of dust and dirt. Depending on the type of flooring in the house, sometimes thermal insulation material laid between the ribs of wooden or metal frame. After installation is completed, the insulation material is cement-sand screed.
And this video shows the process of installing polystyrene foam screeds:
Tools and materials needed to work with mineral wool:
- waterproofing (for example, durable polyethylene film);
- vapor barrier (for example, vapor barrier membrane);
- tape for gluing joints of film and membrane materials;
- tool for cutting insulation boards.
Insulation of a concrete floor in a house requires a careful approach, the right choice insulation and compliance with its installation technology. Working with expanded polystyrene is much easier than with mineral wool, and it protects no worse. Costs at the construction stage will easily pay off during operation (savings on repairs and heating).
In this video, experts talk in detail about all the nuances that you need to keep in mind when installing a floor.
home distinctive feature The design of the floor of the 1st floor, located above an unheated underground, means that the structure contains insulation. And where insulation is present, the question of protecting it from unfavorable factors automatically arises in order to preserve its heat-protective qualities. And one of the most important issues protecting insulation is a matter of protecting it from moisture, that is, installing a vapor barrier. In this article we will talk about insulating the wooden floor of the first floor above the basement, and do it yourself.
Creation of temperature and humidity conditions
The main task of all structures using insulation is to create the correct mode of its operation, i.e. make sure that moisture does not penetrate into the insulation, and that which may form in it has the opportunity to evaporate outside without hindrance. The first means of protection is vapor barrier. The second remedy is ventilation, since sufficient ventilation promotes the evaporation of moisture. These principles should be used when installing the floor of the 1st floor.

The first is ensured by the correct use of vapor barriers. Ventilation is provided by air gaps and space under the floor (underground). The underground (technical underground, basement) must be dry and well ventilated. Incorrect temperature and humidity conditions in the underground can lead to the formation of condensation inside the insulation. To prevent this from happening, the underground must have vents for ventilation. At very low temperatures air in winter, they can even be closed so that the temperature in the underground is not very low and this does not lead to a large temperature difference, which contributes to the formation of condensation in the insulation or on its surface.
Insulation
Types of insulation
Both bulk and rolled or slab materials are used as insulation. Bulk insulation materials include expanded clay, vermiculite, slag, mineral fibers, and shavings.

Backfilling with expanded clay
Plate materials are factory-made slabs or blocks made from materials with low thermal conductivity. Recently, polyurethane foam insulation, which is blown into the space of the insulated structure, has become very popular.
Mineral wool insulation
But the most popular, especially in private construction, are flexible, soft materials. Such insulation materials are good because they are easy to give the required shape and are convenient to install. The most common insulation is the so-called mineral wool in the form of mats or rolls.
Advantages of mineral wool insulation:
- good thermal conductivity;
- non-flammable and does not support combustion;
- lightweight, saving on load-bearing structures;
- convenience and speed of installation.
Flaws:
- hygroscopicity;
- a base for installation is required.

Vapor barrier - why is it needed?
The insulation must be protected from moisture. Any insulation, if it gets wet, greatly loses its heat-protective properties. And since mineral wool is a hygroscopic material, you need to take care that moisture does not get on it.
But protection is required not only from water. Protection is required against steam penetration. Vapor barrier plays a big role in creating optimal operating conditions for insulation.
Without delving into the concept of partial pressure, we note the importance of understanding two points:
It is the vapor barrier that is the barrier that prevents moisture (in the form of steam) from penetrating into the insulation;
It is important to correctly determine where in the “pie” the vapor barrier should be placed.

The principle of placing vapor barriers
In order to briefly but clearly understand where the vapor barrier should be placed, you need to remember: steam always spreads from a place with more high pressure to an area of lower pressure. It can be put simply this way: warm steam always (almost) spreads from the room to the outside. You need to remember this and then it will be easier not to get confused about where it should be placed.
From the above it follows that the vapor barrier is not placed “above” or “below” the insulation. It is placed “between” a warm room-source of steam (usually internal heated rooms) and a cold room (outdoor space), where this steam moves. Therefore, in case of insulation attic floor, the vapor barrier will be under the insulation, and in the case of insulating a wooden floor above the basement, above the insulation.
Concepts of vapor barrier, waterproofing, membrane
In order for the vapor barrier to be effective, i.e. worked correctly and did not cause harm, the film needs to be laid right side. To do this, you need to study the manufacturer's instructions and consult the seller. Now in production a large number of various materials for protection against steam and water. But there is a difference between them. The scope of their application depends on the type of premises, their humidity and temperature conditions, air temperature environment, for what structure they are used - roofs, ceilings or walls. Often confusion stems from the concepts themselves: vapor barrier and membrane; instead of waterproofing, a vapor barrier is used.
Designed to protect against water vapor in the room air. In fact, steam is a water-saturated gas, or one can say the gaseous state of water. The vapor barrier must have a low vapor permeability rate, i.e. it shouldn't leak steam. It is approximately 10 g/m2/day.
Basically, vapor barrier is a film. They can be roughly divided into:
Vapor-permeable or “breathable” (membranes);
Vapor-tight, practically impermeable to steam, water, or air.
Waterproofing Designed to protect structures from water. Water molecules are larger than gas molecules.
Membrane. Nowadays the word membrane has become very popular. Membranes are already more high-tech films. In relation to the topic of vapor barrier, we can say that this is a material capable of permeating or, conversely, trapping certain substances. The most commonly used expression is a vapor-permeable moisture-proof membrane. This means that this material does not allow water to pass through, but at the same time allows steam to pass through and allows moisture to evaporate. These are the properties that are required during construction to protect thermal insulation.
The direction from which the membrane allows steam to pass through and from which it does not allow water to pass through may be different for different membranes, depending on its intended location. Therefore, you need to be very careful when choosing and ask the seller for all the necessary characteristics.
Basic structural diagrams of the 1st floor floor
Let's consider the design of the floor of the 1st floor above the underground or unheated basement.
Scheme of a wooden floor on the first floor without waterproofing
The basic layout of the first floor floor is as follows. By load-bearing beams which rest on the foundation, a subfloor is laid. The subfloor is necessary in order to lay insulation on it. The insulation is placed in the space between the beams. A vapor barrier is laid on top of the insulation. Between the vapor barrier and the boardwalk, it is imperative to organize air gap to evaporate condensation that may form on the vapor barrier from the room side. It can be organized by nailing bars 2-3 cm high. A plank flooring is placed on top on which the finishing floor is laid.

The supporting structure of the floor is beams. The pitch of the beams is usually 60-80 cm. You can choose the pitch so that it would be convenient to lay insulation between the beams. Then the step will be equal to the width of the insulation plus the thickness of the timber.
In places where the beams are attached to stone structures between them there should be a waterproofing layer made of, for example, roofing felt or bitumen mastic. It is necessary to make a gap between the beam and the foundation wall for ventilation; the beam should not be adjacent to the wall.

Rough floor. To attach the subfloor to the beams, smaller blocks are attached, “ cranial bars" Subfloor boards are laid over them. Here you can use a board with a thickness of 15-50 mm of low grade.

Wooden floor of the 1st floor with waterproofing
Sometimes waterproofing is included in the floor design. It is appropriate if the basement is very damp, available high level groundwater. Then there is a need to protect the insulation from below. To do this, waterproofing is installed under the insulation. This waterproofing must be made of a water-repellent but vapor-permeable membrane. In order to avoid annoying mistakes, it is better to call the top film simply vapor barrier (even if the manufacturer calls the film itself a membrane), and the bottom one – waterproofing. But here, ideally, a membrane should really be used - a vapor-permeable, waterproof one.
An example of the use of incorrect waterproofing
In this video - very clear example that water may form in the insulation. This video is quite common on YouTube under different names. Very often it is called “incorrect vapor barrier”. The vapor barrier itself is not visible in the video. Perhaps the authors of this design used the bottom film as some kind of vapor barrier.
But the point is that the bottom film was supposed to be waterproofing, waterproof on one side, but vapor-permeable on the other.
Useful videos
We also recommend:
Comments:
Facebook (X)
Regular (17)
- Natalia
Good afternoon. I'm completely confused about steam and waterproofing. Tell me if we are doing the floor of the first floor. We have wooden house from timber 150 by 150 by screw piles. We are making a subfloor, then we must install waterproofing. We bought it in a store and it says hydro and vapor insulation D, it’s like a bag of sugar. Then we want to lay insulation and vapor barrier material, then the floor. I’ve seen a lot on the Internet and I’m thinking, what if this film accumulates water inside? And at the same time the insulation gets wet? Please advise. What kind of insulation should I put on the subfloor?
And another question. We have taken out part of the second floor, that is, below open terrace, and on top it turns out to be a room. Yesterday we put the same waterproofing on the joists of the second floor and then a 25mm board. It seems like they wanted to protect the room from the cold, but now I think that water will also accumulate. Then we wanted to put insulation on the bottom and again we don’t know what’s next, probably waterproofing would be more correct. In stores, sellers only recommend it everywhere, but based on experiences on the internet they write differently. please give advice. - Natalia
I live in an apartment on the 1st floor, there is a basement under the floor. The floors are winter time icy. Is it possible to insulate the floor using OSB, and what kind of underlay should I use between the floor (wooden) and OSB, or is something else needed for insulation?
- Maksim
Thank you. I would still like to receive a competent answer.- Alexander (Foreman)
Good afternoon. Each material has its own purpose. That's why it was invented. The manufacturer's websites contain a specific description of the use of each membrane. Therefore, we need to talk specifically about the floor pie and specific membranes.
If you cover a tree from below with film, it will quickly rot, because... will have the same effect as with the ventilation pipe. Moisture will condense on the inside of the film from the room, thereby keeping the logs constantly wet. To do it right, look at the instructions for membranes that are used for floor insulation.- Maksim
Good afternoon. I live in a small town and don’t trust the competence of sellers, because... 99% of them, as Zadornov says - KOECAKERS - don’t know anything and don’t want to know. practice shows that manufacturers do not know what they are producing. I’ll give you an example: I purchased isospan D steam-waterproofing on the official website in the description of this product it is written: used for insulated and non-insulated roofs, or used as a temporary roof. Having unpacked three rolls, I finally found instructions (out of 3 rolls there was only one) for use: used only for non-insulated roofs. I had to return everything to the store. instead of this steam-waterproofing, PGI from another manufacturer was purchased. on their official website there was the same description as isospan. After unpacking the roll, instructions were found: cannot be used as a temporary roof.
Returning to my question, I want to clarify: the vapor-waterproofing film, if I understand correctly, allows moisture vapor to pass through in one direction, and on the other hand prevents moisture from penetrating into the insulation. if you stretch the film from below over the joists, then the vapors from the wood and insulation will escape into the underground, and moisture from the underground will not get into the joists and insulation. or is that not true?- Alexander (Foreman)
Question accepted.
Still an opinion: How is a vapor barrier supposed to protect the entire inside of the house from steam!! both the pie of the structure and the wind-waterproofing must protect the entire pie of any design from wind and water.
Returning to the pie above the underground. No membrane protects from steam, plus there is no permanent residence driving force for that. so that steam from the underground enters the pie above the underground (if the house is not a permanent residence and there is no underground ventilation, that’s a different matter!). I also don’t think it’s necessary to protect yourself from water - except in the case of water gushing out from the underground onto the ceiling. Therefore, in this case we should talk about vapor-permeable wind protection (the wind protection must release steam from the cake to the outside). Wind protection is required to protect the cake from being blown by the wind/draft/pressure difference and protect the insulation from being blown away by the wind... Therefore correct solution IMHO - the most vapor-permeable membrane with overlaps and seals and with the obligatory protection of the entire cake. Ventilation of the underground is required in any case. as well as vapor barrier of the entire pie immediately under interior decoration floors when overlapping the walls and gluing the required overlaps.- Maksim
Good afternoon. Actually the question is not whether to lay down the film or not. I have a question: why do they lay the film ON TOP OF THE JOINTS AND NOT UNDER THEM?
- Alexander (Foreman)
And this is not correct for logs without an air gap and boards right away! This was done in the old days, so that dust from glass wool would not get in and so that it would not blow into the micro-slits. You can, of course, nail the boards directly onto the film, but then there is no point in breathability.
The film also protects against possible dampness due to temperature changes on the floor (condensation). - Maksim
WHY IS THE FILM LAYED ON TOP OF THE JOINTS AND SUB-FLOOR, AND NOT UNDER THE JOINTS?
I AM NOT ABOUT THE UPPER LAYER OF VAPOR INSULATION, BUT ABOUT THE LOWER.
- Maksim
Let's start from the beginning. somehow we seem to misunderstand each other.
I have a house made of rounded logs on screw piles. plinth height 60 cm.
The base has not yet been insulated with anything, but is laid out with half a brick, purely decoratively, to cover the base. In the future I plan to insulate it with expanded polystyrene from the inside 50-100 mm. There are vents in the basement for ventilation of the underground.
house for permanent residenceso: now I have 50x200 logs installed with a pitch of 60 cm. Where to start insulating the floors? from bottom to top: subfloor, vapor barrier, 200 mm insulation (min. wool) vapor barrier, ventilation gap (which one is necessary by the way?), finished floor (40 board)
My whole question is why it’s impossible to do the insulation like this: from bottom to top: vapor barrier, subfloor, 200 mm insulation (min. wool), vapor barrier, ventilation gap (which one is needed by the way?), finished floor (40 board)
- Sergei Pavlovich
Good afternoon. I didn’t find an answer to Maxim’s question.
"Good afternoon. please tell me why the bottom layer of vapor-permeable waterproofing is placed on top of the joists and on the flooring. I want to stretch the film from below along the joists onto the stapler, thereby protecting the wood from underground moisture. Or, on the contrary, will I leave it (wood (joists and flooring)) without ventilation and it will be even worse? tell me how to do it?”I'm very interested in the answer
- Alexander (Foreman)
Good afternoon. Apparently they completely forgot about Maxim’s question. You need to understand the difference between a vapor barrier and a hydrobarrier! It is important. The vapor barrier is placed at the bottom of the structure to prevent moisture from entering during evaporation from the bottom. And the hydrobarrier, allowing moisture released by the structure (for example, drying wood) to the top, prevents moisture from entering from the top. By using the film itself, you will retain moisture...which will lead to rotting.
- Maksim
- Alexander (Foreman)
- Maksim
- Alexander (Foreman)
- Maksim
Good afternoon. please tell me why the bottom layer of vapor-permeable waterproofing is placed on top of the joists and on the flooring. I want to stretch the film from below along the joists onto the stapler, thereby protecting the wood from underground moisture. Or, on the contrary, will I leave it (wood (joists and flooring)) without ventilation and it will be even worse? tell me how to do it?
Insulating the floors of the house on the first floor is a mandatory task. She can't be the only solution to achieve complete comfort in the home and is often only a stage in a whole range of measures to ensure heat. It's about about insulation of walls, ceilings, entrance groups And window openings. But the most logical place to start taking care of thermal insulation is from the floor. The article will discuss the insulation of the floor of the first floor.
First floor floor installation
To begin with, it is worth deciding what type of surface insulation will be carried out from the widest range of materials. Most in demand on this moment are:
- Styrofoam;
- expanded polystyrene;
- dry expanded clay screed;
- glass wool;
- mineral (stone) wool.
They differ not only in cost, but also in a number of characteristics that are worth considering in more detail. Since some of the materials offered are of similar origin or are mistakenly accepted as analogues, then Comparative characteristics will help you make your choice.
Insulation for the first floor floor
Polystyrene foam or polystyrene foam
- If we talk about kinship, then these two insulation products undoubtedly have it. Polystyrene foam is somewhat older, polystyrene foam is rather an improved version of it.

- The differences begin already at the production stage. Polystyrene granules are used as raw materials. To obtain polystyrene foam, they are treated with a stream of hot air, and they expand and join together. A product with a porous structure is formed. The extrusion method is more progressive, and as a result of its use granules source material melt. The output is a material with a single structure, denser than the above-described specimen. At the same time, the cellular structure, which helps retain heat, is preserved in it.
- Foamed polystyrene is 5-6 times stronger than its “brother” in bending, and it will not crumble if conditions change external environment. In addition, expanded polystyrene absorbs moisture less well, and thanks to its improved density, it absorbs noise much more effectively.
- Both materials are lightweight and non-toxic (provided that high-quality construction products from proven brands). They are also not susceptible to rotting and mold does not form on them. Fireproof performance is good for both products. It is more expedient to use polystyrene foam for insulating floors in those rooms where little traffic is expected, and the surface will not experience additional loads from, for example, massive furniture. It is also suitable for those who want to save money. However, as follows from the above technical characteristics, such a desire is not always appropriate.
Glass wool or mineral wool
Another difficult task is choosing between glass wool and mineral wool.

- The latter has very impressive fire resistance characteristics, so it is most often used when insulating wooden floors. Natural inorganic origin stone wool gives the right to talk about its environmental friendliness and resistance to the proliferation of pathogenic microorganisms.
- The thermal insulation properties of mineral wool are not questioned. We can say with confidence that its use will reduce the cost of heating rooms. It will also provide a high level of sound insulation. All these wonderful properties will not “work” if the installation technology is violated when insulating the floor. Therefore, when giving preference to rockwool, you should strictly follow the installation recommendations.
- Glass wool differs in that it is produced on the basis of broken glass, that is, it is essentially not related to mineral wool. At the same time, it loses (slightly) in terms of thermal insulation and also in the ability to shrink over time. In addition, working with it is not as comfortable as with rockwool due to the formation of fine “glass” dust, which irritates the respiratory tract and hands if they are not protected. But it will cost much less than its “stone” counterpart. So those who are willing to experience some discomfort when laying the material and want to save money can opt for glass wool.
Advantages of expanded clay
- This porous material is essentially clay. It is formed into granules and processed at high temperatures. The result is excellent insulation; its flowability makes it easy to fill all voids.

It is good in several respects:
- durability;
- environmental friendliness;
- non-flammability;
- complete resistance to the development of microorganisms, does not cause interest among rodents and other pests;
- cheapness.
- Due to its porous structure, it is quite lightweight material, but is inferior in this indicator to other insulation materials, including those described earlier. Expanded clay also creates an excellent layer that promotes natural ventilation. The sound insulation achieved after its use is considered one of the best.
- The thickness of the floor of the first floor can also play against expanded clay, since in order to organize a high-quality layer of thermal insulation, a significant headroom will be required. The minimum recommended bedding layer is 20 cm, and 40 cm is considered optimal. And again, do not forget to add the height of the screed.
- To finally decide on the material for insulation, you will need to take into account many factors. In terms of cost, glass wool, polystyrene foam or expanded clay are the most preferable options.
- If time is of the essence, then laying foam is the easiest and fastest way.
- When it is necessary to carry out the procedure in accordance with all fire safety rules and requirements, then mineral wool will be the best choice.

- And also important criterion there were and remain the needs and capabilities of the building owners. But in any case, any home craftsman can do all the work on his own.
Thermal insulation of the first floor floor using expanded clay
Expanded clay absorbs moisture very well. This is the main disadvantage of this material. Therefore, the construction of a high-quality waterproofing layer becomes the first and very priority stage. Next, a detailed pie of the first floor floor using expanded clay will be painted.

- Moisture protection. The material most often used for these purposes is polyethylene film. You need to take the most durable one. Naturally, one canvas cannot be used, so the joints are carefully taped with construction tape. The calculation when creating a waterproofing sheet should be based on the fact that its edges should be higher in level than the entire intended backfill along with the screed. The extra centimeters can then be trimmed.
- Preparing the insulation. The maximum effect will be achieved by preparing a mixture of material from different fractions. The use of expanded clay with sizes from 5 to 20 mm will serve to better distribute the granules and create a base more suitable for adhesion to concrete.
- Lighthouses. Their alignment is necessary to create a perfectly flat surface without drops or slopes. The first is located a few centimeters away from the walls. Fixation is carried out on small piles of fairly thick cement mortar. Next, the beacons are placed parallel to the first. The installation distance corresponds to the length of the rule. It will be used for subsequent leveling of the screed. Typically used for guides metallic profile. If floor insulation and subsequent pouring is carried out independently for the first time, then it is better not to “save” on the number of beacons.
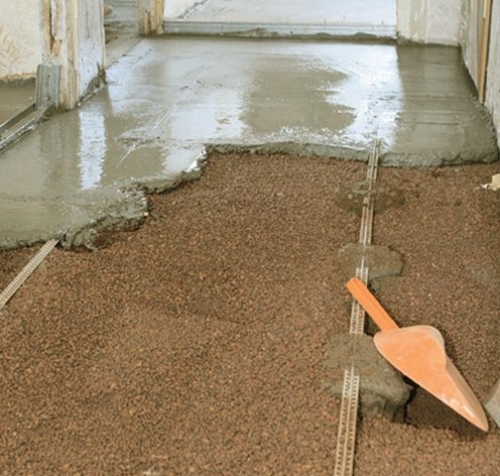
- Prepared expanded clay can be poured. It is evenly distributed and lightly compacted. The fill level needs to be constantly monitored to avoid slopes. Then you will need to saturate the bedding with a solution of liquid cement. This “cement laitance” will give strength to the insulation layer and allow it to remain in its original position during further pouring. Reinforcing layer made of metal mesh will be the final step at this stage.
- Filling. The prepared solution is evenly distributed from the wall along the level of the beacons. Smooth out using the rule. So they gradually move towards the entrance to the room.
- You can walk on the screed no earlier than after 7 days, but the coating will completely harden and be ready for use. finishing a month later. While the drying process is underway, to avoid cracking, the future floor should be moistened with water. You can check for “readiness” in this way: place the neck down glass jar. If condensation forms on its walls, it means that there is a lot of moisture in the floor and it is too early to start laying the finishing coating.
- The result is durable and warm. Smooth surface, on which tiles, laminate or any other type of flooring will look ideal.
As an option, you can consider a “dry” screed using expanded clay and gypsum fiber sheets (gypsum fiber sheets).
- Creation of a waterproofing layer. It is mounted, as in the first case, the joints are overlapped by about 20 cm, and a margin of 6-7 cm is made on the walls.
- Along the entire perimeter of the room, the places where the film comes into contact with the wall are covered with damper tape.
- Beacons are displayed.
- Expanded clay is poured in portions. It is leveled and lightly compacted. After this, be sure to check that the height is level. This operation is carried out gradually in separate areas. As soon as one piece of the floor is prepared, it is immediately covered with a gypsum fiber board. It is laid in two layers, gluing together and additionally fastened with self-tapping screws.

- The seams at the joints of the gypsum plasterboard are puttied; you can go over them with a layer of bitumen waterproofing.
- The remains of the film and damper tape are cut off, and the base is ready for finishing.
Insulation of the ground floor floor using mineral or glass wool
If the desire to insulate the floor arose already during the operation of the building, then first you will need to get rid of the old flooring material. When boards are dismantled and later planned to be returned to their place, they can be numbered for ease of assembly.
- The condition of the joists and rough flooring is assessed. If there are rotten elements, then work is first carried out to replace them.
- Waterproofing. It is better to choose polyethylene with a density of 100 microns or higher. It is laid with an overlap of 10 cm. Near the walls in height, it is necessary to leave a reserve of approximately 10 - 15 cm. If groundwater lie too close to the surface, then it is preferable to choose roofing felt or glassine as a vapor barrier.
- Between the finished floor joists the selected insulation is laid. It is covered with another layer of insulating material on top.

- A counter-lattice is constructed with a thickness of 2 cm. Its function is to provide ventilation gap.
- A new flooring is being built or the old boards are being installed back.
If you need to insulate the concrete floor of the first floor with mineral wool, then logs are installed first. Vapor barrier films are not required.

Do-it-yourself insulation of the house floor with polystyrene foam
- Waterproofing layer created using the technologies described earlier. It is assumed that it is laid on a leveled surface.
- Beacons are placed on top.
- Performed cement strainer. Its thickness is 4 cm.
- On her in a checkerboard pattern foam boards are installed, which fit tightly to each other when laid. After this, the screed is left alone for a couple of days.
- After the first layer has dried, performed finishing screed . The beacons for it are attached to the insulation boards. The thickness of the cement layer is 70 mm. It is filled using reinforcing mesh. After leveling and drying the solution, the floor is ready for finishing with any coating.
Proper use of extruded polystyrene when creating floor insulation
- If polystyrene foam is placed inside the logs, they should be located at a distance of 60 cm from each other.
- Initially laid waterproofing layer, and then insulation is tightly laid between the joists.

- By using construction stapler Another layer of vapor barrier is fixed on top. The top of this layered structure is covered with sheets of plywood or boards.
- A prerequisite is a ventilation gap, which is left around the perimeter of the entire room (approximately 0.5 cm). It will not be noticeable after installing the skirting boards.
- At a relatively high cost, foamed polystyrene creates a high-quality and warm layer that will last a long time. However, experts recommend taking into account next moment when using it: if polystyrene foam was used to insulate floors, then with a similar procedure with the ceiling and walls it is better to give preference to more “breathable” materials so as not to create a greenhouse effect in the home.
Often residents on the first floors apartment buildings facing the problem of icy floor surfaces in winter. Therefore, the relevant question is how to carry out thermal insulation correctly, what methods exist and what is best to use in a given situation. Practical recommendations on how to choose optimal insulation floors of the first floor, as well as instructions for doing the work yourself are designed to help solve this problem.
Materials to choose from
There are two types of coverings in apartment buildings: wooden and concrete. Depending on this, the appropriate type of insulation is selected.
Basics for warm covering for the floor there are liquid, bulk, and also in the form of blocks and rolls. They can be used together with each other or separately.
Liquid
The insulation can be cement mixture filled with expanded clay, polystyrene foam or other materials.
Currently, polymer penoizol is widely used.

However, in order to work with it, special equipment is needed.
Bulk
Among the insulation materials of this group are expanded clay, foam chips, sawdust. They are suitable for insulating floors in apartments with an unheated basement.

Expanded clay is strong and durable, has low thermal conductivity. But, having chosen it as insulation, you need to take care of high-quality waterproofing, since its granules absorb moisture well.
Block
They come in the form of slabs and mats mineral wool, foam plastic, basalt fiber.
Polystyrene foam has low thermal conductivity, costs little and is environmentally friendly. But it is fragile, and when heated strongly, it melts, releasing harmful fumes.

More modern version polystyrene foam - expanded polystyrene. He's different better density, does not burn. Sheets of such insulation are convenient because they can be used to install a heated floor, install a plank floor, fill a screed, and so on.

The most environmentally friendly material among blocks is vermiculite, which is obtained by processing mineral products.
However, it is by no means cheap and in order to save money, you can use its analogue, granulated vermiculite.
Rolled
Insulation materials are made in the form of rolls from polystyrene, cork, mineral wool and foil bases. When the thickness of the insulation roll type not enough, they are placed in two layers or used together with blocks.

Mineral wool, being a cheap insulation material, guarantees low heat transfer. But, you need to take into account that over time it can become denser, causing its properties to decrease. In addition, during installation, mineral wool crumbles and forms dust that is harmful to health, so it requires the use of a respirator and special clothing when working with it.
Concrete floor
Concrete is durable and therefore very often used as a floor. However, this material is very cold. Therefore, in those houses where it is used, careful thermal insulation is required on the first floors. Otherwise, any heating will not be able to warm up properly.

Apartment owners must do the insulation of the concrete floor of the first floor with waterproofing, since dampness often forms in the basement, as a result of which, without appropriate work, mold will appear on the walls.
Instructions for carrying out work
The process begins by preparing the base. To do this, you need to remove the entire coating and check the slabs for cracks, chips and cracks. If there are defects, they are eliminated with a special solution based on concrete or cement. After the surface hardens, it is treated with a special impregnation that strengthens the layer.

Next, waterproofing should be done. Polyethylene film is quite suitable here. It should extend onto the walls by about fifteen to twenty centimeters. A special deep penetration primer will also cope with the task.
To install the insulation, a frame is made. To do this, beams are laid, and under them - pieces of roofing felt. Logs are placed on the bars, and the entire structure is attached to concrete.

After this, you can install bulk insulation alone or in combination with liquid version. Mineral wool is placed on top of it in the cavity of the structure. You can also use foam or other material.
Then a vapor insulating film is laid, which is secured with staples to the joists.

The process ends with the installation of the subfloor. Depending on the type of finishing coating, it can be made of boards or thick plywood.
Modern high-rise buildings no longer have wooden floors. But they can often be found in old-type houses.

Wood is a warm and environmentally friendly material, but over time it tends to dry out, causing gaps to form in the floor. And they cause drafts. Therefore, it would be correct to further process such coatings.
Insulation technology
To insulate the ground floor, you need to perform the following steps:

- dismantle the old coating, check and, if necessary, replace, and if in good condition it can be put back in place;
- treat the surface with antifungal antiseptics and allow to dry;
- install insulation and cover it with a vapor barrier film;
- A board is laid on top of the surface.
Work from the basement
It is possible to insulate an apartment on the ground floor from the basement side. For this purpose, thermal insulation material is attached to the ceiling in the technical room. It can be polystyrene foam or polystyrene foam, which are simply glued on. Mineral wool is also suitable for this purpose. But attaching it will be more difficult. To do this you need:

- fix the bars a couple of centimeters thick than the insulation layer;
- lay mineral wool between the elements of the installed structure;
- Using a stapler, install a vapor barrier membrane on the surface
- cover the structure with plywood or fiberboards.
This type of insulation is becoming increasingly popular. Thanks to it, the floor surface on the first floor will always be warm, the humidity in the apartment will decrease, and its microclimate will improve. The system is:
- electric, mounted in a screed or on top of a rough covering;
- infrared, from a special film installed under the final coating;
- water, when the liquid is constantly heated and pumped into the heating system.

It is best to lay such structures in a leveling screed. A water floor can also be used for wooden covering. But this will be more difficult to implement, since polymer pipes must be placed in the grooves made for them and covered with foil. The finishing is installed on top of the system.
This coating is used not only as decorative, but also as insulation for the floor, especially on the ground floor. Special mixtures guarantee thermal insulation and waterproofing, as well as fire safety.
They are made from environmentally friendly pure materials, which you can install yourself.
Installation instructions
Before starting installation, it is important to properly prepare the base.

- whatever it is rough surface- concrete, wood, ceramic tiles or cement screed, it must be carefully checked;
- seal cracks, cracks, loose elements, dismantle and replace;
- clean the entire coating;
- sand wood and concrete;
- Prime the floor generously so that all pores are completely closed;
- a day after this you can start laying.
The prepared mixture is simply poured out of the bucket and leveled with a spatula. The entire room is covered at once to create a flat surface. At the end, to avoid the appearance of bubbles, you need to go over the entire coating with a roller with needles. Polyurethane varnish is applied to the dried floor.
In order for the floor insulation work in the apartment to be successful, you need to take into account some points:

- the basement walls are examined to identify cracks, holes and chips that must be repaired;
- ventilation holes in basement can be covered for the winter, but not completely;
- installation of a vapor barrier is required.
In order for the house to be cozy and comfortable to live in, you must first take care of its thermal insulation. Wherein Special attention should be given to the first floor, since it is closest to the ground base. If the house has poor thermal insulation, then all the heat will go into the ground.
To compensate for the loss of heat, it is necessary to increase heating, which leads to an increase in material costs for maintaining the house. Insulating the floor on the first floor will help solve this problem.
Choosing a method for insulating the floor on the first floor
The choice of thermal insulation method depends primarily on the material from which the floor on the first floor is made. If the floor is wooden, then it makes sense to insulate it with mineral wool or polystyrene foam. A concrete floor can be insulated using expanded polystyrene, gypsum fiber board or fiberboard. If you want not only but also to improve your heating system at the same time, then it makes sense to install a heated floor system.
 Floor insulation on the ground floor can be external or internal. When installing external thermal insulation, the floor is insulated not only with inside at home, but also from the basement. Carry out frequently internal thermal insulation impossible due to communications located in the basement. It is not recommended to attach foam to the bottom of the slab, as this does not comply with fire safety standards. Use mineral insulation This is not possible, as it will quickly deteriorate due to exposure to moisture. Very often the only way is to close winter period everyone ventilation holes. Please remember that if you live in apartment building, then all insulation actions must be legally agreed upon.
Return to contents
Insulation of the floor on the first floor using mineral wool
Floor insulation with mineral wool is best suited for wooden floors in the apartment. This option is perfect if you are not satisfied with the quality of the flooring. The technology for insulating floors with mineral wool is quite simple.
The first step is to remove the existing boards (by numbering them in advance). After this, check the condition of the vapor barrier (if any) and the tightness of the base. All detected cracks are sealed using polyurethane foam. If the vapor barrier is in poor condition, it should be replaced. Next, mineral wool is laid between the joists, and floorboards are laid on top. When laying mineral wool slabs, you need to carefully monitor how tightly they adhere to the walls and joists. The denser they are laid, the better the insulation will be.

Floor insulation on the first floor can be done using polystyrene foam. Sheets of polystyrene foam can also be laid under a wooden floor. Insulation is carried out by analogy with laying mineral wool.
The difference is that the foam sheets should be laid with small gaps. After all the sheets are laid, you need to fill all the cracks polyurethane foam. This way the insulation will form one continuous layer.
Return to contents
How to insulate a floor using fiberboard or plasterboard
The first step is to remove the floor covering and level it if necessary. concrete base. If there are cracks, all recesses should be filled with putty. When the concrete screed has completely dried, a layer of vapor barrier is laid. In this case, you need to make a small bend on the walls. Then lay the first layer of gypsum board sheets 12 mm thick and treat it with adhesive mastic. The second layer is laid on top so that the joints do not coincide. When the adhesive mastic is completely dry, the surface is primed and puttied. Next, lay the selected floor covering. To compensate for the expansion of the material after exposure to moisture or temperature changes, lay between the ends of the sheets and the wall edge tape. When insulating a floor using fiberboard, you must first remove the baseboards. Next, fiberboard is nailed to the floor, and the floor covering (carpet or linoleum) is glued on top. The glue finally dries only after a day.
Return to contents
How to insulate the floor on the first floor with penoplex

(or penoplex) suitable for installation various coatings(linoleum, parquet, laminate, wooden board, ceramic tiles). To do this, clean the floor covering until concrete screed(you can only leave ceramic tiles) and lay a layer of vapor barrier on it. Next, foam sheets are laid. A layer should be laid on top of the sheets polyethylene film. Then you need to make a reinforcing screed from cement mortar. After her completely dry You can begin laying the flooring.
Return to contents
Installation of heated floors
Warm floors can be of several types: water, electric, film and infrared. The most economical option is water system heating, since it does not require large installation and maintenance costs. Electric heated floors are also easy to install, but they have two significant drawbacks:
- electromagnetic radiation negatively affects human health;
- Electric underfloor heating significantly increases energy consumption.
There are several ways to install water heated floors:
- Concrete method, in which laying is done using a concrete screed.
- The laying method, in which finishing coat placed on aluminum plates.
- A wooden installation method in which pipes are laid directly on the subfloor or wooden joists.

Most often, the first installation method is used to insulate the floor on the first floor. To do this, first of all, divide the area into sectors (to compensate for the thermal expansion of the screed) and prepare the necessary tools and materials:
- Thermal insulation material.
- Concrete (based on the calculation that the lower (starting) layer will be 10 cm thick, and the upper (finishing) layer - 5 cm).
- Metal-plastic seamless pipes with a diameter of 16 mm.
- Fastening elements for pipes.


