SINGLE SHIRT... It is used for leveling the surface after planing with SCHERHEBEL. The blade of the knife is straight, but the edges of the cutting edge have a small radius of curvature, so that when planing there is no scuffing of the wood and no unwanted marks left.
  DOUBLE SHIRT... It differs from the SINGLE PLIER in that it has a CHIPBREAKER (HORBATIC). The bottom edge of the chipbreaker is positioned parallel to the cutting edge of the knife at a distance of 0.2 - 2 mm from it. The closer the bottom edge of the chipbreaker is to the cutting edge, the cleaner the planing. DOUBLE CUT is used for finishing, deburring and scoring. When the direction of movement of the DOUBLE CUTTLE is at an angle of 30 - 40 degrees to its longitudinal axis, the ends of the workpieces can be cut.
  GRINDER... It differs from the DOUBLE SHEARS in a shorter last and an increased angle of addition (the angle of inclination of the knife to the sole of the SHEAR). The GRINDER is used to remove scuff marks, twisted spots and ends of workpieces.
  JOINTER Designed for precise processing of large planes, for leveling (shaping) edges. The knife at the FUGANKA is equipped with a chipbreaker, and the block exceeds the length of the PLUG 2 - 3 times. Most of the FUNGANTS have a reinforced handle behind the knife, which greatly facilitates the work. A low insert (impact button or cork) is glued into the front of the block, which serves to knock the knife out of the tap hole. The shortened FUGANOK is called the HALF-FUNCTIONAL.
  ZINUBEL... This is a STRUCT with a single knife, cutting edge which on the side opposite to the chamfer is covered with a fine notch. The notch is performed on a planer before hardening. The notch, going out to the cutting edge, creates teeth on it. When planing, they remove (each - its own) narrow (0.8 - 1 mm) shavings. The surface becomes corrugated, which is extremely important for veneering work or when gluing very hard wood species. At the same time, when planing a curled surface of hard rocks (mahogany and ebony), ZINUBEL can be replaced with a PLUNGER. But after zincification, the surface must be cleaned with a CYCLE. Due to the complexity of making a ZINUBEL knife, some craftsmen replace it with a piece of HACKSAW BLADE from a SAW for metal - they sharpen it on one side and clamp it between the knife and the chip breaker with a DOUBLE CHIP.
  Particular attention should be paid to STRUCTURES with a metal body. With such TOOLS, not only the position of the chipbreaker in relation to the knife is adjusted, but also the width of the span. Especially suitable for working with hard wood species SEMI-FUNCTIONS
.
Particular attention should be paid to STRUCTURES with a metal body. With such TOOLS, not only the position of the chipbreaker in relation to the knife is adjusted, but also the width of the span. Especially suitable for working with hard wood species SEMI-FUNCTIONS
.  Well-deserved respect is the small metal SHIRT - WEANER, in which the knife turns with the chamfer forward. For this reason, it has a large rake angle and is used for fine planing.
  HORBACH
. This view STRUGA is intended for processing curly edges with external and internal diameters. Accordingly, it has two types of soles, designed for its type of work.
HORBACH
. This view STRUGA is intended for processing curly edges with external and internal diameters. Accordingly, it has two types of soles, designed for its type of work.  SPOOL... Or GROOVE - used for cutting longitudinal grooves (grooves) on the face and edges of the workpieces. It consists of two pads, fastened together with screws. One block is a guide, the other is used for fixing replaceable iron knives. With the help of the SPOOL, select the
  CYCLE
. This TOOL also refers to planing. The CYCLE is a thin (0.7 - 1 mm.) steel plate 25 - 30 mm wide from a spring steel strip. Bringing the CYCLE to a working state is usually called a POINT. The working edge is sharpened at a right angle, thus forming two sharp rectangular ribs. One or both of the ribs fill up (direct), drawing along them with the aiming edge, as which you can use an old file. A very thin burr forms on the edge - the working blade itself. If the CYCLE is tilted slightly, the burr will remove very thin chips. The movements made by the CYCLE must match the direction of the wood layers. Sometimes, for example, when cycling decks, it is allowed to move the CYCLE at an angle of up to 45 degrees to the direction of the layer. It should be remembered that CYCLI usually does not have a special holder for a knife.
CYCLE
. This TOOL also refers to planing. The CYCLE is a thin (0.7 - 1 mm.) steel plate 25 - 30 mm wide from a spring steel strip. Bringing the CYCLE to a working state is usually called a POINT. The working edge is sharpened at a right angle, thus forming two sharp rectangular ribs. One or both of the ribs fill up (direct), drawing along them with the aiming edge, as which you can use an old file. A very thin burr forms on the edge - the working blade itself. If the CYCLE is tilted slightly, the burr will remove very thin chips. The movements made by the CYCLE must match the direction of the wood layers. Sometimes, for example, when cycling decks, it is allowed to move the CYCLE at an angle of up to 45 degrees to the direction of the layer. It should be remembered that CYCLI usually does not have a special holder for a knife.  Nowadays, along with the usual, appeared ELECTRIC CUTTING(ELECTRIC CUTTER), which is equipped with a system for adjusting the thickness of the chip and its ejection. And, importantly, special protection from knives - both the fingers of the worker and the surface to be treated. It is important to note that both types of PLATES are used for wood planing. Lecture No. 4 Chiseling and cutting Chiseling of wood is performed in the event that it is extremely important to make finger joints of parts, through and blind rectangular holes. Chiseling and cutting tools. Hand slotting tools include chisels and chisels Chisels have a working part 130, 150 or 160 mm long, 6, 8, 10, 12, 15, 18 and 20 mm wide, 8, 9 and 11 mm thick. Chisels are flat and semicircular... Flat chisels are divided into thick and thin... Flat thin chisels are made with a length of 110 and 120 mm, a width of 12, 15, 18, 20, 25, 30 and 40 mm and a thickness of 3 mm. Flat thick chisels are made in lengths of 105, 110 and 120 mm. Chisels with a width of 4, 6, 8 mm have a thickness of 3 mm, and chisels with a width of 10, 12, 18, 20, 25, 30, 40 mm have a thickness of 4 mm. Semicircular chisels used for processing convex and concave surfaces(chisels with external sharpening), gouging and cleaning of rounded sockets and grooves (chisels with internal sharpening). The length of the working part of these chisels is 105, 110 and 120 mm. Chisels with a width of 6, 8 and 10 mm have a thickness of 2.0-2.5 mm, and chisels with a width of 12, 15, 20, 25, 30 and 40 mm have a thickness of 2.5-3.0 mm. You can watch a fragment of the movie below about how chisels and chisels are made. Full version the film can be downloaded here and here. Preparing the slotting tool for work. It includes the following operations: sharpening and finishing the cutting edge; checking the integrity of the handle, the presence of a ring and a cap on the handle. The sharpening angle of the chisels is 18-25 °, and the chisels are 30-40 °. Sharpening and debugging of the slotting tool is carried out in the same way as the knives of planing tools. Carrying out the operation of chiselling and cutting wood. Before performing this technological operation mark the workpiece according to the drawing. When making a through hole, markings are made on both sides of the workpiece. The marking marks should be visible after chiselling and even after the final cleaning of the nest with a chisel. For greater reliability of fastening and better clamping of the workpiece, use clamp, with which the workpiece is attached to the workbench lid (fig. on the right, a). The workpiece must be reinforced firmly and without deflection. To prevent the wood from crushing by the supporting surfaces, the clamps are lined under them. Workpieces of considerable length should be secured with several clamps.
  When slotting through holes, a lining (plank) is placed under the workpiece so as not to damage the workbench cover. A part of the workpiece with a marked hole on it should be on the workbench cover. When chiseling, you need to face the workbench, opposite the workpiece, keep the body straight, slightly tilting your head forward. The foot of the left leg is placed perpendicular to the workbench lid. Take a half step back with the right foot and place the foot at an angle of 70-80 ° to the left (Fig. On the right, b). The chisel is taken in the left hand, the mallet in the right. The bit width must match the width of the hole. The chisel is held by the handle at a distance of 15-20 mm from its upper end, and the mallet is held at a distance of 20-30 mm from the lower end. The sequence of slotting through and blind holes is different. Through holes are marked and hammered on one side. Chiseling through holes can be carried out either only on one side, or on two: first, on one side of the workpiece (up to half), and then, turning it 180 °, on the other. This method of chiselling (counter) is used when processing thick workpieces. The resulting holes are cleaned with chisels. Chamfers are cut with chisels, the workpieces are planed and cleaned (Fig. Below). When performing these works, the chisel is taken with the left hand for the working part, and with the right hand for the handle. The right hand tells the tool the direction of travel, while the left hand controls the direction and thickness of the chips.
  Wood cutting with a chisel: a - planing; b - cutting a chamfer at the end; c - chamfering along the grain; d - cleaning the thorn. Chiseling quality control is carried out with various control and measuring tools. The depth of blind holes is measured with a caliper. The length and width of the holes are checked with scale rulers and calipers, but the use of templates gives the greatest control accuracy and time savings. When chiselling and cutting, the following rules should be followed to avoid injury. You can only work with a tool, the cutting part of which is securely fixed in the handle and correctly sharpened. The movement of the chisel should be in the direction away from you. DO NOT push the processed material against any part of the body. The cutting tool may only be passed with the handle forward. DO NOT place the instrument on the edge of the table to avoid injury to the legs from the falling instrument. Instruction card... Chiseling and deburring rectangular holes.
 | Name and sequence of operations | Recommendations for operations and self-monitoring | Sketch |
| Chiseling blind holes: | ||
| 1. Place the chisel across the grain at right side marked workpiece | The chamfer of the bit should face inside the marked hole, and the bit is installed, retreating 1-2 mm from the marked risks; the angle between the workpiece and the leading edge of the bit should be 90º |  |
| 2. With light blows of a mallet on the butt of the handle, deepen the chisel into the wood. Remove the chisel blade from the formed recess | After blows with a mallet, the chisel blade will cut the wood fibers and deepen by 3-5 mm (at greater depth, the quality of the hole to be machined does not deteriorate), remove the chisel from the wood with light swaying across the fibers |  |
| 3. Install the chisel by positioning the blade perpendicular to the wood grain on the left side of the marked hole; cut the fibers and remove the chisel | The chamfer of the bit should face inside the marked hole, backing 1-2 mm from the marking line; lightly hitting the handle of the chisel with a mallet its blade is inserted into the wood by 3-5 mm |  |
| 4. Prune wood along the grain | The chamfer of the chisel should face the inside of the marked hole; pressing the chisel handle with the right hand, its blade is inserted into the wood by 3-5 mm, removing the chisel from the wood, it is installed in a new place and the wood is again cut along the marking line, etc. |  |
| 5. Set the chamfer of the chisel perpendicular to the wood grains at a distance of 15-20 mm from the first notch (right, see sketch), hitting the handle with a mallet, and then, swinging the chisel, remove the wood and thus continue chiselling to the middle of the marked hole | The bit must be chamfered to the center of the marked hole. The thickness of the cut chips should be 2-3 mm. The cut piece of wood is removed using the chisel as a lever |  |
 |
||
| 6. Set the chamfer of the bit perpendicular to the wood grain at a distance of 15-20 mm from the second notch (left). Cut the fibers and remove the shavings. Use a chisel to cut off the rest of the wood used as a support for the chisel in the 5th and 6th stages of processing. To obtain a pocket of a specific depth, it is extremely important to carry out the same operations as when removing the first shavings. | The bit must be chamfered to the middle (uncut) part of the marked hole; the thickness of the cut-off shavings is not more than 2-3 mm. The cut piece of wood is removed using a chisel as a lever. Place the chisel on the bottom of the socket and, lightly hitting the handle with a mallet, cut off the middle, remove the shavings. The chip thickness should be increased to 5-10 mm. Remember! Cutting off thicker chips speeds up the chiselling operation, but degrades the surface quality of the hole walls |  |
 |
||
 |
||
| Cleaning the nest with a chisel: | ||
| 1. Take the chisel with the right hand by the handle, and with the left hand by the working part | The right hand gives the tool a straight-line motion, while the left hand controls the direction and thickness of the chips. |  |
| 2. Strip the walls of the nest | When cutting with a chisel facing the cutting surface with the blade plane, the clearance angle between the blade plane and the cutting surface should be 0-3º; informing the working movement to the chisel, clean out the nest Remember! Cutting is much easier, and the surface is cleaner, if the chisel is moved under slight angle to the direction of the fibers |  |
| 3. Clean the bottom of the nest | Install the chisel with a chamfer to the processing surface; the clearance angle between the chamfer and the surface should be 3-5º; clean the surface. The thickness of the cut-off shavings during roughing is 2-3 mm, with final stripping 0.5-1 mm; the slotted and stripped socket should not be narrowed downward, since the end of the spike, falling into the narrowed part, will be compressed and squeezed back |
LESSON OUTLINE
Grade 5 " »»
Completed:
Kuzmin Sergey Ilyich,
Teacher
MBOU Secondary School No. 6, Ozyory
Explanatory note.
The summary I submitted meets the requirements of the Federal educational standard... An activity-based approach to learning is taken as a basis.
The material consists of a lesson outline.This lesson takes place as part of the technology training course « Technologies for manual processing of wood and wood materials " .
Forms of student work: frontal and individual.
Lesson objectives:
Educational:
Educational:
Developing: develop students' creative activity and self-assessment skills.
Form UUD:
Personal UUD:
Regulatory UUD:
Communicative UUD: skillbuildto expresstheir problems.
Cognitive UUD: realizeinformation search, analysis
Students own
regulatory ECDs:
formulate questions on the topic based on supporting (interrogative) words; transform a practical task into an educational and cognitive one together with a teacher;
cognitive UUD:
collect and highlight information essential to solving the problem, under the guidance of a teacher;
communicative UUD:
express your point of view at the initiative of the teacher;
Personal UUD:
to reflect on their attitude to the content of the topic and the assessment of the results of work.
Planned results:
Learn to reproduce the acquired knowledge and skills in specific activities. Planing parts in compliance with safe working practices. Sustained motivation to learn and consolidate new things. To be able to build reasoning in the form of a connection of simple judgments about an object, its structure, properties and connections.
To prepare students for the perception of new material, to activate their mental activity as a motivational beginning of the lesson and to update basic knowledge, a purposeful repetition of previously passed material in the form of frontal work is organized in order to prepare students for the perception of new knowledge. A number of questions and educational tasks led the students to formulating the goal of the lesson. The accent of the lesson was put on the independent individual work of children. Where each child by the end of the lesson must come to a result, make a wedge for the workbench.
For self-assessment of students at the stage of reflection, I used a series of questions. The children had to evaluate their own work and that of their classmates. What mistakes or violations were made. What worked and what didn't, explain why.
At the end of the lesson, homework is given to help expand knowledge on this topic. Thus, the lesson is built on an active basis using the techniques of modeling problem solving in real life, is practical, and ensures the development cognitive activities and solving the assigned educational tasks.
Content teaching material and the types of work used in the lesson were aimed at maintaining the cognitive activity of students throughout the lesson. From an educational point of view, the lesson contributed to the formation of children's interest in the subject.
LESSON PLAN 5th grade
Lesson topic: “ Planing wood blanks»
1. The purpose of the lesson:
Educational: summarize and systematize the material studied on this topic.
Educational: to promote the education of students, accuracy, responsibility, indifference to the results of their work, the practical significance of the manufactured product.
Developing: develop students' creativity and self-assessment skills.
Form UUD:
Personal UUD: assessment of the assimilated content, providing personal choice, an active position.
Regulatory UUD: setting an educational task, comparison, the ability to control one's own and someone else's activities, correction of initiative, management activities, mutual control and self-control.
Communicative UUD: skillbuilddialogue and monologue (speech activity), cooperation, with sufficient completeness and accuracyto expresstheir problems.
Cognitive UUD: realizeinformation search, analysisto copy the information received during the lessonin order to highlight the main one, formulate problems and cognitive goals.
2. Objectives:
1. To reveal the concepts of "planing", "plane", "scherhebel", "working posture".
2. To reveal the technology of the process of planing wood blanks.
3. To be able to prepare the tool for work, to carry out adjustment.
4. Carry out visual control of product quality.
5. Compliance with the rules of safe work.
6. Draw conclusions, generalize.
3. Expected results:
Learn to reproduce the acquired knowledge and skills in specific activities. Planing parts in compliance with safe working practices. Sustained motivation to learn and consolidate new things. To be able to build reasoning in the form of a connection of simple judgments about an object, its structure, properties and connections
4.Type of lesson: Combined lesson.
5.Technology: Health preservation, problem-based learning, a differentiated approach to learning.
6.Equipment: carpentry workbench, pencil, ruler, plane, scherhebel.
7. Object of work: wedge for the workbench.
Technological map of the technology lesson in grade 5 on the topic "Planing wood blanks"
Main contentMethods
Teacher activity
Student activities
Planned educational outcomes
subject
UUD:
Regulatory cognitive; Communicative
personal
Organizing time motivation to learning activities
Hello guys! Check if you are all ready for the lesson? Today we will learn another way of processing wood and active work in the lesson will help you learn new material and make a product. The result of the work done will depend on the work of each of you. Therefore, you must work in an atmosphere of cooperation, mutual assistance and kindness.
Verbal
Provides an open, welcoming environment for classroom work. Psychologically prepares students for communication.
Greets students, checks the readiness for the lesson, checks those present.
Check for the availability of teaching tools and materials for the classroom.
Greet the teachers.
Regulatory:
Self-control of learning activities
Communicative:
Planning educational collaboration with teacher and peers
Students are ready for self-development and self-education,
know how to mobilize their personal qualities and the student's ability to learn in a “start-up” situation.
Motivation for learning activities
We have already got acquainted with some carpentry operations. Scrub them through. Today we will get acquainted with one more.
Problematic question:
I demonstrate two boards of the same size. One is planed, the other has a rough sawn surface. Question. Let's compare the two blanks?
How is it processed?
Who guessed what in question? What operation are we going to get acquainted with today?
Verbal
(conversation), visual,
practical
Motivates students to define the topic and to formulate the cognitive goal of the lesson.
Invites trainees to share what they already know about woodworking.
Asks the class with questions.
Listen to the teacher; Determine the topic of the lesson;
Participate in setting the cognitive goal of the lesson.
Students remember what they already know on this topic, take turns expressing themselves.
Regulatory:
determine the goals and objectives of the lesson);
Communicative :
participate in the formation of an atmosphere of exploration and co-creation
Cognitive: work with a table
Educational and cognitive activity .
To get a flat surface, the parts are planed. When planing, a thin layer of wood - shavings - is removed from the surface of the workpiece. For manual processing of wood blanks by planing, we will use a plane and a scherhebel. Let's compare the two tools. What are the differences. Scherhebel is used for preliminary (rough) planing of workpieces. The plane is intended for the final (finishing) planing of workpieces.
I explain the structure of the plane. Features of the knife attachment. Demonstrating the adjustment of planers with a knife fastening with a wedge and a screw.
Verbal
(conversation), visual,
practical
Offers learners problematic issues and assignments to clarify the differences between plows and understand their purpose.
Directs the activities of students related to the formulation of a problem, the search for ways to solve it.
Make a conclusion about the use of plows.
Comparison of tools is carried out, signs of their similarities and differences are revealed, they are aware of the difficulty, and they are looking for a way to overcome it.
Perform an assignment in a workbook.
They know the difference between a planer and a scherhebel, in which cases to use them. Know the device of the plows.
Cognitive:
Formulation of the problem, search for solutions;
Information search;
Analysis with the identification of essential and insignificant signs, comparison, establishment of cause-and-effect relationships, generalization;
Building a speech utterance.
Regulatory:
Goal setting;
Planning;
Control;
Assessment and self-esteem.
Communicative:
Presentation of your own thoughts and ideas, dialogue, the ability to lead a discussion.
Show cognitive interest. Understand: your success in studying the topic.
Respectful attitude towards another person, his opinion.
Independent work... Briefing.
Before planing, the workpiece is placed on a workbench. How to do it? The planer is placed with the sole on the workpiece and planing begins. In order for the planed surface to be smooth and even. It is necessary to fix the workpiece so that the direction of the wood grain coincides with the direction of movement of the planer during planing. At the beginning of planing, press harder with the left hand on the front of the planer, and at the end of the movement, press with the right hand on the back. If the taphole is clogged with shavings, then it must be pulled up from the taphole or cleaned with a chip. The quality of the planed surface is checked with a ruler, applying it in different positions.
Visual,
practical
Distributes blanks. Suggests fixing it to the workbench. Controls. Demonstrates tool grip, working posture, planing process. Control of planed surfaces. Fitting the wedge to the workbench.
Workpieces are installed on workbenches. Prepare the tool for work. They plan, control the planed surfaces, fit into the holes of the workbench.
Self-creation ways of solving creative problems based on the method of reflective activity
Responsible attitude to the implementation of educational tasks.
Consolidation, reflection, summing up the lesson
Let's go back to the goals set at the beginning of the lesson. Did you manage to achieve them?
Verbal
Initiates reflection of students about their emotional state, their activities, interaction with the teacher, classmates. Ensures that students learn the principles of self-regulation and cooperation. This could be a test.
What sparked interest?
What seemed difficult? What mistakes were made?
Determine the level of perception of information in the lesson, the state of comfort in collective, frontal and individual work.
Regulatory:
Participation in summing up the results of the lesson; development of criteria for evaluating work.
Self-esteem.
Cognitive:
Monitoring and evaluating the way you operate
Establish a connection between the purpose of the activity and its result;
evaluate own work
Self-assessment based on success criteria; Adequate understanding of the reasons for success / failure in educational activities;
Compliance with moral standards and ethical requirements
Know the material of paragraph § 13 from the textbook;
Creative d / z (what else exists for planing wood).
Assess their capabilities when choosing a d / z.
Write d / s in the diary.
List of used literature
1. Sample programs of educational institutions “Technology. Technical Labor "for grades 5-9; recommended by the Ministry of Education and Science Russian Federation... Project. - 2nd ed. - M .: Education, 2011.
2. Technology: Technical labor. 5kl .: textbook / ed. V.M. Kazakevich, G.A. Molevoy.-2nd ed., Stereotype. - M.: Bustard, 2014.-192 p.: Ill.
3. Tishenko AT, Simonenko VD Textbook “Technology. Industrial technologies "- 5th grade. M .: "Ventana-Graf", 2012
Used materials and Internet resources
Hand planing tools. After sawing, the workpieces have risks, roughness, warping. All these defects are eliminated by planing. In addition, when planing, the workpieces are given the desired shape... For manual planing use
call wooden planes. Planer (fig. 18, a) consists of a wooden body, into which a knife is inserted, firmly fixed with a wedge. The wedge rests on shoulders made from the sides of the tap hole. The surface plane of the tap hole, to which the knife is attached, must ensure its snug fit. Swinging the knife is not allowed. In the sole of the planer, that is, in the lower part of the body, there is a narrow slot (span) with a width of (5.7 ± 0.5 ... 1) mm, through which the knife blade protrudes beyond the sole.
For better work with a plane and comfortable ^ advancing it along the material, there is a horn in the front part. ^ The joint of the plane, the jointer should be even, smooth. Due to the fact that the sole works for abrasion, they make an insert of hornbeam, maple, acacia, ash or beech wood. Horn, stop, wedge, linings are made of wood intended for the manufacture of the sole of the case, and of birch and elm wood. Handles are made of uncoated plywood PF-A board. Glue the sole of the planer and the overlay on waterproof adhesives... Wood for making a planer, jointer should not have cracks, rot, germination, wormholes, large knots, non-consolidated knots, resin pockets, etc. The moisture content of the wood should be (10 ± 2)%. The surfaces of parts of planers, jointers, with the exception of the sole of the bodies (pads) and the surface of the wedge adjacent to the knife, are coated with a light waterproof varnish.
Scherhebel(GOST 14666-79) (Fig. 18, b) intended for rough planing of wood along, across and at an angle to the grain. After planing with a scherhebel, the surface of the wood is uneven with traces of grooves in the form of grooves. This is because the blade of the knife is oval with a radius of 35 mm. When working, the knife is released up to 3 mm. When working with a scherhebel, the chips are narrow and thick. The scherhebel weighs 0.82 kg.
Single Knife Plane(GOST 14664-77) (Fig. 18, v) used for leveling the surface after sawing or for planing it after processing with a scherhebel. The blade of a knife with a width of 40 ... 50 mm is rectilinear, it is released by 1 mm. Since this planer does not have a chipbreaker (humpback), the chips are formed without breaking, therefore, on the surface of the treated wood, scoring and sometimes spalling are often obtained. Planer weight 0.9 kg.
Double Knife Plane(GOST 14665-77) (Fig. 18, G) They are used for fine planing of wood, blocking of ends, as well as twisted wood and wood with scuffing marks. This plane, in addition to the knife, has a counter knife - a chipbreaker. The presence of a chipbreaker improves the quality of planing, since the chips, after separation, rise up the knife, bend and, falling on the chipbreaker, break. The fracture of the chips after separation prevents the possibility of their flaking or spalling from the surface of the wood. Planer weight 0.97 kg.
The closer the chipbreaker is to the knife, the sooner
Rice, 18. Planers:
a- general form, b- sherhebel, v- with a single knife, G- with a double knife; / - body "2 - horn, 3 - letok, 4 - wedge, 5 - knife, 6 - emphasis, 7 - Cork, 8 - sole, 9 - rough knife, 10 - single plane knife, II- double plane knife, 12 - chipbreaker, 13 - chipbreaker knife

Rice. 19. Metal planes:
a- sherhebel, b- single knife plane, v- plane with
double knife; / - frame, 2 - horn-handle, 3 - screw, 4 -
knife, 5 - handle, 6 - rod, 7 - clamp, 8 - base under
it will break off the chips, therefore, for better wood processing, the chipbreaker is placed closer to the knife. But at the same time, it should be borne in mind that it is impossible to put a chipbreaker very close (less than 2 mm), since the chips will clog under the blade and the planing process will be difficult.
In addition to wooden planers, metal planers and planes with single and double knives are used for wood planing (Fig. 19). Planers are a metal body, into which a knife is inserted, fixed in the body with a screw. The horn and handle are made of wood. The amount of the removed shavings is regulated by the overhang of the knife. To do this, loosen the screw and re-
3 Joinery, carpentry and parquet work "
Rice. 20. Jointer:
a- general form; b- jointer knife; / - cork, 2 - handle


Rice. 21. Tsinubel:
a- general form, b- zinc knife
place the knife up or down by the required amount, and then re-fasten the screw.
Jointer(GOST 14670-77) serves for the final finishing planing, as well as for the jointing of individual parts (Fig. 20). The planer is almost three times longer than the planer, which allows it to plan long parts. In the front part of the jointer on the body there is a plug, with a hammer blow on which a knife is knocked out of the notch from the body. The knife blade should protrude 1 mm. When using a jointer on wood with a wavy surface, chips are produced in the form of small pieces, and on repeated passes, continuous thin chips are formed, indicating that planing should be completed, since the surface is smooth. Jointer weight 3.25 kg.
Shorter parts are processed half-joiner(GOST 14671-77), with a shorter body (530 instead of 650 mm).
To clean wood that has scuffs and curliness, a plane with a shortened body is used - a grinding machine. Grindingteak has a narrow slit (5 mm wide) and an increased filler angle (60 °), due to which, during operation, it removes a thin

Rice. 22. End plane: - general view, b- the sole of the planer
shavings and wood surfaces are processed cleaner. The knife blade comes out at 0.5mm.
Tsinubel(GOST 14667-79) (Fig. 21) serves to form small, barely noticeable grooves and hairiness on the wood surface for gluing (facing). The knife has a serrated blade. When replacing a serrated knife in a cinubel with a regular one, it is used as a grinder.
End plane(Fig. 22) is used as a regular plane and for planing the ends, since the knife installed in it at an angle to the side surface facilitates the planing process and improves the quality of processing. When planing at an angle to the axis of the board, a regular plane can be used as an end plane.
Zenzubel(GOST 14668-79) (Fig. 23) serves for manual

a- general form, b- wedge,
Rice. 23. Zenzubel:
side view of the case, G- bottom view, d- zenzubel knife

noisy selection and cleaning of quarters in the details of joinery. The body at the zenzuba is high (80 mm) and narrow with a straight sole. The presence of a side hole in the body provides free exit of chips during the planing process and improves the quality of processing. The chisel knife has a side and bottom sharpening, due to which it forms a quarter during operation. The mass of the zenzubel is 0.38 kg.
Falzgebel (GOST
14669-79) (Fig. 24) serves
for sampling quarters in
Fig. 24. Falzgebel: details of joinery;
unlike the zenzubel has a- general form, b- knife-stepped sole. Weight
falzgebela 0.5 kg. Tongue and groove(Fig. 25, a) is intended for manual sampling of grooves-grooves on the edges and faces of parts. Consists of two bodies connected by screws, and in one of the bodies a knife is attached. The bodies are installed at the required distance of the groove (tongue) from the edge of the part. A set of knives is available for cutting grooves of different widths. Dowel length 250, width 20, height 80 mm; weight 1.1 kg.
Primer(fig. 25, b) serves to cut a groove, as well as to clean the trapezoidal groove selected by the award.
Galteli(fig. 25, v) form grooves different widths or depths with different radii. The fillet body has a convex bottom. Fillet length 250, width 10 ... 25, height 60 ... 80 mm.
Stap(Fig. 25, d) is designed to form roundings on the edges of the parts. The sole of the body and the knife are concave.
Kalevka(fig. 25, e) profiling the edges of the parts. The sole has a mirror (reverse) shape of the part's profile. A set of moldings is available for processing different profiles.
Gorbach(fig. 25, f, g) serves for planing concave and convex surfaces. The humpback body has a convex or concave shape (with constant curvature) along its entire length, which must correspond to the profile (curvature) of the workpiece. The humpback's knife has a straight blade. The length of the humpback is 100 ..., the width and height are 60 mm.
Manual planing. Wood planing work consists in the selection of material for planing, sharpening of knives, adjustment

Rice. 25. Tools for profile planing:
a- tongue and groove, b- ground pipe, v- fillet, G- shtap, d- kalevka, e- humpback with a concave body, w - humpback with a convex body; / - screws, 2 - nuts, 3 - knife, 4 - frame, 5 - guide bar
tools, planing, quality control of the work performed.
When selecting material, determine front side and the direction of the fibers, it is determined whether it has bulges or concavities to be removed by planing, the defects of wood are revealed and whether they are acceptable for parts made from this material.
The knives of planers and jointers are sharpened on sharpeners with a carborundum or sandstone circle (Fig. 26). A sharpener for sharpening knives is a metal shaft on which a round sharpening stone with a diameter of about 500 mm is fixed. The shaft is located above a metal trough, into which water is poured to wet the wheel during the sharpening process. The shaft is driven by an electric motor.
The sharpener should be equipped with a stop on which the knife will have a support that fixes its position in relation to the sharpening stone, and a protective visor.
When sharpening knives, the grinding wheel rotates against the blade, while the knife is held with the right hand at the required angle straight, without distortions, evenly pressing it against the circle, and the knife is supported with the left hand. Sharpen the knives on a wet sharpener until burrs form on the opposite side. If the burrs are minor and appear as thin and ditched,

Rice. 26. Sharpening planer knives:
a- the position of the knife when sharpening on a wet sharpener, b- the position of the knife when working on a donkey, v- checking the sharpening of the chamfer, G- the procedure for checking the knife blade "by eye" (1,2 - not right, 3 - right), d- sharpening on an abrasive bar (straight-line movements), e- the same, in a circular motion
strips, the sharpening is considered satisfactory. Large, coarse burrs are formed by applying strong pressure to the knife during the sharpening process. Therefore, the knife is pressed against the circle tightly, but not strongly. In the process of sharpening, it is necessary to maintain the taper angle (25 ± 5) °. If you do not remove burrs from the knife, they cannot work, as it will quickly become dull.
When sharpening knives on a sharpener, you should stand slightly away from the circle and work with safety goggles, as the sparks that form and small pieces of stone (abrasives) flying off can get into your eyes.
Knives are also sharpened on fine-grained whetstones of the BP type, with the help of which burrs and notches are removed from the chamfer of the knives. The bars should be moistened with a few drops of kerosene or water.
When sharpening in rectilinear movements, the knife is taken by the tail with the right hand and the chamfer is placed tightly on the bar, and with the left hand it is pressed against the bar. Then, with uniform movements, move the knife back and forth along the bar while maintaining the angle of sharpening (see Fig. 26, e). When sharpening in a circular motion, the knife is also taken by the tail part with the hands and, pressing the bevel against the bar, move it along the surface of the stone in continuous and uniform circular movements (see Fig. 26, e).
Scherhebel profile knives and fillets are sharpened on bars, and

Rice. 27. Electric sharpener ET-1:
/ - current supply cable, 2 - frame, 3 - casing, 4 - abrasive wheel, 5 - hand-hand, 6 - base (bed)
ruled on whetstones or sharpened with files and ruled with emery powder and oil (in the form of a paste). The correct sharpening of the knives (fig. 26, v) check using a template, a ruler and a square, and the angle of sharpening with a template, and straightness with a ruler and square. For a properly sharpened knife, the blade should fit snugly against the ruler, without gaps. A knife blade is considered sharp when it can cut hair.
The knives are ruled by a touchstone - a fine-grained whetstone. Before dressing, the touchstone is moistened with mineral oil or kerosene. Since the whetstones become salted during the sharpening process, they are periodically washed with kerosene. The blade on the donkey is ruled in a circular motion, but can be corrected by moving the donkey along the chamfer of the fixed knife. The worker applies the knife with a chamfer to the donkey and guides it in circular movements, maintaining the sharpening angle, then he puts the knife to the donkey with the other side and also rules in circular motions until the burrs are completely removed.
For sharpening carpentry tools (planer knives, chisels, chisels), an ET-1 electric sharpener is used (Fig. 27). The sharpener makes 45 (2700) s -1. The power of the electric motor of the grinder is 0.32 kW, the voltage is 220 V. A grinding (abrasive) wheel with a diameter of 100 mm is installed on the machine. Machine dimensions 310 X 166 X 205 mm, weight 7 kg.
Adjustment of planers and jointers consists of disassembling the tool for changing knives, installing and fixing the knife.
Disassemble the plane as follows. They take it in their left hand and, lightly hitting the back with a hammer, weaken the wedge, after which the wedge and knife are easily removed. Then a sharp knife and wedge are inserted into the notch and hit on the front end of the plane (on the frontal part) (Fig. 28). The wedge should fit snugly against the knife, the blade of the knife should protrude evenly from the sole of the planer

Rice. 28. Adjusting the planer:
a- the position of the planer when fastening or loosening the knife, b- position
hammer when hitting the end of the planer to loosen or fix the knife, in -
the position of the planer when installing or removing the knife, G- validation
release of the knife by the sole of the case "by eye"
by the required amount (without skewing). The size of the blade protrusion is reduced by blows of a hammer on the rear end of the planer, and increased by weak blows of a hammer on the tail (end) of the knife where the angle of the blade is more visible. The correctness of the release of the blade is checked "by eye" by lifting the plane with its sole up to eye level. If at the same time the blade will be seen in the form of a narrow strip - a thread, the knife is "seated" correctly. The knife is installed with the front face in relation to the horizontal plane (the plane of the sole) at an angle of 45 ° - at the scherhebel, planers with a single and double knife, zenzubel and falzgebel, and at an angle of 80 ° - at the zinubel.
Receptionsplaning. Before you start planing with a hand tool, you should carefully inspect the workpiece, determine the direction of the fibers and the front side. The wood should be planed along the grain, since the surface is smoother and wasted less effort for planing.
You need to plan with the movement of your hands at full swing, in a straight line with even pressure on the tool. In this case, the body of the body should be slightly inclined forward and remain motionless during planing. Planing should be done by the movement of the hands, not the body, otherwise the worker will quickly get tired.
The workpiece to be processed is fixed on the workbench between the comb (stop) and the vice so that the direction of the fibers coincides with the direction of planing. The workpiece must lie tightly on the workbench, without bending.
Right hand take the tail of the body, and the left - the horn and install plane on the workpiece being processed. At the beginning of planing (fig. 29, a, 1) press with the left hand on the front of the plane, and with the right hand lightly on the back.
In the middle of planing (fig. 29, a, 2) press the same and

Rice. 29. Techniques for planing:
a- a plane, b- jointer, v- planing the butt off yourself, G- planing the butt towards yourself, d- selection of a quarter with a zenzubel, a falzgebel and a grouser; 1, 2, 3 - pressing the plane at the beginning, middle and end of planing, respectively, 4 - initial tackle of a quarter, 5 - tackle of a quarter, 6 - cleanup of a quarter
evenly over the entire plane, and at the end of planing (fig. 29, a, 3), when the plane comes off the workpiece to be processed, you should increase the pressure on the right hand so as not to "fill up" the end of the workpiece to be processed. If it is necessary to take the plane back, raise its back and move it.
First, the workpiece is planed with a sherhebel at a certain (acute) angle in the direction of the fibers, since if you plan with this tool along the fibers, you can remove excess wood.
When processing curled places with a scherhebel, do not remove thick shavings, since wood spalling may form and the billet bar will become unsuitable for further processing.
After planing with a scherhebel, the surface of the part is leveled with a plane with a single knife. The part is finally cleaned with a plane with a double knife or a semi-jointer, which smooth the surface of the bar being processed.
Rectangular blanks begin to be planed from the front side, which has fewer defects. After processing the front side, check the quality of planing with a ruler along and across the fibers, and if the workpiece is wide, then diagonally. If there are no gaps between the ruler and the edge of the machined workpiece, the machining should be considered satisfactory. After that, the edge of the workpiece is planed with a plane with a single or double knife. The rectangularity of the edge and face is checked with a square. Then the non-face face and the second edge are planed, while observing the required dimensions.
The bars are planed as follows: they are laid on a workbench and fixed; irregularities on the surface of the bar are cut off with a sherhebel, a plane, and then the surface is cleaned with a jointer, after which the bar is turned and planed, respectively, on the other sides.
At work jointer(fig. 29, b) with the right hand they take the handle, and with the left hand they support the body slightly behind the cork. Having pierced one section of the part in width, they proceed to processing another section. A jointer is planed in one step, without interrupting the shavings. When machining very long workpieces, the worker must move forward along the workpiece.
When planing for gluing, the workpieces should be processed in pairs and even in three pieces.
When working with the tool, they stand at the workbench, tilting the body slightly forward and placing the left foot along the workbench forward, and the right foot relative to the left at an angle of 70 °.
When side planing, one edge of the end is first planed away from you (Fig. 29, v) to the middle of the part, and then from the other towards yourself (fig. 29, G). This method of planing flakes and spalls on the surface and edges does not work. In order to avoid the formation of flakes, it is recommended to process the ends before planing the sides of the bar.
Zenzubel take a quarter (fig. 29, d, 4) according to the pre-made markup. The initial selection of a quarter is carried out as follows: they take the right hand for the back of the body, and with the left hand for the sole behind the knife, and thumb positioned on top of the housing, as shown in the figure. Planing is carried out at a short distance from the marking line (risks) and chips are removed to a depth of a quarter (by about 3 ... 4 mm). After selecting part of the quarter along the entire length of the bar, they work with a zenzub at full swing of the arms, making sure not to go beyond the range

Rice. 30. Electric planer IE-5708:
/ - handle, 2 - body, 3 - electric motor, 4 - main handle, 5 - lead-in cable, 6 - rear fixed ski, 7 - front movable ski
labels. After selecting a quarter, it is cleaned, for which they take the rear end of the zenzubel body with their right hand, and with their left hand - its upper part.
Falzgebel(fig. 29, d, 5) the quarters are chosen in the same way as with the zenzubel, but without preliminary marking, since the stepped sole of the falzgebel determines the size of the quarter. Groove sampling grouser shown in Fig. 29, d, 6.
Tools for mechanized wood processing. Manual electric planers (IE-5701A, IE-5708, IE-5707A) are designed for milling wood along the grain. The plane (fig. 30) consists of a built-in electric motor, the rotor of which rotates in two ball bearings. At the end of the rotor shaft, a drive pulley is mounted, which drives the V-belt drive into rotation. The rotation of the knife drum (cutter) with two flat knives is carried out by means of a V-belt transmission from the rotor shaft. On the plane there are front (movable) and rear (fixed), cast together with the body, panels (skis). The front ski is lowered and raised with a special mechanism, thereby adjusting the depth of milling (planing). The planer can be used as a semi-stationary machine, fixing it on a table or workbench with the panels facing up and installing a removable protective guard that protects your hands from falling on the drum (cutter) with knives.
Work with electric planers. Before work, check the correctness of sharpening and installation of knives. The blades of the knives must be extended the same way and be level with the rear panel (ski). "The weight of the knives must also be the same. Before installation, the knives should be carefully sharpened and balanced so that the cutter shaft (drum) rotates without beating. The angle of the blades must be be 40 ... 42 0. Knives must be firmly attached to the shaft, and the cutting edge should protrude 1 ... 1.5 mm beyond the cylindrical surface of the drum, and the blade of the knives should be strictly parallel to the axis of the drum (shaft).
They work with an electric plane as follows. Insert the plug into the network, pull the trigger, turn on the electric motor. When the cutter shaft reaches the desired speed, the electric planer is lowered onto the material to be processed, fixed on a workbench or table. Materials to be processed must be free of dust, dirt, snow. The electric planer must be fed forward slowly, so that when it comes into contact with the wood, there is no sharp jolt, and evenly, without much effort on the handle. The effort of the worker should be spent only on the advancement of the electric plane. When processing medium-hard wood, the feed speed should be 1.5-2 m / min. During operation, electric planers are moved along the material in a straight line, without distortions, making sure that no shavings or sawdust gets under the panels (skis).
After the first pass (if it is necessary to start processing along the site or in the area next to the processed one), the electric motor is turned off and, with the electric plane turned off, they return to their original position, after which the electric motor is turned on and starts to work again. During breaks, the electric planer is turned off and placed with panels (skis) up or laid on its side.
When vibrating the planer, check the balance of the knives, as well as the play in the drum bearings. Upon receipt of an unclean processing surface, check the sharpening of the knives and clean the plane from shavings.
When working with an electric plane, make sure that the live parts are reliably protected from accidental contact with them. Everything electrical connections must have reliable insulation... The power cable should not be laid with large kinks. To avoid damage from workshop vehicles, it should not be laid on the floor. Power tools may only be operated by trained personnel.
When working with planers and electric planers, the following defects may occur: mossiness or hairiness - when working with blunt knives; longitudinal stripes - when working with knives that have crumbled places on the blade, etc.
The quality of processing along the length and end of the bar is checked with a square (Fig. 31, a, b) at several points: at the ends of the part and in the middle, and in long parts - at other points between the middle and the ends of the part.
Checking "by eye" (Fig. 31, v) requires a lot of skill. The worker takes the block in his hands and lifts it, placing it against the light at eye level. Irregularities resulting from poor-quality processing are detected by a light shadow, which will appear as a spot on the bar. The quality of processing can also be checked with rulers (Fig. 31, d).
The quality of the milling of the part is checked with two strictly calibrated bars (Fig. 31, e), which are placed on the surface of the part parallel to one another, and after that they look at the bars

Rice. 31. Quality control of planing:
a- with a square along the length of the bar, b - with a square along the end of the bar, v- "by eye" against the light, G- rulers, d- paired bars
against the light. If the surface of the part is well processed, the edges of the bars will merge into one line, and if not, the faces will be in the form of intersecting non-merged lines.
The quality of the profiling is checked by templates and visually. The surface of the processed parts must be smooth, without roughness, scoring and tears.
The purpose of the lesson: Teach students the techniques of wood planing, familiarize students with the rules safe work when planing.
Tasks:
Educational: Formation of students' skills in wood planing, teach students the safety rules for wood planing.
Developing: The development of the cognitive interest of students in the field of woodworking, the improvement of students' techniques and skills in working with carpentry tools.
Educational: Fostering in students a love of work and respect for working people, fostering independence, self-confidence, fostering technological culture, vocational guidance of students.
Lesson type: combined.
Teaching methods: explanatory and illustrative, explanatory and demonstrative, visual, verbal, a method of developing skills and abilities, a method of consolidating the studied material, a method of assessing knowledge, skills and abilities.
Reproductive - instruction, practical work, independent work.
Inductive - from simple to complex.
Form of study: frontal, group, individual.
Interdisciplinary connections: physics.
Material and technical equipment of the lesson: workbenches, planers, measuring tool, fixtures, lumber.
Visual aids: product samples, safety tables.
Labor objects: decorative board.
Career guidance: the profession of a joiner, carpenter, planer machine operator.
New terms and words: sherhebel cladding.
During the classes.
I .Organizing time:
Mutual greeting
Checking the readiness of students' workplaces.
Monitoring student attendance.
II . Statement of goals and objectives of the lesson.
III. Learning new material.
Outline of presentation of new material:
I.Basics of wood cutting.
A) Planing.
C) Adjustment of planers.
II.Safety in wood planing.
III
A) Planing is the cutting of a layer of wood from a workpiece using planers to obtain the specified dimensions, shape and smooth surfaces.
C) Planing tools and planer knives.
The plane consists of a wooden or metal block, a knife, a wedge. The main part of the planer is the block. The working body of the planer is a steel knife.
Depending on the purpose, the planers have different design knife and are divided into scherhebel, with a single knife, with a double knife and a jointer.
For the initial, rough planing, a sherhebel with a narrow and rounded knife is used. This makes it possible to effortlessly plan along, across, obliquely of the fibers and effortlessly cut off a thick layer of wood. However, the surface of the workpiece is uneven.
The term "scherhebel"- modified german word, which translates as "rough cut plane".
For preliminary final planing along the fibers, as well as after processing with a scherhebel, a plane with one knife is used.
For finishing planing of the end, twisted, rough surface with simultaneous breaking off of the chips with the help of a chipbreaker, a double-knife plane is used.
For leveling the finished surface big size(smooth planing) use a jointer.
Knives are made of two-layer steel: the main layer is steel grade 30, the cladding layer is made of steel grades 9ХФ, 9Х5ВФ, Х6ВФ, 9ХС.
The term "clad"- modified French word, which translates as "overlay, cover". The cladding layer is more resistant to corrosion.
C) Adjustment of planers.
Before you start planing, you should find out if the plane is adjusted correctly. They lift him up with the sole at eye level and watch how the knife is put. With correct adjustment, the knife above the sole is visible without distortions. For a scherhebel, it should protrude by 1 ... 3 mm, for other planers - by 0.1 ... 0.3 mm without skewing.
E) Tool grip and working posture when planing.
The metal plane is held with the right hand for the handle, with the left hand for the horn-handle. Grasp the wooden plane with your right hand tightly by the stop, and with your left hold by the horn. Hold the jointer with your right hand by the handle, and put the blocks on top with your left.
Stand at the workbench half-turned towards it, tilting the body slightly forward. Place the foot of your left foot approximately parallel to the edge of the workbench lid, and your right foot at an angle of 70 ° to it.
E) Techniques and control of planing.
Planing begins from the base side of the workpiece, observing the correct grip of the tool and the working posture. Planing should be in the direction of the grain of the wood, in a straight line, for the entire span of the arm, sending the plane forward with force. Leave the body still. At the beginning of the movement, it is pressed more strongly with the left hand, in the middle - with both, at the end of the movement - with the right. When machining the end face, plan with a plane first from you to the middle of the workpiece, and then from the other end of the end towards you.
Perform planing with a plane in several stages, plane one section after another. Use a jointer to cut the workpiece to its full length without interrupting the chips. You can move along the workbench.
In case of clogging of the taphole, it is cleaned by pulling the chips up or pushing them with a thin chip from the side of the wedge.
Check the straightness and flatness of the planing bar by eye or with paired rulers. The quality of the planing is checked for light by moving a ruler or square on the treated surface. Plane planing of the board and linear dimensions control the planed part with a ruler. Control the perpendicularity of the planing with a square, the correctness of the planing of the chamfer - small, adjusted according to the protractor.
II .Safety when planing wood:
a) Securely attach the workpiece to the workbench.
b) Work with a plane with a sharpened knife. The sharpness of the blade cannot be checked by running your finger along the edge.
c) Hold the plane firmly while planing.
d) When moving the planer, do not touch the workpiece with your right hand fingers, do not hold them close to the sole of the tool.
f) Do not check the quality of the planed surface with your hands.
g) When blocking the tap hole with chips, clean it with a small hardwood wedge.
h) During breaks, put the planers in the tray with the knife blade away from you, make sure that the tools do not protrude beyond the edge of the workbench.
i) Do not blow off the chips or sweep them by hand, use a broom brush.
j) If you are injured, contact your teacher immediately.
III .A story about the professions of a joiner, carpenter, machine operator of planing machines.
In woodworking enterprises and in construction organizations planing with hand and electrified tools when fitting parts is performed by joiners and carpenters, and on machine tools - by machine operators of planing machines.
Guys, now I want to tell you about the professions associated with woodworking. The professions of a carpenter, joiner, planer machine operator are associated with wood. These are one of the most ancient professions - after all, in the beginning, mankind mastered the processing of wood. Wood. ... This is a man's house, and fuel, and food, and a vehicle, and clothes, and shoes, and medicine, and the first writing material - birch bark. The tree finally produces the oxygen we breathe. Glory to the tree! And that means, glory to those who work with him, who, having learned his secrets, are able to make countless necessary and beautiful things out of him. The carpenter usually does major work: he sets up the house, builds boats and bridges. The carpenter makes finer things, makes beautiful furniture... But there is absolutely no way to separate workers by wood. Joiners and carpenters are brothers both in material and in their skills. They can always replace each other.
But all the same, first the carpenter, the joiner - then. Carpenters are called "cleaners". Top class carpenters are called cabinetmakers (beautiful, beautiful). You can become a good warrior only by thoroughly mastering the weapon, and for the master the main weapon is the tool. In each instrument, a lot of beauty is hidden, a lot of necessity. It is not only meaningfully comprehensive, but also tested by deeds. And in work, you know, any hidden flaw will immediately manifest itself, the smallest imperfection will come out. That's why guys, the tool needs to be kept in order. Treat him and the materials with care. Labor skills, mental flexibility and aesthetic taste - important qualities each person. They develop only in practical activities... In order to master the techniques, methods and skills of wood processing, one must try to perform each carpentry operation. Guys, if you choose another profession that is not related to woodworking or metalworking, the skills and abilities acquired in school workshops will always come in handy in your life. For first you have to become real men who can not only think, but also plan, and hold a hammer, and do any male work around the house, and then be doctors, lawyers, artists, etc. A man is known through work.
IV ... Practical work.
Planing blanks for the manufacture of decorative boards.
A) Familiarize yourself with planers, learn the rules of planing.
C) Select the base side of the workpiece, determine the best and worst faces.
C) Peel off the faces and edges, check the quality of the planing. Show the teacher.
V ... Execution analysis practical work.
VI ... Delivery of tools and blanks.
Vii ... Cleaning of workplaces (Tidy yourself up, wash your hands).
VIII ... Summing up the lesson.
Municipal government
"Lyceum number 1"
Technology lesson summary
Grade 5
Lesson topic: Planing wood
prepared
Emelyanov Oleg Borisovich,
technology teacher
Shadrinsk, 2013
Outline outline.
Lesson topic: Planing wood
The purpose of the lesson:
1. Educational: To give students an initial understanding of the technology of planing wood blanks.
2. Educational: To foster initiative and independence in work.
3. Developing: Develop coordination of movements when performing carpentry operations.
Equipment of the lesson:
1. Material and technical equipment:
Instruments: joiner's hacksaw (16 pcs.), joiner's square (16 pcs.), ruler (16 pcs.), plane (16 pcs.), awl (16 pcs.), drill 10 mm (2 pcs.), pencil (16 pcs.), rasp (16 pcs.), jigsaw (16 pcs.), sanding block (16 pcs.).
Equipment: drilling machine(2 pcs.) Joinery workbench (16 pcs.), Backing board (2 pcs.), Sawing table (16 pcs.).
Materials: Bar (birch) 15x40x320mm (16 pcs.).
2. Didactic equipment: Presentation: "Planing wood", routing manufacture of the handle, criteria for evaluating practical work.
3. Methodological equipment: Lesson outline, Kazakevich, V.M. Technology. Technical labor. Grade 5 [Text]: method. allowance / V.M. Kazakevich. - M .: Bustard, 2005 .-- 127 p.
Location: training workshop
Occupation type: combined
Lesson structure:
1. Organizational moment - 1 - 2 minutes.
2. Updating knowledge - 3 min.
3. Presentation of new material - 15 - 20 min.
3.1. Planing wood blanks.
3.2. Types of planing tools.
3.3. The device of a plane, jointer and scherhebel.
3.4. Planing techniques with a plane.
3.5. Anchoring.
4. Practical work - 45 - 50 min.
4.1. Induction training... Rules for safe work when planing wood.
5. Summing up the results of the lesson - 5 min.
6. Cleaning of workplaces - 3 - 5 min.
TOTAL: 80 min.
Board decoration
Lesson topic
Planing wood
Course of the lesson:
Organizing time.
The teacher marks those present by the journal. The teacher communicates the topic and purpose of the lesson.
2. Updating knowledge.
1. What tools are used for sawing wood. (Joiner's hacksaw, circular saw, bow saw)
2. What parts does a hacksaw consist of? (Pen, canvas)
3. How hacksaws are distinguished from in various shapes tooth? (For cross, rip and mixed cuts.)
4. What hacksaw is used for rip sawing? (For rip sawing, you need to choose a saw with an inclined tooth profile)
5. For what purposes is the miter box used? ( The miter box is used for precise sawing of workpieces across the fibers under different angles 30 °, 45 °, 90 °)
After listening to the students' answers, the teacher clarifies, complements and evaluates them.
3. Presentation of new material.
For more prepared students, the teacher offers to make a presentation on the types of carpentry planing tools.
Guidelines:The students are then told that they will be introduced to a new woodworking operation - planing. It is used to give products the required shape, size and required surface quality. Students are encouraged to give examples of the use of planing in manufacturing various products... It is advisable to present technical information about this operation gradually. So, in this lesson, you can familiarize students with the device of a planer and with the methods of working with this tool, on subsequent ones - with other planing tools, their adjustment, with the mechanization of planing work at woodworking enterprises, etc.
After sawing sawn timber or wood blanks have roughness, risks, warping and other defects, which are eliminated by planing. In the process of planing, the workpiece is given the desired shape and dimensions.
Planing- process, workpiece processing up to the right size and creating flat and smooth surfaces on it using plows.
In Russia, all types of tools used for planing wood were called plows or shavings. Currently, in furniture and woodworking industries, there is manual and profile planing, as well as planing with the help of electrical tools and on planing machines. This work is donecarpenters, joiners, planing machine operators.
Manual planing is carried out with wooden and metal planes. Wooden planes are divided into two groups: single knife planer used for preliminary planing, double knife planer- for finishing.
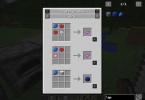
A metal plane with a single knife consists of a front handle, a block, a clamp, a thrust rod, a clamping screw, a knife, and a rear handle.The teacher relies on the presentation to explain
A wooden plane with a single knife consists of a block, a handle-horn, a taphole, a wooden wedge, a knife.
A wooden plane with a double knife consists of a block, a taphole, a knife, a chip breaker, a screw (chip breaker attachment), a wedge, a horn, a stop, a sole.The teacher relies on the presentation to explain
Among the wooden planes, there are sherhebel and planer - jointer. Scherhebel– used for rough planing of workpieces. Jointer – hand tools for obtaining flat surfaces of long workpieces. A jointer is planed (jointed), as a rule, after the surface has been treated with a plane to make it smoother. This is achieved due to the large length of the planer block - more than 600 mm.
The cutting edge of all carpentry tools is wedge-shaped. For example, a plane knife in its cutting part is sharpened in the form of a sharp wedge. The two surfaces of the wedge at their intersection form a sharp cutting edge. This cutting edge cuts through the wood fibers, and the front surface of the knife folds back the cut layer in the form of shavings.
Guidelines:Before explaining and demonstrating the techniques of planing, the teacher is advised to talk about planing wood along and across the fibers, about facing, to explain that when planing along the fibers, a little effort is spent, a less rough surface is obtained.
Before planing, check if the tool is adjusted correctly. For a correctly installed knife, the blade is located above the sole of the shoe without distortions and protrudes 1 ... 3 mm for a scherhebel or 0.1 ... 0.3 mm for a planer.
The workpiece to be machined is fixed on the workbench by clamping or wedging between the stop and the wedge so that the side to be cut is directed upwards. With the right hand, take the planer by the handle on the back of the block, and with the left hand, by the block or handle on the front side.
The planer is placed on the workpiece with the blade down and pushed forward. At the beginning of planing, pressure is exerted on the front of the planer, and at the end - on the back, so that the surface to be treated is flat. With the return movement of the plane, it is raised above the surface. So, making a movement back and forth, they gradually cut off the surface to be treated until it becomes even and smooth.
If the fibers on the surface to be treated are scuffed, then the part should be planed from the other side.
The plane must be held firmly so that your hands do not slip off it and hit the sharp side edges of the workpieces. In this case, bruises and cuts on the hands are possible. The workpiece stops should not protrude above the surface to be machined. Checking and quality control of planing. The planed surfaces of the workpiece - faces, edges and ends are checked using control and measuring tools.
The correctness of the planed face is checked "in the light" with a ruler. Correctly planed face with face or face. On it, a joiner or carpenter draws a wavy line with a pencil. This means that the front face will be basic during further work.
Guidelines:Given that it is difficult for students to master planing right away, it is recommended to offer them training exercises. During these exercises, the teacher walks around the workplace, monitors correct execution methods of work, compliance with labor safety rules, helps those who are in difficulty. After the fifth graders have mastered the skills of planing, you can allow them to start practical work on the manufacture of the product.
Anchoring:
1. What tools are used for planing the surfaces of workpieces? (Single knife plane, double knife plane, scherhebel, jointer, kalevka, fillet, etc.)
2. For what purposes is the Sherhebel used? (For rough planing)
3. For what purposes is the double knife plane used? (For fine planing)
4. What is the jointer used for? (For obtaining flat surfaces of long workpieces )
5. List the main parts of the planer? (Front handle, block, clamp, thrust rod, clamping screw, knife, rear handle )
6. What tools are used for profile planing? (Kalevki, faltsgobel, zenzubel, fillet, humpbacks, etc. )
4. Practical work of students.
4.1. Induction training.
Guidelines: Before performing practical work, the teacher explains its content on the sample, shows which surfaces should be cleaned with a rasp and sandpaper, and gives recommendations for cleaning the edges of parts. Before starting practical work, the teacher explains to the students the criteria for evaluating practical work.
Rules for safe work when planing wood:
Check the reliability of the workpiece fastening on the workbench.
Perform work with a serviceable, well-sharpened and correctly adjusted tool.
Clean the entrance from the shavings with a wooden stick (chip).
Do not check the quality of the planing with your hand. You can splinter your hand.
Keep the plows on the edge (side), with the blade away from you.
Do not leave plows on the edge of the workbench.
Use tools strictly for their intended purpose.
Do only the work assigned by the teacher.
Remove the workplace after finishing work.
4.2. Handle making and current instruction.
Manufacturing of a product in accordance with the flow chart.
For less prepared students, the teacher suggests making bars for a backing board.
Guidelines:During work, the teacher bypasses workplaces, monitors the correct implementation of working techniques, compliance with labor safety rules, etc. Provides assistance to individual students as needed. In case of revealing errors or difficulties typical for many children, he stops work and conducts the current briefing.
5. Summing up the results of the lesson.
The teacher analyzes typical errors and their causes. Reports the grades of each student's work. The teacher gives marks based oncriteria for evaluating practical work .