Good day to all!
Today we will talk about such an element. country decor for relaxation, like a gazebo.
Sooner or later, every owner of a summer cottage, in addition to planting worries and caring for plants, thinks about comfortable rest. The house on the lot is good. However, if it is hot in summer, then sitting in the "four walls" is not very pleasant. And here the gazebo comes to the rescue.
This element is very convenient: both a roof over your head and for fresh air practically open. And if you install a barbecue in such a gazebo, then the rest will be doubly pleasant.
But, if you decide to install a gazebo on your site and don’t know where to start, then in this article we will analyze all the features of this design.
In the beginning, let's decide what gazebos are.
Open gazebos (standard and common option) - easy to erect, used for summer holidays;
Closed gazebos are solid structures with walls, doors and windows. Used in both summer and winter;
Portable gazebos - seasonal collapsible structures, easy to dismantle and install anywhere.
As for the material of manufacture, there can be the most, most variety of options. Classic and, at times, standard wood, brick and metal with the use of plastic, glass and stone, as well as many so-called improvised materials: plastic bottles, wooden pallets, tree trunks, etc.

Simple and inexpensive gazebos with your own hands (photos and drawings)
So, you have decided to build a gazebo. Where to begin? And it's best to start with a general plan of how your gazebo will look like. Or is it open summer design, or closed gazebo for use and more cold period. The choice of material and its quantity depend on this.


In addition, based on the gazebo option, you are planning whether it will be with an earthen floor, or you are doing wood flooring. Also, you are determined by the size of your building. It all depends on your capabilities and the size of your site. You can make a small 3x3 m (if you need a square one), or you can grow it the size of a good country house.
Here we will consider simple design, which can be installed without significant costs and in a fairly short time. For example, a gazebo of such a tent type:

She can be like you rectangular shape with two and four-pitched roofs:

and polygonal shape (six or eight). Below is a drawing of such a gazebo.
The main material for its construction will be wood.


We start by choosing a site, removing all vegetation, turf and tamping well. After that, we move on to the foundation. Supports for the lower trim can be made using or ready-made concrete blocks, or folded out of brick, or use logs of the same size.


We make the distance between the supports no more than 1.5-2 meters. Basically, it depends on the thickness of the timber from which the strapping is made. For example, under a beam of 100 * 100 mm, such a distance will be 1.5 meters, and under a metal profile pipe 60 * 60 mm - 2 meters.
After installing the supports, put the bottom trim on them. The strapping beam is fastened either with nails from 150 mm or with self-tapping screws. You can also use corners to secure the ligament.

And in this version of the gazebo, a gap is left between the lower guides, where the racks are inserted, fixed with corners.

After that, in a similar way, put top harness. And we cover the floor with a board. The main thing is that the floor boards must be treated with antibacterial impregnation for wood.
Now let's move on to the roof. The installation option depends on which type you have chosen. If you are making a simple gable or flat roof, then you can use the following triangles:

If you have a roof with a more complex configuration, like this one:

then, accordingly, when installing the top trim, you plan the mount for such a roof.
All work is completed, and the frame of your gazebo is ready. Now it remains only to sheathe it suitable material. If you decide that your gazebo will be entirely made of wood, then both the walls and the roof are also sheathed with wood. Basically, this is a lining, which can later be either painted or just processed. You can make a roof or from soft tiles, or from a metal profile.

Below I will give a few more drawings of a simple wooden gazebo.


And shown here design options, in my opinion, quite original and not very difficult to perform.


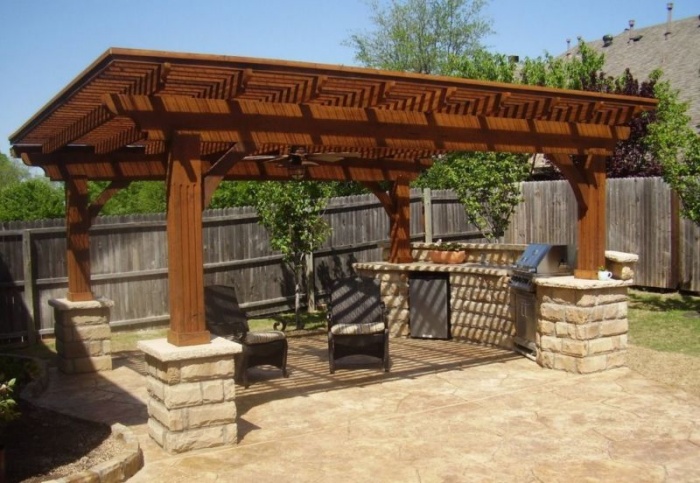
A gazebo with a barbecue for a summer residence - an inexpensive project with a photo
As mentioned earlier, the brazier installed in the gazebo makes the rest very attractive, especially if you are gathering with friends. There are two ways to make a gazebo with a barbecue. In the first option, you put a barbecue in a ready-made gazebo, and in the second option, you install a gazebo over the barbecue. It all depends on what you already have.
Below are a few drawings of such arbors.


And the following photos show options for gazebos with barbecues.


If you are making both a barbecue and a gazebo at the same time, then when installing the lower harness of the gazebo, do not forget to dig a foundation for the barbecue in the chosen place of the gazebo.

Project of a gazebo with barbecue and barbecue
Basically, a gazebo with barbecue and barbecue is no different from the previous options. The difference is only in the design of the furnace itself. Or is it just a brazier, or together with a barbecue.
If you install a stove in the gazebo, then for the sake of the gazebo itself fire safety It is best to build with bricks. An example of diagrams of such arbors is shown below.


You can also make a gazebo from wrought iron, such as this option:


There are a lot of different options for gazebos, the main thing is to choose what you like and where it would be cozy and comfortable.
Good luck with your building and design!
A cozy gazebo in the garden is the dream of many homeowners. Wooden and metal, polycarbonate or wrought iron, square, round and hexagonal, these structures are found in almost every garden. To make garden gazebos with your own hands, it is not at all necessary to hire specialists or be an experienced builder, it is enough to have minimal skills in working with a tool.
How to choose a gazebo design
The construction of a garden gazebo will be cheaper if you immediately carefully think through everything to the smallest detail. The main parameters are the dimensions of the gazebo, its shape, the type of foundation and roof, materials for building walls. The size of the building depends on the number of residents of the house and the planned guests. It makes no sense to build a structure of a large area for 2-3 people, in this case it is better to choose a 2x2 m structure.
The level of complexity of its installation depends on the shape of the gazebo. - rectangular, but round or hexagonal ones require more skill and time to build. If there is no experience at all, it is not worth taking on the construction of such a structure right away.

The foundation for the gazebo can be columnar, tape or slab. The cheapest option is, besides, it is the easiest to put. The strip foundation is widely used for both small and large buildings, but is practically not used for gazebos. round shape. Base from monolithic slab ideal for any arbors, but what more area, the more expensive the slab foundation.

Roofs on garden arbors are single-pitched, gable, pyramidal, in the form of a tent. The most budgetary and easy to install is a pitched roof. It is suitable for rectangular buildings, as well as gable. Cone-shaped and pyramidal roofs are installed on hexagonal and round arbors.

A variety of materials are used for construction: brick, stone, timber, logs, polycarbonate sheets, metal pipes, forged lattices, and some craftsmen collect gazebos even from bottles. The easiest way to build from timber and metal racks; the assembly of the frame is carried out in a matter of hours, the sheathing also does not take much time. Working with logs is a little more difficult, because you need to cut and connect them correctly. To lay out walls of stone and brick, it is advisable to have the appropriate skills, otherwise the masonry will turn out to be sloppy and unattractive.

Prices for garden tents
garden tents
To avoid serious mistakes and minimize construction costs, you need to start with the simplest. For example, a rectangular gazebo is taken with pitched roof and on a slab foundation.

Necessary materials:
- large stone or rubble;
- sand;
- formwork boards;
- timber 100x100 mm and 50x50 mm;
- boards with a section of 30x150 mm;
- primer for wood;
- dye;
- slate or corrugated roof;
- self-tapping screws and bolts;
- reinforcing bars.
You will also need tools:

Marking the base of the gazebo


Choose a flat open area of the garden and make markings. To do this, determine the location of one of the corners of the gazebo and mark it with a peg. They measure the distance to the other corners, put beacons, pull a twine between them. Diagonals are measured in the resulting rectangle: if they are the same length, the markup is correct.
Pit preparation

The soil is selected with a shovel to a depth of about 25-30 cm, the bottom is leveled, and it is carefully rammed. The walls of the pit must be strictly vertical. Next, coarse-grained sand is poured in a layer of 10 cm, it is well leveled and moistened abundantly for compaction. Along the perimeter, formwork is laid out from boards up to 10 cm high, reinforced with timber.
Foundation pouring
More about the foundation of the gazebo
The pit is laid out with large flat stones or covered almost to the top with large rubble. At the corners of the perimeter between the stones, segments of reinforcing bars are driven in; the rods should rise at least 10 cm above the finished foundation. concrete mortar and fill the pit. The surface is leveled with a rule or smoothed with a trowel.

Frame installation
For the frame, take 4 beams of 100x100 mm and cut the gazebo to the height. The front bars are left 15-20 cm longer than the rear ones to make the roof slope. After that, the supports are well treated with a primer and dried. In the lower end of each support, a small hole is drilled along the diameter of the reinforcing bars that protrude from the concrete at the corners of the base. They put the bars on the rods, set them vertically with the help of a level and additionally strengthen them with metal plates and anchor bolts.

After installation, the side supports are interconnected with 50x150 mm boards, and then the braces for the rafters are mounted. At a height of 10 cm and 0.5 m from the floor, the racks are connected with horizontal jumpers from a 50x50 mm beam. Vertical bars are fixed between the lintels in increments of 40 cm. The doorway is left free. All fastenings are carried out with the help of bolts and steel corners, which are screwed to the tree with self-tapping screws.


Prices for various types of timber


On the boards connecting the support bars, logs are stuffed in increments of 30 cm. From above, the logs are sheathed with an edged board 30x150 mm. Between the boards leave gaps from 5 to 15 cm wide. Of course, all roof elements must be treated with a primer and dried well. On top of the board, you can cover with glassine and fix it with stapler staples. Thin slats are stuffed over the film so that between the roofing and the film remains ventilation gap. Slate is laid on the rails and fixed with 120 mm nails with galvanized caps.
Arbor arrangement

After installing the frame and roof, everything wooden surfaces needs to be painted. When the paint dries, put inside the gazebo wooden table and benches along the walls. From the house to the gazebo they conduct electricity, hang a light bulb or a lamp. To give the room coziness, you can hang the walls with a dense light fabric. The interior decoration is completely dependent on the taste and capabilities of the owners of the house.
This version of the gazebo is basic. If desired, you can improve the design: install between load-bearing beams wooden lattices, sheathe the walls with clapboard or waterproof plywood, lay logs on a concrete base and make a wooden floor. Instead of beams for the frame, you can take metal pipes, and replace the slate with polycarbonate or soft tiles.

A hexagonal garden gazebo always looks very elegant and is an adornment of any site. During its construction, the accuracy of calculations is very important, because errors at any stage will significantly affect the final result. You need to start with a drawing of the future building, which will allow you to correctly mark the site and calculate the amount of materials.

For construction you will need:

Step 1. Markup
To mark the site you will need two wooden slats and a rope about 2 meters long. The selected area is leveled, freed from vegetation and stones, a rail is driven into the ground in the middle and tied with a rope. The second end of the rope is tied to another rail and, using such a homemade compass, draw a circle with a radius of 1.75 m. The resulting circle is divided by 6 equal parts and put beacons on the marking line. Here will be located the support posts for the gazebo.
Step 2. Making a column foundation
In place of the beacons, pits are dug 0.5 m deep and rectangular in shape. Pour on the bottom river sand a layer of 10-15 cm, then a layer of coarse gravel of the same thickness. In the middle of the pit, a steel bar 70 cm long is driven in, after which everything is poured with cement mortar. A brick is laid on top in 3-4 rows with obligatory dressing. The reinforcing bar should be in the center of the masonry. In the same way, lay out the remaining 5 supports and allow the solution to dry well.
Step 3. Mounting the base of the gazebo

Measure the distance between adjacent posts and cut the beams according to the measurements. You should get 6 beams of the same length and thickness. For reliable connection of the supports to each other, cuts are made at the ends in half the thickness of the tree. After that, the lumber is primed and dried, and then laid on poles in the form of a hexagon. Pieces must be laid between the beams and pillars of the foundation.

When the beams of the lower trim are fixed, logs are attached inside the hexagon. The central lag is placed exactly in the center of the structure, aligned horizontally and fixed to the beams using metal plates and bolts. Next, 2 logs are mounted perpendicular to the central one, and all the rest are inserted at an angle, for which small cuts are made at the ends of the boards on both sides. In conclusion, the logs are strengthened with lintels made of timber and sheathed with boards.
Step 4. Building walls

The frame of the gazebo is made of 6 bars 100x100 mm of the same length. Each beam is installed on one of the corners of the base and fixed with anchor bolts. Be sure to check the verticality of the support posts so that the structure is not skewed. A strapping of thick boards is mounted along the upper edge, and at a height of 70-90 cm from the floor, the racks are connected with horizontal lintels made of timber, leaving the entrance free.
Walls can be made in several versions, depending on the materials available. You can close the gazebo up to half with sheets of waterproof plywood, sheathe it with boards, fix wooden figured lattices on the lintels between the racks. You can make two or three walls blank, and decorate the rest with forged elements.
Step 5 Mounting the roof


When the walls are ready, proceed to install the rafters for the roof. Boards 50x100 mm are taken as rafters; for convenience, assembly is carried out on the ground. Since there is no central pillar in the gazebo, it is rather difficult to neatly connect the rafters. To simplify this process, a hexagon cut from a bar will help, each side of which will correspond to the thickness of the rafters. The ends of the boards are cut at an angle and fastened with nails to the hexagon; and on the inside of the strapping, grooves are cut out for installing rafters. After that, the structure is sheathed with boards in a circle, leaving small gaps, lifted up and fixed with bolts. Now it remains only to lay.

Prices for various types of fasteners for rafters
Fasteners for rafters
Video - DIY garden gazebos
Video - How to build a gazebo
What kind of gazebo can you make in the country with your own hands? How to create drawings of a future gazebo? How to make a gazebo in the country on your own? What you need to consider in order to make a high-quality gazebo, which then does not have to be rebuilt?
A summer cottage at the present time and six acres, relying on citizens from the state during the times of the USSR, are often completely different things. Now many people acquire a summer cottage not at all in order to devote every weekend to the garden, but rather, on the contrary, to relax. Arrange your own little resort outside the city - what could be better? And what could be more interesting than to equip this very resort with my own hands? Put, for example, a bathhouse in the country, attach a spacious veranda to the house, etc. Not everyone, of course, thinks so. But with those who are not afraid to work with their hands, let's talk about how to make a gazebo in the country on your own.
What kind of gazebo can you make in the country with your own hands (photo)
Before starting work, you need to decide what type of gazebo you would like to see in your country house. It can be open or closed, spacious in size or very small and cozy. The roofs of the gazebos can be single-pitched or multi-pitched.
Construction materials also vary. Wood, plastic, brick, concrete - and the list does not end there. In addition, materials can be combined, connecting with each other in the most bizarre way. Let's say the roof country gazebo make of plastic, and the table and benches in it are made of wood. Everything will depend on your imagination or design ideas your relatives.
Here are several types of gazebos for summer cottages, which, if you have desire and perseverance, you can build with your own hands:
- Arbor for summer cottages made of wood
One of the most simple options, if we talk about the time and effort spent on the gazebo. One of the advantages of such a country gazebo is that it is suitable for different kind foundation, both made of concrete and constructed from improvised material.


Moreover, a wooden gazebo for a summer residence does not have to be put in one place once and for all, it can be portable. Firstly, this will allow the dacha gazebo to "overwinter" in warmth - it is doubtful that anyone may need it at -30 C⁰, right? Secondly, at any time it can be moved to another place you like in the country, if the previous one suddenly got bored.
There are enough materials to make a wooden gazebo in the country, ranging from ordinary light slats to a heavy log.
However, in addition to its undoubted advantages, a wooden summerhouse has several disadvantages.
- First, the tree anyway fire hazard. Some summer residents like to make kebabs right in front of the gazebo, or even in it. So, this is not recommended for security reasons, of course!
- Behind the wooden gazebos need to look after, and not so that you build and forget. To exclude rotting, it is necessary to process it from time to time with a special composition.
However, if everything is done correctly, the disadvantages of such a gazebo are nothing compared to the beauty that will appear in your country house.
- Brick gazebo
For such a conversation you need a strong foundation- tape or monolithic. And this means that before starting construction work, you must inspect the soil and decide which foundation fit better Total.


Country gazebos are mostly built not for the sake of beauty alone. Of course, sitting in it, reading a book and thinking about the beautiful is also good, but no one forbids using a country gazebo for purely utilitarian purposes, especially if size allows. In a brick gazebo (as opposed to a wooden one), nothing prevents you from putting up a brazier, or even a folding barbecue and turning it into a virtual summer kitchen. Or you can generally equip a country gazebo with windows with curtains and hang doors, and then you get something like separate apartments. In general, a brick gazebo is good from all sides, except for one thing - making such a gazebo in the country will cost you a lot of work and patience.
- Gazebo for summer cottages made of polycarbonate
The advantages of polycarbonate are that it is “picky”, it can be in harmony with many other materials, and it will look quite decent. In addition, it can be pulled on any frame. And this means that you can literally make a summerhouse from everything that is at hand.


Another plus of polycarbonate is that it transmits light well. Although, perhaps, someone can credit this ability of his as a disadvantage, because why else was a summerhouse built, if not for the opportunity to sit in the shade?
In general, to be honest, the disadvantages of polycarbonate are not so few:
- First, the price. This material is not cheap at all. Moreover, it is so expensive that even a free frame made from improvised materials is unlikely to correct the situation.
- Secondly, polycarbonate does not cope with sound insulation at all. So, when talking in a summerhouse during a downpour, you will barely hear the interlocutor.
- It is good to make greenhouses from polycarbonate. But think about whether you need a "greenhouse effect" in a summerhouse?
- Polycarbonate is not the most durable material, and even moderate hail can damage it.
If this kind of weather "surprises" for your area is not new, then making a gazebo for a summer residence from polycarbonate is more expensive for yourself.
How to make a gazebo in the country from improvised means
- Arbor to the cottage from plastic bottles
A country gazebo made of plastic bottles in the vast majority of cases is not a means of saving, but rather an expression of the owner's individuality, a tribute to his originality. Such a gazebo, on the one hand, looks quite exotic, and on the other hand, it is a challenge to your patience and determination.


Not easy to assemble right amount plastic bottles and glue them together in one way or another. Here, in any case, you will need to make the foundation, and the frame of the summerhouse, and its roof. So in any case, you can not do without cash injections. But the walls of the "bottle" material will be distinguished by increased density, well protected from rain and sun.
The easiest way to make such an arbor for a summer residence is as follows. First, build a foundation of steel piles screwed into the ground, which (assuming hammer work, of course) will take you no more than a day. The frame can be welded from ordinary metal pipes.
Then you take steel rods and put bottles on them in even rows. Of course, the shape and size of the bottle must match. Then you place the rods in a row between the frames of the frame, and in this way you get a wall. By the way, for the beauty of a country gazebo, you can take bottles different color and make a certain pattern out of them or, if you have talent, even a picture.
- Arbor in the country from glass bottles
Despite the fact that such a summerhouse will also be made of "bottle" material, the technology for its construction is somewhat different from the previous version.


Glass bottles, with all the desire, cannot be put on a metal pin, therefore, in this case, they are fastened together with cement. It is necessary to have the “building material” with the necks inside the summerhouse, and with the bottoms on the outside. A separate topic is the corners of the gazebo. If you can’t figure out the corners, don’t worry, even if the walls of the gazebo are made of bottles, this is unlikely to reduce the beauty of the country house. And it really looks amazing - a gazebo sparkling and shimmering in the sun.
- Arbor in the country from old trees
AT recent times the so-called "ecological style" of the interior is in fashion. This is the decoration of rooms and even summer cottages with various "natural" elements: leaves, bark, plant twigs. Of course, artificial. Now imagine if your country gazebo is made of real wood!


Finding an old tree outside the city, which is long overdue for cutting down, is not so difficult. Maybe this (and more than one) can be found right at your dacha or with your neighbors. Usually, you pay money to remove excess garbage from your summer cottage, but there is a good chance to save money, and twice. Do not rush to get rid of such trees, but first figure out: will they make an excellent gazebo?
To make such an arbor for a summer residence, if desired, is not so difficult. The trunks cleared of bark will become the material for the columns of the summerhouse. Spreading branches will make fences and railings. Most likely, the "material" for the construction will need two or three old trees.
Trunks-columns will act as the corners of the summerhouse. They will need to be fixed in the foundation and tied with a beam from above and below. After removing the bark from the trees, they will need to be treated with a moisture-resistant primer, and on top - varnished, which will prevent the wood from drying out. And one more thing: if you have already decided to make a summerhouse in a similar style, then you should stick to it to the end: the roof of the gazebo is also needed from “natural” material. Reed or ordinary shingles will look good here.
- Arbor in the country from cement mortar
Cement is one of the most universal materials in construction, so there is nothing surprising in the fact that it is also suitable for making a summerhouse. True, for the construction you will first have to work hard on the frame. Usually it is made of reinforcement, which bends and welds in the form necessary for the future gazebo. The work is not easy, so if you do not have the necessary skills in welding, it is better to invite specialists.


Then it all depends on your imagination. Thick cement mortar step by step superimposed on the frame of reinforcement. And as soon as it dries a little, you can “blind” anything from it: any kind of column, wall with a mysterious ornament or Kabbalistic signs, etc. Even if some pattern does not turn out as planned, you can always tell relatives or friends that it was originally intended that way.
A popular option is to make something like a spaceship or even a UFO out of a summerhouse. To do this, you need to insert metal “spare parts” into the cement in some places, and build a roof from plastic or use a steel coating.
- Arbor in the country from reed mats and vines
Country gazebos made of such materials are far from eternal, but they look exclusive in the literal sense of the word. They are usually placed on the shore of a pond or lake, if there is one, of course, on your site.


From a vine or reed, you can generally make a gazebo for a summer residence completely, without using any more materials. Do not be alarmed, no one will force you to weave the roof and walls from plants, both reed and reed mats have been on sale for a long time. And such a summerhouse looks very attractive. After all, what else should stand on the bank of the pond, if not a reed "hut"?
The use of such materials has other advantages. Thanks to the hollow stem building material»In such a country gazebo, you will not feel the heat and suffer from excessive humidity.
- "Live" gazebo in the country
We have already talked about a country gazebo made of trees. But these were cut trees. And how do you like the idea of \u200b\u200bcreating a "live" gazebo in the country? The process, of course, is laborious, but believe me, it's worth it! And all that is needed for this is a spreading tree, or at least a shrub.


Advantages of "construction" similar gazebo in the country that it does not need a foundation, a frame, or a roof. All this is already available, you just need to give the plant certain form. Rowan, willow or willow are best for creating a “live” summerhouse.
One of the main disadvantages of a "live" gazebo is that it is a very long process. The plants chosen for the "construction" must be planted along the diameter line of the future gazebo, and then artificially direct their growth in the required direction until their branches form the "roof" of the gazebo.
This kind of country gazebos are popular with people who love everything natural that does not violate natural harmony. But, as already mentioned, such construction will take a lot of time. However, there is a way to speed up the process - to braid a pre-built frame climbing plants like ivy or grapes. The main thing here is to observe the “density of the building”, to make sure that no artificial structural elements are visible behind the greenery. Otherwise, it can spoil the whole impression.
- Gazebo in the country from pallets


A gazebo for a summer residence will look quite original if you make its walls out of wooden pallets. The main plus here is that the air will penetrate into such a gazebo without problems. True, and from the rain strong wind she is unlikely to save. But the material chosen for construction is one of the most environmentally friendly.
How to draw a simple gazebo
The first stage of any construction is, of course, the creation of drawings. Of course, to make a gazebo in the country is not to build a house and not even put a bathhouse on the site, but in any case, one cannot do without a detailed drawing. To begin with, carefully inspect the place where you are going to build your architectural creation. Mentally estimate where you will make the entrance to the gazebo, where you will put the barbecue. In the gazebo itself, if it is brick, or at what distance from it, if you decide to make a gazebo from combustible materials. Do not forget also about the "meteorological" conditions of your site. It is best to build a gazebo in the most wind-protected place. Decide on the area of \u200b\u200bthe summerhouse, since often its size will directly depend on the number of family members or friends, so that everyone has enough space under the roof. And finally, decide what kind of materials you want to make a gazebo in your country house.
If you have decided on the place and size of the summerhouse, then it remains to choose the shape of the future structure. The most common of them are:
- hexagonal or octagonal. However, there can be more or less angles;
- classic - square or rectangular;
- round.
Next, you have to calculate everything and transfer the scheme of the future gazebo to paper. Of course, not everyone has the necessary skills in creating drawings. In this case, you can contact a specialist. But in the case of your fundamental decision to do everything yourself from beginning to end, turn to the Internet or specialized programs for help. Finding them online is not difficult for you.
The drawing of the gazebo should look something like this:


How to make a simple gazebo in the country with your own hands: step by step instructions
Step 1. We choose a place for a future gazebo
After choosing a place where you are going to make a gazebo, we are engaged in " general cleaning» plot. The place of future construction should be perfectly clean and even. Nothing superfluous, even small stumps, if any, will have to be uprooted.
Step 2. Determine the size of the future gazebo
By this time, you should have already estimated the approximate dimensions of the future summerhouse. Now you need to do this as specifically as possible, depending on the number of people who should be placed there at the same time. Moreover, it is desirable that friends and relatives "huddle" under the roof of the gazebo, not in crowded conditions.


Making a gazebo for a summer residence, of course, is incomparably easier than building a house. But in both cases, certain stages of construction are unchanged. In addition to a solid foundation on which the gazebo should stand, you also need to make it strong enough so that your building does not stagger and creak from the slightest breath of wind.
Wooden parts of the building must be treated with a primer deep penetration and finally paint. The choice of color is entirely up to you. There is only one piece of advice here. With in green trees surrounding the gazebo will blend well pastel shades rather than bright flashy colors. And one more thing - if you want to protect your creation from premature destruction, you will have to repaint the gazebo every season. Yes, again, time and money, but you can choose a different color for a summerhouse - if you suddenly become bored with the old one.
Step 4. Making the roof of the gazebo
It will not be difficult to make a “correct” roof for a country gazebo. First of all, remember that the roof should be flat and slightly sloping to prevent rainwater from accumulating. It would also be nice to install a similarity to such a roof drainpipe.


You should also think about where the water will be discharged from the drainpipe. This issue is resolved as follows: a small hole is dug near the gazebo (about 70 cm deep), covered with rubble - and a home-made drainage is obtained to drain water. By the way, next to this place you can put a barbecue or barbecue, but if the gazebo is not brick, and they will not be located inside it.
Step 5. Ennoble the gazebo
And the last, most pleasant part of the work: to choose the environment for the summerhouse and decorate it. There is plenty of room for imagination here. To make an open gazebo look more comfortable, you can hang curtains from light or thick fabric. Wooden benches inside the gazebo can be upholstered with material or put on them soft pillows(or both together). Cover the table with an elegant tablecloth and place bronze candlesticks on it. But you never know what else you can think of, it all depends on your desire and taste. 
How to make a gazebo in the country with your own hands (video)
5 nuances of how to make a gazebo in the country, which will not have to be redone later
The foundation of the gazebo
The foundation for any more or less serious building is the foundation. If there are any problems with the foundation of the dacha gazebo, then this will affect the entire structure as a whole. The type of foundation you need to choose depending on what kind of gazebo you want to build.
If you are planning to make a gazebo in the country, you are planning a small and cozy, light weight, then it will be enough for you and strip foundation. The order of work here will be as follows. First, you need to apply the desired markup to the site. For clarity, in each corner of the future foundation, drive in a peg and pull a construction sword between them. Next stage- from each driven peg we measure another 30-40 cm inside the foundation and pull the twine between them, which will become inside foundation. It is on these marks that you need to dig a trench.
Here one should remember one point: the depth of the pit must necessarily exceed the depth of freezing of the soil. At the third stage of work, we fill the trench with sand, then cover it with polyethylene. Thanks to this technology, air gaps cannot form in the foundation.
In order to properly build a gazebo in the country, it is not enough just to lay the foundation. It is also necessary to increase its strength with the help of building reinforcement. Such reinforced the foundation will easily withstand and brick gazebo, and made of cement mortar.
The fittings should be with a cross section of 8-10 mm. To make a reliable frame out of it, a knitting wire and a special hook are used. Learning how to fasten rebar with wire is not so difficult, it would only be a desire.
A wooden formwork is placed in the foundation trench, and then a reinforcement frame is placed inside it. Formwork boards should be no thinner than two centimeters, and it is better if they are edged. Otherwise, caulk any holes in the boards before pouring the concrete to prevent the concrete from seeping out.
People who are far from construction may not know that the foundation must "breathe". To do this, through the formwork to it you need to bring special pipes. If the area of \u200b\u200bthe summerhouse is large, then such ventilation pipes there should be several on all sides.
The height of the foundation of the gazebo depends, first of all, on which site it is located. If the place is flat, not flooded due to heavy rains or river floods, then 25-35 centimeters from ground level will be enough. The floor of the gazebo will not come into contact with the ground and rot because of this.
After all the above work, it's time to take the next step - pour concrete. This is a simple process, the only thing that, during pouring, the concrete must be pierced with a stick. Due to this, no air pockets form in it.
Filled with concrete? Well! Now it remains only to align it, and First stage the construction of the summer house has been completed. Well, almost completed, only small technical details remain. After 4-5 days after pouring, you need to remove the formwork, then wait about three weeks and start slowly making your summerhouse. Why wait? The point is that the most strong concrete becomes only a month after its filling.
Before undertaking the construction of the foundation for a summerhouse, it is better to evaluate your strengths: can you master this work? If it is new to you, then for the first time it will be useful to call for help from friends who understand something in this matter.
- The walls of the gazebo
Each material for the walls of a country gazebo requires a certain amount of care, both at the beginning of construction and in the future. So, for example, a tree must first be treated with a special compound against decay and the appearance of fungus. It is better to treat the metal components of a country gazebo with a special primer so that they do not rust.
The walls in the gazebo must be made exactly according to the drawing, using a level and a plumb line for work. And here it’s better not to rush, it’s worth once again checking and double-checking everything.
- The roof of the gazebo
The roof of the gazebo must also be done in accordance with the project. Of course, only after you put the rafters and mount the crate. It is up to you to decide which material to cover the roof with, but it is better that everything be done in the same style.

- Gazebo floor
For the floor in the country gazebo, it is best to take a bar with a section of 100 by 100 mm. Thanks to this material, the floor will be very, very reliable. In addition, to prevent the floor from sagging in the center, it would be good to strengthen it with brick supports.
- Brazier in the gazebo
If you want to install a barbecue or barbecue right in the gazebo, you need to follow a few rules. Firstly, the gazebo itself must be made of brick, stone or cement. Secondly, in order not to smell of smoke while cooking barbecue, do not forget to provide a chimney in the gazebo. And, thirdly, it would be nice to provide a special place for the “kitchen” in it during the construction of the gazebo.
The simplest wooden gazebo, photo report of the construction.
Gazebo in the country, this perfect place for recreation, it is within the power of every summer resident to build it, special skills in construction are not required here, it is enough to view step by step photos gazebo construction.
This time we'll do a simple gazebo from timber and boards with a gable roof with a slate ceiling.
We build a gazebo with our own hands photo.
STEP. 1. We do columnar foundation, it is enough to pour 6 supporting concrete supports. The device of the columnar foundation is described in detail in this article. Support concrete pillars you need to cover it with a waterproofing material, for example, pieces of roofing material, otherwise the wood will draw moisture from the concrete.
STEP. 2. We make a strapping from a bar, at the corners the bar is fastened with a spiked joint and self-tapping screws.

STEP. 3. We install the supports and make the upper harness from the timber. Supports are attached to the straps metal corners and also self-tapping screws. bottom harness we cover with used motor oil, which will serve as an excellent antiseptic and protect the wood from decay and insects.

STEP. 4. We fix the rafters for gable roof. The slope of the roof slopes must be at least 30 degrees.

STEP. 5. We fill the crate of boards on the rafters and lay the covering material, in this embodiment, slate was used, but it is better to work with corrugated board, it is much easier and easier to install.
The slate laying scheme, first the bottom row of slate is laid, then the upper one with an overlap, the laying direction is towards the most windy side.


We lay a wooden floor, fasten the side walls of the gazebo and the gables of the roof.


In the country, it is not customary to sit in a house when it is sunny and warm outside. Only during bad weather can a summer resident hide under a roof. However, you can resort to another option. You can stock up on great experiences at outdoors if you build your own gazebo.
Such a building will become an ornament garden plot as well as a place for pleasant communication with family and friends. There are many ready schemes light gazebos. If you assemble the structure yourself, its cost will be 50% lower than that of finished building. The simplest do-it-yourself gazebo is assembled quickly enough. With unhurried work, it can be built in 2-3 days.
Materials and designs
Cheap and practical option- a gazebo made of wood. Such material looks beautiful and is easily processed. If wooden elements are impregnated with special solutions, they can serve for a long time. In addition, the construction of a country gazebo will not take more than 3 days, even if the work is done slowly.

Another material that is used for the construction of such structures is metal. When making a frame from profile pipe and steel corners gazebo can serve for many decades. It can be built with your own hands. The work is done quickly enough, and the materials are quite cheap.
DIY gazebo
How to build a simple gazebo with a minimum of cost and effort? For the construction of such a structure, it will be necessary to create a frame and a floor. If it is wooden, the bases are made of bars. The floor covering is constructed from boards. As a base, it is better to pour a concrete screed. This version of the foundation will be simple affordable. Before work, it is necessary to choose the right place for installing the gazebo. The area for concreting should also be leveled.

Important! For a simple gazebo, you should not combine wooden and metal frame elements.
Practice has shown that even when protecting wooden supports with roofing material or bitumen, when placed in concrete, the elements begin to rot. Subsequently, this can lead to their destruction. For this reason, it is better to immediately exclude the contact of wood and concrete.

For this purpose, you should:
- Concrete round metal pipes.
- Then fasten wooden posts to them. Metal rods should come out of concrete base by 30 cm.
- Holes are made in them for fastenings.
On such supports, the gazebo can stand for more than a dozen years. Any roof can be mounted on the obtained supports. Building a wooden structure with your own hands is quite simple.
For regular light gazebo no need to build brick fences. You can limit yourself to a simple fence from eurolining. Its height usually does not exceed 90 cm. Such a fence is attached to longitudinal bars. The gazebo will help to hide from the scorching sun, and will also avoid blowing your back with a strong wind. The fence for the walls of the structure is fixed to wooden poles using self-tapping screws.
Eurolining can be replaced cellular polycarbonate. This material looks great and does not obscure the gazebo space too much. It is also easy to install. The material is not afraid of sudden changes in temperature and high humidity.

Roof
For the roof frame, it is better to find a beam of 50x50 mm. From it it is necessary to create a frame on which the crate will be installed, and then roofing material. The frame is installed on the top harness. The roof is covered with such materials:
- ondulin;
- metal tile;
- slate.

When choosing optimal width the roof should be calculated in such a way that when installing the roofing, you do not have to cut the sheets. To do this, you must first measure the dimensions of the panels used, and then subtract the sheets overlapping each other, which will be performed during installation. The result will be taken into account when calculating the length and width of the roof. It is also worth considering the side overhangs and end overlap. You can make a gazebo with your own hands quite quickly. The main thing is to choose the right materials, including for roofing.

For example, for a slate with 8 waves in each panel, the length of the gazebo is chosen as a multiple of 1 meter. In this case, the length of the slopes can be equal to 1.75 m. If several panels are laid along the slope, the estimated length of each of them is reduced by 15 cm - this is necessary to create an overlap.
Choosing best option for roofing Special attention give polycarbonate.
Distinctive features of the material:
- It is an excellent option for the construction of lightweight structures.
- It also makes a fence.
- Polycarbonate is a transparent plastic with a small mass.
- In combination with it, a metal profile is often used.

Such gazebos are especially attractive and practical if they are located in the shade of trees. In the presence of a translucent roof and the shadow created by dense foliage, the atmosphere in the gazebo will be as comfortable as possible for relaxation.
Garden gazebos, made of polycarbonate, are simple and affordable. To create them, you need to have several tens of meters of steel angle, as well as polycarbonate panels and a steel strip. Also, before erecting such a structure, it is worth preparing planed boards, which will be needed for the manufacture of benches and a table. original photo gazebos can be seen below.

Manufacturing steps
To understand how to make a gazebo with your own hands, you should get acquainted with the main stages of work. It is better to choose an easier option. First you need to equip the foundation. In it, the support posts of the gazebo are concreted. After that, they should be scalded with a corner of 25x25 mm. After that, 2 belts of corners are welded to the racks. One of them is placed in the middle of the supports. The second should be put on top - the roof will rest on it.
Polycarbonate sheets have the ability to bend perfectly. For this reason, they can be used as a creation arched roof. For this purpose, steel strips must be welded to the racks, which have a width of 50 mm. They are mounted on support stands. And then holes are made in them to fix the polycarbonate. You can assemble a simple gazebo for a summer house with your own hands (as in the photo) quickly enough.

Also roofing often made of tiles. For the basis for it, OSB sheets should be prepared. The material does an excellent job of holding shingles on the roof. The thickness of such sheets can be 10-12 mm. It has a fairly high strength and rigidity. That is why it does not have to assemble a spatial frame from wooden elements. It is only necessary to firmly attach it to the harness.
Features of simple gazebos
A simple gazebo for a summer residence does not have to be done with a frame frame. Its foundation is concrete screed which was reinforced with steel bars. On such a surface, you can put a barbecue. The safety of such a design is quite high, because concrete floor not afraid of hot coals. In case of winter option the floor is better equipped planed boards, and sheathe the area around the barbecue with steel sheets. Such winter design looks simple and beautiful.

Inexpensive in construction and easy to install is a columnar foundation. In order not to overpay when building a gazebo for a summer house with your own hands, you can prepare a red brick. To install the foundation, it is necessary to dig holes for support pillars and then put into them brickwork, place reinforcement and pour concrete. Anchor bolts of 20 cm are laid in the masonry. There should be a thread at their free end.
Supports are placed on the pillars. The frame is best made from a bar 50x100 mm. If you put antiseptic boards on it, you can get an excellent warm floor. Subsequently, the gazebo can be equipped open hearth. With such a finish in the room, it will be possible to rest comfortably even during severe frosts.
To figure out how to build a gazebo, you should get acquainted with the main features of simple structures, as well as learn more about popular materials. You should also understand the sequence of erecting simple arbors.
Conclusion
As you can see, you can build a simple structure with your own hands, without resorting to help. professional builders. First, an exact drawing is made, and then, in accordance with it, all the necessary work is carried out. It is important to consider the capacity of the gazebo, its location and materials. In order to avoid mistakes in the process of work, it is worth performing the correct calculations.