Decorating a corridor in an apartment or house cannot be limited to choice general style, buying furniture and decorating walls and floors. It is important to understand the ceiling properly so that its appearance completely satisfies you and does not create a feeling of dissonance. To do this, you need to follow certain rules, which will be discussed.
Types and forms
Ceilings are:
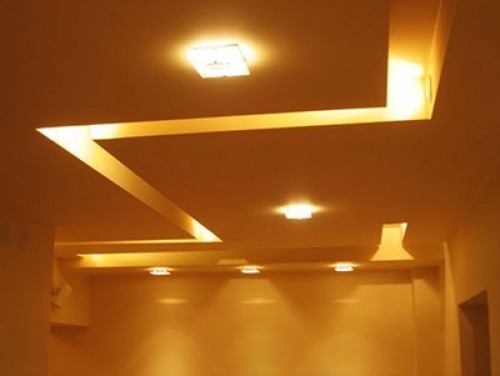
- Multi-level. Such a ceiling is rarely used in the corridors of residential buildings and apartments. This design exhibits its aesthetic advantages over a large area. Most often it is used in other rooms. So, two-level ceiling differs from three-level and more sophisticated options only in the number of layers created. The more there are, the stronger they should be support structures on the original tiers.


A very precise marking is a mandatory requirement, but this inconvenience is compensated by the opportunity to cover communications, change the visible geometry of the space, or use a unique lighting scheme.
- Floating. The effect of a floating ceiling is achieved through the use of LED lighting. You can create it yourself.


- Curly ceilings, as multi-level options, are formed from plasterboard. They are quite simple to make, but the resulting structure will be heavy and cannot be disassembled. If old whitewash does not crumble, you can create such structures directly on top of it.


Finishing options: pros and cons
Can be used to finish the ceiling various materials, which have their own characteristics, pros and cons. Let's take a closer look at them.
Painting
Painting ceilings is permissible with water-based or water-dispersion paints, but there are other options. So, acrylic compounds with latex will close cracks and allow you to wash the painted surface. If there are concerns about flooding of the apartment, use silicate paint, which can easily withstand strong moisture.
You can use either a stepladder or a table as a support. In the first case, the support is more compact and reliable and is easier to rearrange, but in the second, you don’t need to think about where to put the can, and you’ll have to climb down less often to move to another place. Decision is on you! Regardless, be sure to wear a hat, and ideally, also bring safety glasses.


Low ceiling It is better to decorate in light colors; By painting the walls darker, you will visually expand the space. If the room is high enough, it would be better to use darker shades.
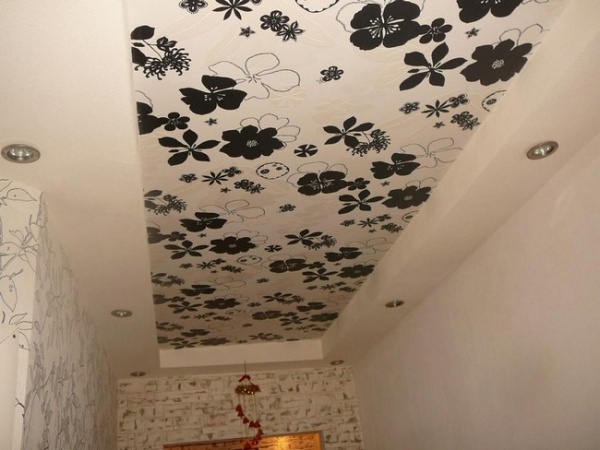
Wallpaper
Pasting the ceiling with your own hands is not the worst idea, because in this way you can both save money and create an elegant appearance by investing an additional amount of money. Professionals say that top part corridor is best compatible with glass wallpaper, as well as non-woven or non-woven fabrics vinyl based. Paper version less elegant and does not last as long, although it is relatively cheap.


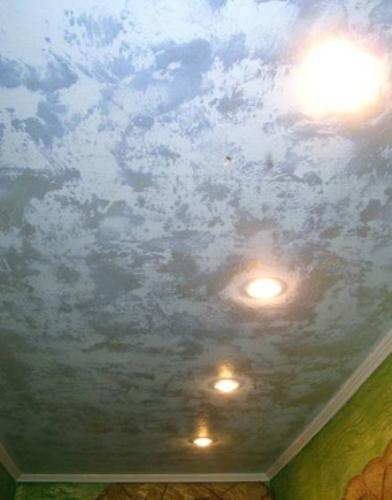
Whitewash
Considering the caustic nature of the composition used, it is advisable to take the furniture outside the room, and if this is not possible, cover it with polyethylene. You can use both chalk and lime whitewash. The bottom layer is applied from the light source (window, lamp, passage into a glazed room), and the second layer is applied in the opposite direction. As a rule, you need to whitewash the ceiling once every five years.
Whitewashing, plastering and painting begin only after:
- the entire surface is cleaned up to and including concrete or other permanent foundation;
- primer treatment was carried out;
- Beacon profiles are set along the level, creating landmarks.


Drywall
Various suspended and mounted structures are made from plasterboard, which have gained great popularity over the past 10-15 years. Home craftsmen and professional builders highly appreciated the lack of need for plastering and putty rough foundation. There is no need to remove the previous finish, with the exception of old hanging elements.


Attention: be sure to measure all dimensions with high accuracy and double-check the calculations to eliminate the appearance of irregularities and defects!
You should not assume that a gypsum board ceiling is better than all others, since it also has an inevitable drawback - height absorption. Because of this, in the room with low walls It would be better to use other solutions. Such as plastic panels, For example.
PVC plates
These are ready-made blocks made of polyvinyl chloride, measuring 50x50 cm. An important advantage when using them is that there is no need to carefully prepare the base of the ceiling. All preparation for applying plastic panels will only consist of removing old coatings and any contaminants. It is enough to apply glue to the back surface of the block and vigorously press it against the ceiling to literally transform the room in a few hours.


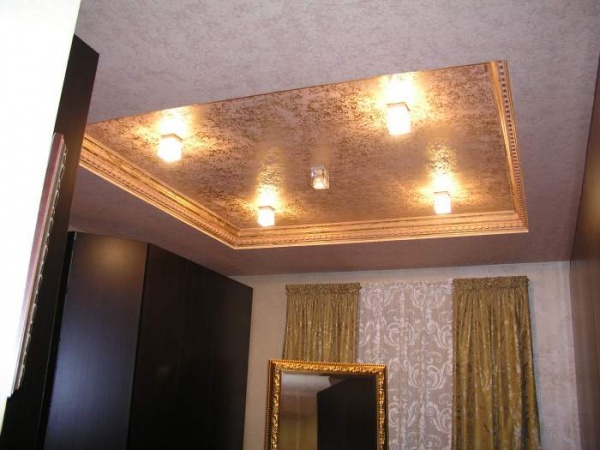
Plaster
Advantages the latest methods do not give a single reason to neglect plaster. It is quite simple to apply - careful puttying is not required; on the contrary, it will be possible to mask any unevenness in the relief with the material used. You will spend relatively little money, time and effort, but the result will be aesthetically attractive.
The work proceeds as follows:
- apply the mixture you bought to the plastered ceiling;
- a relief is formed with a sponge, spatula, grater or other tool;
- Then all you have to do is wait for the layer to dry.


The dried coating can even be painted, and if desired, in two different colors at the same time, even black and brown, even yellow and green.
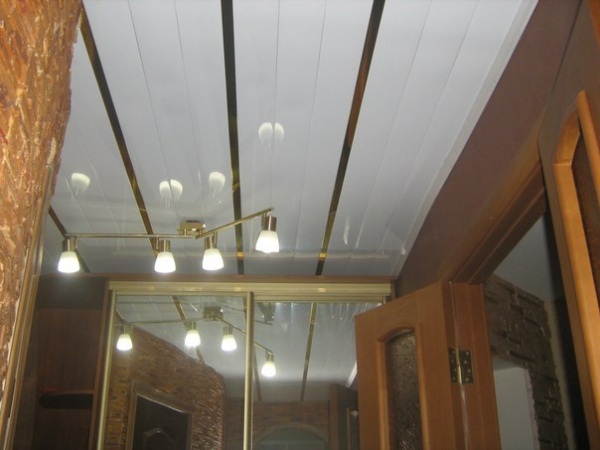
Aluminum slatted structure
Slatted structures made of wood and aluminum are found wide application in technical and utility rooms, because they:
- practical;
- aesthetic;
- insensitive to water and high humidity
- well mounted;
- are relatively inexpensive.


Aluminum ceiling systems will be one of the optimal solutions not only for the corridor, but also for the bathroom. Since aluminum suspended systems are installed below the ceilings, the actual condition of the rough ceilings does not matter. They just need to withstand the load consistently. Arranged similar systems simple: this is a series of suspensions to which they attach load-bearing profiles(they fix the aluminum strips that create the outer surface).
Aluminum slatted ceilings can be colored, and can be painted in any of the many shades included in the RAL palette. Most often, white structures are used (including the entire range of varieties of this color) and beige coatings. Most often, these options for slatted systems are always available, and if you need other colors, you will have to make individual order. Matte, glossy, semi-gloss surfaces can be found in the assortment of any self-respecting company.


The difference between the slats concerns their width and geometric shape. A plank produced at a Russian or German factory will be straight from the face, but in Italy they prefer to make it round. It is not advisable to take perforated options, because all their advantage is optimal internal ventilation, but it is undermined by an overly cold and official style, more decent in an institution than in a private house or city apartment.
Slats with edges are not very suitable for corridors. Their main place is bathrooms and kitchens. Important: the wall guide must match the main planks or slot profile. It is advisable to select the stringer corresponding to the width of the individual slats. In a room that is not high enough, dowel-nails are preferable rather than pendants. With their help, you can reduce the reduction in height to the limit and even attach the material close to the rough ceiling. It is useful to know that in a small corridor, the thinnest slats are sufficient (their reserve of rigidity is enough to avoid sagging).


White flat slats are the cheapest, and manufacturers and sellers charge the highest price for chrome-plated products. Two-level structures open up additional possibilities, but it is better to entrust their installation to professionals.
Wooden slatted structure
As for wooden slatted ceilings, then their undoubted advantage will be their relevance in any interior (from classical to modernist). Thanks to modern methods processing from natural wood, you can even get lamellas that look like natural stone.
Various positions of the slats are possible:
- longitudinal;
- transverse;
- diagonal (in some newer versions).


A wooden ceiling is much more effective than other options in containing the spread loud sounds. You just need to strictly follow the technology and install a fiber-acoustic slab (the price for it is completely justified). If the upstairs neighbors really like to do renovations or hold discos, your home will be relatively quiet. For certain interior styles, it is more correct to choose slatted ceilings with small gaps between the elements. Important: a wooden slatted ceiling will help hide even the most unsightly communications and defects of the main surface from prying eyes.


Tensioners
Stretch ceilings are used very often. It is not at all surprising that such solutions are regularly used in the corridors. The undeniable advantage of this choice is quick installation. You only need a day or two to get optimal results. Responsible owners will invariably be pleased by the absence of dust and dirt during the installation process. There is also a weak point: if you have not yet laid out all the planned communications at the base of the ceiling, you will have to speed up this process or postpone cosmetic repairs.

Lighting
Adding lighting fixtures to hanging structures is extremely important for more than just stylistic reasons. Thus, incandescent light bulbs are incompatible with stretch fabric, as they can melt it. You will have to either use chandeliers or resort to LED lighting, which does not produce excess heat. A small chandelier is easy to install, but only if the wiring goes under the frame. Immediately determine the places where the lighting fixtures should be and take care of laying wires to them.


The desire to save money when renovating is quite reasonable, but not in this case. Be sure to entrust the installation of electrical appliances and wiring for them to professionals, because the slightest mistake will have very serious consequences. The choice of the type of fixtures among all that meet safety requirements is limited only by your personal taste and the style of the corridor. It is quite acceptable to use spots.
According to most experts, it is unnecessary bright light inappropriate in the corridor. It is much better to use dim lighting there. If the ceiling is completely flat, you can apply fluorescent lamps both open and installed behind the eaves. 50-60 watts should be enough for the entire room.


For gypsum plasterboard surfaces, professionals believe optimal choice oval niches with lamps, the rays of which intersect, and the lamps themselves are slightly inclined in relation to the plane.
Additional design
Stained glass may look quite attractive, but they alone cannot “pull out” a bad design. Therefore, immediately think through the entire style, including auxiliary decorative elements, so that later it will be easier to achieve success. Stained glass ceilings are created using frames, and for quite a long time they have not been an attribute of a luxurious and elite interior and can be used almost anywhere. It should be taken into account that it is almost impossible to make a sufficiently strong frame at home and even in a home workshop.


So you will have to order it from official suppliers. Stained glass windows are not only rectangular and round. They often imitate the shape of lampshades and domes, or are even made in non-standard configurations. It is advisable to use dome solutions in large-area corridors.
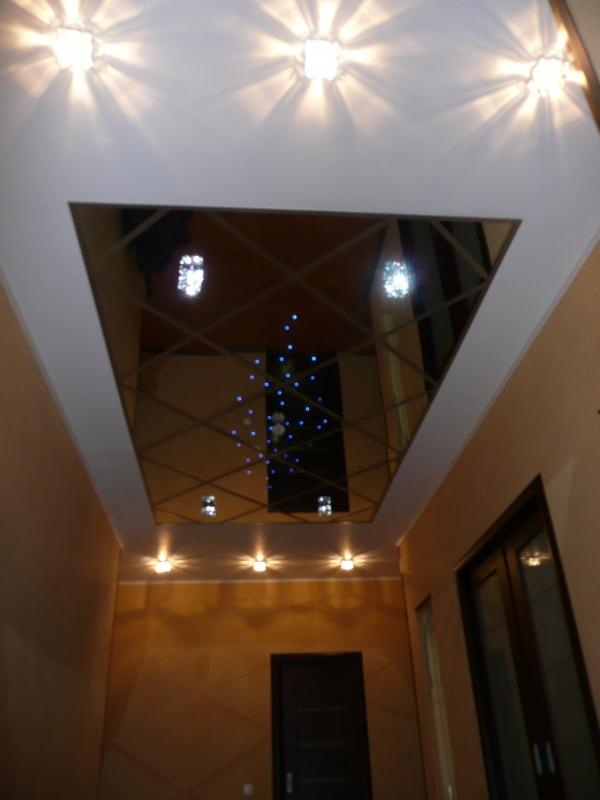
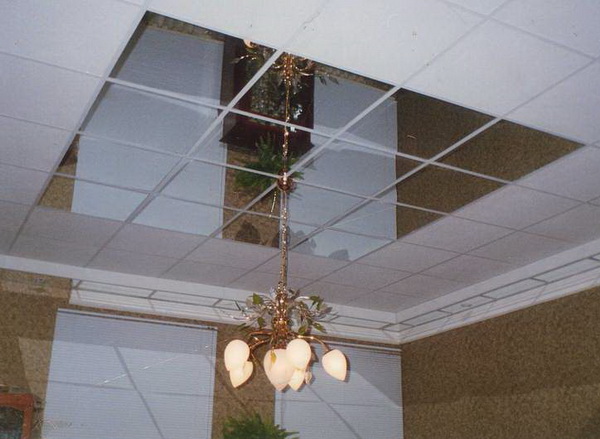
For lovers natural wood It is not at all necessary to choose ceilings from boards or slats. It is quite possible to imitate it with the help of plaster (a “bark beetle” type coating reproduces the effect of oak wood eaten away by wood-boring beetles). Mirror materials and designs can brighten even the darkest corridors farthest from windows. Mirrors help add elegance and luxury to a room. Beveled slabs with hidden hanging systems are especially good.


Mirror tiles can be covered with decorative patterns (ornaments), but stretch ceiling It is not recommended to use it with the same effect. Attaching them is quite simple, but the image will be blurred and the seams will be too visible on the canvas. Serious weaknesses of a mirror ceiling are its fragility and soiling. The slightest stain when good lighting immediately visible.
It is quite difficult to decorate ceilings with solid mirrors (harder than with single tiles). The slatted version coated with a reflective film is attached with screws or held in place with cement. This coating is flexible, but can catch fire and the image will be distorted. Tiled mirrored ceilings, as practice shows, are better suited for corridors than all others. Their strict geometry and refusal of excessive decoration will only benefit. Important: think through the design in such a way that the shelves placed at the top of the wall can be used without problems.


Features of choice
The purpose of the room (hallway or corridor) requires, as already mentioned, to use only durable and non-staining solutions. In long hallways (the length of which is over 3 m) it is necessary to use only those slatted ceilings that have special connectors for the guides. To choose the right plasterboard structure, measurements must be taken as accurately as possible, leaving a reserve of space for built-in lamps and communications.
Choosing a ceiling for a Khrushchev-era corridor is not very easy, because the dimensions are frankly small. In many cases, they are limited to painting in white tones or coating with lime. This is quite reasonable stylistically, because light colors draw out the room and allow you to get rid of the oppressive feeling at least a little. But now there is alternative solutions, such as light-colored stretch ceilings. For them, varnish or glossy fabric is used.
Often the ceilings in the hallway are low, as in the entire apartment - this is a significant part of our old housing stock, and it is unlikely that anyone would want the ceiling in this already small room to become even lower - in this case we're talking about about suspended ceilings as the most common phenomenon of our time.
A suspended ceiling, for example, removes a bunch of problems that a basic ceiling contains: unevenness, curvature, various defects in floor slabs, etc. Of course, the presence of a suspended ceiling does not at all negate other types of finishing.
Apartments, as a rule, do not always have smooth ceilings.
This finishing method has a number of advantages over other types.

Advantages:
- The ability to remove all defects of the base ceiling;
- The ability to hide various communications: electrical wiring, pipes, air ducts;
- Ease of installation;
- Simplicity of design;
- Reasonable price for materials and components;
- The ceiling can be painted and done as many times as you like;
- This ceiling takes only a few centimeters from the base ceiling.
Based on everything said above, we can conclude that this method is the most common today.
Ceiling in the hallway: which one is better to do?
Everyone wants to make the ceiling in the hallway at least as good as in the rest of the rooms of their own home.
The ceiling in the hallway should not reduce the optical size of the room.
There are plenty of options for finishing ceilings in the hallway.

Main options:
- Suspended plasterboard ceiling;
- Stretch ceiling;
- Cement ceiling;
- Ceiling made of PVC panels;
- The ceiling is made of foam tiles.
Any of these options deserves your attention and has the right to exist. Well, which one is better is up to you to decide.
Ceiling ideas in a modern hallway
- Innovation. This style is generally infinite, like the Universe. Here, photo printing, for example, can be combined with a ceiling such as red, etc.
In short, there are a lot of ideas, and you may like any of them.
Hallway: the ceiling will not spoil the interior
A beautiful ceiling does not spoil, but decorates the overall interior.
Beautiful ceilings are a great addition to the design of your home.
So that the ceiling in the hallway does not irritate, in the future, either you, or your friends or relatives, you need to think through everything from the very beginning, that is, before you have already started arranging your ceiling.

So, let's take into account:
- Ceiling height. If the ceiling is too low, then you should forget about multi-level ceilings, For example. Do not hang a chandelier that is too bulky.
- Hallway area. If the square is too small, you should not arrange, for example, “Starry Sky”, or the so-called “Wave”.
- Hallway width. If the width is small, you should not arrange ceilings that are too dark, in order to avoid turning the hallway into a very narrow corridor.
Thus, taking into account everything mentioned, you can radically improve the appearance of your hallway, and even increase it visually.
How to make a ceiling in the hallway: choose a stretch ceiling
Stretch ceilings are one of the most popular types of finishing among consumers in recent years.
Stretch ceilings have recently become cheaper than several years ago, which can be explained quite simply - competition. Moreover, an acceptable price also plays a decisive role.

So, the advantages:
- Great appearance;
- The loss of ceiling height after installation is extremely small;
- Moisture resistance. Such a ceiling can hold a large number of water in case of leakage from the upper floors.
- It is possible to install combined and multi-level ceilings.
- The design is inexpensive.
- The ceiling does not need to be painted for the entire period of operation.
- Such ceilings are durable.
- The materials are environmentally friendly.
As you can see, there are plenty of advantages.
Flaws:
- The coating cannot be called durable. Even children playing can damage it, or it can also be disturbed by moving tall furniture or carrying long objects.
- If the installation is of poor quality and unprofessional, water will not be retained on the surface of the tension fabric.
So, taking into account all the advantages and disadvantages of suspended ceilings, we can say with confidence that the advantages clearly outweigh the disadvantages.
Proper use of the stretch ceiling will help maintain its integrity.
Thus, a suspended ceiling is one of the highest priorities for finishing your hallway.
Stretch ceilings: ready-made structures will make repairs easier
With the availability of ready-made structures, the work of installers is greatly simplified, and the process is noticeably speeded up.
It is possible and necessary to use ready-made structures in order to avoid mistakes when cutting and purchasing components.
Having purchased finished design, You not only simplify the repair process, but also significantly improve the quality of the work performed.

What is needed for installation:
- Step profile;
- Elements for hidden lighting;
- Connecting profiles;
- Profiles for curved structures with notches. This will significantly save your time, saving you from routine work using an angle grinder.
Standard series are especially needed when constructing multi-level ceilings, or especially structurally complex ceilings.
Stretch ceiling in the hallway: design options (video)
In conclusion, I would like to summarize some of what has been said. The choice of ceiling design in the hallway is as great as the choice for any other room. There are many finishing methods, and almost all of them are suitable for the hallway. The hallway in an apartment is usually small, so the costs for it, as well as the labor intensity, are low. Based on this, you can arrange in the hallway both a suspended ceiling and plasterboard, say, or you can even limit yourself to foam tiles or plastic panels. The choice remains with the apartment owner, that is, with you.
Original suspended ceilings in the hallway (photo)


Acquaintance with the apartment begins from the hallway and it is important that it makes a positive impression on guests, and not vice versa. The ceiling finish is not the best simple work, and considering that we rarely have people in our houses smooth surfaces without defects, this process can make you sweat. We will discuss how to properly repair the ceiling in the hallway and what materials to choose in the article below.
To this day, the most budget and in a simple way finishing is whitewash. Many still do not refuse it, even with a huge choice. Whitewash is easy to apply and does not require calling in specialists. Anyone can whitewash a ceiling. This is probably her only advantage. Whitewash is outdated as a material: it does not hide the imperfections of the ceiling and requires careful preparation of the surface. The appearance in comparison with other types of finishing leaves much to be desired. In addition, over time it will turn yellow and begin to peel off.
A little bit more effective option- painting. In appearance it differs significantly from whitewash, and the choice of colors is not limited to one. But she doesn't hide her flaws. The ceiling must be perfectly leveled before painting. Even though the paint is not expensive, you will need to buy putty, primer and apply more than one layer with it.

Few people like to glue wallpaper to the ceiling, but still this a good choice from cheap types of finishing. Due to wide choice You can choose wallpaper textures that will hide imperfections. Drawing can also expand the space. Under the wallpaper you only need to level the ceiling. The only inconvenience: it’s difficult to do on your own. You will definitely need an assistant. One holds, the other glues.
Ceiling tiles are also a type of finish available to everyone. But don’t take the cheapest option, such slabs will look simple. Choose quality materials.
The slabs can be coated with paints and varnishes, which will be an additional advantage for those who like to change their interior frequently.
Instead of slabs, you can install PVC panels. They are easy to care for and easy to install. Plastic does not react to moisture. But their appearance is more reminiscent of an office than of home comfort. Plastic will yellow and fade over time.
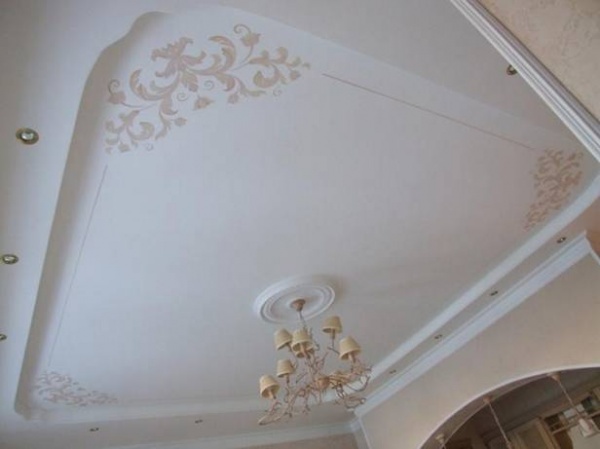
Decorative plaster will look impressive on the ceiling. One of the biggest advantages is different kinds design. Only stretch and plasterboard ceilings can offer such a wide range of patterns. But at the same time, plaster is much cheaper. But there is a significant disadvantage: than more complex drawing, the more difficult the work. Some varieties cannot be applied independently, only with the help of a specialist.

To expand the space they often do mirror ceiling. Looks very nice. And in combination with the drawing and proper lighting mirrors will turn your ceiling into a work of art. You can install it yourself, but it’s still difficult. Mirrors weigh a lot. The downside of mirror finishes is cleaning. In order for your ceilings to sparkle, you will have to take good care of them.
Previously, designers did not like to use suspended ceilings in the corridor. And now this is a thing of the past. Modern materials allow you to install a suspended ceiling in narrow corridor, long or completely non-standard.
A plasterboard ceiling in a hallway can be an excellent design solution. It will hide all imperfections and remove wires. The difference in colors and types of designs will help hide the shortcomings of any room. In large rooms, you can create massive structures to fill the space. But in small ones you will have to limit yourself to one level. Plasterboard ceilings for a corridor lower the height, making it unsuitable for low rooms.

One of the types hanging structures, which will not only hide imperfections, but also visually expand the space - a slatted ceiling in the corridor. Slatted ceilings are made of plastic or aluminum. Aluminum ones create a mirror surface, which will double the size of your corridor. But here in large rooms such a ceiling can create the effect of endless space. If you don't like long slats, you can install a cassette ceiling. The principle is the same, only there are long slats, and here there are squares. But they will cost more.
Stretch ceilings will help give your corridor a beautiful appearance. Although they are expensive, their durability and aesthetics make up for this drawback. Tension fabric will serve you for at least 15 years. You can forget about the ceiling for a long time; it is easy to clean. Beautiful appearance and the ability to hide all imperfections make suspended ceilings one of the best views finishing.

How to prepare a ceiling for finishing
Whatever finishing option you choose, it is imperative to prepare the surface. It’s just that for some species it’s more thorough, for others less. But experts say that even if you finish the ceiling using hanging structures, it is better to put it in order. This will save you from problems in the future.
Before repairs, all lighting, if any, must be removed. Immediately insulate the wires and attach them to the places where they will be located after finishing.
The old coating must be completely removed: whitewash, paint. Nothing should be left. The ceiling is always coated with an antifungal primer, even if you have a suspended ceiling. The fact is that under some materials the ceiling does not breathe, this can lead to the accumulation of water, dust, and subsequently lead to the appearance of mold and mildew. If there is no coating, this can be immediately noticed and eliminated, but if the ceiling is closed, it will not be possible to see. It's better to save the ceilings. If you have concrete ceiling, then apply the primer in several layers.

Then it’s time for holes and cracks. Putty them and treat the surface with plaster. This is optional work when installing suspended ceilings in the hallway, but it is better to do them anyway, since you have already started the repair.
How to make a ceiling in the hallway with your own hands
One of the most common types of ceiling finishing is plasterboard ceilings. With their help, you can hide the shortcomings of any room, except low ones. It is better not to install in small corridors.
What you may need: a hammer drill, a screwdriver, metal scissors, a knife, self-tapping screws and a level. The materials you will need are plasterboard sheets, hangers and a profile.
The sheets are attached to the frame, so the installation process begins with it. While working, check the evenness of the structure, otherwise later you will have ceilings at an angle.

First you need to apply markings to the walls where the profile is attached. Measure all angles. The markings go from the lowest. Using a level, apply horizontal line along the perimeter of the walls. According to the markings, the profile is installed on self-tapping screws at a distance of 40 cm. Then the ceiling profile is inserted into the guide. They are attached to the ceiling with hangers using dowel-nails. Bend the ears of the hangers.
Now let's move on to installing the sheets. For ease of work, it is better to have two pairs of hands. One holds, the other mounts. The sheets are fastened from the corner with self-tapping screws. The seams are then covered with putty.
Repairing with your own hands gives the owner special peace and pleasure. Having done all the work on our own, You will not be afraid to make adjustments to the repair and spend money on the work of specialists, which in our time is not cheap. And below you will learn how to repair the ceiling in the hallway with your own hands, and also look at photos and videos of the most important processes.
Each room in an apartment or house has a specific role, which is especially important, but the central room, which always attracts special attention, is the corridor. In it we get rid of shoes, outerwear, and leave hats and umbrellas there.
It is important that there is nothing superfluous in the corridor, nothing should get in the way, pieces of furniture, every thing, accessories should have specific functions and in no case clutter up the space. By finishing the room it is necessary to enlarge, create comfort in spacious corridors, do not be afraid to use non-standard premises. The design of the hallway should form the overall impression of the apartment or house.
The renovation in the hallway plays an important role, while in other rooms all surface finishing work has been completed and all the furniture has been placed. Experts advise not to neglect this rule in order to eliminate the possibility of damage to the lining of the floor and walls in the corridor.
Repairing the ceiling in the hallway with your own hands: photos and points to consider
In most cases, hallways are cramped and small, with no natural light sources. Dirt is regularly carried into the hallway, and people often walk on the floor in high heels, or even on skates. Heavy objects are often placed on the floor, sometimes angular and hard. Splashes from clothes, umbrellas, and shaking off pets fly onto the walls.
Someone might break into the corridor cold air from the opened door, and the humidity in it increases significantly. Condensation is not noticeable to the eye, but it will remain in the pores and crevices of the finish and will gradually deteriorate, leading to rot, mold and all possible infections.
But every owner wants to have a cozy, bright and clean corridor, and not a dark, gloomy passage that spoils the mood of the guests and themselves. This is quite possible to achieve if you carry out repairs strictly according to plan, following the sequence of work and understanding the intricacies of the matter, especially in terms of the choice of materials.
Repairing the corridor ceiling with your own hands: photos and features of the choice of materials
Before you begin repairing the ceiling in the hallway, first of all, you need to find out its type of finish. Of all the variety that we will consider below, the cheapest and easiest way is whitewashing and painting the ceiling. If you need to do something more elegant, consider making the ceiling from curtain panels or plasterboard.
The ceiling in the hallway adds completeness to the entire room and determines the subsequent design of the room. When developing the idea of a corridor, designers rely on the height of the ceiling, its configuration and dimensions. The decoration of the ceiling directly depends on the purpose of the room - a service or a corridor in a residential apartment, etc.
Well-chosen material and thoughtful design of the corridor ceiling can significantly change the appearance of the room, reduce or increase its size.Methods for visual resizing
One light on top and high ceiling in a narrow corridor it can make the room taller, but it looks more like a tunnel. There are two ways to solve this problem:
- make the ceiling slightly darker (a tone or several tones) than the predominant color in the corridor;
- install the lamp on the side of the wall.
Also, the option of using a lamp will help make the room visually brighter, which is very important, since the corridor is a space that does not have natural light sources. Conversely, the ceiling in a small corridor can visually make the room higher by using a glossy design (plastic panels, glossy paint or glossy stretch ceiling).
What type of ceiling should I choose for the corridor?
The design of ceilings in the corridor is developed by choosing the optimal type of ceiling. It is extremely important to consider the following factors:
- room configuration and height;
- presence of temperature changes;
- humidity level;
- the basic idea of the room design, etc.
When choosing what to decorate the ceiling with, you need to pay attention, first of all, to its practicality and durability.
What types of ceilings can be used in the corridor?The main types of ceilings that are popular both among builders and designers, and among consumers:
- painting with paint;
- suspended ceilings, which are divided into suspended (mineral fiber, plasterboard, slatted and lattice) and tension;
- ceiling made of plastic panels.
Due to the structure of the room, installation features and performance qualities exhibited by these types of materials, plastic or suspended ceilings are increasingly being installed.
Suitable Types suspended ceilings for the corridor
Suspended ceilings can be of 2 types - suspended and suspended. It is very problematic to install the first ones on your own, since the installation process will require certain skills and specialized equipment. For this reason, most consumers choose suspended ceilings, the installation of which will not cause difficulties.
Suspended ceiling is one of the most popular finishing materials nowadays. There is an opinion that only a professional can install it in the hallway, but this is not true. If you follow the technology and have the necessary equipment, installation can be done on your own.
The first thing you will need to install a suspended ceiling is a set of tools:
- metal profiles;
- ceiling panels;
- accessories (dowels, screws, self-tapping screws);
- pliers;
- level;
- wooden scaffolding;
- screwdriver
Before installing a suspended ceiling in the hallway with your own hands, you need to do the preparatory work:
- clean off old coating;
- securely secure the electrical wiring with special ties;
- cables and other communications by marking the ceiling surface.
Before fixing the profiles, you need to check whether there are any unaccounted pipes with communications, otherwise during installation you risk damaging them with screws or tools.
On next stage Fix the corner profiles around the perimeter of the room using 100 mm screws. This is quite simple to do with a frame wall - the screws are screwed directly into the studs. With concrete or stone wall it will be much more difficult. In this case, you will need to pre-drill holes intended for dowels and nail them. After this, you can start unscrewing the screws.Next comes the installation of the foundation for the future frame. To do this, make markings on the ceiling surface. Using it as a guide, drill 6 mm holes in the supporting base to a depth of 40-60 mm. If the base is wooden, then installing the frame base involves the use of large-threaded screws that do not require pre-drilling.
Then it is worth checking that the distance corner profiles, which were previously fixed to the walls, corresponded to the length of the profile. How to do it necessary measurements? To do this, just use an ordinary tape measure. The dimensions obtained after measurements should be used to cut off the required part from the transverse profile required size. In order to install the transverse profile, it must be supported on the corner ones.
The next stage - assembling the cells that hold the tiles in place - begins with securing the profiles along the corner guides. All of them have their own mounting system, which greatly simplifies their installation. At the end of the profile rail there is a “petal” that must be bent to in the right direction. If you do everything correctly, a click will occur.
Installation of cells holding the profile
- To prevent the canvas from sagging in the center, a transverse profile is attached to the old ceiling or beams (using special hangers). The profile rails have holes for mounting. Then the upper loop of the suspension should be tightened 90 degrees.
- The loop, after performing such procedures, must be attached to the ceiling and secured using a screwdriver and self-tapping screws.
- The last stage is completing the installation of the cell and laying the transverse panels into the already formed cells.
How are panels laid into cells?
The first sheet is installed in the central part of the room and gradually moves from there to the edges. If plasterboards are used for installation, they will need sanding and putty at the end. To hide the gaps between the wall and the ceiling, acrylic is used, and gypsum putty is used between the slabs.
The odor from the finishing materials may persist for some time after installation. But if you use high-quality materials, it disappears in a few hours. Fragrance is a sign of low-quality materials.
Common and inexpensive methods for finishing hallway ceilings
Today construction market offers a huge number of different construction technologies that can be used when arranging the ceiling. Let's look at the most popular of them to see their advantages and differences.
- Whitewash.
If you are looking for a simple and economical solution for finishing the ceiling in the hallway, then whitewashing is ideal option. It is resistant and durable various pollution. But in order to whitewash the ceiling, you need to do preparatory work. This includes putty, plaster and ceiling sanding. All of them are performed for one purpose - to eliminate irregularities.
Attention! Whitewashing the ceiling is considered a long-outdated method, since it requires serious labor costs. Although the low cost of such technology captivates many people when carrying out budget repairs.
- Painting.
Painting is also a simple finishing option. In both cases, the ceiling is first plastered, puttyed and sanded. You will have to apply several coats of putty consisting of a starting and finishing mixture.
Attention! A painted ceiling implies attention special attention during preparatory work. The paint focuses attention on all surface differences and irregularities. For this reason, it is recommended to hide defects and imperfections in the ceiling in advance.
If we consider the benefits of painting, it saves space, especially when the ceiling is quite low. At the same time, you have the opportunity to save money, because, unlike other technologies, it will be cheaper.
- Decorative plaster.
This method of ceiling treatment has its own advantages, in contrast to those listed above. The base of the ceiling does not need to be thoroughly puttied. Thanks to decorative plaster, you can hide surface imperfections. As a result, with minimal physical effort you can create an aesthetically attractive ceiling.
It is worth noting that the process of preparing decorative plaster for application is very simple. First you need to apply to the surface decorative mixture. Then, using a grater, spatula, sponge or other tool, make waves, lines, streaks, grooves and other relief that you like. With this decoration you have the opportunity to show your imagination, since there are no templates in this regard. Once the decorative plaster is completely dry, all that remains is to paint it. Moreover, this can be done in two colors.
- Wallpaper.
Traditional ceiling technology in the hallway is wallpaper. Depending on their cost, repairs can be economical or expensive.
If you often change your environment, then you will probably be interested in paintable wallpaper. This option will be the most practical among those described above. The cheapest wallpapers will be paper based, but they are not so durable and attractive.
- Expanded polystyrene boards.
With this design, slabs of 500x500 mm are used. Among budget ceiling finishing options, this technology is the most common and popular. To glue them, no special preparation of the ceiling is required. In addition, all the work can be done with your own hands.
Attention! Thanks to high density It is not necessary to putty the surface of the material - just remove the previous coating and thoroughly clean it of all kinds of contaminants.
The gluing of polystyrene foam boards itself is quite simple. You need to apply special glue to the product and press the slab to the ceiling. In just a few hours, the ceiling in the hallway will be completely transformed.
Do-it-yourself corridor ceiling repair: photos and features of the room
Hallway lighting should be as close to shadowless as possible, in addition to any specific individual wishes. Otherwise, subsequent efforts to organize the space are simply nullified, and the cramped room will seem even smaller. The surfaces of a small hallway should be created by texture and tone, and not by the play of chiaroscuro, since there will not be enough space for it anyway. That is, the ceiling should act as a source of diffused light and seem to dissolve in it. Based on this, it is worth starting from the design of the ceiling.
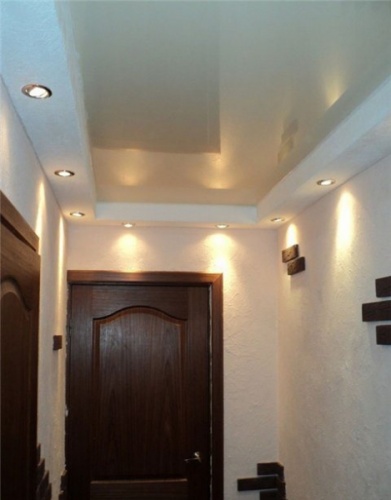
In compartment hallways, a suspended or mirrored ceiling made of a shiny film would be more appropriate, provided that the color is maintained correctly. For low ceilings, shiny tension ceiling will do and in a “box,” but for a narrow winding corridor or “hole” this option should not be considered: a person in such a room will see himself either in a glacial crevasse, or at the bottom of a well.Optimal in terms of costs, labor, created effect and subsequent design options - a two- or multi-level plasterboard ceiling. When installing it, give preference to curved surfaces: an association with clouds arises and the hallway seems to expand. Moreover, a two-level ceiling allows you to place a minimum number of lamps (which consume electricity and cost a lot of money) to obtain the desired lighting effect.
How can you achieve shadowless light? When performing repairs on your own with minimal costs and budget, you can use the following most effective methods:
- for a perfectly flat ceiling - linear fluorescent lamps under the ceiling, behind the eaves or open. For a “box”, several 13-16 watt lamps on opposite walls are enough; in total - 50-60 watts;
- for a plasterboard ceiling - an oval niche with lamps shining crosswise on the walls at a slight angle relative to the ceiling surface.
Attention! A common option for lighting a corridor is sconces shining on the ceiling, which are quite expensive (decorative lamps require quite a lot of power), insufficient re-reflection of light from the ceiling, and deep intersecting shadows below, so additional light will be needed to expand the hallway.
Do-it-yourself ceiling repair in the hallway: mounting a chandelier on a suspended ceiling
A chandelier is an integral element in the corridor. What should the lighting be like so that it hides minor defects rooms? There are several effective options:
- built-in lamps - they are mounted directly into the walls, thereby creating an illumination effect, and they are used as a supplement to the main lighting, but in small corridors they can be used as the main source of light;
Attention! When choosing a chandelier model, you should pay attention to those in which the lamps are located inside the shade. This arrangement will help avoid the appearance of dark spots on the ceiling.
Mounting a chandelier to the ceiling can be done in two ways:
- ceiling hook is the most reliable. The hook is securely mounted in concrete wall. It is better to install it before repair. If it is completed, then you can use anchor hooks. Upon completion of installation, the “glass” of the chandelier itself is sealed into the ceiling fabric without gaps.

Repairing the ceiling in the hallway with your own hands is not technically difficult, but it requires developing a design and choosing suitable finishing materials.
The peculiarity of the renovation of the corridor and hallway is that if work is carried out in the entire apartment, it is completed at this stage. Until the completion of repair work in other rooms, there is simply no point in dealing with the hallway and corridor - garbage is taken out through them and Construction Materials. The materials that will be used to decorate the hallway and corridor must not only have an attractive appearance and color scheme do not discord with the interior of the apartment. It is necessary that they are wear-resistant and practical for further use. This rule applies primarily to the floor and walls, but also applies to the materials from which the ceiling will be constructed.
Features and methods of repairing the ceiling in the hallway
Before you start renovating your hallway, you should think carefully about all the details. In most cases, the hallways and corridors in our apartments are not pleasing in size, and a mistake in choosing a finishing option will visually make a narrow and long room even smaller.
It is customary to call the hallway the place where the apartment and the street “meet”. And in order for it to be exactly a part of the apartment, and a cozy part, it is necessary not only to small area place storage areas for shoes and outerwear, but also provide optimal lighting for the hallway. Moreover, with the help of properly selected lighting, try to visually expand its area.
On reinforced concrete floor You cannot install built-in lamps; this will require a suspended structure. A few ceiling chandeliers They will look strange in a small hallway.
Important! “Flat” ceiling options (painting, wallpaper, tiles, decorative plaster) will reduce the ability to achieve optimal lighting in the hallway, while suspended structures will expand these possibilities.
Typically, to finish the ceiling in the hallway they use:
Painting. You can choose high-quality and affordable paint without any problems, but before painting the surface must be leveled, plastered and primed. On uneven ceiling the paint will “stick out” all surface defects.
PVC plates. Cheap, fast and proven finishing method.

Ceiling installation with mirror tiles. These can be polystyrene tiles coated with a mirror film that gives a blurred image, or traditional mirror ones. They are attached with special glue or screws. It should be remembered that a mirror ceiling is a unique, even extravagant finishing option, and it must be used carefully. So as not to turn the hallway and corridor into a kind of “laughing room”. This finishing method is very suitable for small children. dark rooms where the light needs to be amplified. Reflected in mirror tiles, the light from even one lighting fixture will illuminate the hallway well.

Wallpapering. Paintable glass wallpaper or thick wallpaper (vinyl, non-woven) are perfect for such repairs. Some may say that this is an outdated way of finishing the ceiling. But fashion in clothing tends to return after 25-30 years, the same thing happens in repair work. After all, the new is nothing more than the well-forgotten old. Finishing materials have only become better quality.

Decorative plaster. This technique will help hide all surface defects and will not require significant funds from you to achieve an excellent result.
(cassette and rack and pinion). They have wonderful performance characteristics, attractive appearance. The problem is that most people associate such structures with office or industrial premises, and slatted ceilings with bathrooms.
Suspended plasterboard structures. A universal method that eliminates the need for pre-plaster ceiling surfaces. It is important that there are no leaks. The “limiter” will be the height in your apartment, because such a suspended structure will “eat” about 100 mm. Agree, at a height of 2.20-2.30 m, such a loss will be quite noticeable.
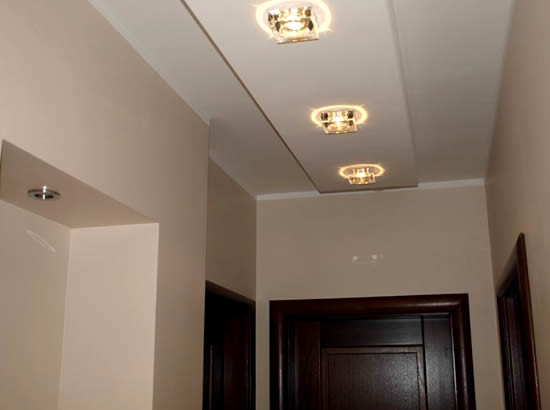
A very popular, although quite expensive, method. Beautiful appearance, reliability, practicality, durability - that’s it positive sides. Optimal for rooms with a large number of corners and irregular shapes.


Installation of plasterboard suspended structure
A very popular method of installing a ceiling. It combines beautiful appearance and practicality, allows you to hide uneven surfaces of a reinforced concrete floor slab without the need to level and plaster it, carry out any communications and organize multi-point lighting. In very small hallways it is hardly advisable to install a multi-level plasterboard ceiling (you can limit yourself to a simple single-level one for organizing combined lighting), but for rooms larger area it will be the optimal solution.
Important! In no large hallways It is advisable to use a two-level design with simple geometric shapes. This design will not seem pretentious, and will make it possible to arrange hidden lighting along the contour, which will visually “raise” the ceiling. Installation of rotating built-in lamps will allow you to create a light accent on the desired areas of the hallway or interior items.
When choosing a color, you can move away from traditional white and use others light colors. But don’t get carried away; you shouldn’t paint the structure in more than three colors. Glossy colors will “work” to increase the volume of the room, and it is advisable to use them for painting the ceiling in small hallways. Matte ones will create an atmosphere of comfort, so they are perfect for plasterboard structures in large hallways. The combination of hanging plasterboard construction, painted matte paint, with a glossy stretch ceiling.
A suspended ceiling made of plasterboard will last a long time and can be easily updated by painting. The construction materials are environmentally friendly. Only gypsum is not friendly with water and will not tolerate a leak. Even moisture resistant drywall will suffer from the leak.


Stretch ceiling
This method of finishing, in addition to decorating the ceiling surface, also solves whole line practical problems. No surface preparation is required; it is only important that there are no significant leaks. And existing defects and unevenness of the ceiling will be reliably hidden. “This painting is very useful - it blocks the hole in the wallpaper.” It’s difficult to formulate better than what the mother of the boy nicknamed “Uncle Fedor” said.
Another task that can be successfully solved with the help of a stretch ceiling is the organization of optimal lighting in the hallway, a room without natural light and small area. Using lighting systems in a suspended ceiling, you can provide comfortable lighting that will make the hallway cozy. Adjustable lighting brightness and emphasizing certain areas will make the interior design of the hallway original.
In rooms with irregular geometry, the use of suspended ceilings will make the visual perception of such a hallway better, because a person’s attention will be drawn to the attractive ceiling, and not to the angularity of the room.
Important! The moisture resistance and wear resistance of suspended ceilings will save you from problems with leaks from your neighbors, and will protect furniture and repairs made in the hallway.
Types of suspended ceilings
Stretch ceilings vary in surface type (matte, satin, glossy), color (plain color, with a printed pattern) and the material from which they are made.
Stretch ceilings made from PVC film are the most popular due to their versatility and affordability. The welds that are made on such structures (the width of the fabric is usually 1.3-2.0 meters) are practically invisible. Manufacturers produce many options for shades of canvas, so choosing the one you need won’t be a problem. And one more important advantage of such structures made of PVC film is that even a significant leak will not harm it. The film sags under the weight of water, and after release through a special valve it restores its shape without consequences for appearance. Such suspended ceilings are installed using heat guns.


