When making repairs in your own house, it is often about the ceiling, because it creates an overall picture of the entire interior of the apartment. Emphasizes overall design or hides flaws. The floating ceiling with light stripes always makes the room attractive, light and spacious. When creating a "floating" ceiling above your head, you should familiarize yourself with the installation technique, as well as choose the backlight, which creates the "floating effect".
Characteristics of a floating ceiling
 Dedicated box for LED strip
 In the center of the ceiling, it is usually hung as the main lighting. Only in a single-level ceiling, the chandelier should not be bulky. Large, beautiful chandeliers are hung in tall, tiered rooms. But, in general, when creating a "hover", there are no lighting fixtures in the center of the room.
Sketch to create a ceiling with a light line
The first thing to do is sketch the ceiling. You need to know exactly how many levels there will be, what kind of backlighting will be used? By choosing light strips on the ceiling, you get one or 2 levels. If a second level is provided, then it will be an order of magnitude less than the first, for example, a floating square in the center.
For a single-level ceiling, it is drawn on paper. But, with a niche for lighting. All dimensions, points of intersection of profiles, and also places of fasteners are marked on the created drawing. Plasterboard sheets are drawn without fail. The joints of the sheets are of great importance, since at this point there should be a transverse strip from the profile. All dimensions are indicated in the unit of measurement - millimeters.
 Drywall ceiling drawing
 Attention. By specifying the unit - centimeters, you can get lost in the calculations, which threatens with incorrect installation of the metal frame.
Separately, a plan is drawn up for the wiring. The locations of the wires for connecting the LED strip, sockets, switches are specified in advance. And also indicates the connection of the wiring to the junction box.
 Wiring diagram for connecting LED strip
 Preparation matters
The work carried out before the installation of the metal frame will indicate the strength of the entire structure. Preparatory work includes the following processes:
- The room where a floating ceiling with light lines made of plasterboard is created is freed from objects that interfere with work (furniture, curtains, chandeliers).
- If cracks are found, it is required to carry out reinforcement and puttying.
- The entire surface of the ceiling is covered.
 Ceiling preparation and installation of the guide profile
 Unfilled cracks in the ceiling can further negatively affect the plasterboard structure. If the ceiling is not covered with a primer, and the house (apartment on the top floor) is cold, fungus will appear, which will also adversely affect the suspended plasterboard structure.
Drawing on a rough ceiling
For a lesson on drawing lines for metal profiles, you will need tools:
- Laser level. An ordinary building one is also needed, but building straight lines on the ceiling will be difficult.
- Pencil or crayon. It's good if you have a chopping line. With its help, it is easiest to leave straight lines for the frame on the plane of the walls and ceiling.
- Meter or tape measure.
 Floating ceiling marking tools
 Initially, you need to measure the height of all corners in the room. When the lowest point is found, a mark is made. From the rough ceiling, an indentation is made downward by at least 8 cm. In the same corner on the ceiling, the same point is marked with an indent of 8 cm. What does this mean? Lines are drawn along these points through the entire room along the perimeter. A marking is created for a niche for floating lines. The wider the niche, the larger the line. This is where the room size rule comes into play. In a room with a small square on the ceiling, wide light stripes are irrelevant.
 Drawing of a soaring ceiling in 1 level
 On the ceiling, stripes for the ceiling profile are drawn in 60 cm increments. On these strips, the attachment points for the suspensions are set - every 50 cm. Perpendicular to the lines on the ceiling, the attachment points for the transverse ones for fastening drywall are marked. They have the same pitch - 60 cm. The cells should be 60x60.
The markings for the floating plasterboard ceiling are ready.
Installation of a plasterboard floating ceiling with light lines
Creating a floating ceiling with light lines takes care, time to verify the accuracy of the work. All work is divided into stages of forming the ceiling structure. The first is the production of a metal frame. Its features: the correct choice of fasteners, checking the accuracy of the created plane, strength, rigidity.
 Creating a skeleton base for a floating ceiling
 The second stage is. There are rules here, the omission of which will lead to early deformation and cracks in the ceiling. The third stage is the installation of floating lines in the ceiling. The effect of a floating ceiling depends on the correct backlighting, as well as the accuracy of its installation.
 Floating line on the plasterboard ceiling
 The fourth stage is priming, puttying. At this stage, the main thing is the quality of the material and the correctness of the work performed.
 Reinforcement of corners and joints
 The final stage, completing the whole process, is the finishing of the ceiling. This can be painting, pasting with plain wallpaper, decorative finishing.
 Finishing the floating ceiling
 Fastening profiles for a metal frame of a soaring ceiling
It is the basis for the soaring stream. The correctness of its implementation is reflected in the entire ceiling with LED strips. When creating a frame base, factors such as the shrinkage of a new building, the age of the house (especially old private houses), the percentage of humidity, and the temperature regime are taken into account. If a soaring ceiling with an LED strip is created in a warm apartment, and the apartment building is stable, then the transverse ones in the frame are installed only at the joints of the gypsum board. But, if the building is unstable and subject to many external factors, then the frame base must be solid, strong. For reinforcement, the transverse ones are installed with a certain pitch.
So, the creation of a metal lathing begins with the installation of guide profiles. Designations: PNP - ceiling guide profile or UD - European marking.
 Fixing the profile to the ceiling
 The ceiling profile is fixed with dowel-nails 6/40 to the ceiling along the extreme line. The fixing step is as follows: retreat 15 cm from the edge. After every 25 cm. The last dowel is also fixed from the edge of the profile by 15 cm. The PNP is attached along the entire quadrangle on the ceiling.
Next, you need cut pieces from the PP ceiling profile (aka CD). The length of such a segment is equal to the distance of the drawn line from the ceiling along the wall (100 mm). The uprights are attached with small screws to the guide rail on the ceiling. The step of fastening the racks is 30 cm. They create rigidity and strength of the structure.
Another guide profile is fixed to the posts into which the ceiling profiles will be inserted. Straight hangers are attached to the wedge anchor along the entire ceiling at the marked points. Fasteners are inserted into the "ears" of the hangers and hammered in with a hammer. To maintain evenness and form a single plane, a thread is pulled across the entire surface. Guided by this thread, as well as with the help of a level, ceiling profiles are inserted into the guides and attached to the suspensions.
 The ceiling profile is inserted into the guide
  Schematic representation of creating a frame base for a ceiling
 Jumpers are created from PP. They are attached to the ceiling profile with crabs. For rigidity, crabs are fastened not only with clasps, but also with self-tapping screws.
 Using crabs
 At the end, the entire metal lathing is checked for rigidity, strength and evenness. This is important because an uneven and flimsy frame will not create a floating structure.
 Finished metal structure
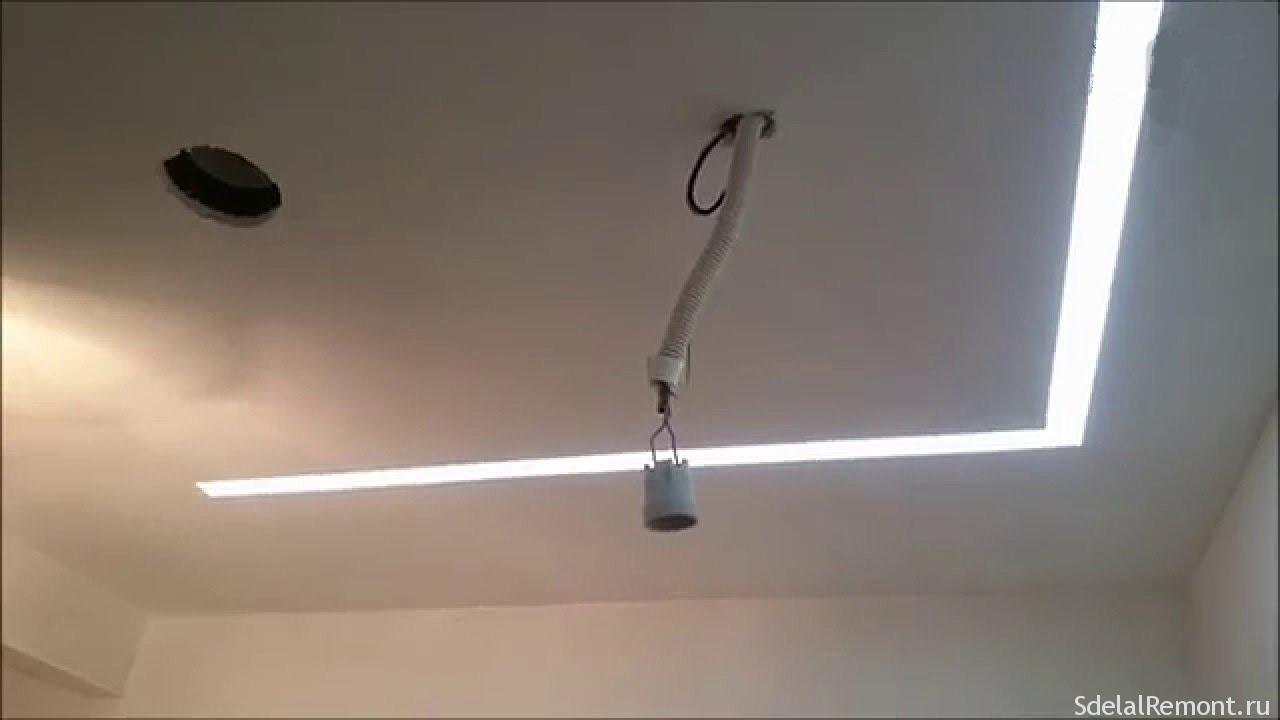
 Attention. The conduction of wires among metal profiles occurs only in a corrugated sleeve, otherwise a short circuit will occur when a live wire comes into contact with a metal. At the point where the lighting fixture is connected to the wiring, the cable threads are set at 20 cm and insulated.
Sheathing of a metal base with plasterboard sheets
First, you should cut the height of the ceiling structure from the drywall. These sections are attached to the outside of the metal lathing. For this, self-tapping screws with a size of 3.5 * 25 mm are applicable.
 Sheathing a niche for an LED strip with gypsum plasterboard
 After fixing the vertical sections of the gypsum board, the entire ceiling is sheathed with plasterboard sheets. Here you should read the rules:
- The gypsum plasterboard is fixed only to the profile. There should be no sagging corners.
- The self-tapping screw is fixed with a step of 15 cm and from the edge of the sheet 1 cm.
- Plasterboard joints should not be aligned horizontally. The staggered order of the sheathing creates the strength of the entire structure.
- The self-tapping screw's head should not stick out above the surface, but also the screw should not be screwed in too deeply, as this will damage the surface of the sheet.
When sheathing plasterboard metal lathing, you should check the surface again using a level, rule. There should be no drops at the junction of the GK sheets.
Making a niche for a light line around the perimeter of the created ceiling with your own hands
Since, a niche is obtained from a rough base of the ceiling and wall. The LED strips for the ceiling are created in this method without a profile holder, which is produced specifically for this lighting. You will need a profile for an LED strip, plastic corners of the minimum size, plexiglass.
 Niche for LED lighting
 To level the surface of the niche, cover the entire interior with a primer mixture, and after drying, apply an even layer of putty and leave to dry. The dry surface is sanded with sandpaper.
According to the craftsmen, insulating material should be laid in the niche. It can be foil or other foil-clad material. It is attached with PVA. It is created for light reflection and isolation.
In the center, a profile for the LED strip is attached to the ceiling. Since the tape heats up, the profile, according to experts, should not be fastened to the very end of the niche. 3-5 mm is left. The choice of LED strip is individual. There are many types of diode strip: different number of diodes per 1 meter, color, manufacturer.
 Profile designed for LED strip
 Fixing the LED strip and installing glass
In a ceiling with floating lines, the LED strip is connected to a dimmer for correct operation. Consider this when preparing to mount the tape. The LEDs are placed on a special sheet with a sticky layer on the back. This layer should be used to secure the tape to the profile. To connect to a dimmer, controller, as well as to connect a tape, you need to familiarize yourself with the installation and operation rules.
 LED strip connection diagram
 After connecting the lighting element, the mains voltage is switched on and the correct installation is checked.
The next step is to fix the plexiglass. To do this, you need to act according to the plan:

The design is collapsible. If repair or installation of additional illumination of the light strips is required, then one side rises, the glass is wound up and screwed back.
 Light strip on the ceiling in a niche
 The gaps left at the bottom at the junction of plastic and drywall are sealed with putty or acrylic sealant.
Installation of LED strip and ceiling decoration
The LED strip is glued to the profile installed in the niche. Then it is connected to the wiring, dimmer, according to the tape installation scheme.
Attention. Do not glue the tape to the very end of the niche. As it heats up, expansion takes place. At the ends of the niche, a gap of at least 5 mm is left.
When the LED strip is installed, it should be checked for correct connection. For this, a switch is used, as well as a control panel.
The entire surface of the plasterboard ceiling is covered with a primer. At the joints of the gypsum board, the primer mixture is applied with a brush. All seams are covered with reinforced tape and Knauf Fugen putty. All fasteners are covered with the same mixture.
Light stripes in the ceiling are a design idea of unusual ceiling lighting that makes the whole room bright, well-groomed, and unusual.
Ceiling design today is one of the most convenient and affordable options to radically change the interior appearance of the room. Walls and floors perform more technological functions, while the emphasis is placed on ceilings in two directions at once. Due to the combination of finishing materials and new technologies, it has become possible to create suspended structures of stunning beauty and originality, which are distinguished by high manufacturability. Double ceilings are becoming a frequent occurrence in the field of apartment design, especially when it comes to the desire to create a unique and original interior inside the living space.
Two-level ceilings made of backlit plasterboard sheets are a great option to transform a room. In addition, by creating several levels, you can successfully emphasize the zoning inside the room, individual elements of house structures. In each case, two-level ceiling surfaces solve a number of problems, thanks to which apartment design has reached a completely new level. Let's take a closer look at how to make a two-level ceiling on our own and what you need to pay attention to, first of all, during work.
Purpose of multilevel ceilings. Design features
The use of drywall in finishing works has opened up ample opportunities for interior improvement and design optimization. Thanks to the technological capabilities of the gypsum board, this consumable has become actively used for working with ceilings, performing two functions at once - technological and aesthetic. With technological functions, the situation is less clear. Plasterboard allows you to quickly align a curved base surface, hide imperfections and defects on the floors. When constructing single-level ceiling suspended structures, the problem with communications is also solved. All cables and ventilation are successfully hidden in the space between the ceiling, leaving the ceiling surface flat and smooth.

A multi-level plasterboard ceiling with backlighting is a completely different approach to solving problems of ceiling design. The smooth and flat surface of the main ceiling is complemented by steps and other elements in which lighting equipment can be installed. Due to the step-shaped structure of the suspended type, a striking visual effect is created that improves the visual perception of the interior space. Two levels can achieve several goals at once:
- align the base ceiling;
- improve the appearance of the ceiling surface in terms of aesthetics;
- fill the interior of the room with new details;
- to create technical possibilities for the equipment of hidden and decorative lighting.
On a note: for premises of a large area, 2-level ceilings will be quite appropriate. For large interior spaces and a huge ceiling part, multi-level complex ceiling structures look good, where, along with the illumination, there are original fragments and elements of the ceiling decor.
It should be noted right away that for apartments of a small area with standard ceilings, suspension systems of two or more levels are not acceptable. The average height of a single-level ceiling is 7-10 cm, while the thickness of a multi-level structure is often more than 20 cm. This depth of the suspension system is critical for rooms where the ceiling height is only 240-250 cm.

Calculations and drawing up a drawing of a multi-level ceiling structure
In order to build with your own hands a beautiful and original multi-level plasterboard ceiling, besides with backlight, it will take more time and appropriate preparation. It is best to start in this situation with calculations and drawing up a drawing. Having at hand a sketch with the dimensions of each area, indicating the required number of profiles, hangers and fasteners, it is always easier to work.
Leveling the ceiling horizontally using drywall is not a difficult task. Another thing is to build the next levels correctly and correctly arrange the lamps. Backlighting in this case is a key element of the entire suspended structure, so it will be best when you have both a drawing and a lighting scheme in your hands. Thanks to the drawing, it will become easier to mount complex radii in the future, to correctly lay curved elements and volumetric figures in the upper part of the room. The proposed scheme clearly shows how a suspended multi-level ceiling, equipped with hidden LED lighting, should look like.

Thanks to the drawing, you get a complete picture of how the zoning of the internal space will be carried out with the help of the suspension system. On the sketch, you can always pre-calculate how much the ceiling will be lowered, and where in the room steps or ledges should be made. In addition, a preliminary calculation will allow you to save money when buying consumables and accessories. Profile trims and excess drywall may no longer be useful, so it is best to rely on the exact amount of parts and material in your work.
Important! Having no experience in carrying out such work, it is best to limit yourself to the construction of a simpler structure. The minimum difference between two or more planes from each other in height is the thickness of the gypsum board. As a rule, this is 8-10cm - the average thickness of the sheets used for ceiling works.
The drawing should indicate the optimal height of all vertical elements of the suspended structure. It corresponds to the width of the guides and longitudinal profiles - 50-60mm. The maximum height of a multi-level ceiling can be up to 20 cm, no more. The proposed drawing shows the approximate dimensions for a two-level plasterboard ceiling of medium complexity.

When drawing up the drawing, all reference points should be made from the corner of the room, where the lowest location of the base ceiling surface is. In the drawing, this place is marked in a different color, then starting from the calculations from this height value.
When creating a drawing, we can conclude that it is not so difficult to build a suspended ceiling in two or three levels. The only condition is that all the work will take more time.
Step-by-step implementation of work on the equipment of multi-tiered suspended ceilings
You can choose a simpler installation option, focusing on the two levels of the new ceiling. However, if you have sufficient experience and assistants, you can not limit the flight of design ideas. It is enough to understand the device of a two-level ceiling with illumination, its design and how the sheets of plasterboard are laid.
What tools and consumables will be required for work
For work, you will need ordinary drywall with a thickness of 8-9 mm. For the kitchen and dining room, where there is a high probability of high levels of humidity, you can use moisture resistant gypsum board. As consumables for the construction of a multi-level ceiling surface, you will need: aluminum or galvanized profiles of two types, ceiling C-shaped and guides - U-shaped. Jumpers for assembling the frame are crabs. Spring hangers are used to fasten the frame.
On a note: spring hangers were not chosen by chance. Damping compensates for suspension system movements and additional dynamic loading.
Dowels are used to mount suspensions in concrete, anchors are used to install suspensions in the first level, assembled from drywall. Plasterboard sheets are attached to the guides with self-tapping screws.
As for the finishing, here you will additionally need putty, fugenfüller, serpyaka, damper tape.
The following tools will help you make a two-level ceiling:
- screwdriver;
- hammer drill or hammer drill;
- grinder or hacksaw for metal;
- assembly knife;
- roulette and level.
Of the decorative elements, internal spotlights or LED strip will be required to complete the work.
On a note: for decorative lighting or to create the main sources of artificial lighting, halogen or LED lamps should be used. These lighting fixtures do not have the intense heat that is common with conventional incandescent lamps.

Preparatory work
Before proceeding with the installation of the frame, it is necessary to equip electrical wiring, other communication lines and ventilation. For better convenience, it is immediately necessary to indicate the location of the junction box, indicate the installation locations of the first level lamps. The surface of the concrete floor is cleaned of debris and dust, the old plaster is removed if it is in an unsatisfactory condition. A two-level ceiling is already a heavy structure in itself, so if old plaster is poured onto the drywall from the back side, it may happen that the suspended structure cannot withstand the excess weight and collapse.

In addition to the ceiling, walls also require preparation. The upper edges of the walls half a meter from the ceiling surface are leveled. You should start work on ceilings only after finishing finishing work on other parts of the room. At this stage, it is important to make the final decision on what the first level will be - concrete or sheathed with plasterboard.
Installation of multi-level ceilings
The work begins in the same way when it comes to the construction of a two-level ceiling, assembled from plasterboard, without lamps or with a diode suspension. All subsequent work can be conditionally divided into the following stages:
- ceiling marking;
- installation of guides and longitudinal profiles of the first level;
- plasterboard sheathing of the first level structure;
- installation of the frame for the next levels;
- sheathing of structures with plasterboard decorative elements;
- finishing works on finishing ceilings;
- installation of lighting equipment or LED strip.

The first level is done similarly to the technology of laying single-level ceiling structures. First, the guide and longitudinal profiles go into operation, which are attached to the suspensions fixed on the concrete floor. Further, already on the prepared frame, cut pieces of gypsum board are attached.
A two-level backlit plasterboard ceiling is the easiest option. Experience in conducting such work will appear, you can proceed to the installation and installation of more complex structures with three levels and additional volumetric figures.

The second level is mounted according to the principle of the first. The lowest point of the first level is the starting point for the subsequent marking and installation of profiles of the second level. On the walls, a mark is made at the height desired, taking into account the width of the next tier. The hangers are placed on the finished first level using anchors. To obtain the steps, an angular profile is used, in which the drywall elements cut to size are placed. To install the curly part, a template is made, with the help of which the location of the curly part is marked on the finished first level. The subsequent installation of straight and curved profiles allows you to achieve almost any shape of the second level ceiling. Plasterboard cladding is done in the same way as in the previous version, starting the laying of sheets from the corner or fixing the figured part. Ceilings with diode lighting are a little simpler in their structure and design.
Conclusion
In conclusion, it should be said that the creation of multi-level ceilings is not much more difficult than the device of one-level ceilings. A double ceiling made of plasterboard with diode lighting can be made quite quickly. Observing the geometry and correctness of the lines, this design is not very difficult. Typically, ceilings with diode lighting are rectangular ceiling surfaces, where the second level serves purely for decorative purposes to improve the interior of the room. Let's summarize:
- Tiered ceilings are suitable for large and spacious rooms
- The main task of multi-level ceilings is to increase the aesthetic properties of the room.
- Technologically 2-level ceilings allow you to create decorative lighting
- Spotlights and LED lighting are the main decorative elements of multi-level ceiling surfaces.
- Do not overweight the structure
The creation of a beautiful, cozy interior is probably the desire of every person who is concerned about the renovation of his house or apartment. Among the important stages of improving the premises, of course, it is necessary to highlight the creation of the ceiling.
Today there are various options for ceilings: from stretch to multi-level. Of course, each of them has its own advantages, but backlit plasterboard ceilings can become a real decoration of the interior. What is their advantage.
Benefits of illuminated ceilings
- Backlit drywall has one undoubted advantage - this combination allows, with a moderate combination of beauty and functionality, to stylishly and tastefully equip your own home.
- Drywall is a fairly simple material to install and use. If you have some skills in electricity, then there will be no problems with creating ceilings with any lighting.
- The ceiling will be flat, since the sheet has a smooth and even surface.
- Drywall is an environmentally friendly product - it does not emit toxins.
- Drywall is fireproof.

Design features
Despite the external showiness and complexity, it will not be difficult to create such ceilings. Even in the absence of the necessary skills in working with electrical appliances, you can use simple recommendations that will allow you to quite successfully mount the backlight into your plasterboard ceiling.

According to the design and location of the luminaires, such ceilings can be divided into main groups:
- with open backlight;
- with hidden backlight.

Open backlit ceilings
The first group of ceilings assumes that the luminaires must be built into the ceiling using specially created holes in the plasterboard ceiling, or a simple suspension to it is carried out.

Keep in mind! For plasterboard ceilings, the weight of the pendant lights should not exceed 10 kg. This recommendation is caused by the low bearing capacity of the sheathing and the frame of this ceiling.

Ceilings with hidden lighting
In the second case, the luminaires must be placed in specially equipped niches, which are located between two levels of the ceiling. As a result, the light from the lamps does not spread directly into the room, but goes to the ceiling and is reflected from it, creating a unique atmosphere in the room.

Thanks to such lighting in the room, coziness is formed, emphasized, and your home takes on a sophisticated look.

When creating a backlit plasterboard ceiling, first of all, you should decide on the backlight option and the shape of the ceiling. For small rooms, it is advisable to use a single-level design, since the multi-level option will significantly reduce the height of the room, which will lose 8-15 cm. If the room is large, then you can build where your design ideas will be involved.
Types of backlighting that can be implemented
When creating a backlit plasterboard ceiling, it is necessary to optimally select the lamps for the backlight. In most cases, fluorescent or LED lamps are used to create lighting for suspended ceilings, however, other options can be used.

Before starting work, you should evaluate all the advantages and disadvantages of various backlights and choose the one that suits you best.
Backlight types:
- lamps;
- LED lights;
- chandelier;
- duralight;
- neon lights.
LED lights
For lighting, LED lamps or LED strip can be used. In the case of plasterboard ceilings with side niches in several levels, the illumination in the form of a tape will look quite interesting, it will be very practical and functional.

The backlight can be made in different colors; to control the modes, you can use an RGB controller or a dimmer.
Advantages of LED backlighting:
- lack of heating of structural elements;
- low power consumption;
- ease of placement of the backlight.

Disadvantages:
- low level of room illumination;
- reworking of the wiring is required;
- a step-down transformer must be installed.
Light fixtures
This option is very common. In this, the installation of luminaires occurs pointwise. To place them, markings are made and holes of the required diameter are cut out for the lamps. Their number, as well as their location, is selected based on the purpose of the room, ceiling design, natural lighting.

Luminaire advantages:
- modern design;
- easy to install on your own.

Disadvantages:
- low light level;
- lamps that use incandescent lamps consume a significant amount of energy and also get very hot;
- rewiring required.

Classic chandelier
This option is the simplest, because you only need to choose the color, shape, number of lamps, and then use the old wiring to connect the chandelier. It is recommended to use energy saving lamps. For combination, you can use warm or cold lights.

Advantages of the chandelier:
- the simplest and fastest installation;
- high level of illumination.

Disadvantages:
- visual reduction in ceiling height;
- a significant contrast to the modern interior.
Neon lights
Thanks to the neon lights, you can create pretty smooth outlines. At the same time, you can create a unique design using a variety of color solutions, of which there are plenty.

Neon lighting can be placed in the niches of the walls, along the ceiling of the room. The installation technology in this case is akin to installing LED strips, but in this case, professional skill in performing these works may be required.

Advantages:
- a large selection of colors;
- modern design.
Disadvantages:
- complexity;
- the need for professional skills.
Duralight
A feature of this type of lighting is that tubes with incandescent lamps (duralight) are arranged in series and the failure of one light bulb will require replacing the adjacent segment. It is desirable to use modern duralight, where LEDs are used instead of incandescent bulbs. This will also reduce power consumption, increase the resource and brightness of lighting.

Duralight is often used as additional lighting.
Advantages:
- one of the cheapest options.
Disadvantages:
- low durability and reliability of duralight when using incandescent lamps.
Frame installation instructions
First of all, to create a drywall niche for hidden lighting, you need to use a metal profile.
Installation of the first level frame is carried out as follows:
- It is necessary to retreat from the ceiling about 100 mm and draw a horizontal line around the perimeter of the room. In order for the line to be even and correct, you need to use a hydro level or a laser level.
- The starting profile should be fixed to the wall along the line.
- Then you need to insert the main one into the starting profile and fix it to the ceiling additionally using suspensions (distancers). The profile is fixed at intervals of about 40 cm.
- To give the structure rigidity using crab connectors, jumpers made from the same profile are installed between the main profiles.
- With the help of crabs and hangers, profiles and lintels are connected.

At the end, the frame is sheathed with plasterboard sheets using self-tapping screws. As a result, the first basic level of the ceiling structure will be ready.

The next step will be the installation of a niche for lighting. To create a niche for hidden lighting, it is necessary to build a second level.

Second level frame
- At the first level of the ceiling, draw the border of the second.
- It is necessary to retreat 4-6 cm (under the width of the cornice), after which the starting profile should be fixed to the ceiling.
- With scissors for metal, it is necessary to cut the segments of the main profile, which will be sized. They should be fixed with self-tapping screws in the starting guide, as a result they will be assigned the role of suspensions.
- You should also fix the starting profile from the bottom side to the hangers.
- In the formed frame, you need to insert the main ceiling profiles, connecting them into a common structure.
- The necessary wires must be brought out and sheathed the frame in the same way as was done with the first.
- At the end, protruding screw caps are performed, as well as over the rest of the area. To protect the seams from cracks, you can use a fiberglass "cobweb".
12094 0 2
Installation of a two-level plasterboard ceiling with lighting: detailed instructions plus photo reports
Greetings. In this article I will talk about how to make a two-level plasterboard ceiling with backlighting. And in order for the article to be truly useful, I bring to your attention not the most difficult steps for self-installation.
By following the instructions below, you will be able to assemble the supporting frame, route the wiring to the lighting fixtures, and sheathe the entire structure with plasterboard. Before, how to assemble a multi-level plasterboard ceiling with lighting with your own hands let's decide on its design and select the necessary materials.
What and from what we will build

What should be a multi-level plasterboard ceiling? The finished structure must have the following qualities:
- Strength, reliability and durability of the structure;
- Reliability and safety of operation of the installed backlight;
- Attractive appearance of the finished structure;
- The design of the assembled ceiling should correspond to the general design concept of the room being equipped.
As materials that will ensure the strength and reliability of the structure, we will use a metal profile and a 6.5 mm thick ceiling plasterboard. For a backlight device, I recommend using an LED strip.
Why is it advisable to use thin drywall rather than sheet material with a thickness of 9 mm or more? The small thickness of the drywall was not chosen by chance, since this will reduce the weight of the suspended structure and reduce the load on the fasteners.
By the way, the large thickness of the gypsum board on the ceiling is not needed, since the covering of the floor is practically not exposed to mechanical stress, which means that the thickness of the covering is slightly more than half a centimeter - exactly what is needed.
The use of a metal profile is also no coincidence, since metal structures are more durable with less weight in comparison with a wooden lattice assembled from slats.

Finally, a few words about the choice of LED backlighting. Why should you choose this type of illumination, and not the same halogen lamps that were used not so long ago to install spot lighting?
- Firstly, the LED strip with a higher brightness of the glow consumes significantly less electricity in comparison with other light sources.
- Secondly, the LED strip practically does not heat up, thereby eliminating the possibility of fire in ceiling structures.
- Thirdly, the LED strip is an order of magnitude more compact than other light sources, and therefore it can be placed inconspicuously, that is, without compromising the design of the structure.
Assembling a ceiling with illumination from a CD-profile

I suggest that you familiarize yourself with the figure, in accordance with which the installation of a simple multi-level ceiling will be carried out.

The figure shows a side that will be attached around the perimeter of the room with an offset of 50 mm from the surface of the main ceiling. It is in this gap that it will subsequently be possible to place the LED strip, which will project the glow onto the ceiling and create the impression of a floating plane.
From materials and tools, the following will be required:
- CD-profile (according to the domestic classification - rack-mount PS) for assembling the inner and outer chord along the perimeter of the walls;
- UD-profile (according to domestic classification - PPN guide) for the manufacture of mounting jumpers;
- GKL ceiling with a thickness of 6.5 mm;
- Self-tapping screws for metal profiles;
- Dowel-nails for mounting the side along the perimeter of the walls;
- Laser level (in the absence of a laser level, we use a spirit level and a plumb line);
- Perforator with a drill in the diameter of the dowel-nails;
- Screwdriver or drill with speed control;
- Hacksaw for cutting drywall;
- Segment knife (painting);
- Metal scissors;
- Cutter for metal profiles;
- Tinted lace for level beating.
Installation instructions are as follows:

- At the initial stage, the first level of plasterboard cladding was installed over the entire floor area;
I will tell you about this stage in brief, the more detailed instructions I have given repeatedly in previous articles. For installation, a level was marked along the perimeter, a profile was mounted on the wall along the level, on which guide profiles were installed, which, in turn, were fixed to the ceiling with hangers. On the surface of the guide profiles, the gypsum board was fixed with self-tapping screws.
- We set a laser level and marked a line along the beam along which the lower level of the side will be located;

- A line was beaten off according to the markings made, with a dyed lace around the perimeter of the room;
- We made measurements of the length of the walls along the marked line and cut a CD-profile according to the measurements taken;

- The cut profile, as shown in the photo, was fixed along the marked perimeter;
- The upper and lower jumpers were cut from the UD profile, so that they were located in the cavity of the side every 30 cm;

- In accordance with the existing drawing, a side was assembled from an external and an internal one with transverse bridges;

- Installed a side along the entire perimeter of the walls;
- We mark and cut drywall strips according to the size of the installed side;
- We fasten the prepared strips from the bottom from the end and from the top of the mounted side;

After reviewing the proposed drawing, you may have noticed that the distance between the upper part of the side and the lower part of the first level of the ceiling sheathing does not exceed 50 mm. And, probably, when trimming the side, you will encounter the inconvenience of attaching a strip of drywall in this five-centimeter gap.
Since it is impossible to squeeze a screwdriver into a narrow gap, there are two possible solutions to the problem - using a screwdriver with a rotary chuck or laying the gypsum board on glue. Personally, I recommend fixing the problem strip with Liquid Nails or Baguette Glue.

- In this way, they trimmed the side around the entire perimeter, the result that turned out, you can see in the photo.
So, the assembly of the multilevel structure is finished. What to do next? And then the seams are putty, and the entire surface is brought to zero.
After that, the ceiling with the rim is painted in the required color and the LED strip is placed in the prepared gap on the double-sided tape. We will consider connecting the backlight to the network further.
We got acquainted with the first instruction. Agree, there was nothing particularly difficult in the assembly. Now I bring to your attention a less simple instruction, which I hope you can also cope with.
Installation of a multi-level structure with a rectangular niche for installing lighting

In this photo, you can see not an ordinary double ceiling, but a structure with one common level, in which a niche is made and a backlight is already hidden in this niche.
It is in the design shown in the photo that a stretch vinyl ceiling is used as a light diffuser, which is installed in a rectangular niche. However, the installation of vinyl film is not the only option, for example, you don't have to cover a niche at all, but simply position the sources and lights correctly and choose the right power, so that the light is not very saturated.
But back to our instructions. Do you think the ceiling is difficult to assemble in the photo? In fact, this is not the case, and after reading the proposed instructions, you will be convinced of this.

The figure shows the scheme according to which the ceiling assembly will be performed. The diagram shows the dimensions that were used in the manufacture of a real ceiling, which you can see in a further photo report.
While drawing the diagram, I did not try to maintain the proportions, since you will still use the dimensions that are relevant for your room. By the way, if there are any difficulties in recalculating the indicated dimensions for the dimensions of your room, write about this in the comments to the article and I will calculate the optimal dimensions for you personally.

To assemble such a ceiling, you will need the same materials and tools that I listed in the previous instructions. The assembly of a multilevel structure is performed as follows:
- At the initial stage, the location of the niche was marked on the surface of the rough ceiling;
- We connected power to each point where the fixtures were located and left the cable with a small margin for easy connection;
For fire safety reasons, we lay the power wiring in corrugated hoses.

- We installed a laser level and set marks around the perimeter of the future structure;

- On the exposed marks, the lines were beaten off with a dyed lace and the markings were obtained according to which the installation was carried out;

- Guide profiles were installed along the outlined lines, as shown in the photo;
- By the size of the level difference, and on the diagram it is 100 mm, strips of drywall were cut for installation along the inner and outer long wall of the niche;

- Along the outer perimeter, prepared strips were installed on a profile fixed to the ceiling;

- The installed drywall strips were reinforced with transverse inserts cut from the CD profile;

- In the lower part of the fixed strips, a profile strip was fixed to the transverse struts in order to provide the structure with optimal rigidity;
- Along the edge of the lower plank, a strip was cut under one level;

- Installed cross braces for horizontal sheathing of the outer perimeter, as shown in the photo;
- The transverse (short) sides of the outer perimeter were also sheathed with plasterboard strips;

- Cross-braces were installed, as was previously done on the long sides;

- As well as along the outer perimeter, along the inner perimeter, sides were installed from a profile, lintels and a strip of drywall;
- Sheathed with plasterboard the horizontal plane of the outer perimeter;

- Jumpers cut from a CD-profile were installed along the entire horizontal plane of the inner perimeter with a step of 30 cm;
- After that, the horizontal plane of the inner perimeter was sheathed, due to which a niche appeared in the integral structure, as in the diagram;

- The inner space of the niche was also sheathed with a plasterboard strip;
- At this, the assembly of the ceiling was completed and it was possible to proceed with the finishing.
So, you learned how to make a two-level plasterboard ceiling with your own hands using an available tool. Now I'll tell you how to properly connect the backlight, which should be bright, durable and safe at the same time.
Features of mounting and connecting the backlight

The basis of the safest backlight is an LED strip with an adhesive backing. There are diodes on the front side of the tape. Correctly selected and installed correctly, the tape can be used not only as decorative lighting, but also as the main lighting.
To connect the LED strip, you are trying the following materials and tools:
- LED Strip Light;
- Power Supply;
- Power cord;
- Connectors (if you need to connect several pieces of tape);
- Shaped screwdriver with straight slot;
- Scissors;
- Wire strippers (alternatively you can use a cutting knife);
- Soldering iron 25-40 watts with solder and rosin;
- RGB controller (only for connecting multi-color tape).

The tape is supplied in a plastic reel with a fixed length of 5 meters. Upon closer inspection, you will notice that the tape is divided into small 5 cm segments with a mark along which an incision can be made.
In addition to the line for making the cut, there are places for soldering on each of the segments. Thus, the tape can be cut to the size you need, plus or minus 5 cm.
Please note that the copper base of the tape is the same wires, only flat. Such a wire is designed only to feed 5 meters of tape. If, by soldering, the tape is increased more than 2 times, there is a possibility that it will fail.
There are several types of LED strips, namely one-color and multi-color, waterproof and open. Also, ribbons differ in glow intensity. For example, diodes with a brightness of 4 lumens are the best option for a backlight device. And accordingly, if the tape is installed as the main lighting, diodes with a brightness of 10-15 lumens are selected.
Installation instructions consist of the following steps:
- Remove the protective film from the inside of the tape, opening the adhesive layer;
- We apply the tape with an adhesive layer to the mounting surface and press it down with minimal pressure;
- We connect the LED strip to the power supply, that is, to a constant current source with a voltage of 12 W. The connection is made via intermediate wires using special connectors.

It must be borne in mind that the power of the power supply must correspond to the power of the tape. That is, if you are assembling one tape of two, you will need a power supply, the output of which will be powered with a total doubled power.

The connection of several fragments of the tape into one whole is performed in parallel, as in the proposed scheme.
It is very important not to reverse the polarity when connecting to the power supply. On the block, + is connected to the red terminal, the remaining terminal is a minus.

When a multicolor tape is connected, an amplifier and an RGB controller with an infrared sensor are connected between the tape and the power supply. The sensor in the controller is connected to control the color illumination from the remote control.
Output
Now you know everything about how to make a two-level plasterboard ceiling with backlighting with your own hands. This means you can draw a diagram, prepare the necessary materials and assemble the ceiling, as in one of the proposed instructions.
By the way, if questions arise during the assembly, ask them in the comments to the text. I periodically re-read your questions and give timely answers to them. In addition, I recommend watching the video in this article, I think it will be interesting for you.
Various structures are made of drywall, including ceilings. This material gives unlimited possibilities in terms of creating all kinds of surfaces, shapes, niches and false partitions. One of these original designs is a floating plasterboard ceiling with lighting. The first glance at the ceiling surface gives the impression that the ceiling is simply suspended in the air, not attached to the walls. We will talk about the advantages and disadvantages of such structures, their types and installation sequence.
Types of soaring ceilings
The soaring plasterboard ceiling with lighting in the photo looks beautiful and original. It seems that the coating is not rigidly fixed, but as if suspended above the floor. In fact, this effect is achieved due to the fact that the drywall sheet is mounted on a hidden frame so that there is a shelf around the perimeter for installing LED lighting.
It is the hidden illumination of the ceiling and the special design of the tier that create the effect of soaring. The LED strip along the perimeter of the suspension system casts light onto the upper level, giving the impression that the ceiling is not rigidly fixed.
There are several types of floating ceiling coverings:
- The easiest to manufacture single-level soaring ceilings. LED lighting is placed around the perimeter of the room in a niche behind the suspension system.
- Two-level pavements consist of a main pavement plane and a bottom tier, which can have any shape. The backlight is installed along the perimeter of the lower level.
- Multilevel systems are the most difficult to implement. There may be different options for installing the backlight and the main light sources.
Important! The floating effect of the suspended cover cannot be achieved without the use of backlighting.
Varieties of backlights
GKL ceiling lighting can be open and hidden:
- in the first case, conventional built-in lighting devices are used, which are installed in the ceiling tiers;
- hidden illumination of the plasterboard ceiling is performed in the shelf of one of the tiers, where the LED strip is placed (the strip itself is not visible, but the light from it freely falls to the upper level of the ceiling thanks to the open shelf).
The following lighting devices are used for the backlight device:
- LED Strip Light differs in a variety of colors and ease of installation. There are single-color and multi-color ribbons. The latter require additional installation of an RGB controller and the purchase of a remote control.
- Neon tubes are practically not used in residential premises, because they emit a characteristic noise during operation.
- Fiber optic filaments are economical and have an impressive service life. With their help, various effects are created on the ceiling, for example, the "starry sky".

Also, according to its functional purpose, the ceiling lighting can be used as a source of the main lighting in the room. This option is more suitable for bedrooms where you do not need to make bright light.
Zone lighting helps to divide the room into separate functional areas. It is usually installed in a lowered tier above the dining or sleeping area, bar counter, work area in the kitchen, or divides the living room into two parts.
Decorative lighting creates a certain mood in the room. It should not be very bright, it is designed to highlight certain elements on the ceiling, emphasize the outlines of tiers or create a floating effect.
Advantages and disadvantages of soaring ceilings
A plasterboard suspended ceiling has the following advantages:
- When the backlight is turned on, the room appears visually taller and more spacious.
- When installing a ceiling, you can embody a variety of design fantasies.
- By installing LED lighting, you save on energy costs.
- A soaring plasterboard ceiling with backlighting can be done with your own hands. It is important to follow the instructions exactly, have minimal construction skills.
- Such designs and special lighting create an atmosphere of comfort and warmth in the room.
- It is convenient to hide the unevenness of the base surface, protruding building structures and utilities behind the suspended ceilings.
- In addition to LED backlighting, you can install built-in lamps or use hanging lighting in suspension systems.
The disadvantages of such ceilings include some installation difficulties that beginners may have. In addition, the suspended ceiling steals the height of the room a little, so it is not suitable for low apartments. For self-installation of an LED strip, you need to have certain knowledge and skills.
Installation sequence

Before the construction of the structure, you need to make a drawing on a scale on which all the levels, the frame diagram, the installation locations of the lamps and fasteners, as well as the sections and heights of the levels will be drawn.
In principle, the base surface does not need any special preparation, since it will be hidden behind the suspended structure. But if the old ceiling covering is fragile, then it must be removed. Old paint and wallpaper are cleaned off with a spatula, whitewash is washed off, and flimsy plaster is knocked down with improvised tools.
After that, all the cracks and cracks in the ceiling are repaired. If this surface will be used as the upper tier of a two-level coating, then it is putty, polished and primed. After that, the ceiling is ready for painting and installing the frame.
Materials and tools
To make a soaring plasterboard ceiling with your own hands, stock up on the following materials:
- ceiling and guide profiles;
- ceiling plasterboard with a thickness of 9.5 mm;
- self-tapping screws for metal;
- dowels and screws;
- single-level crab connectors;
- construction tape;
- putty;
- painting net;
- dowel-nails;
- LED Strip Light;
- perforated hangers;
- corner fasteners;
- primer;
- insulating tape;
- wires.

You will also need the following tools:
- tape measure, pencil;
- construction and laser level;
- screwdriver and hammer drill;
- ladder;
- chopping cord;
- construction knife;
- spatulas;
- containers for different mixtures;
- scissors for metal;
- hammer;
- brushes and rollers.
Separately, it is worth considering the issue of choosing a lighting device. For soaring structures made of gypsum board, you can use lamps with incandescent lamps, halogen devices or LED strips. In principle, there are no restrictions on the power of the luminaires. It is important to lay the wiring in insulating ducts.
Room layout
First you need to mark the walls and ceiling of the room. Since the suspended structure will consist of two tiers, you need to determine the height of each of them.
After that, we proceed to the markup:
- Using a laser level, we measure the height of all corners in the room, find the lowest of them. From this corner downwards we measure the height of each level. We will have two points.
- Using the same laser level, we transfer the obtained points to the other corners in the room. Using a chopping line, connect all the points with horizontal lines.
- On the base ceiling, we draw lines along which we will attach the longitudinal profiles of the frame. We draw them in increments of 40 or 60 cm, which is a multiple of the width of a drywall sheet equal to 120 cm. A reinforced frame with a slat pitch of 40 cm is made for heavy structures with several levels.
- Along the lines on the ceiling, we put points in increments of 60 cm. Perforated suspensions will be attached in these places.
- On the base surface we draw the outlines of the lower tier. If you need to make a smooth line, then it is more convenient to draw it from several mating circles. We attach their radii to anchor points (corners of the room or its center).
Assembling the frame
We begin to make a plasterboard ceiling with lighting around the perimeter with the assembly of the frame.

We work in the following order:
- According to the markings on the walls of the room, we fix the guide profiles. If the lower tier is located along the walls of the room, then the NP profile for it is also attached to the walls. If it is located in the center of the room, it will be constructed after the installation of the upper level frame. We attach the profiles to dowels and self-tapping screws, which we install in increments of 30 cm.
- Next, we fix the perforated hangers on the base ceiling. To fix each supporting element, we use a pair of dowel-nails.
- Then we cut the ceiling profiles according to the dimensions of the room, insert the ends into the groove of the guide elements on the wall. In the central part of the rail, we fasten it with short self-tapping screws to the perforated hangers. Using the same self-tapping screws, we fasten the longitudinal strips to the NP profiles.
Similarly, we construct the frame of the lower level, but along the line of the difference of tiers when assembling the frame, we release longitudinal profiles to form a shelf for hidden lighting. We put on the NP rail on the open end of the PP profiles. If you need to make the curvilinear outlines of the lower level, then we cut the shelves of the NP rail with an equal step and then bend the bar.
Important! We lay the wiring for the LED strip and other lamps at the stage of assembling the supporting frame.
Fastening drywall
First, we sheathe the upper level of the ceiling. We fasten drywall sheets from the corner of the room. Each sheet should be fixed on 3 or 4 longitudinal rails of the frame. The joint of adjacent gypsum boards must be exactly in the middle of the lath.
Important! Be sure to offset the end joint of the sheets in adjacent rows so that the 4 corners of the slabs do not converge at one point.

We screw the fasteners around the perimeter of the sheet with a step of 15 cm, and from the edge we place them at a distance of no more than 2.5 cm. The self-tapping screws in the central part of the sheet can be screwed in with a step of 25 cm. We recessed the caps of the fasteners into the body of the material to a depth of 1 mm. Cut the slab if necessary. In the place of the cut, you need to make a chamfer 1/3 of the thickness of the material at 45 degrees. It is needed to facilitate the filling of seams and the laying of the reinforcing tape.
We sew the second level in the same way. But along its perimeter we make an open shelf. The end of the shelf is sheathed with a strip of gypsum sheet to a height of 3-4 cm.
If the edge of the lower tier is curved, then the GCR strip can be bent in two ways:
- make cuts on one side of the material by a third of the thickness with an equal step, then bend the strip;
- walk along the reverse side of the gypsum board with a roller with needles, moisten the surface with water, after soaking the strip bends easily.
After sheathing the entire frame, we carefully putty the seams using the serpyanka reinforcing tape. We put it in a layer of putty mortar. You also need to putty the grooves from the screws. After the putty has dried, we grind and prime the surface. If the structure is painted, then the entire ceiling made of gypsum plasterboard is putty with a finishing mixture. When it dries, we grind it again, soak it twice with a primer.
Backlight mounting
Before installation, the LED strip is cut or soldered to obtain the backlight of the desired length. You can cut the tape only using special markings in the form of a dotted line and scissors. Observe the polarity when soldering individual pieces.

After that, the prepared tape is connected by spreading it out on the floor to check its functionality. Then the LED lights are placed in a shelf on the ceiling. To do this, remove the paper strip from the adhesive coating on the back of the LED strip. The backlight is glued to the base, laid on a shelf made of gypsum board. The tape is connected to the power supply and RGB controller.
Finishing
Painting with interior paints is more often used as a finishing finish for a floating ceiling. Also, ceiling structures can be pasted over with wallpaper or self-adhesive film. Please note that light glossy surfaces reflect the light from the backlight better, make the room visually taller and more spacious.
If it is decided to use painting as a finish, then the ceiling in a room with normal humidity can be painted with water-based paint. If such structures are mounted in the kitchen or in a place with fluctuations in humidity, then it is better to choose silicone or acrylic paint.