Metal tiles stand out significantly among other roofing options. Of course: roofing a roof with metal tiles is easy, beautiful and inexpensive. Thanks to current technologies, there are many varieties of this material, which are ranked according to base material, coating, insole depth and geometry.
Designing such a roof yourself is not the most difficult thing, especially if you are armed with knowledge and tools.
Types of metal tiles
To choose the right metal tile for your roof, you need to keep in mind the pros and cons of each type.
Based on:
- steel - the most popular type, extremely resistant to external influences;
- aluminum is the lightest tile, durable, does not suffer from corrosion. However, it is more expensive than steel, and its range of colors is limited;
- copper is an excellent option for roofing, does not require a protective coating, and looks noble.

The photo shows one of the types of metal tiles, aluminum cascade
By coverage:
- polyester is the cheapest option. Such metal tiles can be matte or glossy;
- plastisol is also not the most expensive type of coating. It is a plastic film;
- pural – glossy metal tile. This coating is resistant to corrosion and is based on polyurethane;
- PVF2 is an elastic coating that is resistant to temperatures and has many shades.
By insole depth and geometry:
- Andalusia – covering with hidden fastening. The downside is the need for precise and frequent sheathing;
- banga - tiles with an impressive wave height, but a smaller installation width. Allows you to get a “3D” effect;
- country - this look is similar to natural tiles, has a sophisticated appearance (soft and even waves), easy to install and durable;
- Cascade is the most economical option for metal tiles. The installation width is sufficient, the shapes are rectilinear, which allows emphasizing the classic style of the building and its sophistication;
- Monterrey is the most common type. Very similar to real tiles, it can have symmetrical or asymmetrical steps, the profile is rounded.
Self-installation of metal roofing involves 3 stages: preparation of the structure, installation of metal tiles, installation additional elements.
Installation instructions
To work you need:
- screwdriver or screwdriver;
- hammer;
- cutting and metal scissors;
- hacksaw for metal;
- strip and markers for marking;
- jigsaw

Preparing the rafter system
- We manage the crate. The flatter the roof slope, the smaller step battens. The correct distance is necessary for accurate installation of metal roofing sheets. Impregnate the sheathing with anti-fire and rotting agents.
- If you intend to use the room under the roof, install thermal insulation.
- Install a vapor barrier from special film, observing 3 rules:
- from 150 mm between sheets of vapor barrier;
- from 200 mm of material overlap on the walls;
- fastening with slight sagging.
Laying metal tiles

Important! You cannot use a grinder to cut sheets of metal tiles. The area near the cut becomes very hot, the decorative, protective layers and zinc galvanizing simply burn out. Corrosion forms on the sheets.
Installation of other elements
- We install the ridge parts with an overlap, the amount of which is indicated in the passport. The skates are fastened with self-tapping screws through each wave of the bottom sheets.
- To equip the gutters, use the elements from the kit with metal tiles. They require special sheathing structures.
- Cornices, gable boards and chimneys, ventilation ducts, dormer windows, cables, snow guards, fences, stairs and bridges are also installed using the included materials and included instructions.
Roofing an attic roof with metal tiles
Metal tiles, while gaining popularity, have not spared mansard roofs. The reasons are the same: simple installation, aesthetic appearance and durability.

In the Foto - Vacation home attic floor covered with metal tile roofing
Peculiarities
There are 5 features on which the installation of an attic roof with metal tiles is based:
- joining of sheets should take place along the wave;
- the sheets are also joined along the rows of the sheathing boards, self-tapping screws at the joints are installed in each wave;
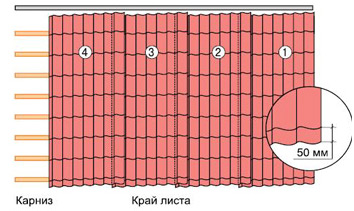
- when fastened to the eaves, the roofing sheet protrudes 5 cm beyond the edge of the eaves, between the first board of the sheathing and the edge of the eaves - no more than 25 cm;
- the ridge board of the sheathing is 1 cm thicker than others for good ventilation, fastening occurs in increments of 0.8 m to the crest of the wave;
- Installation of the roof at the ends involves end strips on self-tapping screws in increments of 0.8 m. The same applies to gutters.

Installation instructions
The set of rules for installing a mansard roof with metal tiles will depend on its type. Consider the rectangular option:
- We install the rafter system and sheathing. The pitch for the rafters is 60-90 cm, the sheathing board is 10 mm wide, 25 mm thick. We level the cornice board and hammer it in.
- Then we install the gutter hooks on the eaves strip. For better joining of all sheets, first fasten them with self-tapping screws through two rows, then completely.
- For normal fastening of 4 sheets, 2 sheets are mounted in one row, followed by a pair of another row. The seal at the joint is eliminated by leveling the capillary groove and cutting off part of the corner.
- If you have roof windows, it is better to use single-module sheets - 2 for each window.
- The metal tiles are laid from the end - the ridge is mounted on the end strips with a protrusion of 2-3 cm. We make the elements of the flat ridge overlapping, and the semicircular ones - along the profile line.
Important! Under-roof ventilation plays an important role. If mansard roof made of metal tiles - flat, it is recommended to install an aerial roller that blocks the snow from falling under the ridge. If the ridge is equipped with ventilation in the form of pinholes, a sealant must be installed.
Do-it-yourself roofing with corrugated sheets
Corrugated sheeting has high quality indicators, including its versatility as a working material, ease of installation and reconstruction, minimal waste after work and the ability to install sheets without special preparation.
Types of corrugated sheets

When choosing corrugated sheets, be guided by the letter of the marking:
- N (“bearing”) is the strongest sheet, giving the structure amazing strength and durability;
- NS (“load-bearing-wall”) – universal look, has medium sheet and corrugation sizes;
- C (“wall”) is an elegant option used in finishing walls, roofs, making fences and other things.
Installation instructions
Installation of a roof with corrugated sheets occurs in 3 stages.

Metal roofing cost
The price of a metal tile roof varies depending on the cost of the material, roofing and additional work.
A good metal tile costs around 160-700 rubles. per square.

Work without materials will cost per square:
- 500-600 rub. - roof only;
- 770-820 rub. – roofing and sheathing;
- 1000-1200 RUR – installation rafter system, lathing, roofing;
- 1500-1650 rub. – new pitched roof mansard type with attic, rafter system, insulators, sheathing, roofing.
Additional services can cost a pretty penny:
- 250-280 rub. per m. linear – snow retainers and drainage system;
- about 150 rub. per m. linear – installation of cornice and end strips;
- about 450 rub. per sq. m. – rafter system from scratch;
- over 7500 rub. - installation dormer window into the finished roof.
Video
From the video you will learn how to professionally cover a roof with metal tiles, avoiding common mistakes. Options for installing additional accessories for of this type roofs.
When purchasing one of the best roofing materials - metal tiles - do not skimp on components. It is better to purchase a complete set from one company: some companies do not provide a guarantee for their Construction Materials, if they are mounted by “foreign” components. If necessary, it is better to save on labor and install high-quality and beautiful metal tiles with your own hands.
A reliable roof, which has high-quality waterproofing and insulation along the slopes, is the dream of any dacha owner or country house. Today, such a dream is easily achievable if it is fulfilled.
Before making metal tiles with your own hands, you will need to think about the issue of removing old roof, which may lack waterproofing. In this case, everything will depend on the technology used to make the roofing cake and its condition.
List of items that will be needed to install new roof to your home:
- hacksaw for metal;
- anti-condensation films;
- waterproofing;
- galvanized nails;
- self-tapping screws;
- sealing tape.
The process of performing control measurements yourself
After the installation of the rafters is completed, you will need to re-measure the dimensions of the roof slopes. This is due to the fact that during construction any deviations could easily arise. It is worth paying attention to the rectangularity of the roof, because additional elements can hide only small defects (no more than 10 mm).

It is worth knowing that when covering a roof with metal tiles, cutting sheets should be done exclusively using a hacksaw, a hand-held power saw, or special scissors.
It is worth noting that technology that includes waterproofing can only be used if the roof slope is at least 14 degrees.
The choice of type of snow guards for the roof will depend on what material the roof is made of and how much snow falls in a particular region. The main size that will determine the length of the sheets is the length of the slope. This is the distance from the roof ridge to the eaves, which must be set taking into account the overhang of the sheet from the eaves (up to 40 mm).
In the case where the slope is longer than 7 m, the sheets will need to be divided into two or more fragments, which are overlapped (at least 150 mm). Minus long sheets, which have fewer joints, is that they are very inconvenient to work with.
It is worth knowing that when cutting sheets, you need to do it exclusively with a hacksaw, a hand-held power saw, or special scissors. All places where bare metal remains must be treated with a special paint that protects the steel from corrosion. At the same time, it is not at all recommended to use a popular grinder with an installed abrasive wheel in order to cut sheets. Its use is not justified.
How to install the sheathing yourself
The space under the roof must have good ventilation, therefore, sheathing and counter-lattice will be needed. Anti-condensation films will need to be placed between the rafters and metal sheets. The waterproofing should be laid parallel to the eaves.

For a soft roof made of rolled materials, a continuous sheathing is required.
The material should sag slightly between the rafters. A small slack in tension (1-2 cm) will be enough. Along the rafters on top of it you will need to nail small bars with a cross-section of 40x25 mm. This will be the counter-lattice, on top of which you will need to fasten the flat bars of the sheathing. The distance is equal to the wave pitch of the metal tile. The board that will go onto the cornice will need to be chosen 10-15 cm thicker than the rest.
It is worth noting that the bars for sheathing and all the rest wooden elements must be treated with an antiseptic. It is able to protect them from insects and rot.
The installation of a metal tile roof must necessarily include the use of special materials for waterproofing. There are 2 types of waterproofing, therefore, it is important not to make a mistake here. The first is intended to protect the insulation and rafters from any penetration of moisture vapor from inside the room. The second waterproofing is waterproofing films, which protect from wind, moisture and condensation. They must be installed exclusively on top of the insulation. They allow water vapor to pass through, so it does not accumulate in the insulation. The slope of the slopes prevents moisture that flows from the metal tiles from remaining on the film for a long time.
Do-it-yourself installation of the valley and cornice strips
Installation correct roof made of metal tiles requires protection not only from condensation that forms on back side metal sheets, but also from precipitation. They can pose a danger to the bottom edge of the sheathing, so a cornice strip may be needed here. It consists of a number of boards that are nailed to the sheathing, overlapping each other. In order to do the installation yourself, you should install galvanized nails in increments of no more than 30 cm.

Scheme of a valley roof.
Valleys should be used when the slopes are adjacent to each other. The lower edge of the valley should be laid on top of the completed cornice strip. It is necessary to use a porous seal to get rid of the gap between the roof covering and the bottom valley strip.
A valley overlay can give the roof structure a complete look; it must be installed after installing the sheets. It is fixed at the top of the wave, the step being 30-50 cm.
The end strip must be installed using self-tapping screws. In this case, the step between them should be no more than 40 cm. The planks themselves must be mounted overlapping (10 cm) along the length.
How to install a metal roof with your own hands
Installation of the covering should begin from the end of one of the slopes after they are completed preparatory work, which include laying anti-condensation film and installing sheathing.
If installation starts from the left end, the second sheet must be installed under the last wave of the first. When work starts from the right end of the roof, new leaf must be laid on top of the last wave of the previous one. In case there is hip roof, installation will need to start from the middle of the slope, after which the installation is carried out evenly in both directions.
Each of the sheets has a capillary groove, which is located along its edge. This groove should be covered by the edge of the next sheet. The covering sheets must be aligned along the eaves strip.

The screws used to secure the sheets must be in the deflection of the wave.
The obvious fact is that it is not difficult, but there are some nuances that you need to know about. For example, the screws used to secure the sheets must be in the deflection of the wave. It is necessary to use only those self-tapping screws that have a special sealing washer. In this case, they will need to be screwed in strictly perpendicular to the sheathing material. The average consumption of self-tapping screws is not high at all. It is up to 8 pieces per 1 sq. m.
If you screw in the screws at an angle, they will not be able to press the sealing washer tightly, therefore, a potential leak will appear in the roof.
An important issue is the movement on the roof during construction or repair work. It is worth noting that it is recommended to avoid moving on a finished roof altogether, but if all existing rules are followed, it can cause only minimal problems.
It is recommended to use shoes that have soft soles. It is allowed to step only on the deflection of the wave and only in the place where the sheathing will be located under the metal layer. Under no circumstances should you step on the crest of a wave.
DIY ridge installation to ensure good ventilation
A correctly installed ridge is the key to good, high-quality ventilation of the space under the roof.
This element must be given Special attention while installing a metal tile roof with your own hands.

The sheets of covering should not converge towards each other, and there should be enough space between their edges under the ridge strip. The skate should be fixed using self-tapping screws that are screwed into the top of every second wave. Will need to be pasted over sealing tape the edges of the sheets themselves.
If you need to make a semicircular ridge on hip roof, it would be best to use special elements such as Y-shaped overlays.
Even if the person who performs renovation work, will know that he may make a mistake when making a connection with such vertical surface, like with a pipe or wall. In such cases, the contact area will be isolated using a junction strip and a self-adhesive seal. Additional sealing can be easily created using sealant.
The lower junction strips must be installed in a groove prepared on the surface (pipe or wall). To do this, you should perform a groove, after which you will need to remove dust and wash the groove. The abutment strip is trimmed, installed and fixed using self-tapping screws.
After the work is completed, you will have an internal apron, but you will also need to organize water drainage. To do this, use a flat sheet of metal, the edges of which will form the sides.
In addition to the internal apron, you can also use an external one, which is created from the upper abutment strips. Installing it is almost the same as the internal one, with the exception of gating. The edges of the planks are simply secured to the wall.
Some difficulties may arise when working on broken roofs. Such elements can be internal and external. In the first case, an abutment strip is used, which is installed together with the seal. If we're talking about about an external break, you will need to use a cornice strip.
Do-it-yourself installation of a drainage system and snow guards
Rectangular systems should be used. The gutters need to be mounted below the edge of the roof by 2-3 cm. The lower edge of the eaves strip should cover part of the gutter, and the waterproofing film should be placed on top of it.
Snow guards are installed on the mounting plate using self-tapping screws that reach the sheathing. They screw up every second wave.
Metal tiles are one of the most popular materials used for roofing. This material is good both for its performance characteristics and ease of installation, which contributed to its popularization among owners of private houses who decided to build a roof themselves. This article will discuss how to install metal tiles with your own hands.
Selection and purchase of metal tiles
To purchase a sufficient amount of material for arranging a roof, you need to draw up a detailed plan future design– and for this you need to take measurements of the roof and display the obtained data on a sketch.
The parameters that determine the amount of metal tiles include the following:
- Roof slope length. Measurements are taken from the ridge to the outer part of the cornice, but for extreme accuracy it is worth measuring three indicators - the distance between the overhangs and along the center line of the ridge. The outer part of the wind board and the center line of the ridge are taken as reference points.
- Length of cornices and ridges. These indicators must be measured along the entire perimeter of the building, taking into account the design of the future roof.
- Length of internal corners (valleys) and external corners (ridges).
- The diagram should also show the dimensions of all ventilation shafts, dormer windows, chimneys and antennas present on the roof.
Calculation required quantity metal tiles are carried out by sellers on the basis of a previously drawn up roofing plan, so it must be painted in all details. In addition to the metal tile sheets themselves, the kit should include a full set of fasteners and accessories.
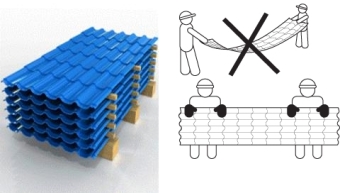
Warehousing and storage of metal tiles
Standard metal tiles are available in sheet form measured length up to 7.5 meters. To store sheets you need Smooth surface, on top of which are laid every 50 cm wooden blocks. The sheets are stacked, covered and loaded with a pair of bags filled with sand - in the event of gusty winds, they will protect the sheets from flying apart.
During installation, the metal tiles are dragged onto the roof along two guide boards. You need to hold the sheets by the sides at those points where there are waves.
Preparing roof structures - step-by-step instructions
Before installing metal tiles on the roof, you need to make sure that the installation is correct. load-bearing structures roofs. In particular, all elements of the sheathing should already be in place, and the insulation should not have any defects such as breaks or gaps. The lathing must be installed with the step specified in the documents attached to the material.
The thickness of the lathing is calculated depending on the pitch of the rafters and the level of precipitation in a given region. The latter indicator for different regions may differ significantly, so it is necessary to find suitable data. If the rafters are located at a distance of more than 90 cm from each other, or if a serious snow load is expected on the roof, then additional sheathing elements or a solid flooring should be installed near the eaves between the boards, which will allow the installation of snow guards or fencing in the future.

The first sheathing board, running immediately behind the eaves overhang, may have a different cross-section from the rest of the boards. As a rule, in project documentation there is a recommended value for the cross-section of the sheathing - you can use this value. If there is no project, then there is always the opportunity to order it from metal tile suppliers - of course, this is an additional service, so the budget allocated for the roof will have to be increased.
At the point where the ridge is installed, another board is needed to which the ridge elements will be attached. In valleys, if they are built, additional boards are also placed between the sheathing elements, increasing the strength of the structure and reducing the likelihood of damage to the metal tile sheets.
Another point that cannot be ignored when installing a metal tile roof with your own hands is the ventilation of the space under the roof. Air must be provided with unimpeded passage into this space through the eaves and exit through the ridge part, so that it passes through all areas located under the roof and ventilates the inside of the metal tile. The roof must be designed in such a way that there are no areas where air will stagnate. Lack of good ventilation often leads to structural failure due to condensation and leaks.

Manufacturers of metal tiles are aware of the need for ventilation of the structure and try to take this aspect into account. The optimal solution which will provide high-quality ventilation, are the gaps located between the sheathing boards and in the space between the counter-lattice - due to this, the blowing of the metal tiles and the waterproofing layer is ensured.
And the last thing worth paying attention to is that wooden structural elements need to be treated with compounds that increase fire resistance and resistance to biological influences. The cheapest option for a protective composition is lime milk, but the construction market offers a lot of other options - if you have a budget, you can purchase a coating with a variety of characteristics.
Required Tools
Before you perform step by step installation metal tiles, you need to stock up on the following set of tools:
- Screwdriver;
- Hammer;
- Rubber mallet;
- Soft brush;
- Fabric tape measure;
- Building level;
- Marker.

Several tools are suitable for cutting sheets, but one of them will be enough for the job:
- Manual Circular Saw(makes it easier to work with a large number of sheets);
- Electric jigsaw and a set of files with small teeth;
- Electric drill with an attachment for cutting metal;
- Metal scissors.
Standard construction tool– grinder – cannot be used for cutting metal tiles. When working with an angle grinder, deformation of the polymer coating always occurs at the cut site. In addition, heated sawdust causes the top layer of the material to burn out, making it unsuitable for further use.
Algorithm for installing metal tiles with your own hands
The instructions for installing metal tiles with your own hands boil down to the following sequence of actions:
- Gutter supports must be installed first, if they are to be installed at all. The step between supports should be 70 cm or less.
- Next, the cornice strips are attached using galvanized nails. The fastening step is about 30 cm. The planks should be installed with an overlap of about 10-15 cm. The waterproofing membrane is placed over the plank. Waterproofing must be hidden from direct sunlight.
- Further step-by-step instruction Installation of metal tiles involves the installation of the sheets themselves. You can start laying sheets from any edge of the roof. When laying, you need to take into account the location of the capillary groove: depending on it, the edge of the previously installed sheet must either be raised, or the sheets must be laid sequentially. The lowest sheet is aligned with the slope and fixed in in rough order. The overhang of sheets from the side of the eaves should be 40 mm - practice shows that this is the optimal value.
- The following sheets are installed sequentially. They need to be aligned not only relative to the cornice, but also relative to each other. The three sheets are temporarily fixed and fit tightly together, after which they can be secured. After making sure that the sheets of metal tiles are correctly positioned and the amount of overhang near the eaves is correct, you can proceed to the next steps. The temporary fastening located near the ridge can now be removed.
- Next, the sheets are attached to the sheathing using self-tapping screws with seals. Fixing the sheets together is usually done with 4.8x19 mm self-tapping screws, and the entire structure is attached to the sheathing with 4.8x25 mm self-tapping screws. When calculating the required number of self-tapping screws, you should proceed from the calculation of about 7-10 pieces per square meter roofs.
- The sheets are attached to each other at right angles, and the self-tapping screw must be directed to any place except the capillary groove. To attach the sheathing to the boards, you need to tighten the screws 15 mm below the wave, and the fastening step is two waves. Near the cornices, ridge and gables, the step of fastening the sheets is reduced to one wave. Before tightening the self-tapping screw, you need to check whether it fits into the sheathing board.
- These operations are repeated using the same algorithm over the entire surface of the roof slope. In the event that metal tiles are used non-standard sizes, they will have to be joined vertically. To do this, you need to vertically create a solid row of two elements, and lay them on top of it. next row. The overlap of individual sheets of a vertical row should be about 10 cm.
- An additional board with a thickness of 10 mm greater than the other elements is nailed near the ridge. In order for the roof ventilation to be complete, there must be a gap of at least 8 cm between the center line of the ridge and the edge of the roofing profile. The ridge itself is attached on top of the metal tiles, and its strips are fixed with self-tapping screws high points profile. The amount of overlap between the ridge strips should be more than 100 mm, and the distance between the screws can be from 30 to 80 cm.
- The pediment strip is attached with the expectation that it should cover the upper part of the wave. This plank is fastened in increments of 30-60 cm. The gable planks are installed from the eaves part towards the ridge part with an overlap of about 5-10 cm.
Installation of roof valleys and pipes
After the installation of metal tiles with your own hands is completed, all that remains is to equip internal corners roofs:
- The required number of sheathing boards is installed in the valleys (in case of large volumes of precipitation, it is worth installing a solid sheathing of boards). The distance between the boards should be 20 mm.
- A valley gutter is laid in the direction from the cornice towards the ridge. The width of the gutter should be about 50 cm from the center line of the valley, and the overlap of the sheets should be 20 cm.
- 10 cm from the center of the valley, it is necessary to mark with a marker the lines along which the adjacent sheets are subsequently cut. A special seal is attached to the gutter.
- Metal tile sheets are cut according to measurements. The trimmed metal tiles are attached to the sheathing 25 cm from the center line of the valley. If the cutting process results in uneven edges of the sheets, they should be covered with decorative elements.

To ensure passage through the roof of ventilation shafts and chimneys, it is necessary to use special aprons made of galvanized steel and coated with a polymer. These aprons are installed outside with a 15 cm overlap on the pipes. Sealants are used to join aprons.
If it is necessary to install additional accessories, they are attached directly to the sheathing, with a passage through the metal tile. All details related to the installation of accessories are usually indicated in the documentation attached to them.
Conclusion
You can assemble a metal tile roof with your own hands step by step without any problems - you just need to study in detail the technology for installing sheets and additional roofing elements, as well as perform all the necessary operations efficiently and competently.
Metal tiles are one of the popular roofing materials, which are characterized by reliability, durability and affordability. To perform coating work efficiently, you must follow the instructions below. But first, let's look at what is so remarkable about this material and what disadvantages it has.
Advantages and disadvantages of metal tiles
Among the advantages of this coating are:
- Light weight, which allows you to cover the roof without much effort;
- The work will not cause difficulties and no special training will be required; it is enough to have basic knowledge in this area;
- The service life is very long, which allows you to not think about covering for a long time;
- Affordable price and high wear resistance no less important criterion when choosing roofing material;
- Such material does not burn, but under the influence high temperature does not melt or deform;
- Huge selection and stylish appearance, will allow you to find a suitable option for everyone, without exception.
The only drawback that many buyers cite is its noise. But even this can be dealt with if you take care of sound insulation when covering.
We cover the roof with metal tiles correctly: step-by-step instructions
To do this work yourself correctly, you must follow all the rules outlined in the step-by-step instructions. So, where to start:
- Conduct necessary calculations to find out the amount of materials, not forgetting about the insulation and fasteners;
- Cover around the chimney;
- Lay the material using one of the options.
Calculation of the amount of metal tiles per roof
Typically, the width of a full sheet is greater than the working area. This difference can be from 80 to 120 mm. therefore, when purchasing material, you need to know the exact dimensions of the working coating.
To perform the calculation correctly, you need to focus on the following formula:
- The greatest length of the material is divided by its width. The resulting figure must be rounded upward.
- First you need to measure the length of the slope, while the overhang of the cornice must also be taken into account;
- The overlap is 0.15 m per row. If it is possible to lay the coating in one row, then the overlap does not need to be taken into account.
Having measured both indicators, they are added together.
If the purchased metal tiles were made to order according to certain sizes, then in order to correctly calculate all the indicators it is better to use the help of specialists.
The sizes of such material range from 70 cm to 12 meters.
But most the best option There will be a covering with dimensions of 4 - 4.5 m.
Apron equipment

Where the chimney passes through the ceiling, care should be taken to take care of the inside of the junction.
Do-it-yourself installation of the apron should be done according to the following scheme:
- The base material must match the color of the strips;
- The groove made in the pipe should be about 15 cm deep, and the slope should be slight;
- Heat-resistant insulation must be installed on the chimney pipe. The place of contact must be glued with tape;
- Where chimney passes the roof level, it is wrapped with a special film.
A decorative apron can be installed when the sheets of metal tiles are laid on the roof. External connecting strips are placed on the chimney so that they top part moved into the prepared groove. For more reliable protection, the joints are filled with heat-resistant sealant. And the lower part of the slats needs to be attached with self-tapping screws to the sheathing.
To be good ventilation between the chimney and the rafters, it is necessary that the distance between them be large.
And to protect the brick chimney from possible cracking, the pipe must be wrapped with steel with your own hands polymer coating. To ensure good ventilation, it is necessary to leave a small gap, about 20 mm.
Chimney with round must be insulated where the roof surface passes. To do this, you can take a special tape that has the ability to self-expand. It perfectly seals all holes, including the entire diameter.
Installation of metal tiles: sequence of work
To ensure that installing the roofing yourself does not cause much difficulty, you need to take care of the method of supplying the metal tiles to the roof. To do this, it is recommended to make logs.
If the roof is large or it is not possible to store all the purchased material near the house, then you can try to make a kind of rack with your own hands. All materials will need to be transferred there, and then installed. To prevent the sheets from being damaged during storage, they must be arranged with slats during moving.
As soon as the metal tile is in place, the protective film coating should be removed.
If you have to walk on laid material, you need to know how to do it correctly so as not to damage it. The first is caution. Before you step on anything, you need to carefully select a place for it. Secondly, movements should be carried out only along the sheets and step only between the waves of material.
If you need to walk across the covering, then the place where your foot will step should be a fold. Thirdly, you need to wear soft shoes when covering the roof, this will help avoid damage to the material.
If you have to cover it in rainy weather, then water may get into the joints. All moisture is squeezed up under the force of the second sheet. To completely eliminate moisture accumulation, each sheet of material contains a special groove, which helps drain unnecessary water. There are some species that have such a groove on both sides, but mostly it is on one side, on the right. When , make sure that this groove is covered by the subsequent coating.
Having laid the beginning of the row, you can continue to cover in any direction:
- right;
- left.
The direction of installation is chosen for personal reasons regarding convenience. But the beginning of installation should begin from the side on which there are no cuts or bevels. You need to cover, focusing on another roof slope or valley.
If the process begins on the left, then the sheets laid after should lie on the wave of the sheet in front of it. And the groove should be on the left side of the coating.
If the laying principle provides for a direction from the right, then the groove is overlapped using the edge of the next sheet, ending up under the wave of material. The second method of covering is much easier and simpler, since shifting of the laid material is eliminated. But it is also very easy to scratch.
Whatever method of laying this work is carried out, the initial sheets should be placed parallel to the cornice, and the length of the overhang should not be more than 50 mm.
You can cover the roof with sheets using two technologies:
- Place the material in one row;
- Perform multi-layer styling.
How to lay metal tiles in one row
This technology involves installation to the right of the edge. This means that the coating should be leveled, focusing on the ends and cornices. When the first sheet is aligned with them, it needs to be fixed in the middle, not far from the ridge. Subsequent materials are applied with slight overlap. Usually, one wave of sheet is enough for good strength. After aligning the second sheet in relation to the first, it is also fixed, but not in the middle, but together with the previous sheet. Using this method, blocks of 4 sheets are laid out. The resulting block is aligned with respect to the cornice and end and, leaving room for overhang, the entire structure is attached to the sheathing boards. Last page it needs to be fixed in the block when it is adjusted last block. In the figure below, you can take a closer look at this installation method.
Multi-row fastening method
This installation method involves covering the roof according to the following scheme:
- The roof needs to be on the right side. The initial sheet must be leveled relative to the end and cornice. Another covering element is mounted on top and attached to the first sheet, after aligning the two sheets. The next sheet must be mounted to the left of the first covering element, and also fastened to it. The fourth element should be laid on top of the third, and this continues until the end of the roof. Having completed two rows of such covering, the block is fixed on a wooden sheathing.
In the figure below you can see the described circuit.

Laying material on the ridge
Before installation begins, markings should be made on the slope and the central axis should be determined. On one sheet of metal tile you should do the same, mark the central axis. Place the surface of the slope and the sheet of material together; the latter must be secured with a self-tapping screw. Subsequent sheets should be laid on both sides of the ridge using one of the above methods.

What points you need to pay attention to
- should occur only at the point where the sheathing boards touch;
- The bottom sheet must be mounted, passing one wave over the step;
- Subsequent rows are fastened at a short distance relative to the steps;
- When attaching the material from the beginning of the end board, it is necessary to use all the waves;
- The laid material must fit tightly to the sheathing boards;
- When covering vertically, the material is secured using self-tapping screws into the recess of the waves.
Having analyzed the process with your own hands, you need to pay attention to the processing of sheets.
- It is prohibited to use a grinder when working with metal tiles, as the coating can be damaged, and this will lead to further corrosion. For these purposes, it is recommended to use cutting electric scissors or a jigsaw. A hacksaw for metal work is also suitable.
- Areas of damage to the material must be treated with paint to avoid further rusting.
In the figure below, you can see how to lay the material yourself.

In the picture shown, number 3 means waterproofing film;
- Number 4 means sheathing;
- Number 21 - end board;
- Number 22 - outer corner;
- Number 23 is a self-tapping screw.
End strip
If it is installed correctly, then it serves not only as decorative element, but also as a protective one. It allows you to protect fasteners from the harmful effects of environmental factors. Preventing moisture from entering is also within her purview.

Endova

It is intended for refining external joints. Lead excess moisture also within her power. When attaching the upper valley, it is necessary to ensure that the screws do not damage the lower valley; this can lead to damage to the waterproofing.
Roofing fractures
There are two types of fractures on the roof: 
If the roof has a slope with a straight bend, then the sheathing boards should be placed fairly close to each other. The coating material must cover the area of the direct fracture, with a small protrusion.
If the roof has a reverse bend, then it is necessary to use a wall connection, which will act as a connecting element. Where there is a reverse break, the sheathing boards should be fairly close to each other. And between the metal tile and the junction there should be a layer of sealant.
Did you know that even the simplest types of metal tiles can give the roof of your home an elite and modern look? After all, people who come to visit often turn their attention to her. So why not get a luxurious roof for such a low price? And if this is your plan for the near future, then in this article you can read how to lay a metal roof with your own hands step by step, its types, positive and negative sides, and much more.
Types of metal tiles and their protective coatings
When corrosion occurs on metal tiles, developers often blame manufacturers for poor quality metal, but it is worth understanding that this sheet material manufactured to standards that are subject to constant inspection by construction commissions. Therefore, the problem most likely lies elsewhere - in the protective coating. It can last either one year or a full service life.
Therefore, if you are concerned about the reliability of your roof, then you should think about purchasing materials that will more reliably protect your roofing. Today on the construction market you can find the following products:
- Polyester . This material is universal, because it is suitable for almost all climate zones and can withstand a very wide range of temperatures. Maximum corrosion resistance. The price for different polyester manufacturers differs, but remains in average values. When spraying yourself, it is worth considering that the layer must be at least 25 microns
- Matte polyester . As the name implies, this is some kind of offshoot from the standard. Its thickness is usually 35 microns. After spraying, the painted element acquires a richer appearance, which results in increased aesthetic values. Matte painting can imitate natural materials. Corrosion resistance is at an average level, which is also a pretty good indicator. This material can withstand heat well (up to +120C o), but does not tolerate low temperatures (down to -10C o). Therefore, it is not advisable to use matte polyester in northern latitudes.
Almost 100% corrosion protection of roofing material against corrosion can be achieved by spraying a protective layer of 50 microns. Thanks to this thickness, you can also get rid of the noise of raindrops and hail. A wide temperature range (from +150C o to -90C o) will allow you to use this product anywhere. Ultraviolet rays do not in any way affect the protection of the protective coating, so if you want to protect your roof for a long time, then you should choose this thickness for spraying.
- Pastizol . It is quite outdated material. It is mainly used in highly corrosive environments. The service life of such a protective layer is at least 20 years, has a rich appearance, which sets excellent competition modern coatings. Over time, direct sunlight does not affect the functionality and color of the protection. Relative cheapness makes this material accessible to any developer
- Granite chips . Stone as protection is a bold idea. It is not possible to prepare such a protective coating on your own, but in the store you can find a fairly wide range of such products. They are usually based on polyurethane and granite chips in a 1:1 ratio, and of course other binders. Positive aspects of this product is: colossal resistance to physical damage, high protection from solar radiation, transfers big differences temperatures However, not poor defense, but has a fairly high price
- The most ancient and time-tested protection is the coating of the base metal aluminum and zinc . It is believed that a coating of 20 microns is more than enough, however, there is no arguing with this because the average lifespan of such parts is 25 years. One of the important positive qualities is low cost

Before you immediately purchase the roofing coverings you like, ask the seller what type of polymers are used as a protective coating. If the answer suits you, then you can lay your roof with the purchased material with peace of mind. Otherwise, they will push you a low-quality product, which over time will only become a reason for you to repair it.
IMPORTANT: If sound insulation is of particular importance to you, then you should apply a polyurethane coating, but if your home has two floors (a residential floor and a non-residential attic), then you should skip this option, because then the price of the roof will be 30-40% cheaper .
Positive and negative qualities of metal roofing
Each material has its own strengths and weaknesses, so in order not to make mistakes, I have prepared for you small lists describing the properties of metal tiles.
And I'll start with the positive:
- The economic benefits in relation to other types of roofing coverings are obvious. The fact is that the material being laid has a low mass, therefore, the device complex structures a rafter system is not required, which entails savings on materials, installation work Oh. Despite being the same cheapness, the material has a fairly long service life - 50 years
- As mentioned above, metal tiles are a relatively lightweight roofing material. Its load on the base is in the range of 3.6-5.2 kg/1m2. Usage protective layers polyurethane will only reduce this figure, but zinc and aluminum will increase by a whole kilogram. Never take load indicators on the Internet. This is learned from each seller individually, because each manufacturer can produce sheets with contents different thicknesses metal (from 0.3 to 1.2mm)
- High corrosion resistance. If you want to observe the corrosion process on a newly laid roof, you will have to wait a little over 25 years. In addition, the roof is reliably protected from ultraviolet rays, moisture, sudden temperature changes
- Knowledge from physics lessons that metal is not a flammable material will be quite sufficient to declare metal tiles fireproof. The tiles are ideal as a fire-resistant material, which makes them head and shoulders above the same ECO roofs made of straw or other roofs using combustible materials
- Attractive appearance. Metal roof once became an indicator of the status of the owner, and this trend continues to this day. Most likely, this is due to the fact that metal is very often used on complex roofs, and they, in turn, are used only in large houses.
Due to its ease of installation, metal roofing can easily be laid with your own hands; by the way, you will learn about this process below.
After looking at everything positive traits material, one might assume that such a product has no negative aspects, but this is still not the case. And these are the sides:
- If you do not purchase soundproofing material, you may suffer from the noise of falling drops or hail during rain. If your building is two-story or has an attic, which you are not going to equip for living quarters, then you can still tolerate this if you are on the ground floor, otherwise such annoying noise will definitely force you to take the necessary measures
- If you make incorrect calculations, you can end up in an awkward situation when material is needed, but it is no longer available. Often this difficulty is encountered when purchasing metal tiles cut to size. It is worth understanding that complex roof is not a simple system, and, therefore, there will be times when the trimmed part of the material is no longer suitable. As a conclusion, I can say that the installation of metal tiles generates a large amount of waste, which is a negative side
- The smooth surface of the roof during operation can play a cruel joke on you. The fact is that when there is a large amount of precipitation in winter period time, a situation may arise when they begin to move. As a rule, such a process does not bring anything good. After all, when snow melts from the roof of a building, people passing under it at that moment may suffer. There is a solution to this problem - the installation of snow holders and various types of fences, but this will entail additional expenses, again a minus
Most developers do not strive to make an intricate structure out of the roof, quite simple, but of high quality, which is why they are attracted to metal tiles, because everyone can afford to buy such material, and the installation of all structures from scratch can be carried out in the shortest period of time, and this is what I will consider in the following chapters.

Calculation of material requirements
Calculating the materials required to create a good roof can be done in just 30 minutes using a pen and a piece of paper, but this is a rather frivolous task if you do not know the technological process of laying metal tiles. In this case, it is best to trust the professionals.
The calculation process begins with measuring the length of the slopes from the ridge to the very bottom. Don't forget to take into account a small overlap, which is usually 10-15cm. For this simple manipulation you will need to subtract 10cm from each sheet. As for vertical joints, here the overlap will be already 15 cm, but the technique for determining the missing material is exactly the same. The number of rows is determined by dividing the values, where the first will be the long roof, and the second will be the working area of the sheet (taking into account an overlap of 15 cm).
IN modern world Thanks to computers, calculating the exact number of sheets is not difficult; the error is only a couple of centimeters. This is a negligible value when compared with mental calculations.

The length of this roofing covering can reach 12 meters, which in most cases allows you to completely cover the slope with one sheet. If this is possible for you, then you will not only avoid the generation of waste, but also benefit from roof waterproofing, because the fewer joints, the less likely it is for moisture to flow into them.
To install the truss structure and its elements, you will need some additional calculations and costs for their acquisition. Please note that in addition to this, you will need to equip your roof with the necessary fences, drains around the perimeter, snow holders, etc.
As you can see, selecting the required amount of material for installing a metal roof can be done with your own hands, but this is only if you have certain knowledge. When knowledge is not enough, turn to specialists.
Installation of vapor barrier and waterproofing layers
You've probably heard that excessive moisture content in the air can have a detrimental effect on the service life of natural materials, for example, wood. Therefore, in the process of laying any roofing material, you must first take care of providing some protection.

The work on installing water drainage layers will not take much time and money and will increase the service life of the entire roof by several decades. So what should you do about it?
- Laying a waterproofing layer. This process is most convenient to carry out when you are at the top. In this case - on a skate. It is from there that rolls of waterproofing protection are rolled out. You must understand that waterproofing should not have many holes, so it is best to attach it to a building duct tape. Some developers even manage to use Double-sided tape, but this is a dubious alternative. The sagging of the material at the cornice should be about 30 centimeters
- Flooring of insulation boards. Of course, you can use non-tile material, but in general, I think the job is clear. With this work, I hope there will be no problems, and where will they come from? The only snag may be when you cannot fit the insulation board between the rafters. To do this, you will have to cut it into the necessary parts (divide by 5 centimeters more, so that during installation it can remain in place without fastening devices)
- Installation of a vapor barrier layer. If you decide to save money on this particular item, then you will make the stupidest mistake. Vapor barrier materials needed to remove moisture from insulation layers. Don't ask how she can get in there. Moisture has three states of aggregation and in any case it will find a way through one of them. It is worth noting that even a low water content in insulation boards will negate all its functional qualities. Fastening elements, as a rule, are staplers
In construction, there is a term that brings all these layers together - roofing pie. The construction of this cake should be done in the absence of a strong wind, because the work is carried out with a large area of material, and it can simply fly away or come off the base with a sharp gust of air.
IMPORTANT: As a rule, waterproofing films are produced with directional sides. This means that installation can only be done on a certain side. After all the main task Such a layer is to protect the insulation from moisture and, if necessary, remove it from the slabs.

Covering a roof with metal tiles is not difficult, the main thing is to create the necessary conditions for this - high-quality sheathing.
Do-it-yourself roof sheathing for metal tiles
In almost any field of work, everything can be done using your own strength, the main thing is practice and some knowledge. In the next paragraph, I will describe to you step-by-step instructions on how to build a metal roof, but before that you should pay attention to another important installation process - lathing.
Installation of any element requires a fairly reliable foundation. For roofing material it is sheathing. It usually consists of small blocks of wood 5x5cm. Mounted vertically to the rafters. It is worth paying attention to the device ventilation ducts between the roofing material and the waterproofing layer. 3x10cm boards are used as alternative materials: they are fastened in 0.6m increments across the rafters. The eaves overhang is equipped with slightly thicker boards, for example, 5x10cm. This is due to the higher load. As for the opposite side, i.e. ridge, then it is upholstered with two of the same elements without a gap.

In some documents you can find certain instructions that state that installing a cornice strip is a mandatory job. It provides decent resistance to strong gusts of wind and excessive moisture on the sheathing. Galvanized nails are used as fastening elements. Their arrangement has a checkerboard appearance, and the distance between them is 30 cm. By the way, just before starting work on constructing such a board, it is worth impregnating it with special solutions to protect it from rotting and drying it thoroughly.
There are two types of sheathing:
- Discharged
- Solid
The first of them is arranged along the entire perimeter of the plane. The elements of such sheathing have a certain step that should be followed. The second type looks like a solid shield. It is installed, as a rule, in places of increased loads and joining of elements, for example, valleys, places around chimneys, joints, eaves overhangs, etc. Wood screws or self-tapping screws are often used as fastening elements.

A roof structure made of metal tiles can have the following types:
- Single-pitch
- Gable
- hip
- Broken and others
As you may have guessed, this roofing material allows you to use absolutely any roof structure, perhaps with the exception of the domed one. This is a good fact for manufacturers, because the relative cheapness and wide range of applications make this material so popular among developers of private houses.
When everything is explained, you can answer the main question: “how to properly cover a roof with metal tiles?”
DIY metal roof
Any self-respecting man will want to get a good apartment or build his own own house. If you follow the second path and do everything on our own, then you should definitely absorb more information on how to re-roof with metal tiles yourself. This is exactly what will be discussed in this paragraph.

Working on your own brings moral pleasure, which then develops into some pride in the result. By the way, you can see how to install a metal tile roof with your own hands in the video at the bottom of the article.
Do-it-yourself roofing with metal tiles, step-by-step instructions:
- Purchase of material. At this stage, according to preliminary calculations, the required amount of roofing product is purchased. It is worth choosing qualitatively, asking the seller as much as possible. Pay special attention to the coating of the material, find out what polymers the protective layer is made of and draw the appropriate conclusions
- Upon delivery of the product to the site, it is worth carefully inspecting it for mechanical damage. After this, move the storage location closer to the installation site
- Next, we proceed directly to laying the roofing material itself on the prepared base. Before installation, remove the special protective film from the surface of the leaf product. The location of the first sheet will be the edge of the cornice. Its location should have a small overlap of 5-6 cm. Screws will act as fastening elements. They spin right through the metal in massive board, walking along the perimeter. All measuring work carried out using a construction tape measure
- The next sheet of roofing material is laid a little higher with an overlap of at least 5 cm and secured. Self-tapping screws or self-tapping screws are screwed into different sides two pieces for each. We arrange two more sheets and then check the evenness of the work done
- Further, all work moves in an already understandable direction. Arrangement of blocks of 2-4 sheets and their subsequent calibration. Do not forget that the overlap should be at least 5cm
- After laying all the sheets on a plane, end strips are installed in order to protect the newly created roof from rain and wind. They are fastened to the rafters or sheathing using long self-tapping screws. By the way, there are not only wooden end boards, but also PVC products. Their advantage is that they are not subject to corrosion and have higher protection of wood from moisture
- Roof ridge installation. This element allows you not to align the joints of the top sheets of material; they will disappear under it. The ridge is fastened on both sides with self-tapping screws. In the resulting space, it is worth paying special attention to the waterproofing of materials; the fact is that it is here that the greatest number moisture
- The final work is finishing the chimney
That's all, the work on installing the roofing material can be said to be completed.
For convenience, all measurements and cutting of metal tiles are best done on the ground.
It is worth covering the roof with metal tiles with your own hands, if you want not only to save money, but also to do this work for the sake of your own pride, I hope the step-by-step instructions I wrote above will help you achieve your plans.
As a conclusion, I can say that work done on your own is an activity worthy of praise, but you should not assume that without certain skills you can create high-quality and reliable roof. Contact professionals in your field if you find it difficult to carry out one or another stage.

If the text is not enough for you or you want to consolidate what you have read, then here are a few videos on the topic “how to roof a roof with metal tiles with your own hands”


