When constructing various objects at a specific stage, the question arises about what material to use for thermal insulation, what material to use so as not to get the effect of a bathhouse or steam room? Are there materials that can help combat this problem?
Izospan is the undisputed leader among materials for protection against moisture and steam. The material is named after the manufacturer's company. There are several types of isospan. Each type meets certain requirements and is used for insulation of a different nature.
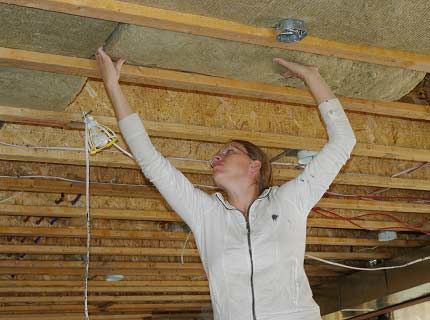
Izospan on the ceiling
Types of polymer film
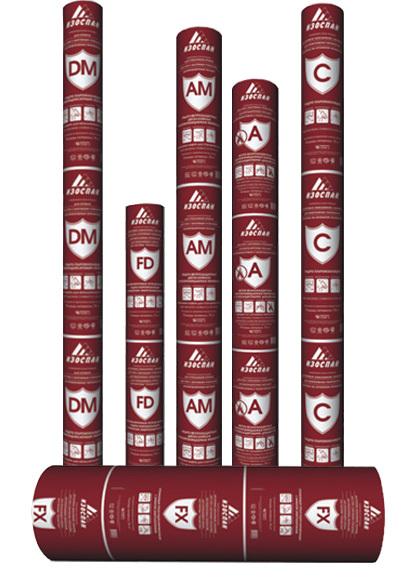
The following types exist:
- Izospan series “A” is suitable for external work. It insulates the roof, walls, facades from wind and moisture, but does not prevent internal steam from ventilating outside. This became possible thanks to the structure of the fabric, which is smooth on the top side and covered with pile on the inside.
- Izospan "B" is used for finishing interior spaces. The vapor permeability of this type is lower than that of its predecessor, since the method of applying the material has different technologies. They help maintain properties building materials for many years, as they prevent the formation and deposition of steam on internal structures. It is this option that is laid on ceiling structures and serves as a reliable protector against vaporization.
- Izospan “C” is used for interior decoration, but it also has an additional insulation effect. Mainly used for floor insulation. It has the effect of heat reflection and energy saving.
- Izospan type "D". These are connecting tapes. During installation, it is important to have all materials produced by one company. Tapes are necessary when attaching the main sheet for better sealing.
 Connection tape
 Polymer types films have a number of common the most important qualities, this became possible thanks to the development of new technologies in the field of construction and reconstruction.
Material properties
Polymer-type membranes have earned positive reviews due to their room protection properties:
- Ability to conduct heat.
- High density due to membrane type structure.
- Waterproof.
- Strength, resistance to external influences, breakthroughs.
- Ability to protect against ultraviolet rays.
- Modern technologies make it possible to produce building materials with a high degree of environmental safety - this applies to all types of isospan.
Prices
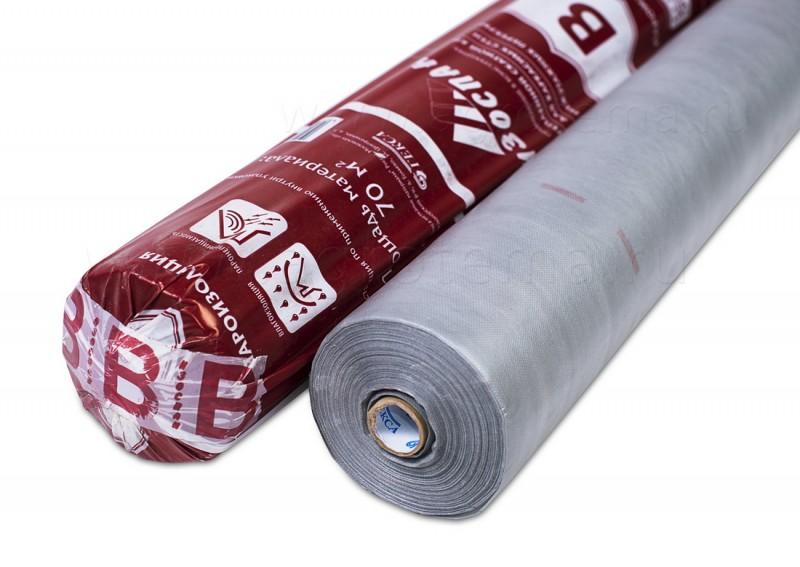
Prices for polymer film depend on the type to which it belongs and the manufacturer that represents it on the market. Izospan is sold in rolls with the waterproofing side inward, the area of one roll is 70 sq.m.
The price for one roll of types A and B, which are suitable for use on the ceiling, can range from 1000 to 2000 rubles.
Self-adhesive Izospan tape is available for sale, which is used in different qualities. It costs about 500 rubles. per piece, it contains about 30 m.
Often, unscrupulous manufacturers want to pass off their products as isospan, so when purchasing, you should ask about the presence of a quality certificate and compliance with production standards. To calculate the quantity of a product on special websites construction companies or intermediary stores have special online calculators calculation.
By the way, you can buy good eurolining on the company’s website RealWood.ru. Good quality and reasonable prices.
How to lay isospan on the ceiling
Many questions arise about how to properly lay a vapor barrier film.
Building a house with your own hands is difficult task, it is necessary to take into account many emerging nuances so that later there is no need to start all over again. Wooden houses are especially susceptible to problems with condensation on the ceiling and subsequent rotting of the material. In this case, isospan will reliably protect the house from mold. It is only important to lay the material correctly. It is important to follow the rules of proper vapor and moisture insulation when building houses from other materials.
There are several rules that apply to the instructions for using isospan for the ceiling. The film itself cannot be a load-bearing structure, so it is important to understand how the ceiling will be constructed.
Required Tools
Tools and materials for laying isospan on the ceiling:
- construction stapler and staples (in order to effectively secure the material to the ceiling);
- slats (to secure them after tensioning the isospan);
- nails with wide heads, a hammer (instead of construction stapler or along with it to secure the material in difficult places);
- self-adhesive tape (for gluing areas and covering all suspicious holes);
- scissors, knife (to quickly and efficiently cut the film).
 Construction stapler
 To understand how to lay isospan, you need to remember that line B material is suitable for the ceiling. It lies between the two main load-bearing structures, that is, between the rough ceiling and the interior decoration.
The rough ceiling is a ceiling that was erected during construction.
 Rough ceiling
 Side material
Now you need to figure out which side of the isospan is located on the ceiling. The smooth side should be adjacent to the rough ceiling, and the membrane fluffy side should be placed down. The installation system consists of laying sheets on top of each other with a margin or overlap. The width of these areas should be at least 15-20 cm.
The material can be secured to the rough ceiling using a construction stapler or using wide-head nails. In order for the sections of isospan that are located on top of each other to be firmly secured, self-adhesive isospan tape is often used. It is easy to use and designed specifically for such work.
The final stage of fastening to the rough ceiling is the application of wooden slats or galvanized profiles. Then they can be covered with plasterboard, clapboard, panels or plywood. They, in turn, are attached to the frame with ventilation intervals of 5 cm.
In order not to make a mistake with the dimensions and not create the problem of a shortage of material, it is best to use it with a reserve so that parts of the film peek out from under the outer slats near the walls. The film can be trimmed and the excess hidden under the plaster, thereby providing more reliable protection.
An important point is the presence of holes or projections in the ceiling. It's about about openings for chimneys and the like.
 Izospan under the ceiling
 In these cases, it is necessary to cut out special sections from the panel, and then fix it around the perimeter of the hole with tape or tape. In this case, it is important not to leave holes that will reduce all the work to zero.
Before you begin installing the isospan, you need to check whether the wooden blocks have been treated by special means. Treatment includes antiseptic measures in order to wooden elements have not undergone premature rotting or infection. Before work, you need to carefully inspect the ceiling, remove all dirt, seal the cracks, putty them, if necessary.
If you have a stepladder, skills, and tools, you can handle the task of laying the material yourself, but it is best to have an assistant who can help with tensioning or properly securing the material.
It is most convenient to roll out the roll from left to right and hold it in such a way that smooth side ended up on top. First, the side that ends with the roll is secured with a construction stapler, and then the free side is correctly tensioned, after which you can begin securing with yardarms.
Besides ceilings the material is suitable for insulating walls and floors, but in these cases the laying technology changes slightly.
Questions arising during installation
Many questions arise for those who do not have the opportunity to build a house on their own and decide how to insulate their premises, what material to choose and what to do with the floor?
When the question arises about vapor barrier of an existing room with its own initial data, you need to take into account the condition of the ceiling. There are cases when owners stick isospan to a plastered ceiling and expect that condensation will not appear on the loggia or in another room, thanks to the magical properties of the membrane. They make a mistake in advance: isospan does not fit on structures that are already plastered or insulated with mineral wool.
Insulation of this kind does not require a vapor barrier, and plaster is already a type interior decoration. Flooring will lead to consequences that will then have to be eliminated.
For roof insulation with outside a different type of material is required, type A. It will be laid according to different principles and reasons. And for insulating the roof from the inside of the room, the flooring technology remains the same.
 Izospan in the attic type attic
 If the film breaks during installation, you can seal it with construction tape. This must be done very carefully so that the sealed layer is not damaged later.
 Izospan under galvanized profiles
 In addition to vapor barrier of ceilings, similar work must be carried out on the floor or walls, but for this, completely different types of membrane film and technologies for its laying can be used. The main thing is to understand what type of film is needed for construction or repair work so as not to purchase something that turns out to be unnecessary.
The use of isospan for ceilings is described in detail in the instructions for use. If you have doubts about the choice of material, it is best to consult with specialists. Installing isospan on the ceiling is easy to do yourself if you study the necessary information in advance.
Correct vapor barrier and waterproofing are the key to comfort in the home and the longevity of many materials. Excess moisture in the room leads to increased air humidity, which can lead to a number of negative consequences: rotting wood, the appearance of fungus on the walls, etc.
Therefore, both processes should be given Special attention. Izospan is considered one of the leading vapor barrier materials on the market today, which gives good result at a relatively inexpensive cost. Today we’ll talk about its varieties and how and on which side it should be laid
What is Izospan
 Izospan is vapor barrier material, which is a special breathable membrane. At the same time, its manufacturer has provided for the availability of specific materials for a wide variety of needs, so this film is available in five main varieties. In particular, the following types of Izospan are distinguished:
- A. Material with this marking is intended for vapor barrier of the outer part of the house, its floors, and roof.
- IN. This type Izospan is necessary for the interior of the building: attics, attics, walls, etc.
- C. Used for vapor protection of roofs, when laying which no insulation was used.
- D. Is the best option for guard concrete surfaces: foundation, bases, floors. Also used for roofs.
- AM. A reinforced type of Izospan, which is used in areas with high climate humidity.
- FB. Allows for excellent vapor barrier of rooms with elevated temperature and air humidity (for example, baths and saunas).
This material is considered one of the best in terms of price/quality ratio on today's market. However, in order for it to serve you reliably, you need to pay special attention to its correct installation. Next, we’ll talk about which side Izospan needs to be laid to ensure quality protection.
Which side is the material laid on?
 So you've purchased required amount films of one type or another, but don’t know how to install them correctly? Then you definitely need to know which side the film is laid on. Even if you see Izospan for the first time, determine right side It won't be difficult to install it. Distinctive features of the internal and external parts of the material are as follows:
- coloring As a rule, manufacturers color different sides sheet in different colour. It is recommended to choose just such a material, since you can quickly and easily determine which part of it should be laid. In this case, installation is carried out with the light side facing the insulation;
- Izospan is sold in rolls and is rolled up with the waterproofing part inside. That is, when unwinding, it is the waterproofing that will be on top. It should be on the insulation;
- did you notice that there is lint on one side? This means that the reverse (smooth) side must be mounted on the insulation. Villi are necessary in order to prevent moisture from entering the room.
As you can see, it is not difficult to determine the required side on which Izospan is laid to the insulation. Now you need to properly lay it on the wall. First of all, pay attention to the correctness of the calculations and double-check everything again! If there is not enough material, it is better to buy more immediately so as not to stop the work halfway. Izospan sheets are laid overlapping each other to provide reliable and high-quality vapor barrier. Be sure to read the installation instructions so you don't miss any important points during the work.
Izospan is one of the simplest but most reliable vapor barrier materials. There is nothing particularly complicated in its installation; it is important to follow every step of the work. The main thing is just to correctly decide which side it needs to be laid in relation to the insulation in order to get truly reliable protection.
Please note that Izospan A, B, C, D and AM are laid out in the same way, and the definition of the parties in this case does not have any special differences. In general, try to purchase film with color differences, then you will not have any problems identifying the correct side.
Which side should I lay Izospan A, B, C, D or AM to the insulation?
How to properly lay Izospan Proper vapor barrier and waterproofing are the key to comfort in the home and the longevity of many materials. Excess moisture in the room leads to
Izospan B: how to install and which side to the insulation
Building structures and thermal insulation materials ensure comfortable living indoors. Being constantly under the negative influence of external and internal climatic factors, they themselves need protection to extend their service life. One of the circumstances that worsens the properties of insulation is getting wet due to the penetration of water vapor inside.
Line of steam and waterproofing materials Izospan is designed to provide reliable protection of load-bearing structures and insulation from moisture. For the material to be effective, installation must be performed correctly.

Why should you use a vapor barrier?
The air inside the room is saturated with moist steam, which tends to leave the house through the walls and ceiling. In the cold season, it turns into condensation, settling in the insulation and on the surface of the building structures. High humidity significantly reduces the insulating properties of insulation and causes the appearance of mold and mildew on the surface of ceilings and walls.
The installation of a vapor barrier layer that retains moisture and does not prevent its evaporation will eliminate these problems. Among the numerous products designed to protect a building from negative impact, materials are deservedly popular Russian brand Izospan. The company's films and membranes are made from polymer materials and get special properties. The dimensions of the canvases are selected in such a way as to make installation as easy as possible, and high strength ensures long service life.

Izospan B - characteristics and features
Regardless of the purpose of the building being built, it is necessary to install protection from steam and moisture. Izospan B film has been developed specifically for this purpose. It is a sheet of propylene, one side of which is smooth, and the other is covered with perforations, creating roughness. After unfolding the material, the question arises, which side should it be mounted to the insulation? To properly secure the vapor barrier film, you need to understand how it works.
The main purpose of the film is to protect the insulation from getting wet, and the room from the penetration of small particles of heat-insulating material. This is especially necessary when placing mineral wool as insulation, which is very sensitive to moisture and has the unpleasant property of spreading small fibers.
The smooth surface of the canvas forms an airtight barrier to steam, and the rough coating serves as a place to collect condensate, which subsequently evaporates. The film has the following technical characteristics:
- resistance to direct exposure to ultraviolet radiation for 3-4 months;
- steam resistance - 7;
- density - 72 g/m2;
- tensile load - 130 (longitudinal), 107 N/5cm (transverse);
- composition - 100% polypropylene;
- water resistance - 1000 mm water. pillar;
- operating temperature - from −60º to +80º C.
The membrane is durable and elastic, it reliably protects metal constructions from corrosion, and insulation and wooden elements from fungus and mold. The product is produced in rolls with a width of 1.4 and 1.6 m, area - 35, 70 m2.

Vapor barrier film Izospan B is installed with inside premises. It is used for insulated roofs, floors, attic floors, and walls. The manufacturer's instructions and information about the material give you an idea of which side to turn the fabric towards the insulation during the fastening process. The smooth surface is always adjacent to the thermal insulation, while the fibrous surface remains outside and retains moisture from the steam, preventing it from penetrating into the structure.
The vapor barrier is laid with an overlap of 15-20 cm, installation is carried out from the bottom up. The joints require reliable sealing; special adhesive tape produced by the company and marked FL is used for gluing.
Izospan SL tape is also suitable. Areas adjacent to the structure, sheathing, utility holes and niches are sealed using self-adhesive sealing tape, which simultaneously presses against protective cloth and the contacting surface.
Installation of film for insulation pitched roof happens according to the following scheme:
- the roll is cut into strips of the required size;
- the first strip is attached from below parallel to the floor, with the smooth part to the insulation;
- the next tape is mounted, overlapping the fixed film by 15 cm;
- fixing the canvases is carried out with a construction stapler or galvanized nails to the rafters of the building;
- joints are sealed with special SL tape;
- a lath is placed on top of the vapor barrier, creating a gap of 40-50 mm;
- Finishing material is attached to wooden slats.

Fastening Izospan B when insulating the floor (floor) occurs in several stages:
- the canvases are laid with the rough side towards subfloor(ceiling);
- the junctions with the walls and the joints of the tapes are glued with SL tape;
- the insulation is laid on the smooth surface of the film;
- moisture-proof Izospan C is laid on top;
- installation in progress flooring.
When attaching a vapor barrier to interior walls and partitions, the canvas is laid directly on the insulation and attached to wooden planks. A lath must be placed on top of the film, creating ventilation gap not less than 30 mm. When subsequently finishing with plasterboard, installation is carried out on a galvanized profile.
The use of Izospan B, which protects the insulation and wall surfaces from moisture, extends the life of the thermal insulation and the entire building structure.
Izospan V - installation rules and vapor barrier characteristics
What is vapor barrier used for? Specifications Izospan B material, its pros and cons. Rules for installing this vapor barrier.
Which side should I put Izospan on?

Roofing systems, as well as technologies for internal insulation of houses, involve the use of hydro- and vapor barrier membranes. In order to know exactly Which side should I put Izospan on? For insulation, we will consider two main types of this material:
- Izospan A. Wind- and moisture-proof vapor-permeable film. This type of material is used as external protection for almost any type of roof and outdoor insulation system. It protects it from the effects of condensation.[*]The membrane has a smooth surface on one side and a rough surface on the other. The smooth surface has water repellent properties, prevents moisture penetration. The rough surface has a structure that absorbs condensation and evaporates it into the air through the ventilation duct.[*]It is laid on the outside of the roof (wall), immediately after the roofing material or facing material walls. The rough surface should fit snugly against the insulation, the smooth side should be on the side of the roofing material or external cladding walls.
- [*]Izospan V. Vapor-proof film. Izospan B is used for internal protection ceilings and walls from the effects of condensation. The membrane has a two-layer structure: smooth and rough surfaces. The rough part of the membrane traps condensation from inside the room, preventing it from entering the insulation. The accumulated moisture evaporates over time from the rough surface of the film. Thus, the membrane prevents moisture from entering the thermal insulation layer of floors and walls, and prevents the formation of dampness, mold and fungi.
So, in order to fully implement the insulation technology, you need to know exactly which side to put Izospan on. Izospan A is used on the outside of the walls of a ventilated facade, on the outside of the roof insulation; the membrane is laid with the rough side facing the insulation. When laying the roof, it must be remembered that between the membrane and the roofing layer it is necessary to install a ventilation duct to evaporate the moisture accumulated in the film. Izospan B is a vapor-tight material and serves to protect walls and ceilings from the inside from condensate getting into the insulation. Place the smooth side against the insulation.
Which side should I put Izospan on?
Which side should I put Izospan on? Roofing systems, as well as technologies for internal insulation of houses, involve the use of hydro- and vapor barrier membranes. In order to know exactly which
“Izospan B” - which side to lay towards the insulation, frame, floor
The Hexa company, although not a monopolist in the building materials market, occupies the entire niche of vapor barrier films and membranes. Their products are windproof, vapor permeable, waterproofing membrane under the brand name "Izospan". Depending on the structure, density and scope of application, series A, B, C, D, E, F, K, etc. are produced. Basically, these are two-layer nonwoven materials, where one side is smooth, the other is fleecy and/or rough.

Using Izospan B film as an example, we will tell you which side to lay towards the insulation, how to lay it correctly and what they are generally intended for.
Why Izospan
This is not the first article we have devoted to the study of this material, so we will briefly discuss the main characteristics and scope of application.
Izospan B (V) is a two-layer non-woven material used to protect all types of structures, including floors, in any buildings. Prevents the formation of condensation and, as a result, the development of fungus. Retains dust and insulation fibers and serves as wind protection.
It consists of two layers - the outer one is smooth for easy fastening, the bottom one is perforated to retain moisture. This difference in texture makes it easy to figure out which side to put Izospan to the insulation - with the bottom fleecy layer towards the place where condensation forms in order to constantly remove it.
Provided that a vapor barrier membrane is used, the structure is reliably protected from the formation excess moisture, accumulation of condensation on components and metal elements, rotting of wooden rafters and walls, etc. Side effect The advantage of using such a film is that it does not provide insulation fibers, especially if it mineral wool and especially glass wool, getting into the room.
We understand the sides and fastening
Let us remind you once again which side to lay Izospan B - perforated towards the insulation, smooth outwards. Even if it is not possible to determine by touch which of them is rough, the marking - the name of the canvas is displayed on the smooth side, that is, when attaching it, you should see the name.

The inner side of the fabric is designed to absorb moisture

Front – smooth – side where the product name is printed
Installation of the Izospan material is carried out by one side or the other, depending on what material is used.
The membrane is always attached to load-bearing elements structures either on rough cladding or flooring. Fasten the canvas wooden slats or a construction stapler.
If lining, eurolining, plywood, etc. are used for finishing, the film is fixed with thin wooden slats parallel to each other. Insulation is inserted between the slats, in this case the smooth surface faces it.
When carrying out vapor barrier waterproofing of the roof, individual strips are attached overlapping each other (the overlap width is at least 10 cm) and fixed with double-sided tape, and the attachment point itself is additionally covered with vapor barrier tape. The Hexa company produces a whole line adhesive tapes precisely for such needs.

Tape for gluing joints of vapor barrier Izospan V
It is clear that you need to determine which side to put Izospan in each specific situation, taking into account that its fleecy surface should absorb water, that is, it faces the place where the condensation will come from.
Application in certain areas
The use of a vapor barrier material repeatedly extends the service life of the insulation and, as a consequence, the entire building structure. Its main task is to prevent the penetration of condensate and the formation of fungus.
Insulated roof
Membrane or polyethylene film – required element when constructing an insulated roof. It is mounted on elements of the supporting frame, less often - on rough finishing. It is necessary to ensure that moisture formed due to temperature differences does not get on the insulation. To enhance the characteristics of the joints (overlapping), Izospan SL is glued.
It is laid with the smooth side against the insulation, regardless of its type - polystyrene foam, polystyrene foam, mineral wool, etc.

- Roof
- Membrane
- Counter-lattice
- Thermal insulator
- Membrane
- Rafter
- Finishing material
External wall insulation
The structure of the product is such that it is equally successfully used both externally and internal insulation. The main thing is that the film should not be exposed to direct sunlight - they significantly reduce the service life and generally have a negative effect on the canvas. At exterior decoration the smooth side also faces the heat insulator.
- Wall cladding
- Counter-lattice
- Membrane fabric
- Thermal insulator
- Membrane fabric
- Interior decoration
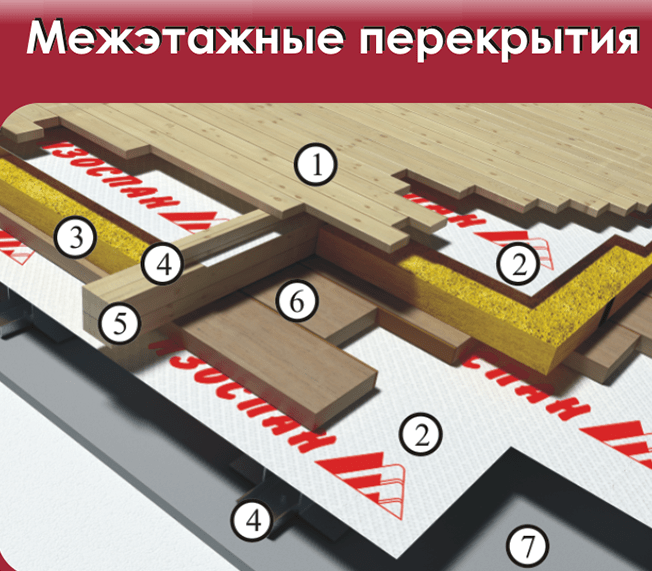
Floor structures
Polyethylene is laid between the cladding and the rough ceiling with the perforated (reverse) side down and directly above the insulation itself, with the rough surface facing it.
Be sure to make a ventilation gap of 40-50 mm between the vapor barrier and the insulation for air circulation.
To ensure the tightness of the joints, it does not matter whether they use series B or FX; when they are laid end-to-end, they are glued with KL or SL tape.
- Floor surface
- Vapor barrier
- Mineral wool or polystyrene foam
- Counter-lattice
- Floor beam
- Chernova
- Interior decoration
Flooring
When laying any floor covering on a concrete, brick, cement or other base (with the exception of wood and its derivatives), be sure to lay a layer of vapor and waterproofing to compensate for temperature differences and absorb condensation. They lay the canvas directly on the screed, they can lay it with insulation if the decorative coating is thin, or they can immediately lay parquet or laminate on the base.
- Decorative floor covering
- Membrane
- Cement/concrete screed, subfloor
- Floor slab
Installation instructions
In houses and premises where work is being done to insulate walls and roofs, the membrane sheet is attached to the supporting frame between the insulation and the rough finish, with the smooth side facing the insulation. For fixation, it is permissible to use galvanized nails with large heads so as not to tear them, or use a stapler - this is much more convenient and faster.

When working with inclined surfaces, cut the required size sheets in advance and fasten them horizontally from bottom to top with an overlap of 10-15 cm.
During further finishing with lining and other wood panels the film is fixed with wooden slats with an edge of 40 mm, pre-impregnated with an antiseptic.
When plasterboard is used for rough finishing of walls, the membrane is secured with staples or galvanized nails, with its smooth side facing the insulation and fitting as tightly as possible to it.

At excess humidity, roof insulation or external wall insulation, the joints are additionally fixed with double-sided tape Izospan KL or single-sided tape SL.
It is prohibited to use ordinary stationery tape - it will not last even a day on the surface of the membrane.
For insulating floors, foundations and ground floor Izospan B is laid between the subfloor and decorative coating. The panels are also laid overlapping, but between outside and the insulation should have a ventilation gap for air circulation - 40-50 mm is enough.
Working with floor slabs and floor insulation on concrete screed
The same applies when laying the floor on cement or concrete screed. In this case, be sure to use adhesive tape or connecting tape for the longitudinal seam of the panels to prevent even the slightest wetting of the parquet or laminate.
Scope of application of individual series
- A – membrane for the under-roof surface to protect against moisture and wind;
- B – vapor barrier
- AS – “breathing” diffusion membrane;
- AM – “breathing” diffusion membrane;
- AQ – professional line protective equipment;
- FS – reflective with foil layer;
- D – vapor and waterproofing membrane;
- KL, SL, FL, FL – double-sided and single-sided connecting tapes
Izospan B - which side to lay the insulation correctly
Vapor barrier Izospan v - which side to lay towards the insulation, supporting frame, on the floor. Detailed diagrams installation of insulation.
“Izospan B”, instructions for use for roofs, ceilings, walls, etc., which will be discussed in this article, is one of the highest quality domestic vapor barriers. Its advantages include, first of all, strength and ease of installation. This material is produced by the Hexa company, whose central office is located in the Tver region.
Varieties of Izospan material
Currently, Hexa LLC produces several varieties of this material:
- "Izospan A". This film is designed to protect all types of insulation from atmospheric moisture and wind.
- “Izospan A.M” is a three-layer diffusion membrane installed directly on the insulation.
- "Izospan A.S." In terms of its performance indicators, this type of insulator is almost identical to the previous one, but has a slightly lower level of vapor permeability.
- "Izospan AQ proff." The main advantages of this film include increased tensile strength.
- "Izospan S". A membrane designed for installation mainly indoors. In some cases, it can also be used outside.
- "Izospan D". Multifunctional film with anti-condensation coating.
- "Izospan B". The instructions for use of this material allow it to be used to protect insulation both inside and outside the room.
The latest type of vapor barrier of this brand is on this moment is one of the most popular. Further in the article we will look in detail at what advantages and disadvantages it differs from and how exactly it is used.
Pros and cons of Izospan V film
The main advantages of this material include:
- Strength. This type of film does not tear during installation and lasts a very long time.
- Reliability. When using this material, the insulation remains dry under any circumstances.
- Versatility. “Izospan V” can be used for any type of insulation on all structures, without exception.
- Environmental cleanliness. Films from this manufacturer do not emit any harmful substances into the air.
- Practicality.
- Fire safety.
- Easy to install.
Due to its unusual structure and structure, the Izospan B material, instructions for use of which will be given below, perfectly ensures the weathering of accumulated condensate, significantly improves the insulating qualities of the “pie”, and increases the service life of building structures and structures. When it is used, fungus and mold do not form on the walls, and the insulation always remains dry.

Scope of use
During the cold season, the difference in temperature in a living room and outside can be very large. As a result, moisture vapor, always present in the air of rooms, condenses on the enclosing structures, and if they are insulated, then directly on the insulator. As a result, mineral wool, glass wool, etc. get wet and lose most of their insulating properties. To prevent this from happening, vapor barrier membranes are used. This material is installed on top of the insulation on the room side and prevents moisture from penetrating into it.
The “Izospan B” membrane, instructions for use (“C”, by the way, is a variety used in approximately the same way, and in the same cases), which is almost identical to that of other types of heat insulator, can be installed during insulation:
- “pie” of attics, attics, as well as roofs outside,
- walls from the inside and from the street,
- ceilings - attics and mansards,
- floor.
This material can be used for insulating buildings of any purpose and any number of floors. “Izospan B” is excellent for protecting such types of insulation as mineral wool, polystyrene foam, polyurethane foam coatings, etc. from moisture.

Features of the material
“Izospan B” is a translucent film with a two-layer structure. One side has a smooth surface, and the other has a rough surface. Due to the presence of texture, condensation is retained on the surface of the material without flowing down, and evaporates very quickly. Accordingly, moisture does not penetrate into the thickness of the “pie” that insulates the structure. As a result, the formation of fungus on the wood and its rotting, as well as rusting of the metal elements of the protected surface are prevented.
General installation rules
How to install Izospan V correctly? Instructions for use (the layout diagram in the “pie” is presented below) from the manufacturer prescribes mandatory compliance with the following requirements:
- Fastening to vertical and inclined structures - roofs, walls, partitions - is carried out from top to bottom. The strips are laid in a horizontal direction.
- The overlap is made at least 15 cm.
- For reliability, the joints are taped with a special adhesive tape.

Izospan V is mounted with the smooth side facing the insulation and the rough side towards the room. For fastening, you can use wooden blocks, clamping strips or staplers. In this case, reliable and effective protection will be provided using the vapor barrier “Izospan B”, instructions for use (see photo of correct installation on the page) of which are usually included with the roll.
Use of material when insulating attics
In this case, the insulation boards themselves are first inserted between the rafters. Next, “Izospan B” is stretched. Instructions for use (attic walls that are not insulated with this type of film cannot be properly insulated, as you understand) in this case are as follows:
- Fix "Izospan" directly to the rafters. Usually fastening is done with bars 3-5 cm thick, stuffed along the legs from above. Sometimes thin pressure strips (two each) are also used. In this case, “Izospan B” is fixed on both sides of each rafter. The second method is also quite reliable. In addition, its use saves attic space. However, it is possible to fasten the material in this way only when the thickness of the rafter legs is at least 2-3 cm greater than the thickness of the insulation boards.
- Mounted on top of the stretched vapor barrier fine finishing(lining, drywall, edged board, plywood, etc.). It is attached using the first method of fixing “Izospan B” to the bars. With the second - to the rafters. As a result, a ventilation gap is formed between the finishing finish and the vapor barrier, which ensures rapid drying of settled condensate.

"Izospan V": instructions for use when insulating roofs
When assembling the “pie” of roofs, the material is attached in approximately the same way as in the first case. However, in this case, the vapor barrier itself is first fixed. It is fixed from the attic side with staplers or by installing internal horizontal sheathing under the final finishing from a narrow board in increments of 50-80 cm.
Next, slabs of mineral wool or expanded polystyrene are laid between the rafters on the vapor barrier. Thanks to the sheathing, they will not fall inside, into the attic. Sometimes instead of the latter, ordinary wire is used. It is pulled from the attic side in such a way that the insulation slabs are subsequently firmly held between the rafters.
After installing the mineral wool, a waterproofing material (with a slight sag) is attached to the rafters. It is fixed with bars, onto which a transverse sheathing is subsequently placed. The selected roofing material, in turn, is attached to it.
Use for walls on the room side
Most often, this vapor barrier is used for insulation vertical walls, enclosing structures from the inside. Next, we will discuss in detail how “Izospan V” is installed in this case. Instructions for use for walls are as follows:
- First, a beam is attached to the surface, the width of which is equal (or slightly greater) to the thickness of the insulation. When used for finishing drywall sheathing, a metal profile can be used.
- Next, slabs of mineral wool or expanded polystyrene are installed.
- On top of them - on bars, slats or staplers - the vapor barrier "Izospan V" is fixed.
- Next, the finishing is installed.

Use of material when insulating walls outside
When assembling the “pie” for insulation from the street side, the procedure will be reversed. That is, first a sheathing made of 3 cm thick timber is attached to the walls (to ensure a ventilation gap). Then the vapor barrier “Izospan V” is stretched over it. Next, a counter-lattice is installed. A heat insulator is mounted between its elements. It is attached on top of it waterproofing film, and then - finishing (lining, siding, etc.).
This is how the Izospan V vapor barrier is usually installed outside. Instructions for using this material for walls, discussed above, however, are given mainly for finishing wooden buildings. The fact is that boards, timber and logs “breathe” and very easily allow moisture vapor to pass from inside the premises to the outside. Concrete and brick walls retain steam much better, and therefore an insulating membrane is rarely used in this case.
Using the method described above, paving stones or planks are usually sheathed. smooth surfaces. It is allowed to attach a vapor barrier to logs without pre-filling the sheathing. That is, right on the wall. In this case, ventilation will be provided by gaps at the joints of the logs.
"Izospan B": instructions for use for floors
In this case, it is also necessary to provide a ventilation gap. Pre-installed between the joists waterproofing layer. Next, insulation boards are installed. Then, by fixing with bars, the Izospan V vapor barrier is attached. Next, the edged or floorboard is installed.
Insulation of attic and interfloor ceilings
And in this case, “Izospan B” is very often used as a vapor barrier. The instructions for using this material for the ceiling practically repeat the recommendations for installing it on the floor. From the attic side - when installing a residential attic - it is mounted in exactly the same way. However, this vapor barrier is usually also attached to the ceiling from below. In this case, it is fixed to the beams before installing the sheathing. For fastening, as in all other cases, small thickness bars are used. The ceiling board is mounted directly on them.
So, the basic recommendations for installing such material as “Izospan V” (instructions for use) were discussed above. By the way, this applies primarily to the ceiling. The fact is that this part of the house, not insulated in this way, cannot be properly insulated or finished. The same can be said about walls or floors. Next, we will give some tips that may be useful to someone when using this brand of material for vapor barrier of building structures:

- Before laying the material, wooden walls must be treated with antiseptic compounds. The moisture between the film and the wood dries out quite quickly. However, it still doesn't hurt to be on the safe side.
- It is also worth treating the wood with insect repellent. It will be impossible to do this after installing the “pie”.
- The Izospan B material, as already mentioned, is very durable. However, sometimes it still happens that the film is damaged by any sharp structural elements as a result of careless actions, etc. Torn areas must be repaired using special tapes with an adhesive layer or glue designed specifically for this purpose.
As you can see, the vapor barrier “Izospan V”, instructions for use of which are given in the article, is a very reliable material and easy to install. Its cost is not too high, but operational characteristics It is significantly superior to traditional polyethylene film. Therefore, it is certainly worth using it to protect insulation from moisture in residential premises.
Izospan is considered one of the most popular vapor barrier materials today. High Quality presented on the domestic market of goods and services. As practice shows, consumers highlight among the advantages a high level of strength, lightness and simplicity of installation work. The production of Izospan V, instructions for use for the ceiling will be discussed below, is carried out by the large company Hexa, located in the Tver region.
Which isospan should be used for the ceiling
Today you can find on sale a large number of varieties of isospan used for ceiling insulation. Among existing species The following are worth noting:
- “Izospan A” is a film used as a protective material for insulation of all types, ranging from atmospheric moisture to strong gusts of wind;
- “Izospan A.M” is a diffusion membrane consisting of 3 layers, this type material, as a rule, is mounted on top of insulation;
- “Izospan A.S” - if we compare the performance indicators, it is worth noting that this material, intended for finishing the ceiling surface, is identical to the previous type, distinctive feature this isospan has a lower level of vapor permeability;

- “Izospan AQ proff” - the main advantage of this type of material for ceilings is the high level of tensile strength;

- “Izospan C” - this type of membrane, as a rule, is used mainly for arranging rooms from the inside; in some cases, isospan can be used outside, but this is extremely rare;

- “Izospan D” is a multifunctional film, which is covered during the production process with a special anti-condensation coating;

- “isospan B” - according to the attached instructions, this material is used as insulation protection; this type is suitable for both external and internal installation work.
As practice shows, “Izospan V” is the most popular building material offered for sale on Russian market and is used much more often.
Among the main advantages of this material intended for ceilings are the following:
- high level of strength - the film for ceilings does not tear during installation work and has a long service life;
- reliability - thanks to this material, the insulation mounted on the ceiling remains dry at any time of the year, regardless of temperature conditions;
- versatility of the material - insulation can be used for any ceilings, regardless of the type of surface and design features;
- ecologically pure material– the film “Izospan B” used for ceilings does not emit environment harmful substances;
- quite easy to carry out installation work on isospan fastening;
- high level of fire safety of isospan.
Due to its unusual structure and structure, the material promotes fairly rapid weathering of accumulated condensate.
Attention! The use of Izospan B prevents the appearance of fungus and mold on the surface of the ceiling.
How to properly lay isospan on the ceiling
The installation process must be carried out taking into account the following rules:
- It is not recommended to fix the vapor barrier material to the surface using nails. In this case, it is best to use staples. The launch on the walls should be 20 cm.
- As a rule, isospan is unfolded to the opposite side, after which it is cut off with a small margin.
- Fastening of isospan is carried out both along the perimeter and along intermediate slats. Since one strip is not enough for the ceiling, they are fastened together with tape.
- To ensure ventilation, it is necessary to leave small gaps between Izospan B and the ceiling surface during the installation process.
After the installation of isospan is completed, you can begin installing the main finishing material.
How to lay isospan on a concrete ceiling
Concrete ceilings need waterproofing as a result of hygroscopicity - water seeps through by capillary action. In order to correctly lay isospan on the ceiling, it is necessary to simultaneously install insulation on the ceiling surface.
It is first recommended to remove all existing debris from the ceiling surface and eliminate existing cracks and potholes. Only after this can you proceed to waterproofing deep penetration or with a base on bitumen. Thanks to this material, it is possible to prevent the accumulation of liquid on the insulation.

After the first layer of waterproofing has completely dried, they proceed to installing soft insulation on the ceiling surface; in this case, you can use mineral or stone wool. Sheets must be fastened frame method. In order to cover the seams, it is recommended to place all elements in a checkerboard pattern.
The sheathing is made from wooden beams, and the length of the step should be equal to the size of the insulation. Through cotton wool in concrete ceiling Make holes and use umbrellas for fixation. After the frame is completely ready, they proceed to the installation of Izospan V. It is recommended to lay the material with an overlap of up to 15-20 cm, after which the joints are taped.

The installed sheathing can later be used as a basis for attaching lining made of wood or plastic. In the event that you have chosen frameless method installation, then the insulation must be glued to the surface of the ceiling, and Izospan V must be attached to the insulation with plastic umbrellas.

Izospan for the ceiling in a wooden house
Since isospan for ceilings is sold in the form of rolls on the goods and services market, it is necessary to roll out the vapor barrier and cut it into pieces required length, and then proceed to installation. It is recommended to lay the material overlapping; the sheets should overlap each other by a minimum of 15 cm and a maximum of 20 cm. It is important to ensure that the ceiling surface is completely covered with a layer of vapor barrier. If necessary, thin wooden slats can be installed on the connecting seams.
It is not recommended to stretch the vapor barrier material during installation work. “Izospan B” after completing all the work should hang slightly from the ceiling surface. This rule is due to the fact that a highly stretched material during temperature fluctuations can quite easily succumb to deformation and, as a result, burst after some time. When laying polyethylene film, it is important to ensure that the rough side is always on the outside.
Advice! To obtain a better effect, you can lay the film in 2 layers, with the layers touching each other with the smooth side.

Izospan for interfloor and attic floors
If it is planned to insulate interfloor and attic floors, it must be taken into account that ventilation gaps must be provided during installation work. First of all, a layer of waterproofing is laid between the joists, after which the insulation boards are installed. When attaching the Izospan V vapor barrier, it is recommended to use wooden blocks. After all the work has been completed, boards or any other finishing material are installed.
When using this brand of isospan for vapor barrier of residential structures, it is recommended to adhere to the following tips:
- In the case where the material is planned to be laid on walls or wooden floors, it is recommended to pre-treat the wood with special antiseptic compounds. As a rule, the process of drying moisture between the wood and the isospan film will be as fast as possible, but it is best to play it safe so as not to encounter disastrous consequences in the future.
- In addition, wooden parts of structures must be pre-treated with special insect repellents. It is important to understand that it is unlikely that it will be possible to do such work after installing the isospan, so it is worth thinking about this in advance.
- "Izospan B", used for walls and ceilings, has a high level of strength. It is worth considering that if handled carelessly, there is a high probability that the film will be damaged. If there are places of damage on the isospan, then they should be repaired immediately, using a special tape with an adhesive base or glue for this purpose.
Due to the reasonable cost of isospan, this material is construction work everyone can afford it.
Important! If some part of the living space is not insulated in this way, then it is worth taking into account the fact that in the future it will not be possible to properly insulate and finish the surface of the floor and walls.
Conclusion
Izospan B - instructions for use for ceilings in different residential buildings was considered in as much detail as possible. The building material is the most popular for carrying out waterproofing works. As you can see, this thermal insulation material can be laid on concrete base ceilings, used for arranging wooden residential premises, interfloor and attic floors. Before you begin installation work on installing isospan on the ceiling, it is recommended to first study all the installation nuances, and then follow the step-by-step algorithm. This is the only way to count on high-quality results.
The Hexa company, although not a monopolist in the building materials market, occupies the entire niche of vapor barrier films and membranes. Their products are a windproof, vapor-permeable, waterproofing membrane under the Izospan brand. Depending on the structure, density and scope of application, series A, B, C, D, E, F, K, etc. are produced. Basically, these are two-layer nonwoven materials, where one side is smooth, the other is fleecy and/or rough.
Using Izospan B film as an example, we will tell you which side to lay towards the insulation, how to lay it correctly and what they are generally intended for.
Why Izospan
This is not the first article we have devoted to the study of this material, so we will briefly discuss the main characteristics and scope of application.
Izospan B (V) is a two-layer non-woven material used to protect all types of structures, including floors, in any buildings. Prevents the formation of condensation and, as a result, the development of fungus. Retains dust and insulation fibers and serves as wind protection.
Membrane properties
It consists of two layers - the outer one is smooth for easy fastening, the bottom one is perforated to retain moisture. This difference in texture makes it easy to figure out which side to put Izospan to the insulation - with the bottom fleecy layer towards the place where condensation forms in order to constantly remove it.
Provided that a vapor barrier membrane is used, the structure is reliably protected from the formation of excess moisture, the accumulation of condensation on components and metal elements, rotting of wooden rafters and walls, etc. A side effect of using such a film is that it prevents insulation fibers, especially if it is mineral wool and especially glass wool, from entering the room.
VIDEO: Which side to lay steam and waterproofing
We understand the sides and fastening
Let us remind you once again which side to lay Izospan B - perforated towards the insulation, smooth outwards. Even if it is not possible to determine by touch which of them is rough, the marking - the name of the canvas is displayed on the smooth side, that is, when attaching it, you should see the name.

The inner side of the fabric is designed to absorb moisture

Installation of the Izospan material is carried out by one side or the other, depending on what material is used.
The membrane is always attached to load-bearing structural elements or to rough cladding or flooring. The canvas is secured with wooden slats or a construction stapler.
If lining, eurolining, plywood, etc. are used for finishing, the film is fixed with thin wooden slats parallel to each other. Insulation is inserted between the slats, in this case the smooth surface faces it.
When carrying out vapor barrier waterproofing of the roof, individual strips are attached overlapping each other (the overlap width is at least 10 cm) and fixed with double-sided tape, and the attachment point itself is additionally covered with vapor barrier tape. The Hexa company produces a whole line of adhesive tapes specifically for such needs.

It is clear that it is necessary to determine which side to lay Izospan in each specific situation, taking into account that its fleecy surface should absorb water, that is, it faces the place where the condensation will come from.
Application in certain areas
The use of a vapor barrier material greatly extends the service life of the insulation and, as a consequence, the entire building structure. Its main task is to prevent the penetration of condensate and the formation of fungus.
A membrane or polyethylene film is a mandatory element when constructing an insulated roof. It is mounted on elements of the supporting frame, less often - on rough finishing. It is necessary to ensure that moisture formed due to temperature differences does not get on the insulation. To enhance the characteristics of the joints (overlapping), Izospan SL is glued.
It is laid with the smooth side against the insulation, regardless of its type - polystyrene foam, polystyrene foam, mineral wool, etc.
The structure of the product is such that it is equally successfully used for both external and internal insulation. The main thing is that the film should not be exposed to direct sunlight - they significantly reduce the service life and generally have a negative effect on the canvas. For exterior finishing, the smooth side also faces the heat insulator.
Floor structures
Polyethylene is laid between the cladding and the rough ceiling with the perforated (reverse) side down and directly above the insulation itself, with the rough surface facing it.
Be sure to make a ventilation gap of 40-50 mm between the vapor barrier and the insulation for air circulation.
To ensure the tightness of the joints, it does not matter whether they use series B or FX; when they are laid end-to-end, they are glued with KL or SL tape.
When laying any floor covering on a concrete, brick, cement or other base (with the exception of wood and its derivatives), be sure to lay a layer of vapor and waterproofing to compensate for temperature differences and absorb condensation. They lay the canvas directly on the screed, they can lay it with insulation if the decorative coating is thin, or they can immediately lay parquet or laminate on the base.
Installation instructions
In houses and premises where work is being done to insulate walls and roofs, the membrane sheet is attached to the supporting frame between the insulation and the rough finish, with the smooth side facing the insulation. For fixing, it is permissible to use galvanized nails with large heads so as not to tear them, or use a stapler - this is much more convenient and faster.

When working with inclined surfaces, cut the required size sheets in advance and fasten them horizontally from bottom to top with an overlap of 10-15 cm.
For further finishing with clapboard and other wooden panels, the film is fixed with wooden slats with an edge of 40 mm, pre-impregnated with an antiseptic.
When plasterboard is used for rough finishing of walls, the membrane is secured with staples or galvanized nails, with its smooth side facing the insulation and fitting as tightly as possible to it.

In case of excessive humidity, roof insulation or external wall insulation, the joints are additionally fixed with double-sided tape Izospan KL or single-sided SL tape.
It is prohibited to use ordinary stationery tape - it will not last even a day on the surface of the membrane.
To insulate floors, foundations and basements, Izospan V is laid between the subfloor and the decorative coating. The panels are also laid overlapping, but there must be a ventilation gap between the outer side and the insulation for air circulation - 40-50 mm is enough.

The same applies when laying the floor on a cement or concrete screed. In this case, be sure to use adhesive tape or connecting tape for the longitudinal seam of the panels to prevent even the slightest wetting of the parquet or laminate.
Scope of application of individual series
- A - membrane for the under-roof surface to protect against moisture and wind;
- B - vapor barrier
- AS - “breathing” diffusion membrane;
- AM - “breathing” diffusion membrane;
- AQ - professional line of protective equipment;
- FS - reflective with foil layer;
- D - vapor and waterproofing membrane;
- KL, SL, FL, FL - double-sided and single-sided connecting tapes
In general, we figured out which side to put Izospan on insulation, supporting frame, subfloors and some types of finishing. If you have any questions, you can ask them in the comments to the article. The company's specialists will answer them as soon as possible.
VIDEO: Condensation on the roof + incorrect vapor barrier


