It is impossible to imagine a suburban area without country paths: they not only connect the house with other objects, but also perform an important decorative function. By choosing the right material, you can create a harmonious picture in a single style, and by building paths in your dacha with your own hands, you can turn several acres into a unique and comfortable area.
The main reason for dividing country paths and paths into types is the material from which they are built. Its diversity allows you to choose the best option for landscaping the area.
Natural stone is distinguished by its natural beauty and nobility, but its price is quite high.

Natural stone is ideal for the construction of curved paths: the stone elements are arranged in a chaotic manner, so it is easy to make smooth bends
To arrange the territory in rustic style wood works great.

The natural textured pattern on wood cuts depends on the type of wood, but an interesting effect can be achieved by also using special impregnations and varnishes
Brick is a wonderful material, especially if the house is also built from it.

For the construction of garden paths, ordinary solid building bricks are not suitable; it is better to use special types of paving that are not afraid of water and frost
Paving slabs or paving stones will serve for a long time.

Using paving stones different color, as well as a specific laying pattern, you can create an amazing original design that is suitable specifically for your garden
Simple and inexpensive gravel paths are also appropriate in the garden.

Gravel is good not near the landscaped area around the house, but in the garden or near a stream - it blends better with wildlife
Concrete can be used to create unique paving slabs.

In construction stores you can purchase special plastic molds that are used for making road concrete elements with your own hands.
By combining materials, it is easy to achieve a stylistic match between the paths and the surrounding natural and artificial objects.

You can absolutely combine different materials: natural stone and multi-colored gravel, wooden boards and river pebbles, brick and concrete
The location of the paths takes into account the landscape and climate
Paths are an equally important strategic part suburban area, like a house, garage or bathhouse, so you need to think about their arrangement before constructing buildings and utility rooms. For convenience, it is better to create a diagram by drawing it by hand or using a computer design program. Having determined important points, it is necessary to connect them by paths - straight or curved, depending on the terrain.
It is better if all objects are present on the diagram, including a garden, vegetable garden, greenhouses, bathhouse, gazebos - paths are the connecting element between them. The material for the construction of communication routes must be combined with buildings and surrounding decorative elements.

Paths on a summer cottage do not have to be of the same type: solid and step-by-step, straight and curved options are perfectly combined

When drawing up a diagram or site plan, you can indicate which plants and shrubs will be planted - this will help when choosing material for building paths
If it rains frequently in your area, you should definitely consider drainage system and dig drains along the edges of the roads to prevent stagnation of water. When constructing country paths with your own hands, remember: freezing, water will ruin the material - wood, brick, concrete. Powerful trees should not grow near the coverings as they root system easily disrupt the integrity of roads.

The more detailed the preliminary planning, the brighter the picture of the future dacha landscape and the easier it is to come to the choice of design elements
Analysis of the 3 best budget options
Owners of villas and luxury cottages will most likely not bother with sand and stones, but will invite a famous landscape designer and a team of specialists. Anyone who independently arranges a garden knows very well that to build original and comfortable paths it is not necessary to use expensive natural stone or collectible paving stones. Therefore, we will consider three options for creating tracks from the available and inexpensive materials: cement, brick and wood. Rest assured, the result will surprise you!
Option #1 – trail made of cement leaves
Lovers of short-cut lawns would never trade silky green grass for dense thickets of shrubs or a flower garden, much less give up a path that crosses the luxurious carpet in front of the house. But there is a clever option in which you can preserve the integrity of the lawn and at the same time create a kind of path that allows you to cross the grass surface directly.

Decorative concrete leaves are just an option that can be replaced with other elements: human traces, geometric shapes, animal silhouettes
To build a miracle path, you will need an ordinary plant and a plant that can be found somewhere nearby - burdock, or rather its large leaves.

Burdock leaves can be replaced with any other leaves, as long as they are large. As an option, use several leaves of different textures
In a small container, mix the solution according to the instructions and spread the thick mass on a large burdock leaf. Why not a filling mold?

Make sure that the cement solution has the required consistency: too thick it will lie unevenly, and liquid cement will not retain its shape.
After the sand-cement mixture has completely set, remove the sheet. We get original decorative tiles - the main element of the path.

As you can see, nature turned out to be the best decorative artist - a decorative leaf with a natural pattern will not disturb the harmony of the lawn or garden
All that remains is to prepare the place for installation. Using a shovel or small spatula, carefully remove a piece of turf to create a shallow hole.

Device advantage step-by-step path for a lawn consists in the absence of a special tool: for example, a child’s scoop is enough to make holes
We lay the tiles in the prepared nest, then do the same with the remaining elements. The path turns out to be light, airy, harmoniously complementing the lawn. Walking on the beautiful decorative leaves is pleasant and safe even in rainy weather.
Option #2 – durable brick path
Brick is a universal material. You don’t have to worry about how to make a path in your dacha if you have it at hand required amount this durable material, as if specially created for the construction of reliable coatings. Its advantage is that it is ideal for almost anyone country style. Red bricks, like gray ones, look amazing against the background of a building made of a similar material, combine perfectly with wood, and fit harmoniously into natural environment. One piece of advice - you only need to use special paving material.

The advantages of brick are obvious: it is durable, lasts for decades, is easy to lay, does not slip even in the rain, and has aesthetic value
Main stages of construction:
- Defining boundaries and extracting soil.
- Preparation of sand and gravel base.
- Filling voids with sand.
The width of the trench depends on the size of the bricks and the pattern that will be laid out of them. The minimum width of the path is 0.9 m. We determine the boundaries and mark them with pegs with a stretched construction cord. We remove the sod and dig a shallow trench. Its edges need to be reinforced with boards - they will serve as additional support for the border in the next two years. Then they can be taken out and the grooves filled with gravel chips or pebbles.
The brick base consists of two layers. The lower one is gravel and coarse sand. After backfilling, the gravel mixture must be evenly distributed along the entire length of the path and compacted.

Determine the depth of the trench for installation brick path simple: you need to add up the thickness of both layers of the base and the dimensions of the brick itself

Tamping the gravel layer is mandatory: loose material will provoke the movement of the remaining layers and, as a result, destroy the brick surface
The top layer consists of only sand. While leveling it along the path, press at the same time until the layer becomes dense enough. It is better to compact sections of 20-30 cm, so the base will be of better quality.

Having done sand backfill, it is necessary to level the surface: pull towards yourself special device, while simultaneously pressing on it so that the sand lies in a dense layer
The next stage is laying bricks along the boards. Before laying each element, dig a small hole, then place a brick in it and adjust its position using wooden hammer. Products placed on the end will act as a border.

To “hammer” bricks into sand, it is better to use a special rubber hammer: a metal or even wooden one can damage the structure of the material
Taking into account the laying pattern, fill the space between the curbs with bricks, easily hammering them into the sand and regularly checking the level.

When focusing on a specific element, do not forget about the integrity of the path: regularly check the horizontal position of the bricks using a level
The last stage is filling the gaps between the bricks with sand. Gently add sand until it is level with the bricks. Water the path and repeat the last operation. Over the next few days, you can adjust the position of the bricks.

An ordinary cleaning brush will help to distribute the sand evenly: with its help you can easily move the sand over the surface and push it between the bricks
Option #3 - using wooden cuts
If you compare wood with stone, it will certainly lose: wood does not have the durability and strength of granite or marble. However, when constructing garden paths in the country, elements from this seemingly unsuitable material are used. Wood cuts, if the laying technology is followed, are excellent “bricks” for creating a decorative path in a rustic style.

By choosing wood cuts, you kill two birds with one stone: you “arrange” unnecessary cut trees and decorate the area with a beautiful and practical path
An old tree can be found right at your dacha or in the nearest forest. We cut the trunk into small segments - from 10 to 20 cm thick. Thick branches are also useful - small round ones are suitable for decorating a site or the edges of a path.

There are several options for constructing a garden path from saw cuts: one uses flat parts, the other uses stumps
In the planned area, remove the layer of turf and dig a shallow trench.
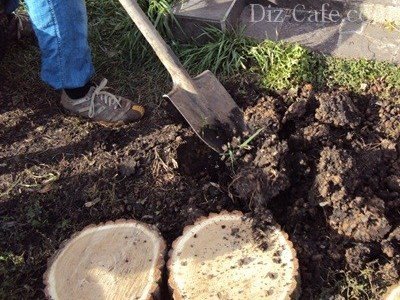
When removing soil when digging a trench, do not take it outside the dacha: it will be useful for filling the voids of the path, and the remains can be used for a vegetable garden or flower garden
We fill the bottom of the trench with sand, a layer of 5 cm is enough. We compact it and level it.

Place the sawn hemp along the path: this makes it easier to imagine how many of them will be needed, and in the future it will be easier to use when laying
We lay out the cuts on the prepared base. Using a level, give them a horizontal position; a wooden sledgehammer or large hammer is perfect for this. In some places, voids form - they can be filled with small saw cuts.

When laying large elements, do not worry about the large number of voids that remain between them: they can be easily filled with small stumps, gravel or pebbles
Gaps between wooden elements cover with sand or earth. In spring they can be planted with lawn grass or small flowers - this will make the path look more artistic.
To determine how to lay out beautiful decorative paths in your dacha, just look around. Don’t be afraid to use your own technological secrets and design solutions during construction - then your summer cottage will become truly unique.
Neat paths, gracefully winding between green spaces and landscape decor, are an integral attribute of any garden. So, if you want your site to be truly well-groomed and complete, do not neglect the paths. Fortunately, to equip them you don’t need to spend fabulous sums and attract professional designers – beautiful paths You can do it yourself, seriously saving on both materials and labor. How? There are many answers to this question, because there are a huge number of types of garden paths that can be laid at low cost. Next, we offer you instructions for the most popular options with accompanying photos and videos - after reading them, you will definitely be able to effectively improve your area.
Original path made from wood cuts
Wooden round timber is a very simple but original material for garden paths. Raw materials for them can be found on every site - there are probably old trees everywhere that would be time to replace them with new seedlings. It is advisable to use larch or oak - they are the most resistant to external influences, which means they can boast a long service life. The path from the saw cuts is made according to the following scheme:

Advice. In order to protect the path from moisture and increase its durability, arrange simple drainage - place a layer of fine crushed stone between the sand cushion and the saw cuts.
Durable paths made of stones
One of the most durable garden path options is made from natural stone. Here you can use cobblestones or rubble - they are equally durable. The path is laid as follows:
- Mark the garden path.
- From the area where you plan to lay the path, remove the top layer of drainage. The depth of this layer should be 7-10 cm greater than the height of the largest stone prepared for the path.
- Fill the resulting trench with a 10 cm layer of sand, carefully level it and compact it.
- Place one by one on sand cushion stones, pressing them firmly into the base. The distance between small stones should be no more than 2-3 cm, and between large ones - up to 8-10 cm.
- Carefully fill the remaining gaps cement mortar. Once the track has set, fill the seams with soil or fine sand to make them look more natural.
Classic concrete paths in the country
Concrete is a traditional material for laying paths, which is always popular due to its low cost and ease of use. Anyone can definitely make a cast path:
- Mark the boundaries of the path - drive pegs along its contour and stretch a wire between them.
- Within the designated contours, dig a small trench up to 30 cm deep.
- Place a 5 cm layer of gravel and the same layer of sand on the bottom of the base. Compact the resulting pillow.
- Cover the base with chain-link or any other thin metal mesh.
- Install lumber formwork along the perimeter of the future path.
- Prepare a cement mortar: 1 part dry cement, 1.5 parts sand, 2 parts gravel and 1 part water.
- Pour the cent and evenly, with vibrating movements, using a spatula, distribute the composition over the entire area of the path. During installation, pierce the mixture with a rod to prevent the formation of voids.
- Use the rule to do final leveling paths and cover it with plastic.
In 3-4 days the path will be ready. All this time, do not forget to gently moisten it with water to protect the concrete from cracking and give it maximum strength.
Advice. To make the path more interesting, even before concrete mixture to finally set, “drown” various decorative pebbles, pieces of glass or shells in it.
Budget garden paths made from tires
Transport tires have long been widely used in dacha farming: they are used to make flower beds, ponds, swings, and now also garden paths. This trend is not surprising, given the operational characteristics of the material: tires are resistant to moisture and temperature changes, easy to care for, do not slip and are durable. You can arrange a garden path out of them like this:
- Using a knife, divide the tires into two parts: rolling tracks and sidewalls. To make the knife fit into the rubber easier, lubricate it regularly with oil or soap.
- Cut ribbons from the resulting rings. Adjust them to length and trim the edges.
- Take wide wooden boards and carefully nail rubber bands onto them so that they completely cover the wood - there should be no empty spaces between the elements.
- Remove the top layer of soil no more than 5 cm deep along the entire length of the future path and press wooden boards into the base. If desired, the rubber can be painted.
Country paths made of bricks
Another traditional material for garden paths is brick. It is recommended to use clinker products, as they are characterized by high resistance to various kinds chemical and mechanical influences. It is important that the bricks are intact and without chips, otherwise the path will turn out not only unaesthetic, but also unsafe.
The path is laid in this way:
- Mark the path: drive a peg around the perimeter and stretch a rope between them.
- Dig a trench along the marked contour - up to 25-35 cm deep.
- Place barriers made of bars or boards along the trench.
- Cover the space between the limiters, that is, the “body” of the path, with a 10 cm layer of gravel and compact it thoroughly. Place a layer of sand no more than 5 cm high on top.
- Remove the limiters and make curbs in their place: on both sides of the path, lay one row of bricks in the “edge” position.
- Form from bricks inner space paths: lay them in the usual position, gently tapping them with a wooden spatula or rubber mallet for them to sit down.
Advice. The bricks do not have to be laid closely - to give the path a more original look, leave small gaps and fill them with pebbles. In addition, you don’t even have to cover the gaps - after a while grass will grow in them and decorate the path.
Multi-format wooden walkways
Wood is one of the most beneficial materials for making garden paths, as it can be used in completely different forms. Let's consider two common options: paths made of boards and paths made of bark.
Site preparation looks the same in both cases:
- mark the path and remove the top soil - about 20 cm;
- lay geotextiles on the resulting trench;
- Place a 10 cm layer of gravel on top.
Further technologies diverge. So, if you are making a path from boards, prepare the component elements: adjust them in length and width and treat them with an antiseptic. If desired, you can give them a twisted shape. Next, install wooden supports along the edges and in the center of the trench along its entire length and secure them with cement mortar. The final stage is to nail the prepared planks to the supports.
If you want to build a path from bark, make sure that the material is durable - it should not crumble. Be sure to treat the bark with an antiseptic. Before fixing the material in the trench, lay a sand cushion on its base, and then drown the bark in it.
Garden paths made of tiles
Although tile cannot be called a very cheap material, it is still used very often for making garden paths. There are several reasons for this: aesthetic appearance, good performance and ease of working with the material. The technology for laying tile paths will convince you of the latter:

Now you know a lot interesting ways make a garden path with your own hands at low cost. Following simple instructions, you can implement any of the above options on your site, so feel free to get to work and discover new opportunities for improving your garden area.
Garden paths at the dacha: video
DIY garden paths: photo


In addition to functionality, paths in the country play a huge role in original design landscape. Availability of beautiful original tracks adds sophistication to the site and creates a positive impression of its owners.
Sometimes it is difficult to decide on the material for garden alleys in order to fully preserve the ideal harmony of the site, without going beyond the available budget.

It is important that the material chosen for arranging the paths is in harmony with the style of the garden. So after compiling estimate documentation, as well as calculating the required dimensions, you can begin to select the most optimal material.

Natural stone
On this moment natural stone is still considered one of the status and practical materials for various coatings.

Marble, sandstone, and granite are used. Based on the preferences of the owners of the site, a stone in a light or dark shade is selected. Stone alleys have a variety of shapes, but require professionalism when laying them.


Stone that is laid in plates is incredibly in demand. It's called flagstone. Identical and affordable option is considered to be an imitation of natural stone, which is offered on the market in a wide range of products.

The stone alleys look great, harmonizing with the trees and shrubs growing on the site. Natural stone goes well with pebbles.

Among the advantages of stone are durability of use, a high degree of resistance to mechanical influences, aesthetics, and a variety of textures and configurations. The disadvantages include a fairly high price, slipperiness when the surface is wet, and coating with a crust of ice in cold weather.


Paving stones
Garden paths made of paving stones are in demand due to their durability and high resistance to temperature changes.

A varied palette of shades and a variety of configurations make paving slabs universal material, used in a wide variety of design ideas.

The paving stones are easy to install and fit perfectly into any shaped garden space. By production type Paving stones are available in several types, so they can be sawn or chipped.

The advantages include versatility of use. Among the disadvantages is that laying at an unprofessional level can cause distortions.


Brick
Clinker brick is often used as a covering for garden paths, as it is convenient during installation, fits well into an area of any style, and is available in a variety of shades.

It is important to note that we are talking about clinker, since building bricks are not suitable for creating garden alleys.


Alleys made of wood
This type of garden path can hardly be called practical, however, additional impregnation and treatment can increase their resistance to the negative effects of mold and humidity.

To maximize the performance characteristics of the coating, it is advisable to use it exclusively on dry hills.

The most suitable tree species for organizing alleys is oak; the rest of the wood also has positive characteristics.


Inexpensive options in terms of price are wood cuts, as well as bars, and a more expensive option includes deck boards.

Among the advantages of wooden alleys are their originality and affordability. Disadvantages include impracticality and instability to mechanical influences.

Concrete alley
Poured concrete alleys have become widespread in suburban areas. This coating is considered a barrier to weeds and has increased resistance to the negative effects of moisture.

Forms for such alleys are sold in any specialized store. With this type of device, concrete becomes a true design find. Using dyes, colored parts are obtained, the shapes provide a specific pattern.

The advantages of concrete paths include practicality and durability, as well as external originality, while the disadvantages include the labor-intensive nature of the work process.


Choose the most suitable material and arrange beautiful and stylish alleys on your site!

Photos of paths on a summer cottage

Due to the passing into oblivion of the era of labor exploits on six hundred square meters, the owners summer cottages people began to think more and more often about their improvement, an integral element of which are garden paths. Design development and implementation garden plot, like any design project, necessitates integrated approach and bold experiments. If in the process of arranging the interior of a room, the auxiliary elements are construction and Decoration Materials- wallpaper, flooring, furniture and decor, then in the garden the beauty and unity of living nature comes to the fore, which provides a vast field for imagination. Garden paths will help to emphasize the unique nature of a suburban area and, at the same time, make it more functional. They are the ones that connect the residential building with the main buildings located on the site and are considered the personification of its beauty and harmony. Being a mandatory attribute of a suburban area, well-organized garden paths will give the area completeness and a well-groomed appearance. They will not only organically fit into the green landscape of the site, but will also divide it into sectors, making it more well-groomed. How to choose the right material for arranging a garden path and how to make a garden path with your own hands - read our article.
Garden paths - a decorative and functional element of the site
Development innovative technologies V various fields life, including in landscape design, allows craftsmen not to stop at garden paths, for the manufacture of which traditional materials are used ( clinker brick, paving stones or heavy paving slabs), and give preference alternative materials With original texture- gravel, pebbles or sawn timber. When answering the question: “How to make a garden path yourself?”, you must remember that a garden path creates additional artistic accents on the site, turning the courtyard into a real work of art, created in collaboration with nature itself. As for the functional purpose of garden paths, they act as a kind of frame for the garden plot and give it a finished look. In addition, they justify their functionality in the process of zoning a garden plot, within which they serve as dividing elements, organizing access to each of the sectors of the garden. And without that limitless possibilities landscape “painting” is expanded through the use of original materials of natural origin, such as wood, natural stone, crushed stone or slate.

Materials for making garden paths: brief description
When developing a plan for the location of garden paths on the site, immediately decide which paths will be the main ones, and, therefore, straight, and which ones will be secondary and more winding. The choice of material for their manufacture will depend on this. In accordance with the material used to make garden paths, they are usually classified as follows:
- Rigid or hard-surfaced tracks, for the manufacture of which monolithic elements are used. This variety includes brick paths, paving slabs and concrete;
- Soft or loose walkways made from bulk materials, such as tree bark, gravel, sand or crushed stone.
Let's take a closer look at the characteristics of the materials most often used in the construction of garden paths.

Concrete, paving slabs and clinker bricks
Concrete paths have long gone beyond generally accepted stereotypes and no longer resemble a boring gray ribbon of concrete. The concept of “concrete garden paths” includes not only paths paved with ready-made paving slabs, but also those made of a similar material own production. To produce such material, you will need molds for pouring paving slabs, which you can make yourself on your own site. If desired, during the preparation of the solution for pouring paving slabs, you can add dyes to it.
If you have chosen finished materials, experts recommend giving preference to slabs whose thickness is 50 mm. Concerning color range, choose tiles in sandy yellow, ocher, red or blue shades. The most wear-resistant and reliable for the manufacture of garden paths are considered to be tiles made by vibrocompression, and more decorative - by vibrocasting.

Despite the undeniable advantages of paving slabs, Lately Clinker bricks, characterized by high strength and moisture resistance, are becoming increasingly popular. Unlike traditional ceramic bricks, which absorb moisture and are susceptible to cracking after freezing, they are resistant to such changes in the aggregate state of water. If you lay out the track with a beat ceramic bricks, then it will last a little longer, but its service life, as a rule, does not exceed two years. At the same time, remember that the cracks formed during the installation of broken brick paths must be filled with fine crushed stone or coarse sand.

In addition, you can concrete the garden path, which requires certain professional skills. An equally reliable way to install garden paths is to lay pre-filled concrete slabs small in size, laid on a bedding.

Natural stone and flagstone
One of the popular materials for making garden paths is natural stone. The demand for this material is due to its strength, long service life and natural variety of shapes. For the installation of garden paths, both processed stone (quartzite, pebbles, diabase and others) and its untreated varieties, such as limestone, sandstone, slate or gneiss, can be used. Due to the high cost of natural stone, it is often replaced with concrete paving stones, which come in a variety of shapes and sizes. The path, for the installation of which concrete pavement stone was used, is resistant to high loads.
Another type of material of natural origin is flagstone, which is a stone that has been pre-sawn into plates. The flagstone installation technology is quite simple and involves laying stone plates on a previously prepared base, followed by filling the resulting gaps with backfill. Stone paths made of flagstone are considered a favorite option for landscape designers.

A tree that will make your garden cozy
Despite the fact that, at first glance, wood seems to be an unsuitable material for making garden paths, if properly processed it can be used to make quite durable elements landscape design. Moreover, it is one of the most available materials for making paths. If you want to quickly and cost-effectively diversify your garden landscape, the most suitable option for you would be to arrange paved paths wooden blocks, the height of which must be at least 20 cm. However, it is important to remember that this option will have to be abandoned if your site is located in a humid climate zone.

Any type of wood can be used as a material for paving the path, but it is recommended to give preference to hardwood, as they are characterized by higher wear resistance. To extend the service life of a wooden garden path, all its elements are treated with antiseptic compounds or fuel oil before laying; the lower part of the bars in direct contact with the ground is treated with liquid asphalt. To prevent wood from rotting, the bars are laid on a sand base. No less original version There will also be a path made of wooden cuts.

Paths made of plastic and scrap materials
Currently, there is an abundance of plastic tiles for garden paths on the construction market, for the production of which polyethylene or polypropylene is used. It is characterized by a square shape and the presence of a locking system, thanks to which its installation is greatly simplified. Installation plastic tiles can be carried out directly on the lawn or on pre-trodden paths. It is recommended to give preference to it if you want to quickly and cost-effectively lay a garden path. If you have free time, experts recommend laying paths in accordance with generally accepted rules, which involve organizing a backfill of crushed stone and sand, followed by laying plastic elements.

A more expensive, but at the same time, more attractive option is “garden parquet” - modern material for arranging garden paths, which are boards or slabs made of wood-polymer composite (WPC). Despite the fact that this relatively modern material resembles natural wood to the touch, in essence it is a compressed mixture of polymer and wood flour. Despite the fact that he is characterized by high decorative characteristics, this material is not found wide application due to its high, although not fabulous, cost.

As for available materials, they can be used here plastic bottles, old tires and many other household items that have found their way into the household.
In addition, paved paths using gravel or crushed stone are quite common. Their distinctive feature is that if a layer of 2-3 cm thick is organized and it is sufficiently compacted, they turn out to be comfortable for walking. As the thickness of the gravel layer increases, uneven surfaces form on the surface of the path, making it difficult to move along them. In this regard, crushed stone and gravel are more often used as backfill, on which rigid elements made of other materials are laid. If you lay them according to all the rules, the paths will be high performance characteristics, which is due to the ability of gravel and crushed stone to conduct water and prevent the formation of puddles.
Important! If you are not a fan of the gray tones typical of gravel and crushed stone, experts recommend painting these materials. This solution is very common among designers when organizing rockeries.

Advantages and disadvantages of concrete paths
Given the fact that sand-concrete mixture is one of the most popular materials when arranging garden paths, before answering the question: “How to make garden paths from cement?”, we will consider their main advantages and disadvantages.
Advantages of concrete paths:
- Durability and high strength characteristics of the material used;
- The arrangement of structures made of sand-cement mixture, including garden paths, is simple, and therefore even an inexperienced craftsman can handle the work;
- Universal availability and affordable cost of materials;
- Moisture and frost resistance of materials, which determines the long service life of concrete elements;
- Increased resistance to mechanical loads;
- Having made the formwork of a suitable shape, the master has the opportunity to make a concrete path of the desired configuration;
- Home craftsmen, including inexperienced ones, can carry out the entire range of work independently, without the involvement of assistants;
- If this is your first time thinking about the question: “How to make a garden path?”, the video presented in the article will help you understand in detail the intricacies of the installation process. Having studied it, you will already understand at this stage that wide opportunities open up for you for the subsequent decorative design of garden paths. For example, in the process of preparing the solution, you can add pigments of any color to it, use natural or artificial stone, or give preference to tiled mosaics. In the latter cases, one of the main criteria for work efficiency is the timely placement of design elements into a layer concrete mortar(no more than 2-3 hours should pass from the moment it is poured).

Disadvantages of concrete paths:
- Ground movements characteristic of the off-season can cause cracks to appear on the surface of the concrete path;
- Due to the fact that the concrete path is a capital structure, it is necessary to clearly think through its configuration and direction in advance, since these parameters are almost impossible to adjust later. In addition, with this in mind, it is important to plan not only the path itself, but also the area around it.
How to make a garden path using a mold: step-by-step instructions
Preparatory activities
Once you have decided on the location of the path, make its preliminary markings. To do this, drive pegs around the perimeter of the planned path and pull string over them.
Next stage preparatory work- assessment of soil density. If the top layer of soil is loose, it is necessary to dig a trench 8-12 cm deep and 45-65 cm wide, taking into account the dimensions of one shape and the indentations along the edges of the border. If desired, you can take double or triple width. After this, the earth is carefully compacted and 5-10 cm of sand and small crushed stone are added, after which the resulting composition is pressed again. At the same time, it is important to ensure that the ground does not sag;
If, when assessing the density of the soil, it turns out to be dense, all of the above measures need not be performed. It is enough just to compact the earth, lay a layer of crushed stone and sand 5 cm thick and compact everything again.
In the place where you plan to build a garden path, pour water on the sand, which is necessary to compact the foundation and maintain sufficient moisture in the concrete. To prevent the sand from drying out prematurely, it is covered with polyethylene.
Important! If you plan to move a car along the path, or you are laying out a parking area with tiles, experts recommend laying a reinforcing mesh on a gravel-sand base, which is cut with a grinder taking into account the size of the area. The use of fiber fiber is a profitable alternative to reinforcement.
The modern market offers big choice forms for garden paths, using which you can arrange concrete paths and platforms with the most outlandish patterns. Previously, we looked at how to make the shape of a garden path with your own hands, so let's immediately start laying the shape. How to make garden paths correctly if you already have ready-made forms?

Using a brush or spray, lubricate the mold with soapy water, a special lubricant that can be found in stores, or, as a last resort, recycled machine oil. Thanks to this, you can easily remove the form after the concrete solution has hardened.
Important! When using a specialized lubricant, the mold is processed once, with a soap solution - before each installation in a new position, machine oil - once every three fills.
Moisten the sand with water using a spray bottle, place the mold on the previously prepared bedding and press it in so that the future tiles protrude at least slightly above the level of the surrounding surface.
How to make a solution for a garden path?
In the process of preparing the solution, you can use three options:
- Using the standard ratio, prepare a solution consisting of 1 part cement and 3 parts fine-grained sand;
- Another option involves preparing a solution consisting of 1 part cement, 3 parts sand and 4 parts fine crushed stone;
- The following ratio is also relevant: 1 part cement, 4 parts sand and plasticizer.

Sometimes, to increase the strength characteristics of the track, crushed stone, a plasticizer, and reinforcing fiber are used simultaneously.
If you plan to arrange a colored path, add a special dye for concrete to the working mixture. Optimal quantity dye - 2-5% of total mass cement. There is also a liquid pigment on sale, which is added to the finished solution.
A plasticizer added to water or a dry mixture will provide the finished track with resistance to changes in temperature and humidity, making it more durable and, at the same time, smooth and elastic. In addition, the use of a plasticizer can reduce cement consumption by 15-20%.

Laying a garden path
- The next point that needs to be considered when answering the question: “How to make a garden path from a mold?” This is the direct laying of a garden path.
- Place the form on the bedding and place the cement-sand mortar on top of it, filling it as evenly as possible and eliminating the formation of voids. Using a trowel, compact the mixture and remove excess mortar, paying attention to the top of the tile, which should be as level as possible.

- After 25-30 minutes (usually this is enough for the solution to thicken), carefully, holding the diagonal corners of the mold, remove it, lifting it straight up. If you have difficulty removing the mold, you can lightly tap it with a trowel. The first tile fragment is ready. Next, move the form to an adjacent place and repeat all the steps indicated above. In this case, it is important to control the vertical installation of the form using twine, a long strip or building level. Once you've finished installing the path, cover it with plastic to protect it from rain and animals while it dries.

- After a couple of days, you can already step on the path, and walk after 4-5 days.
- The seams formed between the tiles are filled with sand, which must be thoroughly compacted, or with soil, into which grass is subsequently planted. For this purpose the seeds lawn grass pour into the compacted seams and, after rolling with a wallpaper roller, sprinkle the soil on top.
How to make a garden path with your own hands video
General impression of summer cottage will be incomplete if it is not decorated with beautiful and comfortable garden paths. Not only the appearance of the territory, but also the organization of management depends on how well they are located and well made. economic activity. Paths in the country can be made of various materials and in different ways.
Choosing material for a path in the country
Many summer residents ask the question: what is the best material to make paths from at the dacha? The answer to this question depends on its size and the person’s material capabilities.
Some paths made from scrap materials have a more attractive appearance than traditional ones made of concrete or concrete slabs. Paving in the country should be economical, practical and durable. The material for country paths can be very different. Most often, common improvised and building materials are used to make them. IN last years people are increasingly producing. All materials used for this purpose can be different in color, texture and decorativeness. Most often, they make their own paths with a compacted surface layer or with a hard surface.

The photo of the paths at the dacha simply amazes the imagination with its diversity. The simplest ones are compacted paths made of sand, pebbles, gravel, and broken bricks. Some summer residents use wooden cuts to complete this element of their summer cottage, which give it a special decorative effect.
For this purpose, only hard woods treated with special impregnations are used.
Video: making a country path from stumps
The hard surface can be made of brick, natural stone, concrete slabs, paving slabs or monolithic concrete. Various patterns can be made from this material, which will give the area additional decorativeness. This path is much stronger and more durable than compacted ones. It is distinguished by its practicality, but it costs much more than one made from scrap materials.

The border plays an important role in creating a path at the dacha with your own hands. It not only fixes clear boundaries, but also protects its edges from destruction. The border also plays a decorative role. Although curbstone is a desirable feature, its presence is not considered mandatory. Most often, paths without a border are made of concrete slabs with large gaps between them and natural stone with a curved configuration of the boundaries.
When coverings made of sand, pebbles, slag, gravel, a curb is necessary. The most practical and durable concrete curb laid on concrete base. For curved paths, it is better to choose curbs made of brick, flat stone or tiles laid on edge.
By choosing the right material, you can create a harmonious system of paths, made in the same style and ideally combined with general view plot.
- So, wood is most suitable for decorating a site in a rustic style.
- Natural stone is ideal for making curved paths.
- Brick goes well with buildings made from it. To make paths, special types of paving bricks are chosen that are not afraid of moisture and cold.
- Paving stones of different shades allow you to create unique patterns.
- Paths made of gravel and pebbles are most suitable for garden areas and near artificial ponds.
In recent years, people have had the opportunity not only to create paths from monolithic concrete, but also to give it an original shape. To do this, it will be enough to buy plastic templates of various configurations in a specialized store, which will allow you to cast concrete elements yourself.
Some materials used to make paths combine perfectly with each other. They combine so well:
- concrete and brick;
- river pebbles and wood;
- multi-colored gravel and natural stone.
Planning country paths
Before you make paths in your dacha, you need to correctly draw up a diagram or site plan on which to depict the planned directions, taking into account all the buildings and plantings located on the site.
When developing them, one should take into account the amount of precipitation that falls in this area. Sometimes it is necessary to create a drainage system so that there is no stagnation of water on the site. It should also be remembered that when excess water freezes, it quickly spoils not only wood, but also materials such as concrete and brick.
Large trees should not grow near paths, as they can destroy them with their powerful roots. When drawing up a more detailed plan, the picture of the dacha landscape will be clearer and it will be easier to make a choice in favor of one or another building material.
For almost all types of country paths, one technology for laying them is followed. All work is divided into several important stages:
- Site marking. At this stage, the contours of the path are marked using a cord and pegs. The edges are carefully drawn along the outlined lines.
- Using a shovel, remove the turf along the length and width of the intended path. The soil is removed to the thickness of the sand cushion that serves as the basis for paving. The thickness of the base layer must be at least 10 cm.
- Sand (sometimes crushed stone) is poured into the dug trench and carefully compacted and leveled.
- Paving is laid on the sand, carefully ensuring that the level of the path is maintained.

Do-it-yourself budget paths in the country
The most popular in the country are the following options tracks:
- Path made of gravel or small pebbles. They are made very quickly, but are not durable. The soil in the trench is treated with herbicides and covered with polyethylene or agrofibre to prevent weeds from germinating. A layer of pebbles or gravel is poured onto it and the surface of the path is leveled. To prevent this material from scattering throughout the area, it is necessary to create a border, for example, from tiles or bricks.
- Path made from wood cuts. To create it, trunks and thick branches of cut hardwood trees are suitable. They are cut into circles. The thickness of the material should be more than 10 cm. Well-dried saw cuts are treated with hot drying oil, which is applied with a brush over the entire surface. After the impregnation has dried, the treatment is repeated. A plastic film is laid on a pre-prepared sand cushion. The saw cuts are laid on it in any fancy pattern and leveled. All voids between them are filled with gravel, sand or soil.
- Country path made of stone can be made not only from purchased material, but also from what can be found in almost any area. When choosing elements, you should give preference to a stone that has at least one flat side. For such paving, the trench must have a depth of at least 20 cm. Crushed stone (10 cm) is poured onto its bottom. It is compacted, and sand (10 cm) is poured on top and compacted again. Stones are placed on the prepared sand and crushed stone bed. To fill the voids between them, sand is poured on top and all the voids are filled with it. At the final stage, the path is thoroughly watered. It may be necessary to refill the voids between the stones with sand.
- Paving stone path. This option is one of the most optimal. The depth of the trench for such material should be 20-25 cm. A sand-crushed stone cushion is created in the same way as for a stone path. Paving stones more than 60 mm thick will protrude above the soil. This path is best done with curbs. The paving stones are laid on sandy base tightly to each other. In this case, the pattern can be very diverse. When laying, you cannot use paving stones with signs of defects, as they will quickly become unusable.
- Brick path. It is created according to the same principle as a paving stone path. The same brick placed on edge is used as a border. Paving made of bricks of various shades looks especially attractive.

Concrete path (video):
concrete path
Roads in the countryside made of monolithic concrete still remain popular. To make them you need a large number of cement, sand and crushed stone. But they are durable and practical. When performing them, one rule should be remembered: the more cement in the solution, the stronger the concrete will be. For paths, the following proportions of materials are most often used:
- cement – 1 part;
- crushed stone – 3 parts;
- sand - 2 parts.
In order for such a path to rise above the ground, it is necessary to make formwork from boards underneath it. Stones, broken bricks or other hard materials are laid at the bottom of the trench. construction garbage. The solution is poured into the formwork and its surface is leveled. Concrete can be decorated with tiles, mosaics or beautiful stones, pressed into the uncured solution.

Tile paths
Paths made of concrete slabs are very popular. various sizes. They are easy to install and are distinguished by their durability. A sandy base is also placed under them. A country path made of 50x50 or 40x40 cm tiles looks quite impressive, does not take up much space and is very practical. By using smaller tiles you can create various options paving patterns. They can be laid close to one another or with some intervals, which are covered with small stones or soil. They can be sown with grass.
Country path (video)


