Often the first structure erected on the site allocated for construction is a toilet. Very often it is done hastily, as if temporarily, and then other, more important concerns appear, and hands do not get around to it. The toilet needs to be built immediately - permanent, hygienic, comfortable and economical.
As a rule, a toilet booth has an area of 1x1 m - this is enough for normal functioning. However, it is more rational to make it somewhat more spacious, 1.2 x 1.5 m or even 1.5 x 1.5 m. Increasing the area will make it possible to make a double toilet, as well as equip open or closed shelving for storing fertilizers, chemicals, etc. winter time toilet stall can be used for storage collapsible greenhouse, watering hoses, equipment and other things.
For various reasons, the idea of installing a cesspool under the booth should be rejected. The cesspool will become a problem for the owner when he will have to obtain approval from the sanitary and epidemiological inspection service when registering the construction. An excellent solution would be powder-closet.
How to replace a cesspool
The function of a cesspool is performed by a metal container (for example, a bucket) with a capacity of 12-15 liters. As the contents of the container are filled, a certain amount of ash, peat or sawdust is sprinkled on top from a box specially installed for this purpose. The approximate period for filling the collection tank is 10-14 days.
It is better to empty collection containers into the ground to a considerable depth (about 1 meter).
It's done like this. By using garden borer in the ground on the border trunk circle fruit tree or at the level of its crown, a hole with a diameter of 200 mm and a depth of about 1 m is drilled. A collection container is emptied into this hole and again filled with excavated soil. It is as if the feces are sealed in the main soil. The next emptying can be done nearby, retreating in a circle by 20-25 cm.
Before emptying the collection container, you can place not a large number of slowly decomposing waste (broken glass, ceramics, etc.)
Building a toilet in the country
Country toilet project 
Making a toilet booth is akin to building a model of a house: design (sketch), marking on the ground, foundation, lower frame, erection of walls, top frame and rafter system, roofing, flooring, door hinges, glazing, interior design And exterior decoration. All construction elements are simplified, minimized, almost toy-like, but they allow you to gain experience and practice working techniques.
The project (sketch) determines the shape, main dimensions of the toilet, as well as the initial Construction Materials and their number. The appearance of the future structure is determined by the presence of one or another building material.
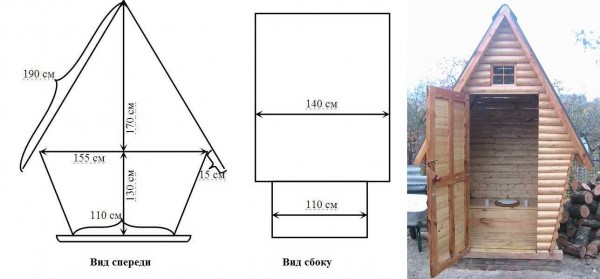
Usually the toilet is made of wood, but you can use asbestos cement slab (flat slate) and even foam concrete blocks. The most common form of toilet - the “birdhouse” - is the most rational: it is technologically advanced and has a large functional volume.
If the project (sketch) has been drawn up, that is, the main dimensions have been determined, the site is marked on site: pegs are hammered in and cords are pulled to define the boundaries of the building. The rectangularity is like this small area can be set using an unfolded sheet of newspaper, and accuracy can be checked using a tape measure, measuring the diagonals.
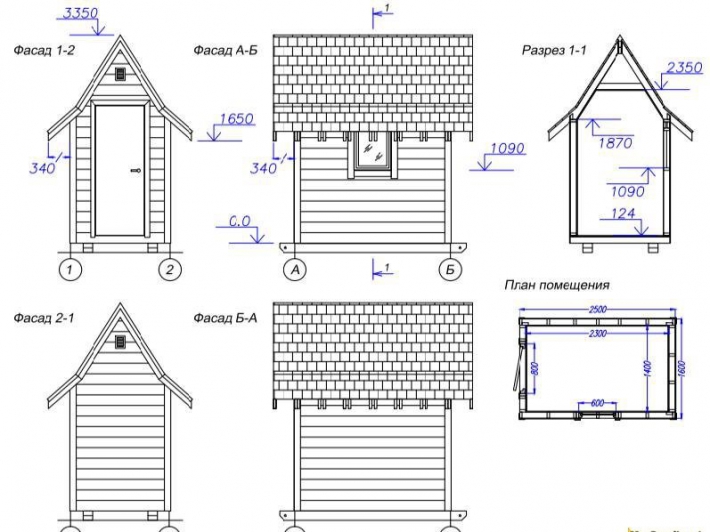
Below you can see a few examples drawings of country toilet projects. To view you must click on any of the images.
Drawings of country toilets


Toilet foundation
For most toilet stall designs, four concrete blocks measuring 260x330x440 mm installed in the corners are suitable as a foundation. To install them, you only need to remove the top soil layer (15-20 cm). It is important that the upper surfaces of the blocks lie in the same plane.
The plane can be checked using a level and a piece of a suitable board. Two or three layers of roofing felt are placed on top of each block for waterproofing.
On foundation blocks the lower trim is installed. The easiest way is to make it from pieces of timber, tied “in half a tree” and tightly tied with staples (the rod of the staple is recessed into a specially hollowed-out socket on the surface of the beams). It is preferable to use an edged board (40 or 50 mm thick) for the bottom trim.
The sides of the bottom trim are made from two pieces of edged board, nailed through a spacer of the same thickness, as shown in the figure below.

In this case, grooves are naturally formed in the lower trim, into which the tenons of the enclosing walls can then be inserted. The sides of the lower trim are fastened using cap screws (diameter 8-10 mm).
Walling
Due to their small size, the walls of the toilet booth can be made in the form of panels from upholstery boards (lining). Sections of upholstery boards of a given size are stuffed onto two planed frame boards, which have the same thickness as the bottom trim boards. The front shield is stuffed onto three boards so that you can frame the doorway.
To give rigidity to the panels, a strut must be inserted between the frame boards. The pictures below show the front, rear and side shields. Parts protruding from the bottom of the shields frame boards are spikes that, when installing the booth, are inserted into the grooves of the lower trim. 

Installation of walls consists of sequential installation of panels into the grooves of the lower trim and fastening the frame boards of adjacent panels using wood grouse screws (3-4 pieces per corner). Essentially, these cap screws perform the function top harness, as they give the necessary rigidity to the entire structure.
Country toilet roof
The rafter system is just two boards embedded in the upper part of the side panels (picture below).
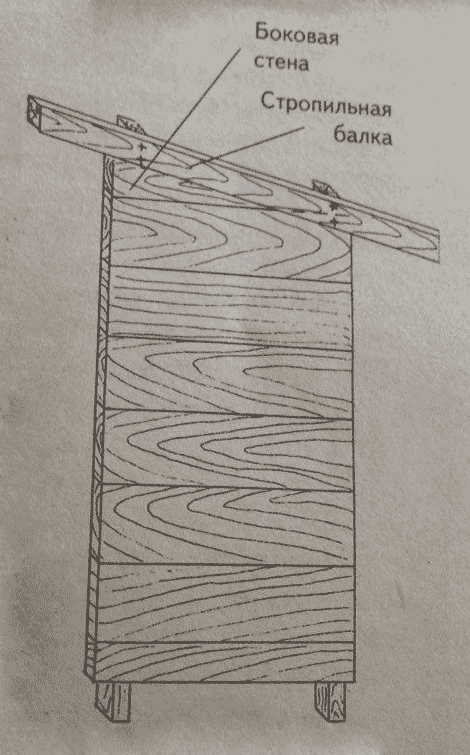
The sheathing is placed on these two boards, which is best made solid from clapboard front side down. In this case, there is no need to hem the ceiling and roof overhangs.
A reliable and simple roof is made from two layers of roofing material. Ruberoid is attached to the sheathing
felt buttons with a frequency of 15-20 cm.
Flooring
The floor is laid from edged boards 50 mm thick. Facial and side surfaces floorboards are cleanly cut and nailed to internal boards bottom trim with gaps (slots) of 5-10 mm. The gaps will facilitate ventilation, as well as drying the floor after wet cleaning.
Door hardware

The door to the toilet consists of a frame with a strut and trim. The brace cuts diagonally across the frame, running from the top corner of the narthex to the bottom hinge. The cladding is made of lining placed vertically. It is advisable to equip the door with a rim lock for locking at the end of the season.
Toilet container
The collection container is placed in the frame shown in the figure below. 
The frame is made of bars with a cross-section of 40×40 mm or 50×50 mm. In the frame, the front wall is completely covered with clapboard, and the upper wall, in which a hole is cut, is made entirely removable. In this form, this structure is most convenient for hygienic cleaning (washing and frying in the sun). Removable top cover allows you to conveniently attach a simple “apron” (a piece of vinyl chloride film). In the powder closet booth there should be another box or other container with peat, ash or sawdust.
Flat slate toilet

Flat slate toilet
Wood, of course, is the most affordable and technologically advanced material, but if for other buildings (garage, outbuilding) it is planned to use an asbestos-cement slab (flat slate), then it is also suitable for a toilet booth.
To work with asbestos-cement slab, you will need an electric cutting machine (grinder) equipped with a stone abrasive or diamond cutting disc. Asbestos cement sheets 8-10 mm thick are cut to form the front, back and both side walls of the toilet booth (similar to Figure 2 above). These walls are assembled with screws using frame boards, and then installation is carried out in the same way as described above. In this case, the door leaf is also made from an asbestos cement sheet mounted on a wooden frame, which is used for inserting hinges, locks and other mounting devices.
For convenience and safety of using products made from asbestos cement sheets, it is advisable to cover them with film-forming compounds (varnish, drying oil, paint, etc.).
Video
DIY country toilet
DIY country toilet and shower
Do-it-yourself toilet in the country: powder-closet without a cesspool
🔨 It’s easy to make a country toilet with your own hands if you put in some effort and effort. We have selected drawings with dimensions for popular country toilets that will serve you for decades! Also in the article you will find step-by-step photo instructions for the construction of a country toilet.
The most labor-intensive stage in the process of constructing a latrine will be digging a pit, but this work can be done. The aesthetic side of the building is a secondary issue; the most important thing is to properly arrange the cesspool and create a reliable foundation for the above-ground structure.
It should be noted that some owners of suburban areas do not build a toilet according to the rules and make do with an ordinary bucket placed under the toilet seat. But, one way or another, waste needs to be disposed of somewhere, so you still can’t do without a capital pit. Therefore, it is better to do all the work correctly once and not return to this issue for many years. It is especially important to make a permanent structure if the residents spend a significant part of the year at the dacha.
When If If you don’t want to spoil the design of the site by installing it, you can hide it in the far corner behind the house, or come up with a design for it that will help the building organically fit into the landscape.
Choosing a toilet location and its design
Usually the toilet is installed closer to the far boundary of the site, and this is understandable, since even a slight smell will be present in this room or near it. But sometimes they use another option, installing a cesspool next to the house, and setting aside a free corner of the house for the toilet, leading a wide sewer pipe into the pit. This design is mainly used in cases where water is supplied to the house, and there are plans to install an insulated container for collecting waste.
In any case, you should adhere to the standards established by the sanitary and epidemiological services. They must be followed in order to protect yourself, your neighbors and environment from undesirable consequences, such as infectious diseases or soil contamination.
- If a cesspool is installed, it must be located at a distance of at least 30 m from water sources, and its depth should not reach groundwater.
- If a septic tank is installed, it should be located no closer than 15 m from the house.
- If you plan to use an insulated container that will be cleaned as it fills sewage treatment plant machine, it can be installed anywhere, since waste will not enter the ground.
An insulated container is also a solution in cases where groundwater do not pass too deep and the construction of a cesspool dug in the ground is impossible.
Typically, the pits of the simplest country toilet have an area of about one square meter. If the hole is round, then its diameter should be approximately 1 m. Its depth is 1.5-2 m, depending on the depth of groundwater.
Once the location for the pit has been determined, you can proceed to choosing the design of the toilet.
- The first thing to consider is the weight of the structure - it will largely be determined by the material that is planned to be used for construction. The house itself should not be too heavy, since over time the soil under its weight may begin to sag and, in the end, the building will become deformed and damaged.
Good for construction wooden blocks and boards, or thin metal - galvanized profiles and corrugated sheets.
If you decide to build a toilet booth from logs or bricks, then you will have to think about a well-fortified foundation. But there is absolutely no point in building such heavy buildings, since they still will not become warmer than light buildings. It's better, if necessary, thermally insulate room with insulation that is light in weight, for example, polystyrene foam. Such a building will be light and warm, not drafty in the cold season, and it will not be excessively hot in the summer.
- Having decided on the material, you can move on to the size of the booth.
Typically, a standard toilet has a width of 1 m, a height of 2.3 m, and a room length of 1.3 ÷ 1.5 m. However, these dimensions are by no means a dogma and may well vary. In any case, the room should be comfortable for any family member to be in, both standing and sitting.
What is needed to build a toilet
Having decided on the design and placement of the toilet, they purchase the necessary materials for its construction. A wooden or metal “house” can be purchased ready-made. If you decide to build it yourself, you will need the following materials:
- Boards and wooden blocks.
- Fasteners - nails and screws.
- Metal corners to strengthen the structure of a wooden frame.
- Door handle, hook or latch for closing the door.
- Roof covering material – slate or corrugated sheet.
- Plastic or wooden toilet seat with a lid.
- At necessary - polystyrene foamst for insulating the booth, and material for internal lining insulated walls, chipboard, thin board or plywood.
To construct a cesspool you will need:
- Cement, crushed stone, sand.
- Reinforcement for strengthening the foundation of the house.
- A metal mesh netting for covering the pit and metal brackets or pins for attaching this mesh to the ground.
Another option, instead of using a mesh and plastering it with concrete, could be brick, which is used to line the walls of the pit.
In addition, pits with holes in the walls are often used to construct pits. Many summer residents prefer old rubber tires of large sizes.

Another, most environmentally friendly option, could be ready-made capacity- septic tank. They are produced in different sizes, so you can choose the one you need, depending on the number of family members and the length of the period of residence at the dacha.

Naturally, when building a country toilet you cannot do without tools, so you need to have:
- A hand drill that can help when digging a pit.
- Sovkovaya and bayonet shovel, with long and short handle.
- If the soil in the area is rocky, you may need a hammer drill.
- Hammer and screwdriver.
- The grinder is a grinder with discs for stone and metal.
- Jigsaw.
- Marking tool – ruler, tape measure, square, building level, pencil or marker.
Prices for popular septic tanks
Construction of a cesspool
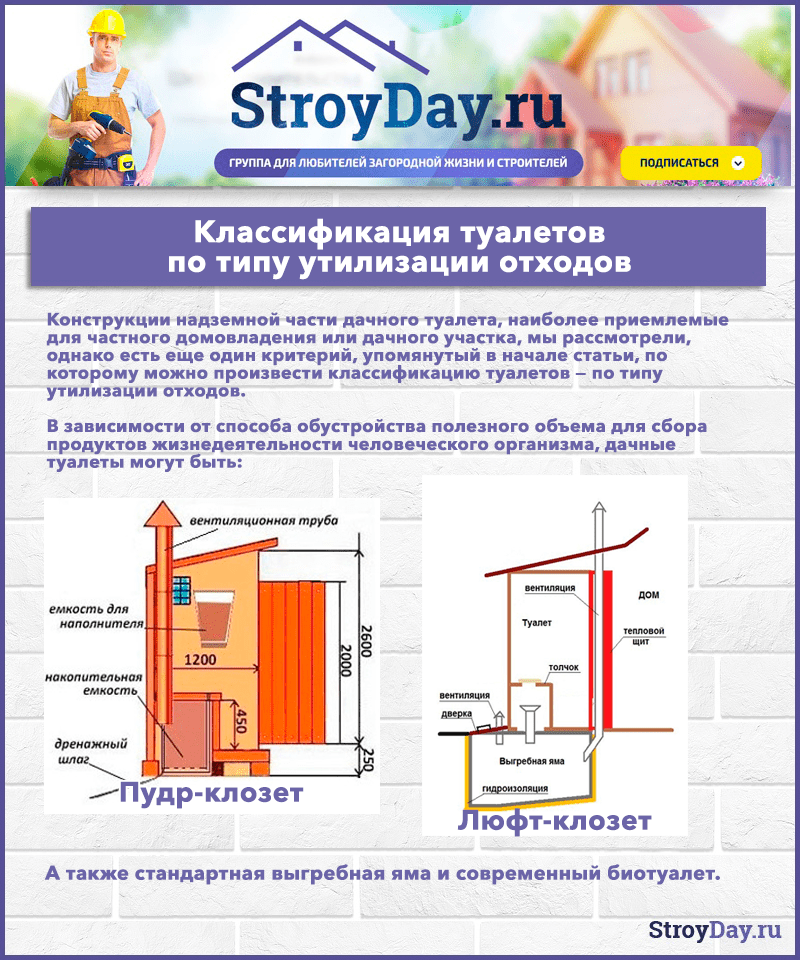 Classification of toilets
 by type of waste disposal
Of course, they always start with marking and digging a hole. It will have a square or round shape, depending on the chosen design.
1. If a two-chamber plastic septic tank, then the hole is dug in such a way that the inlet pipe is located directly in the toilet stall, since the toilet seat will be mounted on it. The neck of the second chamber should remain outside the room - it is needed for regular pumping of accumulated fecal matter.

Tanks come in different shapes, and the dimensions and shape of the pit will depend on this. The size of the pit should be made 20-30 cm larger than the existing container, since the soil around it needs to be compacted well.

2. If the walls of the pit will be finished with concrete or brick, it can be made round or square.

- After digging a hole of the required depth, at its bottom you need to arrange drainage from large crushed stone, stones, and fragments of bricks
- Then her walls become tight metal mesh with cells measuring 50 × 50 mm. The mesh is secured by driving steel wire or pins into the ground.
- To make the walls stronger, you can additionally reinforce the walls with a metal grid with large cells 100 × 100 mm.
- Next, using the casting method, concrete mortar is applied to the walls, which is left until completely dry. The total thickness of the concrete layer should be about 50 ÷ 80 mm.
- After the first sketched layer has set, the walls are plastered until smooth with the same concrete solution. The plastered pit is left to dry.
- The pit is covered with either a ready-made reinforced concrete slab or one made locally. It will serve as a foundation for the toilet and a platform around it.
- Boards are laid on the pit, which should extend beyond its limits by 700 ÷ 800 mm and be recessed into the ground to the same level as the ground. Boards must be treated with antiseptic agents. This wooden backing under the foundation can be completely replaced with concrete pillars.

- Two holes are left on the surface for installing a toilet seat and for a cesspool, which should later be covered with a lid. Formwork is installed around future holes.
- A thick polyethylene film is spread over the entire area of the future foundation.
- A reinforcement grid is laid on top of it, which is enclosed in formwork around the entire perimeter of the future foundation.

- The height of the formwork of the holes should be the same as that of the formwork of the entire foundation. The formwork boards will serve as beacons when leveling the surface.
- The concrete solution is mixed, poured onto the site, leveled and left to dry. For the durability and strength of the outer concrete layer, after initial setting, it is possible to “ironize” the wet surface with dry cement.

- Once the site is fully matured, it will be possible to install a toilet booth on the finished site. A hatch must be installed on the hole intended for pumping out accumulated waste. You can buy it in a store or make it yourself. The hatch cover should open and close easily.
3. Another option would be a round pit with car tires placed in it. But it should be noted that this type of cesspool is not suitable for permanent use. Such a toilet can only be used in dacha conditions, when residents come only sporadically, for example, on weekends, otherwise the collected waste will have to be pumped out very often.

- To construct a cesspool of this type, a round pit is dug 150 ÷ 200 mm larger than the diameter of the existing tires.
- A drainage layer 15-20 cm thick is laid at the bottom of the pit.
- Then the tires are placed exactly in the middle of the pit. on to the other to the ground surface.
- Around the tires, as they are laid, drainage from crushed stone and sand is filled and compacted. This process is carried out all the way to the top.
- When the tires are completely laid, a shallow strip foundation can be built around the hole. To do this, a trench about 500 mm deep is dug along the perimeter of the future toilet, into which concrete will be poured.
- Trench bottom compacted and covered with a layer of sand 50 ÷ 70 mm, which also compacted and covered with a layer of crushed stone of the same thickness.
- Waterproofing made of dense polyethylene is installed.
- You can do this in two ways:
- weld and install the reinforcing grid, install the formwork with a height of 100 ÷ 150 mm above ground level and then fill it with concrete mortar;
- lay a brick foundation and then plaster it with cement.
- After the mortar has hardened, the formwork is removed from the cement foundation, and the brick foundation is leveled on top.
- Roofing material is laid on its surface, which will separate concrete surface from wood.
- A ready-made toilet structure is either installed on the foundation, or it is erected independently.

For the convenience of the construction process, a wooden base-frame made of powerful bars is first attached to the foundation, and other structural elements will be mounted on it, depending on the chosen building model.
4. It is impossible not to mention another way of arranging a cesspool - using metal barrels with a cut bottom. They are installed one on top of the other and in the same way as in the previous case. A gravel mixture or a mixture of sand and crushed stone is compacted around the resulting pipe.
 A cesspool made of metal barrels obviously won’t last long
 Prices for country toilets
country toilet
It would seem that the method is simple to implement, but it has many more disadvantages than advantages. Metal barrels under aggressive influence both from the inside and outside, from the ground, it corrodes very quickly, and such a toilet will not last long.
Popular country toilet projects


Construction of a country toilet house
When both the pit and the site for installing the toilet room are ready, you can proceed to installing the house according to a pre-designed scheme.
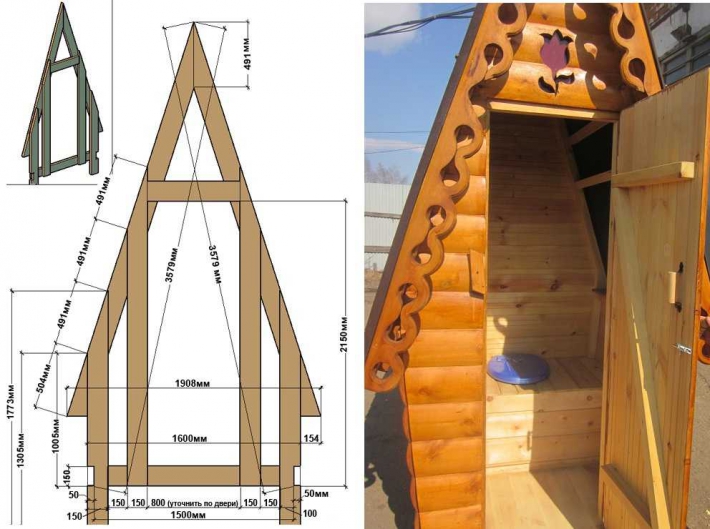
Toilet houses can have a wide variety of shapes, for example, even in the form of a fairy-tale hut. The uninitiated will not immediately determine what kind of room this fits so perfectly into landscape design plot. It is quite possible to make such a structure with your own hands, knowing the diagram of its assembly.
The photo shows an option partially made of logs, which give this structure a decorative appearance and disguise the purpose of the building itself.
 The original little house - you won’t immediately understand that it’s a toilet
 The diagram shows the basic construction of a log cabin, but instead of logs, boards are used. You can clearly see how the walls are assembled and the roof slopes rise. Distributed inner space and selected location toilet seat.
 Approximate diagram"teremka"
 The next stage will be roof sheathing, roofing and wall cladding with the material chosen for this - it can be either wood or metal.
Such a house can either be installed on a cesspool, or used as a room for a dry closet.
Video: making a house - a “teremka” for a country toilet
Another option for building a toilet is called a “hut”. In this case, the house is built in the form of a triangle, and its side walls are also the roof. The shape is quite simple, so erecting the building will not be difficult.
 Toilet - “hut”
This design is not only easy to construct, but also convenient to use - it is stable at the base and quite spacious inside.
Installation of a toilet - “hut”The presented figure shows the entire internal structure of the house, the installation location of the toilet seat and the method of sheathing the walls and roof. The cladding of the front part of the building and the rear wall has begun. The “hut” house can be placed on a equipped cesspool, as in this case, or it can also be used as a room for a dry closet.

This form of house can be called traditional, since it can most often be found on plots. But even such a simple design can be decorated according to your preference.
For example, the toilet on this garden territory it was decided to make it look like a Japanese house. This is indicated by the hieroglyphs written on a tablet suspended on chains, japanese lantern at the entrance and even an additional roof. In addition, the interior design of the room is also consistent with the general style.
This attitude towards the design of the site suggests that even from such a structure as this, you can make a small work of art if you put in a little effort.

An approximate diagram of the construction of such a toilet is shown in the figure. It clearly shows the structure of the cesspool, the installation of a toilet structure and a cleaning hatch on top of it. The design is quite simple in design, and it is not difficult to erect. But for it to be reliable, it is necessary to achieve rigidity in the connections between all parts.
The interior of a toilet, located above a cesspool, may look like this during the construction of walls. That is, foundation bars are installed on the foundation, onto which the frame of the future structure is fixed.


After final finishing toilet from the inside, the room can have such a neat and cozy appearance.
If desired and possibilities you can come up with another design for a country toilet, but do everything interior decoration needed from warm materials. Not recommended for use for decoration ceramic tiles, since this is a very cold type of material, and in addition, in winter, the tile also becomes very slippery.
Video: several options for constructing a country toilet
Dry toilet
If there is no way to build a country toilet or there is simply no desire to get involved with construction work, then you can use a dry toilet. This option will save you from digging a hole and, possibly, from installing a house.
 A dry toilet is an excellent solution for country houses
 - this is an autonomous toilet that does not require either a separate room or connection to drainage communications
The dry closet consists of two compartments-chambers, the upper one of which acts as a toilet, and the other serves for the biological processing of waste. The second, lower chamber contains active substances that decompose feces and turn them into a homogeneous mass that is odorless. The action of the bioactive liquid to decompose waste lasts for ten days, then the chamber is cleaned by pouring the contents into central sewer or into the soil. The disposal method will depend on what active substances will be used in the dry closet. These substances are T Three types: composting, chemical and microorganic. Each of them is suitable for a specific type of dry closet.
- For a composting dry closet, peat is used as the active substance. It has a high absorption capacity - for example, one kilogram of peat absorbs ten liters of liquid. The odorless compost obtained as a result of active processes is ideal for fertilizing beds.
Typically, such a dry closet comes with ventilation pipes that remove unpleasant odors during processing.
- A dry toilet, which operates using chemicals, has an indicator that will indicate that the container requires cleaning. Waste processed in this way is discharged into the sewer system in order to protect the environment. For such models, special substances with non-freezing properties are produced.
- The third type of this useful device is a dry closet in which microorganisms process waste, turning it into compost. The resulting material is environmentally friendly and harmless to the soil and animals, so it will not be difficult to dispose of it.
Advantages and disadvantages of a dry toilet
- high levels of environmental safety;
- ease of use;
- absence of unpleasant odors;
- affordable price;
- durable material.
- odor leakage is possible, installation in a ventilated area will be required;
- If the receiver container is heavily soiled, you will have to wash it yourself.
- It is not possible to use a peat dry closet in rooms with low temperatures. Due to the cold, all processing processes stop, the contents of the lower reservoir freeze, as well as the peat itself. The problem is solved by moving the dry closet to a warm room.
If desired, the dry closet can be installed in the most ordinary room, built with your own hands, which is located in the yard, and on winter period- bring it into the house, setting aside a convenient corner for these needs.
Prices for a popular range of dry toilets
Dry toilets
Biological toilet products
To help owners summer cottages that have pit latrines on their premises have been developed special means, similar to those used in dry closets.

Before using the product, be sure to read the instructions, since the composition is poured or poured in parts. You can learn how to use such substances correctly from the information on the packaging, since each product is dosed differently. This substance is usually used very sparingly. For example, one package or jar of some products lasts for a year for a cesspool with a volume of 3.5 ÷ 4 tons.
So, there are many ways to solve the problem of a country toilet - there is always the opportunity to choose one option or another.
One thing to remember when planning to build a toilet for your dacha with your own hands is: step-by-step instruction will be special for each of the options, of which there are quite a lot. Structures can work according to different principles, and materials for construction are selected taking into account their cost, durability and aesthetic appeal. Experts recommend that before purchasing materials and building a toilet, not only carefully consider the chosen option, but also make the necessary calculations, find optimal place for installation, draw a diagram or drawing.
When choosing a design to build a toilet in a country house with your own hands, they focus, first of all, on the comfort of using the building. Moreover, not only visiting the toilet should be convenient, but also servicing it. In order to do right choice, you should familiarize yourself with the operating features of each of the toilet options.
Pit toilets
The easiest option for waste disposal is a do-it-yourself toilet pit in the country. A house is installed above it, often called in everyday life, depending on the appearance, “birdhouse” or “hut”, the degree of comfort of which depends on the capabilities of the master. The pit is cleaned using a sewer truck. Similar designs - not the most perfect, but due to the simplicity of the device and cost-effectiveness, they remain popular and in demand when it comes to suburban areas, where owners do not appear often. Toilets with cesspools are also suitable for dachas where a small number of people live.
The photo shows a diagram of a toilet above a cesspool
Backlash closets
The backlash closet is an improved design of a toilet with a cesspool, distinctive feature it is the complete sealing of the drive. A backlash closet can be arranged in such a way that the toilet is located in a heated room (house), and the storage tank is located outside it (as a rule, against the wall adjacent to the toilet). The toilet is connected to the storage tank by an inclined or vertical pipe, through which waste flows by gravity into the tank. Due to the tightness, cleaning of the backlash closet storage can only be done with the help of vacuum trucks. Backlash closet more convenient and hygienic than a regular toilet in a country house with a cesspool.
 When arranging a backlash closet, the toilet is located in the room, which is an advantage of this type of design
 Powder closets
Powder closets are great in cases where when there is groundwater in the area close to the surface. This feature may cause trouble when installing other structures, but will not affect the operation of the powder closet. A significant advantage of this option for a country toilet is the ability to transform waste into environmentally friendly organic fertilizer . The powder closet gets its name from the principle of operation - the waste in the storage tank is sprinkled (“powdered”) with a dry composition (peat or peat-sawdust mixture). As a result, the occurrence of putrefactive processes is prevented and the likelihood of unpleasant odors is minimized. Waste, sprinkled with peat, is unloaded into the toilet tank as it fills. compost pit, where they turn into compost.

Powder closets can be stationary with large storage units or compact portable ones. In the second case, a small-sized structure can be brought into the house at night or during rain.

Dry toilets
The dry closets, which are a ready-made compact toilet, have become popular and have proven themselves really well in use. Their operating principle may be similar to the operation of a peat powder closet. Recycling and decomposition of waste in such peat dry closets occurs using a peat mixture.
In other models it is possible for recycling. Dry or liquid fillers contain cultures of certain types of bacteria.

In chemical models, active substances for waste decomposition are chemicals. When choosing, you should take into account that safe and effective fillers are more expensive than others, and some substances used by uninformed summer residents (bleach, formaldehyde, etc.) are prohibited due to toxicity.
Choosing a place to build a toilet
When telling how to make a toilet in a country house with your own hands, experts usually place special emphasis on where it is best to place the structure. In this regard, there are absolute requirements that must be met in any case. They determine the minimum distances from the toilet to residential and outbuildings, water sources and other objects:
- to a house that has a cellar or basement, as well as to a garage or barn with similar underground structures - 12 meters,
- to the source drinking water– 25 meters,
- to a barn without a cellar, garage or sauna - 8 meters,
- to the fence - 1 meter.
- Placing the building according to the wind rose will allow you to install the structure so that bad smell did not cause inconvenience to the owners and did not disturb the neighbors.
- If the site has complex terrain, it is recommended to choose a level place for the toilet, and if there is a source of water in the country, the toilet is located below it in level.
- If you need to use the services of a cesspool truck to pump out a toilet, you need to provide for the possibility of its access to the cesspool, taking into account the length of the equipment hose.
Selection of materials
Building a toilet in a country house with your own hands is possible from various materials. The choice is determined by the cost and availability of various options. For example, if outdoor toilet is arranged as a temporary structure during the construction of a full-fledged sewer system, you can choose cheaper materials. If the dacha is visited only in the summer and an outdoor toilet is the only option, it is better to choose reliability and durability, even if additional costs are required.
Wooden models
Wooden outdoor toilets are probably the most common option. It combines economy and practicality, however, it should be borne in mind that wood is susceptible to moisture. To protect the material, special impregnations can be used. The service life of the material can be significantly increased by primed and painted the boards. Lovers natural texture wood structures are often coated with a transparent, moisture-proof varnish.

Brick toilet
A brick toilet is a permanent structure that will stand for decades without requiring repairs. The cost of materials for such a structure is higher, but if you have some bricks left after building a house or garage, you should take advantage of this opportunity. If you are planning to build a brick toilet in your country house with your own hands, do not forget that the massive structure requires installation on a foundation. Experts recommend choosing a strip foundation for a country toilet. It requires less excavation work, reduces the consumption of cement for pouring, but ensures the reliability and safety of structures on almost any soil. Although for structures made of lighter materials it is also possible to use a columnar foundation.

Using corrugated sheets
A country toilet made of corrugated sheets is frame construction, covered with sheet metal metal material. The corrugated sheet has a coating that protects it from moisture, so it can be used for buildings on outdoors without any risk. The frame of the building is optionally made of wood or metal. The use of corrugated sheets can significantly reduce the construction time of a toilet.

Construction of a toilet with a cesspool
If you are building such a toilet for your dacha with your own hands, the step-by-step instructions begin with the storage device.
- Digging a pit. Its volume is usually calculated based on the conditions of use (number of people, frequency and duration of visits to a summer cottage, etc.). Usually a pit 2 meters deep is quite sufficient. The cross-section of such a pit is a square with sides of 1 meter or a circle with a diameter of one meter. These parameters can be increased slightly taking into account the need to strengthen the walls of the pit.
- Doing the bottom. The most in a simple way The bottom may be filled with crushed stone or gravel. However, this method does not exclude partial penetration of waste from the toilet into the soil. If groundwater is located in an area close to the surface of the earth, it is better to make the bottom impenetrable, for example, by filling it with concrete mortar.
- Strengthening walls. You can strengthen the walls of a cesspool for a toilet in a country house with your own hands using brickwork, concrete rings or concrete solution, using poured construction technology (the solution is gradually, no more than 50 cm in height at a time, poured into the formwork). In all cases, it is important to ensure the tightness of the structure (fill the seams between the rings, avoid gaps when making brickwork). For guard surface waters in the area to prevent impurities from entering them, the walls can be plastered or covered waterproofing layer for greater reliability.
Important: If the groundwater level in your area is higher than 2.5 meters, then the cesspool must be made completely sealed, including the bottom.
After this, the selected house structure is erected over the pit. Most often in such cases a wooden structure is installed.

Construction of a wooden house step by step


Toilet ventilation
Although correct device making a dacha toilet with your own hands allows you to minimize the appearance of an unpleasant odor, and many models eliminate the occurrence of putrefactive processes in the mass of waste; a dacha toilet made with a cesspool or other design must be provided with ventilation.
The ventilation pipe is inserted into the storage tank no less than 15 cm. Light and durable plastic pipes are well suited for these purposes. sewer pipes with a diameter of 100 mm. For stability they are attached with outside on the wall of the building using metal clamps. The ventilation pipe should rise approximately 50 cm above the roof. The ventilation pipe is protected from rain and debris using a deflector installed at the end of the pipe.
Construction of a backlash closet
If you are deciding how to build a toilet at your dacha yourself, a backlash closet should be considered as one of optimal options. It is very simple to implement and does not require significant expenses. At the same time, such structures are more comfortable than ordinary “birdhouses” with holes.
First of all, it is important to choose a location for excavation work. The waste pit, unlike many other structures, is located directly next to the house, since the toilet from which the waste will flow will be located inside the house. So, you need to designate a place for the toilet inside the room and a place for the storage tank near the adjacent wall. The depth of the pit must be at least 1 meter, and its walls must be completely waterproofed. Experts recommend making the bottom and walls of the tank from poured concrete, followed by covering the strengthened structure with a waterproofing layer (for example, bitumen). You can increase the reliability of waterproofing by using clay castle(layer thickness – at least 0.5 m).
The upper part of the toilet pit is closed with a double lid - a layer of heat insulation is installed between the layers of cast iron and wood. Gravity flow of waste can be ensured by the inclination of the pipe that leads from the toilet to the storage tank (in this case, at the construction stage it is necessary to provide an inlet for it, and after entering it, seal the seam) or by the design of the tank itself (an expanding pit that goes under the house in the direction from the toilet to the street with a sloping floor). Ventilation is necessary for the backlash closet. In the cold season, the efficiency of the hood can be ensured by the temperature difference, and in the summer it is better to use an exhaust fan.

Powder closet device
If you are building such a country toilet with your own hands step by step, the instructions will be quite concise. The simplicity of the device is explained, among other things, by the fact that the powder closet does not require the construction of a pit. For compact designs excavation are not needed at all, and for stationary ones a hole in the ground may be required in which to place storage capacity(bucket or tank). The construction of a powder closet boils down to installing a container under the toilet seat for collecting sewage and supplying the toilet with a box with backfill (peat, sawdust, etc.) and a scoop. You should fill up waste after each visit to the restroom.

Video
The video will clearly demonstrate how to build a toilet in a country house with your own hands. The video lists the necessary materials with dimensions, tools, and also shows the sequence of work with comments.
Toilet in the country photo
Here we have selected several photographs on the topic of our article “How to make a toilet in the country with your own hands.”


A toilet is the first structure that a land owner builds.
If at first you can somehow get by without a house by building summer kitchen, then the septic tank cannot be classified as a secondary structure.
For many summer residents, it is with its installation that the acquisition of construction experience begins.
How to build a country toilet? If you want to create a building that has original design, it is necessary to determine the dimensions of the building. You can take a standard drawing and develop a project that suits you based on your individual needs. 
An approximate plan for construction and design work looks like this:
- Start with creating a frame, put the dimensions of the building on the drawing. Calculate the amount of materials required for its construction. Indicate the section on the plan wooden beams and board sizes.
- Be sure to show in the drawing how it will be cut facing material . The diagram must have a calculation for one side wall of the building, as well as for its front and rear walls. Don't forget to add building materials for the other side wall. Optimal toilet width 1.2 m, height - 2 m.
- If you want to expand the building, make adjustments into the drawing. The front wall, like the back wall, is made rectangular shape. The side ones are trapezoidal, this allows you to achieve the desired roof slope. It is necessary to cut a window in one of the walls of the building, through which light will penetrate into the toilet in the country house. In addition, a window is necessary for ventilation of the room.
- Floor covering made from thick boards 50 mm, then the village toilet is lined OSB sheet. The boards are installed on a timber base; nails are used to connect the parts of the structure. In order to increase the strength of the building, all elements are connected into a groove. Its depth must be at least 50 mm.
- Make a door. Practice shows that the optimal sizes 1.95x70.5 cm. You can make toilets for your dacha from edged boards; construction is often carried out from OSB boards. When erecting the roof, lay the rafters, there should be a pitch of 40 cm between them. To make them, buy boards 100x50 mm. Nail them to the frame; the connection is made using nails. You can cover the toilet roof with slate or profiled sheets.
Maintain proportions. Remember that the increase standard size will entail additional costs for the purchase of building materials.
A standard drawing can be used as a basis wooden toilet. If desired, country toilets can be made to individual sizes.
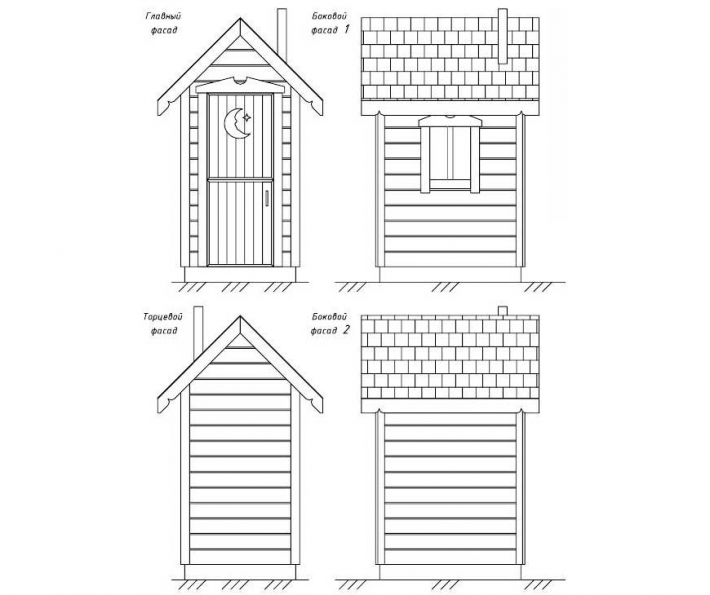
Drawings and design of a birdhouse type toilet

No matter which toilet you choose, it will require a stall. « Birdhouse » - one of the most popular options.
- To make the frame and floor, buy boards. It is best to choose larch lumber, then the structure will be especially durable. You can use pine boards on doors, sheathing and walls. All parts of the structure should be coated with an antiseptic.
- Make a foundation 1x1 m, place a magpie board on the floor. The front wall has a height of 2 m, and the back wall is 2.3 m. Be sure to use a level during construction.
- When the frame is ready, board the toilet. Install doors, after which you can proceed to work on the roofing installation. The process is completed by performing external work.
If you are going to make a “birdhouse”, equipping it with a cesspool, make a foundation. Concrete blocks can be used for this purpose. 20x20x40 cm. Cover the roof with a profile sheet, and make the ridge from a bent strip of galvanized steel.
Drawings and design of a hut-type toilet
« Hut » - another popular option.

- First assemble the front wall, and then move to the back. The easiest way to build a building is to make it from edged pine boards thick 30 mm, use self-tapping screws or nails for fastening.
- Install transverse and longitudinal beams, and then spacer. Make a crossbar for the pedestal, be sure to attach it to the back wall, and don’t forget about the spacer beam.
- After you finish working on the frame, boards sew up the base of the floor. Make a platform, and then move on to covering the slopes. After this you can collect and hang a door for a country toilet.
Drawings and design of a “teremok” toilet
For regions where winters are snowy, construction is ideal « teremok » . This toilet is perfectly protected from the wind. The shape is unusual; such a structure can be made from scrap materials.

Pay attention to the shape of the door . Its upper end is rounded, so construction will take more time.
Construction may seem enough to novice builders challenging task. Pay attention to the geometry of the corners, then the building will be symmetrical.
Powder closet
A powder closet is another construction option. Usually, you make a country toilet with your own hands in those places where groundwater comes close to the surface. The design differs in that it does not have underground waste storage.
The powder closet is great for the garden. But a house in which year-round living is planned is best equipped with a septic tank.
- The foundation is concreted, the toilet stall can be of any shape.
- A pedestal is made inside the building with a hole into which a waste container is inserted.
Backlash closet
Backlash closets are made both inside houses and outside.
- The toilet is cleaned using cesspool machines, this is done once a season.
- The cesspool is made airtight, this required condition which should be observed when constructing a building.
The toilet cubicle can be of any shape.
Shower-toilet
A toilet-shower for a summer house is a building that combines two rooms under one roof.
- A partition is erected between the toilet and shower; each section has its own door. Height and width of the building - 2 m, length - 3 m.
- Upper and bottom trim can be made from timber 100×100 mm, and for vertical supports– timber 50×100 mm. Buy timber at sufficient quantity, should do 24 supports.
- Also, do 12 blanks 200 cm long. They will be used for roofing, use timber with a section 50x100 mm.
Let's start construction
Materials and tools
 Before starting work, buy lumber in advance.
- To build the frame, purchase timber. Pay attention to its cross-section, the best option is 100 x 100 mm, to increase the strength of the building, you can buy lumber with a section 150 x 150 mm.
- To cover the toilet you will need edged board not less than 20 mm thick.
- Laths are required for roof sheathing 50×20 mm, and a tongue and groove board will go on the floor 40×150 mm.
You can easily replace the cladding board by purchasing OSB boards, or sheets of waterproof plywood. If you have chosen OSB, then the slats can be cut from these boards.
You will need the following tools:
- hammer, screws and nails;
- shovel and bucket;
- pliers;
- hammer drill or impact drill;
- brush for applying stain and paint;
- containers for solutions and paint.
How to choose a place
Determine the location where you plan to build the toilet. Its distance from the house and other buildings depends on whether it will have a cesspool, or whether the building will be built without one.
Remember that construction should not interfere with neighbors; do not forget to make a 1 meter retreat from the fence. The door should open towards your yard. When digging a cesspool, leave access roads for the sewer truck.
Pit toilet
Most restrictions apply to the construction of cesspools. They must be properly insulated to prevent environmental pollution.

- The cesspool should be located in 25 m from water source. This could be a well, borehole or pond. The rule also applies to water sources located in neighboring areas.
- From the cesspool to the basement or cellar there should be at least 12 m, to the bathhouse or home - 8 m. To buildings where animals are kept, not less than 4 m. Pay attention not only to the location of buildings on your site, but also on your neighbor’s. This will help avoid conflict situations.
Before starting construction, you must select internal organization toilet. The building can be with or without a cesspool.
If groundwater comes close to the surface, being above 3.5 m from the surface, you can only build without a pit. Otherwise, waste products will be found in the water.
If groundwater comes close to the surface, being above 3.5 m from the surface, you can only build without a pit.
Similar restrictions are imposed on buildings built on shale rocks and in areas with natural cracks. Consider the water level in the spring when the snow melts. The lowest point of the cesspool should be 1 m above the maximum water level in spring.
If the groundwater is deep, then any type of garden toilet can be made on the site. The optimal volume of the pit is 1.5 cubic meters; it can be located under the building or to the side of it.
The cesspool can be:
- round shape;
- square shape.
In the first case, concrete rings are used to arrange it. In addition, the walls can be made of brick and rubble stone to make a toilet for a dacha. But remember that this option will require labor, time and certain financial investments.
- Please pay attention Special attention tightness of the bottom and walls. At the bottom they make a castle from a layer of clay. It is compacted, the thickness of the layer should be minimum 30 cm. If you don’t want to work with clay, the bottom can be filled with concrete.
- Be sure to do bitumen waterproofing.
- Inside the toilet it is necessary make a hatch, or leave several boards on the floor loose. You can choose a design in which the hatch is located outside the toilet.
- It is recommended to equip the toilet ventilation system. When the pit is filled to 2/3 of its volume, the contents should be pumped out.
Detailed instructions for building a tire cesspool:
Options without pit
It is much easier to build a wooden toilet for a summer house without a cesspool. Human waste will be collected in a sealed container.
There are several types of such toilets, but the differences relate only to the method of waste processing.
- In biotoilets this is done by microorganisms, in chemical installations - by special substances.
- In the powder closet, the waste is sprinkled with powder, which can be peat, sawdust or ash.
We are building a house
When the work on arranging the cesspool is completed, you can proceed to the construction of the foundation.
It must be sustainable, and its reliability matters. These are the main points to pay attention to.
If the region often experiences windy weather, it is better to use metal pipes as the base. They must be buried in the ground, and the beams must be installed inside. This way the structure will be further strengthened.
If the region often experiences windy weather, it is better to use metal pipes as the base.
The frame is made from wooden beams. For the base, buy lumber of a larger section, and for load-bearing elements You can choose thinner bars. To construct the door opening, take a 100×100 mm beam.
- Saddle the base first, connecting the beams with nails. To make it easier to work, the bars can be pre-fastened with thin strips. Reinforce the base with stiffeners. For this purpose, use lumber with a smaller cross-section. It is very good if the frame and stiffeners are one whole.
- For roofing at the top of the frame make the sheathing. The crush can be covered with slate; you will need one sheet. In order to fix it, fill the strips on the facade and back of the booth. Attach the beams to the bottom of the frame; they will become the basis for the floor. After this, you can proceed to the construction of walls. Cover them with boards, this is the best option. In addition, chipboard or plywood sheets can be used.
- Make a door. After attaching the awnings, install it in the opening.
- Cover the roof with slate or other material.
- If you want, you can paint the toilet.
How to make ventilation
 The following options exist:
- Leave the building as is. In this case, the air in the cabin will move on its own.
- Forced ventilation. It is based on the installation of a fan.
You can choose any option for organizing the hood, but each of them requires ventilation holes in the walls. We are talking about supply and exhaust channels. A mandatory requirement will be the installation of a hood above the cesspool.
Forced ventilation is more efficient and quickly removes unpleasant odors from the toilet. But organizing such a system will require certain financial costs from the owner of a summer cottage.
For organization forced ventilation you need to buy the following:
- fan;
- switches;
- the wire.
Forced ventilation quickly removes methane, but such an installation is quite difficult to assemble. If you want the air in the toilet to always be fresh, this option will be the most suitable. But without electricity, such an installation will not work.
The natural method of ventilation is good because it does not require additional equipment.
In order to make fresh ventilation, install a hood in the pit. It is required to ensure that gas does not enter the cabin, but is discharged outside.
Make an exhaust pipe. To do this, buy a product whose diameter is minimum 10 cm. The length of the pipe depends on how deep the hole is made in the toilet. To work, you will need an impact drill; in some cases, you cannot do without a hammer drill. The choice of tools depends on what material the booth is made of.
When laying a pipe in the ground, do not forget about its protection; for this purpose, buy a casing. You will also need fastenings. Those designed for drainage work well. To make the system more efficient, purchase a deflector.
The ventilation installation process consists of the following steps:
- Using the tool make a hole in a cesspool.
- Install fastenings according to the height of the building. Insert the pipe and secure her.
- Install the deflector.
Make holes in the walls of the toilet, placing them on opposite sides. There should be a place for the hood closer to the ceiling, and a supply opening near the floor. Take a mesh and close the ventilation passages; this will prevent debris from entering the toilet and also protect the building from insects.
Install the fan by attaching it to the exhaust vent. For standard toilet, the area of which does not exceed 2 m², a device whose power does not exceed 30 Watt. Supply electricity by laying a cable. Connect the fan, connect it to the mains.
Lighting
The lighting options in the toilet are as follows:
- air line;
- underground cable;
- solar-powered lanterns.
Overhead line is not the best The best decision, if you do not want wires running over the area from the house to the toilet. Laying the cable underground is more beneficial from an aesthetic point of view, but few people would like to spend so much money and time to install lighting in the toilet.
- you can use LED lights , which are designed to illuminate the garden. There are products on sale different forms and weight. They are inexpensive and every gardener can buy them.
- Because the bright light not needed, installing one flashlight will be enough for lighting. Buy a product, separate its upper part. Take a knife and cut off the fasteners, then they will not interfere with you.
- Measure the protruding part of the lantern– one that is equipped with an LED and a battery. If necessary, you can easily replace the battery.
- Make a hole in the wall of the building appropriate size. Insert the flashlight and secure it it with glue. Silicone sealant is best suited for this purpose.
How to make insulation
 Choice suitable option insulation must be determined in advance. Much depends on whether you plan to insulate the internal or external parts of the structure.
When planning work on the interior, remember that space is limited. Choose a material that will not take up much space during installation. It is important that it reliably protects against frost, cold and wind. Another thing that speaks in favor of insulation from the inside is that this type of installation of material will require less money. However, each case is individual.
Choosing external insulation, get ready for more painstaking work. Due to limited space, please purchase thermal insulation materials, the width of which does not exceed 75 mm. The ideal option would be to install sheets mineral wool. To attach it, buy rectangular metal slats.
Due to limited space, buy thermal insulation materials whose width does not exceed 75 mm.
- For waterproofing you will need a film, and for cladding - plasterboard. It is best to opt for moisture-resistant sheets.
- Buy screws and profiles. They will be needed in order to make a high-quality fastening.
- To putty the joints between the sheets, buy putty.
To choose required quantity material, it is necessary to take into account the dimensions of the building. Installation of insulation consists of the following stages:
- Take wooden slats. Make the sheathing by painting it on the walls in increments of 50 cm.
- Lay down insulation sheets. Secure them with self-tapping screws and attach them to the sheathing. The material should be placed on the walls, do not forget about the ceiling.
- Place film on the insulation, it is required to protect mineral wool from moisture. Secure the film with tape.
- Cover the insulation with moisture-resistant plasterboard. They are attached to self-tapping screws and mounted on a metal profile.
- Sheet joints seal with putty.
If you want, you can stick wallpaper or tiles onto the drywall.
You can build a toilet by hiring construction team, you can also buy ready-made.
- The cost of the “Hut” or “Birdhouse” starts from 6500 rubles.
- Utility block with toilet – from 12 to 18 thousand rubles.
- Delivery is possible, its cost depends on the destination and region.
You can build a toilet in your country house with your own hands very quickly. All parts of the structure made of wood should be treated with biocides. These drugs are effective against rot. Soak the wood twice with the water-polymer emulsion. This product is inexpensive and will reliably protect lumber from dampness for many years.
- Sheathing with tongue and groove material will show all the advantages if you start filling the board with a horizontal belt. Keep in mind that the ridges should be placed up and the grooves should be placed down. This will prevent moisture from accumulating in the tongue. But the door is always sheathed, placing the boards vertically.
- If you are going to build, and the drawing suggests the construction of curved sections, then cover them with boat boards. Marine cladding will last much longer.
- In regions where there is a large amount of precipitation in summer and winter, such cladding will be an ideal option. But remember that in regions where strong winds prevail, it is better to give preference to sheet piling cladding.
- if you have electric jigsaw, which has a rotating shoe, then you can make your own boat plank from ordinary edged lumber.
- All parts that face the ground or cesspool must be further processed bitumen mastic or hot bitumen.
Conclusion
Building a country toilet with your own hands is a task that even novice builders can do.
- Before starting work, determine the construction site and groundwater level; the type of structure depends on it.
- Make a drawing.
- Buy lumber in advance and prepare your tools.
You can assemble a toilet for your dacha in a few days.
This video describes in detail how to make a toilet for a summer house:
Often the first thing a person thinks about after purchasing a plot is: how to make a simple outdoor toilet in a dacha with your own hands and ready-made drawings will come in handy here, as well as a detailed description of all stages of construction, tips and nuances.
One of the most important and vital buildings in a country house or garden plot is the toilet. The need for a simple structure arises within a few hours of arrival. And even if the owners already have a bathroom in cozy house, street amenities will never be superfluous.

It’s easy to build a toilet in your summer cottage with your own hands
The simplicity of the design allows even a person without much construction experience to equip a toilet for their dacha with their own hands. And if you use your imagination, then a house for thinking about
will fit perfectly into the design of the site and, perhaps, even become its decoration.
What kind of toilet to build: types and features
Actually, there are only two options here: with or without a cesspool.
- A toilet with a cesspool is a simple structure, proven by experience and time, which consists of an equipped cesspool and a toilet house above it. As the pit is filled with sewage, it is cleaned out manually or a sewer truck is ordered.
And sometimes they simply move the house to another place. The old pit is buried, and after 6-7 years its contents will finally rot and you can put the toilet back again.
- A backlash closet is a type of outdoor toilet with a pit for sewage, but with the difference that it must be sealed. Such a toilet has to be built if it is located close to a house, a water source, or when the groundwater is high.

Diagram: how the backlash closet works
- A toilet without a cesspool or a powder closet is installed if the groundwater is very high or if the toilet is rarely used. In this case, the container for collecting sewage can be anything except a pit (bucket, barrel, plastic tank). The required volume determines the intensity of use of the bathroom.
After each trip to such a toilet, sewage is sprinkled with dry peat, sometimes sawdust or ash is used, so the house should have a box for “masking powder”. After filling, the container is removed manually and the contents are evacuated to the compost pit. If the sewage has been sprinkled with peat, then after a while it becomes a wonderful fertilizer.

Toilet without a cesspool (powder closet)
Important! If groundwater lies below 2.5 meters, any type of toilet can be built, but if it is located higher, then a cesspool will have to be abandoned.
Where to build a toilet
For toilets with a cesspool, there are a number of sanitary and hygienic standards and restrictions, which determine their location on the site.
Minimum distances from the toilet to other objects:
- To water sources (wells, boreholes, lakes, rivers) – 25 m;
- To houses, cellars - 12 m;
- Before summer shower or baths - 8 m;
- To the nearest tree – 4 m, and to the bushes – 1 m;
- To fences - at least 1 m.

Diagram: correct location of the toilet relative to other buildings on the dacha plot
Important! When choosing a construction site, it is worth considering not only objects located on own plot, and also those located on the neighboring one.
To summer evenings the terrace was not spoiled by amber; the place was chosen taking into account the wind rose. If the site is located on a slope, it is better to install the toilet at the lowest point.
Construction of a cesspool
After selecting and preparing the site, they begin to dig a cesspool. As a rule, it is square in shape and at least 2 meters deep.
There are two types of cesspool:
- Sealed. The bottom of such a pit is concreted, reinforced before pouring, and to prevent the reinforcement from sinking in the concrete, it is placed on pegs. The walls are also sealed, puttied with mortar or the seams covered with bitumen.

Sealed pit latrine
- Absorbing. It is better to dig such a hole down to the sand, then the liquid fraction of sewage will quickly sink into the ground. The bottom is covered with a layer of coarse crushed stone or pebbles.

Absorption cesspool design
There are several ways to strengthen the walls of a cesspool:
- Brickwork;
- Concrete structure;
- Ready-made reinforced concrete rings;
- Plastic tank.
The pit is covered from above, with beams, slate or concrete, leaving only the area under the toilet seat open, and they begin to assemble the toilet house.
Construction of a toilet house
The optimal dimensions of a country toilet are 1×1.5 m, height – 2.2-2.5 m. Otherwise, it will simply be inconvenient, especially for people with large figures. It is not necessary to make toilet drawings yourself, if there are no special requirements and you can use ready-made ideas.
First of all, the scheme is convenient in that it allows you to correctly calculate the amount of building materials and the preliminary cost of a yard bathroom.

Construction of a toilet over a cesspool (proper placement diagram)
Frame base
It is recommended to move the toilet house 2/3 forward above the cesspool, thus providing access for cleaning behind the rear wall of the structure.
The stability of the building can be ensured by a shallow foundation. Between it and the frame, waterproofing is laid, 1-2 layers of roofing felt. But for light construction made of wood it is not at all necessary. It is enough to install the base on concrete blocks.
You can also install four support posts. To do this, four holes about 60 cm deep are dug in the corners of the future structure, up to 1 meter deep in soft soils, and asbestos pipes are lowered into them. The hole is filled one third of the way cement mortar. After this, a support beam is installed in the pipe, and the hole is completely filled with concrete.

Installing the toilet base on concrete blocks
Frame assembly
To build a frame, beams with a cross section of 50×50 or 80×80 mm will be sufficient; it is not advisable to take larger material.
- First, assemble a rectangular support with a jumper from which the front wall of the toilet seat will rise, and screw it to the foundation or support posts. A board is laid on top. The thickness of the floor board must be at least 3 cm.

Construction of a wooden frame for a toilet
- The frame of the front, rear and side walls is assembled from timber. In this case, the front wall should be at least 10 cm higher than the back wall, this will ensure the necessary roof slope.
- For greater structural strength, it is recommended to make diagonal jibs on the side and rear walls.
- On the front wall, be sure to make a reinforcement for the door of the appropriate size and make a hole for the window.
- The frames of the walls are secured to the base with metal corners, and a strapping is made on top and at the level of the toilet seat.

Strengthening the toilet frame with metal corners
- The next step will be assembling the frame of the toilet seat and covering it, if not provided alternative options, for example, a floor-mounted toilet.
Frame covering
Sheathing the frame wooden planks. The vertical arrangement allows you to significantly save material, and the horizontal one imitates a log house and looks more interesting. The boards are tightly fitted to each other and attached to the base. Instead of wood, corrugated sheets, slate or any other material that matches the construction budget are also used.

Toilet frame trim
Advice! All wooden elements It is advisable to treat the structures with a special antibacterial impregnation, which will protect the material from moisture and pests, and then cover it with varnish or paint
Roof
The roof should not protrude beyond the walls by more than 30 cm. Installation begins by securing parallel boards at a short distance. After this, the visor is sewn up from below, and boards are attached to the outside around the perimeter. A layer of waterproofing is laid on the prepared base, usually roofing felt, after which the structure is covered with any roofing material(slate, metal profile, bitumen shingles).

For a toilet, erecting a simple flat roof is enough
Summer residents, whom standard scheme not satisfied with the house, they can find drawings for more interesting options, make it yourself or purchase ready-made toilet houses, they are assembled like a designer, and for convenience they are necessarily accompanied by instructions and all the accompanying drawings.
Exhaust ventilation
Exhaust ventilation in country toilet- is a pipe that removes odors from the cesspool. Its lower edge is inserted into the hole, and the upper edge should rise above the roof by at least 20 cm.

Ventilation of a country toilet
Suitable for arranging ventilation plastic pipe with a diameter of 100 millimeters. It is pulled to the rear wall from the inside or outside of the building and fixed with iron clamps. To increase traction, a deflector attachment is installed on the head.
Installing a toilet door
Doors are installed using ordinary wooden, ready-made plastic or home-made ones, from the material with which the frame was sheathed. Hang the door on 2 hinges. In principle, the closing method can be any, traditionally it is a latch, latch or hook, outside and inside. It is better to avoid more sophisticated locking systems, for example, with latches, since their mechanism will be exposed to moisture and will quickly rust.

Two hinges are enough to install the door
Lighting
For more comfortable operation of amenities, it is better to take care of their lighting in advance. This could be a wall lantern that is battery powered. As an option, you can install electrical wiring and connect a small lighting fixture.

Lighting options for a country toilet
During the day, a small window will illuminate the interior space. It is usually cut out above the doors or at the top of the door, but there are actually more options, from figured windows on the walls to a transparent roof.
Advice! A cesspool will last longer if you don’t throw it in toilet paper and other hygiene or household supplies, so there must be a bucket in the toilet. If the size allows, it is convenient to install a regular washbasin with a hanging spout here, especially since the rowing pit is already ready.
Powder closet: construction features
The absence of a cesspool is the main difference in construction. But there are some differences in the design of the house. You will have to think about a way to remove the container in which the sewage is collected.

Scheme: powder closet device
The door is usually equipped back wall house or the front wall of the toilet seat. Inside the cabin there is a special box for peat (ash, sawdust). It’s also impossible to do without ventilation here, only the pipe is not lowered into the hole, but directly under the toilet seat.


