Since the dacha plot is mainly intended for growing vegetables and fruits, the vegetable garden should be used as efficiently as possible. However, the garden is dormant for most of the year until the weather warms up (since neither vegetables nor fruits can grow in winter). A building like a do-it-yourself wooden greenhouse will help solve this problem. What a greenhouse is will be discussed further.
The greenhouse is designed for growing fruits, vegetables and ornamental plants in all seasons.
The greenhouse is used to grow fruits, vegetables and ornamental plants late autumn, winter and in early spring. The country greenhouse allows you to grow exotic plants, growing 1000 km south of your region. The greenhouse design consists of a frame covered with transparent roofing material. The frame of this structure can be built from metal, wood or plastic. As roofing material Film coating, polycarbonate and glass are used.
Choosing a place for a greenhouse

Scheme of a small wooden greenhouse.
It is best to build a greenhouse on a flat, open area where shadows do not fall during the day. fruit trees or buildings. If there is no such place on your site, do not despair; the optimal solution in such a situation is a wall-mounted wooden greenhouse. It is attached to the southern wall of any dacha building, which is in the sun most of the day and only hides in the shade in the evening.
Short-day crops, such as eggplants, grow well in such a greenhouse. Another option is to allocate space for a greenhouse next to low shrubs: honeysuckle, currants, blueberries. They provide little shade and root system is located deep in the ground.
Return to contents
Determining the area and shape of the building
When choosing the area of a greenhouse, it is necessary to take into account many factors, among which the following play a decisive role: the size of the summer cottage; some areas simply do not allow the placement of large greenhouses. Type of crops to be grown: Cucumbers and tomatoes require more space than peppers. You also need to decide on the amount of money you are willing to spend on. The amount of materials needed depends on the size of the greenhouse.

End greenhouse frame diagram.
The saying “the bigger the better” does not apply when choosing the size of a greenhouse. Experienced gardeners It is recommended to grow crops with the same agrotechnical characteristics in the same greenhouse. There will not be much benefit from growing cucumbers and tomatoes together. Cucumbers require high humidity, but it is destructive for tomatoes. Big harvest It won’t work even if combined with peppers. They have different temperature preferences and day length requirements. Most the best option is a greenhouse with an area of 3x6. It is quite compact, and the harvest is enough for a family of 6 people.
As for the shape of the greenhouse, it can be tented, arched, in the shape of a pyramid or geodome - the choice here depends on the preferences of the summer resident. The geodome shape is gaining great popularity due to its practicality. The simplest and most common option is a greenhouse with straight walls and gable roof. It can be glazed or covered with film. The walls at the height of the beds can be sheathed with boards, this will add strength to the structure and allow you to save on glass or film. It is irrational to use polycarbonate for such a building: there will be unusable residues. Therefore, it is better to make greenhouses covered with polycarbonate arched. This option is more economical: you will need two whole sheets, and the third will need to be cut in half.
Return to contents
Selection of materials and tools
The greenhouse frame can be built from the most different materials and tools, and wood is the most popular of them. Firstly, a wooden greenhouse will cost less than a metal one: depending on the type of coating, construction can cost from 5 to 10 thousand rubles. Secondly, its construction does not require special knowledge and skills. Thirdly, when correct operation and care, the greenhouse can last quite a long time. To build a greenhouse you will need following materials and tools:

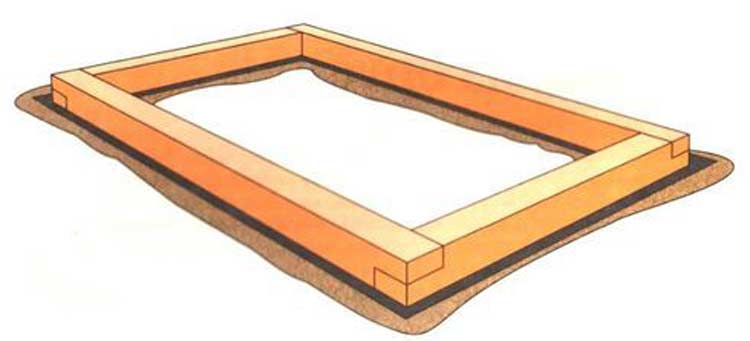
Scheme of foundation formwork for a wooden greenhouse made of window frames.
The frame of the building can be made of a variety of materials, wood comes first among them. Firstly, it costs less than metal: on average, costs range from 5 to 10 thousand rubles, it all depends on the type of coating. Secondly, its construction does not require any special knowledge or any special skills. Thirdly, with proper care it will last a very long time. To build a 3x6 m greenhouse you will need the following materials and tools:
- beams for the base, section 100*100;
- beams for racks with a section of 50*50;
- polycarbonate sheet 3 sheets or 20 m of film;
- saw;
- hammer;
- nails;
- screws;
- concrete solution;
- wooden formwork;
- waterproofing material.
In order to build a greenhouse, you need desire, a little knowledge, carpentry skills, a partner and one working day. The greenhouse you make will become a source of your pride and a real decoration of the site. What are the main stages of work? Construction begins with the purchase of building materials and impregnation wooden products antiseptics. They will protect the frame from rotting, cracking and mold.
Then it is necessary to level the land allocated for the building. The work must be checked at the building level. If the greenhouse will be heated, at this stage it is necessary to provide for the laying of heating pipes. Then the foundation is erected and the base of the greenhouse is built from 100*100 timber. The sides are fastened with special staples and steel corners.
The base of the greenhouse can be placed directly on the ground, but for greater reliability, you can build a foundation, waterproof it and only then install the base.
You will have to tinker a little with the construction of the foundation, but the service life of the structure will increase significantly. Then put wooden frame for a greenhouse. The sequence of work on the construction of an arched and hipped structure is slightly different.
Return to contents
Construction of a foundation for a greenhouse

Scheme of step-by-step instructions for making a foundation.
To build a wooden greenhouse, you can choose any type of foundation, the main thing is that it is stable and reliable. However, it is recommended to give preference to a brick or strip foundation. These bases have all the properties necessary for a greenhouse, in addition they have affordable price what makes them the most practical option. However, if you choose from these two options, the most suitable for a wooden greenhouse is, of course, a strip foundation.
The foundation should have a depth of 40-60 and a height above the ground of 20-30 cm. The foundation must be reinforced, this will make it stronger and protect it from subsidence. Such a foundation can be built not only under, but also under any other. If you decide to move and completely dismantle the greenhouse, the foundation can be reused to build a small outbuilding. Strip foundation it needs to be waterproofed, this will protect it from moisture and extend its service life. The shape of the foundation and its dimensions will depend entirely on the size of the greenhouse and the load on the foundation.
Return to contents
How to make a standard greenhouse

Diagram of a wooden greenhouse covered with polycarbonate.
To build the frame you will need 4 trapezoidal blanks. The work begins with sawing the bars. 8 meter bars and 16 1.2 m bars are used. Blank racks are made from them. The edges of the joints are filed at an angle of 45°, the two bars are connected with screws. We connect the two racks together with a meter-long block. The result is a trapezoidal frame. It will need to be screwed to the base. A total of 4 such frames are made and installed in increments of no more than 1.5 m. The frame elements are connected to each other using wooden blocks. Two bars are nailed along the width of inside greenhouse and on top of the transverse frame parts. An opening for a door is made on the end side of the building. The greenhouse can be covered with film and polycarbonate.
If you want to make a glass greenhouse, choose a traditional design with a gable roof. And this is how it is built. Attached to the base vertical racks 1.5 m high. On top, along the perimeter, bars are attached - strapping. Next, two 1.2 m bars are taken, cuts are made, the parts are screwed at an angle of 45° and connected to each other. The result is an isosceles triangle.
Then the rafters are installed at a distance of 1 m from each other. Finally, the ridge beam is nailed.
If you think that a do-it-yourself greenhouse made of wood is a relic of the past, and the future entirely belongs to “universal” metal Lego structures, then you are mistaken. How alive and absolutely environmentally friendly material, wood will never go out of fashion, and even though it is most vulnerable to moisture, heat and time, it makes wonderful structures! A striking example of this is the strong Finnish structures made of laminated pine - their frames are simply impregnated with an antiseptic before use and dried well. And such greenhouses have been standing for more than 20 years! This is what technology means the right approach– which is what we will tell you about in this article.
What are the advantages of wooden frames?
Here are the advantages of wood as a material for building a frame:
- Cheap. Agree, getting high-quality bars is not so difficult.
- Simplicity. Even a person who is very far from construction can work with such material.
- Easy replacement. Is a part broken or rotten? You can easily replace it with another one.
- Easy to attach any material, be it glass or polycarbonate.
- Absolutely environmentally friendly– wood is also a “breathable” material.
- Easy to assemble and disassemble the frame.
- Light weight and, at the same time, stability.
- Internal organization: in such a structure you can easily attach shelves and special devices, install automation and everything else. Try to do the same in an industrial model with its strictly fixed width, height and curved arcs - it’s not as easy as it seems at first glance!
- Undemanding in care.
- Possibility to build construction of the height, width and design that your soul desires.
And finally, greenhouses are quite aesthetically pleasing and fit perfectly into the surrounding environment. landscape design– these are not mass-produced arched iron tunnels.

How to build a truly durable structure?
The main rule of durability and strength is proper preparation the wood itself for use. Therefore, no matter where you get the bars and no matter how good they look, be sure to first brush them from dirt and sand, rinse them and let them dry for enough time. After this, sand with medium-grit sandpaper or some wet abrasive.
The main thing is to ensure that a painted greenhouse made of wood does not become covered with cracks - if any appear, paint over them immediately, otherwise the material will immediately begin to absorb moisture and rot from the inside. The same applies to bubbles on the paint - clean the layer in such a place and prime the surface again. If, due to some mechanical damage, part of the frame is completely exposed, then use an aluminum primer to treat it: apply the first layer of paint and after a while - two more layers. Also pay attention to what kind of wood you are building the greenhouse from - if it is soft wood, then it will need to be painted twice a year.
Also, the antiseptic significantly extends the life of the structure - it protects it from the destructive effects of moisture.
Ready? Look for some drawing among those offered - and off you go!

Project No. 1

Project No. 2

Project No. 3

5 most popular models of wooden greenhouses
Before you build your structure, purchase quality material, All necessary tools, and carefully consider what the frame will be like. All modern drawings The best wooden structures are simple and accessible, and not much more complex in nature than children's Lego. And believe me, building such a greenhouse is much easier than assembling some kind of prefabricated building according to a thick volume of crookedly translated instructions.
Option 1: Small standard design
Dimensions – 6x4 m. Covering – polycarbonate, foundation – any. So, here is the construction process step by step:
- Step 1. Build the foundation. To do this, drill the soil approximately 60 cm - to the ASG (usually the first step is fertile layer, then sand and only then dense layers). Fill the posts through pre-inserted studs.
- Step 2. On the posts we assemble the harness from larch beams measuring 100x100. We tighten the harness itself with a nut and washer to the posts.
- Step 3. We build the frame and cover it with film - that’s all!

Option 2. Wooden greenhouse according to Mittlider
The structure you see in the photo has the following dimensions: 4 m wide, 8.40 m long, and a height at the ridge of just over 3 meters. According to the famous story on which it was built, it has two slopes of different heights and several windows under the very ridge.

50x100 boards were used for the construction. So, now the building itself:
- Step 1. Build the foundation. For this greenhouse - a monolithic tape 20x35 cm with reinforcement 4x8 mm. We impregnate the outside with Penetron so that it does not crumble later, and for aesthetic purposes you can cover it with natural stone.
- Step 2. Install the frame and impregnate it with Senezh-Bio. The racks should be in increments of 72 cm.
- Step 3. We organize the windows in the upper part of the structure - as in the drawing. In this design there will be four of them, each with an area of 16 m2. If possible, we install automation to open them.
- Step 4. We fix the polycarbonate - always without gaps.
- Step 5. We are engaged in watering - we start a water supply system, install large capacity and spread the pipes into three beds for drip irrigation.
For such a greenhouse it will cost you building material approximately 2 cubes of 50x100 boards. And to knock together the doors and windows, you will also need piece bars of 30x50 and 50x70 - that's all the costs!

Option 3. Wooden greenhouse under polycarbonate
In this design, the frame is built from a 45x45 mm bar. Length – 8 meters, width – 2.7 m. It can install as many as two doors and eight windows. Make no distance between the posts more than a meter, and each truss should be supported by more than two posts at once - with the exception of the central one.
Work order:
- Step 1. The base of the strapping is a metal corner 45x45 or 50x50 mm. Using a grinder, make a 12 cm cut along the shelf, bend it at a right angle and get the base on which to secure the strapping.
- Step 2. Paint the corner twice with anti-corrosion paint.
- Step 3. Drive it into the ground, check everything for level and fasten the strapping bars with self-tapping screws, joining them in half a tree.
- Step 4. Reinforce all joints with a metal plate.
- Step 5. Bottom harness Sew around the perimeter with galvanized steel and bury it in the ground.
- Step 6. Secure the polycarbonate on the roof with self-tapping screws and a rubber washer, and everything else with a press washer.
- Step 7. Cover the ends of the polycarbonate with a plastic corner - at the corners of the greenhouse. Lay the sheets themselves overlapping, processing them along the edges silicone sealant.
- Step 8. Treat the bottom trim in two layers with an antiseptic and paint it.
Detailed video for this option:
Option 4. Design for film
Use Svetlitsa film as a covering. Work order:
- Step 1. Making the foundation. Since the structure will not be heavy, weld ordinary small homemade piles- just like you see in the photo. You can make them from 50x50 mm corners, their length is 900 mm, cover them with two layers of primer and hammer them into the ground.
- Step 2. Align the piles with the laser and proceed to assembling the base.
- Step 3. Now install truss structures– take 8 mm FK plywood, connect it with PVA D4 and 4x45 self-tapping screws.
- Step 4. Place edges for the beds - for this it is good to use 10 mm slate. And next to it on the street side we place foam plastic.
- Step 5. Now we paint the frame. Just remember that the boards must be treated with the non-washable antiseptic Neomid before construction begins. It’s better to paint with Pinotect – two base coats, and then two more – surface ones.
- Step 6. Assembling the frames for the windows and doors.
- Step 7. Cover the entire structure with Svetlitsa film.
- Step 8. In the greenhouse itself, we tighten the cables to tie up the plants.
- Step 9. Install systems and.
In such a greenhouse, if it is located in a fairly cold area, you can also stretch a second film inside, attaching it to the frame with a stapler. Even if it’s the cheapest one, the effect will please you, believe me.

Option 5. Portable greenhouse on foundation blocks
One of the main advantages wooden structure, as you know, is the ability to disassemble it and even carry it due to its light weight. Perhaps you have just such a site where such a need in the future is not excluded. But this does not mean that you will have to completely abandon any foundation - due to the need for concreting - you just think of one that can still be disassembled. As, for example, in the option, the basis of which is 2 beams of 150x150 mm each:
- Step 1. We dig a ditch to the sand, 60 centimeters deep, pour ASG there, tamp it well and lay it concrete blocks three on each side.
- Step 2. Treat the timber with non-washable antiseptic Neomid and after drying, coat the bottom and outer sides with bitumen. It is not necessary on all sides - after all, bitumen can heat up from the sun and cause bad smell, but it is not needed in the structure.
- Step 3. We install the frame and treat it with the same antiseptic.
- Step 4. At the corners of the greenhouse we attach meter-long braces.
- Step 5. Prepare a template rafter, which will be used to do all the rest.
- Step 6. File the racks and install them.
- Step 7. After completing the construction of the roof, we also paint the ends.
- Step 8. Cover the structure with 4-8 mm polycarbonate.
- Step 9. Inside the greenhouse, you can use EPS for special warmth, and outside put cement blocks under a stone. It will be both warm and aesthetically pleasing.
And, if you think that only “houses” are built from wood, then you are mistaken - this material makes chic arched beauties, outlandish “” and stunning ones!
Skeptics voice many counterarguments regarding the advisability of using wood for the construction of a greenhouse. They relate mainly to problems such as the gradual destruction of the material (it has enough “enemies” - moisture, temperature changes, biological pests) and its regular deformation during its service life.
And, nevertheless, greenhouses made of wood are most often built on house and garden plots. The main thing is to organize everything correctly and follow the technology. What to consider when designing, how to correctly draw up a drawing and build such a specific object - this article will tell you in detail about the nuances of designing and constructing a greenhouse.
The author will not tell the reader about all the advantages of wooden greenhouses. Once the choice has been made, it means that all the pros and cons have already been analyzed. But something still needs to be noted.
Firstly, there are no standard greenhouse drawings. It is designed based on the size of the site allocated for construction, the type of crops that are planned to be grown, and the “volume of production.” This is what is primarily taken into account when determining the optimal dimensions and internal structure, including the degree of automation.Eat standard schemes greenhouses, which should be adhered to. A full-fledged drawing, indicating the exact linear dimensions, is compiled individually in each specific case.

It makes no sense to explain that not every breed is suitable for building a greenhouse. Even if “experts” say that it doesn’t matter, you shouldn’t listen to such advice. The best material, taking into account the specifics of the object’s use (first of all, high humidity inside), is considered larch. She's from many others coniferous species differs in the content of a special type of resin in its structure. It is its composition that gives wood its strength, especially when the material absorbs moisture. For a greenhouse this is an invaluable property.
Perhaps, of the species growing in our country, only oak can compare with it. No wonder it makes high-quality barrels, but larch experienced craftsmen always used for assembly lower crown log house The only disadvantage of these trees is the high cost of lumber. But if the price doesn’t bother you – the best option for a greenhouse.
Of the cheaper products, only pine can be distinguished. In most cases, it is this that is purchased for individual construction. You can save some money if you focus on spruce. You just need to take into account that the structure of this tree is less dense, and it is possible to build greenhouses from it only large sizes. Although for a house (garden) area within 3.5 x 4.5 m, as a rule, it is enough.

Preparation of materials for construction
Essentially, it all comes down to pre-processing the wood. It is up to the owner to decide what type of wood to purchase. But a number of points need to be taken into account.
- SNiP prohibits use in construction industry material with moisture< 22%. Но такая древесина будет все равно давать усушку, поэтому лучше потратиться и купить более качественную, обработанную промышленным способом. Можно организовать снижение содержания влаги самостоятельно, но это процесс не одного дня, да и правильно выполнить все операции вряд ли получится.
- Since the concept of do-it-yourself implies some savings, including on materials, it is advisable to use processed materials rather than store-bought preparations to impregnate wood. machine oil. You can negotiate at any car service center. Perhaps they will give it away anyway, especially since they won’t need much. The effect is the same, but much cheaper.
- The fact that each workpiece is processed (for example, with a plane) before use is not worth explaining. Remaining dirt should be removed with an abrasive. It is better not to practice the “wash with water” method. Then you will have to dry it again, and it is not a fact that the finished part will not work.

Some may think that the author is a bit “spirited” if he is distracted by such nuances. Does it really matter, as long as the tree is free of defects? It should be clarified that the peculiarity of the greenhouse is its transparent cladding. Whether it is a cheap film or more expensive polycarbonate or glass, even with a slight deformation of the frame they will give cracks, tears, and gaps.
Consequently, there is no longer any need to talk about tightness. With this attitude towards the greenhouse, you can do it easier - plant the seedlings in boxes, put them outside and cover them with polyethylene film. This is why you need to pay attention to the moisture content of the wood.
Calculator for calculating materials for a rectangular greenhouse
Features of greenhouse construction
For individual plots optimal sizes– 6 x 4 or 4.5 x 3.5. But as already stated, there is no standard.

Foundation
The choice is large, but if you focus on an already developed and planted area, then there are not so many options. The author considers timber support to be optimal. Such a foundation does not require large-scale construction, which gives this solution a great advantage.
What to do:
- Dig a ditch around the perimeter of the greenhouse. The depth is about 10 - 15 cm. You just need to see if the roots of garden plants will be damaged.
- Compact the soil, add a little clay (oily) and compact it again. This will form the primary waterproofing layer.
- Set up a “pillow”. You will need sand of large fractions (river) or ASG.
- Line the bottom with polyethylene film (thick). It is better not to use roofing material. It will last 2-3 years in the ground, and then it will have to be replaced.
- Prepare the timber. In this case, it is necessary to drill 2–3 holes in each workpiece.
- Place the timber in the resulting “gutter” and fasten the individual parts (staples, plates, corners).
- Check the conformity of the entire assembly horizontal plane. If necessary, level it.
- Drive pins into the holes. They will prevent (together with the “cushion”) the beam from shifting when the soil moves. It is easy to make from a 10-12 gauge reinforcing bar. If you think about durability, it is advisable to first immerse the pins in molten tar, and only then install them in the mounting sockets. This surface protection will protect the metal from corrosion.

Any man, even one who is not particularly versed in the nuances of construction, can perform all of these operations with his own hands.
Greenhouse frame
Another advantage of such a foundation is that you don’t have to do any piping, that is, install a support frame. This function will be performed by the laid timber. It is easy to attach vertical racks from the same blanks to it. Depending on the size of the greenhouse, you can use timber of a smaller cross-section. Here you should focus on the type of glazing. If film or polycarbonate is chosen, then the load on the “skeleton” will be small.

In regions with snowy winters, glass is not advisable, and here's why. The film can be removed and the polycarbonate on the roof can be bent, thereby ensuring natural snow melting. This won't work with glass. You will either have to dismantle the top for the winter, or take thicker samples. And this is a significant weight, requiring reinforcement of the entire structure, and increased construction costs. One of the advantages of doing it yourself - efficiency - is lost.
Surface treatment of the frame
Simple - not entirely practical. An aluminum primer should be applied, which should be applied in one layer. And only then – paint. Preferably, water-repellent category. It will cost more, but it will last a couple of years. When using cheaper compositions, it will be necessary to paint annually, or even twice. Overall the price is about the same.
Everything else - doors, windows, shelves, water supply, light - is at the discretion of the owner. Basically, internal organization greenhouses are a topic that requires separate consideration. You can do it yourself as convenient as possible. The main thing is to provide normal conditions for cultivated plants.
The specific use of the structure is also taken into account - whether only for growing seedlings, or for year-round harvesting. In the latter case, you need to consider the option of insulating the structure. For example, install another layer of film inside the greenhouse, “fastening it” to the frame. The same goes for automation. If the owner permanently lives on the site, then it may not be needed.
The general instructions are more than detailed. And which drawing (diagram) to choose is at your discretion, dear reader. The main thing is that everything works out with your own hands, without outside help.
A greenhouse in the country can be made from various materials. The choice will depend on the personal preferences of the owner of the site and the number of available Money. Using wood, you can make a similar structure quickly and without large financial costs.
Wooden beams are a reliable material that can be purchased at almost any large construction supermarket. In terms of durability, bars are slightly different from metal, but if they are treated with a special impregnation, it will be possible to extend their possible service life. Wooden greenhouses can last approximately 5-7 years, and in some cases even longer. Everything will depend on the climate of the area where the structure is installed.
To build a greenhouse, it is not necessary to purchase expensive wood, since it will not last much longer. It is recommended to choose industrial grades of wood. In the selection process, you should pay attention to the quality of the material, technical specifications and the number of defects. To make a greenhouse, it is best to use timber without knots, which has been thoroughly dried.
Foundation for a wooden greenhouse
The base for the greenhouse must be reliable and stable. It is best to make a strip or brick foundation. Such structures have all the properties needed for a greenhouse. In addition, such foundations will not cost too much.
It is best to opt for a strip base. You will need to do the following:

- First of all, you need to fill the base with a depth of approximately 50-60 cm and a height of 20-30 cm above ground level.
- The structure will need to be reinforced to make it strong and prevent subsidence in the future. Such a base can be used for a greenhouse made of any material, so if in the future there is a desire to change the frame, then there will be no problems with this.
- After this, the foundation on the tape will need to be waterproofed to protect it from moisture for a long time and extend the overall service life.
The width and shape of the structure will depend on the size of the greenhouse and the load of the frame, so it will not be possible to make accurate calculations.
How to install a greenhouse frame with your own hands?
Wood is much easier to work with than other materials. Therefore, there will be no problems with installing the frame. First of all, you will need to secure a beam to the base, which will be slightly wider than the slats used to construct the frame.
In order to secure the base of the frame, you can use a metal corner, which will need to be installed in the foundation in advance. In this case, you can use reinforcement, bolts or anchors. Before installing the carrier rail, it will need to be processed protective equipment– antiseptics, drying oil and paint. This is done in order to ensure a long service life of the base of the greenhouse structure.

When the carrier rail is ready for installation, final measurements should be taken and work can begin. To secure the base of the greenhouse structure and carry out the rest of the work, you will need to use the following elements:
- electric drill;
- fasteners;
- hammer;
- Bulgarian.
The base of the structure is attached along the perimeter of the foundation. It is necessary to check that the base is solid and its sides are connected to each other. The ease of installation of the frame of the greenhouse structure and its stability will depend on these values.
Next, the frame is installed. Installing it is quite simple, since the base has already been mounted on the foundation and firmly fixed. All that remains is to take measurements and perform installation using the diagrams. The diagram itself can be seen in Fig. 1.
All other elements of a wooden greenhouse, frames and windows, ceiling joists are secured using self-tapping screws, clamps, corners and metal profiles.
Manufacturing of greenhouses of various designs
Before you start building a greenhouse, you should purchase all the necessary elements.
Standard small wooden greenhouse

Figure 1. Diagram for a wooden frame.
The dimensions of the manufactured structure are 6x4 m. The product is covered with polycarbonate. To make such a greenhouse you will need to perform the following steps:
- First of all, you will need to build a foundation. To do this, you should drill the soil 50-60 cm, pour the pillars through pre-installed studs.
- On the posts you need to assemble a harness made of larch timber measuring 1x1 m. The harness is attached to the posts with nuts and washers.
- The frame is erected according to the diagram and covered with studs. A diagram of such a design with all the necessary steps can be seen in Fig. 2.
Greenhouse made of wood according to Mittlider
The structure that will be erected has the following dimensions: width – 4 m, length – 8.4 m, height at the ridge – 3.1 m. The structure will have several slopes different heights and windows that are located under the ridge.

Figure 2. Diagram of a greenhouse frame on a wooden frame base.
To erect the structure you will need to use 0.5x1 m boards. The construction process is as follows:
- The first step is to build the foundation. For a greenhouse of this type, a monolithic tape of 35x20 cm, which is secured with 8x4 mm reinforcement, is suitable. The outside needs to be soaked special means so that the base does not crumble in the future. The structure can be faced with natural stone.
- The frame is installed. Racks should be installed every 70 cm.
- Windows are made in the upper part of the greenhouse. It is possible to provide automation for their opening.
- Polycarbonate is fixed. In this case, it is important not to leave any gaps.
- Finally, you should install a water supply system in the greenhouse, install a large container, and spread the pipes over several beds for drip irrigation.
To make such a greenhouse structure, you will need to purchase approximately 2000 boards 0.5x1 m. To build doors and windows, you will need to purchase additional small-sized bars - 30x50 cm and 50x70 cm.
How to make a polycarbonate greenhouse?
In this case, the frame will be made of wooden blocks 45x45 cm. The length of the greenhouse is 8 m, the width is approximately 2.8 m. It can accommodate the installation of two doors and several windows.
There should be a distance of no more than 1 m between the posts.

Each truss must be supported by several posts. The exception is the center pillar.
The sequence of actions will be as follows:
- In this case, the strapping will be done using metal corners 45x45 mm or 50x50 mm. Using a grinder, make a 12 cm cut on the shelf at a right angle. This way you can get a base on which the harness will be attached.
- After this, you need to paint the corners several times with anti-corrosion paint.
- Next, you need to hammer the bars into the ground, check their location with a building level, and then secure the strapping slats with self-tapping screws, joining them to each other.
- All joints will need to be reinforced with a metal plate.
- The bottom trim around the entire perimeter is galvanized and buried in the ground.
- Next, you will need to secure the polycarbonate on the roof with self-tapping screws and rubber washers; all other elements are secured using a press washer.
- The end parts of the polycarbonate should be closed plastic corner. The sheets are installed overlapping, after which they are treated with silicone sealant along the edges.
- The lower trim is treated in several layers with an antiseptic and then painted.
How to make greenhouses with your own hands under film?

In this case, the greenhouse will be covered with a light film. The procedure will be as follows:
- A reliable base is made. The structure will be light in weight, so you can weld ordinary small-sized homemade piles. They can be made from metal corners 50x50 mm. The length of the elements should be 90 cm.
- The piles are coated with several layers of primer and driven into the ground.
- The piles will need to be leveled using laser level. After this, you can proceed to assembling the frame.
- Rafter structures are being installed. In this case, you can use 8 mm thick plywood, which is fastened with PVA glue and self-tapping screws.
- On next stage you need to install borders for the beds. It is best to use slate with a thickness of 10 mm. On the street side, near the slate, you can additionally lay polystyrene foam.
- After this, the sheathing is painted. It should be remembered that the boards will need to be treated with an antiseptic before painting. The paint should be applied in several layers.
- Frames for windows and doors are being assembled.
- The entire structure is covered with a light film.
- In the greenhouse itself, you will need to tighten the cables in order to be able to tie up the plants.
- Additionally, you can install irrigation and automatic ventilation systems.
- If the greenhouse structure is being built in a cold region, you can stretch another layer of film inside it, securing it to the sheathing with a construction stapler. Even if you use budget films, the effect will be immediately noticeable.
How to build a portable greenhouse on foundation blocks?

The structure can be disassembled and transported due to its light weight. If the greenhouse needs to be moved from one place to another, a similar structure can be built. Its base will consist of several 15x15 cm bars. It can be made as follows:
- The first step is to dig a hole down to a layer of sand, pour sand and gravel into it, compact it thoroughly and lay concrete blocks.
- Next, you need to treat the bars with an antiseptic. After the product has dried, the wood must be coated with bitumen on both sides.
- The frame is installed and then treated with the same antiseptic.
- Braces 1 m high should be fixed in the corners of the structure.
- A template rafter is made, with the help of which it will be possible to easily make all the others in the future.
- Racks are prepared and installed.
- After the roof is built, it will be necessary to paint the end parts of the structure.
- The wooden greenhouse is covered with polycarbonate 5-8 mm thick.
- To insulate the structure, extruded polystyrene foam can be laid inside it. WITH outside Cement blocks are installed.
What is the best way to cover a greenhouse?

Scheme of fastening a film wooden greenhouse: a - diagram of fastening of racks, b - diagram of a device for lifting the film.
When the greenhouse structure is ready, you will need to decide on the material to cover it. The durable frame can withstand any weight, so you can choose glass, film or other materials. The choice must be made based on practicality and quality of the material. The following materials can be used:
- Film. Covering should be done sequentially, gradually passing through the slope from one side to the other. The film is gradually attached to the frame. It is recommended to cover the corner of the slope of the greenhouse structure with a visor, since the film is often damaged and moisture and cold air enter through the defects.
- Glass. If you decide to cover the greenhouse with glass, you should purchase special stops and glazing beads. It is best to order glass after complete installation laths when will be known exact dimensions cells. The material should be secured firmly. The seams can be treated with silicone or sealant to ensure the tightness of the structure and eliminate drafts.
- Polycarbonate. Covering a wooden greenhouse with polycarbonate is quick and easy. To do this, you should use special slats and profiles, as well as fasteners, which can be included with polycarbonate plates. This material is the most practical and modern, therefore it is recommended to cover the structure with it.
After the greenhouse body is covered with the selected material, the structure will need to be made airtight, heating and lighting devices installed in it, water supplied for irrigation, and a ventilation system installed.
Today there are enough a large number of various schemes greenhouses made of wood. You need to choose based on personal preferences. Making a greenhouse with your own hands is not difficult if you take into account all the existing nuances, follow the sequence of actions and have the necessary tools and materials for the work.
Almost every summer cottage the owners grow their own produce. But sometimes you want vegetables much earlier than they ripen outside. To speed up the ripening time of your favorite crops, greenhouses are used. You can purchase ready-made greenhouses, or create a structure yourself. In order for the premises to serve for a long time, pleasing the owners, it is necessary to carry out the construction in accordance with the instructions from specialists. Making a polycarbonate greenhouse with your own hands is quite simple, in just a few days, if you approach construction correctly.
Advantages of wooden greenhouses
Many people build structures using wood as the main material. In terms of costs it comes out cheaper than other components. Natural ingredients have always been considered more beneficial in terms of environmental friendliness.
Other positive sides wooden greenhouses:
- The work of connecting parts does not create any difficulties compared to other materials.
- It is convenient to secure the tree, and replacing parts if they are faulty is quick.
- The weight of the structure is small, but the stability is high.
- A greenhouse made of wood does not require special care, except for treating the tree at the very beginning of construction with special compounds against insect pests.
- Indoors, just like when using other materials, you can use automation for watering or other purposes.
- The design will have a pleasant appearance.
Construction of a greenhouse made of wood
To the greenhouse self-made served much longer, it is worth building a foundation before it is built. You can do without it, but if the greenhouse is large enough, has recesses or is in contact with the wall of the house, a foundation is required. A base is required if the room is located on a slope. The type of foundation is selected depending on the preferences of the owners. For longevity, you need to choose the right wood.
The best option is larch. The tree is resistant to moisture and is practically not attacked by insects and fungi. In addition, this breed becomes stronger over time, so in a few years the greenhouse will only become stronger. There is only one drawback: the high cost of the material. Oak is also good in its characteristics; it can be softer or harder, depending on the species. The price is also extremely high, which is why this wood is rarely used. 
Pine is often used for construction. It is optimal if you compare price and quality. Resistance to moisture, fungi, high strength. It will be necessary to periodically treat the wood with special compounds so that it is not exposed to external influences. The price is not that high, so purchasing the material is completely justified.
You can use spruce instead of pine. The characteristics are similar, but the latter is very soft, so it will not be possible to construct a large structure. A small greenhouse, up to 7m2 in area, can easily be tolerated by a tree. You cannot use birch or aspen. They quickly rot and warp when humidity rises.
Design and start of construction of a greenhouse
Before construction begins, it is necessary to complete a greenhouse design. To begin with, you need to choose a shape and a place where it will be located. There are several factors to consider:
- Location of the area where construction is taking place.
- The length and width of the area that is planned to be used for a greenhouse.
- The strength of wind and snow on the area. Depending on the loads, the type of roof is selected.
On the sketch you can indicate the dimensions of the structure and approximate data. 
After completing the sketch, drawings are drawn up. Everything must be calculated correctly, everything is displayed required dimensions, fastener locations are installed. 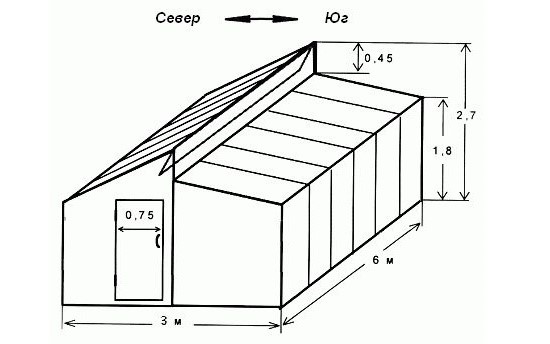
It is necessary to compose everything together, then divide the structure into its component parts: a separate diagram of the roof and frame is made from different angles, and data for individual components is indicated. 
Bottom of the greenhouse
If you make a structure without a foundation, the foundation is laid out first. To do this, use an 8x15 cm beam. There is no need to lay it on the ground. Scraps are screwed around the perimeter of the frame metal corner at a distance of about 60 cm, the harness is turned over so that the corners are located at the bottom. Next, the structure is trampled down so that the distance to the ground is reduced to 5 cm.
It is necessary to carry out work using building level to control the horizontal. If on initial stage the result will be a bevel, the whole structure will not be even. A do-it-yourself wooden greenhouse, drawings of which are given in the article, is the optimal medium-sized option for construction. 
Next, the corner beams are installed. They are also controlled by a level and secured using corners or dowels. It is necessary to fix the racks so that they do not come loose. In the picture below this is done using wooden dowel. 
Next, temporary stands are inserted. They are joined using a notch, but after that it is necessary to secure them with the help of corners. 
After this the installation is carried out top harness. It is done in exactly the same way as below, but the parts are joined by simply adjoining one to the other. Once the top is secured, the temporary fixation can be removed. 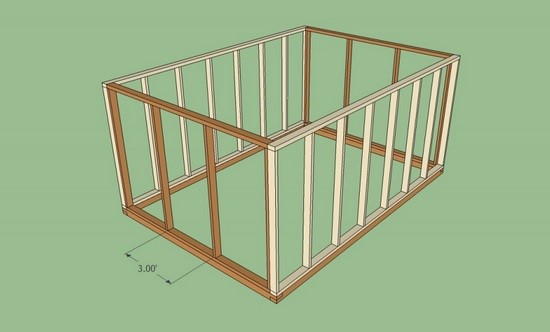
Manufacturing of roofing, doors and windows
To make a roof, the rafters are first assembled. Then, using a corner, they are secured in the upper part, temporarily fixing them. 
The door can be made very simply. A conventional frame, which is reinforced with several stiffening ribs. A pair of hinges are installed inside, which are hung on their second parts, fixed to the frame.

It is recommended to install many window frames on the roof. They are made from several parts, not separately, but directly on the roof. The picture shows how this is done. Next, hinges are installed on the frames where the transoms are secured. 
After the work has been done, it is necessary to strengthen the rigidity of the frame. To do this, additional triangles from boards are fixed on it. The resulting structure must be treated with a composition against microorganisms and moisture, and allowed to dry normally. 
The last stage is the installation of sheathing on the frame. It’s worth starting from the largest parts. Joints must only be in places where the boards pass. If the distance on the roof between the supports is large, you can perform additional lathing. The polycarbonate film is removed only after installation. Do not forget that polycarbonate sheets do not overlap.

The material must be mounted using special fasteners for this material. The edges are closed with special corners to provide protection from moisture and dirt. A do-it-yourself wooden greenhouse, the drawings of which were given in the material, is easy to manufacture and does not require special knowledge and skills in construction.


