November 15, 2019 No comments
How to save on installing an air conditioner: detailed recommendations for installing a climate system with your own hands.
No need to wait until summer heat will still force you to install an air conditioner. It is better to solve this problem in advance. Then you will be able to save a significant amount. In addition, you can carry out installation work yourself, without involving outside specialists.
The equipment must operate without failure. When installing the air conditioner, you should strictly follow the instructions and choose a suitable location. If technical specifications will not meet the standard, or the parts will be selected incorrectly, the split system will break down very quickly.

To properly install the unit, you first need to understand the principle of its operation and structure. The air conditioner consists of:
- from the evaporation block;
- from the compressor;
- from the tubes connecting these two systems.
A compressor is installed on the outside of the wall, and an evaporator is installed indoors. Expensive models have several indoor units connected to one compressor.
Refrigerant is supplied under pressure to the evaporator unit through a nozzle. Once in the evaporator chamber, the refrigerant expands and boils. The vapors of this substance begin to absorb heat with high intensity. At the same time, water condensate is released, which settles in the evaporation unit - on its radiator. From there, the moisture enters the reservoir and is then discharged outside the building through a tube.
During this entire period, the refrigerant evaporation accumulated in the chamber is pumped out by the compressor, and the pressure behind the pump increases. Next, the refrigerant heats up, turning from a liquid into a mist, the density of which is high. The refrigerant in a high-density mist state enters a chamber designed for condensation and equipped with a radiator. There it is cooled by a fan, turning it back into liquid. And then it re-enters the evaporator nozzle under pressure. According to this scheme, the work process is repeated again and again.
Air conditioner efficiency
How efficiently the equipment will operate and how much electricity will be consumed depends on the specific operating conditions.
Condition one. Let's assume that a heating device is installed next to the air conditioner. Then the compressor:
- will work almost continuously;
- will consume a lot of energy;
- will soon fail.
Condition two. Ordinary dust that has penetrated inside the system can reduce the performance of the air conditioner and even disable it. So you should carry out wet cleaning at regular intervals and quite thoroughly.
Condition three. It is not permissible to place any objects on the surface of the block.
Condition four. The air conditioner should not be covered.
Condition five. Evaporation of the refrigerant can be prevented if, when installing the system, you carefully seal any connections and joints.
Condition six. The outdoor unit should be located lower than the indoor unit. To install it, you need to choose the coolest zone on the outside of the wall. For example, an eternal shadow can be formed by a roof overhang.
If all the above conditions for installing an air conditioner are met, then the system will operate smoothly, creating the desired comfort in the premises.
Description of air conditioner parts

- The air flow blows through the air conditioner. For this purpose, a fan is installed in the system.
- The condenser/radiator is responsible for cooling the freon and condensing it. The air blown through the condenser heats up.
- In the compressor, freon is compressed and in this state moves along the refrigeration circuit. The following types of compressors are used:
- spiral (scroll);
- piston.
Piston systems are cheaper, but less reliable. Their reliability is especially reduced if the outside temperature drops too significantly.
- The designs of reversible air conditioners (producing cold and heat) contain a four-way valve. When the heating mode is set, the direction of freon movement changes using the valve. Then the purpose of the indoor and outdoor units changes in fact:
- the indoor unit starts heating;
- The outdoor unit provides cooling.
- Only inverter models have a control board. If the model is not an inverter, all electronics are usually located in the indoor unit. It is taken into account that high humidity and significant temperature changes can significantly reduce the performance of electronic components.
- The indoor and outdoor blocks are connected by copper pipes. And the pipes are secured with union connections.
- There is a freon system filter in front of the compressor inlet. The filter is designed to protect the compressor from the penetration of small particles (primarily copper chips). They enter the system when the capacitor is installed.
But if the installation was carried out in violation of the technology, a lot of debris could enter the system. Then you shouldn’t expect that the filter will cope with the problem.
- The terminal block is intended for supplying electronic cables. The terminal blocks and fitting connections are protected by a quick-release cover. There are models where the protective cover covers only the terminal block, but the fitting connections remain uncovered.
What tools are needed to install an air conditioner yourself?
Here are the tools you should have on hand.
- Vacuum pump.
- Bicycle drift.
- Indicator.
- Tester for electrical systems.
- Hammer.
- Pressure gauge.
- Pipe cutter
- Riemer.
- A set used for flaring pipes.
You should also stock up on a coil of copper tube; the ends should be rolled at the factory. Dents, scratches, and other defects are unacceptable.
When to start work
It is best to install an air conditioner during a major overhaul. All the same, the wall decoration will be damaged, because you will have to make a through hole.
Air conditioner installation rules
After purchasing the air conditioner and unpacking it, you can begin installing the system. Of course, provided that everything necessary tools are available.
The outdoor unit is installed first. After completing its installation, you can begin installing the system indoors.
If work is carried out in an apartment on the second floor or higher, special safety regulations must be observed.

If the air conditioner is installed in a private house, then it is not difficult to place the outdoor unit. But its installation on the building of an apartment building raises many questions.
Should be considered. It is unacceptable for the block to block the neighbors’ view from the window. Also, condensation should not be allowed to flow down the wall.
The air conditioner is mounted in such a way that it can be reached from the balcony. After all, the unit will have to be serviced periodically.

It is best to mount the block on the north or east side of the window (balcony). It is advisable to install the system at the bottom of your outdoor area. Then, if necessary, it will be easier to reach the system by opening the window.
Using a tool such as a level, the mounting locations for the brackets are marked. Holes are drilled in the wall to install anchor bolts.
To conduct interblock communication, a through hole is drilled. A sufficient diameter is 8 cm. If the wall is brick, it is advisable to make a hole between the bricks at the place where they are laid. Then the hole will come out neater and less effort will be spent.
Taking into account the markings, brackets are installed. Once aligned, they are secured with bolts. The outdoor unit mount is installed in such a way that there is a 10-centimeter gap (you can leave a wider one) between the wall surface and the unit.
Next, the system is connected, as well as the resulting gap is sealed. Before proceeding to the next stage of installation of the structure, you should make sure that the outdoor unit is secured sufficiently reliably.
Select a place to mount the indoor unit. The mounting plate is attached. Need to retreat:
- from the corner of the wall - 5 cm;
- from the ceiling - 10 cm.

- pipes;
- electrical wiring (cable);
- hoses to drain condensate.
Important! The indoor unit cannot be mounted:
- above the battery;
- behind the curtain;
- in a room where there is a source of electrical noise;
- at the place where the communication passes (plumbing or heating pipe, electrical wiring).
How to connect power supply
For the indoor unit, wiring with a cross-section of at least 1.5 square meters is laid. mm. There must be an automatic switch. There is a shield at the input, and the wiring is connected to it after its installation on the wall is completed. The zero conductor is the one that has a yellow color and a green stripe. To identify phase and zero, you need to use an indicator.
And then the terminals of each of the blocks are connected stranded wires, passed through the wall. The names of the terminals must certainly be the same as the wires. The instructions always clearly describe the connection diagram.
How to lay pipes

Copper pipes are cut with a margin for bends (the margin is about a meter). When bending the tubes, you should use special tools to avoid dents, folds, wrinkles, and stretching of the copper.
Then polyurethane foam hoses are pulled over these tubes for thermal insulation. Foam rubber is not suitable here, because the service life of this seal is short. Then threaded flanges are put on the tubes so that the thread is located at the end of the tube.
Flaring
Flaring of tubes should be done extremely carefully; grooves and cracks should not be allowed to form in the metal. The nut should fit onto the flange without any effort. It is advisable to tighten it with a torque wrench, then the flared connection will not be squeezed out of the nut.
The pipelines are attached to the fittings one by one. It is impossible to mix up the fittings, since they have different diameters. Flanges are screwed onto the fittings. It is necessary to screw it so that a tight connection is formed, but do not pinch it, otherwise the tube will be damaged.
And finally, a segment is connected to the drain pipe plastic pipe with a reinforced body. Fastened with a threaded flange (if included) or with a piece heat shrinkable pipe. The drainage pipe must be taken away from the load-bearing wall.
It's time to insert the pipes into the hole and align them. WITH outside The walls of the pipe are attached to the wall with clamps; the fastening must be tight (an electrical cable runs nearby). The pipeline is connected to the outdoor unit. Free spaces in the hole are filled with silicone or polyurethane foam.
Leak test
External connections are checked for leaks in the usual way: Bicycle mud and soap solution are used. If air leakage is detected, the threads will need to be tightened more tightly. Upon completion of the test, wipe off the soap solution with a rag or napkin.

It's time to pump the refrigerant from the cylinder into the system. An adapter should be connected to the cylinder, then a pressure gauge. After this, the reservoir is filled. You need to monitor your blood pressure.
After this process is completed, the circuit breaker on the air conditioner turns on. Next, the system enters the test mode independently.
You can count on the system to work without failures. That is, there will be a uniform circulation of cooled air flows. Then you can close the holes made in the wall, clean up the garbage and enjoy a comfortable microclimate.
Video: DIY air conditioner installation:
When choosing an air conditioner, it is important to choose the right climate control device in terms of power. But the location where the indoor unit is installed in the apartment plays a key role. In this article we will talk about organizing optimal air exchange, and also offer several options for placing an air conditioner in an apartment.
Optimal air exchange in a room is the key to human safety
It has been noticed that if a person’s work does not involve staying on outdoors, then he spends 16 to 24 hours a day in an apartment or office. And here ventilation plays a very important role. According to standards, the air in the room should be renewed every 1-2 hours. If this rule is not followed, excess carbon dioxide and humidity accumulate in the rooms. This leads to a deterioration in human well-being and the appearance of mold and mildew on the walls. In a poorly ventilated area, germs and allergens accumulate. Stuffiness, “crying” windows, the formation of mold and mildew, as well as deformation wooden furniture- all these are clear indicators that the air exchange in the apartment is impaired.

Undoubtedly, the ventilation system in our houses is installed in order to solve the problem of insufficient air exchange, together with periodic ventilation. Ideally, air should enter the apartment through the windows, circulate freely throughout the apartment through the gaps between the door and the floor, and then be freely removed from the room through ventilation ducts, which are usually located in the bathroom, toilet and kitchen
To create a healthy atmosphere in your apartment, it is recommended to follow these steps:
- Use a simple test with a thin paper strip to verify proper operation ventilation. If the test shows that air is not removed from the room or is difficult to remove through the ventilation, then the duct must be cleaned. In apartment buildings residential buildings maintenance of ventilation ducts - area of responsibility management company or HOA.
- Pay attention to the windows. Through old wooden frames, street air enters the room through cracks. However, if the apartment has plastic windows with a seal between the frames, then street air no longer penetrates into the apartment when the windows are closed. In this case, it is recommended to install supply valves.
- Install an air conditioner in the room to cool or heat the air in the room, as well as to remove dust.

Such events will help create a healthy microclimate in the apartment, which will help improve the well-being of its inhabitants. But the choice of installation location of the indoor unit in the room must be taken as carefully as possible, so as not to harm human health and not reduce the service life of the device.
Air circulation during air conditioner operation
When choosing the location of the indoor unit and adjusting the direction of the air stream from the air conditioner, it is necessary to remember that being in the zone of a cold air stream poses a threat to his health. Sometimes it is mistakenly believed that the 20 °C set on the air conditioner is the temperature of the air stream coming from the air conditioner. This is wrong. During operation of the air conditioner, air from inside the room is drawn into the indoor unit. The air conditioner controls the temperature of the air entering the device. The cooled stream from the air conditioner is 8-10 °C below the set temperature.

In the hot season, when air conditioning is needed to cool the room, you should install the device's blinds as high as possible. With this adjustment, warm air concentrated at the top will cool faster. In addition, it will be safer for people in the room.

IN cold period time of year, when the room needs to be heated, the warm air flow from the air conditioner is directed vertically downward. Then the heated air masses, rising upward, will warm the room faster.

Requirements for the location of the indoor unit of the air conditioner
Proper placement of the indoor unit affects both the efficiency of the device and its longevity.
There are a number of immutable rules that must be followed when installing the device:
- There should be a space of more than 10-15 cm high between the indoor unit and the horizontal ceiling.
- Between the side surface of the indoor unit and the nearest vertical plane(wall) there should be a distance of at least 5-10 cm.
- The indoor unit should not be exposed to direct sunlight.
- The indoor unit is not installed above horizontal surfaces (cabinet, shelf, chest of drawers, etc.) if the distance from the lower edge of the air conditioner to the horizontal surface is less than 70-100 cm.
- It is prohibited to place the air conditioner above appliances that produce heat (heaters, fireplaces, kitchen stove etc.).
- It is not allowed to bend the tubes through which freon flows from the external unit to the internal unit. The maximum permissible bending radius of the tubes is 100 mm.

- The indoor unit of the air conditioner should be minimally noticeable in the interior. Do not install the device opposite the entrance to the room.
- It is better to install the air conditioner before completion repair work, to lay the route from the external block to the internal block in the groove.
- Minimize the length of the route between the external and internal units, since when the length of the pipes is more than 5 m, the system must be refilled with freon.
- When choosing a location for the indoor unit, think about the accessibility of the device for further maintenance.
Where to install the air conditioner in the room
Now let's move on to practice.
Bedroom. It is important here to avoid direct flow of cold air from the air conditioner to sleeping area. The best option It is considered to place the air conditioner on the wall to which the head of the bed adjoins.

If the first option is not suitable, then the air conditioner can be installed in another way:

Children's room. In the nursery, it is necessary to install an indoor unit so that the child can be in the room at any time without harm to his health. It is important to install the air conditioner in such a way as to avoid air flow entering the child's area. Pay attention to the opening of the indoor unit blinds. It is better if the blinds can be in a position where the air stream flows from bottom to top.

Living room. The cold stream should not be directed at people.

Kitchen. There is an important requirement here: a hood must be installed in the kitchen. The kitchen air conditioner should not be equipped with thin filters, as they will quickly become clogged with fatty deposits. In the kitchen, the noise from the operation of the indoor unit will not be noticeable, so you need to choose the most unpretentious device with a power reserve, since the temperature here is higher than in other rooms. It is optimal to install the air conditioner opposite the work area.

conclusions
Creating an optimal atmosphere in the house is impossible only by installing an air conditioner. Make sure it works correctly ventilation system, and also take care of the flow of air from the street. The air conditioner will take care of the rest if you choose the installation location for the indoor unit taking into account all the nuances.
Split system for indoor air conditioning is more complex system than a conventional air conditioner. But it is worth noting that installing a split system with your own hands is a completely feasible process for every owner of this device.
Installation instructions

The installation instructions for split systems include the following points:
- Selecting a location for the system.
- Air conditioner installation.
- Installing the internal system compartment.
- First, test run.
Of course, today there are many specialized companies involved in the installation and maintenance of indoor air conditioning systems. But most owners, in order to save money, prefer to independently install the device on site, and subsequently engage in its maintenance; this is possible, even if you did not have any skills before and have not encountered this equipment. It's just worth considering one factor when you install and configure new system yourself, keep in mind that the store’s warranty will no longer apply to such equipment.
Choosing a location for the system
The air conditioning system should be located in a place that will not be subsequently obstructed by anything. Air intakes and air distribution openings must be completely freely accessible.
The outdoor and indoor units should preferably be on the same level. If this is not feasible, then the maximum permissible difference in height should be no more than 5 meters.
As for the wall on which you will hang the blocks, it must be level and strong enough to withstand the considerable weight of the structure. This is why you should avoid installing an air conditioner on interior partitions.
The rules for installing split systems completely exclude direct sunlight from entering the internal unit of the device. The capacitor array itself must be completely protected from direct rays. If the installed outdoor device will be located on the roof, then it front side should be turned to the shadow side.
It is also necessary to provide conditions for the installation of a drainage system through which the condensate generated during operation of the installation will be discharged to the street block.
The plastic from which the indoor unit is most often made is very sensitive to known fluorescent lamps, so it is advisable to install the device in a place that is located far from them.
And one more important condition. The internal compartment must be no closer than 1 meter from microwave oven, since the radiation emitted by the microwave during operation negatively affects the operation of the installation and causes interference.
Choosing a location for the outdoor unit
When installing an external compartment, the most important thing is a strong mount. The wall must be level, fastenings in the form of special brackets must be installed in such a way as to maximally dampen the vibration that occurs during operation of the device.
It is necessary to install the split system yourself so that the outer part of the system is located in a place accessible for subsequent installation and maintenance work. Of course, all air intakes should not be blocked with anything.
Air conditioner installation
Before you begin installing the air conditioner, you need to ensure that you have necessary funds. You will need the following tools for installing split systems:
- drill hammer;
- pipe cutter;
- flaring tool;
- pump;
- a device that measures pressure in a liquid.
Installation of the device includes the following operations:
- Initially, you should open the front panel and remove the screws from the cover that covers the electrical unit; it must be pulled out.
- An electrical cable is connected to the unit and the cover is put in place. A couple of useful notes: the unit itself should not be lower than 2m 30 cm from the floor surface, the socket should be close to the element, and have grounding.
Installation of drainage system
The drainage hose must pass under the connecting pipe. It should not twist or bend. In the future, the hose must be wrapped in thermal insulation materials. Where the drainage route runs close to the wall, it is advisable to lay inserts made of heat-insulating material. And the track itself is usually wrapped with felt tape.
Be sure to check the reliability of the joints of the drainage system, as this can subsequently lead to leaks. Next, the pipe is passed through a hole in the wall, and the block, which will be located indoors, is hung on the wall.
It is recommended that technicians adhere to the following restrictions when connecting the pipe line. WITH inside the number of possible bends in the route should not exceed 10 in total. The radius of the most possible bend should not be greater than 10 cm.
The plug from the evaporator tube must only be removed immediately before installation work. First, air is released, then the nut on the connecting tube of the evaporator is unscrewed. It is necessary to apply oil to the joint.
Sealing of holes
Self-installation of a split system must be accompanied by careful sealing of all connecting holes. It all starts with sealing the hole in the wall. Regular standard putty will do for this.
The drainage system pipe is usually tightly fixed using a special clamp. Concerning electrical connection and the cable connecting the blocks for data transmission, then they must be connected in accordance with a special diagram. It is usually attached to the device passport. Depending on the type of installation and manufacturer, the connection must be made.
The cable and data line are connected to the appropriate terminals, which are usually marked different color. The cables connecting the two units must also be secured using a special clamp. 
During the installation process, be sure to pay attention to the following factors:
- The electrical unit must be securely fixed and closed. If this condition is not met, the risk of injury increases electric shock or a simple fire, since dust, dirt or water can easily get inside.
- Under no circumstances should the electrical connection cable be included with the refrigeration pipe. The cable through which the freon passes heats up during operation of the installation, so contact between them should be avoided.
How to bleed air
Installing a split system with your own hands means that you will also have to bring the system itself into working condition with your own hands. Initially, it is necessary to get rid of air in the system. To do this, you will need to bleed the air from the system.
- The nut of the service pipe, as well as the plugs on the liquid and gas valves, must be unscrewed.
- To do this, you need to turn the gas valve 90 degrees with a regular hexagon. counterclock-wise. Counting down approximately 10 s. turn back and close it. Then apply a regular soap solution to check for gaseous leaks.
- If you do not find any leaks, repeat the procedure again, but after 10 seconds you do not close it back, but press the fitting for service work. Steam should begin to appear, indicating that air has begun to escape from the system.
Additional refilling with freon
The maximum length of connecting hoses through which freon moves should not be more than 7 meters. But in cases where another installation of the system is impossible for one reason or another, it is necessary to increase the length of the refrigerant route. In this case, it will be necessary to refill the system with freon.
When all the work has been completed and, if necessary, additional freon has been charged into the system, the next step will be the need to do a test run of the installation.
It is advisable to take care of the equipment before this action. own safety. Pressing the forced start button will activate the system. Sometimes the system beeps twice when turned on. This means that you can control the device using the remote control point. In order to check its operation, you should also press the remote control buttons one by one.
An air conditioner is an electrical appliance that cools the room in summer and heats it when the temperature approaches zero. Installation of a split system or other climate control device has a number of features and nuances. Knowing them and observing technology and safety requirements, you can easily install the equipment yourself.
Principle of operation
An air conditioner is a technically complex device designed to maintain the indoor microclimate. Individual models may differ in the method of air supply, number of blocks, power, size and other parameters.
For example, based on the number of blocks used, there is the following classification:
- Monoblocks. All functions are performed by one block. This design is easy to maintain and operate, and has a long service life. The main disadvantage is the high cost.
- Split systems. The design consists of two independent blocks. The first is mounted on the outer wall of the house, the second - inside. The blocks are connected by a tube through which freon moves. The internal unit contains the evaporator and fan, other parts are located in the external one.
- Multisplit systems. With one external appearance, such structures have different quantity indoor blocks. This is convenient if the owners plan to provide an optimal microclimate in several adjacent rooms.
This air conditioner consists of two blocks, communications and remote control
Regardless of the model, the functioning of any climate control device is based on the property of liquids to give off heat during condensation and absorb it during evaporation.
The main components of the unit include:
- A compressor in which freon is compressed and then sent to the refrigeration circuit.
- Evaporator. Here the refrigerant evaporates and enters the gaseous stage.
- A capacitor responsible for the reverse process - the transition of freon to the liquid stage.
- Thermostatic expansion valve (TEV), which reduces the pressure of the refrigerant before sending it to the evaporator.
- Fans that blow air over all important parts.
All components, with the exception of fans, are connected by copper pipes. The result is a refrigeration circuit with a constantly circulating refrigerant mixed with compressor oil.
The operating principle of most air conditioners is as follows:
- The evaporator sends freon gas to the compressor. At this moment, the refrigerant temperature reaches 10–20 degrees at a pressure of 3–5 atmospheres.
- In the compressor, freon is compressed. The pressure increases to 15–20 atmospheres and the refrigerant is heated to 80–90 degrees. After this, it is redirected to the capacitor.
- In the condenser, the refrigerant cools and becomes liquid. The air flowing through the assembly heats up.
- Next, liquid freon, located under high blood pressure, is transmitted to the TRV. In most household units, this device is a copper spiral pipe. During the circulation process, the pressure and temperature of the freon decrease, and some of it evaporates.
- The freon then goes into the evaporator. Here it finally takes on a gaseous form, cooling the room where the air conditioner is installed. The air in the room becomes cooler. Next, the gaseous refrigerant under reduced pressure is supplied to the compressor and the cycle begins to repeat.
All air conditioners operate on this principle, regardless of the number of units and other features of a particular model.
Tools and equipment
Installation of split systems and multi-split systems is best carried out simultaneously with major repairs premises. If the walls are already finished, you can safely order new cladding.
For installation you will need the following set of tools and materials:
- Powerful hammer drill and set of chisels. When installing, you will need to drill a hole with a diameter of 10 centimeters in load-bearing wall.
- Pipe cutter It is not allowed to cut refrigerant pipes with a regular hacksaw. Copper filings and crumbs that will inevitably remain after cutting will quickly damage the compressor.
- Rebar detector. When installing a split system in concrete wall and if it gets on the reinforcement during work, you will have to make another hole.
- Pipe flaring kit.
- Bicycle pump, which is used to check the tightness of the system.
- Vacuum pump. With its help, the system is checked for leaks.
- Pressure gauge, phase indicator, tester.
It removes moisture and air from the system for subsequent leak testing
The specific set of materials depends on the type of air conditioner being installed and the installation features. In particular, to install a split system you will need the following:
- Copper pipes with return nuts and thermal insulation material. Necessary for laying the route.
- 20A electric circuit breaker and cable.
- Decorative boxes for laying pipes, drainage and electrical cables. If the routes are laid in grooves, the electrical wiring will be placed in a corrugated pipe.
- Brackets for mounting external and indoor units.
- Drainage hoses.
- Fittings, bolts, fasteners, screws, dowels, etc.
It is better to purchase a copper tube with some reserve. With a long enough pipe, you can lower the outdoor unit a little lower. This allows you to compensate for small overruns Money to buy a good thermosyphon.
When purchasing a pipe in a coil, you need to make sure that its ends are rolled using the factory method. Cracks and dents are excluded.
Preparatory work
Before proceeding with the installation of the air conditioner, it is necessary to carry out a number of preliminary procedures and calculations. First of all, you need to decide on the place where the installation will take place.
Choosing an installation location
The quality of air conditioning, the well-being of the owners living or working in the room, and the design of the house or apartment depend on where the air conditioner is installed.
The choice of location for a window air conditioner is obvious. The mobile air conditioner can be installed in any desired location. The main problem is with classic split systems.
When choosing a place for installation, in particular, an indoor unit, you can follow several recommendations:
- Do not place the device on the wall opposite the entrance to the room.
- The distance from the block to the ceiling should not be less than 10 centimeters.
- The air flow is directed in the direction where people are least likely to be. If the split system is installed in the bedroom, it should be placed away from the bed. If remote installation is not possible, the unit can be installed overhead to allow cold air currents walked to their feet.
- The air conditioner is installed at some distance from the cabinets. If the furniture is placed next to and slightly below the split system, air currents, blowing dust from the top cover, will form a dusty curtain.
- The air duct route can be laid in boxes or pre-equipped gates. The minimum length of the air duct can reduce the cost of installing a split.
The location for installing the external unit is selected separately. The simplest option is to place the block on the external wall of a balcony or loggia. Installation can also be done on the roof. The second method is relevant for residents top floors high-rise buildings.
Air conditioner check
Before installation work The air conditioner must be carefully inspected. The owner must ensure that the unit was not damaged during transportation and that all parts specified in the package are available.
When inspecting the air conditioner, you must ensure the following:
- There should be no dents, cracks or other deformations on the external unit of the split system.
- There should be no foreign elements at the connection points. The thread must be clean and undamaged. Deep scratches on metal are unacceptable, this is a sign of defective or unskilled dismantling.
- There are stickers on the external unit that detail the manufacturer, power and other information about the air conditioner. All this data must match the instructions.
- The electrical circuit of the air conditioner should be located under the cover or in another accessible place.
- The split system must include screws with which the remote unit is attached to the bracket. If their availability is not provided by the manufacturer, they are purchased separately.
- Damage to the indoor unit is not allowed.
- Filters must be free of stains, odors, and marks. detergents. If this is present, it means the air conditioner has been used and washed.
If no visible deformations are detected, you can check the operation of the air conditioner. To do this, the indoor unit of the split system is started in “fan” mode from the nearest outlet. There is no need to check other modes; this will lead to incorrect operation of the device. If everything works properly, you can disconnect the unit from the network and continue the installation.
Do-it-yourself air conditioner installation
On the market climate control equipment Several types of air conditioners are offered. The most common among them are conventional and multi-split systems, window, floor and channel models. The installation of each of them has its own characteristics. Let's look at the installation of all systems in more detail.
Split system
It is the most common type of air conditioner. This is a structure consisting of two blocks connected to each other. One of them is located indoors and provides an optimal climate, the other is installed outside.
Outdoor unit
Installing the external part is the most difficult part of installing a split system. When decorating high-rise buildings, such work is carried out using industrial mountaineering.
First, brackets are attached to the wall of the building. With some models of split systems they are included, for others you will have to purchase them additionally. To fasten the parts, anchor bolts are used, which are purchased complete with brackets. Thanks to the reliable fastening, the block will not fall, even if it gets icy.
When installing the block, it is necessary to maintain a distance from the walls. Specific numbers are indicated in the documentation for the split system. The structure is placed horizontally; during installation you need to use a building level.
Some blocks weigh more than 100 kg. A lift is required to install them.
The installation technology is as follows:
- Holes for anchor bolts are drilled strictly perpendicular to the wall surface.
- The minimum distance by which the block must be moved away from the wall is 20 centimeters. The exact numbers are indicated in the instructions.
- All communications approaching the block are securely fixed.
- There should not be any architectural structures or other air conditioners directly above the unit. A small visor is installed on top.
- The mass of the block can exceed one hundred kilograms. When selecting a bracket, it is necessary to take into account that it must withstand double the weight of the unit: this will allow it to withstand the effects of various weather conditions.
The maximum distance to which open communications of a split system can go along the wall does not exceed 1 meter.
Installing an air conditioner on a ventilated facade and loggia has its own characteristics. The difficulty of the first case is that the building is already lined with a layer of insulation and porcelain tiles fixed on metal guides. Installation on a ventilated facade is carried out as follows:

Certain nuances are also associated with installing an air conditioner on a balcony or loggia. Installation of an outdoor unit inside a building is prohibited, which is why it is often placed on a parapet. Some homeowners install a split inside a glazed loggia. In this case, the windows must be left open, otherwise the system will not work properly.
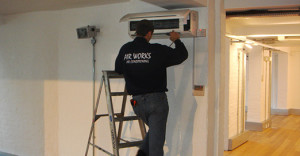
Indoor unit
The block is installed under the ceiling, with a certain distance from the walls. The distance to the nearest surfaces for each model is determined individually and is indicated in the accompanying documentation. During installation, it is necessary to take into account that the indoor unit is installed higher than the external one.
The system is installed in two ways:
- Parallel to the floor. The structure is set to the building level.
- With a slight slope (about 5 degrees) towards the drainage. This facilitates the drainage of condensate.
Before starting installation work, the mounting points to the wall are marked. For this, chalk and a building level are used.
First, the mounting plate is attached. Most often it is included in the installation kit. If the package is incomplete, you need to measure the parameters of the block and purchase the part. 4–6 screws are used for fastening.
A block is installed on the plate. For unhindered access to the fittings for further work, you can place it under the air conditioner. small item, for example, a screwdriver.
If there are increased high-frequency vibrations in the room, for example, from machine tools, there is no need to install a split system here.
Laying routes and communications
A hole is required to carry out the necessary communications. It is drilled with a hammer drill, the diameter of the drill is up to 5 cm. If drainage is laid in the same route, the channel is made with a slight slope (up to 10 degrees) towards the street. A section of the route is laid into a wall; if this is not possible (for example, after renovations in a room), you can outdoor installation using a decorative box.
The standard communication route includes:
- Freon line - copper tubes of a given length.
- Wiring.
- Drainage - occasionally.
Freon pipes, wiring and drainage hose are laid
The length of electrical wiring and pipelines depends on the length of the route, taking into account a small margin. Copper tubes are cut with a pipe cutter; when using a grinder or other devices, sawdust and burrs appear. Before installation, the pipes are placed in a heat-insulating shell - this prevents construction debris from penetrating inside.
When installed externally, communications can be hidden in the cable channel
After installation, it is necessary to connect the wiring and freon pipe line. The wiring diagram is contained in the instructions supplied with each air conditioner.
To connect the freon pipe, you need to adjust its size, remove burrs (if any), thread the nuts and flare the edges. After this, the pipes are brought to the fittings of both blocks, connected, and the nuts are tightened with a wrench. It is necessary to ensure that all connections are completely sealed.
Drainage
Used for drainage reinforced pipe made of plastic. It is connected to the drain pipe, for which a threaded flange is used (if this method is provided for in the design) or a heat-shrinkable tube.
According to technology, drainage is discharged into the sewer. In practice, many owners take the tube outside the house. It is important that it does not bend upward: water accumulates at the bend, and fungi and microbes appear and spread in it.
Final works
After installing communications, laying a route, etc., the line is checked for leaks and vacuumed. The pump is connected to the port using a manifold and pumps out air for 20 minutes. Then the device turns off, after which it is necessary to observe the pressure for a while. If the readings on the pressure gauge have not changed within half an hour, the system is considered sealed.
After the final check, you can open the taps on the external unit and fill the system with freon. Refrigerant leakage is not allowed: this not only provokes malfunctions in the split system, but also negatively affects human health. Next, the structure is connected to the network. In most household air conditioners, power is supplied to the indoor unit, for which you only need to place an electrical outlet nearby.
Video: step-by-step installation
How to install a window air conditioner yourself
Installing a window-type air conditioner does not require laying routes, carrying out work at heights and other difficulties inherent in installing split systems.
Free gaps are closed with decorative inserts
When working, you must follow the given sequence of actions:
- Preparing the site. The glass is removed and a “jumper” is installed.
- Bracket installation.
- Installation of the block.
- Connecting a drainage hose, if provided for by the design.
- Connecting the air conditioner to the power supply.
Video: connecting a window structure
Floor system
The floor-standing air conditioner also does not require installation of an external unit and can be installed anywhere. It is only necessary to ensure that the heated air is discharged outside the room. Some simply duct the air duct into open window- this minimizes the operation of the air conditioner itself.
To prevent heated air from the street or from the air duct from entering the room, you need to equip a ventilation duct. To do this, you can order a plastic window with a suitable hole from a specialized organization, or purchase plexiglass and cut it yourself.
An open window makes it pointless to cool the room
To make a hole of suitable size in the plexiglass, you need to attach an air duct to it, circle it in a circle and cut a hole. As cutting tool An improved soldering iron is suitable: a cut is made in the “tip” of the tool into which a blade from a breadboard knife is inserted. When the device operates, the blade heats up and begins to cut plastic.
Duct
The main advantage of duct-type air conditioners is the ability to combine cooled air with street air, thereby performing ventilation functions. For this purpose, an additional air duct is connected to the unit. To organize the mixture, the following procedures are necessary:
- IN external wall a hole for the air duct is drilled.
- From the street side, a grate is inserted into the hole. An electric valve is installed next to it. When the air conditioner stops, it blocks the air supply.
- The air duct is installed. Air will flow through it into the filter.
- Next along the chain, an electric heater is installed. Filtered air enters it. Heating is provided optimal temperature indoors in winter.
- Final node - duct fan providing air circulation.
Installation of the duct air conditioner itself consists of installing an external and internal unit, as well as a pipe system. The external unit is similar to the same as that of a conventional split system. The indoor unit is installed under suspended or suspended ceilings.
If installation takes place in a private house, it can be installed in a technical or attic room.
The peculiarity of this type of air conditioner is that it can be used to control the microclimate in several rooms without damaging the interior decoration. This is ensured by a system of ventilation ducts, from which heated or cooled (depending on the settings) air passes from the unit through drilled and grated diffuser holes into the rooms.
The air is distributed through pipes and enters the room through diffusers
Some models allow vertical installation. In this case, the unit is located in the gap between the walls. This must be provided for at the construction stage of the building. Some models can be mounted on a load-bearing wall and hidden with a false beam or partition.
The winter kit allows you to use the split system at very low temperatures. The package includes:
- A device that heats the compressor crankcase of an outdoor unit. Thanks to it, a “cold start” becomes impossible.
- A device that regulates the speed of fan rotation. It redirects air flow and prevents freezing inside the air conditioner.
- A device for heating the drainage, installed in the indoor unit. Thanks to this detail, icing of the condensate outlet is eliminated.
Modern devices are equipped with their own temperature sensors and automation
Installation proceeds as follows:
- The protective covers and top covering of the external unit are removed. The front panel is removed. The need to dismantle the rear wall depends on design features specific model.
- The connection diagram for the fan controller depends on the type of device being connected. For example, Fasec-33 is installed in the neutral gap (wires that go to the capacitor), the Ballu device is built into the phase gap.
- The crankcase heater is built into the bottom of the compressor and connected to the power supply. Modern models have their own temperature sensor, and when the set temperature is reached, the heating turns off automatically.
- Heaters belt type, used for the drainage system, are installed directly inside the hose and are powered from the crankcase heating or compressor start terminals. The drains only need to be heated while the air conditioning compressor is running and condensation may form. The length of the heater must completely cover both the street part drain hose, and 15–20 cm located in the wall.
Before installing parts, the unit is disassembled
Video: How to install a winter kit
Safety precautions when installing an air conditioner
When installing the air conditioner, the following safety precautions must be observed:
- The unit should not be installed in close proximity to potential sources of moisture or heat.
- The unit should not be installed next to a doorway.
- Let us repeat that air currents should not be directed towards a person.
- It is necessary to ensure that the condensate drains, otherwise bacteria may appear.
- The block is installed on a strong wall. During installation, a special plate and brackets included in the kit are used. Installation is carried out by level.
Many works associated with installation household air conditioner, do not require qualifications and are performed independently. If you have the skills of a builder or electrician, installation can be carried out without serious difficulties.
Installing an air conditioner yourself should begin with choosing a location for installation. In fact, everything is not easy. We must take into account:
So you will have to solve a complex problem, trying to satisfy all the requirements and recommendations. Only in this case will installing an air conditioner yourself be successful.
Let's start with the simplest thing: choosing a location from the point of view of ease of use. The indoor unit must be placed so that the cooled air spreads throughout the room, but does not fall directly on the bed, desk, or chair. In principle, you can redirect the flow using movable blinds, but it is much better to think about it from the beginning.

The most correct solution in this case is to place the air conditioner above the head of the bed, above or to the side of the table. In this case, the flow of cold air will “flow around” the place of rest or work, which is much more comfortable and less dangerous to health.
In addition there is technical points, which must be provided for before starting to install the air conditioner yourself. The indoor unit is connected to the outdoor unit using a route from copper pipes and control cable. The outputs for connecting the route are on the right (if you look at the block from the front), but they can be bent so that they are on the left or bottom. These outlets are 30 cm long copper tubes.

Outputs from the outdoor unit of the split system (rear view)
A route is connected to them (by soldering or flaring), and the connection point must be accessible for maintenance. Therefore, this section of the route is not hidden in the wall (in the groove), but covered with a decorative box. In this case, the route can be positioned differently - depending on which wall the indoor unit is hung on and where the outdoor unit is located in relation to it.
Block to the left of the outer wall
If the indoor unit is to the left of external wall, and the route comes out smoothly, minimum distance from wall to block - 500 mm (1 picture in the photo). It can be reduced to 100 mm if the route is wrapped onto an adjacent wall, but its total length should not be less than 500 mm. If this is not possible, you can remove the bends from the left and lay the pipes in the groove (picture on the right). In this case, this is possible, since the connection point between the leads and the route is located under the housing cover, so that it is accessible for repair and maintenance.

If cables, pipes, etc. cannot be pulled along the outer walls of the building. (so as not to spoil appearance), the entire route will have to be laid indoors. A less expensive option is to place it in a corner, covering it with special boxes. This arrangement is convenient, since you can then close the box with curtains.

The second option is more labor-intensive (it’s more difficult to make a groove), but with aesthetic side more advantageous is to move the output to the left sidebar and place everything in the recess you made.
On the wall to the right of the outside
This option can be called typical - this is the standard solution when choosing such a location. Most often, the route in the box is led directly into the wall, but if necessary, it can be lowered in the corner (also covered with a box).

If necessary, it can be placed in a groove (the connection point is in the housing). If the route cannot be laid outside the building, it can be laid in a groove indoors. The route may look like two latest photos in the previous chapter.
Where to determine the outdoor unit
In fact, it is not the easiest task to choose a location for an outdoor unit. Not all buildings allow them to be placed on the walls. In this case, there are only two options: install the outdoor unit of the split system in a specially designated place - the air conditioner. If there is no such room, only a balcony or loggia remains. In such buildings they are usually glazed, so the placement of the block does not affect the appearance.
But in this case, it is necessary to provide a system for cooling the equipment and removing exhaust air. If the balcony is spacious enough, open the windows for ventilation or provide access to fresh air in some other way for the entire time it is open. The solution is simple and straightforward, but it leads to overheating of the equipment, and this is fraught with breakdowns and frequent replacement of the damaged outdoor unit.

Installation on the balcony is sometimes the only way out
Installing fans for more active air exchange can improve the situation a little. It’s right to fence small room, do in it effective ventilation, separate ventilation ducts for air removal and supply. Moreover, they must be separate. This is done using air ducts that lead out instead of part of the glazing. In general, in this case, installing an air conditioner with your own hands is a problematic task precisely in terms of ensuring normal operating conditions for the equipment.
On the balcony or loggia
If there are no prohibitions on placing foreign devices on the walls of the building, usually the outdoor unit of the air conditioner is hung on the balcony railing (on the side or front) or on the wall, but so that it can be reached for maintenance - wash, clean, check, repair.
If the balcony is glazed, there should be an opening window sash above it. Otherwise it will be very difficult to maintain it. To protect against precipitation and objects that may fall from the window, a canopy is placed above the block. The choice of materials is something similar to finishing a balcony or a white plastic canopy, but full-bodied. It is better not to use hollow and metal ones (including corrugated sheets and metal tiles), since during rain they turn into a drum, and during hail they can generally deafen.

If the block is placed on a loggia, of all the above options, only the one in the picture on the right remains. It is inconvenient to place it next to the wall, except perhaps under the window, but this already belongs to another section.
One more point: how to run the route - along the ceiling or along the floor? You will have to ditch in both cases, but in the case of the floor, it is possible that you will make it from boards, then the pipes and cables connecting the external and internal units can be laid on the surface, but better - in a box.
Under or next to the window
In those rooms where there is no balcony or loggia, outer part Split systems are hung on the wall outside. It is more convenient if it is located under the window or to the side of it. Moreover, under or next to the opening part. In this case, service is possible without calling a climber.

When installing the outdoor air conditioner unit with your own hands on the wall next to the window, consider the height of its installation. You can position the top surface of the block flush with the top edge of the window. In this case, leaning out of the window and securing yourself, you can carry out work while standing on the windowsill. The second option is to align the lower edge flush with the lower edge of the window opening. Here you can lie on your stomach on the windowsill, but you won’t be able to reach the exit point of the pipes. That is, you will still have to call industrial climbers.
What is required to install an air conditioner yourself
For those who install and connect split systems professionally, the work takes, on average, three hours. The cost of this service is considerable, and it is explained by the need to use expensive equipment. Good devices really cost a lot, but many of them can be replaced with simpler ones or rented. The only thing that will be difficult to find is a vacuum pump. This is really expensive specialized equipment, but there is technology that allows you to do without it. This is exactly what some installers do, who simply do not have such equipment - they simply bleed off part of the freon, cleaning the pipes. This method can be used when self-installation split systems.

Necessary equipment and what can replace it
What is necessary for a DIY air conditioner installation to be successful? First of all, you will need a certain set of tools. With their help, things will go faster. But if there are no special tools, they can be replaced with simpler devices. Working with them will take more time, but if you try, this will not affect the quality. So, what is needed to install a split system:
- Powerful hammer drill. It is necessary to make a through hole in the outer wall of a house or building through which copper pipes and cables connecting the internal and outdoor units. Also, a drainage tube is removed through this hole to remove condensation and excess moisture when the humidity is normalized. A rotary hammer is not such a rarity; the only thing that can cause difficulties is selecting the right attachments. But this is a matter of technology.
- Pipe cutter with a sharp blade. The split system blocks are connected to each other by copper pipes. They are sold in rolls, so you have to cut them into pieces. required length. If the pipe cutter blade is dull, the edges of the pipe will become wrinkled or jagged. This will have to be corrected with a file and a rimmer (a special device for removing burrs). The pipe cutter can be replaced with a hacksaw with a metal blade, and the edges can be straightened and burrs removed using a file (need file), finally finishing the edge until smooth with sandpaper. Just when working, make sure that the hole being processed is directed downwards. This will prevent copper dust from getting inside the pipe (it can damage the inside of the air conditioner, so this is very important).
- Pipe bender or spring. To give copper pipes the desired shape.
- Drill with drills of different diameters. It is needed to make holes for the mounting plate of the indoor unit and corners for installing the outdoor one.
- Flaring machine and calibrator for copper pipes. This device is, of course, specific, but it doesn’t cost much.
- Wall chaser. When laying a route in a groove (a groove in the wall), this device significantly speeds up and simplifies the work. But you can get by with a regular chisel and hammer/sledgehammer.
Well, as they said before, a vacuum pump is needed to properly start the system. There is nothing to replace it with; the only possibility is to release part of the freon on routes up to 6 meters long (the “spray” method).
In addition, you will need screwdrivers, hex keys, a level, a hammer, and perhaps some other tools, but they are usually found around the house or are easy to find.
Materials and consumables
In addition to tools, to install an air conditioner yourself, you will need a certain amount of materials. You can't do without many of them.

As you can see, installing an air conditioner yourself requires serious preparation. You need not only a special tool, but also specific materials.
Installation of blocks
If you want to do everything right, installing an air conditioner yourself should begin with carefully studying the instructions. For the most part, they are similar, but allowances, requirements for cable cross-section, route length, etc. may vary. Another advantage of reading the manual is that you will know exactly in what order to perform the work. In general, here's what to do:

This is the first stage self-installation air conditioner is finished. Next we will build a route.
Connecting blocks
The external and internal blocks of the split system are connected by two copper tubes and a cable. A drainage tube is also brought out. All these communications can be laid from above along the wall, and then they are placed in a special box. The second option is in the groove and then you need to make a groove that will connect the two blocks. But first of all, you need to drill a hole in the wall. This is done after installing the fasteners for the blocks. And only after this, do-it-yourself air conditioning installation continues.

When laying in plastic box, all communications are connected into one bundle. This can be done with zip ties, but more often they are wrapped with metallized tape to further reduce heat transfer from copper pipes.
Connecting copper pipes
We have already connected the cable earlier, and the installation of the air conditioner is completed with our own hands by connecting copper pipes and drainage. It's easier with drainage. There is an outlet at the bottom of the indoor unit, and that’s where we insert the hose or pipe. The junction can be further sealed using plumbing tape. You can also use silicone sealant for sealing.
Next we connect the copper tubes. We start in the indoor unit. There are two ports on the side wall - one with fittings of a larger diameter, the second - a smaller one. It doesn’t matter which one to start with. The procedure is as follows:

Actually, everything is already connected, but you still need to carry out a vacuum or simply remove moisture and air from the working parts of the air conditioner.
Vacuuming
Why carry out this procedure? During installation, air entered the system and also contained argon residues. This mixture must be removed, otherwise it will significantly reduce the operating life of the equipment. Naturally, it is better if you have special equipment. But, as a last resort, you can do without it.
If there is a vacuum pump
If you have a vacuum pump, everything is somewhat simpler. It usually comes with two pressure gauges (low and high pressure), which can be used to track the pressure drop in the system, that is, to identify leaks. The vacuum pump is connected to the output on the external block with a spool (filling port), and turns on for 15-20 minutes. During this time, it removes remaining air and nitrogen from the system.

After this time, the pump is turned off, but not disconnected, but left connected for another 20-30 minutes. All this time you need to monitor the readings of the pressure gauges. If they have changed, there is a leaky connection in the system. Most likely, this is the place where the copper pipes are connected and they need to be re-sealed. If the pressure gauge readings are stable, without turning off the pump, fully open the valve located below. Freon begins to leave the unit, filling the system (noise is heard). We put on gloves and quickly unscrew the hose vacuum pump(freon can damage the skin). After disconnecting the equipment, open the valve on the route at the top (outlets of smaller diameter). Now the installation of the air conditioner with your own hands is completed. You can turn it on.
Without vacuum pump
With a route length of up to 5 meters, the installation of the air conditioner can be carried out without a vacuum pump. To clean the equipment you will have to release a certain amount of freon, but there is no other way. The procedure is as follows:

And in this case, do-it-yourself air conditioner installation is completed and the equipment is ready for use. But in this case, the tightness of the system has not been checked in any way and the freon can slowly evaporate, and there is still some amount of air and argon left in the system. In general, the solution is not ideal.