There are many companies that will provide you with their glass cutting services. But how do you cut glass at home? If you do not have the necessary skills, but you nevertheless decide to glaze windows at home, you should pay attention to some recommendations. Today, there are practically no problems with how to cut glass to the required size.
With proper preparation, any glass product can be made at home.
Glass products have enjoyed great popularity at all times, fine glass products remain in price even now. Of course, a master with rich experience is able to realize any, even the most daring idea. But an ordinary person will need a huge store of knowledge and the necessary tools for this case. But do not despair - everyone can conquer the cutting of glass at home.
Preparing glass for cutting
The first stage is perhaps the most important, because a lot of nuances depend on it. First of all, you need to pay attention to what kind of glass you decide to cut. If the glass is new, which you bought specifically in order to make your dreams come true, there will be no problems with it. In order to prepare the glass, you just need to wipe it, and it is recommended to use a newspaper - it will remove the villi from the surface and leave no streaks ... If the glass was already in use, then much more effort will have to be made:
Glass must be washed and degreased before use.
- A simple newspaper is indispensable here. The products with which we wash the glass at home are perfect for achieving the desired cleanliness.
- Degrease. Take an ordinary rag, soak it in kerosene.
- We dry it. It is better to choose a closed room for drying - this will allow you to avoid dust on the surface.
Open the glass.
In order to prepare the old glass for cutting, you also need to cut it. It is important to be prepared for the fact that there will be waste from production in any case, especially considering the fact that the geometry of the desired shape may be different. But if everything is calculated correctly, then the waste can be minimal. To do this, it would be most correct to combine the workpiece and glass along the length. You should not get rid of scraps - in the future, when you decide to create other products, you can use them as well.
How to cut glass at home correctly?
Before you start cutting glass, be sure to test your glass cutter. This should be done on a small piece of glass: if a colorless line remains in the process, then the tool is quite suitable for work, but if a white line remains, the roller is dull or worn out.
Place the glass you are going to cut on a flat table or workbench. If you are just learning, it will be easier for you to cut straight - for smoother cuts, use a ruler or any straight strip (preferably longer than the glass itself). Also, do not forget about the marks that you can put with a felt-tip pen or pencil.
Where to start and how to cut correctly

When cutting glass, the glass cutter must be held vertically. The line should be drawn without stopping, but even leaning lightly on the glass. Remember that only one line should be drawn: if you did not succeed in cutting the glass the first time, you cannot duplicate! Flip it over and make a new incision.
After the cut is made, move the glass to the edge of the table and tap it with the cutter's mandrel, after which you will see a line (it will indicate where to break the glass). Breaking it is not difficult. It is necessary to combine the line with the edge of the table: with one hand we press on the glass and press it against the table, and with the other we press on the area that is hanging.
Precautions: The size of the waste may be small, so use pliers to break it to avoid negative consequences.
What tools do you need to cut glass with your own hands?
The misconception of many is that they think that a glass cutter is necessary for high-quality glass cutting. What to do if you urgently need to cut off glass, but such a tool is not at hand? There is a way that our grandfathers still used, in terms of efficiency it is in no way inferior to the alternative with a glass cutter. No, this is not cutting with a grinder - use simple scissors that everyone has at hand. And now we will analyze the two indicated options in more detail.
Glass cutter.

Figure 1. To make high-quality cuts of glass and ceramic tiles, it is necessary to choose the right glass cutter.
Cutting glass with this device is very simple. You just need to pay attention to certain rules, as well as choose the right tool. Modern technologies offer you a very wide range of tools. The variety of choices allows you to find ways that make the job easy and give you the opportunity to enjoy the job itself.
- Almazny is the leader of his business. This tool managed to show itself well in work, and to this day it remains in the leading position. The beveled type cutting edge will be acceptable for home use. It is able to cut through thick glass and can handle about ten kilometers with ease. In order to sharpen the tool, a special block is used. Picture 1.
- Roller. The roller of such a tool is cobalt-tungsten. The tool can have about six rollers.
- Oil. Designed for cutting thick glass. The handle has a reservoir from which oil is automatically supplied to the roller.
Yes, don't be surprised, glass can be cut as easily as a sheet of paper. There is a little secret that, once mastered, you will be able to cope with this task. You will need scissors (if possible, prefer sewing) and a water tank (it should be hot). No magic - elementary physics: we take scissors, dip the glass in water and cut it. With the help of scissors, a microcrack will be formed on the surface of the glass, and the capillary effect will complete the process.
It is not difficult to guess that using scissors, you will not be able to achieve such an ideal result as with a glass cutter, but in the absence of a high-quality tool, you can also use improvised means.
What are the types of glass
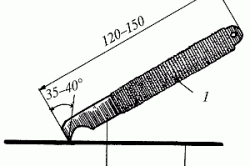
Figure 2. For cutting glass, you can use a blade cutter, it cuts up to 2 millimeters of glass.
Even beginners will be able to cut ordinary glass. What should you do if your goal is to make a glass product with a more complex configuration? You need to know the properties that glasses have and, perhaps, this information will be useful to you in the future.
- Strained glass. Seriously speaking, it is impossible to cope with cutting this type of glass at home - its properties will be lost. Moreover, only professionals need to work with such material.
- Corrugated. With the help of such glass, you can decorate doors or create an unusual interior. Working with it is not much more difficult than with ordinary glass. The only thing to remember is that the cut is made on the smooth side.
- Organic or acrylic. Transparent type plastic. It is not necessary to purchase special tools for it. It can be cut with scissors (thin sheet) or with a special hacksaw blade. Figure 2. If this is not found at hand, you can use a clerical knife, it will cut the glass, the thickness of which is less than two millimeters.
You cannot cut plexiglass with an ordinary grinder, which every real man has.
Due to the high speed of the disc, it can become hot and warp.
Whatever glass you work with, remember to follow safety precautions. It is recommended to take care of high density glasses and gloves. In addition, pay attention to the surface on which you will be working - cover the table with such material, which will not be a pity to throw away (when cutting glass, fragments remain). Trust me, you will achieve incredible results if you feel comfortable and safe while working.
For 2 centuries, glass has been an integral part of any home. This material is used in the production of windows, mirrors, photo frames and many other interior elements. Hard, but incredibly fragile glass, has certain processing characteristics that are radically different from concrete, plastic or brick. Cutting this material is a very delicate and precise process that requires special tools and certain knowledge. In this article, we will try to convey the essence of the glass cutting process in as much detail as possible, and also talk about several important nuances that will be useful when working.
Safety regulations
Having started a procedure for cutting glass, be sure to keep in mind that working with this material requires compliance with safety rules, which are not recommended to be neglected. Unfinished glass has sharp edges that can easily cut through the skin and cause infection. To avoid cuts, protect your hands with gloves and wear sleeved clothing. Since glass tends to crumble into small, sharp fragments, we strongly recommend cutting with glasses.The place where the glass is cut must be flat and stable. It is strongly not recommended to perform this operation on the knee, loose stool and other questionable surfaces. Compliance with this rule minimizes the risk of glass falling to the floor, and also makes work more convenient and improves the quality of the cut.

If you have not previously had experience in handling glass, and still do not know how to cut with a glass cutter, we do not recommend neglecting the above recommendations. Perhaps some experienced craftsmen can do this job with their eyes closed on their knees, but for beginners, things usually do not go so smoothly. Due to inexperience, you can make many mistakes: grab a sharp edge, drop the glass on your leg, or pass the cut and get a splinter in the eye. If you are working with glass for the first time, and have not yet experienced this process, it is best to be fully armed.
Glass selection
One of the key success factors for any job is choosing the right material. This belief also applies to glass, which should be selected based on the task at hand. In the following paragraphs, we will give a couple of recommendations on how to determine the quality of glass and choose the optimal thickness. If you already have the material in stock, you can go to the next heading or directly to the instructions on how to cut glass with a glass cutter.Before starting the description, we clarify that we are talking about ordinary window panes, which are most common in the construction markets. The first thing you need to pay attention to when buying glass is its end part. The edge of the canvas should have a bluish-green tint. Poor quality glasses have greener tones due to their higher iron content. This material is more fragile, but usually costs less.

The choice of glass thickness should be made based on the required dimensions. In order to work with the canvas more conveniently and the risk of rejects to be minimized, the ratio of width, height and depth should be optimal. Glass with an area of 1 m² and a thickness of only 2 mm is likely to crack on the first incorrect movement. When using canvases up to 50 cm, a thickness of 2-2.5 mm will be sufficient. From 50 to 100 - 3-4 mm. More impressive dimensions should have a thickness of 5-6 mm and more. Consider these recommendations when choosing glass in the store and save yourself unnecessary trouble.
Types of glass cutters
The tool plays an important role in any business, having a direct impact on the convenience of the process and the quality of work. Professional devices are more difficult to use, but with the right experience, they produce first-class results. Tools aimed at novice craftsmen require practically no skills, which usually affects the quality. Below, we will analyze each type of glass cutter and tell you which ones are easiest to work with, and which ones can get the most even cut.In household glass cutting tasks, roller, oil and diamond glass cutters are most often used. There are also special circulating devices designed for cutting round holes. To create a clearer understanding of how to cut glass with a glass cutter, let's look at each tool in more detail.
The roller glass cutter is considered one of the simplest and most budgetary devices in its industry. It has a simple structure consisting of a handle and a metal head with a carbide roller. The sharpening of the cutter is enough for 250-300 meters of glass, up to 6 mm thick. The most optimal option for a small amount of work in the absence of experience.

Oil glass cutter is a more advanced analogue of a roller glass cutter, with a couple of significant differences. The handle of this tool also serves as a reservoir for oil that gets on the roller during cutting. The tip of the oil glass cutter is a monolithic piece with internal holes for a wick through which fluid is supplied. Thanks to constant lubrication, the roller will become dull only after several thousand meters of cut glass, up to 8 mm thick. Perfect for both beginners and experts.

A diamond glass cutter costs many times more than previous models and is usually used in professional cutting. Able to cut glass up to 20 mm thick. Consists of a handle and a weighty tip with a groove for breaking glass, a positioner and a diamond. The cutting diamond can be artificial or real, which will undoubtedly affect the cost of the tool. Strength is enough for several thousand meters of high-quality cut. Working with this glass cutter requires a certain skill, which makes it not the best option for beginners.

Glass cutter - compass is designed for cutting round glass. A very expensive tool aimed at professional use. Consists of a suction cup, a guide fence and a cutting roller. Some models may be equipped with a grease reservoir. Doubtful purchase for domestic use. An analogue of such a device can be assembled by hand from a suction cup, a rail and an ordinary glass cutter.

Workplace
Convenience and success of work largely depend on the place where the glass will be located during cutting. An unsuitable work surface can result in uneven chipping, cracks, scratches and even injury to the glass. There are a few simple rules that will help you save material and get a decent result.The most important thing is that the work surface is level. There should be no bumps or indentations on the table, floor, or other place where you will be cutting glass. If there is a void between the material and the surface, then under the pressure of the glass cutter, the fragile glass can simply crack.


The table, workbench, stool and any other structure must be stable so that when the line is being drawn, the glass cutter does not jump off the mark. For greater adhesion to the surface and to avoid cuts on the glass, it is better to place a piece of cloth between it and the working area. Place a sheet, bedspread, or any other soft rag on the table, slightly larger than the glass to be cut.
Glass cutting with glass cutter
At its core, the glass cutting process is quite unusual, but at the same time it may seem complicated only on the first attempts. If you perform the necessary actions in the correct order, as well as cut with a certain speed and force, everything will definitely work out. The following guide will walk you through the steps on how to properly cut with a glass cutter, but while theory is complete, we recommend that beginners practice on less valuable shards first. It is better to start with the base material, at least after a couple of successful cuts.The first step is to prepare the glass for work. For this, its surface must be cleaned of dust and dirt. The cut line on clean glass will be more uniform, which will increase the chances of even chipping. The washed surface should be wiped with newspaper and degreased with alcohol or kerosene. After all procedures, leave the glass for 10 minutes to evaporate the remaining moisture.
It is better to apply markings on the glass with a felt-tip pen or a steklograph. To do this, we simply measure the dimensions we need from both edges, apply a ruler to the indicated points and outline the line of the future cut.

The most important step in the whole process is the glass cutter. We take a roller or oil glass cutter (the diamond is described in the video below) and draw a short line, up to 5 mm from the top edge. Next, from it we lead the cutting roller to the end of our mark. We move the glass cutter over the glass with a precise, confident movement with a pressure force slightly above average. If the cutter is sharp and the force applied is optimal, you will hear a slight crackling sound. The resulting line should be uniform and translucent. Periodic expansion or breakage of the line can form due to a blunt cutter or too strong pressure. It is not recommended to carry out twice in one place. Better to retreat 5-10 mm from the original mark and make a new cut.

The culmination of cutting the glass is splitting it. There are several correct methods for controlled cleavage. It is always better to read from the most delicate exposure, and in the absence of a result, increase the load (within reason).
We put the glass on a table or other more or less flat surface, so that the cutting line is parallel to the edge and extends a couple of centimeters beyond it. Next, take a glass cutter and lightly tap with an iron tip at one of the edges of the cut line on the back of the glass. When a small crack forms, simply break off the hanging piece of glass with a slight movement of the hand.

If, after a couple of dozen hits, no cracks have formed, go to plan B. Put a match, nail or toothpick under the edge of the glass, along the cutting line and lightly press on the canvas from the sides. If after moderate pressure the glass remains intact, you can resort to the roughest method. We combine the cutting line with the edge of the table or other surface and press on the part to be broken off with our hand. This should be done with gloves and goggles. You should not overexert yourself. If the glass does not break, then the cutting line is not deep enough and it is better to try to make a new one and pay attention to the sharpening of the cutting roller of your tool.


After a successful glass chip, it remains only to secure it by cleaning the edges with fine-grained sandpaper or a bar. Hopefully the above guide will help you make an accurate cut of glass. For greater clarity, we recommend watching a video on how to use a glass cutter with a wheel and a diamond.
Figured glass cutting
Our needs are not always limited to straight edges. For some projects, a rounded or wavy shape of glass may be required. The process of curly cutting can be a little more difficult than a straightforward one, but it does not require colossal experience. There are some things to consider before cutting the glass with a glass cutter along a wavy line.
To make curved cutting more accurate and convenient, it is recommended to prepare a template of the required shape in advance. It is better to cut the pattern out of a piece of chipboard with a thickness of 5 mm or more. When marking the future template, keep in mind that the cutter roller will not adhere tightly to its walls, but with an indent of 2-3 mm. To prevent the cut out guide from running on the glass during the cut, several strips of electrical tape can be glued to its bottom.
When the pattern is ready, we apply it to the fabric to be cut out and draw a line with a glass cutter. Then gently tap on the line from the bottom. If you are cutting a shape inside a glass sheet, then for easier extraction, you can draw lines from the shape to the edges of the sheet so that you can neatly chip off the edges.
Cutting glass is not always successful the first time. This almost jewelry process requires a certain skill. Practice and you will soon be able to do the job easily and efficiently.
Save this page in your social. network and return to it at a convenient time.
When doing home renovations, each apartment owner sooner or later faces the need to glaze windows, doors or bookshelves.
Good glazier skills are acquired only through practice, often over a long period of time. However, mastering the techniques of this specialty is not so difficult on your own.
Our advice to the home craftsman on the preparation and safe ways of cutting glass when renovating an apartment with your own hands is designed to eliminate typical mistakes made by inexperienced beginners, to help understand their main reasons, and to exclude them from work.
Read them. Exercising elementary accuracy and caution, it is quite possible to learn how to work with glass confidently and reliably.
Exemplar
In order to correctly represent the work of professional glaziers, we recommend watching a three-minute video of the owner of Nostromo6300 “Cutting glass”. In it, two craftsmen during this time, in front of your eyes, from a sheet of 2.25x3.21 meters will cut 10 different blanks according to exact dimensions.
Their glass cutter is called "mop" in workers' slang.
Preparatory work
To properly cut glass at home, you need to have the appropriate tools and a place for processing it.
Required tool
To work, a home craftsman will need a minimum set:
- glass cutter, it can be of the old grandfather's design or more modern with a container for lubricating the roller with kerosene;
- marker for marking a glass blank;
- construction square, providing control of right angles;
- ruler for marking and orientation of the cutting line.

At the stage of marking the workpiece for cutting the grooves, it is necessary to observe the dimensional accuracy: the width of the working head of the glass cutter should be taken into account. It is 5 mm, and the axis of the cutter wheel is half that distance from its lateral edge.

When choosing a ruler, pay attention to its thickness. Thin and pointed side edges are not suitable. The head of the glass cutter will not move well along them.
When placing the ruler on the glass from its edge to the roller axis, you must create an indent of 2.5 mm.
For such work, it is convenient to use a piece of laminate or a flat strip. To prevent such a template from sliding off the glass surface during cutting, a cloth or cloth tape is glued to its lower side.
Workplace
Glass does not withstand local side loads poorly. The force of pressure from the glass cutter is exactly what causes them. Therefore, the DIYer should work with glass only on a prepared clean and level surface.
A covering made of a solid sheet of fiberboard and similar materials is well suited. It is perfectly acceptable to cover an ordinary table with a blanket and cut on it.
A bit of theory
Glass production is based on melting, followed by cooling of minerals of various compositions. After the end of technological processes, a transparent, relatively strong structure is created. It normally withstands mechanical loads evenly applied to the entire plane, but poorly resists local impacts.
Conventional cutting is based on scratching with the hard, sharp edges of the glass cutter roller. They reduce the strength of the surface and at the same time form microcracks, which under the action of operational loads, for example, wind gusts, snow cover pressure, lead to destruction during operation.
At the factory, during casting, a high-quality glass edge is created without the presence of defects that reduce the mechanical characteristics of the sheet. Consider how it is formed by a conventional building glass cutter or its industrial automatic counterpart.
Cutting steps
The work is carried out in two stages:
- creating a scratch in the form of a groove on the surface;
- breaking into parts by bending force.
The technology of creating a groove with a glass cutter
When cutting, the tool is held with a hand in an upright position, placing the index finger on top of it.
The glass is cut from the far edge to the near. The speed of movement of the cutter must be uniform, the pressure on the glass must be the same. The cut is done only once.
By the quality of the scratch, you can immediately judge the correctness of the cut:
- a thin, transparent line from the roller indicates the sharpness of its edges and the correct cutting technology;
- a deep white cut is a sign of improper work of the master or wear of the cutting part.
How to scratch properly
When cutting a groove, loads are created that work to shear the surface layer.

They cause deformations that form microscopic superficial, lateral and deep cracks.
The correct cut is ensured only by those microcracks that are directed into the depth of the material - the middle ones. All others are unnecessary. They must be avoided.
Cut quality is influenced by:
- angle of sharpening of the cutter;
- roller diameter;
- the force of pressing on the glass;
- the position of the cutting body.
How the roller sharpening angle affects the cut
As an example, consider the designs of three cutters designed to work on industrial glass cutters of automatic robots.

The direction of the forces pushing the surface layer apart when creating a scratch is always perpendicular to the pressure plane. A sharper roller deflects the acting force more widely from the normal to the surface, creating a smaller area of stress penetration.
Thick glass should be cut with a tool with a wider sharpening angle, and sharp materials are used for thin materials.
On the factory models of glass cutters, the sharpening angle has already been created to work with standard glasses used for domestic purposes.
How the roller diameter affects the cut
Smaller dimensions allow better scratching of the outer surface of the workpiece. However, the designs of the glass cutter are already adjusted at the factory for optimal work, and the home craftsman can not change anything here.
The tool is purchased ready-made with standard roller diameters. As they lose their sharpness, which is rarely manifested in everyday life, the blunt part is simply changed to a reserve one.
How pressure on the roller affects the cut
The penetration depth of the scratch into the glass depends on the applied cutting force. When choosing a sharper cutter for thin material, it should be borne in mind that it is dangerous to create a high load on them, because you can simply crush the material.
To facilitate cutting the workpiece, when performing such work, they always monitor the cleanliness of the glass and treat its surface with special liquids, which:
- lubricate the roller;
- provide a hydraulic cushion;
- reduce the effect of the Rebinder effect, reducing the strength of the outer surface;
- wedge the material.

At home, for these purposes, it is quite possible to do with kerosene. It is convenient to apply it by hand with a piece of rags or use a glass cutter of a special design.
How the position of the roller affects the cut
The picture with the sharpening angles of the cutter makes it possible to understand that the roller must be guided strictly perpendicular to the glass surface.

Its deviation from the normal will lead to lateral displacement of the midline crack and improper cleavage.
About the number of cuts
There is a common misconception among beginners that one scratch is not enough and several repetitions must be done. They say they will deepen the crack. So such craftsmen crawl with a glass cutter several times in the same place.
This is a gross mistake: with each movement, repeated deformations of the material and additional cracks are created in all directions. They reduce the overall strength of the workpiece and can lead to improper bending fracture.
Breaking methods
After a cut with deep cracks is made on the surface, it will be necessary to divide the workpiece along this line. This operation is performed in four ways:
- manual bending;
- using matches or thin sticks;
- at the edge of the table;
- by tapping.
Manual bending of the workpiece
The glass is grasped by the hands by the edges near the cut line, squeezed tightly with the fingers and an opposite twisting force is applied to bending directed outward from the groove made.

This is sufficient for precise separation of the workpiece from the main sheet. Most glaziers use this method.
Bend on matches
Matches or thin even wooden sticks are placed in one line on the table. Glass is placed on them with a cut line so that the scratch is located on top.

Place the palms evenly over the surface and break the glass with a sharp downward movement. The amount of effort is determined empirically, starting with small values.
The break is smooth and of high quality.
Curve at the edge of the table
Glass with a scratch is placed on the edge of the working surface of the table with the cut line up. Align it with the edge of the stop.

With the palm of one hand, they press the surface of the glass to the table, and with the other grasp the protruding edge and separate the workpiece with a sharp downward movement.
The method is well suited for mastering by beginners.
Tapping method
The glass is placed on the edge of the table, exposing the cutting line beyond its limits. Hold the part to be cut with one hand. With the head of the glass cutter, precise blows are applied to the place where the middle cracks are formed. They are gradually expanding and deepening from the created loads.

The peculiarity of the method is that the impact should not develop lateral cracks caused by glass deformation during cutting. They will create an uneven chip and ruin the workpiece.
During striking, the expansion of the cleavage is visually observed.
If the break fails
We must be prepared for a similar situation. It can arise in the absence of experience or technology disruption.

The damaged part from the protruding side of the unbroken edge can be carefully removed using the slots on the side of the glass cutter or pliers. The edges will be sharp and jagged. They will have to be ground with an emery stone.

The correct cut on glass is created through skills developed from an understanding of the design features of glass and the technology of the glass cutter.
Frame installation technology
Before starting installation, it is necessary to prepare a place for fixing the cut out workpiece. Its working surfaces must be completely cleaned of old nails, paper clips, putty. It is important to ensure a uniform contact plane of the glass to all edges without distortions.
Any irregularities found are leveled and putty putty. It is not difficult to buy or do it yourself.
Types of putties
Chalk putty
- drying oil - 220 g;
- ground chalk - 810 g.
Putty with chalk and whitewash
- drying oil - 180 g;
- ground chalk - 600 g;
- dry whitewash - 200 g.
Cooking technology:
- chalk is poured with a slide;
- a notch is made on top;
- drying oil and / or whitewash is poured into it;
- mix the components until dough.
How to fix the glass
At home, two installation methods are used:

It is convenient to hammer the glazing bead fastening nails not with a hammer, but with the side surface of the chisel. The blows are applied by conducting it with an oblique cut while sliding on the glass.
Safety regulations
Sharp edges and burrs of glass easily cut through human skin. Sturdy cotton clothing and mittens or gloves are used as protection against accidental injury. Get good shoes.
Glass cutting work requires compliance with all those safety rules as with.
If, nevertheless, trouble has occurred, then you will have to treat the wounds with first aid from a medical kit. She should be close at hand.
Particular attention must be paid to eye protection when working with glass. Transparent glasses do this function well. Unfortunately, many people do not follow these simple rules.
All of the above practical tips should help you cut correctly with a glass cutter and place workpieces in frames. To improve their perception will help watching the video clip "Learning to Cut Glass" by Andrey Smirnov.
Express your opinion in the comments about the material you read, share it with your friends on social networks.
Sooner or later, the household may need to replace the glass on its own. But working with such a fragile material is very traumatic. In this connection, in order to avoid injuries and excessive consumption of material, you should know the basic rules for working with this material and the selected tool.
Cutting ordinary glass is very simple and it will not cause any difficulties for a person. Such glasses can be cut with a special glass cutter or even with ordinary scissors.
If you have no idea how to properly handle this tool, then you can watch numerous videos on this topic on our website. They will help you cut out the desired shape and provide the necessary information for working with a rather complex and fragile material like glass.
In order for the cut to be of high quality, you must first prepare the material for work. If the glass is new, then just wipe it down. A newspaper is best suited for these purposes, mainly it wipes the surface dry, and also does not leave lint and stains behind.
If the glass was previously in use, then before cutting the material with a glass cutter, it will take a little more time to prepare it. First of all, such a surface will need to be washed well using special glass cleaning products. This is followed by a thorough degreasing process. Alternatively, you can use kerosene. To do this, wipe the glass thoroughly with a cloth soaked in kerosene and wait until it is completely dry.
At the same time, the stage of glass preparation also includes its cutting. There is no doubt that you will be able to achieve the end result without waste, especially if you need to cut a product with an irregular geometric shape. But if you make the calculation as correctly as possible, then you can reduce the amount of waste several times.
Also, make sure that the working surface is sufficiently flat and without slopes, but not too hard, it is advisable to make the working surface of plywood or fiberboard, and cover it with an oilcloth or soft cloth on top.
If you have planned to carry out work on cutting glass, then first of all you should decide which is best suited for your case. At the moment there are two types of tools - diamond and roller.

The diamond model is considered to be the leader among the tools of this type. If you are going to use it at home, then the model that has a beveled edge is perfect, which is very convenient for breaking off cut pieces. You can cut glass with such a glass cutter almost ten kilometers of material, with a thickness of up to one centimeter. But at the same time, it should be borne in mind that there are cheap types in which an artificial diamond is installed, which allows cutting glass with a thickness not exceeding 5 mm.
Unlike diamond, a roller glass cutter has a working element in the form of a small roller, usually made of carbide materials, usually a tungsten-cobalt alloy, which is capable of cutting material up to 4 mm thick. The advantage of this type of tool is that the roller can easily move on the glass, while not applying great effort to lining the furrow.
The work process is carried out in the following order:
Clean and dry glass is laid on the surface of the working table. The necessary markup is made with a marker. Further, at both ends, small cuts are made along the marked line. Please note that the material used must be in close contact with the surface of the work table.
How to properly use and cut glass with a glass cutter video
After that, you need to put a ruler on the glass and draw a line along it with a tool. It is worth holding a diamond glass cutter in your hands in the same way as a regular pencil, when passing along the marked line, only a little effort should be made. As a result, only a barely noticeable mark remains on the glass, which looks like a scratch. If the instrument is in good working order, then a characteristic crackle-like sound must be present. If the sound is creaking, then this means that its cutting element needs to be sharpened on a special bar for this.
Holding such a tool during operation should be at a slight angle, the correctness of which is determined empirically. Note that an instrument that is in the correct position relative to the glass leaves a colorless thin line.
A roller glass cutter, unlike a diamond one, must be held strictly at right angles to the surface of the glass, while pressing it with the middle and thumb, and pressing it with the index finger. Please note that the roller tool is pressed a little more than the diamond one, and the cut itself should turn out to be white.
In order to get a high-quality and, of course, even cut - remember a few simple rules that must be followed when working with glass using a diamond tool:
- Do not press down on the glass while moving the cutter, otherwise the cut will be too deep and the edges will be uneven.
- In no case should one more cut be made along the resulting line. Otherwise, the glass may break. The incision should be done as quickly as possible. For example, if we cut a length into a meter, then we need to spend no more than two seconds on it.
- In order for the workpiece to break off quickly and accurately along the cut line, you need to lightly tap on the back of the glass. After which you will not need any effort to break it off.
How to properly cut glass with an oil glass cutter video
If you are just a novice master, then it is best to practice on small pieces, this will help determine the correct angle of inclination of the instrument, gain experience, reduce losses, and also avoid mistakes in the future.
How to cut a circle out of glass
In order to be able to cut a circle out of glass, you can use several different methods, which may differ depending on the diameter of the future circle and, of course, the thickness of the glass.
The simplest and most common way to cut an even circle is to use a circular glass cutter. Usually, the presence of such a tool on the farm is quite rare. But for these purposes, you can use the usual tool.
How to properly cut a circle from glass with a glass cutter video
First of all, you will need to designate the central part of the future product and fix a special suction cup on it. Then you need to attach a strong thread or fishing line to this suction cup with a length equal to the radius of the planned circle. The glass cutter itself must be tied to the end of this rope. Tighten the rope as much as possible and then draw a line with the tool in a circle around the suction cup. When the circle is drawn, it is very important to additionally make more ray lines, which will eliminate unnecessary pieces of glass around the finished product.
How to cut glass without a glass cutter
You can cut glass without using a glass cutter. Very often the simplest scissors are used for this procedure. To cut fragile material with scissors, place it in warm water and cut out pieces of the size you need underneath. Regular glass will cut just as easily with scissors as cardboard or other sturdy paper.
If a large piece of glass needs to be cut, it can be placed in a large basin or tub. Then run the sharp part of the scissors over the glass, break off the unnecessary parts of the glass. Be sure to wear gloves to avoid cutting yourself on the sharp edge. At the same time, it is also desirable to protect the eyes.
In this way, you can cut glass no more than 3 mm. Shapes can only be cut with straight contours. It is imperative to prepare a template in advance and glue it to the glass using glue. It is worth noting one interesting point: the more water is above the glass, the easier it will be to cut the future product.
How to properly cut glass with an electric soldering iron video
You can also use twine, some hot liquid, and a small vessel that needs to be filled with cold water. You need to make the necessary marks on the glass, then soak the string with alcohol or gasoline, fold it onto the marks and set it on fire. Immediately after the fire goes out, pour a thin stream of water over the line. At this point, the glass must be cracked. Then break off the glass along the crack you have created and clean out all the edges. If no cracks appear, then you need to repeat the whole procedure again. In this way, you can cut very complex shapes, everything will depend on how you lay the string.
Compliance with safety precautions
When cutting glass, it is very important to observe safety precautions, because the material is quite fragile and dangerous. You may not only cut yourself, but also injure your eye with shrapnel.
In no case should you cut glass on your knees or on unreliable objects with a glass cutter. Never grab the edge of the glass, as raw edges can be very sharp. If you want to raise the workpieces, then you should make a wrap with your hands from the sides.
To avoid cuts, wear protective gloves and goggles before handling. It is also important to wear closed shoes so that the glass does not cut your foot if it falls accidentally. Clothing should be made of dense and thick fabric, which will also help to avoid accidental injury.
How to properly cut thick glass with a glass cutter video
In order to prevent small glass fragments from getting outside the working room, clothes and shoes must be changed at the end of work.
Quite often when renovating an apartment or renovating old wooden windows you have to cut glass with a glass cutter... In order to correctly carry out this operation, you must follow a few simple rules.
Before starting work, the glass must be thoroughly washed and dried. It is necessary to cut glass with a glass cutter on a flat surface. The work must be carried out so that a minimum amount of waste remains, the remaining waste can be subsequently used.
It is worth noting that factory sheets in some cases may have oblique corners, and it is necessary to check them with a square.
We cut glass with a glass cutter ourselves
Before as cut glass with glass cutter, it is necessary to mark it on it using a regular or special pencil. It should be noted that it is more convenient to cut glass with a ruler (at least 8 mm thick, otherwise the glass cutter will not fit snugly). To do this, the ruler must be placed on the glass, and pressing the glass cutter to it, cut the glass. To prevent the ruler from sliding on the glass surface, you can glue pieces of rubber (from a medical bandage or bicycle camera) onto it. The ruler on the glass must be positioned so that it is slightly away from the marking line (by the thickness of the cutter).
The glass can be cut with a roller or diamond glass cutter. It is worth noting that a diamond glass cutter has the best capabilities, but it is better to use a roller glass to cut corrugated glass. Patterned, corrugated and frosted glass should only be cut from the smooth side.
It should be noted that tempered glass cannot be cut, as it breaks in most cases. Such glass is processed before it is tempered.
Start cutting glass it is necessary from the main edge of the sheet and along the ruler without stopping to lead the line towards you. It should be remembered that the main condition for successful work is the correct location of the glass cutter.

Diamond glass cutter must be held in the hand like a pencil (almost vertical). It is necessary to lead so that the mark indicating the diamond is facing the ruler. With the correct work, the cut line is thin and colorless.
Roller glass cutter must be held perpendicular to the glass surface. It is more convenient to hold it between your thumb and middle finger, pressing down with your index finger. The pressure should be stronger than when working with a diamond glass cutter. The notch line in this case turns out to be white.
In most cases, the cut glass is broken against the edge of a hard surface.
It is worth noting that before cutting the glass with a glass cutter, you need to practice on small parts of the glass. In this case, during the subsequent work, it will be possible to avoid most of the mistakes.
How to cut glass and which glass cutter to choose - this is what novice homeowners are interested in when planning renovations in an apartment. Choose a modification depending on the type of glass and its thickness. Focus on the price indicator, the durability of the device and the resource - the number of meters that it is able to cut through. In the process of working with fragile glass, use tricks that allow you to quickly make an incision with smooth edges, without chips, scratches or cracks.
Cutting glass with your own hands is an occupation that requires patience and endurance. To evenly cut fragile glass at home with any of the tools, follow the rules:
- Before starting work, check that the corners of the factory sheet are correct - they should be 90 degrees each.
- Place the glass sheet on a flat, blemish-free surface. Clean the surface with a kerosene cloth.
- Take a ruler with a thickness of 8 mm or more with a rubberized stand at the bottom and make an incision along it.
- Draw one line - no more, and gently break it in two
- If the glass doesn't break, try tapping it off with a construction hammer. Tap near the notch with almost no pressure and check the material for fracture again.
Cutting glass at home
Observe safety precautions:
- Put on gloves and mark the line. Be careful not to be mistaken in size.
- Press down on the cutting tool lightly, without tearing.
- The cut should be straight and not too deep. Do it in one move.
- Press harder on the glass cutter than on the diamond cutter.
- Broken glass can be finally broken off against the edge of the table by first tapping it with a hammer.
- Break off the narrow strips at the edges with the side of the glass cutter.

Use a ruler for a straight line
Trick: in order not to mark the transparent glass, put it directly on the drawing and fix it with masking tape
Types of glass cutters and instructions for working with them
Glass cutters are classified by type of cutting edge, handle and purpose. There are diamond, carbide roller and oil models that are capable of carving straight or rounded shapes.
Diamond - durable and durable
The glass cutter blade is made of diamond fixed in the handle with silver solder. A diamond can be:
- natural - cuts to a depth of 5 to 10 mm;
- synthetic - with a cutting depth of up to 5 mm.

Cutting without marking glass
A model with a synthetic blade is cheaper than a natural one, and copes with cutting just as well. It is designed to cut 10 thousand linear meters of glass.
Manufacturers perform the cutting head of a diamond glass cutter in one of two forms:
- pyramidal tetrahedral;
- curvilinear.
Tools with pyramidal heads are used by professional carvers, and curved ones are used by novice craftsmen at home. When the cutting part of the diamond becomes dull, the locking screw of the holder is unscrewed and the point is slightly turned with another edge, about 90⁰, and re-fastened. After all the ribs are worn out, the cutter is replaced with a new one or sharpened on a block of cast iron with diamond dusting.
On the basis of a diamond glass cutter, in addition to the tool holders, 1-3 slots are provided for breaking off the glass. The handle is made of wood or plastic, sometimes rubber inserts are made.

Model with diamond cutter
How to properly cut glass with a diamond glass cutter:
- Prepare a table with a work surface 15% larger than the glass piece.
- Lay out a ruler with a suction cup and additional tools.
- Wipe the glass with degreaser and mark with a simple pencil.
- Holding the glass cutter by the metal base, draw a thin line with the diamond blade along the ruler. Apply significant pressure.
- When finished, tap the glass on both sides of the cut with a hammer.
- Break the product so that you get two parts. The cut should be straight and free of chips.
Roller - popular and simple
Cutting glass with your own hands requires patience and jewelry precision from the master. When choosing which glass cutter is better - roller or diamond, make a list of requirements for the tool. If price is the determining factor for you, take the model with a roller. Diamond glass cutters are more expensive but more durable.
The roller cutter is easy to use and popular with novice carvers working at home. Its blade tool, which is in direct contact with the material being cut, is a tungsten-cobalt tungsten carbide roller. When working with glass, it scrolls, forming a cutting line.
There are these types of roller glass cutters on sale:
- ordinary with a wooden handle - copes with material up to 5 mm thick;
- with a plastic handle, made in China - has similar properties;
- professional glass cutter - cuts material up to 10 mm thick;
- the tool from Kraftool is semi-professional.

Glass cutter with 6 rollers
Conventional glass cutters are sold in hardware stores and cost about 100 rubles. Choose a wooden or plastic handle - it's up to you. The kit includes five spare rollers per shift.
Standard Roller Features:
- diameter - 6.6 mm;
- sharpening angle - 100⁰.
How to replace the roller in the glass cutter:
- Loosen the bolt in the center of the tool.
- Rotate the roller disc so that the new blade enters the work area.
- Install the bolt.

Movable head allows you to cut curved shapes
Instead of replacing the roller, you can sharpen it using a fine-grained abrasive wheel.
Kraftool devices are durable. A model with one roller costs 250 rubles, and its resource is 8000 m. A glass cutter with six rollers is cheaper, but each of them wears out completely in 1000 m. The maximum cutting depth for both tools is 5 mm.
The procedure for cutting glass with your own hands using a roller:
- Mark the glass.
- Take a ruler with a thickness of 8 mm or more and attach it to the glass.
- Slowly but surely draw the cutting line.
- Make sure that the device does not leave the marked line during operation.
Video: How to cut glass with a roller glass cutter
Oil - with increased resource
Oil glass cutter is an innovation among glass cutting tools. By the principle of operation, it resembles a roller, but differs in the presence of an oil reservoir on the handle. A wick runs from the reservoir to the cutting edge, through which oil is automatically supplied to the glass surface. The lubricant has the following functions:
- reducing the level of friction;
- increased blade resource.
Oil glass cutter is used for working with glass up to 20 mm thick. It is more convenient to use and easy to move on the surface. Tool resource - 5000 running meters without sharpening.
After the resource is exhausted, the working head is completely replaced, along with the roller. Subject to replacement:
- fastening axes;
- rollers;
- sidewalls.
Usually, rollers are installed with sharpening angles:
- 150⁰ - for working with glass 1-2 cm thick;
- 135⁰ - for cutting material up to 1 cm thick.

Inside the handle - oil reservoir
The head can be movable or stably fixed in the base. Some models of tools with a movable head provide the ability to fix the cutting part.
Due to their ergonomic shape, extensive functionality and reasonable cost, oil glass cutters are more popular than diamond ones. When using such a tool, top up the oil reservoir in a timely manner.
Key requirements that glass cutter oil must meet:
- the consistency of medium density - such that the grease easily penetrates through the narrow neck, but does not ooze;
- good adhesion - oil should not spread over the surface of the material.
High-quality oil easily penetrates the blade of the tool through the wick and, when pressed, leaves a small viscous mark. The glass cutting sequence is the same as when working with a roller tool.
Compass - for round shapes
The devices described above are suitable when it is necessary to cut glass in a straight line. But which glass cutter is better to buy when curly cutting is required? If you need to cut a rounded shape, look for a compass tool. In fact, this is an oil analogue, attached to a suction cup.
How to cut glass with a glass cutter in the form of a compass around the circumference:
- Place the glass on your work table.
- Attach the suction cup to the center of the future circle.
- Find the scale on the "leg" of the glass cutter.
- Set the radius of the future circle by moving the head with the blade to the appropriate value.
- Using light pressure, draw a circle with your “foot” and gently tap it with a hammer.

Cutting a circle with a circular tool
To cut the oval, use a system of two rods, fixing them on a suction cup perpendicular to each other, and placing a rod with a cutting tool on top.
Scissors - an unusual solution
If you do not have a glass cutter, and buying a tool is not possible, use ordinary tailor's scissors instead.
How to properly cut glass with scissors:
- Draw scribed lines on the glass.
- In an enamel bowl, heat the water so that it is warm, but not hot.
- Dip a glass sheet and scissors into it.
- Make an incision underwater.
You will be surprised, but due to the capillary effect, the glass is easy to push. A microcrack forms on the surface, and then a break, and the material falls into pieces. The cut quality when working with scissors is worse, but the method is suitable for irresponsible openings.
Video: Cutting Glass with Scissors
Professional commercial installations
Professional glass cutters are different from household hand tools. In large enterprises, these are automatic installations powered by electricity. There are three types of industrial glass cutters:
- laser;
- sandblasting;
- hydroabrasive.

Glass laser cutting machine
Laser devices convert electricity into high-temperature radiation that is focused at one point. They allow you to perfectly accurately cut the most complex openwork shapes from glass or mirrors without damaging the material.
Advantages of laser equipment: high speed of work, waste-free production, perfect cuts. Disadvantages: the need to work in perfect cleanliness, the requirement for professional knowledge to work with the unit.
Sandblasting machines create a cut using an air jet mixed with sand and released under high pressure. The advantage of this method is the ability not only to cut, but also to decorate glass products. The disadvantage is the impossibility of using it at home.
Waterjet machines work similarly to sandblasting machines, but instead of sand, water is sprayed with air. The specialists set the cutting trajectory on the computer, and then only control the process.
Which glass cutter is best for different types of glass
When choosing a glass cutter, consider the structure and properties of the material you plan to cut.
Methods for cutting various types of glass:
- usual with a thickness of 5 mm - cut with a diamond or oil glass cutter;
- usual up to 5 mm thick - use diamond, roller or oil;
- hardened - cannot be cut at home;
- matte - cut along the smooth side with any tool;
- acrylic - not glass, cut it with scissors or a utility knife.
Having decided on the type of instrument, select its category:
- home glass cutter;
- semi-professional;
- professional.

Glass transfer suction cup
Compare the resource and cost of each tool:
- diamond - 10 thousand m;
- roller - 6-8 thousand m;
- oil - 5 thousand m
Pay attention to the sharpening angles of the blades - the characteristic allows you to determine with what thickness the tool is capable of working.
Other cutting equipment
One glass cutter is not enough to cut the glass efficiently and quickly. You will need other tools:
- Desktop. Its surface should be flat, without depressions and bulges. The table is positioned horizontally. In professional tables, metal guides are provided that allow you to move the glass without the risk of being broken.
- Glass square or ruler with rubber suction cup. If you use professional glass cutters with a ruler, according to which you can set the distance from the suction cup to the notch line, you will hardly need a square. The ruler must be suitable for working with fragile materials and must be secured with suction cups.
- A simple pencil or marker. For markup.
- Hammer weighing 60-80 g. For tapping glasses that cannot be broken off by hand.
- Kerosene and cloth. For degreasing glass. Kerosene is also filled with oil glass cutters.
- Roulette. For measurements.

Ruler with anti-slip rubber lining
Glass tricks
There are a number of tricks you can use when working with a glass cutter. Some are presented below:
- Wear gloves when handling glass.
- Hold the tool like a normal pen.
- Draw the notch line only once. When working with the contour, leave a gap of up to 3 mm.
- To quickly break the glass along the cut line, place it not directly on the table, but place matches on the bottom along the right and left edges. After cutting the blade, press lightly in the center.
Video: How to cut glass correctly
For 2 centuries, glass has been an integral part of any home. This material is used in the production of windows, mirrors, photo frames and many other interior elements. Hard, but incredibly fragile glass, has certain processing characteristics that are radically different from concrete, plastic or brick. Cutting this material is a very delicate and precise process that requires special tools and certain knowledge. In this article, we will try to convey the essence of the glass cutting process in as much detail as possible, and also talk about several important nuances that will be useful when working.
Safety regulations
Having started a procedure for cutting glass, be sure to keep in mind that working with this material requires compliance with safety rules, which are not recommended to be neglected. Unfinished glass has sharp edges that can easily cut through the skin and cause infection. To avoid cuts, protect your hands with gloves and wear sleeved clothing. Since glass tends to crumble into small, sharp fragments, we strongly recommend cutting with glasses.The place where the glass is cut must be flat and stable. It is strongly not recommended to perform this operation on the knee, loose stool and other questionable surfaces. Compliance with this rule minimizes the risk of glass falling to the floor, and also makes work more convenient and improves the quality of the cut.
If you have not previously had experience in handling glass, and still do not know how to cut with a glass cutter, we do not recommend neglecting the above recommendations. Perhaps some experienced craftsmen can do this job with their eyes closed on their knees, but for beginners, things usually do not go so smoothly. Due to inexperience, you can make many mistakes: grab a sharp edge, drop the glass on your leg, or pass the cut and get a splinter in the eye. If you are working with glass for the first time, and have not yet experienced this process, it is best to be fully armed.
Glass selection
One of the key success factors for any job is choosing the right material. This belief also applies to glass, which should be selected based on the task at hand. In the following paragraphs, we will give a couple of recommendations on how to determine the quality of glass and choose the optimal thickness. If you already have the material in stock, you can go to the next heading or directly to the instructions on how to cut glass with a glass cutter.Before starting the description, we clarify that we are talking about ordinary window panes, which are most common in the construction markets. The first thing you need to pay attention to when buying glass is its end part. The edge of the canvas should have a bluish-green tint. Poor quality glasses have greener tones due to their higher iron content. This material is more fragile, but usually costs less.

The choice of glass thickness should be made based on the required dimensions. In order to work with the canvas more conveniently and the risk of rejects to be minimized, the ratio of width, height and depth should be optimal. Glass with an area of 1 m² and a thickness of only 2 mm is likely to crack on the first incorrect movement. When using canvases up to 50 cm, a thickness of 2-2.5 mm will be sufficient. From 50 to 100 - 3-4 mm. More impressive dimensions should have a thickness of 5-6 mm and more. Consider these recommendations when choosing glass in the store and save yourself unnecessary trouble.
Types of glass cutters
The tool plays an important role in any business, having a direct impact on the convenience of the process and the quality of work. Professional devices are more difficult to use, but with the right experience, they produce first-class results. Tools aimed at novice craftsmen require practically no skills, which usually affects the quality. Below, we will analyze each type of glass cutter and tell you which ones are easiest to work with, and which ones can get the most even cut.In household glass cutting tasks, roller, oil and diamond glass cutters are most often used. There are also special circulating devices designed for cutting round holes. To create a clearer understanding of how to cut glass with a glass cutter, let's look at each tool in more detail.
The roller glass cutter is considered one of the simplest and most budgetary devices in its industry. It has a simple structure consisting of a handle and a metal head with a carbide roller. The sharpening of the cutter is enough for 250-300 meters of glass, up to 6 mm thick. The most optimal option for a small amount of work in the absence of experience.

Oil glass cutter is a more advanced analogue of a roller glass cutter, with a couple of significant differences. The handle of this tool also serves as a reservoir for oil that gets on the roller during cutting. The tip of the oil glass cutter is a monolithic piece with internal holes for a wick through which fluid is supplied. Thanks to constant lubrication, the roller will become dull only after several thousand meters of cut glass, up to 8 mm thick. Perfect for both beginners and experts.

A diamond glass cutter costs many times more than previous models and is usually used in professional cutting. Able to cut glass up to 20 mm thick. Consists of a handle and a weighty tip with a groove for breaking glass, a positioner and a diamond. The cutting diamond can be artificial or real, which will undoubtedly affect the cost of the tool. Strength is enough for several thousand meters of high-quality cut. Working with this glass cutter requires a certain skill, which makes it not the best option for beginners.

Glass cutter - compass is designed for cutting round glass. A very expensive tool aimed at professional use. Consists of a suction cup, a guide fence and a cutting roller. Some models may be equipped with a grease reservoir. Doubtful purchase for domestic use. An analogue of such a device can be assembled by hand from a suction cup, a rail and an ordinary glass cutter.
Workplace
Convenience and success of work largely depend on the place where the glass will be located during cutting. An unsuitable work surface can result in uneven chipping, cracks, scratches and even injury to the glass. There are a few simple rules that will help you save material and get a decent result.The most important thing is that the work surface is level. There should be no bumps or indentations on the table, floor, or other place where you will be cutting glass. If there is a void between the material and the surface, then under the pressure of the glass cutter, the fragile glass can simply crack.


The table, workbench, stool and any other structure must be stable so that when the line is being drawn, the glass cutter does not jump off the mark. For greater adhesion to the surface and to avoid cuts on the glass, it is better to place a piece of cloth between it and the working area. Place a sheet, bedspread, or any other soft rag on the table, slightly larger than the glass to be cut.
Glass cutting with glass cutter
At its core, the glass cutting process is quite unusual, but at the same time it may seem complicated only on the first attempts. If you perform the necessary actions in the correct order, as well as cut with a certain speed and force, everything will definitely work out. The following guide will walk you through the steps on how to properly cut with a glass cutter, but while theory is complete, we recommend that beginners practice on less valuable shards first. It is better to start with the base material, at least after a couple of successful cuts.The first step is to prepare the glass for work. For this, its surface must be cleaned of dust and dirt. The cut line on clean glass will be more uniform, which will increase the chances of even chipping. The washed surface should be wiped with newspaper and degreased with alcohol or kerosene. After all procedures, leave the glass for 10 minutes to evaporate the remaining moisture.
It is better to apply markings on the glass with a felt-tip pen or a steklograph. To do this, we simply measure the dimensions we need from both edges, apply a ruler to the indicated points and outline the line of the future cut.

The most important step in the whole process is the glass cutter. We take a roller or oil glass cutter (the diamond is described in the video below) and draw a short line, up to 5 mm from the top edge. Next, from it we lead the cutting roller to the end of our mark. We move the glass cutter over the glass with a precise, confident movement with a pressure force slightly above average. If the cutter is sharp and the force applied is optimal, you will hear a slight crackling sound. The resulting line should be uniform and translucent. Periodic expansion or breakage of the line can form due to a blunt cutter or too strong pressure. It is not recommended to carry out twice in one place. Better to retreat 5-10 mm from the original mark and make a new cut.

The culmination of cutting the glass is splitting it. There are several correct methods for controlled cleavage. It is always better to read from the most delicate exposure, and in the absence of a result, increase the load (within reason).
We put the glass on a table or other more or less flat surface, so that the cutting line is parallel to the edge and extends a couple of centimeters beyond it. Next, take a glass cutter and lightly tap with an iron tip at one of the edges of the cut line on the back of the glass. When a small crack forms, simply break off the hanging piece of glass with a slight movement of the hand.
If, after a couple of dozen hits, no cracks have formed, go to plan B. Put a match, nail or toothpick under the edge of the glass, along the cutting line and lightly press on the canvas from the sides. If after moderate pressure the glass remains intact, you can resort to the roughest method. We combine the cutting line with the edge of the table or other surface and press on the part to be broken off with our hand. This should be done with gloves and goggles. You should not overexert yourself. If the glass does not break, then the cutting line is not deep enough and it is better to try to make a new one and pay attention to the sharpening of the cutting roller of your tool.

After a successful glass chip, it remains only to secure it by cleaning the edges with fine-grained sandpaper or a bar. Hopefully the above guide will help you make an accurate cut of glass. For greater clarity, we recommend watching a video on how to use a glass cutter with a wheel and a diamond.
Figured glass cutting
Our needs are not always limited to straight edges. For some projects, a rounded or wavy shape of glass may be required. The process of curly cutting can be a little more difficult than a straightforward one, but it does not require colossal experience. There are some things to consider before cutting the glass with a glass cutter along a wavy line.
To make curved cutting more accurate and convenient, it is recommended to prepare a template of the required shape in advance. It is better to cut the pattern out of a piece of chipboard with a thickness of 5 mm or more. When marking the future template, keep in mind that the cutter roller will not adhere tightly to its walls, but with an indent of 2-3 mm. To prevent the cut out guide from running on the glass during the cut, several strips of electrical tape can be glued to its bottom.
When the pattern is ready, we apply it to the fabric to be cut out and draw a line with a glass cutter. Then gently tap on the line from the bottom. If you are cutting a shape inside a glass sheet, then for easier extraction, you can draw lines from the shape to the edges of the sheet so that you can neatly chip off the edges.
Cutting glass is not always successful the first time. This almost jewelry process requires a certain skill. Practice and you will soon be able to do the job easily and efficiently.
Save this page in your social. network and return to it at a convenient time.
If you are interested in how to properly cut glass with a glass cutter, the video will help you get a detailed answer to this question. In addition, there are nuances for choosing the right tool and the rules for its use, you also need to learn how to prepare the material for work. Special glass cutters are used to cut different types of glass. At the last stage of work, it is necessary to break the material into two parts, while a number of rules must also be followed.
How to choose the right glass cutter
There are several varieties of such a tool:
- oil;
- roller;
- curvilinear;
- diamond.
For cutting glass at home, you can use each of the options. However, they all differ in design and properties. It is necessary to study in more detail the process of cutting with various types of tools, then an idea of their intended purpose will be formed. So, the device of an oil glass cutter is in many respects similar to a roller analog, however, such a model provides a reservoir for filling lubricant.
If the surface is lubricated with oil during cutting, the rate at which the cutting edge develops is significantly reduced, due to a decrease in the intensity of friction. The lubricant is supplied automatically, which simplifies and speeds up the work. A reservoir containing oil is located in the handle. The service life of the tool is 5 thousand meters. It can be used to work with material no thicker than 20 mm.
When the glass cutter stops cutting the glass efficiently, the cutting edge can be replaced. Unlike a conventional glass cutter, the oil model can be equipped with a fixed and movable (rotating) head. The last of the options is for making bends. The design provides 2 options for the location of the head: with a sharpening angle of 135 and 150 °. In the first case, the tool can cut material no thicker than 10 mm, in the second - up to 20 mm. More about oil glass cutter in the video:
If you need to choose a glass cutter, you need to consider the roller model. In this case, the head is movable. Cutting material: tungsten and cobalt. The number of rollers may differ, more advanced models are equipped with 6 of these elements, but they are also more expensive. Standard glass cutters work with glass up to 4 or 6.6 mm thick.
The curved tool is designed for making bends and intricate patterns. The roller can make circles, ovals and other geometric shapes. By its structure, it resembles a compass. The tool is equipped with a suction cup, by means of which it is attached to the material, and the main part containing the cutting edge, the handle. The design provides for an adjustable scale and a system of two rods, by means of these elements you can make a radius characterized by the required parameters. Scissors are also used as an alternative cutting method.

Diamond glass cutter
The main structural element is a diamond crystal. The location is the bottom of the instrument. With its help, glass is cut with a diamond glass cutter. The cutting element can be artificial and natural, in accordance with this, the restrictions on the use of the tool differ. In the first case, the material should be up to 5 mm thick. This model is inexpensive. It fully justifies its properties. For household needs, this glass cutter is sufficient.
Natural diamond can cut thicker material than artificial diamond, but it gradually dulls. To restore the function of the glass cutter, the cutting edge must be sharpened using a disc or bar. The degree of sharpness of the tool is checked by touching the glass: if a thin cutting line is visible, then the cutting edge is ready for work. This model is presented in two versions:
- curvilinear;
- with a square cutting edge.
The service life of the diamond tool is 10 thousand meters.
Preparing glass for cutting
The degree of complexity of the preparatory work depends on the state of the material. So, if you need to get finished products from glass that has just been purchased, you will not have to make much effort. In this case, just wipe the surface. You do not need to use special detergents. At the same time, they use a newspaper to remove streaks and dust. This method provides the ability to quickly prepare glass surfaces. Do not use a cloth as there is a risk of fluff getting on the glass surface. The only exception is microfiber.
Used glass is prepared more carefully:
- it must be washed using a special glass cleaner;
- the surface is wiped dry;
- at the last stage, it is necessary to degrease the glass; for this, a rag soaked in kerosene is used.
Before starting work, the sheet must be dried, leaving it indoors. You can additionally cover the material with foil so that you do not have to repeat the cleaning procedure. The preparatory stage also includes cutting the material. If you need to make a circle of glass or other curly elements, it is advisable to apply the contours as close to each other as possible. Then the material consumption will be small. Long pieces should be placed along the larger side of the glass sheet.
How to properly cut glass with a glass cutter

Place the material on a horizontal flat surface such as a table. First, make the markup. This is done with a simple pencil. If you try to make an incision without a safety net, the line will turn out to be a curve. For this reason, the use of a ruler is recommended. It is placed next to the marked marking line - the distance should correspond to the width of the cutting edge of the glass cutter.
The ruler will move. To prevent slipping, rubber (from the bicycle tube) is previously glued on the bottom side. If the work is just beginning, the cut should be made in the direction from the edge of the glass sheet towards you. Different types of tools need to be handled differently, for example, a diamond glass cutter is handled in the same way as a regular ballpoint pen. At the same time, a thin, almost invisible line remains on the surface.
The roller tool is held perpendicular to the horizontal plane. The grip should be between your thumb and middle finger. Apply moderate pressure to the tool while cutting. This leaves a white line on the material. If you need to cut glass with a curved glass cutter, install a suction cup, then adjust the rod system, which makes it possible to get a hole or an arc of the desired radius.
Features of working with various glasses
Material with standard characteristics is cut with a roller tool or well-sharpened tailor's scissors. In this case, any other types of equipment can be used to work with glass, if any. It is impractical to purchase them on purpose because of the high price. Cutting is not recommended for hardened material. This will cause the leaf to burst. The hardened surfaces are durable, so the dimensions and the desired shape are set during the production process.
If it is necessary to cut corrugated material characterized by patterns on the surface, it must be remembered that its properties do not differ from ordinary glass. This means that it is permissible to work with it using a roller glass cutter. A diamond analog is also suitable, if it is available, but there is no need to purchase an expensive tool in this case. The cutting edge will cut the sheet from the smooth side.
Plexiglass does not require the use of a glass cutter, since it is a material based on synthetic resins. This is a type of plastic, which means that to cut it, you can use a saw for working on metal or a stationery knife. So that you do not have to collect fragments and shavings later, the surface of the desktop must be freed from foreign objects and covered with protective material.
How to break off glass correctly
It is necessary to lay the sheet on a horizontal surface (for example, a table) so that the marking line falls on the edge of the table top. Most of the glass should be held back. The area to be removed should be grasped by the free edge with your hand, preferably in the center and slightly pressed downward. If the strip is not wide enough, the glass is removed using pliers, special tongs or nippers.
Glass cutting can be attributed to jewelry craftsmanship. After all, real experts can make a real masterpiece out of a piece of this material. However, this will require a fairly large amount of experience. At the same time, many cannot simply cut glass in half, since they do not know the very basics of glass cutting.
We are not saying that we will make you a sculptor with a glass cutter instead of a chisel. However, you will learn how to make a glass tabletop and other such things.
Glass cutter selection
Any training begins with an introductory part. There are no exceptions in our business. Before getting down to business, you need to familiarize yourself with many equally important aspects. One of them is the choice of a glass cutter. There are 3 main types of these instruments in total:
- Glass cutter with natural diamond cutting tool. This tool is the most popular. It has a tip that is capable of cutting glass up to 10 mm thick. In this case, the cuts always turn out perfectly smooth and without various defects, of course, if you use it correctly.
- Roller cutting tool. His working tool is made in the form of a roller. Unlike the first option, instead of diamond, a special alloy of hard metals, which are often tungsten and cobalt, is used.
- Oil glass cutters are not much different from their roller counterparts. To be more precise, there is only one difference. It consists in the fact that during cutting, a special oil lubricant is supplied to the cutting tool. It will not speed up the cutting process, however, this is not the advantage of the tool. Continuous oil supply will extend the life of the roller mechanism.
Returning to the first type, it is worth noting that the tool is not cheap. However, there are also their counterparts that cost less. The difference lies in the fact that instead of a real diamond, its artificial analogue is used. It should be noted that in terms of cutting quality, it is not much inferior to the original, but it is effective when cutting glass with a thickness of up to 5 mm.
Preparation of glass and workplace
Prepare the glass before cutting. If new material is used, wiping with a dry cloth is sufficient. But glass, which has already been used in everyday life, should be treated with special detergents, and then degreased with kerosene. Finally, dry it thoroughly.
As for the workplace, there are few requirements for its preparation, or rather, there are none at all. It is enough just to have a flat free table and a container for waste glass.
The diamond glass cutter is not only reliable but also convenient. The principle of operation is quite easy. The tool is taken by the pen like a pencil. Next, an incision is made along the glass. To avoid messing up, it is recommended to use a ruler or a pre-cut template.

You can also use another trick when marking up. It is suitable if you need to make a straight cut. So, the point is as follows. A straight line is marked on the table with a marker. The glass should also be marked. But there is no need to draw a thick line. It is enough to make notes at the edges of the material, between which the cut will be made. After that, the marks should be set so that the line on the table connects them.
Let's go back to the cutting process. The essence is clear, but there are some nuances that should be taken into account.
- The diamond glass cutter should be held at an angle. At the beginning of the section, it was said that it looks like a pencil. So you need to "draw" as well as with a pencil.
- Do not press hard on the tool, otherwise the cut line will be uneven and full of chips.
- Re-cutting along the line already drawn by the glass cutter is taboo. Don't ask unnecessary questions, just try to do it right the first time. If the break has already failed, you should move a little and repeat the procedure.
- You need to make the cut quickly. It should take about 2-3 seconds for a meter segment.
What to do after the notch line has been drawn? It is necessary to move the glass to the edge of the table so that the unnecessary part of it turns out to be a canopy. Further, along the entire incision line, one simple procedure should be carried out. From below, with the reverse side of the notch, you need to lightly knock on the glass. If everything is done correctly, the unnecessary part will easily disappear. The main thing - do not forget to substitute a container under it or hold it with your hand.
Before figuring out how to cut glass with a roller tool, remember that it is not as durable as a diamond glass cutter. The roller cuts the first 300 meters properly. After that, you should replace the working part.

Now you can get down to business. The first step is to apply the markings. This can be done in the same way as in the first way, so there is no point in re-describing these methods. The general principle of operation is also the same. However, there are still some differences in the intricacies of the process.
- Unlike a diamond glass cutter, which must be held at an angle, in this case the tool must be positioned perpendicular to the plane of the glass.
- Press more firmly on the roller glass cutter, otherwise the glass will not be cut.
Cutting with oil glass cutter
For this cutting method, it was not necessary to create a separate section in the article. After all, the method is no different from the above, only the roller is lubricated with oil, thanks to which the cutting process is facilitated, and the service life of the working part is increased.
How to cut a circle
We have already figured out how to cut the glass in half. But it is also worth paying attention to one important issue. Namely: how to cut a circle out of glass? In this case, you can use two options:

- Place a round solid template on the glass;
- Use a special compass.
The second option is more reliable and simpler. Therefore, it is recommended to use round templates only if there is no way to get a compass.
Let's see what such a compass is. In fact, this is a fairly simple construction, which consists of the following components:
- Sucker;
- Glass cutter;
- Tripod.
How to use a compass is intuitive. The suction cup is attached to the glass, and the glass cutter is placed on a tripod with the required measurements. After that, an incision is made quickly but smoothly on the glass. Then the contour should be slightly beaten with a hammer. Ready.
- Cutting glass is quite dangerous. Therefore, you should stock up on gloves and special glasses.
- Glass cutters are more functional than you might think. Almost every model has a recess that allows you to break off small pieces of glass.
It is worth repeating. These tips and tricks will not make you a pro in glass cutting. However, by following them, you will immediately understand the basics of this business and can cut out simple shapes.
Video: how to cut glass at home