Decorative garden elements are invariably very popular. A beautiful garden helps you break away from the worries of everyday life and fully relax. Garden flowerpots are not only an opportunity for a gardener to select the optimal soil composition for each green pet, but also The best way placement of accents that can emphasize the harmony and splendor of the garden. Decorative pots can be purchased in specialized stores or you can create unusual flowerpots with your own hands.
Many gardeners, encountering funny designs for flower beds made from car tires in city front gardens, often thought about the question “how to make a flowerpot from a tire that will become worthy decoration garden interior".
Car tires, having served their service life properly, can become new life becoming an interesting and functional element of garden decor
DIY flowerpots made from tires - fast, convenient and most importantly free way creation original jewelry, capable of highlighting the beauty and splendor of plants planted at the bottom. You can get hold of the material for making a flower pot at any tire shop.
To create an unusual element of the interior of a personal plot, you will need a little imagination and about half an hour of physical effort to cut out petals or other parts of the vase with a powerful knife or jigsaw.
The technology for making a flowerpot from a tire with your own hands is quite simple. Any tire size can be chosen: R12-R17, etc. So, let's go:
- Preparing the base. The rim is cut with a knife along the border of the transition from soft to thicker rubber around the entire tire. Under the tread inside the tire there is a metal cord that cannot be cut. The cord will serve as a natural boundary to which to cut from the center to the tread in the sidewall of the tire.
- Making cuts. Cuts 5-10 cm deep are made with a well-sharpened knife. The width of the cuts is any, but not less than 10 cm, since in the future they will serve as the basis for the decorative elements of the flowerpot.
- Turning the tire out. After the cuts are made along the entire diameter of the tire, you need to turn it inside out. To do this, the tire is turned over with the cuts down, and the foot is fixed to the ground on the side with a solid rim in the area where it transitions to the tread. To turn the tire out, force should be directed from the center of the product and at an angle of 45 degrees. Having turned out a small part of the rubber, further work proceeds easily.
- Elaboration of decorative elements. The tire turned inside out now looks like a real flowerpot, which just needs to be supplemented with small elements and painted in the desired color. The sections of rubber between the cuts can later be shaped into petals, semicircles, and triangles. Such DIY garden flowerpots will decorate the front area, patio, recreation areas.
- Filling the flowerbed with soil. Any agrotextile material is placed at the bottom of the flowerpot to prevent weed germination and provide the necessary water drainage. The container is filling fertile soil for planting plants and flowers. For this purpose, a truck tire is laid out at the base and filled with a layer of earth, on top is a flowerpot of R16-17 wheels, and on the third level is a flowerpot of R12-R13 tires.
Here's what the whole thing looks like:

To transform a tire into a pretty flowerpot, you should first remove the very durable hard inner rim, which is always located where the wheel meets the rim

If you want to create a flowerpot for the garden on a stand, you can not cut out the core at all, but use it as a base for a bowl
Here are some design examples of what can be done in the same style:
Making your own concrete vases
If you want to create a spectacular decoration for your garden or flower garden that will last for decades, you can make decorative flowerpots from concrete with your own hands. You will need cement, sand, water and any form for pouring. If there are often no problems with purchasing material for manufacturing, then questions may arise with finding a form, especially if it is original or complex. Ready-made forms can be found in construction stores. They are often made of plastic.
Before filling the mold with cement mortar, treat its inner surface with motor oil, lubricant or spray for processing concrete products. Surface treatment will allow you to easily separate the form from the concrete in the future. The solution is mixed in a separate container. Only after this is it poured a third into the mold.
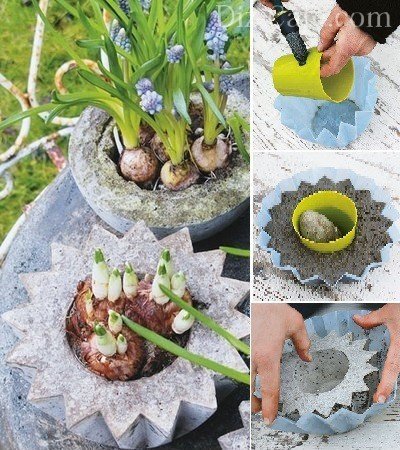
A smaller container (also treated with a spray) to create a recess for placing a flower is immersed in the center of the flowerpot when the solution has set a little, but is still quite liquid
The voids between the walls are filled with mortar to the brim and left for several days to harden. The template is easily removed from the concrete flowerpot after lightly tapping it with a hammer along the entire outer side.
In the absence of the opportunity to incur additional costs for purchasing a form, you can use two ordinary cardboard boxes of different sizes. To do this, the seams of the box are reinforced with tape. To the bottom of the box bigger size a thin layer of sand is poured and poured into one quarter of the box cement mortar. While the solution is holding together a little, you should prepare another smaller box and cut out the bottom in it. Then install this box on top of the cement mortar. Also fill the voids between the walls of the boxes with solution. It takes 5-6 days for the form to harden. The frozen flowerpot is removed from the mold. The bottom of the vase is drilled in several places to ensure sufficient water drainage. The concrete flowerpot is ready: you can fill in a layer of soil and plant flowers.
We offer you an example of making a concrete flowerpot using factory molds:
What else can be used as a flowerpot?
Outdoor flower containers made of natural materials: wood, stone, fit most organically into the natural environment. Original flower pots can be created from old ones wooden barrels, tubs, boxes, carts.
A real masterpiece can come out of an old stump. The basis for such a flowerpot can be found in the forest. For creating unusual jewelry Old tree stumps of various intricate shapes are perfect. To create a recess for placing plants, holes should be drilled in several places on the surface of the stump at a small distance from each other. After this, the inside of the wood is easily picked out with chisels. The resulting void in the center of the stump is filled with soil for planting.

In the hands of a master, seemingly ordinary containers can be transformed into amazingly beautiful flower containers that will become a bright touch to any interior.

In such flowerpots, compositions from several types of plants look impressive: petunia, viola, balsam, coleus, lobelia, pelargonium
To extend the life of a wooden flowerpot, it is advisable to treat the surface with antiseptics and cover it with a layer of varnish or drying oil.
The main advantage of outdoor flower vases is mobility, which allows you to easily change the “scenery” of the interior. Do-it-yourself flowerpots will not only become bright inclusions in the local area, they can organically complement and disguise bald spots in flower arrangements continuous flowering in the flower beds.
They can easily be made with your own hands, or can be purchased at gardening stores. Both the first and second options are quite good.
Flowerpots from the manufacturer are created from various materials: wood, clay, stone, plaster and even plastic. The advantage of such flowerpots is their good quality, durability, availability of many color solutions and designer finishes. In other words, you can choose a ready-made flowerpot for a garden of any style and to your liking. The disadvantage of such products is their high price, which depends on many different factors (material, size, country of origin, etc.)
As for homemade flowerpots, they, of course, benefit from the fact that they have a low cost and can sometimes decorate garden decor much better than store bought products.
Most often, homemade flowerpots are created from concrete, gabions and car tires. The last option allows you to immediately “kill two birds with one stone”: give a second life unnecessary tire and give landscape design the plot has a more creative look.
There is also an option such as purchasing a ready-made regular lawn (for example, clay) and further decorating it with your own hands (with beads, natural stone, waterproof paints, etc.)
Now we will look at how to make a flowerpot from tires with your own hands.
Making a flowerpot from tires
Required materials and tools
In order to make a flowerpot from tires you will need following materials:
Primer
Soap solution
Small pebbles (pebbles or crushed stone)
Plaster mesh or wire
Car tire
Tools you will need:
Jigsaw
Sharp knife
Sander
Construction trowel
Brush for painting a finished flowerpot
Container for mixing concrete mortar
Brush (preferably with hard bristles)
Main process
So, first you need to cut off one of the side parts of the tire (the second must be intact). It is recommended to cut the side not strictly along the contour, but to create a figured edging, which will make the flowerpot more original. Before starting work, it is recommended to draw a line along which you will cut, and then moisten the knife blade with soapy water (this will make it easier to cut).

It should be noted that if you want to make a complex figured cutout of a flowerpot, it is best to use an electric jigsaw. As with working with a knife, it is recommended to make the cutting process easier with a soap solution.
After the sidewall is cut, the tire must be turned inside out. In this case, again, you can make the job easier by slightly cutting through the metal cord using a grinding machine.
Please note that turning the tire out will require effort, so it is best to start at one end and gradually move to the other.
When the tire is turned out, it is necessary to bring the cut edge to perfect condition. To do this, use a sanding machine.
Next we move on to the leg of the flowerpot. Ideally, the wheel rim should act as the leg for the flowerpot from the tire. All you need is to mount two parts of the tire (the cut sidewall and the remaining piece) onto the wheel rim, as shown in the picture:

The finished “body” of the flowerpot
Now that the “body” of the flowerpot has been assembled, we move on to the design of the product. The wheel rim along with the “rubber” must be carefully primed and painted suitable color. We recommend that you use light colors, as they will not fade in the sun.

So that you can see more clearly how to make a flowerpot from a car tire with your own hands, we present to your attention this video tutorial:
Flowerpots from tires: video tutorial on how to create
Creating a concrete flowerpot leg
The process of creating a flowerpot from a tire with your own hands could be completed by simply painting the product, but if you want to give the flower container even more decorative look, we recommend that you additionally decorate the wheel rim concrete mortar and natural stones.
First, you need to wrap the wheel rim with a plaster mesh or wire. This is necessary so that the cement mortar adheres well to the metal base.
After thoroughly stirring the solution, apply it to the disk using a trowel (throw it on).
To avoid getting the flowerpot dirty, the disc should be placed separately on some surface (for example, on a metal sheet), and then start pouring cement mortar.
As soon as the solution is completely applied, we immediately begin decorating the legs with natural stones. It is best to use small pebbles, although broken colored glass will look just as beautiful.
When the solution “sets” a little, the decorative elements (pebbles) must be thoroughly rinsed with water and the stains stained with cement must be removed with a brush.
Original frames for garden plants can even be created from waste material: the yard is decorated and the environment is benefited. Find out how to make flower beds from tires with your own hands for flowers in the country house or in the yard. Assess the feasibility of such work, familiarize yourself with the methods of cutting, turning and painting car tires, with the nuances of choosing them wisely. Compare photographs of finished products and choose a master class for making an unusual flower garden that is suitable in terms of labor intensity.
The feasibility of making flower beds from tires
Used tires are a material in which any landscape designer who imagines how to make flower beds from tires with their own hands opens up new possibilities. It is the tire, and not just a sheet of rubber, that has certain advantages that make working with it easier:
- Low cost. Surely there are car owners among the neighbors who dream of parting with their old tires. For them it is rubbish, but for the artist it is a future work of art, which can only be rolled to the site or brought in the trunk.
- Ease and speed of processing. Chalk, a sharp knife or jigsaw, a grinder and a can of paint are all the tools needed for such creativity. A the simplest flower bed It can be constructed from cylinders in just half an hour: the tire is placed on the ground and “stuffed” with soil.
- Durability. A flowerbed made of rubber does not attract bacteria and fungi, does not rot, is not afraid of an accidental impact and is not destroyed by precipitation. If it cracks after especially severe frosts, it is easy to replace.
- Mobility. Flowerbed from old tire– a one-piece structure that, if necessary, can be easily moved to another place. To do this, you just need to remove the soil from it.
- Possibility of transformation. Even homemade flower beds made from tires can get boring over time. The easiest way to avoid this is to repaint the outside and plant other types of plants.
Figured flowerbed made from an old tire
Doubts about the advisability of decorating a garden with flowerbeds made from tires are usually associated with the dimensions of the cylinders specified by the manufacturer. In a very modest area they can indeed look foreign, but in a large area they can get lost. The problem is solved by combining tires with paths, benches, lighting elements, as well as constructing flower beds from several tires and multi-tiered compositions.

Option for the lazy: potted plants placed on a stand
How to cut tires and how to do it correctly
When looking at a wheel so huge and rigid, capable of supporting the weight of a loaded Gazelle or a powerful SUV, the question arises of how to cut it car tire for a flower bed. In fact, dealing with rubber is even easier than dealing with plywood if you choose the right tool for each stage of work, of which there are three:
- Ripping of rubber. The best tool for the first cut is a shoe knife. You can make it yourself from a mechanical saw blade or a plane blade. The handle of such a knife is wrapped with several layers of insulating tape, which allows the knife to sit firmly in the palm. This is important because the rubber will resist the blade. The knife is inserted into the cut and made upward movements, bending the rubber layer to the side with the other hand.
- Sidewall processing. You can cut tires for flower beds evenly or in waves. In the first case, a shoemaker or other sharp knife with a thin blade is enough; in the second, it is better to use an electric jigsaw, the saw of which should be periodically lubricated with grease or a solution of laundry soap. Some craftsmen use a grinder with a small disk, but high speed results in strong heating and even burning of the rubber with smoke and an unpleasant odor.
- Cutting the cord. The steel cord reinforcement (breaker), which serves as the basis of the tire frame, is cut with a grinder, or less often with metal scissors. You can recognize the presence of steel in a breaker by the Steel marking. The absence of such markings indicates a nylon cord, which is cut with a strong, sharp knife.

A car tire is more complicated than it seems

A jigsaw is the ideal tool for cutting old wheels
To cut a tire for a flowerbed and not injure yourself, be sure to use thick gloves and safety glasses. You should be especially careful when handling sharp metal cords - splinters from them are very painful. You need to work on a wide, hard surface: a table or a piece of plywood laid on the ground. At large quantities Rubber dust, which is typical for Chinese tires, requires a respirator.
How to choose and prepare a tire

Working tool for steel cord – angle grinder
If you have the opportunity to choose a material for a flower bed, you can greatly simplify the work of processing rubber with your own hands. To do this you need to use the following data:
- origin of tires: imported ones cut better;
- seasonal use: winter ones are more flexible;
- service life: the more worn, the more pliable;
- cord material: metal will require more effort than polymer.

Well preserved and brightly painted protector
The degree of tread wear should also be taken into account. A clear pattern of checkers will add additional expressiveness to the finished flowerbed. But if you plan to turn the tire inside out, you need the tread to be as “bald” as possible.
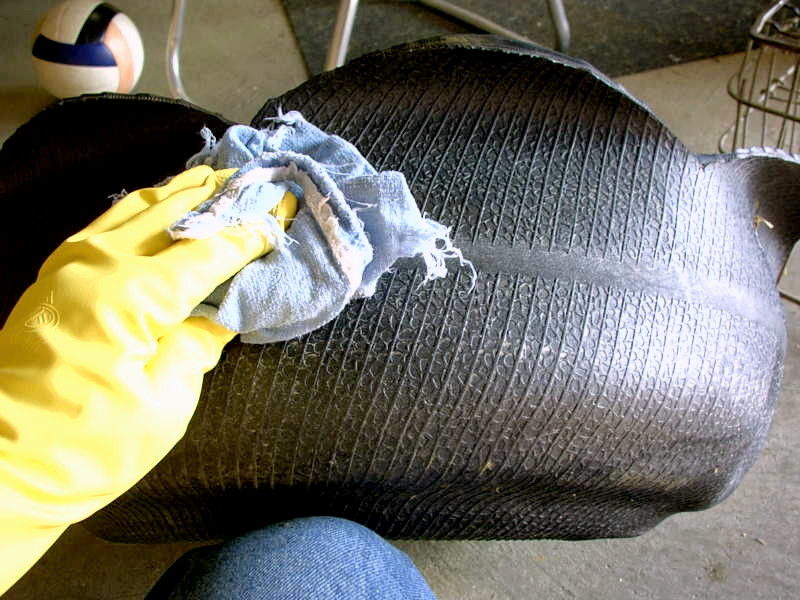
In any case, the first operation to transform a tire into a small sculptural form is to remove dirt. The tire is washed under a powerful stream of water from a hose. This will not only add aesthetics, but will also protect cutting tools from quickly becoming dull.
Options for flower beds made from tires and master classes
The imagination of home craftsmen knows no bounds - those who like to arrange personal plots We came up with dozens of design options for flower beds made from tires with our own hands.
Classification by shape and method of manufacture
Flowerbeds made from old tires are conventionally divided into several groups:
- horizontal single-tier - the simplest and most unpretentious;
- horizontal multi-tiered - the first floor of such a flower bed consists of 5-7 tires, three more on top of them and the last one crowns the composition;
- vertical - a tower is made of tires, flowers are planted in the top and in pockets cut out on the sides;
- in the form of rural household items: teapots, carts;
- in the form of various animals.
Another one interesting variety flower beds made from waste rubber - hanging planters, with which you can diversify the wall of an outbuilding.

A dull brick is simply unrecognizable
How to apply markings to rubber
To make the bed of tires even, before cutting you need to mark a line along which the knife or jigsaw will move. This can be done conveniently using chalk or a bright marker that will stand out against the graphite background of the rubber.

The brighter the markings, the more convenient it is to work
The first line should be in the shape of a ring. It is carried out in two ways:
- Using a tape measure, measure equal distances from the outer or inner edge of the tire, apply strokes (approximately every 10-15 cm) and connect them.
- Holding the chalk with your thumb or index finger, grab the tread (or bead ring) with your little finger and draw a line.
To mark the petals you will need inner and outer lines. Marks are applied to each, then they are connected with a wavy line of any style. At this stage, it is important to take into account that petals less than 7 cm wide do not hold their shape well.

Four wheels and a little paint - the result is a bright flower garden
Flower - quickly and reliably
The options presented in the photo in this section are among the simplest to manufacture, but quite effective due to competent floral decor. The following will help a novice landscape designer make a flower bed out of tires: step-by-step instruction.
- Take four identical tires and rinse them thoroughly under running water.
- Put one aside for now, and on three draw a line with chalk dividing each one exactly in half.
- Cut the three marked tires with a shoe knife or jigsaw.
- Paint all tires using a paint brush or spray can. Choose a color that matches well with the plants you plan to plant.
- Place the halves of the tires in the form of petals, fill the flower garden with prepared fertile soil.
- Place the whole tire in the center of the composition and also complete it with soil.

Flowers can also be cut from tires
Turtle – feel like you are in the Galapagos
To make making a flowerbed out of car tires with your own hands a truly creative experience, try making a figurine of a turtle:
- Prepare two tires for the flowerbed. Leave one intact, and cut out the protector from the other.
- Divide the tread into four equal parts, which will become the turtle's paws.
- Make a short triangular tail from a piece of tread.
- For the head, take a flat bottle of household chemicals, for example, from “Mr. Muscle”. Its neck will become the neck of a turtle.
- Make cuts in the whole tire and insert the paws, tail and bottle into them. Secure with self-tapping screws.
- Color the turtle and draw its face.
Low ones look good on a turtle flower bed in the garden. bright flowers: tagetes, nasturtium, ornamental cabbage.
Frog - from princess to traveler
If there is a pond in the garden, plant a cute frog figurine on its shore. This idea is good because the frog can be made without the laborious cutting of steel cord. The main thing is not to skimp on rich green paint.

Eyes made from plastic bowls, feet made from a hose and a rubber mat
The animal's body is laid out from three solid tires in the form of a two-tier flower bed. For eyes, take tires of a smaller diameter and install them vertically.
Depending on the desired degree of glamor, glue rubber glue or screw on long or short eyelashes with self-tapping screws, paint “bow lips” or a simple smile with red paint. You can complement the look with an arrow, a crown or a pair of ceramic ducks.
Flowers in such a flowerbed are placed behind the eyes and in the lower tier. Grasses and sedges are appropriate around the figure, hinting at swamp vegetation.
Video: One hundred DIY garden frogs
Swan - white grace on a green lawn
If you've learned how to make your own tire beds to decorate your garden, you can try making a swan. This work requires some skill, since the part of the tire in such a figurine must be cut, turned and strengthened in a certain way. Let us consider step by step the process of birth of a beautiful bird from rubber scrap.

Cutting the tires is the most crucial moment
- For your flowerbed, choose a tire with the tread as worn out as possible, since the shaped cuts will have to be made on it.
- Using the pattern in the photo, draw the lines of the head, neck, wings and tail onto the protector. Pay attention to the shape of the beak - this is the most difficult area. Some craftsmen make the beak in the form of a regular triangle, which makes cutting easier, but the bird loses its realism.
- At the nodal points of the marking, drill holes with a diameter of about 10 mm.
- Cut the rubber along the markings with a shoe knife or jigsaw. You should start working from the base of the figure’s neck, leading the cutting line to the head. To prevent the rubber from vibrating, it is recommended to cut both sides in parallel, 5-10 cm from each side alternately.
- Process the edges of the parts: strip the rubber and the ends of the cord threads. Swan flowerbeds made from tires attract children - you should take care of their safety.
- Turn the wings inside out.
- Strengthen the neck with a steel rod. To do this, drill two rows of holes in it and then through the entire body to the base of the tail at a distance of about 15 cm from each other. Thread wire staples through the pairs of holes.
- Attach a steel rod to the base of the tail and secure the chest and neck of the figure to it, twisting the ends of the wires with pliers. Trim off the excess and give the swan's neck a regal curve.
- Paint the finished figure, highlighting the beak and eyes. It will look especially impressive if it is planted (and attached with self-tapping screws) in a lake made from a tire painted blue.
Instructions in photo:

Swans on stands, as if on waves
Vase - build a little Peterhof in your garden
The aerobatics of converting tires is considered to be making flowerpots with legs from them. Once you turn the unsightly wheel inside out and paint it, you see a masterpiece of landscape art, which is difficult to recognize as the original material.

Elegant flowerpot for a flower garden
To create flower beds in the form of flowerpots, use “bald” winter tires foreign production- they are the softest. On the sidewall, jagged or rounded-wavy petals are marked, along which the rubber is cut. At this stage, it is important to try to leave both sides of the cut neat, since one of them will become the edge of the vase, and the other will become the edge of the stem.

Stages of turning a tire into a flowerpot
It is better to turn the wheel together. It is placed with the cut side down, for support they step on the disk with their foot, take hold of the edge of the cut with both hands and pull it towards themselves. They gradually move around the circle, pressing the tread in its most convex part. If there is a tube inside the wheel, it is cut off after turning it out. Due to the labor-intensive process, it is recommended to watch a video on how to unscrew a flowerbed tire with your own hands.
Video: How to turn a car wheel out
The tire flower vase is almost ready, but it looks like it was pulled from the seabed. The rubber walls and disc are cleaned, degreased and painted, and with inside also about a quarter of the height, since the ground level will be below the petals.
Geotextiles are placed at the bottom of the flowerpot to prevent soil from spilling into the holes of the disk. Drainage and soil are poured over the fabric and flowers are planted in the flowerbed.

Gift for the Mistress of the Copper Mountain
Painting flowerbeds made from car tires
Now let’s talk about how to paint wheels for a flower bed and how to turn a boring tire into an interesting flower garden. The main requirement for paint is resistance to weathering.
Choice of paint and technical aspects
Tires are painted with enamels, oil, acrylic and car paints, nitro paints. To beautifully paint tires for a flower bed, you need to follow several rules:
- pick up bright hues so that the soil inside does not overheat along with the roots of the plants;
- do not apply too thick a layer of paint, otherwise it may crack, especially in harsh winters or in the heat;
- remember the primacy of plants and do not let the pattern dominate the flowers.

Bright colors set a festive background on the site
Making flower beds from tires begins with degreasing them with acetone, white spirit or special liquids for rubber. When the used product has completely evaporated, the surface is cleaned with very fine sandpaper. Then a thin but continuous layer of white is applied as a primer - this will allow any shade to play in full force.
It is better to apply the paint using an aerosol can, then it will penetrate into all the relief areas of the tread, but there is a high risk of staining the grass around it. Therefore, they paint the tire with a spray can, placing thick polyethylene under it. Each layer is given time to dry at least 24 hours.
You can decorate a flowerbed of tires with your own hands and with a brush. It takes longer, but you can work by first installing the product on permanent place. Using a brush, they also create more subtle patterns and designs, emphasizing details and shapes.

Folk painting: bright, original, impressive
Taking into account the general concept of garden decor will allow you to correctly paint tires for a flower bed, and you can:
- leave plain;
- decorate with stripes;
- cover with a pattern using a stencil;
- color the tread according to the checkered patterns;
- turn it into an ethnic flower garden.
Do not rush to throw away unusable tires. They will be burned, adding pollution to the air. Try to turn them into a unique man-made flower garden that will decorate your garden and warm your soul. Bright, high-quality and almost eternal flower beds made from used tires are a wonderful use for the creative impulses of a person living on his own land.
There are many ways you can improve the look of your garden, front garden or lawn for free.
For example, from old tires you can make various ones that will decorate the local area.
In this article we will tell and show in the photo:
- how to make flower beds and flowerpots from tires;
- how to make flower beds and beds from tires;
- how to make a basket or flowerpot out of a tire;
- what other crafts can be made for plants;
- how to paint wheels.
There are a few basic types flower beds made of tires, which are ubiquitous. To do any of them, need to cook:
- tire;
- knife or electric jigsaw;
- paints;
- brushes
Depending on model may need additional:
- drill;
- self-tapping screws;
- rope;
- or plywood.
For example, to make a flower bed in the form of a chrysanthemum, you will need an old cup or any round container on which you can draw circles for cutting out petals. Step-by-step instructions are presented in the photo below.

The knife must be sharp because the rubber on the tires is very thick. Cutting will not always be convenient, but don’t be discouraged.
Things will go faster if you use it instead of a knife jigsaw. It is possible that nothing will work out the first time, but once you get the hang of it, you will be able to make flower beds from scrap materials not only for yourself, but also for your loved ones.
In order to turn the tire out and give it shape, male strength is required. You can just make a flowerbed, or you can use the cut out part to add volume to the structure. In this case, the cut out circle is placed downwards instead of the leg and you get a beautiful flowerpot made of tires.
A multi-tiered flower bed with flowers selected in both color and height looks attractive.
To make this structure, you will need 14 tires, which must be carefully positioned and filled with nutritious soil. It is difficult to find such a quantity of old tires, so You can use only 7 pieces, after cutting them in half.
In the second case, the tires will perform 2 functions: decorative and as the side of a multi-tiered flower bed. Such a flower garden will not only please the eye, but will also significantly save time during weeding. Even if weeds get in there, removing them will not be difficult.
 Nutrient mixture before planting in a flowerbed, you need to especially check thoroughly for weeds.
If a piece of the root of any weed gets into a confined space, it will soon be difficult to get rid of it.
The final stage is painting the sides flower beds. For this purpose it is selected Oil paint the desired color.
Before painting, you need to wash off the dirt from the tires and dry them.
To prevent the formation of small cracks in the paint, it is necessary apply at least three layers. The layers should be thin.
A white flower bed will always look impressive. The remaining colors need to be selected carefully, understanding that color determines the first impression. The sides of the flower bed look harmonious in the same shade as the blooming flowers that will be planted there.
Making a flowerpot
In order to make a flowerpot from tires yourself, it will take a little time and effort. Need to prepare the following materials and tools:
- tire;
- jigsaw;
- round container;
- chalk or white marker;
- brushes;
- oil paint.
Instructions for making a flowerpot:
- Remove the disc cover for a while.
- Apply to surface tires chalk outline. If round petals are expected, then you need to draw circles around the perimeter using a cup or round container. If there are teeth, then you need to first cut out one piece from paper or cardboard and, applying it, draw identical shapes around the entire perimeter.
- Along the drawn outline cut out the figured bead flowerpot. The resulting circle does not need to be thrown away; it will serve as a leg for the resulting flower bed.
- Turn out tire, giving it the desired shape.
- Insert the cap into place, giving rigidity to the entire structure.
- Place the previously cut circle under the flowerbed, making a flowerpot leg out of it.
- Clean the surface from dirt and dust. Dry.
- Paint with oil paint.

This flowerpot looks impressive both on the terrace and on the lawn. You can plant flowers in it and ornamental plants different heights: These can be low marigolds and spreading castor beans. In this design, hanging plants look good.
Baskets and flowerpots for pots
Look attractive among the greenery of the garden or on the lawn swans from tires. They can be left as garden decoration, or used as planters for low pots. To make them, you take a tire and draw a contour on it, which you then need to “go through” with a jigsaw or a sharp knife.
For fixing a long neck swan is possible use thick wire, which can then be painted over.
In order for the paint to adhere better, you need to degrease the surface of the tire and additionally prime it before painting. For a swan, two types of paint are most often used: white and black.
Beds for growing crops
 Old tires can also be useful for growing vegetables in the garden. Their main advantage is that in such beds grass hardly grows.
As you know, weeds significantly interfere cultivated plants develop, and sometimes they are simply drowned out.
To make the beds you will need an electric jigsaw. They cut out the side surfaces of tires.
In such small beds you can plant radishes, greens and others healthy vegetables. Such a bed has undeniable advantages if the site is virgin land where nothing grows.
A few beds and a little land are enough to grow good harvest pumpkins and zucchini. Under such a bed, even the most malicious weeds will not be able to develop and will gradually rot. To speed up the process can be placed under the tire several layers of newspapers, and then fill the bed with soil. To make a long ridge, the tires need to be cut and then fastened together to form a border strip.
The second advantage will be the ability to shelter delicate plants from cold weather. It is enough to secure a thick wire to the tire, on which you can throw a film or spunbond.
High ridges can be built using tires, stacking them on top of each other. Such a bed is very useful for plants, since half of it is filled with various organic waste: branches, weeds.
All this rots, forming compost. Pumpkins grow well in such beds.
What else can you make from tires for plants?
Old tires give room for creativity to those who garden. If you add wheels to the flowerbed, you can realize other original ideas and get from them an interesting detail in the garden landscape- in front of us in the photo is a cart made of tires that is carrying flowers.

From tires different sizes It also makes a beautiful multi-tiered flower bed. And for those who have little space in the garden, you can make a vertical bed from several tires.
The video shows various interesting options designing flower beds from tires:
Conclusion
Useful and beautiful flowerpots, flowerbeds, and flower pots can be built from items that have spent their time. Instead of littering the environment, tires can serve for many years as a decorative detail Location on.
We talked about other ways to get rid of old tires. And their advantage in the garden compared to other materials is obvious: they are lightweight and can be easily moved from one end of the garden to the other.
In contact with
To decorate your site with beautiful flower arrangements, it is not at all necessary to buy expensive street flowerpots. You can make a unique frame for flowers of various shades and shapes with your own hands. We decorate the dacha with flowerbeds made of tires: interesting ideas and options for making flowerpots will help make your garden plot unique and inimitable.


Features and Benefits
By making a flowerbed from a tire, you can implement almost any creative idea. Make one like this a budget option Framing flowers on the site is quite simple - you just need to show a little imagination and make a little effort. Flowerbeds made from tires have a number of advantages:
- tires are durable;
- tires tolerate temperature changes well;
- on rubber surface Almost any paint fits well;
- no need to spend money on materials: old tire Almost everyone has one;
- You can use improvised items as decorative elements.


Due to the fact that rubber is a fairly pliable material, the tire can be given a wide variety of shapes. The product can be painted in absolutely any color. Such a product can be used not only as a decorative element, but also as a functional attribute of the site. For example, small seedlings can be planted in such flowerbeds.


Design
You can make a flower garden according to ready-made examples, or using your own original ideas. To complement finished design You can use any available materials: it all depends on your imagination and skill. The process of creating a flowerpot is often not completed after cutting and painting the tire. Product complex shape in the form of an intricate figure must be supplemented with decorative elements. When decorating a flower garden you may need the following materials:
- decorative and natural stones;
- construction metal grid;
- plastic bottles;
- remains of various building materials;
- colored glass.


From several flower beds you can form bright compositions. The combination of multi-level flower beds looks more impressive various forms . A popular option is a composition of flower beds in the shape of cups and a teapot. To decorate it, you don’t have to turn the tire inside out and cut out patterns on it. It is enough just to arrange several tires of different sizes, form handles from pieces of rubber and paint the finished products.

Unusual
In the nursery play area Flower beds in the shape of animals or fairy-tale characters would be appropriate. You can make a turtle from a tire and tread:
- the tread must be cut into four equal parts;
- in the tire you need to make 4 cuts under the turtle’s paws;
- Pieces of tread are inserted into the holes and secured with staples.
- the tail is made from a small piece of rubber, secured with wire staples;
- The turtle's neck can be made from a polymer pipe.
- A head made of crumpled paper is attached to the neck using tape.
- All structural elements are painted in appropriate shades.
Other materials can be used to make the turtle's head, neck, paws and tail. The product can be decorated with additional items (for example, put a small hat on the turtle’s head and glasses on its nose).

Flower
Near the house, flower-shaped flower beds will look good. Before you start making such a flowerpot, you need to decide on the shape of the petals. Petals can be in the shape of a triangle, semicircle, rectangle or wavy. Sometimes they are narrow at the base and wide at the edges.
The outline of the petals is drawn on the outer surface of the tire. To apply markings, you can use chalk or a felt-tip pen. Using a shoe knife or jigsaw, cut out the petals. If the rubber is quite dense, and in quality cutting tool a knife will be used; during the cutting process, it is recommended to periodically dip the blade in soapy water.
Holding the edges of the cuts, you need to carefully turn the tire inside out. The finished product needs to be painted. Flower-shaped flower beds look more attractive if you use different shades of the color palette when painting them.


On a leg
From a solid wheel (tire with disk) you can make a magnificent flowerpot on a leg.
The workflow for creating such a flower bed consists of the following steps:
- in the tire, reaching the tread with a cutting tool, cut out the petals the desired shape;
- then turn out the top and bottom parts of the tire (there is no need to take out the disk - it will be the leg of the flowerpot);
- top part painted in rich colors, the lower one will be some kind of stem if it is painted green.

Swan
One of the most common options for flower beds made from tires is a product in the shape of a swan. Such a flowerbed is made in the same way as a flowerpot in the shape of a flower. The only difference will be more complex cutting. You can use ready-made circuit, which shows the lines of the wings, tail, neck and head of a swan for application on the tire.
After applying the markings to the tire, the swan shape itself is cut out. Next, you need to turn out the tire and complete the formation of the swan. The beak can be made of rubber or any other convenient material, painted with orange paint and attached to the head using self-tapping screws. The swan's eyes can be made from pieces of electrical tape.
Usually the figure is painted in White color, but no one forbids using other shades (you can make multi-colored plumage).
See below for a master class on making a swan from tires.
Required Tools
To start making a flowerbed from tires, you need to prepare necessary tools. First of all, this is a tool that will be used for cutting rubber (knife, electric jigsaw, grinder). If you decide to use a knife, the blade must be sharpened well. It is worth considering that cutting thick rubber with a knife is quite problematic. To make your work easier, The blade must be lubricated with grease before cutting. If the knife will not be used as the main tool for cutting the tire, it can be useful for making small cuts.
Using an electric jigsaw as a cutting tool will be the most the best option. The more powerful the jigsaw, the easier it is to cut the wheel. For cutting tires, the ideal option would be a blade made of high-quality steel with reverse tooth. Cutting a tire with a grinder is much easier than with a knife or jigsaw. The disadvantage of this tool is that the rubber along the edges of the cut will melt, and the cutting procedure will be accompanied by an unpleasant, pungent odor.
If you need to cut the protector to make a flowerpot, it is better to do it with a grinder.


Then you need to decide on the type of paint for the flowerbed. Almost any paint fits well on rubber. The following types are mainly used:
- aerosol;
- oil-based enamel;
- nitroenamel;
- auto enamel.
If necessary, to paint the tire, you need to prepare a brush. For work you will need gloves; they will protect your hands from paint or other possible contaminants.. To apply the markings you will need chalk, marker or soap. When making complex figures, some elements will have to be made from scrap materials. To fasten additional parts to the main tire figure, you will need staples and screws.

How to do it?
Making complex shaped flower beds from tires is a labor-intensive process that requires patience and some physical effort. Whatever shape you want to give to a flowerbed made of tires, the procedure for making a flowerpot will always be almost the same. Here are step-by-step instructions on how you can make your own figured flower bed from tires:
- Choosing a tire. So that working with rubber does not cause unnecessary hassle, tires should be taken that can be easily trimmed (old, heavily worn, thin winter or imported).
- Thoroughly clean and dry the tire.
- Deciding on the form. It is necessary to mark the cutting line with chalk or a marker. The marks on the tire must be made as carefully as possible to facilitate the process of cutting out the figure in the future.
- Cut along the drawn line, then remove the top part. You can use a high-power jigsaw.
- Turn the tire inside out (you need to grab the cut edge with your hands, first step on the middle of the tire and forcefully pull the rubber towards you).
- We sand the cut edges and treat them with gasoline.
- At the end, the flowerbed should be painted, dried well and, if necessary, decorated with additional elements.

View
All flowerpots made from tires can be divided into two main types: solid and cut. The simplest version of a tire bed is a tire in its original form. Ennoble appearance You can make such a flowerpot using paints. Such flower beds can be placed in small groups, or they can be made into a multi-level structure.
A multi-level design will look more attractive if you give it the shape of a pyramid. To do this you need to take tires various diameters and install them on top of each other. The difference in tire diameter should be at least 20 cm. Hanging flower beds will become more interesting solution. A hanging flower bed can be placed along a wall or a blind fence. The shape of such a flower bed can be very diverse.


The inner space of the tire must be filled with soil. A mixture of small stones and sand can be used as drainage. When making a hanging flower bed, you need to make several small holes in the tire so that excess moisture can drain freely. Flower beds in the shape of plants, animals or mythical creatures more labor-intensive, but look quite impressive.
With the help of a tire and a cutting tool, you can realize any original idea.


In addition to the division into two main types, there is an additional classification of flowerpots made from tires. Flowerbeds are divided by size and shape as follows:
- tall;
- low;
- single-tier;
- multi-tiered;
- curly;
- round.


Material
The ease of making the flower bed, as well as its appearance, will depend on the material chosen. When choosing tires, you need to consider the following features::
- the process of making a flower bed will be easier from old tires, worn rubber is more pliable;
- imported tires are thinner than domestic ones and are easier to cut;
- winter tires more flexible than summer;
- Tires with metal cords are more difficult to cut;
- If, when making a flowerpot, it is necessary to turn the rubber inside out, you need to select a tire with the most worn tread.

A flower bed can be made from rims or solid (rims with tires) car wheels. This material is used much less frequently than conventional tires, but flowerpots made from wheels look no less attractive. Whatever material you choose to make a flower bed, it must be thoroughly washed to remove dirt. This can be done using a garden hose.
Pure material will facilitate the process of making a flowerpot and will not damage cutting tools.


In addition to the basic rules for making a flower bed from tires, it is important to know some of the subtleties of its placement on the site. It is better to place the flower bed in a well-lit and relatively flat area. They will look better in large areas multi-tiered structures. Having decided on the location, it is necessary to make a container from boards or other solid material for the base of the flowerbed.
It is important to prepare good soil for flowers. The soil mixture should not be too oily so that moisture can easily pass to the roots of the plants. It is important not to forget about the drainage layer, which can be made from expanded clay or gravel. To retain moisture in the soil and make it easier to care for plants, the area around the flowerpot should be sprinkled with gravel or sand.


It is better to paint the wheels in light colors: This will avoid overheating of the soil in the summer. When painting you should also consider the following:
- Before painting, the tire must be thoroughly cleaned, dried and degreased. You can treat rubber from grease contaminants with solvent, gasoline or acetone.
- It is advisable to paint the tire in several layers. Thin layer paint can quickly wear off or crack. You should not apply many layers, this will lead to rapid peeling of the paint. It would be optimal to paint the product two or three times.
- If you want to plant bright flowers in a flowerbed, it is better to paint the tire in delicate light colors. In flowerpots bright colors It is better to plant light, small flowers.
- It is acceptable for the shade of the flowers to echo the color of the flower bed.
- It’s worth painting a flowerbed not only with outside. If you paint the inner edges, the flowerbed will look more voluminous.
- The flowerpot does not have to be painted in a single color; interesting patterns of a different color can be applied to the tire.
To apply the pattern, you can use pre-made cardboard stencils.


