The kitchen is a gathering place for the whole family, where it is always warm and cozy, where you can all drink tea in the evening, watch your favorite video, listen to music.
A moment comes when the hostess, looking around, looking at the walls and ceiling of the kitchen, says: “Isn’t it time for us to make repairs, freshen up the painting of the ceiling, change the wallpaper, and the style of decoration?”
Thirst for change
It is clear that over time, kitchen interior design, which previously seemed original, may become boring. I would like to update it without much expense, changing the wallpaper, refreshing the ceiling. But the set itself was chosen in the same style as the kitchen decoration. What should I do?
And it's very simple! You can change the design of not only the overall decoration of the kitchen, but also the set itself. Today we will give some tips on how to update an old kitchen set with your own hands.
These tips will come in handy not only for major repairs, but also if the facades of your furniture have become dull over time, or scratches and chips have appeared on the finish.
Options
Give the new kind kitchen set can be different ways. There is no need to spend large sums of money or hire professionals to do the work. You can do everything yourself, if, of course, you try.
There are more difficult options, and there are easier ones. Choose to your taste and consider your capabilities.
Replacement of facades
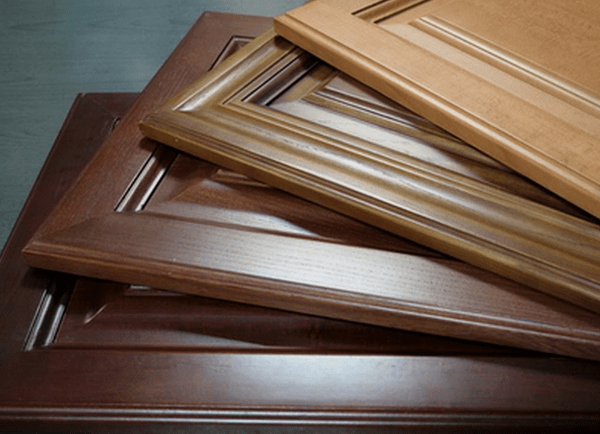
The simplest option, but also the most expensive, is replacing old kitchen facades with new ones. Agree that the price of the facades themselves is much cheaper than the price of a complete kitchen set, and the result will be as if you had completely replaced the kitchen.
The market for kitchen facades is saturated with products from various factories; you can always choose ready-made ones or order facades that suit you.
The procedure for replacing facades with your own hands:
- remove the old doors by unscrewing the screws from the hinges;
- remove the fronts from the drawers, carefully unscrewing the screws;
- fix new facades in place of old ones.
Advice. If you bought untreated facades, then they must be processed before hanging them in place. Prime them thoroughly, sand them after drying, and then paint them with varnish or paint at least 2 times.
Process both sides. And only after that you can start hanging them in place.
Façade renovation

If you decide to restore old facades, give them new life, then let's start updating them.
General rules for restoration
Before you start updating the facades, you need to prepare them.
The preparatory process is the same for different methods restoration and looks like this:
- We mark all the elements that we will restore;
- remove them from the hinges by unscrewing the screws;
- We unscrew the handles and mating parts of the loops from each element;
- wash all surfaces with warm soapy water:
- wipe dry.
Painting
The process of painting facades prepared according to the general rules for restoration is carried out in the following order:
- We clean all surfaces with fine sandpaper;
- remove dust with a damp cloth;
- wipe with a cloth or sponge soaked in white spirit;
- we paint all the panels, grooves, recesses, and then the entire surface;
- we paint in several layers, usually 3 layers are enough;
- after drying, screw on the handles (old cleaned or new) and the mating parts of the hinges;
Pasting with film

Self-adhesive films give you the opportunity to let your imagination run wild when choosing for finishing kitchen facades, no matter what colors they have in their collections.
When deciding how to update your kitchen set with your own hands, keep in mind that with the help of these films the process will be quite simple, and the result will depend on your efforts and imagination when choosing a film.
The palette of colors and textures of films is wide:
- wood-like, about 70 species, from ordinary oak to exotic species;
- plain, bright colors, wide palette of shades;
- imitation facing materials, such as marble, granite, ceramics;
- films with drawings and photographs, with children's and plant patterns.
This material is resistant to elevated temperatures and waterproof, making it ideal for kitchen use.
So, let's consider the question of how to update a kitchen set by decorating surfaces with self-adhesive film.
For work we will need:
- the film we chose;
- sharp scissors;
- ruler;
- breadboard knife;
- scraper.

Instructions for covering facades with film:
- carry out all the actions described in the chapter “ General rules restoration” of this article;
- We begin cutting the film, measuring the surface of the pasting and transferring the dimensions to the back side of the film, where a convenient centimeter grid is applied;
- we place the cut fragment face up on the façade and check whether it is cut accurately;
- carefully lift the film from one edge and peel off the backing from the edge, freeing the adhesive surface;
- glue the edge and begin to gradually remove the paper from below, immediately leveling the film from the center to the edges; you can level it with your hand or a rag, a rubber spatula or a sponge, whichever works best;
- when bubbles form, pierce them with a needle or cut them with a cutter and carefully level them;
- after pasting, screw on the handles and hinges;
- we install the facades in place.
Advice. If the canvas is stuck crookedly or sloppily, peel it off immediately and replace it with a new one. If you do not do this right away, then it will be very difficult to scrape off the film from the facade.
Decoupage of kitchen furniture
Let's look at how you can update your kitchen set by using a decorating technique that is fashionable today - decoupage.
We prepare our doors according to the option in which we prepare them for painting.
Let's prepare for work:
- two types of paint in compatible but contrasting tones;
- ruler;
- pencil;
- plywood 4 mm thick;
- glue;
- napkins with decorative patterns.

To get the result as in the photo, perform the following steps:
- paint the door one color (in our case, it is red);
- we prepare the plywood, cut out a sheet from it that will be in the center of the door, we select the proportions ourselves, approximately two-thirds of the door length in height and one-third in width;
- paint a sheet of plywood with red paint;
- after the paint has dried on the plywood, paint it with a lighter paint, getting the effect of cracks;
- from a napkin we cut out an image of a flower or something else that you like;
- glue the cut out image onto the plywood;
- glue the plywood onto the door;
- Now we cover the door, along with the plywood and the pattern, with furniture varnish a couple of times;
- We screw the fittings and install the door in place.
Options available for this finish:
- you can not use plywood, but simply draw a yellow rectangle on the door itself and decorate it with an image of a flower;
- can be used decorative moldings– frames for highlighting a colored rectangle;
- you can choose the drawings so that they go beyond the yellow rectangle, for example, there are flowers on it, and the leaves extend onto the red field.
There can be a lot of options. So here it is open field for creative imagination.
Advice. Using decoupage, you can also update stools by decorating them in the same style as cabinet doors,

Summary
As you can see, restoring kitchen furniture is not such a difficult task. The main thing is to have the desire to work with your own hands, embodying original solutions and fantasies.
Takes ~4 minutes to read
The old set was adjusted to the size of the kitchen, and everyone was already used to it. But here’s the problem: the facades are dilapidated, the hinges are loose. We can say with confidence that such furniture will last for a very long time if the plywood does not delaminate or the chipboard does not swell from getting wet. In this article we will tell you how to update an old kitchen set with your own hands.

Save
Current repairs are carried out according to plan:
- strengthening or replacing hinges (sometimes the hinge has to be moved to newly drilled sockets),
- sealing cracks followed by painting, pasting with self-adhesive film,
- decoration of facades in connection with the new kitchen concept,
- complete replacement countertops or thickening it over the old one.
The set requires maintenance and repair. The main destroyer of kitchen sets is not time, but incorrect installation. A crooked floor leads to skewed doors and loosening of fastening screws. Even before decorating the facades, all cabinets and cabinets must be checked against a horizontal plane.
How to cover a kitchen unit with self-adhesive film
The update method is suitable for laminate furniture. Careful preparation of surfaces will ensure a tight fit of the film.

Save
There is no need to start gluing right away; it is necessary to carry out the following preparatory work in the exact sequence:
- We remove the doors and inspect them against the light. Scrape off the dried fat tubercles, wipe with acetone or white spirit;
- We put the peeled edges back in place by gluing them;
- We rub the potholes with fine sandpaper, remove the dust with a vacuum cleaner, thin layer Apply acrylic putty. After drying, sand and prime with construction soil.
- Deeply damaged areas should be cut out, outlining the area according to the template of the inserted patch. The insert can be a bottle cap, wood veneer, thin plywood. Then do the work from the three points above.
- A better fit will be achieved by varnishing. An important process for light film - every defect is visible on it;
- Gluing begins from the edge of the door (or along the edge of the drawer). Therefore it must be clean and absolutely straight.
Calculating the area of the purchased film according to the area of the surfaces to be pasted is not suitable. You need to decide on a sample, based on its width, draw on paper each detail to be restored on a scale of 1:10. Cuts and overlays will be immediately visible and will not last long. We start from complete cuts and put up with the inevitable remainder.
Subtleties of the matter
- The “wood texture” pattern horizontally and vertically on adjacent surfaces looks unnatural. It is better to choose a single direction for all facades.
- “Granite chips” require less careful preparation, but mother of pearl will reveal any roughness.
- You need to start gluing the film from the wrong side, grabbing the top and bottom edges, leaving the side edges for completion.
- You cannot pierce the self-adhesive on the tubercles with a needle: dirt and moisture will accumulate in the punctures, and then the tubercles will increase.
- Very jagged edges can be smoothed out by gluing a PVC construction corner onto them. From the corner the film will lie more evenly. By placing even chips under the corner, you can adjust the distortion of the gaps.
Replacement of old furniture facades
We unscrew the old facades, remove them, take measurements of the cabinet or hanging cabinet. We check the corners with a square. We eliminate existing distortions by laying corner clamps. Only from the newly restored angles can one determine Exact size new facades. For two door cabinets and cabinets, subtract 3 mm from the width - for the convergence point in the middle.
Sawing with a hacksaw new laminate- bad practice. Fine-toothed only circular saw at high speed you can avoid chipping. If the home craftsman undertakes to do everything himself, the recommendation is this: you need to remove the plastic under the metal ruler with an awl and go deep down to the chipboard itself. The plastic is cut along two lines with an indentation of width cutting tool(usually 2 mm).
When it is not possible to cut chipboard without chips, they use a 3D edge rather than a strip one. It needs to be filed on a chair, giving a length allowance of 3 mm (an edge of this type hides the corners of the shield). The same allowance - 3 mm - must be taken into account during cutting.
How to update old kitchen furniture with your own hands: painting, moldings
Those who decide to change their facades should pay attention to an excellent material - moisture-resistant plywood. It is light, durable even with through cuts, which is important for frame and openwork facades. In addition, two layers of 8 mm can be folded into a thickness of 16 mm and not change the specified dimensions old chipboard headset

Save
The required thickness can also be achieved using moldings. Semi-cylindrical, molded, flat, classical ancient Greek mutulas - all these configurations, superimposed on a spectacular background, will introduce clear lines and expressive style. Moldings create the effect of milled Victorian style furniture. The weakest point of plywood - the edge - is protected with wood, for example, birch rulers.
Plywood sheets only need a primer before painting. Previously painted chipboard facades without damage do not need to be primed. It is impossible to re-stain stained stained wood. But you can paint it with high-quality acrylic or pentaphthalic paint, tinting it yourself or using a centrifuge at a tinting center.
Painting Tips
- Between the wide moldings, pearlescent acrylic varnish applied with a rubber spatula is expressive.
- TO wooden floor A wood-like pattern with the same shade as the molding is suitable. The texture is painted with two paints - a lighter and a darker one - using a fluted brush with thick bristles using the “wet” method.
- Plain surfaces will not show paint streaks if the paint is applied with an airbrush. Without stripes, you can paint with a roller. The roller should be velor, and the painting should be completed in one direction - rolling only up or only down on the facades of the entire set.
- A beautiful marbled pattern is obtained from shiny pentaphthalic paint. The background is rolled out with a roller. On a damp layer of several jars, apply spots with a brush - light, bright, with blackness. All are sharply different from the general background. A nylon plate cut from a container reduces the drops. You can mix it for 15 minutes. Then the surfaces are not used for 48 hours.
Save

Decorative inserts
Flat plastic inserts, composite marquetry, carved volumetric ones, embossed from metal - a desirable decor, subject to a certain style. But you can set a unique one a new style. Decoupage became widespread and became a total women's hobby. It is famous for its environmentally friendly technologies. Overhead rondos, ovals, boutonnieres, corners and appliqués are created, and sometimes the entire set is modified beyond recognition. The stylistic possibilities of the decoupage technique are wide: from archaic to ultra-modern techno.

Save
Decorating with ceramic tiles
History is silent about which modern master was the first to glue the remaining wall tiles onto the facade. But the traditions of using ceramics to decorate tables and artistic enamels on examples from the past are indicative. Of course, there can be no question of a layer of tile adhesive under such applications. Thin stripes and diamonds can transform a set and reliably protect the wood from external influences. The range is so wide that it can complement any style.

Save
A few examples:
Style | Type of tile | Tile options | Location | Mounting method |
Classical | Geometric constructions in the form of flowers, stripes | 6 x 6 cm, 10 x 10 cm, 12 x 12 | frieze (ribbon) under the tabletop, on overhead fixed flanges as pilasters, single inserts on the doors | Sticker, under wooden slats with selected quarter, behind brass profile |
Painted majolica | 4 x 4.6 x 6 cm | Rhombic diagonal order | Sticks |
|
Ceramics with a thin layer of glaze, composite plaques | 6 x 6 cm, 1.5 cm - on the edges | On the doors in the center | Sticks |
|
Glass, ceramics with a thick layer of glaze, not ornamental | Elongated forms from 2 cm in width, mosaic | Horizontal and vertical chains, arrangement of teeth as an unfinished construction | On smooth surfaces |
|
Japanese minimalism | Glazed ceramics smooth and textured | 5 x 5, 6 x 6, 10 x 10 cm | Vertical inserts between the slats of composite frame facades | Glue into the groove |
Non-story tiles with a thick layer of glaze, relief | No more than 15 cm on the side | Single on smooth surfaces |
To decorate facades, single flowers are produced “in full height", rivets, nail heads and entire still lifes. Before gluing, any of the tiles are primed on the reverse side, dried, and only then glued to laminate or wood using mounting compounds. Glass mosaics on grids don’t even need that - they are installed right away.
Decoration with rattan inserts
Colonial, oriental, safari - styles that imply structural facades. Rattan weaving replaces glass and reliably protects facades from impacts. Palm gratings absorb moisture without warping the surfaces. Such qualities are extremely important for the kitchen. The range is also extremely wide: hexagonal weaving, transverse-longitudinal, combined. Plus - all kinds of colors.

Save
The fastening of rattan weaving is elementary:
- cut out the desired rectangle with a shoe knife under a ruler or metal scissors (secateurs are also suitable);
- fastened with a stapler to the facade with an indentation under the shaped strip,
- parts of the wooden frame are screwed (glued).
The cutting areas remain under the slats with the selected quarter.
But there is even more easy way Rattan fastening: by folding the seam edges onto the inside of the door. To do this, the cut just needs to be soaked. As the rattan dries, it stretches itself. This material should be approached creatively. A rich structure, pasted all over the place, can become intrusive. Rattan is beautiful between the wide slats of composite doors as an insert. The door slats can be straight, but even better - when they have round, oval, hexagonal “windows”. The curved shapes come into soft contrast with the clear rhythm of the weaving.
Renewal by varnishing
The stronger the smell of varnish, the more resistant it is to mechanical stress. Alas, a durable varnish without a pungent odor has not yet been created.

Save
The best varnishes are at the beginning of the list:
- nitrocellulose,
- alkyd,
- polyurethane,
- epoxy,
- acrylic.
There are a lot of “combi” varnishes with the partial addition of certain substances: shellac, resin, drying oil, acrylic suspension. The wide variety is associated both with the purpose of improving the compositions and with different purposes. It is often necessary to re-varnish surfaces containing lecithin (converted fats). Nitro varnish will no longer stick to this. In any case, varnishing is the most reliable way protect solid wood and paint on furniture. If you don’t like shiny shine, choose a matte composition. You can add particles for sparkle, tint to taste (tinting reduces transparency). By selecting the composition and mode of the nozzle of the spraying device, the varnish creates the effect of raindrops, bubble skin, silk, and mica plates.
Some varnishing tips:
- the first layer must be extremely thin, dry, and carefully sanded - a high degree of gloss depends primarily on this process;
- the varnishing roller must be made of fur that is resistant to caustic thinners; even before use, the roller is washed, even a new one, and the strength of the bristles is checked;
- the same requirement for brushes;
- Any brush lint or bristles that accidentally get caught are quickly picked out with an awl;
- varnishing is carried out only in a clean room;
- to avoid splashes, the spray nozzle is first tested on cardboard and only then the torch is transferred to the surface to be painted;
- transform with tinted polyurethane varnish ordinary glass in tinted;
- varnish with a small “chameleon” additive becomes pearlescent.
Very important! Spraying any paints, even acrylics, is extremely harmful to the respiratory system. You need to work with a respirator.
Buying a kitchen set is not always advisable due to financial costs. For any person who has minimal skills repair work, the problem is how to update the facades old kitchen with your own hands will not arise. This will not only save money on the work of craftsmen, but also create your own personal design, which will decorate your home or apartment. To do this, you should know several methods for transforming an old kitchen and choose the most practical among them. 
Similar articles:
Restoration of a kitchen set begins with choosing the color of the facade. If necessary, you can replace it completely by ordering new doors and tabletops at any furniture showroom or small workshop. Companies that sell kitchen parts provide installation services. When choosing a method, it is necessary to take into account the main aspect - what the surface should be like based on the type of material and its structure. The façade surface comes in different types:
- wood (pine or solid valuable species trees) - suitable for Empire, Baroque and Classicism styles;
- MDF (with frame or film coating);
- glass;
- plastic.
If the kitchen set itself is durable, but outside– significant deformations or chips, you can change the doors and countertops, leaving the “skeleton” of the kitchen unchanged. When ordering new facades, it is possible to change styling throughout the kitchen: classic rectangular doors - with smooth shapes protruding at the edges, which will give the room exclusivity and chic. To place an order correctly, you should measure the facades, sides and drawers. This is done with a ruler and a centimeter, placing the elements in a horizontal position.
But the disadvantage of this method is its cost. It is necessary not only to pay for the production of new facades, but also to buy the appropriate Consumables. You will also have to drill the holes for the hinges yourself. To screw in the screws, use a drill with a diameter of 35 mm.
Use of decorative inserts
If the decision has been made to paint the doors or even completely replace them, decorative overlay inserts made from wallpaper, self-adhesive film, ceramic tiles and rattan will help add individuality to the decor. As with gluing and painting, the canvas is laid horizontally and any dirt on the surface is removed.
It should be taken into account that ceramics are fixed to the facade using tile adhesive, and not for paper-based materials.
The peculiarity of installing rattan is that it must first be wetted, then cut and secured to the door facade with framing wooden or plastic strips. The strips that will secure the rattan should be prepared in advance. Pay attention to the edges; they need to be filed at an angle of 45°. To work you will need furniture nails without heads, a hammer and acrylic varnish. Rattan looks beautiful if you place it not across the entire width, but only in the center of the door facade.
Self-adhesive film as a budget-friendly kitchen conversion
Covering kitchen furniture with film is a simple and economical option. For this you will need:
- the film itself;
- centimeter and ruler;
- pointed scissors and a construction knife;
- plastic scraper for smoothing the film.
The doors should be freed from the fittings. Measurements are taken and marks are made on the back of the self-adhesive film on a centimeter grid. Carefully cut required size with a gap of 2 cm. It is necessary to start gluing from the center, gradually applying 5-10 mm to the edges of the facade surface. If it is not possible to level out the formation of unevenness, the folds are trimmed and the air bulges are pierced with a needle.
How to Renew Wood Kitchen Parts
For finishing various surfaces you can use varnishes. This is a simple upgrade method small parts. Kitchen fronts made from expensive types of wood are expensive, but they also wear out. You can tint it, but it will change significantly appearance, especially if it is oak rather than cheap pine material.
To do this, remove the selected parts by unscrewing the screws with a screwdriver, but be sure to mark them. It will be possible to update doors or individual elements of a kitchen set using inserts, if they do not violate the overall design composition. Decor must be used thoughtfully so that it is not tacky.
Moldings, fittings and other decorations for the kitchen facade
Moldings and paint can significantly change the style of a kitchen unit. To do this, use all the tools as when painting a facade. The moldings are cut to the required length with a miter saw. In this case, the edges of the slats can either touch or be of different abstract lengths on each door. To secure it you need wood glue. Then the surface is primed and painted. For both cases, a spray gun is used.
Decoupage has become a popular method for upgrading a kitchen. A drawing, ornament or painting is placed on the facade, secured with varnish.
Thanks to the decoupage technique, you can decorate walls, tiles near the sink, and other surfaces in the kitchen to make the decor holistic and complete.
What do you do with old furniture?
For those who want to update kitchen furniture With at the lowest cost family budget, an excellent solution would be to replace or restore the cabinet doors of the old set. There are the following ways to update kitchen facades:
- pasting with self-adhesive film or photo wallpaper on a laminated base;
- painting;
- decoration with moldings, ceramic tiles or rattan inserts;
- varnishing;
- replacement.
Pasting of facades
The simplest and most economical way to update a kitchen, in terms of time, money and effort, is to cover the facades with self-adhesive film or photo wallpaper. Using vinyl film, with imitation natural wood, stone, ceramic tiles, marble or using wallpaper, with various images appropriate for the kitchen, you can achieve excellent results.
In order to update kitchen furniture, use: self-adhesive film, knife, scissors, ruler, centimeter, plastic scraper, fittings (handles and hinges), tape measure, square, rubber roller, sponge.

Work order
Step 1. Measure and dismantle the facades.
Step 2. Remove handles and fittings (hinges).
Step 3. Remove all types of contaminants, primarily grease stains, from the parts that are planned to be restored.
Advice ! Irregularities and cracks can be eliminated with fine sandpaper and filled with putty or primer-filler.
Step 4. Cut the film. on her back side There is a centimeter grid that allows you to accurately mark the fragments corresponding to the dimensions of the restored facades. It is necessary to leave a margin of 2 cm for bending. If there is a pattern, it is important to maintain symmetry and matching of the pattern on adjacent elements of the set.
Step 5. Glue the film fragments to the facades. To do this, approximately 2 cm of protective paper is separated from the film. Then the adhesive side of the piece is applied to the surface and glued. Using a scraper, you need to carefully level the glued part, “expelling” all air bubbles. Next, glue the film not completely, but in parts of 5 cm, each time carefully smoothing the glued part from the center to the edges.
Advice ! If small air bubbles have formed, they can be eliminated with a needle; larger bubbles can be eliminated with a knife.
Step 6. Reinstall the restored parts. If necessary, you can change the handles, which will also definitely “refresh” the headset.
In exactly the same way, kitchen facades are covered with photo wallpaper.

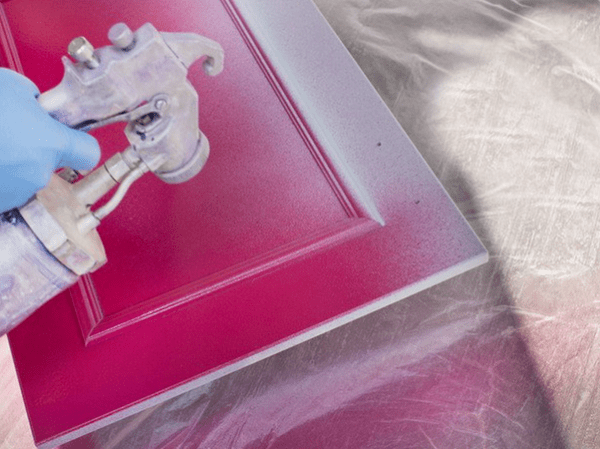
Painting of facades
To update a kitchen set, use: primer, brushes, paint, spray gun, screwdriver, plastic film.
Painting procedure
- Dismantle the facades.
- Remove handles and fittings.
- Prepare surfaces for painting - thoroughly wipe and degrease.
- Cover the floor plastic film. Place the parts to be painted on the floor.
Important! The room in which work is carried out must be ideally ventilated.
- Apply primer to the parts. Wait until it dries.
- Using brushes or a spray gun, apply paint in several layers to the surface of the parts. Wait until completely dry.
- Install the facades in their places.
- Screw on the handles.
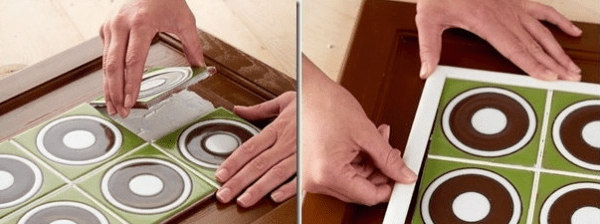
Decorating facades with moldings and ceramic tile inserts
This method of restoration involves decorating facades with decorative details. Can be used on the wall ceramic tiles either the molding separately or complement the tile pattern with the molding.
For decoration you should use: wood glue, silicone sealant or cement glue, decorative elements(molding, tile), miter saw, spray gun, glossy deck paint, drill, furniture fittings, screwdriver, marker.
The procedure for updating a kitchen set with linings
Step 1. Number the parts and cabinets of the set, remove them, thoroughly clean them with a damp cloth from all dirt, and wipe them dry. Remove handles and fasteners.
Step 2. Prepare the room. If possible, work with paint and varnish coatings It is better to do it in the air. If the kitchen restoration has to be carried out indoors, it is necessary to ensure good ventilation. Cover the floor with film.
Step 3. Mark the locations of the decorative trims.
Step 4: Prepare the overlays or tiles. Cut the molding into pieces with a miter saw required length, filing the joints at an angle of 45 degrees.
Step 5. Glue the tile or molding according to the markings.
Step 6. Cover the surfaces with a primer using a spray gun.
Attention ! The primer is applied from a distance of 15-20 cm and dries in approximately one hour.
Step 7: Apply deck paint. Can be used various stencils to create an original drawing. In order to achieve perfect result, apply another coat of paint.
Step 8. Reinstall the handles and the restored facades themselves.
Decorating facades with rattan inserts
Rattan inserts are used to update the kitchen following materials: rattan cloth, wood pads, brushes, scissors, furniture nails, varnish, sandpaper, hammer.
The procedure for updating a kitchen set
Step 1. Measure the height and width of the facades. Based on the measurement results, purchase rattan fabric in a roll.
Step 2. Soak the canvas for about half an hour. This is necessary so that after drying the canvas is well stretched on the surfaces of the cabinet doors.
Step 3. Match the color of the rattan fabric with decorative wooden overlays. If you cannot find the ideal wood shade, you can achieve the desired result by applying acrylic varnish. Apply varnish in 4 layers, allowing to dry and sanding with sandpaper. The edges of the fragments of wooden planks need to be sawn at an angle of 45 degrees.
Step 4. Spread the rattan fabric on the floor covered with plastic film.
Step 5. Mark the parts on the canvas the right size. Cut with scissors. If desired, the entire façade can be covered with canvas.
Step 6. Attach the leaf parts to the doors with a stapler, making sure that the staples are at the edges. In this case, they will be covered with wooden overlays.
Step 7. Sand the edges with sandpaper. Cover with acrylic varnish.
Step 8. Use furniture nails to nail the wooden strips so that they hide the brackets that attach the rattan inserts.
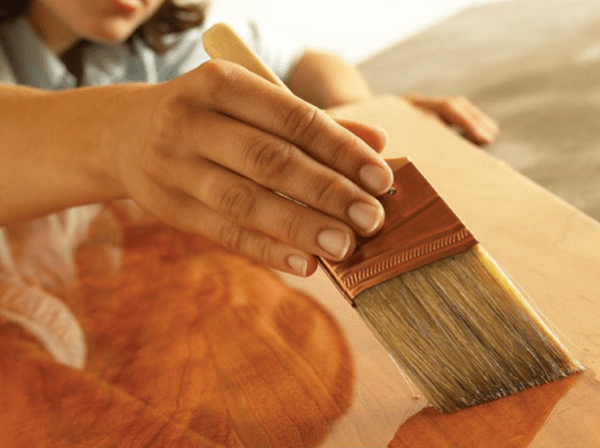
Varnishing of wooden facades
Another budget-friendly way to restore a kitchen is varnishing. wooden surfaces. For the procedure of updating a kitchen set using varnishing, use: varnish, brush, sandpaper, primer, sponge.
The procedure for varnishing
Step 1. Dismantle the facades and take them outside.
Attention ! Due to the high toxicity of varnishes, such work must be performed outdoors.
Step 2. Carefully remove old varnish or paint from the parts undergoing restoration using sandpaper.
Step 3. Wash the cleaned surfaces with a damp sponge and allow to dry.
Step 4: Apply primer. Also leave for some time until completely dry.
Step 5. Apply several layers of varnish.
Step 6. After the varnish has dried, return all restored parts to their places.
Replacement of facades
The most radical, but at the same time the most expensive way to update a kitchen unit is to completely replace all the doors with new ones. Cost savings in this case will be no more than 50% of the cost new kitchen, if we take into account the costs of measuring, dismantling old facades, delivery and installation of new ones.
The facades are delivered to the buyer without holes for handles and hinges. You can drill holes yourself or contact specialists from a furniture showroom who will do this work for a fee.
Facade replacement process
- Dismantle old facades.
- Take exact measurements.
- Buy or order new ones.
- Drill holes for handles and hinges.
- Screw on the hinges.
- Install the facades in place of the dismantled ones.
- Screw on the handles.
- Delete protective film, if available (usually on elements coated with plastic or enamel).
- If the purchased facades are made of acrylic plastic, treat them with a special compound (ordered together with the facades).
Conclusion
In order to determine the most suitable way to update kitchen furniture, you must first of all take into account the availability of free time and the possibilities of the family budget.
You can learn more about how to cover kitchen furniture with self-adhesive film in the following video.
Kitchen is not only workroom housewives, but also a place for the whole family to gather. Therefore, this room should not only be comfortable and functional, but also bring beauty, coziness and comfort to others. The main detail of the furniture is its facade, which catches the eye first, therefore, its appearance must be at the highest level.
Replace kitchen façade – affordable way change the interior
Replacement of furniture facades can be done for several reasons. This could be a kitchen renovation with a change in interior design, wear and tear of materials, or the usual desire to refresh the decor in the apartment. Updating kitchen facades can be done in several ways. In order to determine the appropriate method, you need to approach the assessment of each situation individually, based on many factors.

Do-it-yourself finishing of kitchen facades with rattan for a country-style kitchen

Option for transforming the kitchen after replacing the facades and apron in the kitchen
Replacing the entire kitchen unit is a very expensive undertaking, so restoring kitchen facades seems like a rational move, provided that the rest of the furniture is in good working order. There are three main options for replacing facades: covering with film, painting and replacing the facade slab.
Mainly used polyvinyl chloride film(PVC), which is the most in a simple way restoration of furniture facades. Advantages of PVC films – affordable price, ease of gluing and further operation, high resistance to temperature and humidity changes (which is very important for kitchen area), a wide range of colors and patterns (option for selecting the pattern of new facades for any kitchen design, from plain to imitation marble or wood).

One of the easiest ways to update a kitchen set is to stick film on the facades
The option of replacing kitchen facades is more expensive than film, but in this case the client receives a completely new set, with the exception of its frame (as practice shows, it practically does not wear out during normal use). The cost of such restoration depends on the type of material used. The following materials are most often used for this technology.
- Chipboard or fibreboard. Wood boards have a number of advantages, the main one being price. Quality products These materials have good resistance to moisture and temperature changes. The plates can be covered with film, paint or enamel. The most expensive option is to cover it with a layer of wood, which creates the illusion wooden product when affordable.

Due to the shine of laminated chipboard, the kitchen will visually appear larger
- Tree. It is made from a variety of wood species, looks expensive and noble, and is highly environmentally friendly. In operation, this material is durable and can be subject to subsequent repeated restoration. Among the disadvantages is the relatively high cost of the material.

Solid wood facades are an expensive, but high-quality and durable option
- Metal. Metal facades Perfect for modern or high-tech kitchens. Can be performed in various colors and designs (frames, showcases, patterns, etc.). Convenient to use (easy to clean, special coating prevents corrosion), but such kitchen fronts suitable for a narrow range of interior designs.

Metal facades for kitchens in high-tech style
- Plastic. Enough practical option, widely used in today's market. Withstands all types of cleaning, changes in temperature and humidity, and does not lose its external appearance for a long time. A worthy option for the combination of price and quality.

Replacing kitchen facades with modern plastic – perfect solution, this wear-resistant material remains in its original form for a long time
- Glass. New facades made of glass, which are often decorated with patterns, grooved or tinted, look beautiful. They are easily washed off from dirt and tolerate any chemicals well. detergents. Among the disadvantages, it is worth noting the high fragility of glass.

Glass facades for the kitchen - a combination of external fragility with reliability
- Stone. The most expensive material, but kitchen facades made of stone have no disadvantages - they are the most durable, resistant not only to moisture, but also to chemicals, as well as mechanical stress. Have a wide the lineup, which will provide a worthy choice for any kitchen design.

Kitchen facade made of artificial stone

Kitchen with MDF fronts covered with veneer
If the structure of the furniture material has normal condition, and you only need to change the appearance, great suitable option with painting. Here everything is limited only by the imagination and financial capabilities of the master, since there are a lot of options with the type of paint and the possibilities of its application on the modern market.

Updating an old but strong wooden set by painting and replacing the countertop
To completely update the appearance of facades, it is advisable to replace all furniture fittings, matching it to the updated style of the kitchen. With new handles and hinges the set will look much better.

Set with bright colors will look good in spacious rooms
Progress of work and necessary materials and tools

To replace facades suitable for kitchens standard set of tools
In order to inexpensively change the appearance of the kitchen by replacing kitchen facades home handyman You will need a number of materials and tools, the list of which depends on the chosen restoration technology.
- Film restoration. When finishing the facades of vinyl film you will need PVC tape, measuring device(tape measure, ruler), cutting accessories, roller or soft sponge, new hinges, handles, closers (accessories).
- For ease of use, it is advisable to place the surface to be glued in a horizontal position, having first removed it from its hinges. First you should carry out preliminary preparation, which is to give the façade a perfect flat surface without nicks or roughness. Then the facade should be degreased and allowed to dry thoroughly (in some cases up to 24 hours).

Degrease and level the surface

Peel off the cut out elements from the base
- Pasting should be carried out only after careful measuring and cutting of film blanks. It is recommended to prepare a film with a margin of approximately 20 mm on each side for each façade. Self-adhesive must be applied carefully, avoiding bubbles. A sponge or a construction roller will help with this. Last step– installation of a new facade in place and installation of new fittings.

Updated kitchen facades using film
- Painting. To paint facade surfaces you will need the paint itself and the tool with which to apply it. This can be a roller, brush or spray.

Restoration of facades using painting and decoupage
- IN this moment The gradient painting method is very popular. This method is more expensive, however aesthetic appearance surfaces upon completion of the work justifies this investment.
- Preliminary surface preparation also involves sanding and degreasing the surface. It is also important to prepare the room for painting by covering all interior elements to avoid unwanted paint getting on them.

Do-it-yourself renovation of kitchen facades and frame
- It is necessary to paint carefully and evenly. It is recommended to treat the facades with several layers of paint, after each previous one has dried. This will give the product not only aesthetics, but also greater resistance to external influences.

DIY kitchen façade painting
- New facade slabs. This finishing option can be purchased at furniture stores. If the kitchen set has non-standard sizes, you can order the product according to specified sizes. In addition to the plate itself, for installation you will need a screwdriver, self-tapping screws, a drill, and measuring tools.

Use a Forstner drill to make holes for the hinges.

Using a screwdriver, attach a special tab to the wall of the headset case
- First you need to dismantle the old parts. This must be done carefully so as not to damage the frame of the kitchen unit. IN new stove Using a drill, make holes that should coincide with those remaining on the frame. Using screws, secure the slab to the sides.

We make marks in the center of the facade and make holes along them into which we attach the handles

Using a screwdriver, tighten the fasteners on the foot, aligning the structure at the desired angle
IN self-replacement there is nothing complicated about the facades. this work does not require special skills or highly specialized tools. If desired, you can turn to the services of specialists, whose range of services includes all stages of restoration from design selection to installation.

View of the kitchen before and after replacing facades with your own hands
Video: Restoration of kitchen cabinets.


