Pulling, or, in other words, replacing the old upholstered furniture upholstery with a new one, is a process that will not cause difficulties, it can be carried out independently, without contacting specialists.
With the help of upholstered furniture, you can transform and update the interior in your apartment without spending a lot of money on changes.

If you are in doubt whether your furniture needs restoration, look through the numerous photos of the sofa's banner, which show how original, stylish, and truly new your furniture set can turn out to be.

How does the hauling of furniture take place?
If, once again, glancing at your sofa, you notice that it has long lost its attractive appearance, its upholstery has worn out, faded or torn in places, you do not have to think about buying new upholstered furniture.

A simpler and less costly option is to do it yourself.

This process involves several stages of work:
- complete disassembly of furniture into its constituent elements;
- removal of old upholstery material;
- cutting of the canvas selected for the constriction;
- upholstery of each component of the sofa separately;
- final assembly of the entire structure.
Before starting work, make sure that you have all the tools in your arsenal that you may need in the process.

The choice of upholstery material
The material for the constriction must be selected very carefully. It is better to pay attention to dense, rigid fabric, such as tapestry or jacquard. Their strength will provide the longest service life of the new upholstery, without changing its original appearance.

Upholstered furniture upholstered in leather will look gorgeous and expensive. This is not a cheap pleasure, since the price of high-quality, real leather is quite high. With a limited budget, you can pay attention to its quality substitute.

Since the sofa is usually a favorite place for every family member, it is best to choose an upholstery fabric that is not easily soiled and practical. The color scheme is selected based on your taste preferences.

The main thing is not to forget that the sofa in the interior occupies one of the main places, so its colors should correspond to the general style of the room.
There are a lot of design variations of the updated sofas, without any problems you can choose the material for the upholstery that will meet all the requirements.

detailed instructions
In order to ensure that the process of replacing the sofa upholstery does not cause a lot of questions and unforeseen difficulties, carefully read the instructions for tightening the sofa before starting work.

To get started, prepare all the tools necessary for this work: a screwdriver, a screwdriver, possibly a nail puller, scissors, chalk or a piece of soap, a construction stapler and staples.

First, the side parts of the sofa are removed, then its main elements: the seat and back. Be sure to remove all existing screws and nails.

After that, you can proceed to removing the old coating material. Do this very carefully, the removed upholstery will serve as a pattern for the new upholstery.

If, after removing the old fabric, you find damage to the springs, foam rubber on the sofa seat, it is better to immediately eliminate these defects.

Next comes the cutting of the purchased upholstery material. Upon completion of this, it is directly pulled on all parts of the upholstered furniture. Fastening takes place with a construction stapler.

And finally, you can proceed with the final assembly of all individual parts of the furniture set. This stage must be taken very carefully, the assembly must be carried out consistently and efficiently.
Slight difficulties can arise when pulling the armrests of the sofa, especially if they have an unusual, rounded or curved shape.

Then, for the design of these particular elements, it is advisable to contact the specialists who will beautifully and efficiently make the constriction of complex parts.

Thinking about updating upholstered furniture in your apartment, be sure to pay attention to the possibility of its constriction. These, not very expensive work, will allow you to instantly transform and add new bright colors to any interior.

Photo of the couch


Everyone likes the change. If an old, but beloved and familiar sofa has worn out, and you have not yet saved up money to buy a new one, you can update it by covering it with new beautiful upholstery. You need to figure out how to choose the material, and then cover the sofa with your own hands.
If your sofa is worn out and looks ugly, then its constriction will serve as a way out of this situation.
You need to start with the main thing, without which it is impossible to start work, with tools and materials.
Tools and materials
How to fit a sofa yourself? It is necessary to prepare in advance the tools that are available in the house:

In the process of stretching the sofa, you will need a construction stapler.
- hammer;
- screwdriwer set;
- scissors;
- hex wrenches;
- screwdriver;
- nippers;
- construction stapler;
- pliers;
- pliers.
Now about the materials. First of all, it is upholstery fabric. The main requirements for it are as follows: it must be strong, easy to clean, in contact with the external environment, not to lose its original appearance. The following fabrics are most often used for upholstery:
- Tapestry is a practical and cheap fabric, dense, 100% cotton with woven patterns in various shades and colors. Has a dust-repellent property.
- Jacquard fabric is expensive, looks very solid, perfectly cleaned, strong, durable, wear-resistant.
- Flock is a fabric similar to leather, suede, but much cheaper. It is easy to clean, does not fade, durable, velvety, pleasant to the touch.
- Shinil is a fabric with 50% synthetic and 50% cotton. Similar to velor, but of a higher quality. Strong, breathable fabric.
- Artificial suede is a durable, environmentally friendly material, easy to clean. Washable in warm water. Visually, it is not easy to distinguish natural from artificial suede.
- Leather. For furniture upholstery, both artificial and natural are used. Solid, sturdy and comfortable material.
In addition to the upholstery fabric, you will need to prepare braid, furniture tape and edging. Also needed:
- plywood sheet;
- foam rubber;
- synthetic winterizer;
- special staples;
- piece of chalk;
- strong thread or twine and needle;
- nails;
- screws and bolts;
- joiner's glue or PVA.

To change the upholstery of the sofa, you will need foam rubber.
When buying foam rubber (polyurethane foam), its following properties should be noted:
- softness;
- density;
- elasticity.
The thickness of polyurethane for a sleeping sofa should be at least 4 cm. Marking will help to find out its density, where letters indicate the brand, in numbers - density (the first two) and rigidity (two final). To seat the sofa, you need foam rubber with a hardness of 40 to 50 units.
For different parts of the sofa with an unequal load, polyurethane is selected with different densities: for sitting - with more, and for the back and elbows - with slightly less.
The heaviest load is directed to the seat, therefore foam rubber with a density of 40 kg / m³ (brand EL4050) should be chosen for it, but super soft polyurethane foam should be placed on top.
For the handles and backrest, you can take foam rubber with a lower density, for example, 25 kg / m³.
Disassembling an old sofa

Use a nailer or screwdriver to remove the upholstery from the sofa.
Before starting the main work, you need to carefully inspect the condition of the furniture. Use a screwdriver to remove the upholstery from the furniture. Then it is recommended to pry on the staples. If they are firmly in place, use a flat screwdriver and pliers.
To repair an old sofa with your own hands, you need to inspect all the elements made of wood. For a detailed examination of the frame, you need to remove the substrate. All docking and fastening points must be checked for strength. It is better to replace screws and bolts with new ones. Broken and old structures must be replaced with new components made of wooden beams, fiberboard or plywood sheets. In case of minor damage, the product can be corrected with construction tape and wood glue. Particular attention should be paid to the fasteners. Replacing them will allow you to extend the life of the sofa for a long time.
To repair a sofa, you need to separate the seat from the back:
- First unscrew the bolts holding the elbows to the sidewalls.
- Then remove the side surfaces and detach the lower part of the furniture.
- Unfold the sofa and turn it upside down to the floor.
- Remove the backrest and remove the metal mechanisms holding it.
- Dismantle the seat and remove the worn out fasteners: staples and nails.
- Take off the old drapery and take out everything that the sofa is filled with.
- If the springs are not damaged, then leave them, and if there are damaged ones, then pull out the block.
You do not need to rush to throw away the old upholstery, it can be useful as a template for a pattern when sewing new covers.
Repair of the interior of the sofa

Use pliers and a hammer to remove old springs from the couch.
First, you need to repair the spring blocks inserted into the back and armrests:
- Use pliers to unscrew the damaged springs.
- Instead of the twisted springs, new ones must be installed.
- Attach the spring blocks with nails to the crate.
If the springs on the seat are especially worn out, they can be made elastic again:
- Cut the polyurethane into small pieces.
- Fill the spring block tightly with these segments.
- Cover it on top with an old blanket or some kind of material, such as burlap.
- Attach this entire layer of material with nails to the box.
- Attach the springs to the material with twine and a thick needle.
- If there are cavities between the springs, fill them with foam rubber or cotton wool.
- Cover everything from above with a binding material, for example, coarse calico, fasten with nails, tightening tightly.
- Apply glue to one side of the polyurethane and place this side on the material. The foam will stick and the surface will be flat.
If there are sagging springs, do not throw them away, you can stretch them, and they will still serve. To make the sofa more voluminous, you can put a synthetic winterizer on top of the polyurethane.
When all of the above work is over, you can start sewing sofa covers.
Upholstery and upholstery

Each piece of the sofa should be cut out separately.
Now you need to figure out how to fit the sofa. First you need to cut the fabric. The fabric chosen for drapery is laid out on the floor or on a huge table, the used covers are put on it instead of patterns and outlined with chalk. They cut out the fabric, leaving allowances, and sew new covers on a typewriter. When sewing, it must be borne in mind that a large load is exerted on the seams during operation. Therefore, their strength is imperative. You can use reinforced threads when sewing and sew in 2-3 layers.
At the joints, you can use decorative tape or braid. These materials will cover excess or unsuccessful seams and give the product a decent look.
When everything is ready, you can put on new covers on the seat, armrests and backrest. The attachment points for the new upholstery should be in the same place where the old covers were attached.
You can attach the covers with a stapler, each time pulling on the material when the next mount is driven in. Upholstery on upholstered furniture should stretch well. The fasteners should be positioned every 2-3 cm. This will ensure a strong and secure fixation of the upholstery. Sagging of the fabric is unacceptable. But excessive fastening is also undesirable. Therefore, this procedure requires caution and accuracy. During finishing work, it is necessary to control the degree of fixation.
In order for the upholstery to lie flat, you need to find the middle of the long side of the sofa, drive in the fasteners, and already move from it gradually to the edges, alternately driving in fasteners on one or the other side of the first fastener.
Having finished with the upholstery, assemble the sofa with your own hands in the reverse order:
- Strictly control that the labels match.
- Attach the lock first to the back, then to the seat and the bottom of the sofa.
- Fasten the sidewalls.
- Attach the elbows to them.
- Fasten wood panels, varnishing them in advance, if necessary.
Anyone who wants to do it will be able to cover the sofa with their own hands, because there are no obstacles for the interested person.
To decorate the sofa and mask flaws, you can make several decorative pillows from the same fabric. This will give an organic and inseparable look to this design. A kit like this looks great and will be complete. And the pillows will also have a practical function: they are comfortable to lean on. They will play the role of side backs. Now you know how to wrap a sofa, and you can do it yourself.
Even the most expensive furniture loses its luster over time, the main elements wear out, the parts become unusable. But most of all, due to frequent use, the upholstery suffers: it wipes off, wrinkles, scuffs may appear on it. It is not necessary to purchase a new furniture set - it is enough to pull up the sofa with your own hands. Everything is simple here: first you need to choose a suitable fabric, disassemble the structure and update it with the purchased material.
Damage and types of repair
Damage to upholstered furniture can have several degrees of "severity". Depending on this, various repairs are required. Here are some examples:
- 1. The fabric has fallen into disrepair - the cat has torn or the material has worn out. Requires normal upholstery replacement.
- 2. There are sagging areas - this happens when the components are worn out. Depending on the degree of damage, it may be necessary to replace the padding polyester or other layers. In more difficult cases, the spring blocks need to be repaired.
- 3. Dips in the lower part of the seat, which happens with high loads on the furniture, when the springs pierce the frame. Usually occurs when the lower part is made of fiberboard. Replacing broken components is essential.
Padding is a complex of measures: from normal work to 100% renewal of the product. When carrying out repairs, do not forget to check the rest of the elements, filler. Many experts recommend purchasing foam rubber or special furniture silicone. Due to this, the sofa will become much more comfortable, because incorrectly installed springs will bring a lot of trouble to the furniture owner.
Before proceeding with the repair, you should familiarize yourself with the options for the materials for the constriction, evaluate their characteristics. When choosing a fabric, it is undesirable to use synthetics, rough types. The upholstery should not emit an unpleasant, pungent odor - this indicates the use of toxic dyes that can be hazardous to health.
It is advisable to choose fabric with little or no pattern - this will reduce the cost of the hauling.
Tips for the selection of material:
- 1. Tapestry gives sofas sophistication, a share of aristocracy. It is more expensive than other copies, but at the same time it is characterized by a longer service life. This is second only to natural leather.
- 2. Fabrics made of real cotton wipe quickly - not the best option for a sofa.
- 3. Jacquard materials attract with their high density, long service life.
- 4. Velor is similar to velvet, cleans well, looks attractive, but, like cotton, wipes quickly.
- 5. It is not recommended to use flock as upholstery as it is highly electrified and attracts dust.
- 6. Chenille is a good choice because it cleans well, even tough stains can be easily removed from the surface.
- 7. Arpatek resembles leather in quality and appearance, but its cost is cheaper. Sufficiently sturdy casing.
Doubting between padding polyester and foam rubber, you need to make a choice in favor of the latter, since it quickly takes on its former forms. Experts recommend: instead of one layer of material 50 mm thick, take two sheets of 20 mm each, laying a layer of felt between them. If there are wheels, it is advisable to buy new ones or simply change the bearings.
Padding the sofa - a detailed master class
Prepare all the necessary tools for work:
- anti-stapler for removing staples (can be replaced with a flat screwdriver);
- spanners;
- scissors;
- side cutters;
- nippers;
- stapler;
- high strength threads;
- sewing machine.
Important! To avoid damage to the elements, please be patient and carry out the work as carefully as possible.
Dismantling the sofa and removing the old upholstery
First you need to remove all the components: pillows, pouf, sidewalls. In most cases, this stage will not cause any problems due to the nature of the furniture. The detached fasteners are folded into a separate container so as not to lose them.
Then use a staple remover. Removal is carried out as carefully as possible - this will prevent damage to the old upholstery, since it will be required as a template to create a pattern for a new material. And to keep the correct dimensions, use an iron.
After cleaning from dust and debris, the master needs to study all the details - they can be reused. With the exception of old foam rubber, which usually loses its properties after a couple of years of operation. Replacing it, experts say, will add elasticity to the sofa. Dents, lumps, leading to discomfort will disappear.
A metal mesh, springs and braces are located under the filler. These elements must be carefully inspected and defective ones replaced. If belts are used instead of springs, it is advisable to update them as well. Tighten all fasteners, strengthen the joints, glue the wooden parts again with special wood glue.
Cut out new parts
The final result depends on how well the fabric is prepared. Step by step guide:
- 1. We measure all parameters - length, height, width.
- 2. Mark the material with chalk by spreading it out on a flat surface.
- 3.On each side of the blanks, add at least 3 cm to the hem.
- 4. Cut out the details along the outlined lines (arm yourself with special tailor's scissors).
You can do it easier: we put the worn-out elements of the old sofa cover on the fabric, circle it with chalk and cut it out .
When tightening for the first time, sometimes the calculation of the material is carried out incorrectly - usually this becomes noticeable already during the fastening of the fabric. In this case, it will need to be purchased, but not always the store has a similar product in texture and color. Therefore, try to buy with a margin. The leftovers can be used to make pillows.

How to pull a sofa with your own hands: is it worth it and how best to do it
- Difficulties of upholstered furniture upholstery
- Upholstered furniture stretching technique
- Sofa stretching process
- Features of the banner of the corner sofa
The upholstery of any upholstered furniture gradually deteriorates or ceases to correspond to the new interior of the room. You should not rush to completely replace it, because it is much cheaper to restore it. In order to change the upholstery on the sofa, there are two ways: call specialists at home or take the furniture to the workshop, but you can try to perform this operation yourself. We will try to explain how to pull the sofa with our own hands, and under what circumstances this should not be done.
It should be noted that this operation is not always possible, since it requires certain experience and skills that only constant practice can provide. You should not replace upholstery on upholstered furniture yourself if:
- Furniture to be restored with your own hands has a very complex design, the self-assembly of which causes serious difficulties;
- There is the complexity of the constructive solution of the upholstery elements, since you have to completely repeat its entire configuration with a new material;
- Due to the high wear and tear, it is necessary to replace not only the upholstery, but also the frame elements and filler;
- The furniture is quite expensive or requires replacement of material that is difficult to work with (leather, etc.).
If you decide to carry out the work yourself, you should prepare the necessary tools and materials and study the provided methodology.
Sofa stretching process
Do-it-yourself upholstering of the sofa occurs in the following order.
- It all starts with its complete disassembly. To do this, remove all overhead structural elements (ottomans, backs, pillows, etc.). Depending on the design features of the sofa, this is quite simple to do, since manufacturers, as a rule, ensure the maintainability of the product.
- After that, using a side cutter, a screwdriver and a staple remover, the old upholstery is removed. This operation must be carried out with great care, since it is required to preserve the old coating as much as possible, which will serve as an ideal template for new upholstery.
- After that, a revision of the filler and the spring frame is carried out, followed by the replacement of worn parts.
- The next step is to steam out the old upholstery and turn it into a pattern for the new material. The resulting new structural elements of the pattern are sewn taking into account decorative details, welts, stitches and other things.
- The final stage is the assembly of the sofa, which is carried out in the reverse order. When attaching the fabric of the new upholstery to the structural elements of the sofa, it will be optimal to use a mechanical stapler. During this operation, special attention should be paid to the uniform tension of the skin, while avoiding distortion of the pattern.
When pulling furniture, you can slightly change its design by placing foam rubber or other filler in the necessary places.
Features of the banner of the corner sofa
Do-it-yourself upholstering of a corner sofa is carried out according to the same principles and in the same sequence as for an ordinary sofa. But, since the design of the corner sofa is of increased complexity, its disassembly and assembly take more time. Cutting fabrics and sewing new upholstery also becomes more difficult.

Therefore, at the beginning of work, you should adequately assess your strengths and skills. This can save you time and materials.

Furniture padding - where to start?
As we already wrote at the very beginning of the article, as an example, we will talk about the hauling of a double bed and show photos of the process.
First you need to carefully examine the furniture, the upholstery of which you are going to change. The purpose of the inspection is to understand how it is disassembled and to identify the attachment points. In our case, the headboard was the first element to be dismantled.
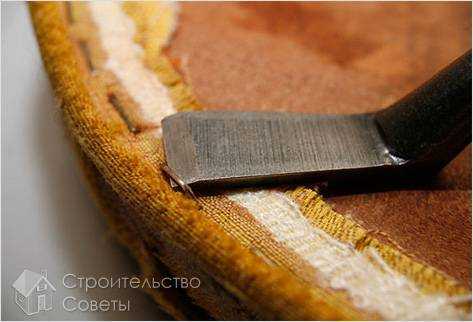
What happened to this back that it became like this? It's simple - the old leatherette cracked and began to peel off and roll from the friction of the pillows on the back. So, having removed the back, you need to carefully study it in order to understand where to start dismantling the old upholstery. Usually, the upholstery is attached in a specific order and dismantled in the reverse order. When disassembling the backrest, we faced a dilemma when it was not clear how the upholstery on the sides was fixed and how the side pads could be removed. The lack of visible mounts and the lack of access to invisible mounts suggested that the pads were attached with glue and / or pins. Therefore, with the help of a chisel, we try to pry off and tear off the side plates carefully along the perimeter (without fanaticism, so as not to break), they finally give in and are separated.
Pay attention to the cardboard tape, which was found nailed to both ends of the back. We damaged this cardboard tape when we chiselled the wooden end plates. The purpose of this tape is to create a ledge around both ends of the backrest. These protrusions are covered with an upholstery material, after which the end plates are "recessed", as it were. This is done not only for beauty and for giving bulk to the upholstery material. No matter how tightly you fasten the end plates, there will be a certain gap between them and the back. And only the creation of protrusions, inside which the linings are heated, hide any gaps from the observer.
We decided to replace the damaged cardboard with leather, after making it more rigid. In order to make the skin hard, hard and reduce its elasticity, you need to soak it in water containing a small amount of ordinary PVA glue, and then dry it. In the photos below, you can see what the result is - the strips of leather are angled upward, without bending.
After that, you can begin to stretch the back with new upholstery. Before you start shooting the upholstery fabric, its edge should be folded (just as it is done when working on a sewing machine - bending the edge, you protect it from starting to crumble into fibers. from the approaches used when sewing on a sewing machine. So for example, to hide the staples with which you fasten the first edge of the upholstery fabric - attach the fabric with the wrong side out and fasten with a stapler, then turn the fabric over, covering the clogged staples. We forgot to photograph this moment separately, but if You will carefully look at the photos of the backrest, located below, - you will understand what is at stake.
So, having changed the upholstery of the headboard with your own hands, you can proceed to the constriction of the bed base. First, we need to dismantle all the elements that prevent the removal of the old skin. In our case, these are legs and side shelves.
Next, we study how the old upholstery is fixed, from which side you need to start dismantling it. In our case, there was a secret mount on top, from which the installation at the factory began, and an open (visible from the outside) mount was found below (under the bed). Therefore, the dismantling was carried out in the same order - first from below, then from above. Honestly, in our case, to simplify installation, we decided not to use a hidden mount from above, since it will still not be visible when the bed is closed. Therefore, we began to install the upholstery fabric not from above, but from below, then, pulling evenly, began to fasten it from above. It is very important, before attaching the upholstery fabric, to maintain the same tension of this fabric over the entire surface of the furniture. Otherwise, the upholstery will not lie flat, but in waves or folds (where it is stretched more, there will be depressions, where weaker - bulges). For even tension of the upholstery, you can use a narrow strip cut from fiberboard. In this case, the edge of the upholstery fabric is attached to the strip, then the strip is scrolled by winding the fabric onto it in one turn. It is then easier with the strip to pull the entire upholstery fabric evenly over its entire length. Stretching the fabric, the strip is attached with a stapler, nailing it to the product along with the fabric.
As you can see, do-it-yourself furniture hauling is not such a difficult process. It took 2 days to change the upholstery of the bed shown in the photo.
Furniture upholstery (sometimes also called "upholstery") involves a number of standard operations, which consist in its complete restoration and include special repair and upholstery work.
Today, everyone (even if they do not have design talent) can turn their old sofa, for example, into a real work of art. A similar transformation can be achieved by decorating furniture with additional decorative elements: for example, cushions in a color contrasting with the main upholstery, decorative cord with tassels or braid.
Do-it-yourself furniture upholstery will not only allow you to save part of the family budget, but also provide an opportunity to get a certain aesthetic pleasure from the manufacture of a functionally finished product.
It should also be noted that furniture upholstery belongs to the category of time-consuming work, but if you follow a number of instructions and some rules, you will certainly achieve what you want.
When removing from each of these disassembled parts of the old upholstery, you should act very carefully, trying not to damage its base and maintain the shape of the removed fabric, which will allow it to be used in the future as a pattern for new upholstery. After that, it is necessary to investigate the condition of the inner filler of the upholstery (foam rubber, batting or synthetic winterizer) and, in case of significant wear of this material, replace it.
The upholstery of the sidewalls and other furniture elements is usually attached using special brackets in that part of it that faces the floor and wall. To remove the upholstery, use a flat screwdriver and pliers to pull out these staples and remove the fabric.
In order to make upholstery of upholstered furniture, you will need the following tool:
- special furniture stapler designed for stuffing fabric and foam rubber;
- screwdriver;
- hammer and nail puller;
- a set of screwdrivers and chisels;
- nippers and scissors;
- wear resistance;
- design characteristics.
The final stage
After the newly wrapped elements of your structure are ready for assembly, you should install the previously removed locking mechanism on it. For a more reliable fastening of the mechanism itself on the base (frame), you can use bolts of a larger diameter, for which you should first drill the holes for them a little. At the final stage of the assembly of the structure, the back and seat are first installed, and only then the sidewalls are fixed. After the completion of assembly work, it is necessary to check the entire structure for the ease and convenience of its folding and unfolding, if any.
How to upholster furniture with your own hands
Upholstered furniture is available in every apartment, it can be both soft armchairs and sofas. After all, we need it not only for convenience, but also for interior decoration. However, over time, we notice that the furniture loses its original appeal. And in this case, only new upholstery can help you, which can be done by hand.
But you need to warn you right away that self-upholstering of furniture is a rather laborious process. And for this you need to do everything in order:
- To begin with, you will have to carefully disassemble the piece of furniture you have chosen: seat, sides and back;
- After that, you need to remove the old upholstery, while trying not to tear it apart, because in the future you will have to use it as a template for making a new pattern;
- Next, we evaluate the state of the internal material, basically it needs to be replaced. After the inner material has been replaced, you can start stretching the new upholstery, while not forgetting to tighten it well;
- The last thing that remains is to collect the furniture.
Now we will consider the banner of an old book sofa (still from Soviet times). 
Foam rubber and upholstery of old furniture
Let's start first of all with the choice of upholstery material for your furniture, as it can be used: chinilla, jacquard, tapestry, velor or flock.
As for the choice of mats, here you need to be guided by the following positions:
- The density of the mat should be at least 30 units for the back, as for the sidewalls, then it should be at least 40 units;
- The thickness of the mat: for the backrest should be from 40 mm, for the sidewalls from 20 mm;
- Rigidity.
In our case, the stiffness and density of the material should be given the greatest attention, since the service life of your furniture will depend on this in the future. Because if the density of the foam rubber is small, then it will undergo crumbling and deformation under load. High stiffness will increase wear resistance, but elasticity will decrease. But there is a solution. To do this, you will need to use a two-layer filler, where the first layer needs to be made harder, and the second, naturally soft.
It is best to use canvas or rough cotton fabric to upholster the filler. This will reduce the ingress of dust into the interior of the furniture. 
Upholstery of the sofa-book
First, you need to disconnect the sidewalls, while unscrewing the fasteners between the sidewalls and the frame. Then we disconnect the seat and back from the frame, for this you need to remove the locking mechanism.
Then you need to unfasten the staples and remove the old upholstery. There you will find a padding polyester or foam rubber layer, it was mainly glued to the plywood of the sidewalls.
To give additional volume, you will again need a foam rubber filler, its thickness should be 30-40 mm. For a more convenient connection to the frame, foam rubber is laid from the outer part of the sidewalls.
To do this, you will have to put the removed sidewall on the prepared foam rubber sheet and use a wallpaper knife to make a pattern so that the foam rubber completely covers the outer side of the sidewall, as well as somewhere half of the inner side. Also, do not forget to make an allowance of at least 7 cm on each side. Next, you need to evenly stretch the material and wrap it along the ends of the sidewalls, while securing it with a stapler. Then from the front side at the bottom, fix the filler and wrap the top of the sides, securing the foam rubber from the inside.
Then you will need to cut the canvas and cover the foam completely. When you have completed this procedure, you can start stretching the upholstery.
For seat upholstery, you will also need to get rid of the old upholstery and filler. Here you will come across a spring block. As for him, you also need to carefully inspect the spring mechanism and replace the springs that have become unusable. You will also need to make some minor repairs to the frame, as it is mostly loosened.
After all this, a dense fabric must be laid on the spring mechanism and attached to the spring mechanism. Next, lay two layers of foam rubber, hard and soft, and secure it in the same way. Then the foam rubber needs to be covered with canvas, and then upholstered.
As for the backrest upholstery, here it is necessary to act on the principle of seat upholstery. But in this case, hard foam is not used, only soft and it is necessary to fix it only in the upper part of the frame, without leading to the bottom. All this in order to prevent the foam rubber from blocking the gap between the doors and the back of the sofa when unfolding the sofa-book.
Now the hauling of your sofa has come to an end, you just have to put all the parts together. At the same time, do not forget to secure the locking mechanism, and make sure that it is securely fastened.
Change of furniture upholstery - video
DIY furniture upholstery - how to upholster furniture

Furniture upholstery (sometimes also called "upholstery") involves a number of standard operations, which consist in its complete restoration and include special repair and upholstery work.
Today, everyone (even if they do not have design talent) can turn their old sofa, for example, into a real work of art. A similar transformation can be achieved by decorating furniture with additional decorative elements: for example, cushions in a color scheme that is contrasting with the main material, decorative cord with tassels or braid.
If you do the upholstery of furniture with your own hands, this will not only allow you to save part of the family budget, but also provide an opportunity to get a certain aesthetic pleasure from the manufacture of a functionally finished product.
It should also be noted that the upholstery belongs to the category of time-consuming work, but if you follow a number of instructions and some rules, you will certainly achieve what you want.
Disassembly and removal of old upholstery
The first thing you should do is to completely disassemble the piece of furniture prepared for hauling into its constituent parts, the main of which are, as a rule, the seat, back and sidewalls.
For a complete disassembly of the sofa, for example, you should remove the sidewalls by unscrewing the bolts to the base, and then proceed to remove the seat and back from it. This can be done immediately after dismantling the locking mechanism, which will allow you to completely disassemble the entire structure and separate the back and seat from each other. Before carrying out all these operations, we recommend that you fix the order of fastening the elements of the mechanism using a camera; this will greatly simplify its reassembly.
When removing from each of these disassembled parts of the old upholstery, you should be very careful not to damage its base and maintain the shape of the removed fabric, which will allow it to be used in the future as a pattern for new upholstery. After that, it is necessary to investigate the condition of the internal filler (foam rubber, batting or padding polyester) and, in case of significant wear of this material, replace it.
The upholstery of the sidewalls and other furniture elements is usually attached using special brackets in that part of it that faces the floor and wall. For removal, you need to pull out these staples using a flat screwdriver and pliers and remove the fabric.
In the event that it is required to update the filler, it should be completely removed from the bases. When removing the padding polyester, try to keep the fragments of the filler remaining at the locations of the sidewall bolts. The new filler must be pulled over the element to be updated and covered with a canvas on top, which is then attached to the base with the help of brackets.
Sidewalls, seat and backrest renewal
In order to make upholstery of upholstered furniture, you need the following tool:
- special stapler designed for stuffing fabric and foam rubber;
- screwdriver;
- hammer and nail puller;
- a set of screwdrivers and chisels;
- nippers and scissors;
- marking tools (ruler, tape measure and awl).
In addition, you will need a specially equipped workplace (for cutting upholstery fabrics) and a sewing machine.
In the presence of all the above conditions and tools, you can safely proceed to the hauling of the prepared furniture elements. When selecting an upholstery material, one usually proceeds from the following performance characteristics:
- wear resistance;
- resistance to light exposure;
- ability to repel water and dirt;
- design characteristics.
In the course of deciding how to upholster furniture, such common upholstery materials are very often used, such as courtesan, jacquard, flock, tapestry and velor in our time. Fabric blanks used to renew the upholstery are usually cut to the pattern of the old upholstery material.
The final stage

When cutting a new upholstery blank, you should carefully ensure that the individual fragments of the facing fabric match in the pattern, and also ensure that the front and back sides are not confused during the upholstery process.
After the newly wrapped elements of your structure are ready for assembly, you should install the previously removed locking mechanism on it. For a more reliable fastening of the mechanism itself on the base (frame), you can use bolts of a larger diameter, for which you should first drill the holes for them a little.
At the final stage of the assembly of the structure, the back and seat are first installed, and only then the sidewalls are fixed. After the completion of assembly work, it is necessary to check the entire structure for the ease and convenience of its folding and unfolding, if any.
www.stroitelstvosovety.ru
DIY furniture upholstery: the subtleties of the process
Looking at the rounded shapes of an expensive furniture set in the showroom of a furniture store, you just want to add volume to your old sofa or armchair. Do-it-yourself furniture upholstery, as well as countertop repair, is not such a difficult process and any Real Man can do it.

To work, in addition to desire and direct hands, you will need the following tools:
- Set of wrenches.
- Furniture stapler and staples.
- Hammer.
- Scissors.
- Screwdrivers.
- Pliers or pliers.
The first step is to determine the degree of wear of the fabric (leather), which upholstered your upholstered furniture, and decide whether to replace it. If you decide to completely update the appearance of the furniture and, in addition, make it softer, then you will have to go to fabric stores and buy tapestry, velor, jacquard, chinilla, flock or courtesan - these are upholstery fabrics.
To add volume, you will need foam rubber or latex, possibly batting or non-woven fabric. In addition to upholstery fabric, you need to purchase linen or rough cotton fabric, canvas. They are needed for the initial tightening of the packing and protecting it from dust and crushing.
Before buying all of the above, first disassemble, for example, a chair. As a rule, all its parts (armrests, backrest, seat) are connected with long screws or pins. Unscrew all the nuts and disassemble the chair into its component parts.
Then, with a flat screwdriver, pry the staples holding the old fabric and remove them with pliers. Do not discard the old upholstery right away - it will still be useful as a template for cutting out new upholstery material. Then remove the lining and padding in the same way.

Earlier, in Soviet times, furniture makers used latex mats. Modern foam rubber cannot be compared with them - it crumples much faster, loses its original shape and begins to crumble. If you are the lucky owner of a latex sofa, ottoman, armchairs and latex is still in more or less good shape, then you better leave it. You will always have time to put the foam rubber.
Before you start upholstering furniture with your own hands, you need to calculate the required amount of new upholstery material using the old fabric. For reliability, add another ten percent, just in case. It is better to replace the upholstery on all upholstered furniture at once - it will come out faster, and you will dilute the dirt in the apartment only once, and there will be no disappointment from the lack of the very fabric in the store that you bought last time.

The assembly of the "insides" of the furniture is carried out in the reverse order. Attach latex or foam rubber first, then cover it with a lining material, nailing it with staples from the bottom. Sew the top cover according to the old pattern and fasten it with staples from the bottom too.
The stapler has an adjustment for the striking force of the striker. Adjust the staples so that the staples are fully inserted into the wood blocks of the frame, securing the fabric securely. Do not regret the staples - hammer them for reliability more often.
To add extra volume to parts of upholstered furniture (armrests, backrests), simply add another thin sheet of foam rubber. Just do not put it at the joints of the backrest, seat, armrests. Otherwise, it will either not be possible to assemble all the parts into a single whole, or with very great difficulty. And the pull-out sofa may stop folding.
After the process of upholstering furniture with your own hands is completed, you can not only admire it with your own eyes, but even sit on it with your booty. Good luck!
Advantages of self-restoration of upholstered furniture
Furniture repair (restoration) at home includes upholstery, replacement of fabric in other cases of damaged items: filler, frame base, decorative parts and mechanisms. After furniture restoration, you actually get a new piece of furniture. The plus is that it costs less than buying a new sofa, and secondly, you yourself decide what color and texture of the fabric the old sofa will be. You can also, if you wish, decorate the furniture with additional decorative elements that will overlap with the style of interior design.
In what cases the furniture cannot be restored at home:
If the furniture is antiques, it is probably best to trust the craftsmen in their craft. Experienced specialists in the repair of upholstered furniture can help to repair the sofa entirely without damaging the structure, improving the model, especially if it is made of natural solid wood and leather.
Leather furniture at home is difficult to repair, so trust the professionals;
When the furniture is badly broken, and you want to get a beautiful and high-quality picture as a result, a repairman will best cope with the structure of a broken sofa or chair. 
How to choose a fabric for upholstering furniture
Upholstery fabrics with a density level of 360 g / m2 are best suited for these purposes. You should focus on the pictograms on the seamy side:
- Armchair - means that the fabric has medium wear resistance, excellent for making upholstered furniture for the home;
- Chair - high strength fabric, which is ideal for the manufacture of furniture products intended for use in public places;
- Curtains and an armchair - the fabric has the ability to drape.
Do not forget, if you buy fabric for children's furniture, then it should be hypoallergenic, simple and easy to clean: cotton and linen types of fabric.
For a soft living room headset, choose synthetics that are easy to clean and durable. Courtesan, microfiber, faux suede, and flock are all good options.
It is better to upholster furniture with wear-resistant fabric with weaving of natural fibers. These types of fabrics include: chenille, jacquard, velor and tapestry.
To calculate how much material is needed to upholster a sofa or armchair, add the width with the length, then multiply the sum by 2. For example, a 2x1.6 m sofa requires a little more than seven running meters of material.
For clarity, we suggest that you familiarize yourself with the table of the approximate footage of fabric for upholstered furniture of different categories.
For an armchair it follows from the table you will need from 12.7 meters to 7.6 meters for a folding chair-bed, and for a pouf with an armchair you will need 8 meters of fabric. For chairs, you will have to buy from 2 to 3 meters of fabric, for a pouf from 2.2 to 5 meters. For a compact sofa, you will need from 2.7 m, and for a corner volumetric one with decorative pillows, 31 meters of upholstery fabric. 
To accurately measure the consumption of fabric, each piece of upholstered furniture should be measured separately: backrest, armrests, cushions, product surface, etc. Transfer all the data to the sheet in the form of drawings and diagrams, add three to four centimeters to the bends for the filler and seams.
Do not forget that you will also have to spend money on filler, for which you can use foam rubber with a thickness of at least four cm with a density of 30 kg / m3. Use felt to isolate the springs from the foam. The filler is changed in case of wear of the old one.
Tools for the restoration of upholstered furniture
- straight and Phillips screwdriver;
- construction stapler;
- pliers or staple remover;
- a set of wrenches from eight to nineteen millimeters;
- side cutters, nippers and scissors;
- glue gun, glue;
- screwdriver and drill;
- decorative fittings, buttons;
- strong threads for the waist of the sofa.
To cut and sew covers, prepare:
- universal sewing machine (industrial);
- tailor's scissors;
- meter;
- a dozen threads or reinforced;
- paper for patterns;
- crayons.
Step-by-step instructions for hauling a furniture product
- disassembly, which means removing parts separately (armrests, seat, cushions, backs);
- elimination of worn out fabric;
- replacement of defective pieces of furniture;
- sewing covers and fixing new upholstery;
- the final stage is the assembly of the structure.
The simplest claws - quick and easy
In the house where the cat appeared, the scratching post for her becomes almost a necessity for the owners, if they do not want to subsequently admire the spoiled things. Because in her absence, the cat will sharpen its claws on anything, most often on furniture. And if you get used to something, then it will be quite problematic to wean her.
If a cat suddenly appeared in the house, or there is no time to create a stationary sharpener for claws, then the simplest methods of making them are suitable for this case. A piece of soft wood log with peeled bark, 70-100 cm long, can act as the simplest scratching post. The scratching post made of wood is very strong, durable and does not require cleaning. You can cut the log in half along the grain and attach it to the wall.
See also: How to make a do-it-yourself cat bed?
A do-it-yourself cat scratching post made of packaging cardboard is made instantly. To do this, it is enough to tightly roll the packing cardboard into a roll and tie it tightly in several places with twine. The height of the roll should be approximately equal to the length of the cat with outstretched legs, and the width of the bundle should be slightly less than the thickness of the cat. With a high degree of probability, the cat will show interest in the process and begin to scratch the cardboard without waiting for the end of production. As a result, the furniture in the house will be safe and sound.
If the cat did not show interest in the process, then you need to play with this roll at the end of production. This should be done when the cat wants to play, and not eat or sleep. In no case should you wake up a sleeping cat and try to play with it with such a roll. This is often provoked by children who are impatient to offer their pet a new game. Therefore, children need to be explained in advance that a sleepy animal can be scared with such a large object, and after that it will bypass the cardboard roll.
If it didn't work out, then you need to slightly moisten the tip of your finger with valerian tincture and touch it to the roll, or rub the cardboard a little with catnip. An old rug or carpet with a fabric backing can be used to make an excellent claw in a matter of minutes. To do this, you need to roll the carpet into a roll with the wrong side out and tie it with twine in several places. Cats love this claw-rail regardless of its size and get used to it instantly - just show it once. It serves for a long time and is suitable even for large active cats.
A wonderful do-it-yourself cat scratching post is easily made from an ordinary bag, sewn from natural material. In the bag you need to put an old unnecessary thing made of natural fabric, twisted into a tube, or a strip of cardboard 7-10 cm wide. And then roll the bag tightly. Secure the edge of the bundle with twine, threading its pieces into the burlap and tying them in a knot. The distances between the threads of the burlap are large, and it will not be difficult to thread the twine through them. For convenience, you can use a crochet hook, if you have one.
A voluminous burlap roll, inside which there is a rolled item, can be stylized as candy by tying it with twine at a short distance from the edges. You can also stylize it as a sausage by pulling it with a rope through equal distances along its entire length, as the sausages are tied up. On a flat claw frame, you can draw a fish or a cat's face with a marker or felt-tip pens, and it will look much more interesting. And a small kitten can use such burlap scratching posts for a long time.

Floor scratching posts
Floor scratching posts are different - flat, posts, combined with a stove bench or a house. They take up a lot of space in the house, but in some cases they are irreplaceable. Flat and heavy floorboards will help out when the wall material does not allow you to attach wall ones to them. And you do not want to constantly stumble over light rags for cats made of cardboard or fabric, which the cat drags around the apartment. The floor claw board, located under the table, will not interfere with anyone. The columns will be very good for an active and young cat if he has nowhere to climb in the apartment, and there is no way to go outside. Complex complexes with houses and beds will be especially useful where there are several cats, and kittens are often born. All animals will have a place to frolic, and they will not constantly get underfoot, scratch and spoil furniture.
Flat floor scratching posts
Making a flat floor cat scratcher is very easy. To do this, you need to take a piece of wooden board, chipboard or plywood 40-50 cm wide and 70-100 cm long as a basis. Part of the old cabinet is perfect for this. The backing can be wrapped on both sides with a fabric backing carpet with the wrong side out. An old wool rug is perfect for this.
Sofa- the main element in the living room, which emphasizes its interior, which means that its appearance should always be attractive. Shabby upholstery will not add chic to the room. Unfortunately, no one is immune from the appearance of characteristic shortcomings, especially given the significant and regular loads that this piece of furniture experiences. In this case, wear occurs naturally. But it also happens that pets irrevocably spoil the upholstery. In both cases, replacement is unavoidable. It often happens that the cost of hauling furniture is almost equal to buying a new one. To help you save your family budget, in this article we will provide useful tips, how to do it yourself on a sofa.
1. Where to start?
Before taking on such a responsible business, and even without proper experience, you should sensibly assess the situation and understand whether your sofa should really be hanged. There are cases when the furniture already looks like a ruin, but it's still a pity to throw it away. But at the same time, all household members are just waiting for the moment when something will break down completely, so that there is definitely a reason to take him to hell. In such cases, even an independent restoration at a cost will reach the price tag of a new piece of furniture. Therefore, do not go to extremes. An exception is the case when the sofa is expensive as a heirloom or antiques. There are a few more situations where should refrain from a handwritten replacement, for example:

If, nevertheless, an unambiguous decision is made to act, it will be necessary to go through all the laborious restoration processes, namely:
- Dismantling an old piece of furniture into separate elements;
- Complete removal of worn-out upholstery, and sometimes;
- Thorough inspection of the frame, spring block and other parts;
- Choosing a new upholstery material;
- Upholstery cutting;
- Fastening fabric to individual pieces of furniture;
- Reassembly of the structure.
Let's consider in more detail taking into account key tips from manufacturers of cabinet furniture and specialists in restoration and hauling. 
2. Stage I - dismantling the old sofa
If your sofa is of a standard configuration, the process will not be difficult and will take an hour or more. For everything to be fast and organized, first of all, you need to prepare everything required tools:
- You definitely can't do without a set;
- A set of wrenches for nuts or bolts;
- For lack of keys, pliers will do.
Dismantling must begin with those elements whose fasteners are in plain sight. Usually these are the sides of the sofa, after unscrewing which, nuts are found that secure the lifting mechanism. After removing the mechanism, you can detach the back and seat. If the sofa has legs, you can start disassembling from them. It is very important at this stage to keep all fasteners intact. If in some places the parts are interconnected with the help of grooves and protrusions, you should not make sharp jerks so as not to break them.
Necessarily memorize the sequence their actions. After all, you have to assemble furniture according to the reverse scheme. It is important to remember which of the fasteners connected this or that part of the sofa. Otherwise, at the end, it may turn out that this bolt does not fit in length, and the required one is already hidden somewhere under the sidewalls. We'll have to disassemble everything again.

3. Stage II - remove the old upholstery
When the sofa appears in front of you in the form of separate spare parts, you must carefully remove everything that is old and has lost its visual appeal and functionality. Be prepared for the fact that you will have to get rid of more than one hundred staples from a furniture stapler. This process can become very painstaking and annoying if you do not prepare the entire required tool:
- First of all, you will need to pry the bracket with something; a thin flat screwdriver is suitable for this;
- Now it must be removed; pliers or round-nose pliers will do for this;
- A clerical knife may come in handy.
The work will progress much faster if on each part you first pry in all the brackets and then remove them. There will be no time wasted on changing the working tool. In order not to find staples later in the most unexpected corners of the apartment and not to get injured, immediately prepare a garbage bag.
When removing fasteners, be careful not to cut the fabric itself. At the stage when it is necessary to cut new upholstery, it will be possible to use the old fragments as patterns. Under the cloth you will find filler. It can be foam rubber and other materials. In older models, filler often fills the space between the springs. You need to carefully pull it out too.
Starting this stage, after you have prepared the necessary tools, we recommend that you cover the area of the floor on which you will work with oilcloth. The old filler can simply crumble in your hands, turn into dust, which will quickly spread throughout the apartment. There will be a lot of garbage. 
4. Stage III - visual inspection and identification of problem areas inside the structure
There is no point in wasting time and effort replacing the upholstery if the inside of the sofa is damaged. Beautiful fabric will not hide the pits that form from the fact that the filler loses its density. It will not hide sagging structural elements, which are the result of a stretched spring block. For this, it is necessary to completely clear the frame of all unnecessary - in order to find and eliminate malfunctions. Under the filler you will find springs or mesh or straps. All these components, including the joints of the wooden frame itself, must be carefully examined. If springs stretched out, straps burst and broke, and metal or nylon stretch marks no longer fulfill their functions, all this must be replaced with new parts. Very often the springs burst in the middle of the seat.  If you find cracked wooden crossbars, they also need to be replaced without fail. To do this, choose well-dried wooden beams without knots and cracks. The presence of such defects will serve as stress concentrators, and the crossbar will burst again under heavy load. Raw wood, gradually drying out under the influence of the temperature in the apartment, will deform, which can cause a skew of the entire frame.
Masters advise impregnate the joints of new and old beams with PVA glue before reassembling. In older models, the frame has three fiberboard jumpers, one in the middle and two on the sides. Very often they also burst after many years of operation. It is useless to repair such parts. Better to do a complete replacement. You can attach the lintels to the frame using a small, faster way - use a pneumatic stapler.
Concerning filler. In 95% of cases, it must be thrown away. Instead of worn-out, you need to purchase a medium or high degree of rigidity with high density indicators. Its height should be at least 45-50 mm, and better at all - 60 mm. This not only makes the seat more elastic and gives it an attractive shape, but also protects the internal parts from damage. To ensure a longer service life of the filler itself, it is recommended to wrap it with several layers of padding polyester. If you need to change the filling in the back, you can use foam rubber of a lower degree of rigidity. This will make your stay more comfortable.
Very often he blabs himself lifting mechanism, uncharacteristic backlashes appear or springs completely fly off. If the problem persists by replacing the screw or spring with a stiffer one, buy a new lock.
As you can see, self-stretching of a sofa is not only about replacing the upper upholstery. This is the replacement of all structural elements that have lost their original appearance. Only this complex work will lead to the desired result and give a second life to old furniture. Of course, if your sofa was just spoiled by pets, or you decide to fit furniture into a new interior by changing its colors, then you may be lucky enough to avoid all this. 
5. Stage IV - choosing a new upholstery
It's time to start the most creative stage of our work - to choose a new, beautiful upholstery. First you need to decide on the necessary the amount of material. It will be very easy to do this if you measure all parts of the old fabric and add a margin of 0.5 meters to the total. Firstly, in the process of cutting, you can make a mistake, and secondly, since you are doing this for the first time, for convenience, you need to leave more space for turns. For what note when choosing a new upholstery fabric:

With all of these points in mind, the choice can be quite tricky. Below we will provide a short list most popular upholstery materials and their performance characteristics so you can quickly find your bearings.
- Microfiber- a kind of synthetic fabric that is highly resistant to various dirt, high humidity and temperature changes, at an affordable cost. Hence, it is very easy to care for. Good quality microfiber is breathable and hypoallergenic. In support of this, it is necessary to ask the seller to present the appropriate quality certificate. This material would be perfect for. The only disadvantage is flammability. To avoid trouble, simply place the furniture away from the gas stove. The color palette is quite diverse, there are both monochromatic and colorful varieties. There will be plenty to choose from.
- Fuzzy fabrics such as velor or plush are very gentle and delicate. They quickly lose their color under the influence of ultraviolet radiation, have a low degree of abrasion resistance, which makes them unsuitable for the upholstery of a sofa that will be used on a daily basis. An exception is the material called flock with a diagonal weave of fibers, which in appearance resembles velvet. It is slightly less durable than microfiber, but it is more attractive in appearance and is suitable for upholstery of a sofa in the living room. The advantage of the flock is its resistance to food and other contaminants. Modern flock has a special silicone coating, and its surface is very soft and pleasant to the touch.
- An elegant but expensive material is jacquard. It is distinguished by high performance characteristics and a rich, varied palette of colors and textures. Its surface practically does not wear out and does not fade. The fabric itself is very dense and durable. However, if you have pets or children, then you should think about it, because it is very difficult to care for a jacquard. It does not tolerate contact with a damp cloth and is more suitable for strict ones, and its surface is cold to the touch.

- Tapestry- a type of fabric with a high degree of wear resistance and density. It is able to keep its shape well. Retains stability and color saturation for a long time, regardless of the influence of external factors. Tapestry has anti-static properties. The color palette is also very varied. All this makes this material very popular among furniture manufacturers.
- Chenille- a kind of natural fabric with the addition of synthetic and artificial fibers, it is considered an ideal option for upholstery of sofas. Its peculiarity is a very high strength, which is achieved by a special production method and the addition of a small amount of synthetic fibers. This fabric is very warm and pleasant to the touch. Sitting on such a surface will be very comfortable. And any contamination can be easily removed from the surface with an alcohol or vinegar solution.

6. Stage V - making a pattern
After the suitable fabric has been selected, you need to cut it into pieces. To simplify the process use old upholstery, which must first be shaken out well or vacuumed.

7. Stage VI - fix the new fabric
Finally, everything is ready, beautiful new covers have already been sewn, and it's time to fix them on the parts of the sofa. You must understand what exactly from this stage the final result depends. Whether the surface of your sofa is smooth and flawless, or wrinkles and distortions form on it, it is entirely up to you. Therefore, you need to work slowly and carefully. It's better to try on all the covers first, because you still have time to work on it. You may have to sew something by hand, cut somewhere, there is nothing to worry about. Better to discover it now. It is better if the cover fits tightly than loose. In the latter version, folds may form when fastened with staples. So, subsequence your actions:

This is such a difficult and painstaking process of pulling the sofa with your own hands. But if you follow all the steps thoughtfully and measuredly, then the result will exceed all your expectations. And your new "old" sofa will delight you for a few more years.
8. Nuances of the process of working with genuine leather
Genuine leather is a very pleasant and pliable material, it is a pleasure to work with it, you just need to observe small recommendations.

In addition to these points, the technology of waistbanding the sofa with leather is similar to the steps described above. Of course, such a sofa will look more respectable, and it will be easier to care for than textiles.