Important
It is equally important to consider the number of storeys in the apartment. I'll explain why: if you live on the first floor, then remember, there is an unheated basement downstairs. And this means high humidity and cold. If you live on the second floor or higher, then there will be a heated and dry residential apartment below you.
When choosing a floor covering, I also recommend considering the height of the room. Some technologies are simply unrealistic to introduce into an apartment, for example, wooden floors on logs, if the ceiling height is 220 cm. Another point is the floor difference between rooms. We level the floors at all our facilities.

If your apartment has a wooden floor, then I do not recommend pouring a concrete screed. There will be a strong load on him. On the contrary, choose a coating that is lightweight, such as laminate or linoleum. Well, it is also important to pay attention to aesthetics.
From a practical point of view, I also advise you to choose the floor covering by zone. For example, tiles for the kitchen and bathroom, wood, laminate and the like can be laid in the bedroom.
Advice
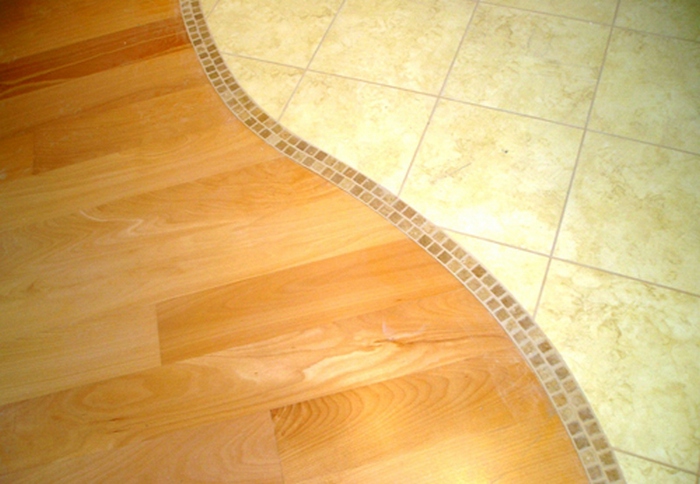
Zone the territory. Separate it with color, it's nice and comfortable.
This is what zoning floors look like:


What reason to use
A rough base in an apartment can be made from:
1. Wet screed.
2. Semi-dry screeds.
3. Dry screed.
Wet screed

· Long drying time. After pouring, it should take about 30 days or more for complete hardening.
- There is a lot of dirt in the process.
· There is a serious load per square meter, which can reach up to 70 kg / m 2.
· As moisture evaporates, shrinkage may occur.
- Serious labor is required.
- High strength.
- Relatively low cost.
· Various engineering systems can be laid in the screed.
· To achieve the required level, a thick layer can be poured without consequences.
Important
Provided that there will be at least three people pouring the screed: one on the batch, the second on the rule, the third on the tray, then on average it is possible to fill the screed per working day with an area of up to 50 m 2 with a thickness of about 50 mm. at the same time, it takes about a day to install beacons.
The work on pouring a wet screed costs about 400 rubles. per m 2.
Semi-dry screed

We use this option at all of our facilities. You can read more about the technology on our second website - http://qualityfloor.ru/
· Dependence on weather conditions. At subzero temperatures, work is prohibited.
- Difficult to implement on your own.
· Excellent quality is maintained at high speed.
· After a while, no cracks appear on the surface.
· Eliminates the possibility of water leakage into the lower room.
· Unlike a wet screed, semi-dry is 15% cheaper.
Important! One team using the traditional method of pouring a semi-dry screed is capable of pouring up to 100 m 2. If you use a mechanized method, then up to 300 m 2 in one day.
Cost of materials: cement M500 50 kg - 350 rubles, washed sand 1 m 3 - 1100 rubles. The cost of work, which includes work with a rule and a helicopter, reaches up to 150 rubles. per m 2.
Dry screed

Disadvantages:
· Hydrophilicity. Let me explain: if a pipe breaks through under a dry screed, then the screed will have to be done completely again, with preliminary dismantling work.
- Cannot be installed in shower and bathroom.
Advantages:
- Wet processes are completely absent.
- Sound insulation and thermal insulation are increasing.
- Environmental friendliness.
· Little weight. Three times lighter than wet concrete screed.
- After installation, the floors are ready for use.
Important! In one day, a team of qualified specialists is able to produce 50 m 2 of dry screed.
The cost of installing a dry screed "Knauf" per m2 ranges from 450 to 1300 rubles. The price depends on the manufacturing method and volumes. For example, a dry floor screed up to 10 m 2, which includes a dry backfill and a floor element of 1000 rubles / m 2. With a similar composition, a volume of 30 m 3 will cost you 450 rubles. I will advise you to compare the offers of several construction companies at once in order to choose the most favorable price.
Noise isolation
Styrofoam

Advantages:
- Simple installation.
- Easy to cut.
- Elastic and strong material.
- Service life up to 25 years.
- Not afraid of moisture.
- Flammable material.
· The presence of joints, which reduces the noise insulation properties.
The cost of polystyrene per m 3 with a thickness of 10 mm is 280 rubles. (I couldn't find the price for the work)
Mineral wool

In my opinion, mineral wool is one of the best building materials for providing excellent floor sound insulation. However, mineral wool should not be poured with concrete. It is only suitable for wooden floors. For example, laying between floor beams.
- The ability to absorb sound waves.
- Does not burn.
- Does not emit harmful and dangerous poisonous gases.
- The ability to cope with temperatures up to + 1000 ° C.
- Possibility of laying without a cold bridge.
- Service life up to 25 years.
- Minvata is resistant to various aggressive environments.
· Throughout the entire service life, mineral wool retains its properties.
- Water vapor permeability.
- Afraid of moisture.
· Difficulties during installation (protective clothing must be worn).
The cost of mineral wool per package differs based on its thickness. For example, a mineral wool with a thickness of 100 mm 600 × 800 mm costs 450 rubles. Minvata 600 mm thick 600 × 100 mm costs 650 rubles.
Important! The cost of installing sound insulation with mineral wool per m2 will cost 200 rubles.
Expanded clay

If a screed is poured, then in my experience and practice, expanded clay is the best solution. Its price is much lower. The price depends on the faction. It is sold in bags. For example, a fraction of 10–20 mm with a volume of 0.05 m 3 costs 85 rubles, and a fraction of up to 5 mm with a volume of 0.05 m 3 costs 140 rubles.
Important! The cost of filling expanded clay per m 2 60 rubles.
Positive sides:
- Low price.
- Natural product - environmental friendliness.
· Does not change its structure when the temperature changes.
- Various microorganisms do not start in it.
- Refractory material.
- Sound insulation is provided by the porosity of its structure.
Negative sides:
- Very brittle due to its porosity.
· Due to the low density, it is necessary to fill in a soundproofing pillow of a decent height. It is impossible to realize in apartments with small ceilings.
- The ability to absorb moisture.
Warming
As for the floor insulation in the apartment, I advise all my customers not to miss this opportunity. Especially when the apartment is on the ground floor and there is an unheated basement below you. Insulation of the floor will eliminate heat loss.
Important
If a floor heating system is laid on the floor, then floor insulation is simply necessary. There should be a reflective film on the insulation. Due to this, all the heat emitted will rise up the apartment premises.
Different materials are used for insulation.
Expanded polystyrene

Expanded polystyrene is sold in packages. Depending on the manufacturer, the price ranges from 1.1 to 4 thousand rubles. Work per m2 will cost you 150 rubles.
- Simple installation.
- Low weight.
- Environmental friendliness.
- Different microorganisms do not live in it.
- Does not allow moisture and heat to pass through.
- The service life is 50 years and more.
- Combustible.
- When the temperature reaches 90 °, it deforms.
Cork

There is a roll of cork 2 mm thick - 1200 rubles. The cork thickness of 6 mm has a price per roll - 3800 rubles. In my opinion, the use of this insulation is unjustified. There are much cheaper heaters. But in some cases, this is the only optimal solution. The price of work for installation is 320 rubles. m 2.
- Long service life.
- Environmental friendliness.
- Does not rot, does not spread mold.
- After a while, it does not lose its characteristics.
- Allows air to pass through.
- Difficult installation process.
· High price. But as for me, the quality is fully paid off by the price.
Ecowool

One of the modern solutions. In my opinion, the most effective way to insulate a wooden floor in an apartment. The cost of 1 kg is 28 rubles. Work for 1m 2 costs from 1600 rubles. (wet way). In my opinion, the perfect combination of quality at a low cost.
- Allows air to pass through.
- Low cost.
· Does not spread mold, does not rot. Insects and mice do not start in it.
- Simple installation.
- Seamless insulation.
For your information
Disadvantages: the main disadvantage is that after a while, the dry laying of ecowool becomes caked. Therefore, when insulating the floor, I recommend thoroughly tamping, on average, 1m 3 will consume 50 kg.
Water heat-insulated floor

For many customers living in an apartment, I advise you to make a warm water floor. However, it is not always possible to do it. For example, your apartment has low ceilings, and the heating cake can take at least 70 mm. It is not always possible to pour the screed onto a water-heated floor, due to the weak overlap. It is also important to consider the choice of flooring. For example, all the heat is eaten under the laminate and it will be difficult to reach a comfortable temperature.
Advice! As my practice shows, a water heat-insulated floor is ideally combined with ceramic tiles. It has a high level of thermal conductivity, which makes it possible not to retain thermal energy in the screed body.
· Lining insulation (which are, which are cheaper and better, briefly describe)
Floor materials
The modern market offers a large selection of floor finishing materials. I propose to compare the most common facing materials.
Parquet

- Ease of use.
- Durability approx. 100 years.
- Nice appearance.
- Perfectly matches any interior style.
· High price. Especially when exotic woods are used.
- It needs to be polished from time to time.
- There is a lot of noise when walking.
The cost of a piece parquet is 950 rubles / m2, and a parquet board is from 800 to 2000 rubles / m2. The work will cost 1000 rubles. per m 2.
Laminate

There are many manufacturers of laminate flooring, respectively, the cost of the laminate is different. I start from the class. For an apartment, I advise you to purchase a laminate class of at least 33. So the price per m2 is in the region from 300 to 2400 rubles / m2. The cost of installation is on average 350 rubles / m 2.
Laminate pluses:
· The packaging is convenient for transportation and hand carry.
- Simulates various building materials.
- Easy to clean.
- Wear resistance (depends on the class).
- Relatively simple and quick installation.
- Can be stacked in different rooms.
· Resistant to negative effects of UV, does not fade. Some planks are even moisture resistant.
- Does not breed mold and mildew.
Cons of laminate:
· It is impossible to restore the top layer in case of wear. Complete replacement required.
- Makes a lot of noise when walking.
- Unnatural tactile sensations.
- Rigidity.
· The presence of formaldehyde casts doubt on environmental friendliness.
· Without expansion joints, the coating will creep or puff.
Linoleum

The cost of linoleum ranges from 200 to 1.5 thousand rubles / m 2. The cost is influenced by its class, for example, commercial, household, etc. For an apartment, I recommend buying linoleum no cheaper than 500 rubles / m2. Installation cost: for glue 320 rubles / m2, without glue 250 rubles / m2.
- Relatively inexpensive flooring.
· Resistant to moisture and steam. Relevant for rooms in an apartment with high humidity, for example, a kitchen.
- Wear-resistant (depends on the class).
- Simple installation. You can use glue or not.
- Non-slip in the presence of moisture.
- Easy to clean.
· Linoleum has a specific smell. It passes after two weeks.
- Poor puncture resistance.
- A perfectly flat floor surface is required.
Wood

In my opinion, wood is the safest option when finishing the floor in an apartment. just keep in mind that it fits into lags. Therefore, the height of the ceilings should allow for such luxury. The cost of a wooden floor per m2 fluctuates based on the thickness of the board. The average price is 450 rubles / m2. Planking the board on the logs will cost 400 rubles / m 2.
- Excellent aesthetic appearance.
- Pleasant tactile sensation when walking.
· Additionally, wooden floors heat insulate the base. You can walk barefoot.
· Easy to operate. A coat of paint / varnish is applied every 5 years and the floors are as new.
· New flooring can be installed on the old wood floor.
- Easy to repair.
· Difficulties in installation. There are many nuances to consider.
- It is unrealistic to achieve perfect floor evenness.
- If the installation technology is not followed, they creak.
Tile

The cost of ceramic tiles varies based on the collection. You can find tiles for 400 rubles / m2, and there are collections for 17 thousand rubles / m2. The cost of the work is within 1000 rubles / m2.
- Hard and durable coating.
- Does not allow moisture to pass through, unless there is a flood.
- Long service life.
- Hygiene.
- Easy to clean.
- Resistant to temperature extremes.
- Resistance to aggressive chemical agents.
· High thermal conductivity. It is cold to walk on tiles without underfloor heating.
- Dangerous when exposed to moisture.
- High price.
- Installation difficulties.
Rating of floor materials
|
Floor material |
Appearance (10 points) |
Material price |
Installation cost |
Price with work |
Durability |
Term before restoration |
|
|
950 - 2000 rubles. |
|||||||
|
RUB 300 - 2400 |
|||||||
|
Linoleum |
200 - 1500 rubles. |
For glue - 320 rubles. Without glue - 250 rubles. |
|||||
|
400 - 17,000 rubles. |
Having started repairs in an apartment, one cannot help but face the question: how to make a flat floor correctly so that the price of materials does not "bite", and to do all the work yourself, without calling specialists. And it does not matter at all whether the work starts from scratch or it is an old floor that needs updating, the question is serious and it is worth considering it in detail. If only because it is not only strength, beauty that matters, but also the abrasion of the coating, sliding features, styling and so on.
What to lay?
The market offers are practically unlimited. Each user can choose a coating by price, color and their preferences. Finishing materials are divided into groups, prices and the manufacturer tries to take into account all the wishes of customers. But not every material can be used in a particular room. For example, tiles. Plain, ceramic, dense and beautiful. The decoration is ideal for the hallway and bathroom, but in the living room and bedroom it is not always appropriate. Therefore, first you should think about what and where to lay in an apartment or house. For example, pay attention to universal coatings: laminate, linoleum.
If you try hard, then you can always find an acceptable material in quality and affordable in price. And after that, start the process of renovation, restoration or complete repair of the floor with your own hands.
Stages of laying a floor with a concrete base

Even starting repairs from scratch, you must first prepare the base. Not every consumer likes concrete, especially if it is a floor in an apartment on the first floors, so the base will have to be insulated. The process is carried out, as a rule, using a log, which allows you to get a flat floor that is inexpensive.
Repair of the concrete base

Often the subfloor has chips, dents, or gouges that can be removed by hand. The simplest option is a screed. The implementation does not take much time or effort, and also does not require knowledge. And even if the user starts work for the first time, it is enough to buy a ready-made mixture and do everything as it is written on the package. Dry powder is sold in packages that are clearly calculated for the area, so you will have to find out this point before work. Now cover the base with waterproofing and start renovating the floors with your own hands:
- Lay out roll materials with an overlap with an edge overlap of 10-15 cm;
- Leave an allowance for wall panels also 10-15 cm;
- Secure the edges of the strips with construction tape along the entire butt border;
- Pour the finished screed.
To make an even floor in an apartment correctly, watch a video that will help you calculate the time spent on repairs. An important point: if the area of the apartment is large, it is worth dividing the space into sections and filling the base gradually. The use of metal guides in this case is necessary so that the solution does not overflow. After pouring, they are removed, the joints are sealed and transferred to another area, you can use metal elements as many times as you like.
In order for the floors in the apartment, made by hand, to please with strength and warmth, you will have to choose a heat-insulating substrate. In this case, the floor will always remain dry, and the final coating, such as parquet, will not creak after the first year of operation. Manufacturers offer a wide range of materials, differing in structure, appearance and characteristics. For example, expanded clay is a dry filler, the price of which is very affordable. Possessing high quality and practical indicators, expanded clay is easy to fit. It is enough to sprinkle the dry material over the base, align and fill with another layer of screed. It is a good idea to do hardening with a reinforcing mesh. Lay it on top of the insulation, thereby securing the screed and, at the same time, not limiting its "flexibility".
As for roll or tile insulating materials, after installation it is worth covering them with waterproofing in the form of cellophane, for example. Otherwise, the liquid (condensate), falling on them, will destroy the quality properties and the insulation will become useless.
Watch again the video on how to make floors in an apartment with your own hands and you will definitely get a flat floor that will last for more than a dozen years.
How to make a floor by logs
It is even easier to make floors in an apartment or house with your own hands along the logs, but only if the height of the ceilings allows. Many experts recommend this particular option, emphasizing the optimality for several reasons:
- This is a dry method that does not require a screed;
- The increased speed of the entire procedure allows you to move on to final work without much time consuming.
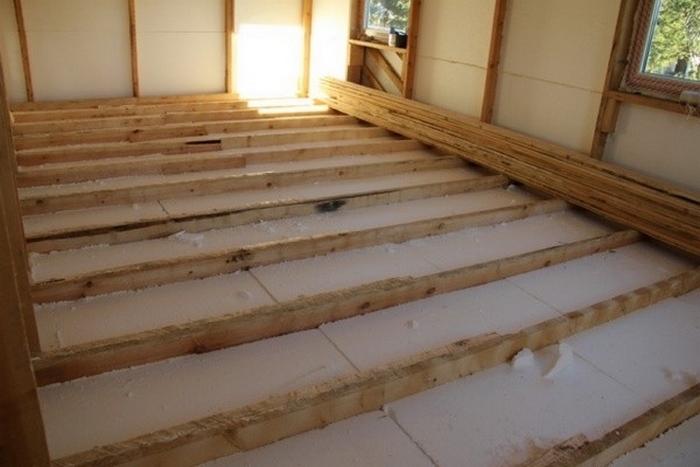
If done correctly, a new flat floor will be ready in just a matter of days. But first, they putty, gaps, chips and so on are poured. Then waterproofing and installation of the lag. For this, a bar with a height of up to 70 mm is used, set horizontally. It will facilitate the process of setting the two extreme lags with stretched transverse threads - it is easier to align the intermediate elements along them, without getting lost in height and evenness.
After preparing the lathing, between the lags, lay out a layer of insulation and waterproofing, attached directly to the bars, and any material of your choice is placed on top of the structure. For example, if you want a wooden floor in an apartment, take boards, but under heated floors you need to make a solid foundation:
- Plywood sheets;
- Boards.
For sheets and slabs, the crate is adjusted so that each element covers three bars: one in the middle, two on the edge. The support should be strong, but the tiled material should be laid out, slightly shifting. This improves the distribution of the load, it will evenly fall on the entire area of the base. What and how much material to take will have to be decided independently, calculating the covered area. It is convenient to make floors on logs in a new apartment, starting from scratch and in a room where the floors are pretty worn out. The option is extremely economical, especially with the use of expanded clay as a heat insulator, while the materials are lightweight, which means there will be no extra weight on the floor.
But there are a number of points that must be fulfilled:
- The tree is covered with an antiseptic;
- Plywood from the top side is coated with hot linseed oil to keep the base always dry;
- Fastening with self-tapping screws along the logs will provide strength;
- The joints are sealed with dry construction tape, puttyed.
Important! If you want to make a solid floor, you can lay the plywood in 2 layers, but in this case self-tapping screws and glue are used for the top sheets. Now the coating is ready for final finishing and you can lay parquet, laminate, carpet or tiles. To make the process even clearer, watch the video.
Alternative options
You can make the floors in the house with your own hands in another way. For example, by means of a dry screed. It is enough to lay gypsum-fiber sheets with density and strength. But here you need a flat surface and laying in at least 2 layers. How many elements to buy, the size of the area of the room will tell. The convenience of using this material is that the connecting element of the tiles is a lock, you do not have to buy it or think about how to fix the fragments on the base.
Important! GVL boards are laid both on concrete and on logs. Watch a video that shows the main points of the layout and fastening of GVL sheets, perhaps this option for renovating or repairing floors with your own hands will be the most acceptable.
Which option to choose is up to the owner. But remember that even the most complex processes do not always require a lot of knowledge and experience. A few tips, patience and a complete calculation: how much material to take, how to fix it, what to lay will help to cope even in a difficult situation when you need to make the floors in the house with your own hands. And thanks to new technologies, manufacturers offer almost completely finished materials, the process of working with which is extremely easy.
From the author: hello dear reader. You've probably heard a lot of stinging anecdotes about the strained relationship between son-in-law and mother-in-law. So, this is not about me! My mother-in-law loves and respects me very much, and even entrusted me with a major overhaul of her apartment. True, at my expense. So, today I want to tell you about how to repair the floor in an apartment with your own hands. This is how you can save both on materials and on the involvement of specialists. I guarantee that this knowledge will be useful to you more than once in your life.
In old houses, as in my case, the floors are made according to the standard scheme: floor slabs are covered with expanded clay, and on top they are filled with a layer on which thermal insulation is laid. In many old houses, as a rule, it has fallen into disrepair long ago or is completely absent. After thermal insulation, it goes, on which the floor covering is laid.
If this floor is laid according to all the rules, then it can serve for a very long time. If the floorboards are deformed from old age, and gaps have appeared between them, this is a clear sign that the floors should be changed. You can't just replace the floor covering here. A worn wood floor will quickly ruin your new linoleum or laminate flooring. To prevent this, you will have to carry out a complete renovation of the old floor using one of the following methods:
- replacement and repair;
Method 1. Repairing an old wooden floor

This option is suitable for you if you only need to replace worn out floorboards and strengthen loose ones. In my case, it also turned out to be acceptable. Here is a diagram of the overhaul of an old wooden flooring:
- clean the floorboards from old paint or varnish. For this, it is best to use a grinder;
- replace old, worn-out boards with more reliable ones;
- check the way of fixing the boards to the logs. In most cases, they are nailed, but for a more secure fixation, use self-tapping screws;
- putty on wood to cover up cracks, pits and grooves and rub these places with sandpaper;
- remove small debris with a vacuum cleaner and then a damp cloth;
- apply paint / varnish to the repaired floor;
- lay the floor covering.
If most of the floorboards have become unusable, a smart solution would be to replace the entire floor. Modern technologies make it possible to create a truly reliable, environmentally friendly and durable structure.
Thanks to the tongue, the boards are tightly connected to each other. You can even reinforce the joint with glue. After installation, you just have to choose and lay the floor. We will talk about the advantages and disadvantages of each type of flooring later. Now let's consider a method of pouring a concrete floor.
Method 2. Pouring a concrete floor
If your old wood floor is in critical condition, simple plank replacements and putty are indispensable. In this case, you can fill the concrete screed yourself. The most important thing in this option is to achieve a perfectly flat surface, because irregularities can lead to undesirable consequences, for example, to deformation and damage to the floor covering.

Here is a diagram of the preparatory work:
- dismantle the old wooden floor. Remove floorboards and joists completely;
- remove debris from the underground space by cleaning the old screed or floor;
- lay the waterproofing. For this, plastic wrap is usually used;
- glue the damper tape along the walls. Sometimes they do without it, but this reduces the reliability and durability of the concrete floor;
- since you repair the concrete pavement yourself, be sure to use guide beacons;
- fill the base with expanded clay. This material is relatively light in weight and has good thermal insulation properties. In principle, you can do without it, but with large differences in height or when using gypsum fiber sheets, expanded clay is necessary;
- perform reinforcement. As a rule, reinforcement is used when pouring the foundation and the floors themselves. But for strengthening the concrete floor, reinforcement will certainly not be superfluous.
There are several ways to fill the floor: 
- pouring a cement-sand mixture. The pouring process itself is quite hard work, and the solution will harden within a month. But on the other hand, you will be pleased with the low price of the issue. In addition, this method has been used in construction for a very long time, therefore it is considered reliable and proven;
- filling with dry cement mixture. If you choose this method, then the work will not be so hard. And the hardening process will not be so long - up to 10 days. The process of leveling the surface with this filling method is much easier. But be prepared for the price of the issue to increase proportionally;
- laying gypsum fiber sheets or gypsum fiber board. In construction, the name "dry screed" is also found. When using GVL, an almost perfect result awaits you with minimal labor costs. The only drawback of this option is the high price, but it is fully justified.
Now about the flooring
Hardware stores offer us a wide selection of floor coverings that differ in their characteristics and prices. This is parquet, and laminate, and linoleum, and carpet, and the newfangled Art Vinyl covering (art vinyl), and various types of floor tiles. Let's talk about the properties of each of the listed floor coverings:

- parquet board. The covering is made of natural wood, so your floor will be aesthetically pleasing and environmentally friendly. If necessary, the parquet board can be easily dismantled and then re-laid. In order for the parquet to retain its original appearance, it requires special care. In addition, it is sensitive to changes in temperature and humidity. Lay the parquet board in dry, ventilated rooms. Therefore, for a kitchen, hallway or bathroom, this is not the best solution;
- laminate. Unlike parquet, a laminate board consists of four layers: stabilizing, bearing (the lock is built into it), decorative (wood-like pattern), upper protective. Laminate flooring is more unpretentious and does not require special care, like parquet, but at the same time it is afraid of moisture. For home use, the best solution would be class 31-32 laminate. Suitable for laying in almost any room, except for the bathroom;
- linoleum. Universal floor covering. Can be on a foam or felt base. The foam base is not sensitive to moisture and is suitable for any room. Felt provides additional heat and sound insulation, but is not suitable for rooms with high humidity. But for a living room or bedroom, linoleum on a felt base will be the best solution. For home use, household and semi-commercial linoleum is suitable. For rooms with low traffic, for example, a bedroom, 0.1-0.2 mm of a protective layer will be enough. For the living room, a protective layer of 0.3 mm is suitable, and for the hallway and kitchen - from 0.4 to 0.6. The higher the thickness of the protective layer, the more durable the floor covering. For a more reliable fixation, linoleum should be glued to the surface;
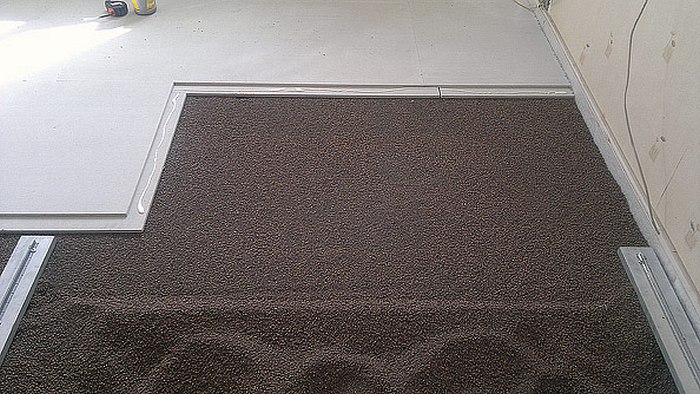
- carpet. Consists of four layers: secondary backing, anchoring layer, primary backing, pile. Has good heat and sound insulation. Sensitive to moisture, therefore it is suitable for laying only in dry rooms with low traffic. In the kitchen and hallway, the carpet will quickly wear out and lose its aesthetic properties;
- art vinyl. A new-fashioned floor covering that allows you to implement almost any design solution. Externally, art vinyl can be styled like wood, stone or other natural material. According to the manufacturers, it combines the aesthetic qualities of parquet, the practicality of linoleum (not afraid of moisture) and the modularity of floor tiles. For installation, simply glue the art vinyl tiles to a clean, even and dry surface. You will have to pay extra for such versatility - the cost of the material exceeds the price of linoleum and laminate;
- floor tiles. Ideal for rooms with high humidity, easy to clean, so it will be the best solution for a bathroom or kitchen.

Tsugunov Anton Valerievich
Reading time: 5 minutes
The surface of the floor is constantly exposed to significant loads and wears out over time. This manifests itself in the form of external defects, squeak and increased deflection of elements. If you decide that it's time to start putting the flooring in order, we suggest that you find out how to repair the floor in an apartment with your own hands in stages, and get acquainted with the important nuances that you need to remember in the process.
Assessment of the condition of the floor
The scope and technology of renovation work will depend on the scale of floor defects in your home.
Repair of a wooden floor
Floor repair options in an apartment may be different. In some cases, it will be enough to replace only the most worn-out floorboards, fix loose elements, close up the cracks and perform scraping. It may be necessary to replace rotten logs, repair the concrete base.
Redecorating
This type of repair involves the following sequence of actions:
- The old flooring is removed from the floorboards. The modern method is scraping or grinding with a machine. In this case, the heads of the nails are preliminarily deepened by 5 mm.
- Dry and rotten boards are replaced with new ones. During the replacement process, it does not hurt to look into the underground and check the status of the lag.
- Poorly fixed floorboards are additionally attached to the joists with self-tapping screws.
- Narrow gaps are sealed with wood putty, and large ones are closed with wedge-shaped glazing beads on glue or putty. The protrusions are removed with a plane, and the filled areas are processed with a grinder.
- Debris and dust are removed and the renovated floor can be coated (paint, varnish) or linoleum, laminate, etc.
Redecorating a floor with a screed base consists of a simple replacement of the topcoat.
You can watch the repair process in the video, and the types of flooring - in numerous photos.
Complete floor replacement
Overhaul of the floor in a high-rise building includes the following stages:
- dismantling the old coating and lag or screed;
- elimination of base defects;
- installation of new logs, insulation and sound insulation or installation of a new screed;
- laying of flooring and finishing floor coverings.
Dismantling
For construction on logs:
- The skirting boards are removed, access to the plank covering is freed.
- Boards may still come in handy, so remove them carefully. Each floorboard is gently lifted from the wall, after which the nails are pulled out with a nailer. It is especially difficult to disassemble grooved boards, as there is a risk of breaking the connection.
- The panel house has reinforced concrete floors to which the joists are attached. They must be dismantled carefully so that you do not have to do unnecessary work to seal the holes later.
If it turned out that the state of the lag allows you to use them further, you just need to change the flooring. For it, you can use boards, sheets of plywood or OSB.
To cover on a screed:
- The floor covering is removed.
- The condition of the screed is checked. If the defects are minor, it can be repaired with fresh cement slurry or concrete repair compound (depending on the composition of the screed).
- If the screed is badly cracked, has become loose, peels off from the base, it should be removed with a punch.
When removing the screed, be careful not to damage the concrete floor.
Sub-floor repair
Cement mortar or a special thixotropic concrete repair mortar are used to seal up defects in the concrete floor. The entire surface is treated with a deep penetration primer.
Now you need to decide on the design of the floor. You can choose one of the following options:
- "Wet" screed using a cement-sand mixture. An inexpensive way to prepare the base, its disadvantage is prolonged drying for 1–1.5 months.
- using special leveling compounds. Allows you to get a perfect surface, dries in just a few days. The cost of self-leveling mixtures is quite high, so it is advisable to use this method for a base with small differences.
- "Dry" screed using expanded clay backfill and GVL.
- Lag system. The method is good in that heat and sound insulation can be laid between the lags. At the same time, the logs give the floor additional strength, and the presence of an air gap provides insulation and ventilation.
Floor device on logs
If you decide to mount your new one, the order of work will be as follows.
- The lags are laid on the base to the width of the insulation roll. They are attached to the base or installed on screw metal pins, leveling them evenly horizontally with a level. They should stand at a distance of 40-50 cm from each other.
- Insulation is laid. It should be placed between the lags around the entire perimeter of the room. A vapor barrier is laid on top of the insulation.
- It is important to properly lay the boards or plywood sheets so that they fit snugly against each other, and there is a 5 mm gap between them and the walls. The sheets should lie on at least three supports, and the joints should be in the middle of the lag. They are laid in a checkerboard pattern, which makes the floor more rigid.
- Small gaps between the boards are sealed with putty, after which the surface must be looped.
- The floor covering is laid on the repaired floor, skirting boards are attached.

Depending on what material was used to create the floor, the repair option will also change. Consider the most popular and common types of coatings:
- Self-leveling floors... Many people choose this design due to its affordable price and long-term use. Working with such a surface will require certain skills and knowledge; it should only be carried out by highly qualified specialists.
- Wooden floor... It depends on the age of the material, as well as the quality of its installation. Transformation is possible in two ways - when laying plywood on the plane itself, and after using laminate / linoleum, or by replacing the boards themselves.
- Working with concrete floors... Most often carried out in the bathroom. Such a coating will hide all the irregularities on the surface. With age, cracks appear on it, which will need to be repaired. The choice of the materials used in the repair depends on what kind of result you want to get in the end.
- Repair of floors in "stalinkas" or "Khrushchevs"... In this case, noticeable changes occur, and the annoying creaky boards are replaced with new material. The process is quite complicated and time-consuming; real specialists in their field must participate in it. If you need to carry out repairs in the "Khrushchev", the best option is to lay the floor on logs.