If you decide to build a frame bathhouse on your own site, pay attention to the basic principles frame construction. Small building wooden bath much like construction frame house, however, due to its functional focus, it also has a number of differences. You can build a bathhouse with your own hands, but if you have never done this before, you will need the help of a specialist in installing equipment, laying communications, as well as theoretical advice. Do not forget that there will be a heating boiler in the frame bath, so any mistake can cause a fire hazard.
Which foundation is better to choose?
The choice of foundation for a bathhouse depends on two main factors:
- soil feature
- weight of the future structure
The heavier your building, the more reliable the foundation should be. For big ones two-story baths it is necessary to use a strip foundation. Light foundations are only suitable for coarse sandy soils. Loose or clayey soils require more strong foundation, construction of an additional cushion and sand layer.
The main types of foundation (read about their features) for frame bath:
- tape
- columnar
- pile screw
A strip foundation is considered the best option for a bathhouse, since it is stronger than a pile foundation and less expensive than a monolithic one. You can do it yourself, saving a significant amount of money.
Before pouring strip foundation, you need to do some preparatory work. It is necessary to level the area of land where the foundation will be and remove the fertile layer of soil. Using pegs and rope, mark the future foundation. We dig a trench at least 30 cm thick. We install formwork, which you can knock down yourself from a board. Fill with cement mixture.
The most commonly used composition is: cement, coarse sand, gravel. All materials are mixed in a ratio of 1:2:2.5.
After the pouring has been completed, the foundation must be given time to harden and shrink. If rain is expected in the coming days, it is better to cover the foundation with film. This will prevent the cement from washing away. You cannot install the frame right away, otherwise the foundation will shrink and the frame will become distorted. Wait at least a month, preferably three if you have clay or fine sandy soil mixtures.
After the foundation has stood, it is necessary to check its geometry. The easiest way is to use a construction laser. However, you can use it in the evening, when it is slightly dark. Laser ray will very accurately determine the uneven height of the foundation. If the distortion is more than 1 cm, we raise the lower parts using a thicker cement mixture. It is necessary to achieve an equally flat surface. Also, pay attention to the evenness of the corners of your foundation.
Columnar foundation consists of pillars standing at the same distance from each other. This foundation is also suitable for building a frame bathhouse, and it is cheaper. Foundation pillars can be made from blocks, bricks, and, using special formwork, from a cement mixture, exactly the same as for a strip foundation.
Pile foundation in Lately Most often used by companies that build turnkey baths. The point is that this is the most quick way make the foundation for future construction. If we're talking about about a mini bath, a pile foundation can be installed in a few hours.

Frame for you
So, you have built the foundation and are starting to build the frame. If it is desirable to use coniferous wood for the house, then for the bathhouse you will also need deciduous wood. The fact is that coniferous wood When heated, it will release resins, so it is not suitable for a steam room. However, the locker room or terrace may well be made of pine needles.

We begin constructing the frame by installing the strapping. The strapping is made of timber, which is placed on anchor bolts pre-recessed into the foundation, or fixed on piles. The harness takes the load from the entire frame and roof, transferring it evenly to the foundation.
How to make a harness correctly, read.
After the formwork is completed, we install the frame. First, the corner posts are installed, and then the wall frame is laid out from them. Read more about how to make the walls of a frame house.
Pay special attention to the quality of the wood, its drying and processing. The strength of the wood that was used in the frame determines the reliability of the future bathhouse. Any curvature will cause a defect when finishing your building. If we are talking about a mini-building, which in itself is not expensive, do not skimp on the quality of materials. You won’t save much, and the longevity of the bath will be sharply reduced.
The roof is the head of the entire building
The structure of the roof depends primarily on your financial opportunity. If we are talking about a mini bathhouse, the roof will not be subject to heavy load, so the slope can be made almost flat. However, do not underestimate the importance of roof quality. The fact is that quite difficult conditions are created inside the bathhouse, under which large temperature jumps, heating to almost 100 degrees, and high humidity are observed. All this means that the roof must be properly insulated and insulated. As the temperature rises, condensation may penetrate into attic space, settle on the walls, pediment and beams.

If your mini sauna is an extension to the house, it is best suited pitched roof. For a small bathhouse, you can combine the roof and ceiling, visually expanding the small space. This is a good option for baths no more than 15 m2, when the width between the supporting walls is less than 6 meters.
There's no need to choose complex roofs For small baths. Multi-pitched roofs themselves are less reliable and may have cold bridges in corner places, especially if these corners are not foamed with expanded polystyrene - modern insulation.
If you decide to build a mini bathhouse and not use it often, pay attention to projects without an attic.
Important: Special attention Pay attention to choosing the slope. For metal roofing a slope of 20 degrees is required, for slate a slope of about 30 degrees is suitable, and if you use roll covering– you can make a flat roof with a slope of 5 degrees.
Installation of boiler and chimney
If you ordered a turnkey mini sauna, the boiler and its installation are already included in the price. If you are building a small bathhouse with your own hands, the choice and installation of the boiler will be yours. What types of boilers are there for baths?
- gas, gas-fired
- electric
- solid fuel, wood or coal
- on liquid fuel– flammable materials are used
The most environmentally friendly boiler is an electric one; it is very convenient, but requires high consumption electricity. However, for an electric boiler there is no need to install a chimney and maintain it. A gas boiler is considered the most common; they are suitable for heating a mini room, as well as a large steam room. If you decide to install a liquid fuel boiler, be prepared that there may be an odor in the bathhouse diesel fuel, which is used in the boiler.

There are two ways to install the stove:
- With the removal of the combustion door from the steam room.
- Without removing the combustion door from the steam room.
In the first case, it will be easier to heat the room, while oxygen will not burn out in the steam room. Lack of oxygen in the steam room often causes people to feel unwell and lose consciousness.
If you decide to stop at gas boiler or running on solid fuel, you need to think about installing a chimney. All chimneys are divided into:
- brick
- metal
Brick ones are more common, but they have two disadvantages:
- Only an experienced person, a professional, can build a brick chimney. Therefore, most often, even when a mini bathhouse is built independently, a specialist is hired to build a chimney.
- A brick chimney has rough walls in which soot and particles of burnt substances settle. Therefore, a brick chimney needs periodic cleaning.

A metal chimney is better suited for a small bathhouse. It is easier to install and very functional. However, like any metal, it can deform due to temperature changes, which means it needs additional thermal insulation.
The chimney can also be:
- internal
- external
The internal one runs through the entire bathhouse and goes outside through the roof. At the same time, not only the steam room is heated, but also other rooms in the bathhouse. However, if there is a crack or other damage to the chimney, the danger of a fire in the bathhouse or house increases significantly, and smoke also appears. When conducting an external chimney, the pipe comes out of the steam room outside and, rising up the wall, leads the chimney above the roof. However, in this case, the cost of thermal insulation of the pipe increases noticeably, and in addition, it is necessary to additionally heat the locker room and shower.
You can learn how to draw a plan for a bathhouse, select materials, make high-quality waterproofing and water distribution, install electricity, and make interior and exterior decoration of the bathhouse.
Also, check out our selection best video for installing a small frame bath:
As users of our portal say, building a house alone is difficult, but on your own it is very possible. That is why topics that tell how to build are deservedly popular on FORUMHOUSE.
Frame bathhouse, construction technology.
We have already told you how to do it “in one hand” and described it step by step. Let's continue the topic we started. From this article you will learn how to build proper frame baths yourself.
Features of the construction of a pile-screw foundation
Practice shows that the main driver of any construction is the idea. We always start building with the word “I want” or a simple vital necessity. This is what served as the guide for the construction of a frame bathhouse measuring 6x4 m.

Sashauzer User FORUMHOUSE
My mother gave me the idea of building a bathhouse, and after reading FORUMHOUSE and watching the films of the recognized guru of frame construction Larry Hohn, I decided that I could cope with the task. Moreover, my hands were simply itching to take up the instrument!
The user's plot is only 6 acres - there's not much room to roam around. Therefore, after Sashauzer chose a place for the future building, he began planning.

The bathhouse was “installed” on the site, taking into account the cardinal directions and boundaries to the neighbors. This allowed the rest room to be oriented so that it faces the site.
Many novice builders miss this point. As a result, the house goes beyond the designated boundaries, or, looking out of the window, our gaze rests on the wall of the neighboring house.
Conclusion: careful planning and design - the most important stage, on which the success of the future construction completely depends.
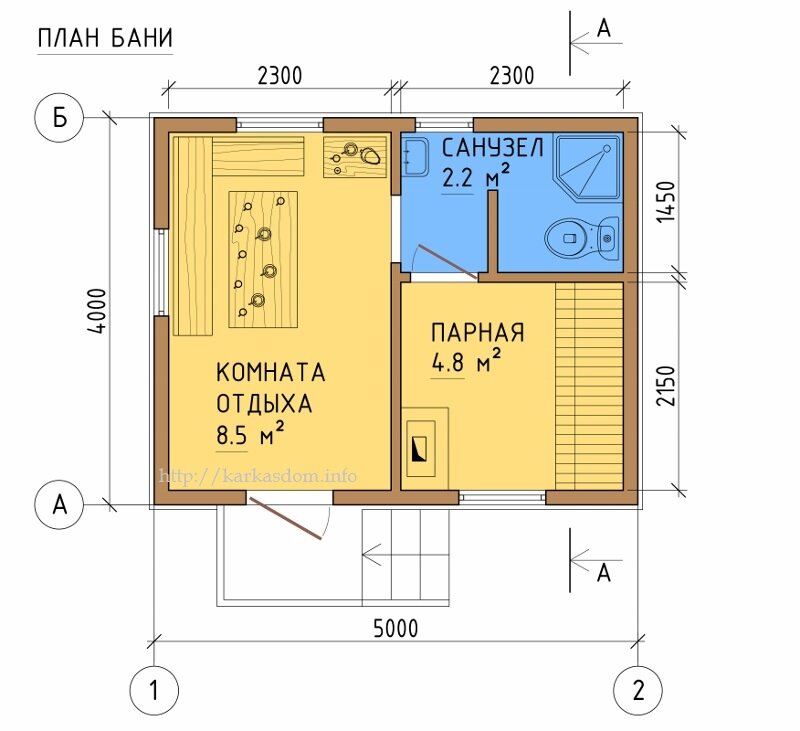
As a result, after creating the correct drawing with the dimensions of the bath, the following came out: Entrance door located downstairs, right above the hallway there is a steam room, to the right of the steam room there is a washing room and toilet. The rest room is on the left, and the bathhouse windows look at summer house Sashauzera.

The location has been chosen, the drawing is ready, the estimate has been calculated, it’s time to make the foundation. As a basis Sashauzer I chose a pile-screw foundation.

The reason for this was, albeit rare, but possible floods that completely flooded neighboring areas. The user's site is higher than the rest, he decided that it was better to play it safe.

Sashauzer
During the spring flood, many neighbors were flooded. Those whose houses are in low-lying areas are flooded up to their windows. We had water standing between the beds.
Reasoning sensibly that the piles cannot be tightened by one person, Sashauzer decided to use the services of a company specializing in this type foundation. Looking ahead, let’s say that the foundation is the only structure made by someone else’s hands at this construction site.
As expected, when constructing a pile-screw foundation, the first thing to do is test screwing. As a result, it turned out that the piles needed to be driven to a depth of 3 meters.

This stage is very important, because if you deepen the piles “by eye”, they may not reach the designed bearing capacity and over time they will sag under load. Or it turns out that instead of 3 meters long, piles 5 or more meters long are needed. In this case, the price of such a foundation may exceed all reasonable limits, and it is necessary to look for other foundation options.
This article explains. This is ready step-by-step instruction for those who are preparing to start construction.
Geological research on the site is necessary to study the composition of the soil and its bearing capacity. If you neglect soil research, this can subsequently lead to emergency situation both with the foundation and with the structure erected on it.
As a result, it turned out that 9 piles, each 3.5 m long, had to be installed under the bathhouse. The “company” arrived and... it began. Bye Sashauzer moved away, the workers managed to dig two huge holes 1.5 meters deep, into which they stuck piles, with 2 meters sticking out above the ground. When asked what kind of shoddy technology this is, the answer was that the pile does not spin into the clay. The most interesting thing is that the workers tried to tighten the pile with an ordinary crowbar, but refused to increase the length of the lever, for which they were kicked out without pay.
I had to resort to the services of a second company. This time they did everything as it should, screwing the piles to the required depth of 3 meters.


Sashauzer
I have an inverter, and I welded the heads to the piles myself.

If you look at the pictures below, you can see that the pits that were dug before driving the piles were not buried at the user’s request.

Target - Sashauzer I decided to make additional anti-corrosion protection for the metal of the piles in the “narrowest” place – the ground/air transition.

“Anti-corrosion” was carried out as follows - first top part The piles were washed with water and a rag, then, after they had dried, they were washed with a rag soaked in solvent. After which the piles were covered with rubber-bitumen mastic.

Letting the mastic dry, Sashauzer I wound the bitumen tape (from bottom to top), not reaching the ends.

Our user decided to attach the tape to the surface using heating gas burner, and at the finish I once again went over all the elements with mastic.


Building a frame: step-by-step instructions
Our construction of a frame bath is approaching the second stage - construction frame. To do this, the user needed a circular saw, a hammer, a tape measure, an awl, a marking thread (a cord with paint) and a pencil.
Having explained to the dispatcher shipping the order that OSB and plywood should be placed on top of the boards on a separate pallet (to optimize unloading), the user also ordered flexible tiles and began to wait for a truck with construction materials.

We managed to unload everything onto a neighboring site that does not have a fence (having previously agreed on this with the neighbors). As a result, from boards to construction site It turned out to be no more than 15 meters.


Having chosen the method of constructing the frame using the “Platform” technology, Sashauzer started making a wooden grillage. Calculation in construction calculator showed that with a span length of 3 meters, a beam with a cross-section of 20x15 cm passes through the load. It is impossible to lift such a beam alone, especially since building a frame from timber is not according to Feng Shui. The solution is to make a grillage by joining together 3 boards with a cross-section of 20x5 cm.
Find out on FORUMHOUSE whether it has the right to exist


Sashauzer
I started assembling the grillage from the outer belt, going inward, and laying the boards so that the diagonals were equal. The corners are arranged in a herringbone pattern. To prevent the first and outer row from leaving, I immediately secured them to the heads with 100x8 wood grouse.
Don’t forget, all boards must be properly antiseptic. For this purpose, a 3-liter garden sprayer with a nozzle was used. The boards were nailed together with 100x4 nails, in a zigzag pattern, maintaining a distance of approximately 200 mm. The external beams were reinforced with tens of studs. 3 studs on the six-meter side and 2 on the four-meter side.

After all the boards were nailed together and the nuts on the studs were tightened, we ran a plane over them to bring the tops of the boards to the same level. As a result, the surface was brought to “0”. The planed surface was also treated with an antiseptic.


We used 15x5 cm boards for the logs. To cut all the logs to size, we lay the boards together, rest them against the frame and, placing another board under the ends, saw them off with a circular saw. As a result, the logs are the same size, and the trim falls to the ground without biting the saw blade.


By laying out the logs inside the perimeter, we get work surface. We also try to keep all waste to a minimum, and the inch trims were used to strengthen the joints.

We place the boards with the “saber” with the curve upward, so that later, under load, they straighten. We count everything correctly, take our time, think it through, and only then cut it and nail it. This approach makes it possible to reduce construction estimate and optimize costs.
The distance between the logs is small - 34.9 cm. You can’t lay slab mineral wool insulation at such a distance without cutting it, and that’s what I chose Sashauzer. Looking ahead, let's say that the user got out and laid the insulation, climbing from below under the already built bathhouse, but more on that later. It's time to lay down the plywood. Sheet size - 2440x1220. We install the flooring using liquid nails, nailing the plywood along the edges, with a distance between nails of 150 mm.
How this was done alone can be clearly seen in the following photographs.


A vapor barrier was not installed, because... According to the user, plywood itself already fulfills its function. Moreover, linoleum will be laid on the floor of all rooms, and tiles will be laid in the steam room.
The platform is ready, you can walk on it, and we are moving on to the third stage.
Construction frame walls: step-by-step instruction
To simplify your task and improve the quality of your work, you need to apply marking lines to the surface of the platform using laces. Now we know where our walls will be. Construction of the frame Sashauzer I started from the back wall. The frame posts were made from a 10x5 cm board, the pitch was 64 cm, the jibs were 12 cm wide. The height of the walls was 2.5 meters.
What could be more pleasant than after completing work at your summer cottage, take a steam bath in your own bathhouse, wash off the dirt and relax your soul and body? Of course, a luxurious bathhouse with a swimming pool in the country is an unaffordable luxury for many, so it’s worth taking a closer look at the projects of small buildings and building the one you like with your own hands, investing a minimum of money and getting maximum benefit and pleasure.

A small bathhouse can be built according to frame technology, lay it out of foam/gas/cinder blocks, bricks, build a log house from logs or timber. Most environmentally friendly material– wood, but bricks and blocks are more durable, reliable and fireproof.

Table. Comparative table of prices for materials for the construction of bath walls
| Material | Make/model/type/grade | Size/section, mm | Price in rubles |
|---|---|---|---|
| M150 | 250*120*65 | RUB 16.90 per piece (240 pieces on a pallet) | |
| First grade | 100*100*6000 | Price per 1 m3 from 5500 to 6700 rubles. | |
| First grade | 150*150*6000 | 5500-6900 rub. for 1 cubic meter. | |
| First grade | 40*100*6000 | 7500 rub. for 1 m3 | |
| 2.3 grade | 40*150*6000 | 5500 rub. for 1 m3 | |
| - | 9*1250*2500 | 548 | |
| - | 12*1250*2500 | 802 | |
| - | 60*250*50 | 40 rub. per piece (133 pieces in one cubic meter) |
Prices for foam blocks
foam block
Economy bath project
Having looked at the prices for materials, you will notice that it is more profitable to build a bathhouse from blocks or using Canadian technology. Moreover, the latter will be more profitable if some of the materials are used or low-grade (for example, instead of edged boards you can use unedged, adding color country bathhouse). More accurate data on material consumption can be obtained after drawing up a project and estimate.
Before starting construction, it is extremely important to think through the design of the bathhouse, calculate the amount of materials, note all dimensions and at the same time plan not only the location of the premises, but also the furniture in them.
 Installation of a shelf in a steam room
  Selecting a bath size
The main room in any, even the smallest bathhouse is the steam room. There must be two or three floors of shelves and a heater. Even country cottage area small, and the bathhouse is planned to be very modest; the steam room cannot be made with an area of 3-4 square meters based on the simultaneous stay of two people (visitors should be comfortable steaming with brooms, sitting and lying on shelves in full height). Such standards are determined by safety considerations (in a very cramped steam room it is easy to get burned on a hot stove or scald your skin with hot steam).

Also, if the entire stove is located entirely in the steam room and fuel is loaded from the same room, it is worth increasing usable area rooms by another 1-2 meters, so that it is convenient to store and add firewood to the firebox. Directly in front of the stove, a pre-furnace sheet measuring 1x1 m must be laid, which is also noted on the plan diagram of the future bathhouse.
The bathhouse will certainly provide water procedures Accordingly, you should think about a small shower located in a separate room or adjacent to the steam room. The second option, when the steam room and washing room are combined, allows you to save space and reduce the cost of installing sewer drains and interior partitions.

Last important room baths - dressing room or dressing room. There should be benches and hangers for visitors, a cabinet for bath accessories, and possibly a small table. It is also possible and preferable to have the heater located in the steam room, and the loading door opens into the dressing room, which allows you to save on heating.

In an economy bath you can do without:
- plumbing system. But you will have to equip a stove with a tank and bring water in buckets manually;
- separate bathroom. These amenities can be taken outdoors or in country house, if the bathhouse at the dacha will be used only in the warm season.
But you won’t be able to do without electricity and sewerage, so it is advisable to order or build a septic tank/cesspool/drainage pit, as well as extend a power line to the site where the bathhouse is being built, because steaming by candlelight is very inconvenient.

Be sure to indicate on the plan diagram:
- dimensions of the building and each room separately;
- ceiling height and overall height of the bath;
- furnace location;
- the sides into which the doors will open, including the firebox;
- location of windows (in the steam room the window is located at a height of 185 to 195 cm from the floor and not above the shelf);
- location of the socket and switch, shield and lamps (only products with a moisture protection level higher than IP54 are used).
Below are several projects of small one-story country baths.


Video - Designing a bathhouse
Video - Bathhouse project. Compilation
Construction of a small frame economy bathhouse at the dacha
Let's start with the base of the bathhouse - the foundation. Since the sauna will be small and relatively light, there will be no need to fill monolithic slab or make a recessed reinforced tape. For a one-story bathhouse, a columnar foundation made of blocks or asbestos pipes with concrete poured into them is sufficient.
Stage 1. Marking

This stage is required for any type of construction. We choose a place on the site where the bathhouse will be located.
Take 4 pegs and a plumb line. We drive the first stake into the soil strictly vertically, that is, we mark the first corner of the house. From this point we set aside the length of one of the walls and drive in a second stake. We tie both pegs with a cord.
We place the third and fourth stakes in the same way. We check the equality of the marking diagonals and, if necessary, adjust the stakes and cord.
We also use a cord to mark the places where the interior partitions will be located.
We arm ourselves with a shovel and remove upper layer soil along with grass inside the cast-off. We level the bottom of the resulting base horizontally and compact it.
Video - Marking the foundation
Stage 2. Foundation
Let's consider the option of arranging a columnar foundation made of concrete blocks measuring 20*20*40 cm. Their price ranges from 45 to 60 rubles per 1 piece. You can use ordinary bricks (13-16 rubles per piece), including used ones.

We take a drill or a shovel and start digging holes measuring 50x50 cm for blocks or 35x35 cm for bricks. The distance between the holes is no more than 2 m, the depth of each is approximately half a meter. The holes should be located in the corners of the house, under load-bearing walls and interior partitions.

We tamp the bottom of each hole, fill it with a layer of sand and crushed stone (each layer up to 10 cm) and repeat the compaction process again.
Fill the crushed stone with liquid cement laitance. We stick one steel rod strictly vertically into the center of each hole.
We lay out bricks or blocks around the rod, 2 pieces at a time. in every row.

The posts should rise 20-30 cm above the soil. Check the horizontality of the entire base by pulling the rope and using bubble level. If necessary, we compensate for unevenness with a layer of cement mortar.


We cover each column with a piece of roofing material.
Stage 3. Economy bath frame
For the frame you can use timber 100*100 cm or 150*150 cm. load-bearing elements It's not worth saving. It is also advisable to impregnate the wood with a fire-retardant composition.
The lower harness consists of 4 beams.


Connecting corners using the “claw” or “half-tree” method.
 Connecting the beams of the lower trim
We cut threads on the reinforcing bars protruding from the corner posts (the pins on the intermediate posts can be cut off). We drill holes at the ends of the beams for these pins. We cut out the ends of the beams according to the diagram shown.
We assemble the lower harness by putting the bars on the pins. Tighten the nuts and locknuts from above.


Between the vertical beams we nail or fasten with self-tapping screws horizontal jumpers from a 50x50 mm bar. Corner posts We strengthen it with jibs made of 50x100 mm boards.


All that remains to be done top harness. To do this, we use a 50 mm thick board, which we screw to the ends of the vertical beams with long wood screws.


Prices for wooden beams
wooden beams
Stage 4. Gender
Let's look at an example of arranging a leak-proof floor in a bathhouse. In order not to waste time cutting lumber, we take fastening perforated corners, screws and assemble the floor joists. We place boards 50x100 cm between the beams of the lower frame on the edge, maintaining a distance between the logs of 40-45 cm.

Assembling the floor from the board in the “on edge” position for greater rigidity

Floor joists can be covered with OSB-3 sheets (approximately 480-550 rubles per sheet 1250x2500 mm and 9 mm thick) or use the same wooden boards, from which the logs are made. IN rough floor you need to provide a hole for installing a drain ladder from a washing room or steam room.

Be sure to stretch Izospan or other vapor barrier film under the wooden subfloor.
To insulate the floor, we again attach the logs on top of the subfloor, between which we lay expanded clay, sawdust or red moss, and cover the entire “pie” waterproofing film and assemble the finished floor from boards or moisture-resistant plywood (from 260 rubles per sheet of 4 grades measuring 1525x1525 mm and 4 mm thick). The use of polystyrene foam as insulation, including packaging, is possible only in the dressing room.

Prices for Izospan
Stage 5. Roof
Before making the roof, we assemble the top floor (ceiling). We use the same fasteners and boards that were used when installing the floor joists.
roof for frame economy It is better to make a gable bathhouse. It will make the bathhouse more attractive in appearance, and the space under the roof will be easily converted into sleeping area or a warehouse for brooms. On the other hand, on single-slope structure will be needed less materials.


Templates for cutting rafters, racks, floor joists
Table. Types of roofs, diagrams
| Roof type illustration | Advantages | Description |
|---|---|---|
| Flat or single slope | Saving of materials, ease of assembly, ability to use the roof. | For baths up to 6 meters wide it is permissible to organize flat roofs with a slope of 10-25 degrees and inclined rafters. The ceiling is made from coniferous bars from 100x100 to 150x200 mm. Laying step from 40 cm to 1 m. On top of the beams, a continuous, gap-free sheathing from edged boards or OSB is assembled, then a sheathing for insulation is installed - expanded clay with a layer of 10 cm, mineral wool or expanded polystyrene. Several layers of roofing material or other moisture-proof material are laid on top of the insulation. The roof itself can be made from corrugated sheets, antiseptic-treated boards, etc. |
| Gable. Suitable for baths with an area >12 sq.m. | Possibility of using the attic for household purposes or for overnight accommodation. The roof is stable and durable | The roof angle is selected from 30 to 45 degrees depending on the type of terrain. To install such a roof, the top trim and the Mauerlat must be made of timber. Roof trusses They are isosceles triangles with a jumper between the edges (crossbar). The rafters rest on the Mauerlat and can hang a maximum of half a meter. The rafters are cut according to a template and assembled into trusses using metal fasteners and long self-tapping screws. The outer trusses on the gables are attached first, followed by the remaining rafters at intervals of up to one and a half meters. A sheathing of slats or boards is placed on top of the rafters, a vapor barrier is stretched, and then secured roofing material, for example, profiled sheet. |


Video – Roof construction
Stage 6. Interior and exterior decoration
Table. Short description stages of insulation, insulation and finishing of an economy bath
| Work order | Scheme | Description |
|---|---|---|
| Polystyrene foam will provide the walls of the bathhouse with additional rigidity and retain heat. For installation we use polyurethane foam and PSB-S-15. We cut out pieces of foam plastic according to the distance between the frame posts, insert foam plastic between them, and foam the cracks. It is recommended to cut out the foam 0.5-1 cm larger in size than the existing openings to avoid gaps. |
||
| We use 2x5 cm slats. We fasten them horizontally. Fixation is carried out using wood screws. We take the distance between the slats equal to the width of the insulation. | ||
| We lay slabs between the sheathing slats mineral wool. We stretch a polypropylene cord over the mats and secure it with small nails or a stapler. | ||
| WITH outside The bathhouse can be covered with OSB-3 sheets, which can then be plastered or painted. Finishing with unedged boards or siding would also be an acceptable option. | ||
| WITH outside baths under the layer of finishing material we attach an overlapping windproof film (you can use glassine). WITH inside We install foil vapor barrier on the walls and ceiling with a thickness of 80 microns. We fix the overlaps of the strips with metallized tape. |
||
| Internal lining | Traditional material for interior decoration- lining. Economy option - aspen. It is better not to use pine lining in a steam room. It is permissible to sheathe the walls in the dressing room PVC panels or moisture-resistant plasterboard, and then paint. |
|
| External skin | As outer skin used a lot interesting materials, for example, shingles or shingles. These are thin wooden planks that are fastened with nails to the walls, and the rows are fixed with a slight overlap (top to bottom). An environmentally friendly and economical solution. |
Stage 7. Ventilation
An economy bathhouse is probably a compact room, but this does not exclude the need for ventilation.

The hole for air flow is traditionally installed near the heater, closer to the floor, and the installation of the ventilation valve is carried out simultaneously with insulation and finishing of the walls. Air flow from supply ventilation duct must fall on a heating element ovens. It is especially important to arrange effective ventilation, if the firebox door does not open into the dressing room, but into the steam room.
Exhaust vent should be closer to the ceiling. The hood must be equipped with a damper. Air exhaust is organized according to ventilation pipe on the roof, the head of the pipe is covered with an insect net.

Natural ventilation can be organized through a small window located at a height of 185 cm above the floor level. Ventilation will occur when open window and room doors.

Video - Ventilation in the bathhouse
Prices for bath fans
bath fan
Stage 8. Equipping the bathhouse
Having assembled a bathhouse with your own hands, make a metal stove with a heat exchanger and an external water tank. The main thing is to lay asbestos cardboard on the floor and wall behind the stove during installation and close it steel sheet to prevent spontaneous combustion of wooden surfaces.
Calculation of the load on the floor and rafters for a single metal furnace It is not necessary to do this; a floor structure made of 150x50 mm logs in increments of 45-50 cm and a 5 cm thick floorboard will perfectly withstand a heater.
Electrical wiring in the bathhouse is laid either up to finishing walls (hidden type), or after (external). Lamps and sockets are purchased and installed that are strictly moisture-proof, class higher than IP 54. Installation of a separate electrical panel and protection of all cables from moisture is required.


Prices for asbestos cardboard
asbestos cardboard
Other interesting projects of economy baths
A very unusual, but no less comfortable barrel sauna is a cylindrical wooden structure on two supports, internally divided into 2-3 compartments, the farthest of which is a steam room. The sauna is mobile, takes up little space, is economical and economical (very little fuel is needed to warm up a small steam room).


Turnkey barrel baths cost from 35 to 220 thousand rubles. In practice, to assemble such a bathhouse yourself, it takes twice as long less funds and not a lot of effort and time.

Assembly and disassembly of the bathhouse is possible due to the boards used 45x90 or 50x90 mm with a tongue-and-groove connection. The length of the barrel, depending on the boards used, is 2.5-5 meters. The structure is secured with metal hoops. Additionally, the bathhouse can be equipped with a porch, roof, and canopy.
The water in the barrel bath is drained through holes in the floor. If you plan to install such a bathhouse at your dacha, you should remove the layer of soil, fill it with crushed stone, compact it, and install the bathhouse itself on a pair of stable, massive concrete blocks. The rules for installing the stove and laying electrical wiring are standard for any type wooden baths, including economy class.
Currently, it is difficult to imagine a summer cottage without a bathhouse on it. Taking a steam bath in a warm bathhouse is a real Russian tradition, with its roots going back centuries. A bathhouse can be built not only in a country house, but also in the city: the availability of a plot is an excellent opportunity to implement this initiative. Moreover, a frame bath is a modern high-tech design that does not require large expenses.
You can build a frame bathhouse with your own hands, without the help of specialist craftsmen. This type of construction is the fastest and most affordable: a frame bathhouse requires several times less materials than structures made of timber or logs of similar dimensions.
Where to start building a frame bath?
First of all, you need to decide on the location of the bathhouse. It may be an extension to the house, or it may be separate from it. Before starting to lay the foundation for a future bathhouse, it is necessary to determine the type of soil on the site and plan the construction itself: the number of floors and rooms, dimensions, interior.
Before building a bathhouse, a plan must be drawn up, where it is necessary to take into account the specifics of the structure and estimate the volume and duration of work. All elements must be noted in the plan ventilation system, chimney, roof features and others important aspects. You can also attach a veranda or terrace to the bathhouse.
In order for the bathhouse to be comfortable and able to accommodate several people at the same time, its dimensions must be appropriate. Most best option for a steam room - 240x200x220 centimeters.
At the discretion of builders or customers, the bathhouse can be equipped with a billiard room, a relaxation room or an additional steam room.
The plan for the future bath should be drawn up as accurately as possible and taking into account the smallest details- this way the construction process itself will be much simpler. The bathhouse project can be ordered from specialists. They will do everything competently and clearly, which will help avoid major mistakes during construction.

Also, when planning a bathhouse, a table is drawn up to record all the materials necessary for construction, which is correlated with the plan.
Materials required to build a frame bath:
- cement for pouring the foundation;
- sand;
- beams for mounting the frame and ceiling;
- beams;
- insulation material in a roll (mineral wool, ready-made mats, polyethylene, roofing felt, glassine);
- waterproofing film for walls and ceilings;
- lining for internal wall cladding;
- roofing material for the roof.
What foundation to choose for building a frame bath?
Since the frame bath itself is very light, a strip foundation, which is poured directly under the walls along the entire perimeter of the structure, will be sufficient for its construction. A columnar foundation is also a common option, but its installation requires stable soil, otherwise the structure may collapse.
Due to the lightness of the frame bath, the foundation for it is poured according to a fairly simplified scheme.

When the main points are determined, you can begin the construction itself.
- Pouring the foundation.
Step one. The perimeter of the future bathhouse is determined in advance; special pegs are driven into the ground along its edges, within which it is necessary to dig a ditch 60 centimeters deep and 40 centimeters wide.
Step two. The ditch is filled with sand to one third of the depth. The sand is poured from above with water and thoroughly compacted.
Step three. After compacting the first layer, finely chopped red brick or gravel is poured over it.
Step four. A layer of broken brick or gravel is covered with a layer of sand, which should be level with the ground level.
Step five. Formwork is assembled from reinforcement. The entire structure is poured with concrete and insulated on top thin layer roofing felt
Important! Before building a frame bathhouse, at least a week should pass so that the foundation has the opportunity to properly settle.
- Construction of walls.
Step one. Lumber prepared for a frame bath must be thoroughly dried before starting work. It is not recommended to use birch wood for construction, as it quickly rots. The best option would be linden, aspen or larch. The wood of these species is capable of maintaining its shape for a long time and has thermal insulation properties, which is very important for a bath.
Step two. After everything construction works When completed, the inside of the board should be coated with an antiseptic solution, and the outside with furniture varnish, in two layers. This procedure must be done around the entire perimeter of the room, avoiding only the steam room and the washing compartment.

Step three. Bottom harness from a reliable beam with a cross-section of 10x10 centimeters, it is necessary to fix it firmly enough, after which the beams should be properly fastened at the corners with nails. It is recommended to place the racks on metal pins so that during the construction of the walls they cannot change their location and knock down the structure.
Step four. Corner posts must be embedded in concrete.
Advice: The pillars - the basis of the walls of the future bathhouse - should be placed directly under load-bearing walls, corners, stoves - that is, in those places where the load is greatest.
Step five. Along the perimeter of the walls, intermediate racks are installed, made of the same timber as the main structure.
Step six. To make the floor waterproof, it should be laid out with timber made of any wood, with a cross-section of 15x15 centimeters.
Step seven. To cover the bathhouse outside and inside, they use lining, which is affordable and easy to use. To ensure that there are no gaps between the sheets of lining located in a horizontal position, they should be overlapped. This procedure is very scrupulous in nature, but it can protect the walls from excess moisture.
- Let's move on to building the roof.
Step one. You need to take 8 special ceiling beams rafters cut at an angle. To begin with, you should set up only the outer rafters, and only after that fix a couple more pieces in the center of the future roof. The remaining rafters are connected to the main structure, first on one side of the roof, then on the other (through the ridge).
Step two. After the rafters are installed vertical racks, if necessary, an exit to the attic is also made.

Step three. On the rafters located at the edges, beams are cut out, to which the front boards are nailed, after which the battens are attached on top.
- It is necessary to insulate the walls.
The most common material for this purpose is roll insulation about 50 millimeters thick. In some cases, mineral wool or ready-made mats are used. The insulation is placed between the vertical wooden stands, after which slats are nailed to them. For thermal insulation of the room, it is recommended to use polyethylene or glassine.
Advice: it is not recommended to use roofing felt for wall insulation, as under the influence high temperatures it begins to emit an unpleasant odor.
For floor insulation, it is better to choose expanded clay or other types of backfill, and for the ceiling - polystyrene foam. If the insulation is selected correctly, heat will be lost several times less. Thanks to this, the cost of heating the bath will also be reduced.
After the walls and roof are built, you can begin installing windows and doors in the openings previously left for them. Upon completion of this work, it will be possible to enter the finish line.
The final stage of construction of a frame bath
For a bathhouse to be a pleasure to use, it must not only be comfortable and well designed, but also have a beautiful interior decoration. Therefore, after completing the main work inside the bathhouse, finishing work must be carried out.
First, you should protect the walls and ceiling from the adverse effects of moisture and high temperatures. Coniferous upholstery is perfect for this purpose. Then you can proceed directly to installing the most important part of any sauna - the stove. It must be installed in accordance with all safety requirements. It is recommended to make the wall separating the steam room and the relaxation room from brick - this way it will transmit less heat.

To make the walls look more attractive, it is recommended to cover them with clapboard. For this purpose the best way Linden wood is suitable.
What are the main pros and cons of a frame bath?
- Acceptable price. The construction of a frame bathhouse costs several times less than its analogues.
- Ease of construction. You can build a frame bathhouse with your own hands, without the help of specialists.
- Light weight. The frame bath box is quite light, its weight is acceptable for areas with soft soil.
- Short construction time. Building a frame bathhouse is not only easy, but also quick: to take a steam bath in it, you don’t even have to wait until next summer.

- Difficult to care for. Insulation materials may become unusable under the influence of moisture and high temperatures, and replacing them will be quite problematic.
- Unsuitable for therapeutic purposes. Due to the fact that the walls of the frame bathhouse do not highlight useful substances, bath procedures in it cannot help with health problems. If there are any, it is recommended to build a different type of bathhouse.
Despite the fact that the advantages of a frame structure are much greater than the disadvantages, you should come to a decision about building a bathhouse of one type or another, focusing only on your own taste and based on your capabilities - both material and physical. The condition of the soil and the location of the future bathhouse are also important.
There is nothing complicated or impossible in the construction of a frame bathhouse. The instructions given in this article will help everyone build the bathhouse of their dreams in a short time, without spending large financial resources.
The most economical both in terms of construction materials costs and labor costs are frame baths. When constructing them, you will need one and a half, or even two times less wood than for analogues made of timber and logs, moreover, such structures are lighter and therefore place less load on the foundation. Therefore, building a frame bathhouse with your own hands is justified both financially and technically.
Many home craftsmen are interested in how to build a frame bathhouse with their own hands, this will be discussed in the article.
Building a frame bathhouse
Before you build a frame bathhouse correctly, you need to carefully plan everything with your own hands.
Before creating a project, you should clarify the following points:
- You need to decide whether this building will be built-in or free-standing.
- Select a building site. In this case, it is necessary to take into account the need for laying engineering communications. In most cases, this factor determines the choice of location.
- Determine the type of soil on the site. In this regard, the foundation of the structure is selected.
- Plan the features of the building. For example, it will be one or two floors, will have a terrace or veranda, attic, attic, etc. Such buildings allow you to implement various design ideas. Determine where the heater will be located, which will determine the design of the ventilation and chimney.
- Define communication patterns. In particular, you should decide whether they will be laid from the main buildings of the site or whether they will be autonomous.

- Select roof type. Here it is worth choosing not only the type of covering, but also paying attention to the configuration of the roof, which will determine the power of the floors and rafters.
Which foundation to choose
Since the frame structure is characterized by lightness, its foundation is made according to a simplified scheme.
Taking into account all the features of these buildings, two types of foundations should be distinguished:
- For the construction of such, poured under the walls along the perimeter of the building.
- Also a good option would be a columnar foundation, which is formed from asbestos-cement pipes filled with concrete.
Advice! A column foundation can only be installed on stable soils. Otherwise the building may collapse.
Installing a columnar foundation

Let's see how to do it right :
- We are marking a building site. The distance between the pillars should be from 1 to 2 meters.
Advice! The posts should be located around the perimeter of the building and under its most loaded elements, including corners, load-bearing walls and the stove.
- According to the markings, we dig holes for the pillars to a depth of one and a half meters.
- Fill the holes with 10 cm of gravel-sand mixture.
- We install the pipe. The best option– asbestos-cement pipes.
- We insert 2 to 4 reinforcing bars into the pipe, which will serve as the basis for forming a grillage.

- We pour concrete solution into the pipes.
The foundation must settle for a week, after which the construction of a frame bathhouse with your own hands can begin. However, before you build the walls, you should install a grillage - that part of the foundation that connects the tops of the pillars, strengthening the foundation.
The grillage is poured in several stages:
- We install formwork from boards on top of the pillars.
- Knitting reinforcement cage and place it in the formwork.
- Fill the frame with solution.
Construction of a bathhouse
So, we build a frame bathhouse with our own hands.
To follow all the subtleties of these works, there are simple instructions:
- We begin the installation with the base frame, which consists of four boards (5x10 cm), which are laid under the future walls of the building. The boards are laid with the outer edge along the outer contour and fastened with nails at the corners. After laying, check the horizontalness of the boards with a building level.

- To make the frame, we first assemble the frames, consisting of frames, racks and crossbars. Therefore, before you start building a bathhouse with your own hands using frame technology, you need to have a construction plan indicating the frame components. The frames are assembled according to this plan.
- Connect crossbars, trims and posts with nails of suitable length. Preferably. So that each side of the building consists of a separate frame. This way you can create more robust construction. The weight of such frames, depending on the type of wood, can be about 200 kg, and therefore you will need several people to carry out installation.
Advice! For the walls of frame steam rooms, dried planed boards made from deciduous wood are excellent. They have low thermal conductivity and do not warp.
- Now we assemble the frames into a frame, fixing them on the trim boards with nails. It is advisable that the gap between the frame posts be no more than 60 cm. Above window and doorways, in places where walls and partitions are adjacent to each other, additional racks are required. Therefore, in such places, the pitch of the racks must be changed.
- Now the walls need to be sewn up. For this, boards or sheet materials such as OSB or DSP are used. Excellent material for external cladding is coniferous wood. When sheathing boards end-to-end, waterproofing should be placed under them - roofing felt or roofing felt. Any boards can be used for the inside of the dressing room.
- Having covered the outside of the bathhouse, place thermal insulation in the frame of the building. Here you can use various insulation materials: mineral wool, fibreboards, wood concrete, etc. It is best to use mineral wool slabs, since this material has high technical characteristics, and its price is very reasonable.
Before laying the insulation, it is necessary to lay a layer of waterproofing. Most often used as a waterproofing agent polyethylene film, 150-200 microns thick
- Completes the construction of walls interior lining. Here you can use boards or lining.

Conclusion
Construction frame baths doing it yourself is a very responsible process. Traditionally, such buildings are made of logs, and therefore it is very important to strictly follow the technology so that what you create frame construction had all the requirements for such structures ().
The above information will help you avoid traditional mistakes that are common to many beginners. And also the video in this article will help you understand this issue more deeply.


