In Russia, a wooden bath from ancient times was the best place to relax the body and soul. With some experience in doing construction works, it is quite easy to build yourself private steam room in your area. Let's figure out how to do it.
Choosing the right timber is an archival task
Classical baths are traditionally built from various wood materials. Buildings for taking water procedures from logs are quite popular. They are distinguished by high reliability and long service life. But the cost of building such steam rooms is quite high. A reasonable alternative to expensive structures is a log bath, which is easy to build with your own hands. By most parameters, it will not differ in any way from steam rooms built from logs. At the same time, the cost of building an excellent bathhouse will be significantly reduced.
When erecting the structure in question from a bar, we have to go through many stages. But the first and truly important of these is the selection process. wood material. All operational properties of the bath will depend on the quality of the purchased products. The beam for your own steam room should visually look flawlessly even and smooth. It is not allowed to have on wood:
- 1. Explicit geometric flaws and distortions. Such defects significantly complicate the process of installation of log crowns. In some cases, it is simply not possible to build a high-quality steam room from a beam with flaws.
- 2. Insignificant (at first glance) cracks. Products with such defects with natural shrinkage of the bath will begin to expand. This will lead to a change in the appearance of the building and rotting of the wood.
- 3. Spots of blue. If there are any on the beam, immediately reject the material offered to you. It is not suitable for construction work. The presence of blue spots indicates that there is a fungus in the logs, which causes the wood to rot.
- 4. Traces of vital activity of bugs and wormholes.
Ideal for the construction of a steam room is wood harvested in winter time. The beam must necessarily lie down for 1-1.5 months, and then processed accordingly. Of great importance is the type of wood from which the logs are made. For laying the first few crowns of the building, it is recommended to use larch products. This wood during operation increases its hardness, it is not subject to decay, is not afraid of a humid environment. But all subsequent crowns are best assembled from cedar, spruce or pine products. They have an affordable cost, which is important, and also have high thermal and hydroprotective capabilities.
The bar is solid and profiled. The material of the first type is characterized by a not very presentable appearance. Buildings made of solid products have to be additionally clad on the outside with a block house or siding. Profiled logs are much more aesthetically pleasing. In addition, they provide for the presence of carefully polished crown grooves and spikes along the entire length. Due to this, baths from profiled timber are built very quickly and with minimal labor costs.
For the construction of the outer box of the structure of interest to us, it is advisable to use products with a section of 15x15 cm. maximum load. Internal partitions usually made from logs 15x10 cm.
We develop a project and build a foundation - a beautiful bathhouse for centuries!
Having decided to get your own bathhouse, you should choose a place for it on your site. The finished building should be functional and comfortable. Therefore, it is necessary to build it not very far from the house, but also too close to it. The optimal distance from a residential building to a bathhouse is about 5 m. Also pay attention to the level of groundwater and the general dampness of the soil in the selected location.
The drier the earth, the stronger and more durable the steam room will turn out.

Having dealt with the place, we proceed to the drafting of the bath. At this stage, you can show your imagination with might and main. Use ready-made drawings, make your own sketches. It is easy to design a very simple building with several rooms and a larger structure, for example, of the following types:
- With a small open veranda (terrace). The construction of such a bath from a bar is ideal for cases when you have a barbecue in the courtyard of the house, a stationary stove for frying food on fresh air. The latter, by the way, can be placed directly on the terrace under construction.
- With attic and terrace. A great option for those who often receive guests and invite them to have a good time in the steam room. After bath procedures, you can sit on the veranda, drinking healing herbal tea. And put beds in the attic and invite guests to spend the night in a cozy summer bedroom.
- With a porch. Such a bathhouse will tell everyone that you are a fan of Russian traditions. On the porch you can have tea parties, admire nature. Isn't this true happiness?
- FROM covered veranda. A glazed and insulated terrace can be used not only in summer, but also in autumn. It is easy to adapt such a veranda as a bedroom, a room for playing billiards or table tennis.
After the drafting and approval of the project, we purchase the required amount of material and proceed to pouring the base for our own steam room. The foundation for the bath can be made columnar or tape. Both of them are quite reliable and can withstand the load from the timber steam room without any problems. For arrangement columnar base on sections of load-bearing internal walls, at the corners of the building and around its entire perimeter, it is necessary to put brick supports. Then pour a concrete pad under them. It will eliminate the risk of subsidence of the pillars. distance between individual supporting elements while taking in the range of 150–200 cm. The specific value depends on the mass of the structure being built. The heavier it is, the more often you need to place poles.
For the construction of a strip foundation, it is necessary to make a formwork from boards around the perimeter of the planned building and pour the structure with a concrete mixture. The main thing here is to reliably protect the bath from dampness. To do this, the height of the foundation from the ground surface should be taken at least 150–170 cm. Important! Regardless of the type of foundation being poured, we strengthen it with reinforcing bars (section - 1–1.2 cm), install special embedded elements (needed to fix the first wooden crown buildings) and be sure to waterproof the area between the first crown of the steam room and the basement.
We carry out moisture protection according to this scheme. First, we heat the bitumen to a fluid consistency. We process the basement with this composition. Then we lay several layers of roofing material on top (optimally - 3). And between separate sheets waterproofing material we also apply a bituminous molten composition.
Assembling the structure - follow the instructions, and everything will work out!
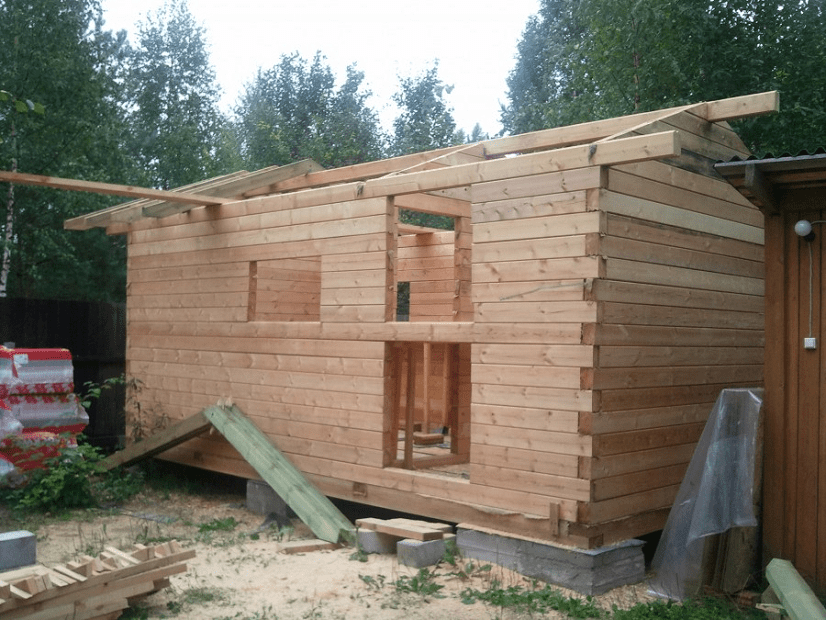
It is not difficult to build a bath from a properly prepared timber with your own hands, if you follow all the rules for its construction. To start, we take building level and analyze for evenness the horizontal surface of the logs that will be used to assemble the first crown. Recall that we are building it from a beam of 20x20 cm. We need to make sure that the logs are perfectly even. If the first crown is mounted flawlessly, the entire wooden structure will turn out to be perfect without exaggeration.

Construction begins with the assembly of the first crown
The installation of the first crown is performed as follows. Throughout the foundation plinth, we install thin (thickness - 1.5 cm) wood slats treated with an antiseptic. These products will protect the first row of timber from decay, due to which the overall life of the bathhouse will increase. The spacing of the laths is 0.25–0.3 m. Experts advise to blow out the gaps between them mounting foam. Then we mount the beam on concrete base. Pre-apply to wooden crafts engine oil or any antiseptic composition. The first beam can be fixed. Or you can not fix it, since subsequent rows will give it sufficient reliability due to its mass.
We build a bath from wooden beam farther. Installing two next row. There is no need to lay the logs of the log house too tightly, since after the construction the bath will give a natural shrinkage. Next, we fasten the crowns of different rows with metal pins or wooden dowels. These hardware are driven into pre-prepared holes. The latter are drilled so that the tool passes through the entire upper beam (through) and additionally captures another half of the lower product. We need:
- drill holes (the distance between them is 100–150 cm) according to the specified requirement;
- remove the top beam;
- drive dowels into holes;
- lay insulating material;
- put the top bar in place.
All crowns are mounted and fixed in the same way. Important! The two upper crowns do not need to be fixed when building walls. We will need to dismantle them for a while during the laying process. ceiling beams. As a heater placed between the logs, moss, tow or jute is usually used. There is a small nuance here. If thermal insulation is carried out with moss and tow, after shrinkage of the structure it will be necessary to caulk all the gaps that have appeared. But when using jute, such an operation is not necessary. It is enough to fix it with small nails or staples of a construction stapler.
The bars are allowed to be fastened together in other ways. You can use nails without hats. They are usually called submerged. They do not rust, as they are completely immersed in the tree, which means they do not spoil the bars. Some craftsmen fasten wooden products with Sila hardware. It is a screw, inside of which a compression spring is integrated. This design of the fastener guarantees the absence of any gaps between the bars due to their maximum pressing against each other. Hardware Sila eliminates the risk of operational deformation of the bath and the occurrence of cracks. But the cost of this fastener is quite high.
When building walls, do not forget to leave small gaps in areas where windows and doors will then be installed. After shrinking the structure in the marked places, it will be necessary to saw through the required openings using a chainsaw. Installation of door frames and window structures theoretically, it can be produced in the process of building a steam room. But it's risky. Indeed, after shrinkage of the structure, they can change their geometry.
The final stages of work - we cover the roof and create comfort inside
When the walls of the building are completely finished, we cover the log house with boards (four centimeters in thickness). And on top we lay a layer of roofing material on them. In this state, the building should be within 6-8 months. During this time, the bath will completely sit down, which will allow us to continue construction work.

Six months later, we cut through windows and doors according to the method described above. And then we start building the roof. The type of this design depends on the type of bath. If a steam room with an attic was built, we equip it. This option is easy to implement. Under gable roof it is possible to organize a well-ventilated and well-insulated attic, in which any room is equipped, from a game room to a summer-autumn living space.
If it was built simple bath without an additional level, it is easier to make an elementary roof. You just need to make wooden beams the frame according to the parameters of the structure, and cut the rafters from the timber. There are little things left. We install the frame, mount the rafters on it (there should be a lattice), perform the final finishing of the roof. For the last operation, we use any suitable material. It can be sheets of roofing material, and metal tiles, and profiled sheets, and other products.
The final stage of work is the internal arrangement of the bath. Recommended:
- 1. Install the oven, overlay it decorative mosaic or natural stone.
- 2. Line from the inside ceiling surface jars using foil. In this case, the fertile hot steam will stay indoors for a very long time.
- 3. Sheathe internal walls suitable material. The most rational use wooden lining. It is mounted without problems and has worthy operational properties.
- 4. Fabricate and install shelves.
Your personal bath is ready for use. Enjoy every trip to it!
From time immemorial, a Russian person has a love for a bathhouse. To this day, it does not change and remains faithful for more than a dozen centuries. The bath has always served as a place for washing and purification for our people. Not for nothing they say I went to the bathhouse, as I was born again. The most precious place in the bath is, of course, the steam room, there is nothing special at first glance, a heater and shelves, but when you sit down, you sit and splash on the heater, it will give you raspberry heat, and then you will feel Russian love for the bathhouse. Not some saunas and other overseas curiosities were not even close to our favorite bathhouse. How many songs and poems did the people shine on the bathhouse "Ex bathhouse, bathhouse, you are raspberry hot"
You can praise the bath endlessly))).
To date, there is a mass construction of baths on summer cottages and country estates, because in Soviet times it was forbidden to build on 6 acres capital buildings. But there was no talk about the bathhouse and in general, it was under a strict ban. Later, in the 90s, people were not up to it. Now, thank God, the people have a penny and a little freedom of action.
People are drawn to their historical roots, and the bath accompanies the people from the beginning of its existence. And it will not be surprising if people begin to explore other planets, then the first building on the new earth should be a bathhouse.
Today's construction boom is also fueled by the presence of a huge amount of building materials on the market. From which only baths are not built today, the main and unchanged is a wooden frame, it is always in the first place, but bricks, blocks, timber are also used, which simplifies the construction process by an order of magnitude.
For example, from blocks, a box of a future bath, if desired, can be folded by one person, quite in a short time, without having building skills.
Of course, you can’t compare with a log house, but still an alternative.
The author conceived the construction of a bathhouse on personal plot, and the material for construction was chosen by timber, which is also much easier to do at the construction stages, because there is no need to cut crowns, grooves and everything else.
Previously, baths were built mainly without a foundation, as a result of which the lower crown quickly fell into disrepair due to dampness. There was also basically no drainage system, and sewerage, and water poured directly onto the floor, and went into the ground through cracks in the floor.
But in our time, everything is far from being the case, because people have learned to put a bath on the foundation, make a drain system, and sewerage, as a result of which the service life of the bath is many times increased. Same for recent times the bathhouse was divided into two rooms, a steam room and a washing room, which also has a number of advantages in terms of temperature, because temperature and steam are not needed to swim and wash, a separate room was allocated for these purposes.
The construction begins with the pouring of the foundation, then the erection of walls, roofing, installation sauna stove, interior decoration.
And so now let's take a closer look at all the stages of construction, how he carried out these works, and what he needed for this.
Materials: timber 100 to 100, cement, sand, roofing material, tow, roofing material, sauna stove, brick, chimney pipes, sewer pipe, car tires.
Tools: chainsaw, hacksaw, axe, hammer, chisel, drill, screwdriver, trowel, mallet, level.
And so, first of all, he invites us to look and deal with the scheme of the future bath.

Construction began in the winter and first rakes the snow to clear the site for construction.

And then pours the foundation, makes waterproofing.

Then he starts building walls.


Pay your attention to how the author makes a lock for fastening the structure.

As the walls are built, window and door openings appear.


Then he makes the roof and ceiling, while setting a plumb line in order to accurately install the sauna stove later.


And now the main part of the construction is completed, the log house is ready and hid under the roof.

Makes a sewer.


Proceeds to the installation of the sauna stove and chimney.


Coming to interior decoration baths.


A log bath is an additional building on the site, which is not as easy to build as it might seem at first glance. If you have professional construction skills, special knowledge and experience, the preparation and implementation of the project will really not take much time. However, it is quite dangerous for a beginner to undertake such a thing: the design may not last long. In any case, it is worth familiarizing yourself with the features of the projects and their implementation.

Preparation for construction
Before you build a small bath, you need to do the preparatory work.
Choosing a location
Any structure, regardless of the area and purpose, should be planned, following certain norms and rules. The place for the bath must be chosen taking into account a number of requirements.
The building must not:
- Being too close to a residential building.
- Harm the communication system.
- Crush the area closest to it.

It is necessary to take into account the distance to other structures in order to avoid problems with civil servants and neighbors. The rules of SNiP regulate at what distance it is necessary to build a bathhouse from other structures. According to the rules established by the state, from the bathhouse to other structures and buildings there should be:
- 3 meters - to a residential building;
- 4 meters to medium trees, and 5 meters to large ones;
- 1 meter to other shrubs;
- 4 meters from buildings where animals are kept.
The choice of material for the walls
Yes, a bath can be built from any materials. But it is advisable not to use the same brick, polystyrene concrete and foam block. They get too hot and then take a long time to cool down. In such structures, strong humidity is created, and when aired, the room dries very quickly.
Bricks and blocks, if desired, can be used, but they must be multi-layered for such variable thermal conditions.

The best option is a beam. It does not require any cladding. In addition, it is the tree that gives useful and healthy steam when heated.
Drawing up project documentation
Creating a bath project consists of:
- Outline sketches and drawings.
- Drawing up a work schedule.
- Budget calculation.
With a drawing, you can:
- make the correct orientation to the cardinal points;
- plan doors and windows;
- wire correctly.

When drawing up a project, it is necessary to take into account climatic conditions and the location of the object:
- It is desirable to place windows from the west and south.
- Put the doors on the side of the house.
- If possible, it is better to build a bath on some hill. Thanks to this, storm water will bypass it.
On our website you can find contacts construction companies, which offer the service of building a bath from profiled timber. You can directly communicate with representatives by visiting the exhibition of houses "Low-Rise Country".
Obtaining permission from administrative authorities
If you build a bathhouse without approving it in the relevant structures, it can be demolished due to any complaints from neighbors.

Therefore, it is necessary that the project be approved. To do this, it must include:
- Floor plan, even if the bath consists of one floor. The plan should include detailed drawings, sections and explication.
- Approximate estimate for materials.
- Foundation type with drawings.
- Written consent of all the nearest neighbors for the construction of a bath.
Obtaining a permit is a mandatory procedure.
Bath layout
In order for the project to be complete and allow you to get permission from the administrative authorities the first time, you need to know the design of the bath well. This will help you make the right drawings.
Baths consist of 4 parts:
- Dressing room.
- Shower.
- Steam room.
- Tambour.

Typical layout of a bath with a vestibule
Tambour
After entering, a person enters the vestibule. The tambour is at the same time a hallway and protection of the dressing room from cold air. It is sometimes used as a locker room. The size is chosen by the future owner.
dressing room
Behind the vestibule is a dressing room. This is the room where people relax. Because of this, it should be made comfortable, convenient, and most importantly - spacious. This room is also used as a place for cooling, so the presence of a window is necessary.

Important! Many make the floor slippery. This is a gross mistake. After leaving the steam room, the feet may be wet, which will directly lead to injury.
shower room

steam room
At the very end of the bath is a steam room. The main thing to consider is that the doors should not go to the vestibule! This error will constantly lower the temperature in the steam room, which will reduce its efficiency.

Stages of building a bath
Below is a step-by-step answer to the question of how to build a bath from a bar.
Foundation
The construction of a bath from a bar begins with the construction of a foundation. The strength of the structure will depend on the quality and reliability of the foundation. Therefore, it is necessary to take this stage with all responsibility.
- In addition to the material, when choosing the type of foundation, one should take into account the type of soil and the relief of the earth.
- Considering that timber structures are not heavy, in order to equip the base with even terrain, great choice will become strip foundation.
- If the relief difference is more than one meter, it is better to choose bored piles.
If it is decided that a bath from a bar with a strip foundation will be erected on a particular land, it is necessary to start work as follows. First of all, they transfer ready plan to the area. The theodolite will help with this. In the absence of this building device, it is proposed to use pegs and cords. They can also be used to draw straight lines.
As soon as the markup is ready, the construction of the foundation begins. First of all, trenches are dug. Their depth is determined by the type of soil and the depth of freezing in this area. If the soil is heaving, the trench should be 17-20 cm larger maximum depth freezing. Depending on the climatic zone, the latter indicator may vary.

A layer of sand is poured into the finished trenches, the minimum thickness of which is 13-15 cm. Next, install wooden formwork. Apart from wooden shield, for this use any sheet materials:
- slates;
- boards;
- plywood, etc.
Then you should lay a layer of waterproofing for the foundation. To stiffen the structure, the foundation can be reinforced using a frame of 14 mm rods, which are connected with wires. After that they prepare concrete mix to fill the trench. After 4 days, the formwork is removed.
Selection and purchase of timber
Further steps directly depend on the raw materials from which you need to build a bath from a bar. All you need to do is prepare quality wood necessary for the construction of walls in the bath.
Timber is one of the most popular and best building materials for a bath:
- It gives minimal shrinkage.
- Does not require fitting.
- Mounted on a small foundation.
But at the same time, its quality directly depends on the selected raw material. Therefore, at the stage of purchasing material, you need to be extremely careful.

When the site is located in a temperate climate zone, it is not recommended to use logs that are less than 20 cm thick. Otherwise, the walls will be too small and thin. Therefore, heat will be retained inside very poorly.
Small logs are often used in an attempt to save money, but this is a cancerous mistake. This will only increase the costs, because, it will be necessary to sheathe everything with thermal insulation materials.
Important! Need to find and buy good beam. Do not spend money on defective material. If there are cracks, axial deformities or lesions, discard and look elsewhere.
During the purchase, you should pay attention to the thickness of the trunks. If possible, it is better to buy those logs, the difference in thickness between the ends of which does not exceed 3 cm. Timber is cut along the length of the bath. In most cases the dimensions bath complexes are 6x6 or 6x3.
Laying rows
- The first row is called the lining crown. It is advisable for him to use the thickest logs and put them on the foundation base. Prior to this, it is necessary to lay waterproofing. After that they collect bottom harness. Logs are made on it in order to further collect the floor.
- Then comes the horseshoe crown. A window row is laid on it, and then a window row. How many rows will be calculated even during the creation of the plan. The height of the building depends on this factor.
- At the last stage, when all the crowns are already installed, the log house is left for a while. It should sag and take its final form. Best time for this procedure - up to 700 days.
The most important stage in the construction of a bath is the laying of a mortgage crown:
- Bars 20x20 are great for the first row.
- Necessarily - all the bars should be cut so that their length is the same.
Important! Even a little accuracy cannot be allowed. In most cases, "in the paw" is chosen as the type of connection.
When laying a bath on lining, and not on a foundation foundation, it is advisable to build a temporary roof over the building.

You need to spend a lot of effort for the ideal arrangement of rows and the most even laying. After the end of the first row, the remaining space between the base and the materials is filled with foam. There is no need to fix the first screw - the overall stability is guaranteed by the weight of the structure.
As soon as the process of assembling the log house is completed, window and door frames are installed.
Installation process: additional factors
Be sure to lay the waterproofing between the base and the first row of timber. The surface is covered with bitumen, then a layer of roofing material is applied. As soon as the first layer cools down, the second and roofing material are applied.
Mortgage rows should always be treated with antiseptics:
- Particular attention should be paid to the surface adjacent to the base.
- Machine oil is excellent as an impregnation.
Most professionals use this particular oil, because it is inexpensive and is sold almost everywhere.

- Lack of contact with the foundation.
- Improvements in ventilation.
- Protect trees from mold and mildew.
All of the above will increase the shelf life of the tree.
Roofing, screed and fine finishing - the final stage
- Lay the floor.
- Make a small decoration inside.
- Decorate the roof.
The roof is very easy to make. You should choose between single and double. Their main difference is in the slope. The gable is made of 2 planes, which together form a ridge.
Single-sided - this is one canvas. It is chosen for garages, sheds and other non-residential structures.

It is with the installation of lags that the flooring begins. Boards are laid on the logs. It is desirable to make them from pine or larch. Definitely need a floorboard!
Further work directly depends on which floor is being built. In baths, non-leaking or leaking floors are made. When choosing the second option, the boards are simply placed as close to each other as possible, slightly increasing the angle. At an angle, water flows into a gutter or siphon.
Further finishing is completely a matter of taste of the owner. Timber is an interesting and design advantageous material that does not require much effort in the design after construction. Leaving it in its original form, it will be possible to create the atmosphere of a classic Russian bath.
Video description
Interesting bath interior design ideas - in this video:
Those who intend to build a sauna or a bath from a bar on their own, and even from scratch, need to solve many problems in stages. Choose a project and material, study the video and tips for building a log house with my own hands. detailed instructions is also in this article.
Beam for a bath: how to choose
Determining what to build a bath from, it is no coincidence that many owners prefer timber. The following characteristics testify in its favor:
- the ability to retain heat well;
- aesthetics;
- minimum shrinkage;
- environmental friendliness;
- ease of installation.
As in a log cabin, in a log sauna it smells of wood, resins - like in an old Russian steam room. This has a beneficial effect on the health of those who take bath procedures. At the same time, it is cheaper and faster to build such a structure than its counterpart from logs: a log house can be installed immediately on the foundation, and finishing can be carried out without waiting for a long shrinkage.
Perhaps, the most significant drawbacks of the timber are only two: a tendency to rot and a high fire hazard.
Advice. The beam can be glued and profiled. The first is more expensive, but at the same time it is durable and does not deform. A profiled beam is, in fact, a log that has been given certain form. Thanks to the presence of spikes and grooves, it is easier to connect it. But the shrinkage of such log cabins can take quite a long time.
The choice of material is a more than responsible task. It is believed that wood that is cut down between December and March is most suitable for construction. According to all the rules, it is stored on a substrate and dried for about a month under conditions natural ventilation. When buying timber or getting it from your own stocks, pay attention to the following nuances:
- The presence of cracks is a serious defect. Even small gaps will expand over time, causing the wood to rot.
- Small holes are a sign that bugs have settled in the timber.
- Blue spots indicate that the material has begun to rot. Naturally, it is not suitable for construction.
Foundation design and pouring
What should be the bath - depends only on the preferences of its owner. Projects of buildings with a terrace are convenient if after a steam room you like gatherings with barbecue in the fresh air. In the bath with an attic, you can equip an additional rest room and accommodate guests there. But the glazed veranda is perfect place for summer kitchen or billiard room.
If you are planning to build two-story building, make a solid strip foundation. Otherwise, you can get by with a simpler columnar one. The tape is laid to a depth of at least 0.5 m.
Technology:
- After digging a ditch, pour sand or gravel on its bottom (layer thickness - 15 cm).
- Make a wooden formwork.
- Equip a frame of reinforcement inside.
- Make a concrete pour.
For column foundation:
- Dig holes up to 40 cm deep along the perimeter, as well as in the corners of the future bath. The distance between them should be about 1.5 m.
- In each of the ditches, make a 15 cm sand cushion.
- Install brick posts in the pits. Their height is about 0.5 m.
- When laying the foundation for greater strength, reinforce the pillars.
Attention! In any case, do not forget about waterproofing. To do this, apply softened bitumen to the surface of the foundation and cover it with a layer of roofing material. When everything has cooled down, repeat the same thing again.
Walling. Connecting a beam in the corners: methods
For the first row (crown) of the bath experienced craftsmen it is recommended to take a bar having a section of 20 x 20. For all other crowns suitable material with parameters 15 x 15. The main thing is that the length of all instances is the same. The construction of the walls consists of the following stages:
- Laying slats on the foundation at a distance of 25-30 cm from each other. This is additional insulation for the beam. Reiki should have a thickness of no more than 0.15 cm and be treated with an antiseptic.
- The location of the first row of bars. They should first be treated with a special antiseptic solution or conventional engine oil. Before connecting, make sure that the surface is strictly horizontal. Use a level for this.
3. Fastening the beams of the first row and filling the space between the slats with mounting foam.
Advice. For the first crown (row of a log house), take a larch or oak timber. These breeds tolerate moisture well.
- Laying on top of the first crown of an insulating layer, for example, from tow or moss. This is true for all subsequent rows of bars.
- Location and fixation of the second crown. To connect, use wooden dowels or metal pins. Holes must be pre-drilled for them. If you take nails, those that can be “drowned” in wood are better, because on the surface the caps rust and cause the timber to rot.
- Laying the remaining rows. You don't need to fit them closely. It is better not to connect the last two crowns, because you will have to remove them during the installation of the roof.
The bars can be connected to each other longitudinally, as well as at the corners. The first option is used when the specimens are too short in order to lay them out along the entire length of the wall (for example, a 4-meter beam is used for a 6 x 6 bath). In other cases, you can use corner connection. It happens with the remainder, when the protruding parts of the timber remain in the corners, and without it.
The first method is considered more reliable and much more attractive from a design point of view. It has 3 mounting options:
- 1-sided;
- 2-sided;
- 4-sided.
The number indicates the number of grooves that are cut in the timber. An optimal connection is obtained as a result of 4-way coupling, although this work is the most laborious. Fastening without residue, which is done end-to-end, on dowels or on spikes, is considered less reliable for a bath, so it is better not to use it.
How to make windows and doors in the bath. roof construction
When laying the bars, you can make a small gap in the rows - where windows and doors are planned. After the frame is ready and time will pass for shrinkage, cut openings with a chainsaw. But there is another option: to make windows and a door at once, during the construction process. To do this, you will need special grooves and specimens of bars with an end cut. The second method requires more time, and as a result of shrinkage, finished windows and doors can be deformed.
The roof on the bath can be shed - quickly and inexpensively. It is assembled from transverse log that are assembled at an angle. In this case, precipitation will not linger on the roof. gable roof – a good option if you need to equip an attic or a rest room under it. Installation of rafters and coverings from purlins is more convenient to do on the ground, and then put finished structure on the log You can cover it with a metal tile, roofing material or ondulin.
Advice. Miscellaneous materials for roofing are optimal for various angles tilt. For example, 5 ° is suitable for roofing material, and 30 ° for ondulin. Consider this feature when choosing a cover.
Do-it-yourself log bath: video
Construction of a bath from a bar: photo


If you try to find the most interesting project steam rooms, to be sure wooden and not too expensive, it is better than a bath from a bar 150x150, most likely, it will be difficult to find. The lumber material is quite capricious in operation, but if you put the bath box according to science, correctly build the foundation and basement crowns, then there is nothing wrong with a steam room made of timber.
Wooden baths from a bar
Among lovers of a real Russian steam room, the attitude towards timber material is rather cool. It is believed that a log bath does not last long, and even if it is built according to a professionally executed project, repairs will be required in 4-5 years.
In reality, a bar steam room has two important advantages:
- Build wooden bath possible for very little money. timber cost good quality lower than the price of hewn or rounded logs;
- A building made of timber does not have super-complicated corner and end cuts and joints, so building a box from profiled material is much easier than using a log or even a frame version.
Especially since modern methods construction allow you to connect crowns and ceilings quite simply and reliably. Metal spacers, tie-ins, corners simplify the process of joining, splicing and joining ceilings, walls and parts of window and door fittings as much as possible.
Important! Most of the work can be done with your own hands to build a wooden bath, a team of carpenters, at least, takes a third of the cost of materials for services.
Savings are large enough appearance bath boxes are of no particular importance. It does not matter whether it is a log structure, or the bath box had to be built from timber, anyway, the building will need to be insulated, sheathed on the outside with clapboard or panels. That's the only way to build warm steam room, which will stand for more than a dozen years.
How to build a timber box without problems
The cool attitude towards timber bath projects is due to too high vulnerability building material to moisture and sunlight. The beam run is made from the core of the log, from the most porous and unstable part. The beam absorbs moisture like a sponge, with prolonged heating or exposure to sunlight, it quickly cracks. Accordingly, the basement and the first three crowns of timber at poor protection and the foundations just rot. Therefore, for a bath, a material with a cross section of at least 150x150 mm is chosen, and moreover, it is impregnated and dried in the shade in several passes.

To make the design of the future steam room as durable as possible, two conditions must be met:
- To build a completely dry foundation for a bath from a beam of 150x150 mm, in addition to good waterproofing, the base must be equipped with a ventilation and ventilation system;
- Effectively block the heat coming from the steam room. It is necessary to build a full-fledged thermal insulation, which would prevent overheating of the bath walls from the inside in the summer and condensation in the winter.
In any case, it will be necessary to insulate and seal the joints between the crowns, regardless of whether the bath box is made of timber or of a more expensive rounded log. Of course, a log cabin looks more representative than simple box from a beam. It makes sense to build a steam room from a log at a small hotel or as an extension of a guest house. In all other cases, this type of bath is not economically viable; a natural-looking steam room will require considerable resources.

Advice! The same effect can be obtained if only a steam room is built from a log, and the main part of the building is assembled from a bar. After laying siding imitating walls log cabin, distinguish bar building from a log house made of hewn logs will be almost impossible.
Baths from a bar: photo
As an example, consider one-story option timber buildings with a classical layout, with a terrace and a stone foundation.

The owners did not use clapboard or siding to decorate the walls. The bath box was treated with high-quality polyurethane, epoxy-polyurethane or ship varnish. The coating will have to be renewed every 10 years, and interventional joints should be minted every three years. The cost of maintaining a steam room is comparable to a log box, but in return, the owners of the bathhouse received a very beautiful and well-groomed room.
Large timber looks very good in dark colors, you can easily get an old oak or larch. If you try to use dark toners for a log cabin, then the steam room will look not stylish, but frankly old.

Sometimes the problem arises of how to decorate the box of a small bathhouse so that the building looks fresh, and there are no associations with a barn or outbuilding. You can solve the problem with the help of finishing "under the log", as in the photo.

A large crown of timber 150 mm wide always looks very expressive on the walls. A small bathhouse can also be built from cheaper material 70x100 mm or 70x90 mm, but the design of such structures will be frankly “gray”.

Two-story baths from a bar
If we consider lumber material with a cross section of 150 mm as the main one, then it is quite possible to build a full-fledged bathhouse with living rooms under one roof. In the variant below, the bath is located on the first floor.

This so-called home version baths, when the kitchen and the steam room are united by a single heating and water supply system. Thick and durable timber allows you to build a full-fledged two-story structure without uncomfortable attic rooms. True, a covered terrace must be built on an attached columnar foundation.

For summer cottages, the reverse layout is most often used, when the steam room is transferred to the second floor, and living room and they prefer to build a kitchen on the ground floor.
At first glance, not quite rational decision, but in practice it turns out that this is an ideal way to build a house with a bathhouse, in which the lower crowns of timber will not rot due to the fact that the room is visited and heated once or twice a week.
How to build a bath from a bar with your own hands
First of all, to equip a full-fledged room with a steam room, a shower and a relaxation room, you need a bath project made professionally. high level. It is clearly impossible to build a steam room from a bar "by eye", and the point here is not the strength or stability of the box. It is just possible to build it by analogy. For example, take as a basis the project of a small country house from a bar 150x150 mm.
Timber walls, window structures and doorways, the floor and ceiling insulation system should be built taking into account shrinkage processes and thermal expansion of wood, especially in areas adjacent to the heater and chimney. In addition, before building insulation and a drainage system, you will have to wait 6-8 months until shrinkage processes are finally completed on a box made of timber. Only after that it is possible to insulate joints and seams, insert full-fledged windows and doors, build a stove and insulate the steam room.

Advice! The loads on the box during shrinkage processes are so great that craftsmen often prefer to build a room with door and window openings, partially covered with wall crowns.
This is clearly seen in the example of a two-story dacha bath. This method is used mainly for small buildings, 4x5 m or less.
The foundation for a bath from a bar
The design of the supporting part of the building made of timber is selected depending on the size of the building, its height, soil characteristics and the proximity of groundwater to the surface. The main task selection of characteristics and foundation scheme for a log bath was and remains a struggle with groundwater, condensation and rain moisture.

What is the best foundation for a bath from a bar
If the bath box turns out to be quite small, 3x3 m or less, then best solution there will be a columnar type of foundation. To avoid problems with soil deformation, you only need to build gravel and sand pad, on top of which they put supports made of concrete or brick.
Classic projects of a bath from a bar put on screw piles, today it is the only universal type of foundation on which even a two-story bath can be built without problems.
If it is planned to build a larger dacha with an attached bathhouse, then the residential building is placed on a strip foundation, and the timber extension is supported on poles.

Sometimes, if you are lucky with the soil, for example, in a stony or sandy-podzolic soil type, then the foundation can be poured in the form of a shallow tape. Mandatory with double waterproofing of the sole and plinth, drainage of the base and air vents around the perimeter.

The width of the foundation for a bath from a bar 150x150
It remains to find out the dimensions of the concrete tape. Usually, under a bath from a beam of 150 mm, the width of the foundation is taken equal to the thickness of the wall plus 50 mm for the arrangement of a protective cornice around the perimeter of the basement. If the floor logs are built at the level of the basement line, then another 50 mm will need to be added to the wall sheathing with a support beam.

For other types of foundation, the width is taken such that it is possible to insulate and close the space under the bathhouse with cladding panels.
Warming of a bath from a bar
The frame of the building, built from high-quality pine timber, with a section of 150x150 mm, already has heat-insulating characteristics sufficient to bathe in such a steam room, as they say, “on black”. It is only necessary to sheathe the steam room with linden or aspen clapboard so that the red-hot heater does not burn the wall insulation.
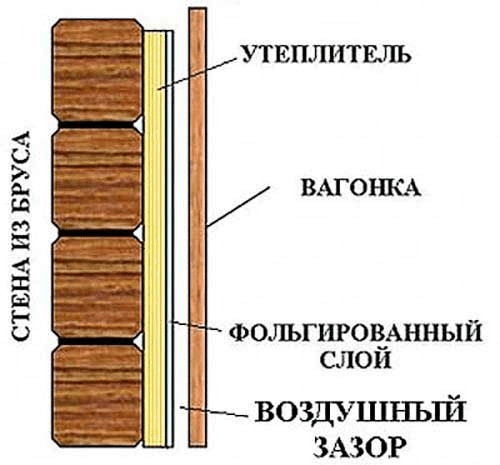
For real baths, a three-layer insulation scheme is used. First of all, it is necessary to build a vertical crate on the walls from a bar and lay a vapor barrier sheet. A small air gap helps to remove condensation and adds an additional 7-8% to the thermal insulation.
The next step is the laying of mineral fiber mats, for them it will also be necessary to build a crate, but already horizontal.

If possible, it is best to use mats with a glued reflective aluminum film, otherwise it will be necessary to lay an additional layer of foamed, foil-wrapped polypropylene. The insulation is completed with a vapor barrier membrane, on top of which a lattice of wooden lath and fill the lining of the steam room. In other rooms, thermal insulation can be built from timber without a reflective layer.
Conclusion
In the event that a bath is planned from a bar 150x150 mm in summer version, insulation can be done with two layers of foil-wrapped polyethylene foam. This will be quite enough for a summer vacation. Many craftsmen believe that it is much more important not to overdo it with wall insulation, it is better to build a more powerful stove than to insulate the walls from timber so that it will simply be impossible to get rid of condensate, and most of the water will drain to the bottom three crowns of the bath box.