A fairly common practice is sound and motion sensors in the house. We suggest you consider how to make motion sensors with your own hands, instructions, diagrams and photos in our article.
How the device works
The operation of the device is based on the reception and transmission of impulses emanating from the vibration of air (or water, for example, in swimming pools) while moving (and it does not matter whether it is a car, a person or an animal). The functionality of the device may vary depending on the requirements for it. There are several types of motion sensors:
- thermal (react to temperature changes in the reachable field). The most striking example is an infrared or laser sensor, mainly used in security systems;
- sound (transmit and receive impulse when air vibrates from sounds). A very simple device, used to record movement in open space;
- oscillatory (respond to vibrations environment and change magnetic field when moving within reach). They are most often used in an apartment or house to turn on or off lights, sound, and other things.
How to make a sensor
Let's look at how the most common motion sensor for alarm is created. It is done based on this scheme
 Motion sensor circuit
 You need to prepare the following tools and parts:
- voluminous body (can be taken from an old camera);
- Soviet-style control element base (buy at any electrical goods store or at a flea market);
- soldering machine;
- wires;
- screws;
- screwdriver;
Step by step guide
An autodyne is assembled on the basis of a transistor, which has now become a local oscillator and a mixing device for signaling. As soon as air vibrations (movement) are detected in the field protected by the device, the signal level will change. It fully corresponds to the Doppler shift, and will be equal to several hertz.
Video: how to make a motion sensor with your own hands
Next, with the help of a capacitor (in the diagram C2) and a low-pass filter (shown as C1, L3, the pulse will be sent to the alarm contact, which will also be a filtering part. Thanks to this, the pulse will reach its maximum and maintain these parameters for a certain time. Resistor (on Figure R11) will adjust the sensitivity of the circuit.
The comparators in this case are VD3 - a zener diode and a small relay (K1). It is imperative to take into account that the nominal mains voltage is 11 volts. Because of this, we also recommend connecting a signal-boosting stabilizer to the circuit.
Step two: adjust the board to the required parameters
There is an antenna at the top of our board; it needs to be thoroughly polished and treated with degreasing solutions; it is very advisable to cover it with rosin or at least acetone, because there is a high probability of oxidation of the antenna material during its use.
Next you need to wrap coil L1 and coil L2 with twelve turns of small-section wire (we took PEL-0.23).
Using a screw with a diameter of 3, screw the bushing to the central hole of the future sensor, secure it, and check the strength of the connection.
Now let's start fitting our body. We measure it, we need the board to fit into the box freely, i.e. the body is either sawn or another one is selected. In it we mark the location of the center of the board and there we also drill a similar hole, as in the diagram, treat it with acetone, and try on the board.
Three millimeters need to be drilled into the corners of the housing where installation is taking place. electrical diagram. Some deviation is allowed depending on your mounting screws.
The screws, sleeve and plates can be of any material, but be sure to check that the holes and legs are even. In some cases, you will still need to drill holes for future LEDs, but basically they are visible through the body.
The simplest sensor is ready, when assembled it will look something like this. Installation is carried out according to a clear scheme: indoor lamp or lamp daylight connect to the detector.
 Motion Sensor
 How to make a laser motion sensor
In the movies, everyone has seen lasers that signal the entry of robbers into a bank. Making an electronic motion sensor with your own hands using a laser is also not as difficult as it seems. You need to prepare the following components:
- infrared diode or photodiode, depending on capabilities and requirements;
- capacitive relay type RES55A,
- wire diagram;
- transistor and resistor blocks;
- Charger at 5 volts;
- multimeter;
- other tools and parts (gasket, screws, soldering iron).
First, let's disassemble the charger. We expose the wires and find positive and negative contacts there. Next, according to the rules, we need to set our resistor to minus. Now we connect a diode to it using a cathode, and the anode must be soldered to the adjustment resistor. Next, we solder the transistor emitter to the negative wire and connect a resistor to the base circuit.
In total, we get: resistor - minus, contactor - to the relay, relay - signaling device. Schematic diagram infrared sensor looks something like this:
 Schematic diagram of a motion sensor
 Using a screw, you need to attach this entire structure to the gasket, and connect the power wire to the screw head. Important: install the connecting screw so that it rests against the spacer spring; in this circuit it is a sensitive part.
This light alarm can be installed anywhere as long as there is an outlet nearby. It is most logical to place it at foot level.
Any of the above options can be customized to suit individual needs.
- The webcam itself can act as a motion indicator. If you connect it to the alarm, it will even make sounds, but in most cases it is enough to just download a special program to your computer;
- When connecting the sensor to the lighting system, make sure that there are no fans or large household appliances within its reach;
- To create with your own hands " smart home» We recommend using a touch switch. The fact is that in most cases there is already a built-in motion sensor;
- Select diodes for your laser carefully. IR radiation can be harmful to the eyes, so it is not recommended for domestic use;
- Car alarms are made using a similar principle. Only an audible alarm is also attached to the circuit diagram. When the sensor detects movement, a light comes on and a tone sounds, similar to a metal detector. Such a device is also called a radar sensor;
- If desired, include a capacitive display in the circuit; it will display the “Work” and “Stop” indicators. Or connect the monitor to a circuit similar to a webcam, and get a full-fledged home video surveillance network;
- It is quite possible to make a GSM alarm on a regular phone; to do this, you just need to download the program, just like on a PC.
If you need to carry out repairs, then all the indicators can be disassembled very quickly and basically the problem lies in the contacts, just clean them.
When you simply don’t have time to make motion sensors yourself, you can buy them at any electrical store, good feedback about GrandWay and Siemens models. average price device - 500 rubles.
Motion sensors are lighting system control devices that respond by turning on the power supply to the movement of objects in their “sector of responsibility.” Not so long ago, such devices were used only in security systems of various organizations. But now it is a technology accessible to everyone. They perform well in lighting local areas. Motion sensors are widely used in residential buildings, private and multi-apartment buildings, significantly increasing the operating comfort of lighting systems. In addition, thanks to such improvements, significant cost savings can be achieved.
The assortment of stores offers many lighting fixtures already equipped with a motion sensor. Installing them is, of course, easier. But often there is a need to separate the lighting device and the sensor over a certain distance. In principle, this shouldn’t cause any difficulties either. In this article we will look at how to connect a motion sensor to LED spotlight, used, for example, to illuminate the yard.
How the motion sensor works
Motion sensors are installed not only for lighting local area, but also inside the house itself. For example, a device installed on a staircase will turn on the lights only when it is really necessary - if someone is going up or down it.
Each sensor is designed for a specific sector located in its field of view. The principle of operation is simple - if movement of objects is detected in this area, then a circuit is closed that supplies power to the lighting fixtures. Therefore, the efficiency of the system is determined by the correct choice of installation location, that is, the creation of a “view” of the controlled area necessary under specific conditions.

Lighting devices connected to the sensor can be turned on only while the object is moving in the sector, or with a subsequent turn-off delay from several seconds to 10÷15 minutes. This parameter is preset by the user.
Types of motion sensors
When choosing such lighting control devices, they are evaluated according to several criteria.
Sensor installation location
Everything is simple here - sensors can be designed for street installation or for work inside the house.
Outdoor sensors are designed to monitor areas adjacent to the house. They usually differ in quite significant perception range parameters. In some instruments it can be hundreds of meters. True, for use on the scale of the courtyard of a private house, such ranges are not particularly relevant.

Such systems are convenient for owners when lighting the yard, for example, when returning home or leaving the house in the dark. The light will be turned on until the person leaves the sensor sector, and then automatically turns off. And for security purposes such a device will be useful. A bright spotlight that suddenly turns on will certainly scare off an intruder trying to get into the protected area under cover of darkness.
Indoor sensors are designed to work indoors in the home. They differ from external devices in their smaller viewing sector, poor protection from atmospheric influences of various kinds. It is clear that their cost is usually much lower.
Prices for motion sensors
Motion Sensor
Check out the requirements and automation options in our new article on our portal -
Built-in and separately located sensors
This criterion has many similarities with the above. But it already predetermines the initial constructive relationship between the sensor and the lighting device connected to it.

- The lighting device itself and the motion sensor can initially be assembled in one housing. It is clear that this is the most convenient option for installation. All internal switching has already been completed, and all that remains is to connect such a spotlight to the laid power line.

- The second option is that the motion sensor is placed in a separate housing, but attached to the spotlight. Such models are also quite simple to install. They are connected like a regular spotlight, since the switching of the lamp and sensor has already been carried out by the manufacturer.

- The motion sensor is made in a separate housing, which is installed in the optimal place for its operation. It is for such cases that a diagram for connecting the sensor to the spotlight is required.
The principle of responding to moving objects
According to the underlying principle of detecting moving objects, sensors can be infrared, ultrasonic, microwave and combined.
- Infrared sensors. The operation of these devices is based on monitoring temperature changes. When objects with elevated temperatures enter the sensor's tracking area, it reacts by turning on the power to the lighting fixture.
Infrared sensors are most often installed inside residential premises. And they are configured in such a way that they react to the movements of people, ignoring pets.
This type of device includes a set of special mirrors and lenses that affect the sensor. The sensitivity of the sensor depends on how many lenses it has, and there can be up to thirty pairs of them in one device.

Infrared sensors have their positive and negative sides, expressed in the following features:
| Advantages | Flaws |
|---|---|
| The devices allow you to determine the range and angle of the response sector as accurately as possible. | When installing a sensor in a house, it is possible that the sensor will trigger falsely when the temperature in a certain zone increases. These “troublemakers” are often portable heaters and heat-emitting household appliances, such as an electric kettle. |
| The infrared sensor only reacts to objects with elevated temperature, therefore can be used for installation outside buildings. | The device may malfunction due to atmospheric conditions. |
| Complete safety of the sensor for human and pet health. | The device may not respond to materials that are resistant to infrared radiation. |
| Small adjustment range. |
- Ultrasonic sensors. The operation of this type of device is based on the reflection of ultrasound from the surfaces of various objects. This principle of operation of the sensor allows you to determine moving objects by changing the frequency of reflected pulses (Doppler effect). This device detects ultrasound, which is inaccessible to human hearing.

Let us list the “pros” and “cons” of such devices
- Microwave sensors. The operating principle of these devices is based on radar. That is, they send a pulse and receive a reflected signal, just like ultrasonic ones. But only the signals already lie in the radio frequency range.

Microwave sensors are considered more advanced than their ultrasonic “competitors”. They are more sensitive and less susceptible to atmospheric interference.
| Advantages | Flaws |
|---|---|
| High sensitivity to any movement of living or inanimate objects. The ability of microwave sensors to detect movement even behind a thin wall or behind glass. | High sensitivity can also be attributed to the disadvantages of the sensor, since it can also respond to movements occurring outside the monitored area. |
| Resistant to all weather conditions. | High cost of devices. |
| Ability to serve several areas of the territory at once. | Microwave radiation is not good for human health. |
- Combined motion sensors. The design of these devices uses two or even all three principles of its response to the appearance of moving objects in the area of responsibility.
Control in a dedicated sector using such devices is carried out more effectively than when using “narrow-profile” sensors. Therefore, we can say that they are the most perfect. But this is also high cost, as well as the harm of microwave radiation to human health, if the sensor has such a motion recognition system. In this regard, you can more often find sensors on sale that include an ultrasonic and infrared sensor.
What else do you pay attention to when buying a motion sensor?
If you have not yet purchased a motion sensor for a spotlight, then when choosing one, in addition to the features of the devices listed above, you should pay attention to the manufacturer and some characteristics that are important for operation.
Prices for LED spotlights
LED Spotlight
- Among the companies that are popular with consumers due to the quality of their products are “Theben” and “Brennenstuhl” (Germany), “Orbis” (Spain), Russian brands “Camelion”, “Feron”, “TDM”, “ ERA". Many of the listed devices are assembled in China, but there are no particular complaints about the quality. And purely Chinese brands “Ultralight” or “REXANT” are also considered quite worthy and competitive models.
- The permissible load power must be at least not lower than the power consumption of the spotlight intended for joint installation. In general, it’s better to have a certain reserve, about 30%.
- For outdoor placement, it is necessary to select sensors that have a housing protection class of at least IP44.
- The most important parameters are the operating range and the angular width of the viewing sector.
- The manufacturer may indicate a recommended sensor installation height. This recommendation should be followed so that the system automatic switching on The light worked correctly, without failures or “idle” starts.
- High-quality devices have several adjustment controls - turn-off time delay and sensor sensitivity. IN inexpensive models These parameters can be preset and cannot be adjusted. This can be very inconvenient to use.
- Another adjustment element may be changing the light level for the device to operate. As a rule, a photo relay is included in the design of the motion sensor. That is, the device will respond to movement by turning on the light only in insufficient conditions, below a preset level. Agree, there is no point in operating such a system during the day.
If there is no photo relay, then you will have to turn the power on and off manually every day. Or still purchase an additional photo relay and include it in general scheme. How this is done will be shown below.
Schemes for connecting a motion sensor to a lighting device
When starting this section, you should immediately note the following. Despite the variety of models, almost all motion sensors are connected to lighting fixtures in a similar way. The exception is lamps that require voltage conversion. But here the whole difference is that the power supply is included in the circuit.
Prices for LED lamps
LED lamp

The standard connection system for the vast majority of motion sensors is a three-pin terminal. Two of them are the usual phase (L) and zero (N). The third contact can be indicated by the letter "A", "L out" or even just an outgoing arrow → . But in any case, this is also a phase, but this one goes to the lighting device when the sensor is triggered.
A. From here - the most simple circuit connecting a motion sensor to an LED spotlight.

A few clarifications. The power cable of a 220 volt network combines three conductors. Brown (in the diagram, in reality it may have a different color) – phase L, blue – zero N, and green-yellow – protective grounding RE.
Grounding RE goes directly to the spotlight - since in most cases there is a metal body, this measure is a necessary condition operational safety.
Zero N is switched equally to the corresponding terminals of both devices.
The phase goes to the terminal contact L motion sensor.
And finally, from contact A sensor terminals, the phase when the device is triggered will be applied to the contact L spotlights. Thus, when the circuit in the motion sensor is closed, the lighting device will turn on.
B. The diagram shown above assumes direct connection of the “spotlight + motion sensor” system to electrical network. But often a switch is also provided. By the way, there may be different options with it.
So, the following diagram demonstrates that the switch can be installed in a phase break going to the terminals of the motion sensor.

It is quite obvious that when the switch is in the off position, the power is interrupted completely. That is, the motion sensor itself does not work and, accordingly, the phase cannot reach the spotlight. When turned on, the system operates in its characteristic “standby mode”, that is, it reacts by turning on the light to movement in the “sector of responsibility”.
IN. But this arrangement of the switch in the circuit, as shown below, has a completely different purpose.

It is clearly visible that the power to the motion sensor is not interrupted. When the switch is in the “off” position, that is, with open contacts, the system operates in its characteristic mode, that is, the sensor controls the activation of the spotlight. But there are often situations when it is necessary to illuminate an area of the yard, so to speak, on an ongoing basis - performing certain chores at dusk, receiving guests, etc. That is, there should be no dependence on the activation of motion sensors. It’s simple - when the switch is on, the light will be on constantly, since the phase is along the section of the circuit shown in the diagram purple, goes directly to the spotlight, bypassing the sensor.
G. You can apply the scheme with two-button switch. Then, as necessary, you can select the most appropriate operating mode of the system at the current moment.

What happens with this scheme:
When both keys are turned off, the system is completely de-energized.
Turning on key No. 1 puts the system into the mode of tracking movement in a given sector and turning on the spotlight based on the sensor.
Turning on key #2 (regardless of the position of key #1) simply turns on the spotlight directly.
D. Sometimes complex configuration territory (premises) forces the installation of two motion sensors, or even more. In this case, they are placed so that the “sector of responsibility” of one intersects with the area of the other. That is, a moving person is constantly in the field of view of the devices.
In such cases, it is most convenient to connect motion sensors in parallel. An example is shown in the diagram below.

It is clear that in operation both devices are completely independent of each other, but each of them is equally capable of controlling the spotlight.
The scheme is less commonly used sequential connection sensors, when the phase to each subsequent device comes from the control terminal A previous one. It is unlikely that this method would be appropriate in the yard in combination with a spotlight. Therefore, there is no particular point in providing a diagram.
E. It has already been said above, but let us clarify that most household motion sensors are designed to operate on a 200 V network. But for one reason or another, it may be necessary to connect a lamp that requires a constant low voltage (12, 24 or 36 volts). This is often practiced, for example, in other outbuildings that require increased security measures.
This means that the scheme is slightly modified.

The working zero and grounding conductors are connected to the power supply. And the phase is supplied to it according to the same principle as shown above - through a motion sensor. And the DC voltage is removed from the power supply, which is transmitted to the lighting device while maintaining polarity.
AND. Another scheme to which modern conditions you rarely have to resort to it, but still... This is in case you happen to deal with an outdated model of a motion sensor that does not have its own built-in photo relay. It turns out that if you leave such a system in working order during daylight hours, the device will still turn on unnecessary lighting when it detects a moving object.
Turning off the power in the morning and starting it up in the evening is often simply forgotten. The problem is solved by installing another device in the circuit - a photo relay. This, by the way, is exactly the device that automatically turns on street lighting at dusk.
A circuit with a separate photo relay will look like this:

There is nothing complicated. Moreover, the principle of the arrangement of contacts on the photo relay terminals is exactly the same as the motion sensor.
Important - the phase from the power supply comes exactly to the terminal L photo relay And then from the output terminal A supplied to the input L sensor And then - according to the scheme already known to us.
The automatic photo relay is configured (or allows it to be configured) to a certain level of illumination. As soon as it falls below the set limit, the relay is triggered and the phase goes to the motion sensor. That is, during the day it stands without power, but at dusk it comes into operation. And when power is supplied to it, it begins to track the movement of objects in its sector, closing the spotlight’s power circuit if necessary.
* * * * * * *
All basic schemes for connecting a motion sensor to lighting fixture. It can be noted once again that despite the very wide variety of models, the principle of their connection remains common.

In addition, if the device is purchased in a store, instructions will definitely be attached to it. It usually describes in detail all aspects of installing a motion sensor - mounting in place, electrical switching and final fine-tuning of the adjustable parameters.
It's difficult to add anything. Unless you can just watch a video in which the master makes short review infrared motion sensor "FERON Sen 11". And then he shows the principle of its inclusion in a circuit with a lighting spotlight. After watching, everything should become completely clear.
Video: How to connect and test a motion sensor "FERONSen 11"
* * * * * * *
So, connecting a motion sensor to a spotlight or a regular lamp usually does not cause difficulties even for novice craftsmen. In addition, each manufacturer necessarily provides the buyer with instructions and a diagram for assembling the system, which simplifies the task even more. But when carrying out work, in addition to the recommendations of the instructions, all safety requirements must be observed. Electricity does not like and often does not forgive negligence, disregard for rules and other “jokes”. All electrical installation operations should be carried out only after the technician has ensured that the wiring in the work area is de-energized.
A motion sensor is an electronic infrared device that allows you to detect the presence and movement of a person and helps switch power to lighting devices and other devices. electrical appliances. It is based on a special detector of temperature changes in space (). Nowadays there are a lot of models of various Chinese detectors on sale, which are almost all similar to each other and differ only in the design and power of the switched lamps - the connection diagram itself is usually the same.
If you need to connect several at once through this device powerful lamps, That the best solution There will be a use of a magnetic starter or a powerful relay.
Installation Features
To install it, you need to choose a place that provides the best viewing angles both horizontally and vertically with a maximum coverage area. Most PIR motion sensors have a dead zone, the location of which should be taken into account when choosing their placement height and angle of inclination.
 Motion sensor HC-SR501 with regulators
 If the sensor is made in a fixed housing and does not have positioning adjustment, then you need to check technical passport, for correct placement of the device. Sometimes this device requires the presence of not only phase and neutral wires, but also ground (ground). Although most operate from a regular two-wire 220 V network.
Electrical connection diagrams
How to connect a motion sensor with a switch

An option in which it is installed parallel to a conventional switch.
How to connect a motion sensor without a switch

And this is for connecting it directly to a 220 V network without any other buttons.
How to connect several sensors to the network at once

On long stairs or corridors you may need several pieces controlling one lamp or long LED strip white glow.

Inside the PIR sensor there is usually a terminal block with standard colored and labeled contacts:
- L, brown or black - phase wire.
- N, blue - neutral wire.
- Ls or L’, red - phase return to the lighting lamps.
- ⊥ , yellow-green - protective grounding.
Lighting devices should be connected between contacts A and N. Electrical power should be supplied to L and N, strictly observing the polarity of the connection phase. If you are interested circuit diagram detector, then follow the link at the beginning of the article.
Sensor setup and adjustment
After installation, it is necessary to carry out the procedure for adjusting the motion sensor for lighting. After all, the geometry of the room is different for everyone (humidity, lighting, wall material).
- LIGHT or LUX - sensitivity threshold for illumination.
- TIME - trigger timer.
- SENSE - sensitivity.
The usual limits for adjusting the timer response time are set in most devices from a few seconds to ten minutes. The photosensitivity threshold can only be set in devices that have an appropriate light sensor. It determines the daylight brightness at which the device stops supplying voltage to the lighting fixtures. Setting the sensor sensitivity is the most subtle and capricious setting. In any case, the sensor should respond to the appearance of a person in the room, and not small animals. When changing the viewing angle of the device, sensitivity adjustment is often required.
Video
5 / 5 ( 1 vote)
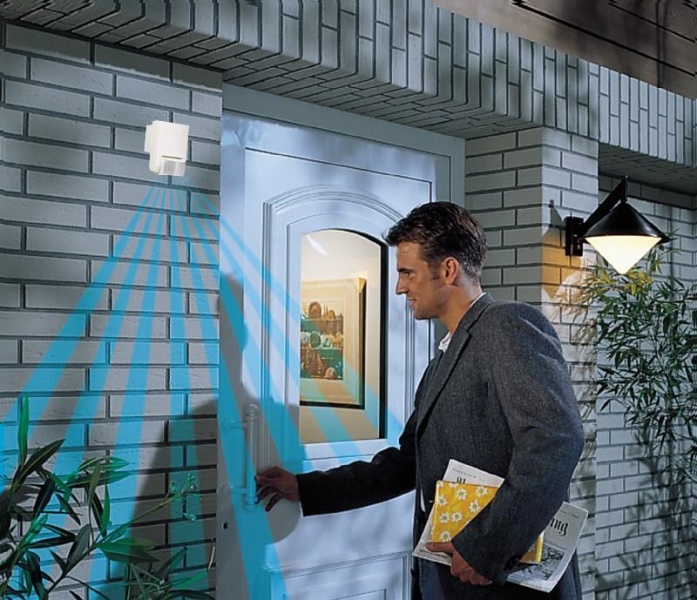
To ensure safety and improve people's comfort, motion sensors have recently been added to conventional lamps. They are designed to react in the area of their control - when moving, they transmit a signal through a wire to the lighting device, which turns on the light. If previously such devices were used exclusively for security purposes, today they have gained wide popularity in private houses and apartments. They perform the following functions:
- prevents searching for the switch in a dark room;
- save energy by turning off when movements are not detected;
- can activate an alarm and scare away intruders.
Externally, such lamps are represented by a plastic rectangular or round box, which is covered by a Fresnel lens. Through it, the device monitors movements in the control zone. The Fresnel lens is made of quite fragile and thin material, which requires special care when installing the lighting fixture. Also, when installing, you need to consider the size of people or animals that will pass through the control zone of the sensor.
Motion sensor with built-in light
When choosing a lamp with a controller, you need to pay attention to its appearance:
- motionless - does not move as a person moves;
- movable - turns in the direction where movement was detected, and is often used for security purposes.
Depending on the type, sensors can be:
- active - work on the principle of an echo sounder;
- passive - triggered by detecting the heat of the human body.
As a rule, the sensor range is limited to 12 m. And when installed in a room or on an area that has a non-rectangular shape, you will need to buy additional lighting fixtures with sensors.

Motion sensor connection diagrams
Expert opinion
When choosing a motion sensor, you should give preference to infrared models. They respond to the heat of the human body and are resistant to sound vibrations and vibration (unlike ultrasonic sensors that respond to temperature changes). They are the most accurate, but they require fine tuning, preferably professional.
Konstantin Kotovsky
Connecting the motion controller to the lighting fixture
Connecting a motion sensor according to the diagram is a simple operation that resembles connecting an ordinary switch. This is logical, because this device, like a switch, opens and closes contact through the electrical circuit where the lighting device is located.
Typically, a diagram for connecting a motion controller according to the diagram is attached along with the instructions or shown on the packaging or the device case.
According to the diagram, there are 2 types of sensor power wire: phase (conductor Brown) and zero (wire blue color). When a phase leaves it, it is transferred to one of the two ends of the lamp in the luminaire and vice versa. When the controller is triggered, the relay contact closes, which leads to phase transfer.
To connect the motion controller to the lamp according to the diagram, you need:
- remove the back cover and find the terminal block. There are 3 wires connected to it coming out of the device body;
- looking at the diagram indicated in the instructions or on the case, connect the wire from the sensor to the corresponding wire in the device case;
- After connecting the controller, put on the back cover;
- for connecting wiring to distribution box, where there are 7 wires (3 from the motion sensor, 2 from the lamp, as well as zero and phase), the phase wire of the power cable is connected together with the phase wire from the motion controller. Then the “0” wire from the power cable is connected to a similar wire from the lamp and sensor. Final stage- connection of the 2 remaining conductors.
Connecting the switch to the sensor
Some users of lamps equipped with motion sensors decide to connect them through a common circuit and a switch. This is necessary so that the light is on in some cases regardless of the operation of the sensor, for example, if you need to stand still or turn on the light in a room or in the yard before entering it.

Connection diagram for a motion sensor for lighting, for operation in two modes, as well as a switch + motion sensor
To connect the switch you will need to follow a simple diagram that can be found on the Internet. According to it, the switch will duplicate the functions of the sensor, in some cases controlling the light in forced mode. This scheme involves parallel connection of the switch and the motion controller.
With an active switch in the circuit, the light will not go out for the required period, and when turned off, the lighting will be controlled through the controller.
Motion sensor settings
In addition to connecting according to the diagram, you also need to adjust the following parameters:
- illumination (LUX);
- shutdown delay (TIME);
- sensitivity to infrared rays (SENS).
By adjusting the time settings, you can set the period during which the lighting will turn on from the moment movement is detected in the controlled area. Typically, this value for lamps ranges from 1 to 600 seconds. A person’s speed will also play an important role in setting the time period. It also determines whether the controller will work or not. If a person quickly passes through the control area, it is better to reduce the light burning time. And vice versa - when installing such a device in a garage or utility room It would be logical to set a longer shutdown delay.

Setting up motion sensors
As for the LUX illumination parameter, it adjusts the operation of the lamp during the day and at night. If the light level outside or in a room drops to a certain level, the light turns on. You can also change the light threshold yourself.
Setting the LUX parameter to the largest scale division is recommended if there is a small amount of daylight in the room and vice versa.
In many motion sensors in lamps, you can also adjust the sensitivity to lighting activation - SENS. The controller's response depends on what level of sensitivity to objects is set there. If the motion sensor is triggered quite often, or “sees” the slightest vibrations, the sensitivity needs to be reduced. A simple rotation of the lamp to the desired point can also help in changing it. In addition, you can set:
- range (no more than the maximum, which usually reaches 10-12 m);
- volume (if you do not want the lamp to turn on due to a flying bird).
By the way, in many models operating outdoors, reconfiguration must be carried out in winter and summer - some indicators in them may go astray.

Received higher education majoring in Fundamental Informatics and information Technology in Moscow state university named after M.V. Lomonosov. After that, he became an expert in a well-known online publication. After a while, I decided to try writing articles on my own. He runs a popular blog on YouTube and shares interesting information from the world of technology.
Automation of lighting systems plays a huge role in saving electrical energy. This also allows you to increase the life of lamps and conductors. Photo relays and motion sensors can help with this. It may seem that the connection diagram for a motion sensor for lighting is quite complicated, but this is not so if you know all the nuances and possible options. The article will discuss the available types of motion sensors, as well as methods for installing them.
What to choose from motion sensors
Motion sensors vary in many ways, so it is important to navigate them in order to choose the best one for a particular room. Based on their operating principle, they include:
- microwave;
- ultrasonic;
- infrared;
- active;
- passive.

In the first, microwaves are supplied for monitoring, which are similar to those used in mobile phones or stoves. If the reflection of the wave changes its range, then a trigger occurs. Ultrasonic devices send sound high frequency, which is not detected by the human ear. Infrared is used most often. Such motion sensors emit a special light spectrum, which serves as an indicator. Active sensors movements work in tandem with the receiver.
Based on the location of the motion sensors, as well as the detected territory, they are divided into:
- peripheral;
- for perimeter;
- internal.
The former are most often installed at the corners of buildings or in parts of it where movement is infrequent, but it is still possible. Perimetric motion sensors most often have a 360° directionality. This allows you to turn on lighting for people who move around the area with different sides. Indoor motion sensors are used inside buildings. They can also have different directions. Based on the location of the sensors, the following are distinguished:
- monoblocks;
- two-position;
- modular.

Monoblock motion sensors contain both a transmitter and a receiver in their housing. Thanks to their synchronous work, an analysis of what is happening occurs. Two-position devices have a transmitter and a receiver. Most often they are opposite each other. As soon as the beam or wave intersects, a trigger occurs. Modular designs motion sensors can have one transmitter and several receivers. Some motion sensors are combined and react not only to movement, but also to light levels. According to the installation method they are divided into:
- invoices;
- mortise
The first type can be mounted on any surface. The second involves some preparation, as it is mounted in specially prepared boxes. Overhead motion sensors have some freedom to adjust the angle of action if required.
How does a motion sensor work?
The motion sensor is a transition link. Its purpose is to detect objects and trigger certain actions. Most often it is used for lighting systems, but this is not the rule. In some cases, for example, a motion detector can start ventilation as soon as someone enters the specific room. There is no need for instrument loads to be placed on the sensor. For this, additional nodes are used that make this task easier. There are a few simple tips, which will be the key to the uninterrupted functioning of the sensor:
- presence of obstacles;
- interference;
- corner;
- purity;
- rated loads.
It is important to remember that the displacement sensor does not emit x-ray waves. This means that it cannot act through obstacles. Various objects in the beam's path may interfere with its operation. Depending on which motion detection device you choose, you must ensure that its operation is not interfered with by electromagnetic or thermal radiation. Each sensor has its own coverage angle, so it is important to correctly calculate the area it should monitor. The sensor emitter window must always be clean. Maximum load it is necessary to connect the one specified by the manufacturer.
Where to install the sensor

It was said above that it is important to choose the correct viewing angle, and therefore the correct location for installing the motion sensor. In this case, you must follow several rules:
- location closer to the door;
- avoid the central part of the wall;
- correct location in relation to light sources;
- the need to install several sensors;
- correct location in the entrance.
If it is intended that the light should only turn on when entering or leaving a room, then the motion sensor should be located as close to the door as possible. There's no need to choose central part walls, because the sensor beam may not cover the doorway. It is good if the motion sensor is mounted in such a way that it will not be exposed to direct rays from the sun or an artificial source. This may interfere with his work. If there are several doors in the room, then it makes sense to think about installing several devices or one with a wide coverage angle. When installing in a stairwell, it would be rational to install the sensor above landing so that the light turns on during the ascent.

Possible connection diagrams
There are several schemes for connecting motion detection devices. Some of them involve interaction with other modules. Among them are:
- straight;
- with switch;
- with photo relay;
- with starter.

The switching circuit directly implies a direct supply of power from the detector to the lighting device. It implies continuous operation of the sensor. When using a diagram for connecting a motion sensor with a switch, there are several operating scenarios. One of them involves connecting a break detector to a switch. That is, the device is powered only when necessary. Another scheme makes it possible to turn on the light bulb regardless of the detector. A connection diagram with a photo relay is often used. It is useful because the motion detector is only activated at night. If you want to include a load in the circuit that is more powerful than what the detector can withstand, then it is necessary to use a starter.
Installation process
All safety precautions must be observed during installation. It is important to turn off the power in the place where the detector will be installed. It is desirable that all tools have insulated handles that can withstand a breakdown of 1 thousand volts. For the whole process you will need:
- perforator;
- screwdriver;
- insulation stripper;
- terminal block;
- wire lugs;
- dowels and screws.
Advice! Most often, the connection diagram is indicated on the back of the device itself, so you can safely follow it.

The first step is to select a place to mount the device. Most often, places for self-tapping screws are already marked on the body. Based on them, you can make markings on the wall and drill holes for dowels. The next step is to dismantle the back cover and inspect the place and method of fastening the wires. Most often, a terminal block with three outputs is hidden under it. They can be designated by three Latin letters L, N, A. The first must be connected to the neutral, to the second the phase, and the third output is the power wire that goes to the consumer. The neutral wire for the consumer is taken from the main source. If it is implied Full time job motion detector, then the connection can be made directly in the device body.

If you plan to have a switch in the circuit, then it is worth installing a separate junction box in which the wires will be connected. The wires from the detector are fed into the junction box, and the main network is also connected there. If the switch is to turn off the detector, then the phase wire that comes from the source must be routed through it. In a circuit in which the switch forcibly turns on the lighting source, it is necessary to supply a phase wire through the switch to the contact that goes from the motion sensor to the final device, as shown in the figure above. But you should make sure that the detector supports this mode of operation.

Note! Sometimes it may be that the detector does not indicate which wire to connect where. In this case, you can focus on the color of the conductor. Zero is usually connected to blue, phase is connected to brown, and the third wire goes to the consumer.
When, based on a signal from the detector, it is necessary to start a high-power load, then a starter for the required power is purchased. In this case, the power wire from the motion detector is connected directly to the contactor, and it completes the circuit to supply power to the lighting. If you want to mount a photo relay, it must be connected to the break in the phase wire that comes to power the detector.
Connecting multiple sensors
There are times when a room is too long for one detector. In this case, it may be necessary to install several devices so that they power one consumer. This scenario is also possible. The commonly used method parallel connection several detectors. An example can be seen in the diagram below.
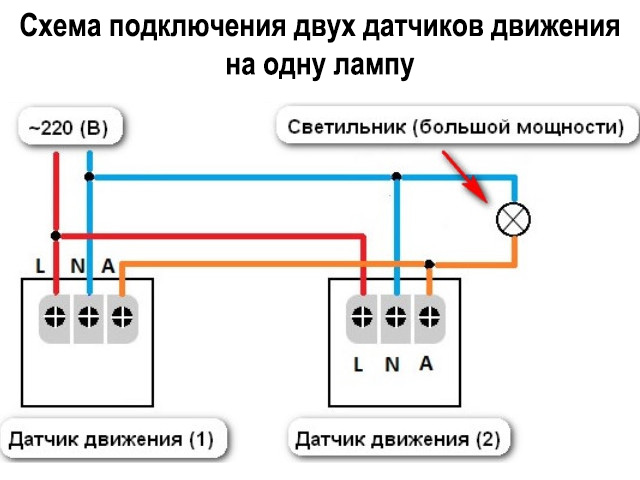
It becomes clear that power must be supplied to all detectors that will be installed in the room. The wires that should go to the consumer are connected to each other. This makes it possible to close the circuit at any time so that the lighting turns on. You can watch a video about this below.
Device setup
The matter does not end with installation and connection. It is important to configure the device correctly for its operation. Usually you can find two regulators on the detector, but sometimes there are three:
- time;
- sensitivity;
- illumination

Usually signatures are made on English language or special pictograms are applied for designation. Time or Time indicates the period during which power will be supplied to the lamp. The minimum value of this parameter is one second, and the maximum is ten minutes. Sensitivity or Sens sets a parameter that allows the detector not to trigger on rodents and small animals. Makes it possible to reduce the number of false alarms and, accordingly, save electricity. The illumination or Lux parameter is important in order to set the process of triggering the detector. This is especially important if there is a natural light source. The detector will be triggered when the illumination value is lower than that set on the housing.
Conclusion
Connecting a motion detector is not a difficult task if you follow the instructions above. When purchasing a device, you should ask the seller to write a check and fill out a warranty card. In this case, there will be confidence in the possibility of returning a defective or non-working product.


