This article contains 7 step-by-step master classes- how to make a key holder with your own hands on the wall in the hallway on a very budget! This does not require a lot of materials and time, because they can be made from scrap materials such as wood, branches, old toys
And with the help of the original design of a key hanger, you can emphasize the style and interior of your home or apartment.
Sometimes, looking at familiar things from the other side, you can notice completely new possibilities for their use.
Here we offer a new look at using Lego. We perceive it as an educational children's game (of course, adults too, because it's no secret that parents sometimes buy toys more for themselves than for their children). But with the help of a few tools you can use it to make not only different figures for games, but also an original wall-mounted key holder.

Key tag - also made from a construction element

Wall-mounted key holder made of plastic Lego
You will need:
- Lego pieces: a flat rectangular platform and as many small pieces as you want to hang keys
- Drill with fine bit
- Screws, dowels (2 are enough)
- Keychain rings
- Ruler
- Marker
- Lace
- Scissors
Manufacturing:
- On small parts of the construction set (square or rectangular to your taste), on one side, mark the middle with a marker and carefully do small hole drill.
- Tie a string to the ring and to the small part of the construction set (thread through drilled hole and tie a knot).
- On a large flat platform, make two symmetrical holes for screws.
- Attach the platform to the wall (depending on what kind of wall, use dowels)
- Put your keys on rings, hanging from small pieces and attach them to the platform.
Enjoy using it and don't lose your keys again!

Master class No. 2: Original key tags
Let's look at how to make a simple wooden key holder that can be mounted on the wall. This Master Class is very simple, for complete beginners in tinkering with their own hands.

Materials:
- Dremel 8050 Micro multi-tool or similar model(possible separately grinder, saw, drill)
- wooden block approximately 2.5 cm x 5 cm x 14 (we made it for 4 keys, if you need a different number, take the appropriate size)
- two small pendants for shelves (consider the selected size of the bar)
- leather lace (we used 1.5mm thick, but a regular strong lace can also be used)
- screwdriver
- 4 small opening rings
- 4 pendants around the neck (you can take the keychains you like)
- wire cutters
- round pliers
- pencil
- ruler

Step 1: To make the holder you need:
- Sand the wood block.
- Fix it and go through it first coarser grinding disc to remove irregularities and protrusions, then medium and smooth.
- Mark with a pencil the place for the hangers on the back side of the block and use an engraving cutter to make recesses with a depth of approximately 3 mm(the bar is symmetrical, so choose one of the two back sides at your discretion).
- In the place where there is an opening in the suspension, make recess another 3 mm.
- Place the hangers on the block and secure them with screws.
- On the front of the block, make marks for 4 openings(parallel, as in the photo) and using a cutter attachment, make indentations about 1 cm deep.
- Attach the block to the wall.
Step 2: All that remains is to make the keychains:
- Regardless of whether you took a pendant or a keychain, remove the mount (the keychain is too thick for the opening, and the pendant is too long). Use wire cutters if necessary.
- Place the release ring on the key. Can be clamped with pliers.
- Cut off from leather lace 4 even parts, thread through the key ring and keychain, tie.
Instead of a wire polygon, you can use any object, for example, any toy or ball.

Key tags can be made of any shape and type
Master class No. 3: Key hanger made from tree branches
The easiest way to make a key holder is to use tree branches.
- How to do it right .
- Then we decorate them at our discretion, either varnish or paint with paint.
- We buy in the store hooks, they must be sharpened on one side and carefully hammer it into the wood.
There are many design options for such hangers - look at the photos and choose!

Boho style key hanger


Very simple and beautiful!


Different options for hangers for keys and not only using branches

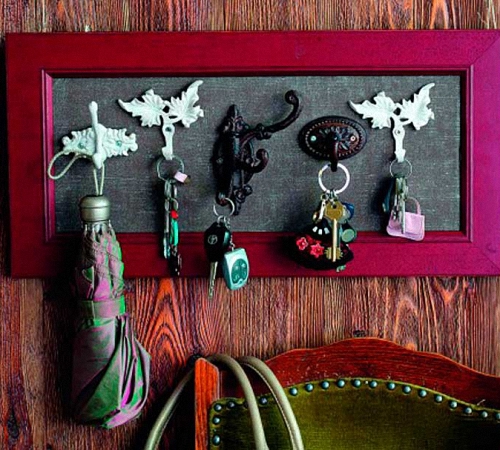
Master class No. 4: Made from wood and old keys
It sounds strange, but it is true, in this master class we will actually make a key holder, the hooks of which will be made from old and unnecessary keys.

Retro housekeeper
You will need:
- Rectangular wooden board
- Old keys (3-5 pieces depending on how many hooks you need)
- Nails (short and thin, but the head should be wide enough)
- Pliers
- Sandpaper
Manufacturing:
Using a saw, give the board the desired size and shape, and round the corners. Then use sandpaper to remove all burrs. If you are lucky enough to immediately find a suitable board, this step is skipped.

Attaching hooks to the base of the key holder
- Lock the key head, and bend the blade with pliers to form a hook shape. Repeat this step with the remaining keys.
- Place evenly hook keys on a board.
- In the place where there are holes in the key heads, drive in the nails(the cap must be larger than the hole on the key to hold it).
- The key holder is ready, all that remains is to hang it on the wall. This can be done by attaching hangers to the back of the board or driving two nails into the wall and making holes in the board and hanging them by them.
It looks very original and immediately reminds of its purpose.
Master class No. 5: Key holder with a vase
In fact, such a board with hooks can be used not only as a key holder in the hallway, but also as a kitchen hanger for potholders and towels, or for the bathroom.

Key holder with vase
It looks interesting and unusual, because it’s not often that you see a vase of flowers on a hanger.
Materials:
- Rectangular wooden board
- White paint for wood
- Hooks (3-4 pieces)
- Jar (maximum 0.5 l)
- Metal pipe clamp (must fit the jar)
- Hangers for fastening
- Screws
- Drill
Manufacturing:

- Paint the board in White color . This will perform two functions at once: aesthetic and protective, the latter is especially important when used in the kitchen or bathroom to reduce the effect of heat and moisture on the wood. Let the paint dry.
- Attach the hooks and clamp to the board using screws and a drill.
- The hooks have special holes for screws, but most likely they will not be in the clamp, so you should use a drill.
- Attach the hangers to the reverse sides e boards and hang them in the chosen place.
- Insert a jar with a bouquet or sprig of flowers into the clamp.
The result is a beautiful key holder gentle tones. It will complement the interior well and will serve as an additional accessory for decorating the apartment.
We also described in more detail how to make such a mount - as in the photo below.

Master class No. 6: Housekeeper “like in a hotel”
Such a housekeeper has not only original design, but a definite advantage over others described here is clarity and orderliness. It’s not for nothing that they are used in hotels, because each key location can be signed.
Only we will indicate not the room number, but the purpose of the key: for a house, work, dacha, car, mailbox, parents’ apartment, staircase etc. Often the keys to different rooms look the same, such a key holder will once and for all save you from situations when, instead of keys to the office, you put the keys to the dacha in your bag, and then you cannot open the door.

Large wooden key holder

Necessary materials:
- Thin wooden strip (approximately 8 cm wide)
- Frame strips
- Set of metal tags
- Hooks (threaded)
- Dye
- Suspensions
- Small nails or screws (very thin)
Assembly steps:
Step #1: Prepare the base
Saw the wooden plank into 5 equal parts. When choosing the length of the planks, keep in mind that you will then glue them together to make a rectangle or square; calculate the dimensions for the desired shape.

- Form a frame of the required size from frame strips.
- Staple 5 planks and frame special glue for wood, as it shown on the picture.
- Now we need to paint this entire structure.
You can first apply a wood antiseptic, wait until it dries, and then apply several layers of paint one after another. Wait for it to dry.


If you wish, you can give the wood an antique effect by rubbing it a little with sandpaper.
Step 2: Attach tags


- It's time to attach the tags. Think about how the board will hang: so that the slats are vertical or horizontal (in our example they are vertical). Lightly with a pencil mark the mounting locations, they should be at the same distance. You can place them under a ruler or make a stencil out of paper. Attach tags to wooden base cloves or tinsel.
- Under the tags in the center of each of them Make thin holes for the hooks with a drill, use the thinnest nozzle.
- Screw the hooks into the holes.
- Attach With reverse side key holders pendants and hang it on the wall.
- Insert notes about the purpose of the hooks into the key tags and hang the keys.
Use it to your heart's content!
Ideas for key holders using improvised means
From a tennis ball
Easy way to make a key holder from a tennis ball:
- fasten with liquid nails a ball to the suction cup (bath hooks are sold like this),
- make a cut with a sharp knife in the center
- decorate: attach eyes (can be taken from an old doll) or draw with a marker.

Key holders can be wall-mounted or pocket-mounted. Pocket cases are made of leather or fabric. There are hooks for keys inside the case. This type of key holder contributes more to the convenience of carrying keys in a bag and teaches neatness and organization (keys in a case are inconvenient to carry in pockets).
Key holders that hang on the walls are open and closed design. Closed key holders are not very convenient if you have to use them frequently (the doors of the structure will have to be constantly opened and closed).

Open key holder design
The shape of the key holder largely depends on the place where the key holder will be nailed. Perhaps it will be long and narrow, or shaped like a square or a circle. For the first time, you can come up with a sketch complex model and feel free to get to work.

Wooden planks are a favorite material to work with.
Wood planks are the most favorite material for crafts. First of all, they are easy to find. Secondly, planks of any length and thickness are suitable. Thirdly, the planks can be folded into any shape and connected to each other in any sequence. Another important argument is the fact that wood is easy to process. For example, using sandpaper you can sand the surface until smooth. The surface of the wood can be coated with paint, varnish, or stain. Each time it will be a completely different appearance of the wooden surface. But still, the base of the key holder will be in a strict classical style.

If you want to enhance the wood pattern, then wire brush needs to be broken flat surface planks. After this, varnish, paint, and stain are applied. Again, the drawing will be different each time, but soft spots after coating they become darker and this is how the wood pattern appears on the surface.

To the processed wooden surface After it has completely dried, the hooks are nailed. You can use the same hooks, but hooks that are different in color, shape, or material will give your key holder some uniqueness.

It's easier to work with plywood
Using plywood will reduce working time. the main task- this is to come up with an interesting figure for the key holder. You can cut out a large key, a dachshund, a mouse, a sleeping cat. The surface of plywood, unlike wood, does not require treatment. All you need to do is sand the cut areas (edges of the plywood). To make them smooth, they are coated with paint. Last step– attach hooks in a strict order or randomly.

An original way to use picture frames
You can make an unusual key holder using a picture frame. Hooks can be attached to the frame itself to the top bar on the back side. It is also recommended to attach the chipboard base with brackets on the reverse side. It can be decorated with wallpaper or small multi-colored mosaics, painted, or simply glued on a design. Hooks can then be attached to this base.

Key holder made of wood and without hooks
It will be unusual to see a key holder without hooks. Wood is used to make it. The trick is that the keys are not hung, but inserted into the slot. It is not difficult to make such a gap in a wooden base. You can cut the slot exactly along horizontal line, or you can do it with an acute angle to the wall. For this you need milling machine or circular saw. You can carefully achieve a good result with a regular saw. The cracks made must be carefully processed.

Key holder in youth design
If you have non-working panels of any instruments, then they can be used to decorate an unusual avant-garde key holder. It is important that the panel has sockets for plugs. A carefully cut panel from the device is screwed to the wall. The key is connected to the ring, a plug is attached to the ring, which can be inserted into the socket of the new key holder. So the key, with the help of its unusual keychain-plug, will be attached to its new place.

An interesting key holder will be in the form of the neck of any stringed instrument, for example, a guitar. If it is inconvenient to hang the keys on the neck pegs, you can attach additional hooks.

Unusual options for key holder models
Nobody says that creating key holders is necessarily a long and painful process. You can take a non-standard approach to this issue. Then the key holder will be ready in 5 minutes.

- The connectors will play the role of a key holder, and the plugs will act as key fobs. The new key holder-connector is simply screwed to the wall in the selected location. By inserting the plugs into the sockets, the keys are hung in their places. The work will take 20 minutes.
- Hooks are hung on a straight stick with aluminum wire. The stick can be painted or wrapped with multi-colored woolen thread. A rope is tied at both ends of the stick. The original key holder is hung on it by nailing a nail or hook into the wall.
- A key holder is made quickly and originally from wine bottle corks. Wine corks connected to each other using glue. You must wait until it dries completely. You need to buy hooks and screws on sale. Such a screw is screwed into the cork surface along with the hook. Minimum costs and the original design of the key holder.

The required number of hooks and the size of the structure depend on your wishes and, to a greater extent, on the number of household members. If the family is large, you need to make sure that the model is durable. It is recommended to hang the key holder at eye level of the youngest family member (not counting, of course, the tiny baby). The key holder needs to be decorated so that it fits harmoniously into the interior of the corridor. Invite the children to design a model of a key holder and let them show their creativity.
Key holder - convenient and original way keeping keys in order. There are two types of key holders - wall-mounted and pocket-mounted. We invite you to familiarize yourself with original ideas for making wall key holders with your own hands.
DIY wall key holder - varieties and characteristics
The design features of key holders changed in relation to the type of keys used. With the great popularity of spring and lever type locks, the size of the key holder was large and very original. Key holders had various shapes; forging, wood carving, painting, etc. were used to decorate them. Household key holders were made in the form of wall linings to avoid damaging the finish with a metal key.

One of the most popular options is to make a key holder on a board, which easily fits into any type of interior, takes up little space and has a simple design.
Key holders in the form of small shelves are also distinguished by their compact size and ease of use. To make the simplest key holder, it is enough to use wood or plywood. On such a key holder you can also store other small items, such as glasses for example.
If the house has a large number of locked premises, sheds, outbuildings, etc., then installing a key holder will be relevant large sizes. Most often, it has the shape of a board, each of the fragments of which has certain type key The location of such a key holder is usually near the kitchen or in utility room. For a standard set of keys used for locking front door, a small key holder is installed, usually located in the entrance room.
If access to the key holder is limited, it is necessary to install a lockable cabinet option. Such key holders are located in secluded places; some of their options are additionally locked with a key or a special code, which is even more convenient.
The most popular option for a key holder is the board key holder. Their widespread use is explained by their simple design, ease of operation, and convenience. self-made. It is quite possible to make such a key holder from a regular piece of board. However, it is recommended to choose boards that have oblique grooves for making a key holder. Next, you should install the fasteners for the keys. Most often, these are nails or screws. If necessary, the key holder is painted in relation to individual characteristics premises and installed on the wall.
The key holder in the form of wooden block. All fasteners for keys are located on it firmly, without the possibility of deformation.
Another option for making a key holder is a frame. It goes well with the wall and makes the interior unusual and original. It is enough to build a frame from wood or other materials, attach hooks for keys to it and hang it on the wall. When provided with a durable finish, it functions as a highlighted image on the wall. To fix the frame to the wall, use glue or additional fasteners. The installation method is determined individually depending on the material from which the walls are made.
To combine several useful properties key holders, we recommend taking a closer look at the key holder and organizer. On such a spacious shelf there is room not only for keys, but also for various papers, notes, reminders.

If there is a need to install secret locks or store not only keys, but also additional documentation, we recommend choosing a key holder cabinet. Sometimes the front door of such a key holder additionally serves as a clock.
Another subtype of a cabinet-shaped key holder is a house key holder. Wood is most often used for its manufacture. The front door of the key holder is decorated with carvings, original drawings or even decoupage. The size of the house key holder is smaller than that of the cabinet, it is more compact and roomy.
DIY wall key holder - master class
If you have an unusual, original box in your house, you can also use it to build a key holder. In this case, on back wall the box is attached with fittings to hold the keys, and it is fixed to the wall with self-tapping screws. Please note that the box in this case must be made of wood.
The same key holder can be made from an old wooden box, additionally completing its decoration. For additional strength, the wood is coated with moisture-resistant compounds.
Quite often, key holders are made from leftover plywood. With the help of a special tool, it is possible to create incredible works of art in the form of small key holders. For additional protection plywood, it is varnished, after sanding. Artistic sawing using plywood allows you to make key holders in the shape of a horse, heart, star, animal and plant.
In production, this process is performed using laser systems. However, it is quite possible to make this version of the key holder at home. For these purposes, follow the instructions below:
- draw or print the picture you want to receive;
- prepare a hand jigsaw;
- if you have a vibrating jigsaw, use it to cut particularly thin elements;
- using hand cutting, the workpiece is made in order to hide minor irregularities, the surface is additionally processed using an electric wood burner;
- To manufacture such a device, you will need an old soldering mechanism and a power supply unit.
We offer the option of making a key holder in the shape of a key from plywood. To make it, prepare a sketch of the shape you like. This type of key holder is especially interesting for children, as it has an extraordinary shape and resembles a “Golden Key”.
DIY wall key holders photo:

To make original wall key holders with your own hands, it is enough to use simple improvised means. The first option - fixing branches with knots on a wooden plank allows you to get a completely original key holder. Do not choose branches that are too small, as they may break under the weight of the key. Do not forget to additionally treat the wood with antiseptic compounds.
The second method is to use previously dried boletus mushroom. These elements are characterized by high strength and long service life. Using old cutlery in the form of forks and spoons, you can also build original key holders. By bending the fork in a certain position, it turns out original hanger for keys.
If you have experience working with various techniques When decorating key holders, it is possible to build entire masterpieces in the form of wall key holders. You can make a key holder from polymer clay various forms And color solutions. The most important thing is that this element should be in harmony with general style interior design. After drying, polymer clay acquires special strength and has a long service life. Additionally, fittings of a suitable size are fixed on the key holder.
An oven is used to bake the finished part. Only after complete cooling is the part ready for use and further opening with varnish.

The prepared surface of the key holder is also decorated using decoupage technique. To fix this removal, a matte or glossy varnish is used. There are two methods of decoupage - direct and reverse action. The first involves pre-coating the surface with a primer, applying glue and gluing the picture.
The second method uses transfer-type pictures installed on the surface. DIY wall key holder decoupage - original and unusual appearance. Particular attention must be paid to the absence of wrinkles on the surface that can be decoupaged. It is possible to decorate the key holder with 3D decoupage. However, for this you need to have experience in carrying out this kind of work.
How to design and make a wall-mounted key holder with your own hands
The process of designing a wall key holder needs to be given Special attention. After all, both the aesthetic appeal of the resulting product and the duration of its operation will depend on the quality of this process.
Most often, wooden key holders can be painted, varnished or artificially aged. For painting wooden products We recommend using acrylic-based paints. Their drying time reaches five hours. They differ widely color scheme, the presence of simple and glossy shiny shades. With their help you can imitate wooden, metal, nickel, chrome surfaces.
After applying paint to a wooden wall key holder with your own hands, you can obtain a thin, durable and elastic coating. Thus, it is possible to achieve the effect of an aged surface. For these purposes, an abrasive sponge is used, which is used to treat the surface after painting.

As additional elements To decorate the surface of the key holder, we will highlight the following means:
- varnishes - these compositions allow you to obtain a glossy, matte, textured or smooth surface;
- varnishes with a 3D effect - allow you to create a fairly thick protective covering, which has individual optical components and makes the image convex;
- textured type pastes - after drying, they allow you to create an image in the form of an aging, cracking texture.
The technique of decorating a key holder with crackle consists of obtaining a cracked surface. At the same time, there are many varieties of this technique and Various types compositions for crack formation.

How to make a wall key holder with your own hands photo
Particular attention should be paid to the key holder, with a secret mechanism. This version of the key holder has the shape of a regular picture, which opens using a special lock. By pressing the secret bar, you can open the key holder. The secret bar, in this case, is equipped with special bevels that allow it to open and close with one click.
To make such a key holder you must have special experience and knowledge. First of all, you should draw up drawings and determine the mechanism for opening the picture. Next, you should build its frame part.
There should be hooks inside the picture for placing keys. Additionally, the mechanism is equipped with spring mechanisms and clamps. We recommend purchasing such a key holder in a specialized store, since its manufacture will require a lot of time and effort.
Another option for a hidden key holder is a key holder in the form of a shelf with hidden lock. To open it, a special magnetic locking mechanism is used. Therefore, to open such a key holder you will need a special key.

DIY wall key holder made of wood
When working on a key holder you will need:
- scraps of plywood or fiberboard sheet;
- acrylic paints;
- varnish for treating wooden surfaces;
- napkins;
- brushes;
- glue;
- fittings and fasteners.
To make such a key holder from wood or plywood, make a rectangle or square. In order to give the surface maximum smoothness, sand it additionally. After stripping, the workpiece should be coated with spray paint. Next, the workpiece is varnished in several layers with completely dry everyone. Further actions surface decoration is determined individually and described above.

To secure any decor, a moisture-resistant varnish is used, which will protect the key holder from destruction. Additionally, secure the key fittings to it. Hang with self-tapping screws ready product on the wall.
Making a wall-mounted key holder with your own hands is a completely individual process, the procedure for which is described in the drawings and depends on the preferences of the craftsman performing the work.
How to ruin your mood without leaving home? It's very simple, just forget where you put the keys! It’s especially offensive to be late for an important meeting because of such a trifle.
Keep your keys in one place so as not to waste time and nerves looking for them at the right time.
If you are tired of wasting time looking for the keys to your apartment, car, office, garage, basement, there is a simple solution that will allow you to forget about this problem once and for all.When you have a key holder hanging in your hallway, your home is more orderly.

Tested: the sight of empty hooks is the best reminder that you need to look right now, and not just before leaving.
A wall-mounted key holder will not only become a permanent meeting place for all your keys, but will also decorate the hallway: there are many design options for this essential item in every home.You don’t have to look for the key holder of your dreams in the store: you can make it yourself! In this article there are several available master classes in which you will find ideas for making it.

You will have to try a little, but the result will meet your expectations.
- A key holder in a style, size and color that matches your interior is a rarity. It is enough to go looking for her once to be convinced of this. You will save time if you do it yourself.
- Only a key holder made for your home with your own hands can become the embodiment of your individuality and love for your loved ones.
- You will be sure that your wall key holder made from durable and quality materials, because you chose them yourself.
- You will not only enjoy creativity, but also surprise your guests with a beautiful and unusual thing in the hall.
- Finally, a homemade key holder from scrap materials will cost less!

“Keepers of the keys” are very diverse. You can choose them to suit a variety of interiors and hallway styles.
Deciding on design and construction
How to make a key holder for your home? Very simple! We have selected design solutions, thanks to which you don’t have to spend money on expensive materials: almost every apartment has everything you need for work.
Materials and tools:
- Plywood, a piece of chipboard, leather, frame;
- Acrylic paints, stain;
- Hooks and hangers;
- Drill, jigsaw and pressure roller;
- Screwdriver, spatula, awl and needle;
- Sandpaper;

To realize the most daring ideas, you need only a few materials and tools.
Master class No. 1: key holder made from cut wood
Do you want your key holder in the hallway to look stylish? This master class describes in a simple and accessible way everything that is required for this.

Some simple steps– and it can be hung on the wall.
What you will need:
- Spil,
- Alcohol or water stain,
- Abrasive sponges or medium to fine grit sandpaper,
- Acrylic lacquer,
- Printing of the mirrored image,
- Wide synthetic brush,
- Pressure roller,
- Hooks,
- Suspensions – 2 pieces,
- Drill,
- Crosshead screwdriver.
Key holder from sawn wood - suitable option for those who like to work with wood. You can use cut wood of any species, but it is better if it is pine.

Its wood is easy to process and has a beautiful pattern.

Master class No. 2: a key holder made from a branch
This master class is for those who often spend time outdoors and simply adore eco-style in the interior! You don’t need a lot of materials, the main thing is to find a suitable branch.

This key holder is sure to surprise your guests!
What you will need:
- Dry tree branch,
- stain,
- Acrylic paints (optional),
- Jigsaw,
- Drill,
- Suspensions.
There are no two identical branches, which means your key holder will certainly be special!

Making such a key hanger is easy.
- We take a tree branch we like, wash it, dry it, and saw off all the excess. Now we need to decide whether we will preserve the bark. Option A: remove the bark, using sandpaper if necessary. Option B: the bark remains, we remove only its damaged areas.
- Using a jigsaw, we will make a cut on the side where the hangers will be and using a drill we will drill recesses for the self-tapping screws.
- Using a wide brush, apply stain to the key holder: it will not only shade the wood, but also serve as an antiseptic. After this, we leave the branch to dry for about an hour.
- If we have an option without bark, we simply cover the branch acrylic varnish. If you chose the option with bark, first saturate the branch with varnish diluted with water in a 1:1 ratio, and after drying - undiluted.
- If desired, you can go over the surface with a dry brush. acrylic paint suitable shade. The result needs to be consolidated finishing layer varnish
- Knots will serve as hooks for keys. All that remains is to screw the hangers.

You can be proud of the results of your work: the key holder is ready.
Master class No. 3: key holder made from a picture frame
Do you have at home old frame from a painting or photograph? Don’t rush to throw it away: the key holder is out of the frame - great way decorate the wall and define permanent place for keys!

This master class describes not only how to make a key holder, but also how to decorate it.
What you will need:
- Frame,
- Fit to size piece of plywood,
- Acrylic primer,
- Acrylic paints,
- Wide synthetic brush,
- Medium to fine grit sandpaper or abrasive sponges,
- Decoupage card,
- transparent file,
- Glue for decoupage (or stationery pva),
- Acrylic lacquer.
- Key hooks and hangers,
- Drill,
- Crosshead screwdriver,
- Jigsaw.

Necessary materials for work.
To get started we need to know inner dimensions frames Using a jigsaw, we cut out a rectangle of the required size from a piece of plywood.We take a thin drill (with a diameter 1-2 mm smaller than the screws on which we will attach the fittings) and drill all the necessary holes.We cover the plywood with acrylic primer or white paint. When the primer is dry, sand it with medium-grit sandpaper (No. 600-800) and wipe with a damp cloth.

For the frame we use paint that matches the color.
Now we will decorate our product using the decoupage technique. Place the image face down on a stationery file and moisten it well with water, smoothing out the bubbles formed on the surface from the center to the edges.Apply glue to the primed plywood base and immediately attach a file with a decoupage card. Again, smooth the card from the center to the edges (it is convenient to use a pressure roller). The file can now be removed.

If there are small folds left somewhere, the pattern can be smoothed out with wet (!) fingers. Leave to dry for 2 hours.
Now you can tint the frame with diluted acrylic paint. Apply acrylic varnish with a synthetic brush.We insert the plywood into the frame, screw in the hangers and hooks.

If you have a lot of keys, this key holder will keep them organized.
Additionally, you can hang tags with numbers. And to make it easier to navigate, just stick signs under each of the keys with the inscriptions “From the basement”, “From the dacha”, etc.
Master class No. 4: key holder made of plywood or chipboard
Do you have 6-10mm thick plywood or a piece of chipboard? Do you have any shelves left over from an old bedside table? Arm yourself with a jigsaw, and you will have an exclusive wall-mounted key holder made from materials you never even thought you could use!

It is much more aesthetically pleasing when there is an original item in the hallway.
What you will need:
- Pattern,
- Jigsaw,
- Drill,
- Wood putty,
- Putty knife,
- Key hooks and pendants.
We find a suitable picture on the Internet and install it required sizes and print it out. Simple generalized shapes look impressive: a fish, a key, a leaf, the outline of a flying bird, a cat...

It would be great for budding designers to try their hand at creating open key holders.
The pentagon easily turns into a key house. Even an ordinary circle can be played up if, by adding a few details, you build from it, for example, a similar hot air balloon. We cut out the shape along the contour and trace the resulting pattern with chalk or a simple pencil.Now you will need a jigsaw.

Carefully, slowly, cut out the selected shape along the contour.
It happens that chips form on plywood when working with this technique, especially if the plywood is not in its first youth. It is within our power to make the surface and even the ends of the key holder smooth. We arm ourselves with a spatula or palette knife and apply it to problem areas wood putty. We wait until it dries completely.

We sand with sandpaper, first medium and then fine, paying special attention to the ends.
Using a drill, we make recesses for the hangers and drill holes for the screws that will hold the hooks.

Turn on your imagination at full capacity and create!
The key holder can be decorated with your own hands using the decoupage technique, as described in the previous master class (in this case, we will additionally need glue and a suitable design).

All that remains is to screw the fittings and hang it on the wall.
Master class No. 5: leather key holder
How else can you make a key holder? If you think that the best place for keys - this is a pocket, our master class is for you.

A key holder made using the technique described will not require much effort.
What you will need:
- Pattern,
- Thick leather (an old bag will come in handy),
- Lining,
- Lightning,
- Strong threads
- Thick needle
- Awl,
- Buttons,
- Carabiner for keys,
- Scissors.

You decide for yourself what materials to use and how to decorate the key holder.
The more keys you have, the larger the pattern should be. Exactly according to the pattern, we cut out all the details from leather and suede. Connectingdetails of the outer part and lining.

To make the product look neat, trim the edges with scissors.
All that remains is to unscrew our key holder and admire the result. We attachcarbine - and a leather key holder in your pocket!

Now, no matter how many keys you have, they are all in one keychain.
Decorating a key holder: ideas and solutions
Your key holder is almost ready. It's time to add some more charm to her! Shabby chic or Provence, cyberpunk or country, ethnic style or retro, painted or embossed... Only you can decide what technique and style the key holder will be decorated in.

This can be done using available materials, so we are collecting ideas.
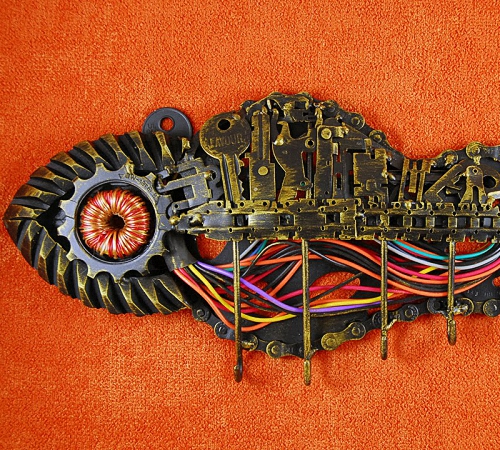
If your old clock is broken, you can use a few gears, 5-6 unnecessary keys and a little glue - and your steampunk key holder will already decorate the hallway! If you're into decoupage, you might have some craquelure varnish and a waxy patina.

This is enough to give the product the appearance of an antique item: you get a key holder in a retro style.
A stencil and putty - and the key holder is covered with a three-dimensional pattern. Do you have small nails and threads? Take a hammer, draw a few lines on the board, hammer in nails and wrap them with thread - your panel key holder will be super stylish! If you still have old forks or spoons, bend them and nail them to a wooden base - the key holder is ready to take its place on the wall.

Ideas are everywhere, you just have to look around!
Scraps of twine, buttons, chains, beads, castings from plaster or self-hardening plastic, cardboard cuttings, ice cream sticks, fragments ceramic tiles- any little thing that lies idle at home can become the final touch for something you will be proud of.

The time you could have spent looking for keys will now be put to better use!
Keys have a habit of getting lost. This small item performs a big function - it closes and opens our home. Therefore, it is better not to lose them, as they can be used by thieves. It will be convenient if the keys have their own place in the house or apartment. Such an interior item aswill provide a place where they can always be found without difficulty. Also, this piece of furniture is an excellent option for a gift.. Moreover, you can do it yourself. This does not require special skills. There are many options for making such an interior item aswith your own hands. They all have simple technique execution.
Key holder made of wood using a board

- To make it easier to work, you need to make a drawing of the future key holder. To do this, you first need to decide what dimensions it will have. A drawing of a wooden key holder will be a kind of design project according to which the work on its manufacture will take place. Here you can indicate which decorative elements will have a future
- Next, you should prepare the tools and materials that will be used in the work. For this project you will need a wooden board, 6-8 keys, self-tapping screws, a drill and wire cutters.
- Unneeded keys will serve as hooks. Therefore, using wire cutters, you need to bend their lower part so that you get a hook. This procedure must be done with all elements of future hooks.
- Then you need to take wooden board and mark cutting lines on it in accordance with the dimensions that were indicated earlier in the drawing. Using a saw, make a board for the key holder of the required size.
- Next, depending on the idea, you should decorate the board. It must be said that there are a lot of design ideas. Alternatively, you can leave it as it is. Wood itself is a very warm and cozy material, so without any finishing it looks good at home.
- After the board is ready, we screw the bent keys to it using self-tapping screws. In the future they will be hooks. The distance at which these elements are attached should be chosen based on your preferences. Keys can be attachedat the same distance from each other, or you can group them.
- Next, on the back of the board we make a hole with a drill, which will be needed in order to attach the key holder to the wall. The holes should not be through, their number depends on the length of the board, usually two or three holes are enough.

When the key holder, made with your own hands from wood, is ready, you can use it for its intended purpose. One of the most simple ways making a key holder from wood. But he's not the only one.
Key holder using decoupage technique
There is another one easy way how to make such an interior item as DIY key holder made of wood using For this option you will need the following materials.

- Wooden frame. The size of the frame depends on the size of the key holder you need. It is better to buy a frame that has special rings on the back wall for attaching to the wall.
- For decoupage you will need a napkin with a pattern or a picture or a special decoupage card.
- A special decoupage set that includes glue, brush, primer, and varnish.
- Hooks. They can be made from anything. For example, from buttons, handles, rings, etc.
- T You will also need a knife, pencil, ruler, drill and screws.
Work on the manufacture of this piece of furniturecan be divided into two stages. First you need to do decoupage and then assemble the key holder.
How to make decoupage
In fact, decoupage is not difficult to do. To do this, you need to disassemble the frame, take its base and prime it, leave it for some time to dry. To speed up the drying process of the soil, you can use a hair dryer. Next, the decoupage pattern is glued and left for a certain time to dry. Then the drawing must be varnished and also given time to dry.

Assembling the key holder
The next stage of work on the manufacture of the key holder is its assembly. To do this, first assemble all the parts of the photo frame. Then you need to mark the places on the wooden frame where the hooks will be attached. They are attached using self-tapping screws.
It should be said thathave many manufacturing options. For example, instead of decoupage, you can use embroidery. Instead of a frame, take an opening box. You can also approach the process of making a key holder with humor and focus on the hobbies or hobbies of the owner of the apartment.


