Huge topiary trees in the garden of Crats Castle (Srathes Castle), Aberdeenshire, Scotland
Topiary (topiary) - decorative figuratively trimmed trees and shrubs. To create topiary, upright evergreen shrubs or shrubs with many small dense leaves or needles are used. Topiary looks very impressive and will always be the center of attention, whether they grow in a garden or are placed in tubs, decorating a patio, entrance or terrace.
TOPIARI HISTORY
Curly planting has its origins in the gardens of the Roman Empire. In the large-scale work of Pliny the Elder Natural History (the most valuable source of information about the culture, history and natural science of ancient Rome, preserved from the 1st century), the merit of creating the first neatly trimmed tree is attributed to Caesar's courtier named Calvena. Topiary plants quickly spread in the atriums of Roman villas, where they were used to create bizarre landscapes of geometric shapes and animals. The gardeners responsible for creating such landscapes were called topiary. With the expansion of the Roman Empire, the plant trimming tradition spread throughout Europe.
Medieval European sources illustrating church life often contain images of neatly trimmed plants and hedges of varying heights that surrounded the flower beds and vegetable gardens in the monastery gardens. In the ensuing era of the Italian Renaissance, gardening and landscape art began to flourish. The sophisticated formal designs of the time sought to replicate in the garden the ornaments of home tapestries, carpets, prints and stucco moldings (read more about this in Garden Styles in History). Topiary was an absolutely integral part of these designs and was widely used to create long walking alleys and labyrinths, popular at the time, as tapeworms, and endless hedges of different heights that fringed a variety of flower beds and potagers (ornamental vegetable gardens). Samples of such gardens have been perfectly preserved and are still maintained in their original form (for example, Versailles and its many imitations, the gardens of the Hampton Court ensemble in England, and others).
With the flourishing of classicism, the art of topiary begins to fade away and falls into complete decline by the middle of the 18th century. The English park style is in vogue, for which topiary is an absolutely alien element, and the artistic shearing of trees and shrubs leaves landscape practice for a whole century. It is curious that at this time in Britain, topiary continued to be cultivated by "ordinary people" in practical and natural cottage gardens, where they were a rather unusual and conspicuous decorative object among vegetables, fruit trees, aromatic herbs and uncomplicated "village" flowers.
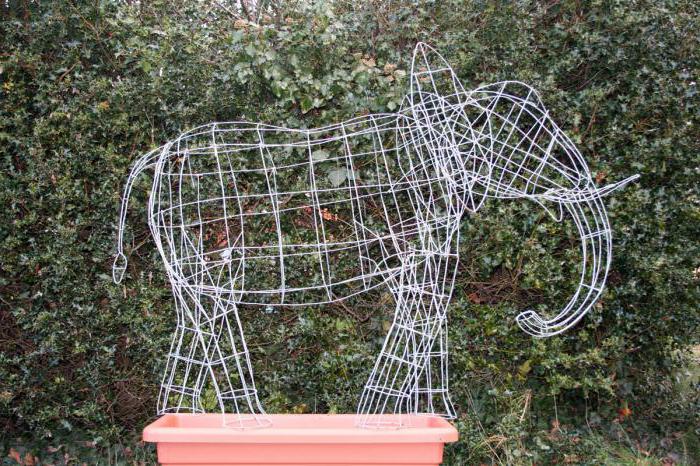
In the early 20th century, pragmatic Americans made a simple but very useful invention. They came up with a curly-shaped braided wire frame that is worn over a young plant. In this frame, the shrub grows and develops, and when young shoots begin to go beyond the frame, a haircut is performed along its borders.
In our time, the art of topiary has become a classic in garden design and no longer obeys the "fashionable" criterion. In modern informal garden designs, with their naturalness, asymmetry and slight clutter, topiary adds a structured element and adds eye-catching contrast.
The most popular form of topiary at all times are undoubtedly standard trees and small trees. In the standard culture, not only plants are grown - traditional favorites for topiary, but also any dwarf shrubs. Elegant standard trees are not at all easy to grow and require close attention for several years until they reach the desired condition. This explains their high price in stores.
PLANTS MOST SUITABLE TO CREATE TOPIARI
SAMSHIT Evergreen (Buchus sempervirens) is an undemanding shrub that grows up to 2 m and more under suitable conditions. Grows well both in the sun and in partial shade. There are variegated forms (Variegata). Boxwood needs haircuts twice a year. In colder climatic zones (zone 5 and to the north), to maintain a decorative appearance, it needs a light winter shelter. Caution, the plant is poisonous!
PADUB, or holly (Ilekh sp.) - frost-resistant and slow-growing, holly need to be trimmed no more than once a year (which can be both an advantage and a disadvantage of a plant for creating topiary). We wrote about holly in detail in a special article Holly - the plant of January. Additional benefits of holly: it perfectly tolerates partial shade and even full shade, there are especially beautiful forms with colorful leaves, spectacular berries of red, black or yellow color, there are self-pollinated forms. The difficulties of the work include the fact that the plant is very prickly.
TISS (Tachus sp.) Is a frost-hardy shrub with dense needles and round red berries that look great against a background of dark greenery. The most popular type used for creating hedges is berry (T. bazzata). There are forms with yellow needles. Yews are renowned for their durability and stamina: they can grow in full shade and can be transplanted well. The plant grows back rather quickly, so it will take two haircuts a year. Beware, many parts of the plant are extremely poisonous!
BIRYUCHINA (Ligustrum sp.). A fast-growing shrub that needs regular pruning - a couple of times during the warm season. The most common in Europe b. oval-leaved (L. ovalifolium), called here Hello, in central Russia needs winter shelter when grown in open ground, because it can freeze over. The most cold-resistant type of privet (up to zone 4) - b. ordinary (L. vulgare).
KIZILNIK (Tsotoneaster sp.) - there are both evergreen and deciduous species. Additional attractiveness to the cotoneaster is given by the red berries ripening in autumn, the shades that the leaves of deciduous cotoneaster acquire, as well as the growth features of different species (there are almost recumbent, arched, upright, highly branching varieties), which can be used for interesting ideas. Many cotoneaster stands are frost-resistant, unpretentious, perfectly tolerate haircuts and grow quickly.
BARBARIS (Berberis spp) - evergreen or deciduous thorny shrubs. Many barberries are very decorative, especially in autumn, when berries ripen on them, and their leaves become purple in color. Barberries are unpretentious, grow well and easily tolerate haircuts.
Laurel noble (Laurus nobilis) and other species - a popular plant for container topiary. The root system of laurel is located high in the soil, so plant care should be carried out carefully and it is advisable to use mulching.
TUYA (Tkhuya sp.) Is an unpretentious coniferous plant that lends itself well to cutting and grows quickly. A haircut is desirable twice a year.
TSUGA (Tsuga spp) is an evergreen shade-tolerant and fairly winter-hardy tree from the pine family.
Weeping forms IVA (Salih integra, etc.) are especially suitable for creating a standard form.
OLIVA (Olea europaea) - this plant is extremely fashionable lately. Usually grown as a trunk. Cold hardiness - from zone 7, in cold regions the plant should winter in a cool room. In addition, the plant is hardy, drought-resistant and not at all difficult to care for.
HOW TO CREATE TOPIARI
Topiary making is a fun and creative activity that requires a clear vision, a steady hand, as well as patience, time and work. Complex, sophisticated forms and large specimens of plants usually require many years of careful work by an experienced professional gardener specializing in topiary. However, simple forms are quite within the power of enthusiastic amateurs, subject to the availability of a good tool, time, patience and accuracy. You can also make it easier for yourself by using the special metal frames mentioned above, which are available in garden centers.
If you really want to decorate a garden or house with a green figure, but there is no way to create a real topiary, try to cheat. Plant an ivy (Hedera spp) or other climbing plant with small leaves in a pot and set the metal frame in the desired shape. Under favorable conditions, ivy literally in one season will wrap around the frame and begin to resemble an elegant topiary plant.
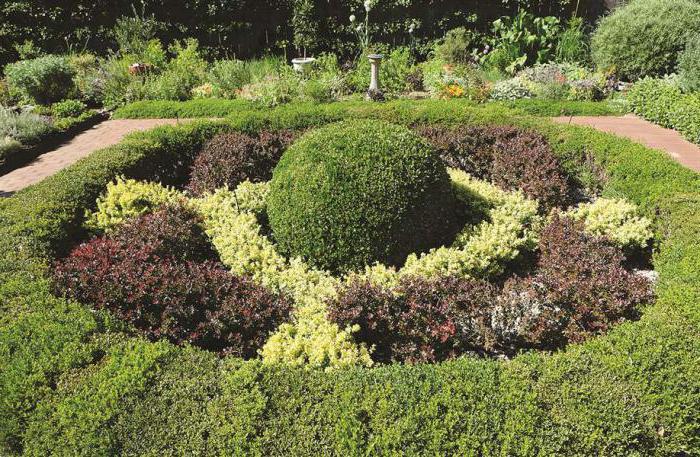
If you are a beginner topiary, then let one of the simplest forms of topiary - a hemisphere, cone or cube - become your first masterpiece. By practicing simple shapes, you can more confidently tackle more complex spirals, as well as artistic or multi-piece shapes. When growing topiary in tubs, you should pay attention to the combination of the container and the shape of the plant. So, rounded topiary (balls, hemispheres) look better in square tubs, while cone-shaped ones - in ordinary straight ones.
Well-rooted, strong and healthy plants are suitable for creating topiary. Start with small haircuts, carefully shaping the crown of the plant and gradually approaching the intended look.
One of the popular trends in modern landscape design is topiary art. Topiary is geometric figures and sculptures from a similar way of decorating the landscape was born in ancient Rome.
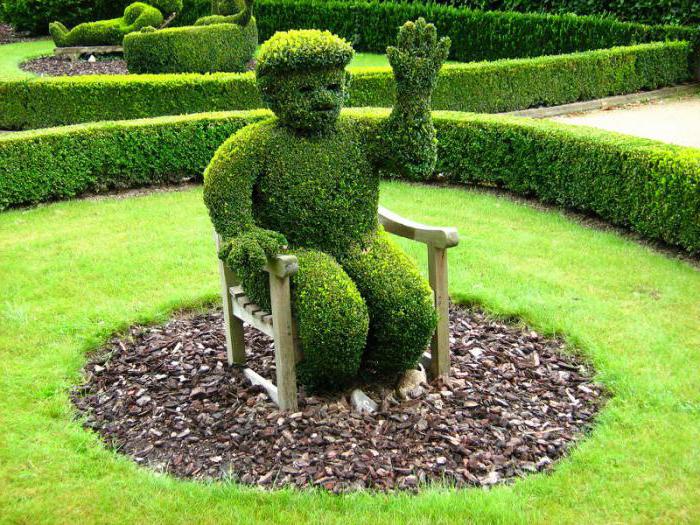
From trees and shrubs, craftsmen create topiary figures in the form of balls, cubes, people and animals. Unusual creations allow you to make the garden different from others, lively and interesting.
Varieties
The art of creating sculptures from plants is diverse in technique and style. There are two types of topiary figures:
- traditional;
- wireframe.
The traditional technique is a finished tree that is sheared into shape. Simple shapes for the garden (cubes, balls, cones) can be created by simple cropping by eye, without using other materials. Complex structures are obtained using a metal frame of a certain shape, dug into the ground near the plant. When the tree grows up and begins to go beyond the borders of the frame, it is pruned, and as a result, the desired figure is obtained.
Wireframe technology is inherently more painstaking. It differs from the traditional one by the presence of a special metal frame in which a tree or shrub is grown. A frame is pre-made, soil is placed in it for planting. Then the crop is planted. She, growing up, fills the frame. Branches that go beyond it are cut off. The plant is looked after by regularly watering and trimming.
Plants
Not every plant can be used to create a green sculpture. A suitable one must have the following characteristics:
- resistance to winter frost;
- unpretentiousness to growing conditions;
- the presence of replacement shoots;
- specific crown shape;
- slow growth.
Plants differ in these properties:
- western thuja;
- ordinary spruce;
- small-leaved elm;
- the cotoneaster is brilliant.
Of course, 3D shapes can also be created from other plants. And these crops are most suitable for the climatic conditions of central Russia.
Nowadays, many owners of their own garden plots use topiary landscaping. We will consider step-by-step descriptions of creating shapes further.
Wireframe method
The required frame can be made of 2-3 mm wire or purchased at a special store. The finished frame has gaps for penetration inside. There is a cover at the top for access to the inside of the sculpture, so that it is convenient to fill it with earthen substrate or moss. By the way, before filling, the moss is soaked in water for about 30 minutes.
When filling the frame with a substrate, you need to make holes where climbing plants, herbs or succulents are planted. For this, the following are perfect:
- ivy;
- grape;
- stone rose;
- loosestrife;
- saxifrage.
Creating a topiary from climbing crops, plants with a lump of earth are transplanted from a plastic container into a metal frame, and the shoots are distributed on a rack and secured with clips. To facilitate large topiary figures, bags with foam balls are placed inside.
Caring for the topiary, it is watered, trimmed, pinched. For the winter, the figure is brought into a cool room or simply covered with a warm box.
Express topiary
Experts simplified the process of creating a topiary and proposed the following scheme:
- In spring, climbing plants (ivy, hops, grapes) are planted in the ground.
- A frame is installed over the landings.
- As the plants grow, their branches are distributed over the frame, fixed and pruned.
- By the end of summer, the skeleton of the frame will be completely covered with green shoots.
- Further care consists of watering and pruning the plants.
Classic technology
To create a topiary using traditional technology, you will need a lot of patience, imagination, as well as the presence of a sharp garden tool.
It is better to start with the simplest geometric shapes: a ball, a cone, a cube. Plants are best cut in March-April or summer. It is not recommended to cut a haircut in autumn; it will undermine the plant before winter.
The scheme for creating a figure is as follows:
- An adult shrub or tree with powerful roots and a lush crown is selected. It can be spruce, hawthorn, blackberry.
- A shape is drawn on the earth's surface under a tree, for example a square, if a topiary figure is created in the form of a cube.
- Rails or sticks are placed in the corners of the square and fastened with planks. This will be a rough outline.
- They cut the plant with trellis scissors, giving an approximate outline. It is better to start from the top, then process the sides.
- Check the sides for evenness and gradually trim them.
- Small protruding branches are trimmed with pruning shears.
This is how simple shapes for the garden are created.

Complex geometric models
The ball is considered a complex figure in topiary art. It can be obtained from a cube by trimming its edges. Best suited for this purpose: thuja, barberry, yew, boxwood and other plants. So, for example, you can create a topiary figure "Globe" using plants that differ in shades of green.
Cylindrical outlines are obtained from western thuja, larch, irgi, linden. To get such a figure, adhere to the following scheme:
- A circle is drawn on the ground.
- Set stakes made of wood.
- Shear out the cylinder.
To create a cone-shaped figure, three poles are dug in and fastened at an imaginary top.
Traditional technology using a framework
When creating topiary figures, the frame can be used to simplify the process of cutting the desired shapes from plants. To do this, you need a removable metal frame, which is installed on top of the tree. This technique is usually used by novice topiary.
The plant develops in a mesh frame, and the master only needs to cut off the branches that have been knocked out. Once the crown is formed, the frame is removed. However, this is not always easy to do, often the tree grows together with its "frame". You need to remove the frame very carefully so as not to damage the crown.
Artificial topiary
Not everyone can create natural topiary. Topiary figures are an excellent alternative to them; their advantages are obvious:

The process of caring for artificial figures implies regular cleaning of dust and snow.
The elements of the figure are fixed on a wire frame. Imitated leaves and green fabric are used. The fantasy of the master in this case is not limited to anything. You can install such a creation outdoors or indoors.
The art of topiary is unusually diverse and attractive. It is not for nothing that it is gaining more and more fans. Starting with potted green figurines, you can move on to real garden masterpieces.
In the interior, you can often find a do-it-yourself topiary or a tree of happiness, which attracts good luck, wealth and good mood.
Topiary in a circle

How to make a tree of happiness with your own hands? Everything is very simple. To do this, you will need the following set of materials, namely:

Master class: do-it-yourself tree of happiness in a circle
We prepare necessary materials:
- ball-shaped expanded polystyrene blank;
- a beautiful mug;
- artificial flowers;
- a stick made of wood or a regular pencil;
- decorative ribbons for winding the barrel;
- ball. It should be the same diameter as the mug;
- some artificial moss or grass.
We wrap pencil with tape and insert it into the ball. Alternatively, you can fix it with polyurethane foam in a mug.

Next, into the blank in the shape of a ball, you must insert and artificial flowers so that there are no empty spaces. After that, the finished crown is strung on the trunk. Decorative moss or grass is used as decoration. Also, in addition, an artificial butterfly can be planted on the edge of the mug.

Diy tree of happiness photo from corrugated paper... Such a topiary is made according to the same principle as a topiary in a cup. Only for its decoration, instead of artificial flowers, you can use flowers from multi-colored corrugated paper.

How to make a coffee tree?
Topiary made from aromatic vegetation is very popular. They serve not only to decorate the interior, but also to fill it with aroma. Trees of happiness made from coffee beans are very popular.

To make such a tree you will need the following materials:
- roasted coffee beans - 100 gr.;
- sippy glass;
- whitewash brush;
- ball-shaped workpiece made of plastic. The optimal ball diameter is 8-9 cm;
- scissors;
- brown threads;
- two rubber bands for money;
- universal colorless glue;
- sand, gypsum or cement - 200 gr.;
- a branch or stick 20 cm long and 1.5-2 cm thick;
- twine 50 cm.
Coffee tree making guide
With the help of scissors, one hole must be made in the plastic blank.

We disassemble whitewash brush on the strands.
We attach the strands to one end of the branch. For these purposes, we use an elastic band for money. We coat the future "trunk" with glue and spirally glue it threads... You can fix the thread at the other end of the stick with an elastic band.

We glue the blank in the shape of a ball with brown threads. Also, for these purposes, you can take fibers from the bakeware.
Using super glue, liquid nails or a glue gun, glue the ball with the first layer grains.

Tip: it is best to stick the grains in a chaotic manner. The glue must be applied directly to each grain and quickly glued to the workpiece. All work should be carried out in a well-ventilated area.
The second layer is done in the same way.
We create the original pot for wood... To do this, you need strands from the brush. We smear the bottom of the container with universal glue and put it on the strands laid out on the table. The threads that protrude from the edges must be cut.

We cut the strands of the brush. They should be 3 cm longer than the height of the container. Next, you need to apply glue to the glass. Moreover, the glue is not applied to the entire surface. 2.5-3 cm should be left on top. Next, the container is pasted over with strands prepared in advance. After that, it is tied with twine from below, and the excess is cut off. It is also necessary to trim the strands from above. As a result, the threads should rise two centimeters above the glass.


Pour into the container filler... It can be sand or plaster. You can also use polyurethane foam for these purposes. Next, you need to move the strands at the top and put a funnel with a barrel on the container.


At the top, the container should be tied twine.

Finally, you can place a few coffee beans near the barrel. Also, moss can be laid at the base of the composition, and an insect can be placed on the crown.
Flat coffee topiary

To create such a flat coffee topiary with a magnet, you need to stock up on the following materials:

Step-by-step instruction
The first thing to do before starting work is to enable thermal gun to warm it up.
While the thermo gun is warming up, you can do blanks... To do this, draw a circle and a pot on cardboard and cut out these details with scissors.

We collect the details of the tree. Crown and pot connect with a flat stick. To do this, you need to insert a stick into a cardboard blank so that it is between two layers of paper.


We use glue to fix the parts together.

The workpiece must be pasted over burlap on both sides.

Tip: the burlap on one side should be equal to the diameter of the workpiece, and on the other side - slightly larger. Thus, you can hide the ends of the cardboard and the tree will look beautiful from behind.
Improvised pot decorate as well as the crown.

Glue on the back magnets.

We decorate the crown coffee beans... They are attached with glue along the edges of the workpiece. Moreover, the grains should be arranged in cuts from top to bottom.


Glue the next row in such a way that the grains are arranged in cuts upward. We alternate the subsequent rows by analogy with the first and second rows.

To give the crown volume, it is necessary to glue several layers in its central part.

Finally, you will need to glue decorative ribbons and lace.

Topiary - a tree of happiness from boxwood

To make such a decoration, you will need the following materials:
- boxwood branches. For topiary, both artificial and natural branches are suitable;
- decorative container;
- artificial flowers;
- some moss;
- filler. In our case, it will be gravel;
- wire.
Step-by-step instructions for making topiary - a tree of happiness
Inserted into the workpiece boxwood branches so that there are no voids.


The branches that will act as the trunk must be tied wire.

A hole is made in a spherical blank and a ball is placed on the barrel.


A layer of moss should be placed on top of the gravel.

The crown can be decorated with artificial flowers.


Diy cash topiary

Topiary can also be made from fake paper money. Such decoration can attract financial well-being to its owner. It is not difficult to make such a money topiary with your own hands.

For manufacturing, you will need the following materials:

Step-by-step instruction
Decorating the pot... Stains the upper part, about one to two centimeters. For these purposes, it is best to use acrylic paint. Glue the rest of the pot with twine. For these purposes, apply a thin layer of glue over the entire surface with a toothpick. The end of the twine is securely fixed with glue.


The basis for the crown we make from old newspaper and thread. To do this, newspaper sheets are just enough to crumple and wrap with threads. In our case, the workpiece is about 10-11 cm in diameter. In order for the ball to be strong, it must be coated with PVA glue. After the glue has dried, a hole three to four centimeters deep must be made in the workpiece.


12-15 skewers must be tied together. Their number depends on the diameter of the paper blank. Tie the skewers on both sides with threads. Using a heat gun, we pump hot glue into the hole and immediately insert the tied swords there. After the glue has dried, you can start wrapping twine around the trunk. In the process of wrapping, we coat the barrel with glue. We fix the ends of the twine.


Napkins or newspapers must be torn into pieces. PVA glue is mixed one to one with water. Next, one or two layers of glue mixture are applied to the blank of newspapers so that threads and newspapers are not visible.

We do gypsum mortar and pour it into a pot. There should be about one centimeter left to the top of the pot. The trunk must be set in the center of the pot. If necessary, hold the barrel with the workpiece until the mixture hardens. This process takes about 15-20 minutes.


While the gypsum hardens, you can make blanks from artificial banknotes. To do this, they must be cut in the shape of a circle. To make discs, you will need artificial money measuring 15.5x6.5 cm. On average, our ball will need 17-18 discs. Paper blanks must be folded in the form of an accordion with a width of about one centimeter. In the middle, we tie the resulting accordion with a ribbon, and glue its ends on both sides.


Glue the bills to the ball from bottom to top. Hot glue is used for these purposes. We close the gaps with coins.


From paper money we make elements of various shapes and attach them in a chaotic manner.

You can decorate plaster with sisal.

We lay small burlap pouches... To do this, we cut out a circle from the fabric, the diameter of which is about 9-10 cm. We take a needle with a strong thread and sew it around the entire circumference at a distance of 1.5 cm from the edge. After that, the thread is pulled together. We put a large coin inside the bag, and stuff it with cotton or padding polyester on top. Pull the bag together and secure it with a few stitches.


Decorative details should be glued to the pot, and the crown can be decorated with coins.


Diy ribbon topiary

Do-it-yourself topiary from ribbons looks very impressive. To make such a decoration, you will need the following materials:
- ball-shaped blank made of expanded polystyrene;
- stick or pencil;
- ribbons;
- glue;
- decorative pot;
- invisible.
The tape is cut into small strips and wound around the finger, so that rings are obtained. Then, in turn, it is necessary to attach the formed rings to the workpiece. At the same time, make sure that there are no empty spaces on the ball. On one side, a pencil is pushed into a ball with ribbons, and on the other, inserted into a pot filled with gravel. As a decoration, you can put decorative frost or decorate with scraps from ribbons.


Topiary - a tree of happiness with your own hands from fresh flowers

Topiary can also be made from fresh flowers. To do this, you will need the following materials:
- decorative container;
- plastic bag;
- chopsticks or twigs;
- putty;
- floristic sponge;
- decorative ribbons and wires;
- Natural flowers. In our case, 9 roses.
We wrap the inside of the pot with a bag and fill it with a putty solution so that 5-7 cm remains on top. Insert a stick into the solution and leave it overnight. After the putty hardens, the remains of the package must be cut off.


Cut out a circle from a floral sponge and fill the pot with it to the very top. Next, moisten the sponge and lay a layer of moss on top. In the central part of the sponge, you need to stick roses. They can be fixed using decorative tapes with wooden rods. You can use bows for decoration.


DIY paper topiary
DIY paper topiary is very popular. They can be made according to any of the above instructions. For the base, you will need a styrofoam ball, a decorative small vase, a pencil and paper flowers. For making flowers, you can use both plain and corrugated paper. To revive the topiary, you can use regular moss, which is usually placed in a vase.
Topiary from sweets master class
To make such a topiary, you will need a standard set: a blank in the form of a ball, a pot, stems, ribbons and about 300 grams of colored candy. The manufacturing process for such a topiary is standard. The rod is inserted into the pot, the ball-shaped blank is pasted over with a red ribbon. Lollipops are glued on top with a glue gun. In order not to stain the candies, it is better to take them with tweezers. The space around the trunk can be decorated with glass pebbles or large beads.


Topiary from chupa-chups
Such a decoration is easy to make with your own hands. Each chupa chups must be glued to the drawn eye. Further, all the candies are stuck into a blank in the form of a sphere made of expanded polystyrene.


Balloon topiary
Topiary made of balloons looks beautiful. In order to make such a decoration, you will need the following materials:
- blanks from expanded polystyrene in the form of a ball and a cube;
- pencil or straight wooden stick;
- multicolored balloons of small sizes - 70 pcs.;
- multicolored balloons of large sizes - 70 pcs.;
- small sawdust;
- glue or putty;
- decorative pot;
- pins or paper clips.
The process of making such a tree is standard. Only on the blank in the shape of a ball, instead of flowers, are attached balloons connected to each other.


Diy shell topiary

Another original idea can be called making topiary from shells with your own hands. Such a tree will remind you of your summer vacation on the seashore for a long time. To create such a masterpiece, you need to stock up on the following materials:

First, we do crown of a tree... To do this, sisal and shells must be glued to the foam ball with a thermal gun.


Next, we proceed to the device trunk... The barrel will be made of wire, which must be wrapped with white thread and twisted. Two trunks will be made for our tree. Only the second will be wrapped in twine.

The next stage is manufacturing pot. To fix the tree, a foam plastic will be used in the form of a cylinder, which must be attached to the bottom of the pot with glue. On the one hand, the trunk is attached to the crown, on the other, it is stuck into the foam. We use hot glue for fixing.


For strength, fill the distance between the flowerpot and the foam with paper, glue and cover with cardboard. Next, beige sisal is first placed in the container, and then white. Shells of various sizes and shapes will also be used as decoration.


To give bright accents, a satin ribbon. The crown can also be decorated with beads on the fishing line.


The original version of making topiary from sisal and fruits

First, let's make crown. For these purposes, you can take a ready-made base ball, or you can make it yourself from newspapers and threads. In our case, the base was made of newspaper, which was crumpled into a ball with a diameter of 6-7 cm.


Getting started filling the pot plaster... After the solution is poured, it is necessary to insert the trunk there and leave to harden.

While the solution hardens, you can start making decor for the crown. To do this, you need to cut off a small piece of sisal and make a ball out of it. In total, it will be necessary to make about 25-40 lumps.

To decorate the trunk, we use a lace or twine. We fix the sisal balls on the workpiece with glue. We decorate the space around the trunk with sisal, decorative ribbons, beads, etc.


DIY felt topiary

A handmade felt topiary looks original. To make such a decoration, you need to prepare the following materials:

Manufacturing procedure
The most time consuming part of the job is considered making flowers... All blanks are made from fabric circles of different sizes. A minimum of 30 such blanks will be needed for topiary. In order for a voluminous rose to turn out from a mug, they must be arbitrarily cut in a spiral. The rosette turns out to be more magnificent if it has many turns. Also, before each flower, small circles-bottoms are cut out, which are attached from below. For decoration, we attach a bead to the middle of the flower.


Trunk can be painted with acrylic paint.

Crumpled was used as a filler for the pot. paper covered with glue.
Put a piece of green around the trunk felt that will mimic grass.

We connect the trunk with the pot and crown.
We attach blanks of flowers and leaves to the crown.


We decorate the product with ribbons, ribbons and beads.


DIY New Year's topiary

With the onset of cold weather, many are thinking about making a New Year's topiary with their own hands. To do this, you need to prepare the following materials:

Manufacturing procedure
Using white acrylic paint, paint the pot from the inside and fill it with polyurethane foam. Until the foam hardens, inserts a branch there, which will be the trunk of the New Year's tree.


We fix Christmas balls, candies and cones on the crown with wire, toothpicks and glue.


The buds can be dyed white and gold.

We decorate the topiary with New Year's tinsel.


Topiary, as a type of garden design, has been known since ancient Rome. In the gardens of the wealthy townspeople, one could see fancifully trimmed trees and shrubs. Plants were given strict geometric shapes, patterns were cut, and even figures of animals or birds were formed. Nowadays, the art of garden topiary is still at the height of fashion. In parks, public and private gardens, in city squares, you can see not only neatly trimmed hedges, but also real works of art - green figures of people, animals, compositions of blooming sculptures.
In addition to the gardener's imagination and skill, the choice of a suitable plant plays a huge role in the successful result of creating a topiary. It must meet several requirements:
- respond well to a haircut;
- be unpretentious and winter-hardy;
- have the ability to actively form new shoots from dormant buds;
- grow slowly;
- grow well in the shade.
Many trees and shrubs meet these requirements. They can be divided into two groups: deciduous plants and conifers. Conifers grow more slowly, the result of the work will have to wait longer, but they are decorative all year round. Conifers for creating garden sculptures are suitable:
- spruce and prickly;
- thuja western;
- juniper Cossack and ordinary;
- fir;
- boxwood;
- Siberian larch.
Deciduous plants for topiary:
- Tatar maple and ginnala;
- apple (wild) and pear;
- small-leaved elm;
- small-leaved linden;
- common barberry and Thunberg;
- bladderworm;
- cotoneaster;
- hawthorn;
- euonymus;
- irga;
- spirea;
- golden currant.
Whatever the gardener's choice, the plant must be healthy. As a rule, the formation of the necessary forms does not begin until the age of five years of the tree. By this time, it will form a well-developed root system and quickly recover from a haircut.
Basic rules for creating topiary
There are sheared and frame topiary. The first ones are simpler, their creation is within the power of a beginner. By clipping, they give the plants simple shapes:
- pyramidal,
- spherical,
- cuboid.
Frameworks are more complex, and allow you to create real green sculptures of animals, people and any objects (cars, houses, furniture). For such forms, a metal frame is made, inside which plants are planted. They fill the space of the frame, all unnecessary branches that go out are cut off. Small parts of the frame are filled with a mixture of peat and moss, where the seedlings are planted, achieving the desired density and volume. It is not at all necessary to create a sculpture from one type of plant. Forms consisting of foliage of different shades and shapes look very picturesque. Often, flowering crops or cereals are additionally planted in the frame topiary.
- A haircut is carried out no more than 2 times a summer, removing no more than a third of the crown. The latest pruning is carried out no later than September. So the plant will be able to recuperate before wintering and will not get sick.
- During the season, you need to give the necessary fertilizing to the seedlings.
- Sometimes, if the crown is too dense, it is necessary to thin out the dense branches, letting in light inside. If this is not done, you can get exposed areas - not getting enough light, the branch will simply shed the foliage.
- Have patience. It even takes at least 3 years to create simple geometric shapes.
Tools for the job
A gardener will need to work: a delimber, trellis shears, pruning shears, a level, wire and slats for the frame, a template, a garden pitch for covering the cuts. All cutting tools must be sharp.

If you are planning to arrange a topiary in the shape of a ball or other complex shape, you cannot do without making a template. Lines of the necessary shapes are drawn on a piece of cardboard or plywood, the excess is cut off. For example, if you plan to cut the crown of a tree in the shape of a ball, then an arc in half a circle of the required size is drawn on the template. The inner part of the circle is removed.
When working with a seedling, the template is applied vertically to the crown, and all the shoots that go beyond it are sheared. It is important here to keep the template evenly relative to the vertical so that the ball turns out from all sides without distortions.
You can arrange a template for a spherical wire topiary. An arc of the desired shape and size is bent from it, and small hooks are bent at the ends. The lower end is attached (not tightly!) To the stem of the seedling from below, the upper hook of the template clings to the central vertical branch (if any). Carefully guiding the template in a circle around the plant, the excess shoots are cut off.
For more complex shapes, the wire frame is folded directly around the seedling. Sometimes a metal or plastic flexible mesh is used, fixing it over the main frame. If you paint it in advance in the color of the tree crown, it will become completely invisible.
The mesh makes it a lot easier to work with when creating a green sculpture.
Step-by-step instructions for creating a pyramid-shaped topiary
- A healthy, well-developed plant with a dense crown (thuja, larch, barberry, yew) is selected, not less than 5 years old.
- An even triangle is drawn around the seedling on the ground - this is the future base of the pyramid.
- Even long bars are installed at the vertices of the triangle. Their ends are tied together at the top of the "pyramid". The frame of the future topiary is ready.
- First, with a delimber, then with scissors and pruners, they begin to cut off the branches protruding beyond the frame. Form even corners and a top, then align the planes. For the convenience of aligning the sides of the pyramid, periodically apply a wide flat rail to the end bars.
- At the end of the work, the template is removed.

During the season, the sculpture is regularly trimmed, giving definition to the edges. All the beauty of geometric shapes in plants is in their even and straight lines. The slightest carelessness and curvature is noticeable and ugly.
Topiary is the transformation of trees and shrubs into large figures of various shapes. To create a masterpiece on your own on the first try is an impossible task. Looking at the photo of the topiary, you can immediately understand the complexity of mastering the skill. It will take a lot of time to master this skill, but the result will pay off the effort expended with interest.
Application
Topiary brings order and a sense of serenity to gardens, and is used in the design of the classic approach. It is recommended to apply symmetrically, as they form perfect lines in the frame of the garden.

If you want the instructions to please you in winter, then choose evergreens for landscaping. Green topiary figures, framed by a snow cap, transform your yard into a fabulous landscape.


Planting plants is allowed not only in open ground, but also in large containers and pots. But only certain plants are suitable for this, for example:
- thuja bushes;
- boxwood.

They allow you to form the perfect contour of the figure, for example, a ball or a cone.

Plant selection
When forming a list of necessary plants, you should consider your preferences.

Plants from the conifer family are considered the most popular, since it is easier for them to give a certain shape, which lasts for a long time and special care conditions.

Main types:
- western thuja;
- common juniper;
- prickly spruce;
- Cossack juniper.

Deciduous plants:
- holly magnolia;
- red barberry;
- hawthorn bushes;
- common honeysuckle.

For a grandiose figure, a rough elm or linden is planted. They attract not only with their aesthetic appearance, but also emit wonderful aromas that are beneficial to health.


Technique without framework
This technique is based on manual shearing of shrubs with ordinary garden shears or pruning shears. Here one of the main roles is played by the art of a topiary of a specialist, and his ability to correctly and measuredly trim plants.

The next important step is to select a suitable plant with a well-growing crown in order to be able to change shape to the desired result. The shape of the leaves, their length, the density of vegetation - everything matters.

Advice for beginner gardeners - Conifers and deciduous trees, such as thuja, boxwood bushes, privet, are a convenient option.

The progress of the frame topiary
It is not difficult to get the job done, but it will take a long time to complete. Let's describe the progress in detail:

Decide on the shape of the topiary, it must fit into the overall design of the garden and be practical.

Basic forms:
- geometric shapes (ball, pyramid, square, cube and others);
- fairy-tale heroes;
- figures of various animals and birds.


Create a metal frame for the topiary made of wire, preferably steel, fastened by welding or special ties.

Pour out the base, in this case chernozem with nutrients, adding a resinous substance for viscosity. Add water.


Fasten with a steel mesh so that the structure is stable and the earth does not spill out. Spray water onto the structure.

Add earth, sprinkle with water. The mixture should turn out to be viscous and not go beyond the frame. Remove excess layers of earth with a trowel. Make sure that there are no gaps, otherwise everything will fall apart.

Sow the soil with seeds. Combine flower seeds and herbs to create the best effect.

There is a long process of caring for the plants. Water only with a watering can, so as not to spoil the structure.


Instruments
It is not necessary to have the most sophisticated tools in your arsenal, the most classic and simple ones are enough. The most common set includes:
- Gardening scissors;
- Trellis scissors;
- Regular secateurs;
- Lopper;
- Wooden slats.

It is worth putting in patience and imagination, and you get a masterpiece. You should not immediately tackle a complex figure, for a start, get your hand on simple shapes.

Even simple, but three-dimensional figures in the process of forming mastery can be remade into more complex ones. The cube is converted into a ball shape by means of certain manipulations and actions.


Landscaping filler process
The last, final stage in creating a topiary in the garden with your own hands. It is worth sowing the structure in the order in which the plants will grow. Flowers first, then lawn grass.

Consider an example of planting a lion-shaped topiary:
- The first to be planted is the "lion's skin", which is planted with flowers;
- "Mane" - add lawn grass, which is decorated with long stems;
- Small figure details. Tail, ears, paws, muzzle;
- Depressions are made in the soil with a sharp object, sending seeds or already rooted plants into them;
- Seal the holes and cover with moss;
- It is advisable to install supports for each figure so that the structure does not collapse;
- Watering can be done either manually using a watering can or a special irrigation irrigation system can be carried out.


The process of choosing plants, various planting schemes - gives a wide flight for your imagination in the manufacture of topiary. But do not forget that summer is not all year round, and in winter everything can die if you do not take care of insulation. It will take a lot of effort and time to master this skill, but the result is worth it.

Photo of topiary in the garden with your own hands