If you have started renovation and decided to whitewash the ceiling, this article is for you! Today the market offers us many in various ways finishing: tension and suspended ceilings, ceiling tiles, GCR structures. But, of course, whitewashing is the most environmentally friendly and affordable option. And, importantly, it will not steal precious centimeters from you. Before starting work, you need to decide on the material. The whitewash mixture is based on lime and chalk. Which one is better to choose?
Whitewashing the ceiling with lime
This solution is suitable even for cold and damp rooms, since the lime layer contains pores, which promotes rapid drying. If there are small cracks on the surface, lime will hide them. It has powerful antibacterial and disinfectant properties, resists the appearance of fungus and mold. Therefore it is perfect for utility rooms with high humidity, where disinfection is necessary: basements, sheds, outbuildings. The limestone surface does not smudge. There will be no problems with cleaning after finishing the work. Anything that gets on the floor can be easily washed off with water, leaving no streaks. This coating will last quite a long time - about 4 years.
But it is worth considering that lime can cause allergic reactions, so people with allergies should not stay in such rooms.

Whitewashing the ceiling with chalk
Chalk-based solution can only be used in warm and dry rooms. Unlike lime, the chalk layer does not have the pores necessary for drying. The surface whitened with chalk looks more matte, the color is deep and rich. back side This effect is that the surface smears. The coating lasts for 1-2 years, after which it must be whitened again. It is quite difficult to clean marks on the floor after finishing work. Just remember school board No matter how much you wash it, it still remains white. Unlike lime, chalk will not hide small cracks and irregularities. But there is one significant and important advantage: chalk is a hypoallergenic material, it passes all the most stringent sanitary and hygienic requirements. Therefore, if you have allergies, then best material just can't be found.
We figured out the advantages and disadvantages of the two solutions. Which one to choose is up to you. What will we do next?

Before starting work, all possible furniture must be removed from the room, as drops and smudges cannot be avoided. Cover what cannot be taken out with newspapers. Let's start cleaning the ceiling. If before this it was whitewashed with lime, then both lime and chalk mortar will fit well on such a surface. If the ceiling was whitewashed with chalk, the lime will not take it. No amount of cleansing or priming will help. You can only put chalk on chalk.
Required Tools
In order not to rush around in search of the right tool, prepare everything in advance. You will need:
- wide brush (15 cm) or roller;
- narrow brush (5-7 cm);
- plastic containers;
- stepladder or table;
- latex gloves;
- old newspapers, rags.
Depending on the situation, you may need:
- spatulas;
- sponges;
- serpyanka;
- sandpaper.

How to find out what was applied to the ceiling before
Run your finger over the surface. If a white mark remains on your finger, then it is chalk. If not, it's lime. If you are still in doubt, soak a piece of cotton wool in lemon juice and apply to the surface. Chalk will sizzle, but lime will not.
Regardless of what kind of coating there was, it must be processed. To do this, we go through the entire ceiling with a wet rag. Thus, we will eliminate dust and white deposits.
What to do with cracks
If there are large cracks in the ceiling, they need to be filled with putty. Please note that it is not enough to simply cover up the cracks. After drying, the putty will crack. Therefore, it is imperative to apply a serpyanka. Serpyanka is a mesh in a roll 3-5 cm wide (the width varies). Using a serpyanka, seal cracks and joints in drywall. In general, all elements that violate the integrity of the surface. The fact is that the crack contains air inside itself and there is nothing for the putty to stick to in this place. While we are applying it, it is damp and it seems that everything is smeared. But after drying, the cracks will appear again. Therefore, we unwind the tape from the roll and seal the crack. The serpyanka has an adhesive surface on one side, so it sticks easily. Then apply putty using a spatula. Only in this case the crack will not appear again.
Don’t be afraid that it won’t turn out very smooth, then you can rub it all over. The drying time of the putty depends on the humidity and temperature of the room. If you live in ordinary apartment, then it will take a day. In any case, you can determine the level of drying yourself. Well, at the end we sand all the irregularities with simple sandpaper.

How to remove stains
Are your neighbors flooded or do you live on top floor where the roof leaks in the spring. Consequently yellow spots and smudges. You don’t have to try to whitewash them or even putty them. This is impossible! While water-based paint can still cope with this task, lime cannot. But don't despair. In fact, there is a way out. Regular bleach or bleach will help us with this. Dip a sponge in any liquid and apply to the stain. Just be sure to wear rubber gloves, otherwise it will instantly corrode your skin.
Primer for better application
We whiten and whiten in one place, but the solution doesn’t seem to stick, and only droplets remain. So, to prevent this from happening, you need to prime it. Primer is a white liquid in plastic bottle. In general, this is polyvinyl acetate glue diluted with water. But for convenience, they began to release it in finished form. This slurry is applied using a roller. Ideally, if you have a plastic basin or a wide plastic bucket (a large bucket of high-grade paint will work perfectly). The main thing is that the roller fits into this container. The primer creates an adhesive layer. In other words, a thin film with micropores is formed, to which the solution will definitely stick.

How to properly dilute the solution
There are two types of lime: slaked and quicklime.
Quicklime is sold in plastic packages of various packaging and consists of solid rocky pieces, similar to chalk. In order to obtain lime powder from them, they must be quenched. This is done as follows. For 1 kg of lime, take 1 liter of water and gradually pour it in. As a result of slaking, lime powder is obtained. Lime is a very strong alkali.
When extinguishing, take all precautions. It is necessary to wear a protective face mask, a plastic gown and rubber gloves, because everything will hiss, bubble and splash.
Just in case, keep a solution of vinegar or citric acid. If the mixture gets on the skin, the acid will neutralize the alkali and no burn will form. It is best to slak lime in metal containers, because plastic ones may not hold up. high temperature and melt.

It is much easier and simpler to work with ready-made slaked lime. To obtain 10 liters of solution you will need 3 kg of lime. It’s good if you have large unnecessary metal containers. We heat the water in it so that it becomes not warm, but rather hot. Add lime gradually, while simultaneously stirring the solution so that no lumps form. It is better to stir with a wooden stick. The brine solution must be mixed in a separate container. We take any salt that is available and dilute it in a ratio of 100 g per 1 liter of water. Pour it into the solution and mix.
To ensure that the lime does not acquire a yellowish tint after drying on the ceiling, you can add blue. To do this, you need to dilute it separately so as not to overdo it. You must determine the amount and concentration of bluing yourself, depending on the desired result. When everything is well mixed, the mixture needs to be strained. This can be done using gauze or a nylon stocking. This is done in order to eliminate lumps of lime that have not dissolved. Otherwise, you risk decorating the ceiling with relief decor.
You can also follow the instructions on the packaging, if available, since different manufacturers offer different technology preparation of the mixture depending on the characteristics of the composition.

If you have a stepladder, great! If not, it will do regular table. It is even more convenient because you can walk on it. You will need two brushes: wide (15 cm) and narrow (5-7 cm). You can, of course, use a roller, but since the solution is very liquid, it will all flow copiously onto the floor. In addition, the chance of covering without gaps with a brush is higher. Prepare some convenient container that you can hold in your hands. Large for a wide brush, small for a narrow brush.
We start whitewashing from the window, since only in this direction of light will the unbleached areas be visible. First, we whitewash the joints between the ceiling and the wall along the perimeter with a narrow brush. Then, using a wide brush, we fill in the main area, starting from the window to the door. Movements must be in one direction. After whitewashing, the ceiling is damp, looks gray and ugly. Do not be afraid! It will become whiter as it dries. After the first layer has dried, you can apply the second. In general, it depends on the neglect of the case. Perhaps one layer is enough. But if you decide to whiten again, then whiten perpendicular to the direction in which you whitened before. This will help prevent streaks and streaks. Whitewash dries quickly. In a dry, warm room for 3-4 hours.
Important! Close the windows and vents. Make sure there are no drafts in the room, otherwise everything you care about will stick to the ceiling.

Painting the ceiling with water emulsion
If you have had lime and blue applied to your ceiling, you don’t even have to try to whitewash this situation with lime or chalk. Nothing will work! Don't waste your time. No matter how many layers you apply, the blue will show through. Therefore, immediately take water-based paint. It will cover up bluing, smudges, and any other defects. No material for whitewashing that is more pleasant to use has yet been invented. The only advantage of lime and chalk mortar compared to water emulsion is the price. But how much effort does it take to whiten well! Water-based paint has many advantages:
- no dust during the cooking process;
- smoother surface due to thick consistency;
- the mixture is already ready and does not need to be diluted;
- you can paint with a long-handled roller directly from the floor;
- no need to paint in many layers;
- the ceiling will still be whiter than from lime;
- the coating is more durable.

If you decide to paint with a water emulsion, the technology is the same as for whitewashing. First, we go through the joints between the ceiling and walls along the perimeter with a brush, and then with a roller, starting from the window, we paint the main area in one direction. Unlike lime, paint on the ceiling immediately has White color. At normal temperatures, the water emulsion dries in 3-4 hours. After which, if desired, you can apply a second layer. But, as a rule, this is not necessary.
We looked at the advantages and disadvantages various types whitewash mixtures. Well, which one to choose is up to you.
Whitewashing the ceiling is the simplest type of execution. repair work Moreover, it does not require large investments. Whitewashing is environmentally friendly and helps maintain the indoor microclimate. And also a whitewashed ceiling can significantly improve the interior of the room and fit into any design.
As renovation work progresses, many people wonder how to whitewash ceilings without involving specialists? To save money and get good result When whitewashing with your own hands, you should prepare the ceiling and room in the apartment or house. First of all, remove all furniture and belongings from the room. Objects that are too large are covered with paper or wrapped in film. Doors and jambs are also covered with film. The floors in the room are covered with a thick layer of newspapers.
Whitewash the ceiling yourself - the main points
Before starting work, you need to prepare the surface and find out what the ceiling was whitewashed with before the new renovation.
Old whitewash - wash it off or leave it on?
It is quite possible to apply whitewash over the old coating. But only if the old whitewash is in good condition. There are a number of nuances, for example, you cannot apply lime over chalk whitewash. Also, chalk is not applied over lime whitewash. Otherwise, you may end up with dirty stains instead of a perfectly white ceiling.

When it is impossible to whitewash the ceiling using the old layer of whitewash, the previous coating will have to be removed.
Removing old whitewashed coating
Chalk coating is easy to remove, but old lime, on the contrary, is much more difficult. Determining the origin of the previous whitewash is very simple. You need to wet a fragment of the ceiling with water and run your palm over the surface. If your hand is stained very white, it means whitewashing is made from chalk. If the hand remains without traces of whitewash, and the coating has darkened, it means that lime has been applied to the ceiling.
You can wash off old whitewash with plain water using a large brush and a small spatula. Part of the ceiling must be moistened with a solution of warm water and vinegar/citric acid. Then immediately start removing the wet material with a spatula. upper layer- it just scrapes off. To prevent the remains of old whitewash from falling down onto the floor, you can use a pallet. All remnants of the previous whitewash are washed off with a soft cloth.
Cleaning the ceiling surface
If there are any stains (grease, rust) or mold on the ceiling, all this should be removed and cleaned. Rust can be easily removed with water and immediately apply vitriol solution. Grease stains and mold particles are removed with a cloth soaked in aqueous solution with regular soda. After the treated areas are washed with clean warm water.
After cleaning the ceiling, you need to look for cracks or bumps. If they are detected, such areas are cleaned and a primer and then putty are applied. It is advisable to choose a quick-drying adhesive putty as it is easy to apply and will last a long time.
The primer layer acts as a connecting element between the whitewash solution and the ceiling slab. The putty, in turn, makes the surface uniformly even and smooth, hiding roughness and imperfections.

After finishing preparatory work go directly to whitewashing.
What material to choose for whitewashing?
Before you begin whitewashing work, you need to decide on the choice of material for the solution: chalk, lime or water-based emulsion. If the previous coating was made of chalk, then the new layer should be made of chalk. With lime coating, this rule remains the same. This applies to those cases when it is decided to whitewash over old whitewash.
Chalk whitewash is widely popular, primarily due to its environmentally friendly raw materials. Chalk is hygienic and allows the ceiling to “breathe”. Also, the chalk coating gives a snow-white and shining effect after drying. The disadvantages of whitewashing with chalk include:
- fear of moisture;
- touching can get dirty;
- the appearance of dust if the whitewash begins to crumble.

It’s easy to prepare a chalk solution for whitewashing:
- 10 liters of water;
- 5 kg chalk;
- blue (it is added so that when drying the ceiling does not acquire a yellowish tint);
- Not a large number of wood glue.
After mixing, the solution should be viscous and not flow off the tool.
When whitewashing using lime, small bumps or cracks are well masked; lime also hides cracks in the ceiling. One of the main advantages of lime is its bactericidal property. But along with this, there are also disadvantages of lime whitewash:
- long drying;
- Strong smell;
- the color of lime is not completely white;
- may cause allergies.

To make a solution for whitewashing you need to take 3-2.5 kg of lime, 100 grams of ordinary table salt, 1 liter of warm water and a little blue to obtain a white tint. The components are mixed and then warm water is added. As a result, the volume of the solution should be at least 10 liters.
Construction and repair professionals especially highlight whitewashing (painting) the ceiling with water-based emulsion. The paint is completely non-toxic in its composition. That is why it is used in residential premises. Water-based paint is already sold as ready solution for use. It is also very resistant to external influences. Therefore, the cost of water emulsion exceeds the price of lime and chalk.

If the room has high humidity, you should purchase washable water-based paint. To avoid problems with the shade, it is better to buy immediately required quantity material.
List of tools
When whitewashing ceilings, you don’t need a lot of tools. It will be enough to select the following tools: gloves; container or bucket for solution; protective glasses; stepladder, long handle or pole or table; roller/wide brush; sprayer/spray gun.
If the room is small, it is better to use a roller or brush. If you have no experience in whitewashing, you should also give preference to a roller and work the corners of the ceiling with a brush. Unlike a brush, a roller saves water-based paint and solution, and does not leave behind streaks.
The technology for applying lime and chalk whitewash is similar. The water-based emulsion is applied with a brush or roller. If you have experience in such work, you can use a sprayer. The lime or chalk solution will lie evenly on the pre-moistened ceiling.
Work should begin from the walls, carefully moving along the entire perimeter of the ceiling. It is especially important to comply with this condition when using water-based emulsion. This method of application will help avoid streaks and marks.

Experts recommend whitening ceilings in several layers. The first layer is made parallel to the window, and the second goes perpendicular to the first. Each subsequent layer should overlap the previous one so that traces of brush or roller strokes are not visible. The number of layers can be from 2 to 4. Multi-layer whitewash allows you to paint the surface of the ceiling evenly.
After the entire ceiling surface has been whitewashed once, the whitewash should be allowed to dry completely. And after whitewashing done a second time, the ceiling will have a uniform matte white tone.
During the process, bubbles or drops should not form on the whitened surface, as stains and stains will subsequently appear in this place. When whitewashing with lime or chalk, be sure to stir the solution from time to time. This is done in order to ensure uniform thickness of the layers of the solution. Most last layer whitewashing should be done towards the window. Then allow the surface to dry completely naturally - without drafts, ventilation and without additional heating of the room.
When whitewashing, be sure to observe safety: cover and tie up your hair, use safety glasses, a mask or respirator, and rubber gloves.
Advantages of a whitewashed ceiling
- Affordability (unlike ceilings made of plasterboard or stretched fabric).
- Sufficiently moisture-resistant coating and natural composition.
- Durability of whitewashed coating.
- The service life of a whitewashed ceiling is from 3 to 5 years.
- You can whitewash ceilings yourself without special skills and knowledge. You just need to take into account the recommendations and nuances.
After the work carried out, the result is a smooth, white color (or another shade when using water-based paint) and aesthetically pleasing beautiful ceiling.
How to whitewash a ceiling with your own hands - step-by-step instructions!
When carrying out renovations in an apartment, it is important to pay Special attention ceiling.
Smooth and Smooth surface is able to emphasize the dignity of the room, filling the space with air and light, which are so necessary to create a cozy atmosphere.
Among the diversity finishing materials used for repairing and decorating ceilings, whitewashing is the leader in popularity.
How to whitewash a ceiling with your own hands
An undoubted advantage is the material attractiveness of the process. In addition, many consumers make a choice in favor of whitewash, focusing on its hygienic safety and harmlessness to health, as opposed to hanging structures, stretch ceilings or ceiling tiles.
How to whitewash a ceiling
The beautiful gloss of a freshly whitewashed ceiling goes well with any design solution rooms, visually expanding the space (read an article on our website about a beautiful do-it-yourself ceiling). And finally, whitewashing the ceiling yourself is a completely feasible task if you strictly adhere to the rules and instructions.
How to whitewash a ceiling
What are ceilings whitened with? Pros and cons of materials
For whitewashing ceilings, chalk, lime or water-based paint are most often used. Most often, when choosing a material, they are guided by what the ceiling was previously treated with. In order to determine this, it is enough to run your finger over a dry surface: lime whitewash does not smudge, but chalk will remain on your finger.
How are ceilings whitened?
However, if you have any doubts, you can rub the ceiling with a damp hand - the lime will darken, but will not remain on the skin, but the chalk will smear after your hand. It is not recommended to whitewash with chalk over lime, due to the possibility of the formation of numerous streaks and stains, which will entail repeated repainting.
Ideally, ceilings should be painted once every one and a half to two years.
- Chalk whitewash will provide a deeper white color than any other coating and is resistant to high humidity and has bactericidal properties, in addition, this type of whitewash is absolutely safe and completely hypoallergenic, meeting all hygienic requirements.
Chalk whitewash
- Lime whitewash (or painting with slaked lime) is moisture resistant, can hide small surface defects, tighten ceiling cracks and crevices, fixing them, which allows you to get a smooth and even ceiling. However, despite all its bactericidal properties, lime is contraindicated for repairs if an allergy is detected to it. It has a pungent odor and dries much slower than chalk coating. More priority for whitewashing bathrooms.
Lime whitewash
- Water-based paint is non-toxic, provides long-lasting coverage and a dense layer. Almost universal in use.
Water-based paint
There are several types of emulsions:
- satin emulsion allows you to hide multiple defects on the ceiling surface due to the fact that the coating turns out to be somewhat glossy; depending on the marking of the emulsion, the degree of gloss may be different;
- matte emulsion has a denser texture, which makes it possible to hide more significant surface imperfections, but it dries much longer;
- special types of emulsions intended for kitchens or bathrooms have enhanced moisture-resistant and bactericidal properties.
Another argument in favor of chalk or lime is that when whitewashing with these materials, it is not necessary to pre-prime the ceiling.
Tools required for work
You can whitewash ceilings using either a roller or a brush. These methods are optimal for apartments and small country houses and premises.
How to whitewash a ceiling correctly
Whitewashing using a spray gun is more labor-intensive and costly; it requires skill and ability to work with the unit; in addition, whitewashing with a spray gun creates a large amount of splashes that can interfere with work.
Spray gun
So, to carry out whitewashing work yourself you will need:
- bucket for mixing chalk or lime mortar;
- construction mixer or drill with a special attachment;
- ladder;
- spatulas for removing old coating;
- rags;
- container with hot water;
- covering material;
- brushes with stiff bristles or whitewashing rollers;
- protective equipment (headgear, respirators, protective eye mask and rubber gloves);
- paint tray;
- sandpaper and holder. How to whiten a ceiling
New brushes should be soaked entirely in warm water for several hours before use. Brushes prepared in this way will not “lose” their bristles during use. It is recommended to choose natural hard bristles with a width of 12-15 cm.
Rollers are selected individually, based on personal preferences. The main thing is to use a previously unused tool for whitewashing, in order to avoid defects and blemishes in the coating.
How to prepare the solution?
Diluting water-based paint is most often not particularly difficult, which cannot be said about preparing chalk or lime mortar.
How to prepare the solution
The solution is prepared based on the approximate calculation that for each square meter of the ceiling to be painted in one layer, half a liter of the mixture will be required. But most often component compositions are given on an area of 10 sq. m. Ready mix can be stored for no more than 36 hours, and dry ingredients can be stored for several years without spoiling or losing their properties and qualities.
If possible, the solution is mixed using a construction mixer.
To prepare a chalk solution, you will need from 30 to 100 ml of glue (PVA or carpentry), a piece of laundry soap weighing 50 g rubbed on a fine grater, as well as 3 kg of chalk sifted through a sieve (sifting - necessary stage, which allows you to remove debris and the largest particles from the whitewash material) and 10-20 g of ordinary blue to enhance the whiteness of the color and prevent possible yellowing of the coating. First, soap shavings and glue are dissolved in warm water, then chalk is poured in a thin, even stream with constant stirring, after mixed with blue powder.
The lime mixture is prepared somewhat more simply: 1.75 g of pureed lime, 100 g of table salt and 40-45 g of blue are diluted in warm water. However, saturated white light This mixture does not give, but pays for it with its masking properties.
The amount of water is taken arbitrarily. Approximately 1 kg of chalk or lime requires 2 liters of warm water.
To determine the optimal consistency of the mixture, they use this technique: a metal object with a smooth surface (a pin or a knife) is vertically lowered into the solution; if, when pulled out, the mixture flows down without leaving traces, the solution is not thick enough and chalk or lime should be added. In this case, the concentration of the mixture is increased gradually, checking the quality of the solution after each addition.
Preparation of whitewash solution
The finished mixture is left for 10-15 minutes, after which it is filtered through a sieve or a layer of rags. A well-prepared mixture has no lumps and, as it flows, paints the metal white. Immediately before whitewashing, the solution is mixed well.
Preparing the premises
Before whitewashing, the room must be emptied as much as possible: all objects must be removed, cornices, chandeliers and other lighting fixtures must be dismantled.
Large furniture and built-in items and decorative elements should be thoroughly covered plastic film and cover with tape.
You need to lay it out with special care flooring– this will significantly save cleaning time later.
Preparing the premises
The floors can be covered in several layers with old newspapers or sheets, floor skirting boards– paste over masking tape. Close if necessary ceiling skirting boards and stucco.
Preparing the ceiling. Step 1. Removing old whitewash
Even if the previous whitewash is not cracked and looks quite clean, it is better to remove it. To make this task easier, there are special solutions, but you can use proven methods - warm water or a weak soap solution and a spatula.
Removing old whitewash
Before starting work, you need to protect your face, body and hands with protective equipment. Lime or chalk have a detrimental effect on unprotected skin and are difficult to wash off from hair.
Removing whitewash is a painstaking and time-consuming process, depending largely on the nature of the whitewash mixture. The chalk layer is easier to clean than the lime layer.
How to remove old lime whitewash?
Most often, it is simply scraped off from the ceiling using a metal spatula, after tapping the area to be cleaned with a rubber hammer. Soaking lime whitewash is ineffective, since old layer will clump and smear across the ceiling.
There is a known method of cleaning a ceiling slab using a paste, when the entire surface is thickly covered with a solution, and then it is cleaned off with a spatula along with the whitewash.
How to remove old whitewash
How to remove chalk whitewash?
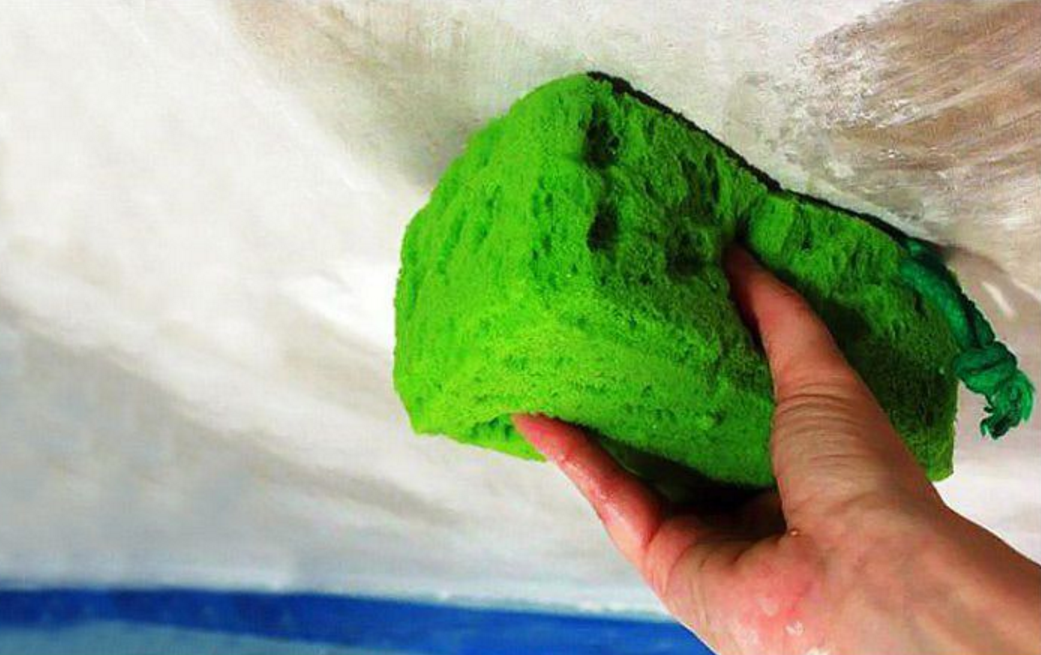
The chalk layer is removed from the ceiling using hot water with the addition of 3% acetic acid and a sponge (it is acceptable to use a separate roller with a long handle). The thoroughly moistened stream is left for half an hour for the whitewash layer to swell, and then carefully removed with a spatula. If the layer is not sufficiently swollen, the ceiling is moistened again.
Chalk on problem areas need to be rubbed with a sponge. And after cleaning the ceiling, let the surface dry. The degree of cleanliness is checked by the presence or absence of white marks on the palm when touching the ceiling.
Step 2: Cleaning, patching and priming
When the old layer of whitewash has been removed, the ceiling must be cleaned of stains, traces of grease or rust, mold and mildew, if any.
Traces of rust and stains can be easily removed with warm salt water and a sponge. It is advisable to treat the dried area with a solution of copper sulfate (75 g per 1 liter of water).
Ceiling cleaning
Old traces of fat are cleaned with a rag soaked in a solution of calcined salt, which is sold in hardware departments. After removing the stain, the area should be rinsed with water.
Ceiling putty
If the joints of the slabs on the floor cause concern, they can be glued with sickle tape - it will preserve the integrity of the coating from cracking. Slots, recesses and cracks need to be puttied. Best for troubleshooting ceiling tiles Homemade adhesive putty is suitable - it holds well and is easy to use.
Ceiling putty
To obtain it you will need two parts of wood glue and plaster and one part of sifted chalk. The mixture is mixed with water and applied to the ceiling using a spatula.
After drying, the surface is rubbed with sandpaper until smooth. The ceiling prepared in this way is primed - this will give the surface additional moisture-proof properties and facilitate the whitewashing process itself.
The primed ceiling is left to dry for 24 hours.
Ceiling primer
Step 3. Whitewash
With a well-prepared ceiling, two layers of whitewash are sufficient. You should start from the corners, mentally dividing the ceiling into sectors. It is most convenient to start from the window, gradually moving towards the door.
When carrying out work, it is very important to eliminate drafts, otherwise the whitewash may crumble.
Each layer of whitewash must be dried thoroughly and only then proceed to the next one. There are some nuances when whitewashing with various tools.
How to whitewash a ceiling
Whitewashing with a roller is preferable, as it provides the best results, even if you have no experience. Using a roller, you can use a V-shaped motion to ensure even coloring.
Or you can apply multidirectional layers: the bottom one is perpendicular to the window, and the top one is parallel, carefully rolling the roller over the surface. This will avoid divorces. The overlap width between strokes should not be less than 5 cm.
Direction of whitewashing the ceiling
It is important to ensure that there are no sagging or drips. To do this, excess whitewash solution should be removed from the roller by rolling the roller along the inclined part of the ditch.
Whitewashing the ceiling
Hard-to-reach areas and corners are painted with a medium-sized brush.
How to whitewash a ceiling
Whitewashing with a brush is a more painstaking and lengthy process. The principle is the same - the work begins from the window with short strokes, layers are applied in different directions with an interception width of 5-6 cm.
Whitewashing the ceiling is a labor-intensive process, but quite doable on your own.
Whitewashing the ceiling
– Whitewashing the ceiling
Source: //svoimi-rykami.ru/remont-kvartiry/potolok/kak-pobelit-potolok-svoimi-rukami.html
How and with what to whitewash a ceiling: preparation of whitewash and application technology
Repair of an apartment or private house on our own – interesting activity. The first thing you need to do when performing work is to whitewash the ceiling. How to do the job correctly for an inexperienced builder? We will tell you how to whitewash a ceiling and what you will need for this in this article.
Preparation for whitewashing
This is the first and important stage in carrying out the work, a lot depends on him. And if you neglect it, the newly whitened surface will soon peel off.
If previously the surface was whitewashed with chalk, but today there is a solution to cover the ceiling water-based paint, then it is definitely worth carrying out preliminary work. No less important is the question of how to whitewash the ceiling using old whitewash.
It is worth noting that whitewashing the ceiling using old paint or over chalk will not give a good result.
To determine what was previously applied to the ceiling surface, it is recommended to wet it. If a darkish stain appears on the ceiling, and your hand does not get dirty from it, then this means that lime whitewash has been applied to the ceiling. But if with light contact your hands get dirty, then this is chalk whitewash.
When using a water-based coating, no changes are observed. Next, you need to consider the principles of how to prepare the ceiling for whitewashing.
Step by step washing off the old layer
Work carried out even at low altitude requires special care. You cannot be distracted and think about other problems. To protect your eyes and respiratory system from accidental splashes and chalk dust, you should use safety glasses and respirators. You must wear a hat on your head, otherwise it will be difficult to wash your hair later.
Surface preparation steps:
1. First, you need to close all the furniture that, for some reason, has not been removed from the room. The floor should also be covered with waterproof materials, for example, plastic film or oilcloth. It is recommended to close it with an overlap, so that there are no gaps, otherwise if paint or chalk gets on the surface of the furniture or floor, it will be difficult to clean.
2. It is necessary to prepare a soap solution in warm water, a round or swing brush or brush. Soap dissolves better in warm water, and if it accidentally gets into certain areas of the body, there will be no unpleasant sensations.
3. It is necessary to wet the old whitewash one at a time, mentally dividing the surface into small squares so as not to miss even small area. If you start randomly wetting the entire ceiling, it will soon dry out and you will have to repeat the procedure again.
4. If the surface of the ceiling is saturated with moisture, then you can start scraping off the old layer with a spatula. To ensure that as little chalk or lime gets on the floor as possible, you should place a container underneath.
The ceiling needs to be moistened in any case, even if the old coating is not dirty. This is necessary for the best adhesion over the layer of new whitewash.
The next step will be to prepare a surface cleared of old whitewash or to repair the ceiling. To do this job well, you need to do the following:
- Conduct a visual inspection of the surface for cracks, potholes and the integrity of the seams between the slabs. Identified defects can be noted using a piece of chalk to prevent omissions during preparation.
- It is recommended to glue the joints of rustications with serpyanka. What is serpyanka? This is a special mesh tape that is used in painting work. Previously, rustications were sealed using cement-lime mortar, but practice has shown that dry plaster under the influence external factors tends to fall out, and this process is labor-intensive and can only be performed by a specialist.
- Identified cracks and irregularities must be filled with putty; for this, a tool is used - a spatula.
- After the surface has dried, it is necessary to eliminate the unevenness formed after puttying using sandpaper.
- The surface is primed with a product purchased from a specialized store. The choice of primer must be made depending on the material in which the ceiling will be painted or whitened, but universal ones are more common.
On video: method of removing whitewash.
How to whiten the ceiling surface
You can whitewash the ceiling in a room using lime or chalk. Let's consider two options for preparing a solution for whitewashing, and also find out how to whitewash the ceiling in an apartment.
Preparation of whitewash
Chalk is a frequently used material for preparing whitewash solutions. You need:
- Pour some warm water into a container and add 30 g of casein glue to it, you can use Bustilat or PVA.
- Separately, grate a pack of laundry soap and then add it to the same container.
- Stir everything until a liquid homogeneous mixture is obtained.
- Sift 3 kg of chalk and gradually add it to the prepared solution, remembering to stir.
Advice! To avoid a yellowish tint on the whitened surface, it is recommended to add 20 g of blue (based on 10 square meters).
Lime is also widely used. To prepare the solution, you need to dilute 1 kg and 700 g of lime in water, add 40 g of blue and mix everything thoroughly.
Lime coating or whitewashing the ceiling with lime protects the surface from harmful microorganisms and helps eliminate small cracks in the ceiling. The best way to whitewash the ceiling is up to everyone to decide for themselves.
But to create whiteness and freshness in the room, it is recommended to use chalk.
Before whitewashing the ceiling with lime, you need to check the consistency of the prepared mixture. To do this, it is recommended to lower any metal product into the prepared solution, and after removing it, evaluate whether the surface coverage is sufficient.
If the whitewash flows off the metal without leaving a trace, then it is very liquid. You should add chalk or lime in small portions, stirring and checking until you get the desired result. Lime whitening should be done with extreme caution.
Which tool to use
Whitewashing at home can be done with a spray gun, vacuum cleaner, roller or brush. But, it should be taken into account that the splashes left by the spray gun and vacuum cleaner will spread throughout the entire room, and not just settle on the ceiling. Therefore, you should either cover everything well enough, or choose to apply it with a brush or roller.
To choose the right brush, you need to follow the recommendations:
- the bristles should be natural;
- The width of the pile should be at least 15-20 cm.
Before direct use, it is recommended to soak the brush in warm water for a couple of hours so that the wood swells and the bristles do not remain on the ceiling. After the work is completed, the brush must be rinsed with running water.
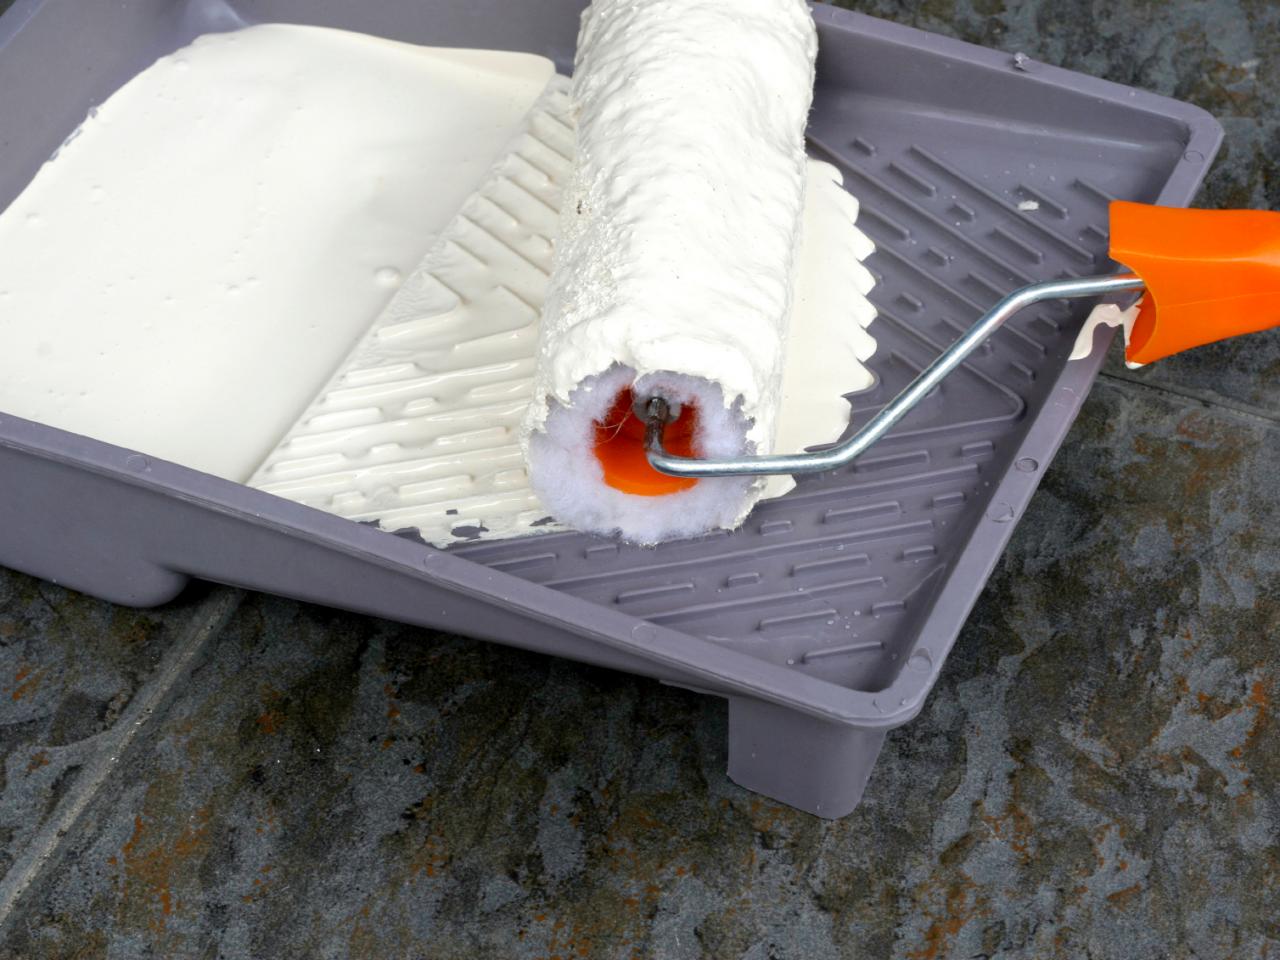
Whitewashing with a roller is accessible to everyone. How to choose a roller for whitewashing a ceiling? There are no special recommendations for choosing this tool. The main thing is to purchase an additional tray for wetting the roller with whitewash, and it doesn’t matter which roller you use to do the work.
Whitewashing technology
How to whitewash a ceiling correctly? When using a brush, you need to know the following rules:
- Initially, apply the layer perpendicular to the windows and to another light source.
- The final result is achieved by applying a layer parallel to the incident light.
A simpler option for performing the work is provided by using a roller. The technology is simple:
- The prepared solution must be poured into the pan.
- Dip the roller into liquid whitewash and roll the ditch along the slope until the glass excess liquid, and the whitewash is evenly absorbed into the “coat” of the roller.
When whitewashing the ceiling with a roller, you should take into account that the first time the work must be done perpendicular to the light source, and then parallel to it on top, just like when working with a brush. When working with a roller, you should whitewash the surface overlapping the previously applied layer. This is done in order to prevent unpainted areas.
It is impossible to whiten with a roller hard to reach places, angles between the ceiling and wall, as well as junction points heating system to the ceiling. In these cases the best solution will use a brush. A whitewashed ceiling will look uniform.
Whitewashing with water-based composition
When choosing what to whitewash the ceiling with, you should not rule out painting. To avoid problems with chalk or lime whitewash, alternative solution is painting water-based compositions on top existing coverage. The painted ceiling will look aesthetically pleasing; this paint can be used to paint the ceiling evenly.
But preparing the ceiling for whitewashing has certain nuances, and therefore must be done more carefully. The new coating will adhere better to old whitewash, and will not be defended in the future.
To avoid visible streaks and marks from a roller or brush, the second layer should be applied perpendicular to the previously applied one. Whitewashing with water-based paint should be done 2 times, but before that you need to ensure complete drying first layer.
Experienced builders know how to whitewash the ceiling themselves and correctly estimate the costs of the work. For beginners, it can be difficult to determine how much time and Money they will use up. There are some tips to help beginners:
- It is necessary to calculate the cost of materials for whitewashing, including brushes, rollers and other means. First you need to calculate the amount of chalk, lime or water-based paint consumed. Then decide what tools are needed for the job, and then calculate how much they cost. Add the two resulting sums.
- During work, avoid drafts or exposure to sunlight. As a result of this, the whitewash will soon peel off.
- During the actual work of painting or whitewashing the flow, it is important to ensure that no sagging or streaks form. To do this, you need to paint slowly, carefully and carefully.
Important! You need to prepare for work morally and psychologically so that the effect of the work done and whitewashed ceiling pleased for a long time.
Source: //GidPoKraske.ru/okrashivanie/steny-i-potolki/kak-belit-potolok.html
Whitewashing the ceiling with your own hands - step-by-step instructions!
There are a huge number of ceiling finishing options, but the most affordable and simplest is whitewashing.
If you have a limited budget for renovations, this solution will be the most optimal, and a clean and smooth surface will in any case give the room a neat, well-groomed appearance.
In addition, whitewashing the ceiling with your own hands will not take much time and will not require much effort.
Do-it-yourself whitewashing of the ceiling
Ceiling preparation
You cannot whitewash a ceiling using an old coating: when wet, the previous layers of whitewash will begin to peel off and stick to the brush, making the process difficult. In addition, the surface will not be perfectly smooth, which is completely undesirable. When cleaning the ceiling, you must take everything out of the room or cover it with polyethylene, otherwise you will have to wash everything from lime and plaster.
Step 1: Surface Cleaning
Cleaning the ceiling with a spatula
For cleaning you will need:
- bucket with water;
- sponge;
- medium-sized metal spatula;
- clean rags;
- ladder.
If you clean a dry ceiling, a lot of dust will rise, and the process itself will take a long time; It is much faster and more convenient to remove the whitewash after moistening. You should not wet the entire area at once, since the surface dries out very quickly; it is better to divide the ceiling into small sections and moisten as you go.
After wetting the whitewash, you need to wait a few minutes until the layers are saturated with water to the base, then the coating can be very easily removed with a spatula. Finally, wipe off any remaining chalk or lime with a clean, damp cloth until no traces remain.
Step 2. Sealing joints and cracks
For further preparation you will additionally need:
- serpyanka;
- putty;
- sandpaper;
- primer;
- brush or roller;
- level.
Between ceilings There are always joints that gradually diverge over time. To prevent them from appearing on the ceiling, they are embroidered, filled with putty mixture, and covered with sickle tape on top. Putty is again applied over the serpyanka and thoroughly rubbed with a spatula, making the surface even.
While the joints are drying, the ceiling is carefully inspected and defects are eliminated. Small cracks are simply rubbed with mortar, recesses and chips are puttied.
Step 3: Remove stains
Very often stains appear on the ceiling that show through the finish. It can be quite difficult to remove them, but this must be done at the preparation stage, otherwise after a while they will again be visible through the whitewash layer.
Stains from water leaks are removed using bleach or bleach: dip a sponge in the liquid and press it onto the stain until it lightens. Of course, you need to wear rubber gloves to protect your skin.
How to clean a ceiling
To remove rust stains you will need copper sulfate. Prepare a saturated solution of bright blue color, spread the stain well, let it dry and repeat everything again. If necessary, re-process until the marks fade. After this, the problem areas are well primed and dried.
Step 4. Alignment
Putty is best used to eliminate small defects on the ceiling: cracks and unevenness.
When all noticeable defects have been removed, ceiling surface Apply a level in different places to determine the magnitude of the differences in height. If there are recessed areas, they are puttied separately, and when the solution dries, the entire ceiling is covered with putty. Usually used finishing putty, which is applied in 2 layers 1-2 mm thick.
To work, take two spatulas - narrow and wide; when applying, hold the spatula under small angle to the ceiling. The resulting sagging or stripes are removed after the mixture has dried with sandpaper. It is necessary to sand the entire treated area to give the surface maximum smoothness. Finally, the ceiling is wiped with a dry cloth to remove dust and primed.
Primer
How to whitewash a ceiling
For whitewashing, chalk, slaked lime and water-based paint are used. Each option has its own advantages, so to decide, you need to learn about the basic properties of these materials.
Chalk
Chalk for whitewashing
The chalk solution is easy to apply, has good covering power, and is almost odorless. Chalk - very cheap material, and therefore whitewashing will cost pennies. But at the same time, the chalk gets very dirty, preparing the solution takes time, and the surface may acquire a yellowish tint. To prevent this from happening, blue is added to the solution.
Lime
Lime has bactericidal properties, covers small cracks well, lasts a long time, and has a low cost. Disadvantages include sharp bad smell, which appears when the solution is diluted and the material is caustic. When whitening with lime, you must wear gloves, otherwise it will corrode the skin on your hands.
Water-based paint
Water-based paint
Paint on water based- this is the most best option. Its cost is higher than that of chalk or lime, but its covering capacity is much greater. It does not smell, is easy to apply, is sold ready for application, and the painted surface does not get dirty. There is a washable paint that is especially suitable for wet areas.
Ceiling whitewashing process
For whitewashing you will need:
- ladder;
- small brush;
- roller 20 cm long;
- plastic container.
Step 1. Preparation of the solution
Dilute the whitewash solution
To dilute chalk, you will need water, preferably warm, PVA glue and blue. First, glue is diluted in water, and then chalk is added in small portions. Stir the solution well, break up all the lumps, and pour in the blue. Mix everything again until the color is uniform. For 10 square meters you will need 3 kg of sifted chalk, 30 g of glue and 20 g of blue.
Less lime will be required for the same ceiling area: you need to dilute 1.7 kg of lime in water and add 40g of blue.
First take a little water, about 5-6 liters, and then add little by little, depending on the required concentration of the solution. If necessary, the paint is also diluted by adding only clean water.
If you want to give the ceiling a colored tint, you can use special pigments.
Step 2. Applying the first layer
Do-it-yourself whitewashing of the ceiling
They begin to whitewash in the corner from the window; First, the joints of the ceiling and walls are carefully treated with a brush, and then whitewash is applied to the surface itself with a roller.
Do not dip the roller into the paint too much to avoid splashing and drips; the layer should be thin and uniform. Whitening should be done in parallel movements perpendicular to the direction of light.
Having finished applying the first layer, the surface is left to dry completely.
Ceiling brush
Step 3: Reapply whitewash
How to whitewash a ceiling
The base can be visible through the first layer, and stripes from a brush or roller are also clearly visible. A second layer of whitewash, which is applied perpendicular to the first, will help remove these defects. The solution must be mixed, because lime, chalk and paint could settle to the bottom.
After this, they begin to whiten from the same place as the first time. The movements should be as uniform and confident as possible, then the quality of the whitewash will be high.
To ensure that there are no unpainted areas left, when applying the composition, the ceiling is visually divided into strips and overlaps 4-5 cm wide are made at the joints.
Whitewashing the ceiling
After completion of the work, it is necessary to exclude the occurrence of drafts and sunlight illumination of the ceiling, otherwise the coating may crumble.
Also, you should not create dust in the room while the whitewash is drying; All paint stains on the floor and walls should be wiped off immediately with a damp cloth, and swept only later so that dust does not settle on the ceiling.
Subject to these simple rules re-finishing will be required no earlier than in 3-4 years.
People often have to save on repairs, so many of them prefer to whitewash the ceiling. In the article: what is the best way to whitewash a ceiling - issues related to materials for whitewashing the ceiling, preparing the ceiling surface before whitewashing, and much more will be considered.
Whitewashing walls and ceilings is the simplest and most economical way make surfaces look neat and beautiful. In addition, by whitening the surfaces of the ceiling or walls, you can thereby get rid of fungus, since whitewashing “dries” the walls and prevents dampness from appearing on them.
However, before performing such a seemingly uncomplicated job, many people nevertheless ask the following questions: What is the best way to whitewash the ceiling? and How to properly prepare it before whitewashing?
Preparing surfaces before whitewashing
Having set out to whitewash the ceiling with your own hands, you need to start, first of all, by preparing the surfaces for whitewashing. You don’t need a lot of tools here, you just need to have:
- A bucket for liquid to wash off old whitewash;
- Wide brush or brush;
- Foam sponge;
- Wide metal spatula;
You will also need a high table or stepladder so that you can reach the ceiling surface with your hand. The height of the stepladder must be completely sufficient, otherwise the process of whitewashing the ceiling will be “painful”, and it will take much more effort to whitewash the ceiling yourself.

In order to wash off old whitewash or chalk from the ceiling, you need to generously moisten the surface of the ceiling. It is convenient to do this, of course, with a spray bottle, but you can also use a foam sponge.
It is important to understand that you cannot immediately wet the entire surface of the ceiling, since any plastered surface absorbs moisture well. And as soon as you reach the end of the ceiling with wetting, the “beginning” of it will already be dry.
Therefore, in order not to waste your energy and quickly wash off the old whitewash from the ceiling, you need to act in stages, first treating one square of the ceiling, then another, etc.
You can remove old whitewash from the ceiling when it is moistened with water using a metal spatula. You need to work with a spatula carefully; you only need to remove the whitewash layer with it, without affecting the plaster layer.

Otherwise, on next stage To prepare the ceiling before whitewashing, you will have to fork out money and purchase a putty mixture to level the ceiling.
How and what is the best way to whitewash a ceiling?
Having prepared the ceiling for whitewashing, it is worth considering the second question: What is the best way to whitewash the ceiling? You can whitewash the ceiling with chalk or lime. Lime for whitewashing the ceiling has some advantages over chalk, since, as mentioned above, it can “dry” the surface of the walls, thereby preventing the appearance of mold and mildew on them.

The only downside to lime is the color. Lime is not as white in color as chalk. In addition, some people are allergic to lime, so if such diseases occur to residents, it is better to pay attention to chalk for whitewashing the ceiling.
However, in this article: How and what is the best way to whiten a ceiling? — both options for whitewashing the ceiling using both chalk and lime will be considered.
How to whitewash a ceiling with chalk?
Whitening the ceiling with chalk is the best solution for those people who are allergic to lime. Before whitewashing the ceiling with chalk, chalk whitewash is first prepared. The recipe for its preparation is as follows:
- For 3 kilograms of white chalk, take 5 liters of water;
- Be sure to add 10-15 grams of blue and up to 30 grams of wood glue to the solution.
- After this, everything is thoroughly mixed and infused for some time.
- To check the consistency of chalk whitewash, you need to dip a knife blade into it.
- When you take out the knife, notice how the whitewash flows off the blade.
If this happens freely and quickly, then the chalk whitewash is not thick enough and chalk should be added to it. If on the contrary, then water is added.
This amount of chalk whitewash is enough to treat ten square meters of ceiling.
The solution for whitewashing the ceiling with lime must be prepared in a slightly different way. You can now buy slaked lime and quicklime on the market. After purchase, you can work with slaked lime immediately, but quicklime should first be dissolved in water, allowing it to sit for a while.

The proportions of components for preparing lime whitewash are as follows:
- Take 3 kilograms of slaked lime per liter of water.
- The lime is mixed in water, to which 100 grams of salt and 200 grams of aluminum alum are added.
- The added components, lime and water are thoroughly mixed.
- Next, the resulting mass of lime whitewash can be diluted in another 10 liters of water.
- If there is such a need, you can add dye to the prepared lime whitewash. For 10 liters of whitewash, add from 200 to 500 ml of dye, depending on the color.
After the lime or chalk whitewash is ready, you can start whitewashing the ceiling with your own hands. By this time the question is: What is the best way to whitewash the ceiling? - you probably didn’t have one, but another one probably appeared: How to whitewash a ceiling with your own hands?

Answering the question: How to whitewash a ceiling with your own hands, it should be said that a variety of devices can be used for these purposes. There are special rollers for whitewashing the ceiling, and there are brushes for these purposes.
In the process of whitewashing the ceiling with your own hands, the whitewash should be applied evenly to the ceiling, trying to avoid drips and streaks. If you see that the whitewash is not light on the ceiling, then cover the surface with it a second time.
As can be seen from all of the above, the question of what is the best way to whiten a ceiling is not really that difficult. It is important to be patient and whitewash the ceiling in stages, starting, of course, with the preparatory work.
Renovating an apartment or private house on your own is an interesting activity. The first thing you need to do when performing work is to whitewash the ceiling. How to do the job correctly for an inexperienced builder? We will tell you how to whitewash a ceiling and what you will need for this in this article.
This is the first and important stage in the work; a lot depends on it. And if you neglect it, the newly whitened surface will soon peel off. If previously the surface was whitewashed with chalk, and today there is a decision to cover the ceiling with water-based paint, then it is necessary to carry out preliminary work. No less important is the question of how to whitewash the ceiling using old whitewash. It is worth noting that whitewashing the ceiling using old paint or over chalk will not give a good result.
To determine what was previously applied to the ceiling surface, it is recommended to wet it. If a darkish stain appears on the ceiling, and your hand does not get dirty from it, then this means that lime whitewash has been applied to the ceiling. But if with light contact your hands get dirty, then this is chalk whitewash.
When using a water-based coating, no changes are observed. Next, you need to consider the principles of how to prepare the ceiling for whitewashing.
Step by step washing off the old layer
Work carried out even at low altitude requires special care. You cannot be distracted and think about other problems. To protect your eyes and respiratory system from accidental splashes and chalk dust, you should use safety glasses and respirators. You must wear a hat on your head, otherwise it will be difficult to wash your hair later.

Surface preparation steps:
1. First, you need to close all the furniture that, for some reason, has not been removed from the room. The floor should also be covered with waterproof materials, for example, plastic film or oilcloth. It is recommended to close it with an overlap, so that there are no gaps, otherwise if paint or chalk gets on the surface of the furniture or floor, it will be difficult to clean.

2. It is necessary to prepare a soap solution in warm water, a round or swing brush or brush. Soap dissolves better in warm water, and if it accidentally gets into certain areas of the body, there will be no unpleasant sensations.

3. You need to wet the old whitewash one at a time, mentally dividing the surface into small squares so as not to miss even a small area. If you start randomly wetting the entire ceiling, it will soon dry out and you will have to repeat the procedure again.

4. If the surface of the ceiling is saturated with moisture, then you can start scraping off the old layer with a spatula. To ensure that as little chalk or lime gets on the floor as possible, you should place a container underneath.

The ceiling needs to be moistened in any case, even if the old coating is not dirty. This is necessary for the best adhesion over the layer of new whitewash.
The next step will be to prepare a surface cleared of old whitewash or to repair the ceiling. To do this job well, you need to do the following:
- Conduct a visual inspection of the surface for cracks, potholes and the integrity of the seams between the slabs. Identified defects can be noted using a piece of chalk to prevent omissions during preparation.
- It is recommended to glue the joints of rustications with serpyanka. What is serpyanka? This is a special mesh tape that is used in painting work. Previously, rustications were sealed using cement-lime mortar, but practice has shown that dry plaster tends to fall out under the influence of external factors, and this process is labor-intensive and can only be performed by a specialist.
- Identified cracks and irregularities must be filled with putty; for this, a tool is used - a spatula.
- After the surface has dried, it is necessary to eliminate the unevenness formed after puttying using sandpaper.
- The surface is primed with a product purchased from a specialized store. The choice of primer must be made depending on the material in which the ceiling will be painted or whitened, but universal ones are more common.

On video: method of removing whitewash.
How to whiten the ceiling surface
You can whitewash the ceiling in a room using lime or chalk. Let's consider two options for preparing a solution for whitewashing, and also find out how to whitewash the ceiling in an apartment.
Preparation of whitewash
Chalk is a frequently used material for preparing whitewash solutions. You need:
- Pour some warm water into a container and add 30 g of casein glue to it, you can use Bustilat or PVA.
- Separately, grate a pack of laundry soap and then add it to the same container.
- Stir everything until a liquid homogeneous mixture is obtained.
- Sift 3 kg of chalk and gradually add it to the prepared solution, remembering to stir.

Advice! To avoid a yellowish tint on the whitened surface, it is recommended to add 20 g of blue (per 10 square meters).

Lime is also widely used. To prepare the solution, you need to dilute 1 kg and 700 g of lime in water, add 40 g of blue and mix everything thoroughly. Lime coating or whitewashing the ceiling with lime protects the surface from harmful microorganisms and helps eliminate small cracks in the ceiling. The best way to whitewash the ceiling is up to everyone to decide for themselves. But to create whiteness and freshness in the room, it is recommended to use chalk.

Before whitewashing the ceiling with lime, you need to check the consistency of the prepared mixture. To do this, it is recommended to lower any metal product into the prepared solution, and after removing it, evaluate whether the surface coverage is sufficient.
If the whitewash flows off the metal without leaving a trace, then it is very liquid. You should add chalk or lime in small portions, stirring and checking until you get the desired result. Lime whitening should be done with extreme caution.

Which tool to use
Whitewashing at home can be done with a spray gun, vacuum cleaner, roller or brush. But, it should be taken into account that the splashes left by the spray gun and vacuum cleaner will spread throughout the entire room, and not just settle on the ceiling. Therefore, you should either cover everything well enough, or choose to apply it with a brush or roller.

To choose the right brush, you need to follow the recommendations:
- the bristles should be natural;
- The width of the pile should be at least 15-20 cm.

Before direct use, it is recommended to soak the brush in warm water for a couple of hours so that the wood swells and the bristles do not remain on the ceiling. After the work is completed, the brush must be rinsed with running water.
Whitewashing with a roller is accessible to everyone. How to choose a roller for whitewashing a ceiling? There are no special recommendations for choosing this tool. The main thing is to purchase an additional tray for wetting the roller with whitewash, and it doesn’t matter which roller you use to do the work.
Whitewashing technology
How to whitewash a ceiling correctly? When using a brush, you need to know the following rules:
- Initially, apply the layer perpendicular to the windows and to another light source.
- The final result is achieved by applying a layer parallel to the incident light.
A simpler option for performing the work is provided by using a roller. The technology is simple:
- The prepared solution must be poured into the pan.
- Dip the roller into liquid whitewash and roll the ditch along the slope so that the excess liquid drains away and the whitewash is evenly absorbed into the “coat” of the roller.
When whitewashing the ceiling with a roller, you should take into account that the first time the work must be done perpendicular to the light source, and then parallel to it on top, just like when working with a brush. When working with a roller, you should whitewash the surface overlapping the previously applied layer. This is done in order to prevent unpainted areas.
It is impossible to whitewash hard-to-reach places, corners between the ceiling and the wall, as well as the places where the heating system adjoins the ceiling with a roller. In these cases, the best solution is to use a brush. A whitewashed ceiling will look uniform.

Whitewashing with water-based composition
When choosing what to whitewash the ceiling with, you should not rule out painting. To avoid problems with chalk or lime whitewash, an alternative solution is to paint with water-based compositions over the existing coating. The painted ceiling will look aesthetically pleasing; this paint can be used to paint the ceiling evenly.

But preparing the ceiling for whitewashing has certain nuances, and therefore must be done more carefully. The new coating will adhere better to the old whitewash and will not settle in the future.
To avoid visible streaks and marks from a roller or brush, the second layer should be applied perpendicular to the previously applied one. Whitewash with water-based paint in 2 times, but before that you need to ensure that the first layer is completely dry.

Experienced builders know how to whitewash the ceiling themselves and correctly estimate the costs of the work. For beginners, it can be difficult to determine how much time and money they will spend. There are some tips to help beginners:
- It is necessary to calculate the cost of materials for whitewashing, including brushes, rollers and other means. First you need to calculate the amount of chalk, lime or water-based paint consumed. Then decide what tools are needed for the job, and then calculate how much they cost. Add the two resulting sums.
- During work, avoid drafts or exposure to sunlight. As a result of this, the whitewash will soon peel off.
- During the actual work of painting or whitewashing the flow, it is important to ensure that no sagging or streaks form. To do this, you need to paint slowly, carefully and carefully.
Important! You need to prepare for work morally and psychologically, so that the effect of the work done and the whitewashed ceiling will please you for a long time.

Painting the ceiling with a roller (1 video)


