One of the tasks that each of us solves in the process of redevelopment and renovation of a house is to achieve the most rational use area of any premises. It can be solved in several ways, comprehensively, including by placing in the openings interior doors recoil type. In addition to the fact that they allow you to free up additional square centimeters, such models also have a number of significant advantages. For example, the possibility of developing own project and fairly simple installation.

reference Information
Sliding doors are often confused with their sliding counterparts. In many ways, they are similar, since they have almost identical systems that allow the doors to be moved along the wall, which achieves release in the room usable area. But there is a difference between them, and quite significant. The sliding door mechanism includes supports in the form of small wheels, which ensure ease of movement and smooth operation. Plus, such models are more durable, easier to operate, they are not at risk of distortion (jamming), they do not create noise during the opening/closing process, which can be automated if desired.
But sliding doors move along guides in the profile of which they are installed without additional support (sometimes these are ordinary rollers). Similar models always only double-leaf ones, while sliding analogues are shifted to either side, and therefore consist, as a rule, of only one leaf. Even a child can operate it, which gives another advantage to such models.
Sliding doors include:
- support mechanism (guides + wheels). The option with the installation of one “rail” (in the upper part) is much easier to implement, but there is also a disadvantage. The point is that in a strong draft, the door leaf can “play”, since there is no rigid connection to the supporting part. If there are guides on both sides of the door (at the top and bottom, on the floor), then the installation of sliding doors becomes more complicated, although only slightly. But in this case there is no such drawback;
- travel limiters. Without them, when the sliding door leaf is in the extreme position, it can jump off the guides;
- stopper Its task is to fix the canvas in a certain position and prevent its spontaneous displacement;
- sash. In the simplest designs there is only one. Although you can purchase or make your own models with two or even three fragments. In fact, this is a symbiosis of folding and sliding doors. Such options attract few people due to the increased cost, complexity of installation, and regulation;
- additional equipment. At the owner's discretion, such models are equipped with automatic elements (electric motor, blocker, closer, circuit remote control etc). Having installed the door, it is easy to understand what else will be required, depending on the specifics of its operation.

Installation procedure
Scheme development
The fact that when opening the door will not swing open, but roll back, is understandable. But the nuance is how the room in the area of the opening is designed and what is planned in the future. In addition, the feature of the wall is also important. She can be as complete monolithic design, so light partition, consisting of a frame sheathed on both sides. In the first case, one cannot ignore its specificity. If the wall is load-bearing, then it is unlikely that it will be possible to make a legal redevelopment, and you will have to be content with what you have. Therefore, the sliding door is mounted so that its leaf moves along the wall.

The second option, if it can be implemented, is much more convenient. The cavity in the partition is empty, and if it contains insulation, it can be partially removed. Consequently, when the sliding door is opened to the limit, its leaf will begin to go into the wall. The advantages are obvious, since this solution allows you to design and furnish the area near the opening as you wish. Not a single detail of the interior will interfere with an interior sliding door.

Installation process
With the option of moving into the wall, you will have to fix the guides either during repairs (redevelopment) in the room, or after partial dismantling frame sheathing. Put sliding doors Doing it yourself using this technology is much more troublesome. This is already a minus for this method.
The “along the wall” project is easier to implement. You can do it at any convenient time, even after finishing cosmetic repairs in room. There will be no damage to the finish if you are careful.

Algorithm of actions:
- Door equipment. All necessary accessories can be installed later. But the wheels are attached immediately. This will allow you to more accurately determine the height difference between the upper and lower rails. When choosing a circuit with only one rail, the task becomes simpler.
- The position of the upper guide is determined. Basically, many home craftsmen prefer to mount it on the ceiling. Depending on the height of the room, the door leaf is also selected. Fixing the rails on the wall is in a certain way more convenient, but here you will have to correctly calculate the installation locations of the brackets. They must be at the same level, and the interval between them must be chosen correctly, taking into account the weight of the sash.

It is also worth considering the tightness of the sliding door to the wall. The base should not interfere with its free movement, at the same time the gap is kept to a minimum. Otherwise, drafts cannot be avoided, and there is no talk of sound insulation at all. By the way, this is one of the disadvantages of models of this type, which is noted by both experts and users.
To ensure everything is done accurately, you will need an assistant. You'll have to take the canvas and literally try it on locally. Fastening the guide, taking into account the load, only with self-tapping screws and dowels. As an option - small anchors.
- Attaching the bottom guide. Here, too, in advance, even at the stage of drawing up the diagram, it is necessary to determine how best to install it. Directly on the floor - faster and easier. The downside is that it will become a kind of threshold that is easy to trip over.
- Installation of the canvas. If everything is done correctly, there is no error in the calculations, then the sliding door is mounted simply - the support wheels are placed on the guides, the sash moves, and the travel stops are attached.
- Additional activities. All that the owner considers necessary is the installation of a handle, a lock, automation elements and decor.

In fact, all the work on installing a sliding door with your own hands comes down to competent calculations of the linear parameters of its door leaf (if it self-production) and mounting points for the guides. And the ability to choose options allows you to install a model of this type in almost any room. And what is important, without the involvement of specialists.
Hello, dear readers and DIYers!
In this article, Steve, the author of the YouTube channel "Steve Carmichael", will tell you how he did sliding doors for your workshop.
Many of us now prefer to work from home. They set up their workshop in a barn, garage or office in an apartment. Often it becomes living room, for example, part of the living room or hall, or less often a separate room (such a luxury!). As you know, there is always little space in the house, and in most cases there is a constant war between household members for every extra square meter free space. Under such circumstances, sliding doors are just what you need! They will save space and create a quiet nook, protected from the prying eyes of strangers.

Materials.
- Pine boards
- Steel strip
- Self-tapping screws for wood.
Tools used by the author.
- A circular saw
- Orbital sander
- Clamps
- Belt sanding machine
- Reciprocating saw
- Drilling machine.
Manufacturing process.
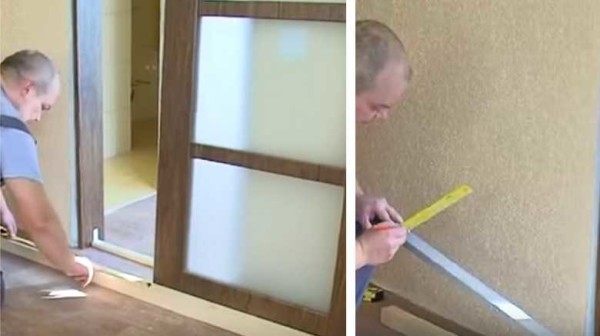
And he begins by measuring the opening in which the doors should be installed. The author intends to install two doors from the outside of the wall so that they can slide freely on the top guide rail along the wall. In addition, the rail will need to be surrounded by a plinth or decorative molding.
In order to behind closed doors If there are no gaps in the sides of the opening, the master adds a few more centimeters to the width of each of the doors so that in the end they completely cover doorway.
If you try to order sliding doors of this size, the author warns, it will be quite expensive. If you make them yourself, you can save a decent amount.
There are many tutorials and videos online that illustrate the process of making such doors. The author offers several links to help: and second.
Steve uses an 18mm wide Dado blade to cut deep grooves into the sides of the boards.
He then cuts the boards until they meet the rail and studs.


Next, Steve cuts the tenon joints at the ends of the crossbars so that they fit into the grooves. It would be a good idea to practice a little on test samples, the author notes, to make sure that all the elements fit together.


Steve cuts the tongue and groove boards with a miter saw.


And here in front of you are all the elements of the future door: two long panels for outer skin, three short crossbars and a row of cross bars.
The middle crossbar has a groove on both sides to connect the top and bottom panel. All door elements are glued together.


The author begins by gluing three crossbars into each of the two long supports.


When the glue has dried, the author pushes the tongue and groove boards one by one into the resulting grooves and thus “collects” the door mass.


The craftsman uses a small hand plane to cut off the corners at the edges - this will make it easier to glue another long longitudinal strip later.


Once the door is assembled, Steve tightens the outer strips with large clamps.
He decides to glue two more narrow diagonal strips to give the door more rigidity.


Next, the craftsman carefully sands both doors and coats each door with two layers of paint.


Steve now switches to door hardware. He cuts them from a flat steel plate 50mm wide and 4.5mm thick.


He drills holes in each of the four pieces so they can be attached to the wheels and doors.

On grinding machine it removes all the sharp corners.


All metal elements of the structure are coated with black spray paint.
Next, Steve attaches the rollers to the door and this is what the finished doors look like. All that remains is to hang them.


Now the author will install the hanging plate. Colors in White color and attaches the guide.


The technician drills mounting holes 16 inches from center. The guide rail is mounted to the wall using eight anchors.


And now the doors are ready!


The author points out the fact that not all doorways Sliding doors can be installed. Ideally on the sides doorway there must be some additional space into which the doors can “go” when they open.


All that remains is to attach door handles to make it easier to slide doors apart. You can buy ready-made, industrial pens, or you can make your own if you want to add some flair to the product.
Don't forget to take into account external finishing doors - plinths, baguettes, etc. - which will tell you at what distance from the wall the doors should be hung.
At the end points of the bottom of the doors, Steve glued felt pads so that the doors could rest gently against them when opened.
These doors weigh 30 kg each! Therefore, it is important that the guide bar is attached to hardwood. In addition, he drives several pins/rods on both sides of the support beam for reliability. You can hardly trust such doors with drywall anchors!
Stoppers should be placed at the ends of the guide rail - these could be L-shaped brackets or something made of wood. In our case, the roller rests on the bolt head.
Interior doors are one of the key elements in the interior of a house or apartment. Installing door structures allows you to solve several problems at once: isolating a specific room from other rooms, increasing its level of comfort, protecting it from noise and drafts. To the consumer modern manufacturers They offer door designs in a wide range of types and one of the most popular solutions is interior sliding doors.
The key difference between sliding doors and other types of products is how they open and close - the slider simply slides apart, moves to the side or diverges. In the article we will talk in detail about the advantages of sliding doors, their features, and also provide step-by-step instructions for self-assembly of structures.
Types, pros and cons of sliding interior doors
The demand for sliding interior doors among buyers is growing and this is explained by the fact that their installation in the interior allows for rational and ergonomic use of living space, which is especially important for rooms with small area. Sliders are classified into several separate varieties:
- Structures built into the wall. Their installation involves mounting rollers on the door leaf and guides on the wall or doorway. Such sliders open and close in the same way as compartment doors, that is, when the rollers move along the guide elements, the doorway will open for entry or exit from the room.
- Accordion sliders. Doors of this type are made of small lamellas that fold to open the entrance to the room.
Accordion sliding doors are an interesting option for modern interior, however, it is extremely important to choose a design made of high quality and from high-quality materials, otherwise the product will quickly fail and lose its useful functionality.
Before deciding whether you will install interior sliding doors in your home, you should study in detail all the pros and cons of the designs. The advantages of sliders include the following characteristics:
- The originality of the solution allows you to create an ultra-modern interior;
- Space saving;
- Safety in operation;
- Reliable room insulation.
There are also disadvantages to interior sliding doors. In particular, it is worth keeping in mind that their installation is a difficult and quite expensive process, and the structure itself and its elements will require regular maintenance.
Features of the functioning mechanism
In order to install interior sliding doors with your own hands in a high-quality manner, it would be advisable to study in detail in advance the mechanism of operation of the structures, which can be:
- Hidden type. Movements for opening and closing the door will occur in the interior space and therefore the mechanism will need to be installed at the stage of wall construction by installing the door frame inside.
- Open type. Doors with such a mechanism can be installed without problems at any stage of repair and construction, including the finishing stages. Installation of the product will not require any adjustments to the wall structure, since the movement of the canvas will occur along guide elements located along the wall surface.
Doors with an external functioning mechanism are presented on the market in a wide range, which gives great opportunity pick up best option to suit any interior style and room size.
Having decided on the type of door based on the functioning mechanism, it is also important not to lose attention to the selection of guide elements - profiles along which the door leaf will move during operation. Profiles can be mounted in different areas of the doorway - in the upper or lower part, on both sides at once.
The simplest option is to install a sliding door on runners placed at the top. Profiles mounted in the upper part of the opening have a fairly long service life, since they are less susceptible to mechanical damage. However, this arrangement of elements is suitable only for low-weight door structures.
Roller for sliding doorsFor heavy doors it is better to use combined option guides, which also provide a smoother movement of the blade when opening and closing, but installing guides at the bottom is rarely used, since the runners mounted in this area quickly deform and require constant cleaning.
Step-by-step guide to self-installation of sliding interior doors
Below we provide detailed instructions By self-installation doors with external functioning mechanism. Preparation process for installation work They always start by purchasing material and collecting tools that may be useful. It’s worth preparing in advance:
- The door structure itself with all components;
- Door fittings – profiles, locks, handles, rollers;
The number of rollers is determined by the weight of the door - if its value exceeds 30 kg, then it is advisable to use four rollers. It is better to purchase locks and handles of a hidden type to avoid damage finishing walls as work progresses.
- Bars with a section of 50x30 for fixing the runners;
- Fasteners;
Tools that will be useful for installation work include a level, tape measure, hacksaw, drill and chisel.
Preparation
At this stage of work on installing an interior sliding door, it is important to accurately determine the location of its installation and the side of its opening. After measurements and calculations, the old structure (if any) is dismantled from the opening, and the opening itself is cleaned of debris, dust and dirt, after which a box is installed in it.
When installing a frame in an opening, do not forget about the need for a technological gap between the door structure and the floor surface. If the floor in your house is completely finished, it will be enough to leave a gap of ten millimeters in height before finishing the finishing layer. If fine finishing surfaces are yet to come - to the height of the gap you need to add the height of the screed and the thickness finishing coating surfaces.
Work with the opening
This stage begins with measurements - the height and width of the door structure should be determined. For getting accurate indicators measurements are taken at several points at once - at the top, in the center and at the bottom. The height of the structure is measured in two states at once, closed and open. This approach to measurements will allow you to take into account floor unevenness and avoid mistakes when installing the door.
Next you need to strengthen the bars. They are installed along a line that is drawn directly above the top edge of the box. The center of the installed beam should be above the side of the frame that you choose to open the door. That is, if the door opens to the right, then the center of the block should be located with right side boxes.
After securing the beam in the selected area, the upper guide elements are mounted. They are fixed to the bar using fasteners. A simple test will help you make sure that the guides are secured correctly: run a roller along the profiles and if it moves freely and easily, you’ve done everything right!
Installation of the lower guides can be done using various methods:
- By inserting the rails into part of the subfloor.
- By installing elements directly on the floor surface, followed by closing it with a threshold. The threshold will protect the runners from mechanical damage.
- Installation of a packet knife, which will support the structure and ensure its correct movement.
Another option is a non-threshold system with carriages and roller elements. It is optimal because door design will move easily when opening and closing, no damage will occur flooring, there is no need to waste time installing rails.
Assembly and installation phase
To assemble a sliding door, you should first install it on it roller mechanism at the upper end of the structure. At the bottom of the product is done. To make the groove correctly, you need to drill holes on both sides, at a distance of about 15 millimeters from the edge. Between the finished holes, choose a groove ten to eighteen millimeters deep.
Having finished with the fittings, all you have to do is install the door into the opening into the guides. Having put the structure in place, be sure to check its progress and, if everything is fine, insert rubber shock absorbers into the profiles, which act as limiters holding the door in place.
They complete the installation of the interior sliding door by masking all visible structural elements. Decorative trims are used for this purpose.
As a conclusion
Interior doors are a beautiful and functional element of residential interiors that can last a long time, provided correct installation design and regular maintenance. There is also nothing complicated in installing the product - you just need to spend time studying some of the features of the work and have basic skills and knowledge in the field of home repairs.
We hope the article helped you find out useful details about the process self-installation interior sliding doors, and now you can easily carry out this work on your own, without the involvement of professional craftsmen.
There is an opinion that it is not possible to make sliding doors with your own hands at home, but this is not so. A sliding door is not such a complicated thing, and then we will talk about what sliding doors are like, we will go through the pros and cons of compartment doors, and most importantly, we will give step-by-step instructions on how to make a sliding door with your own hands, in 2 options.
Sliding structures in houses are not only beautiful, but also convenient.
The question of how to make sliding doors is just right to ask when you know what you want, so first let’s figure out what they are like:

The accordion looks original, but is not very convenient to use.
An accordion sliding interior door consists of a certain number of sections connected by hinges, which fold according to the accordion principle. There is no point in assembling this structure manually, firstly, there is a lot of small and precise work, and secondly, the system is inconvenient to use, plus, when the package is completely moved, it takes away part of the doorway.

Cascade sliding structures.
A cascade sliding design refers to several door panels that slide and hide behind each other. The whole trick is that the panels, no matter how many there are, slide apart synchronously, but you can’t make such a sliding door mechanism with your own hands, and installation is far from the easiest.

Retractable radius design.
The sliding radius design is aerobatics in this niche. You shouldn’t even try to make such sliding doors with your own hands, because almost all the details radius doors will have to be ordered individually. Agree, it would be a shame to pay money for an order and then break the doors trying to install them yourself.

It’s quite possible to make interior compartment doors with your own hands.
Sliding compartment doors are the best option for the home craftsman. Such a door can be single-leaf or double-leaf. The mechanism for sliding compartment doors is simple but reliable; in short, guides are installed on the wall along which the doors slide.
- Hidden doors that hide in the wall;
- A door that slides along the wall.
But this is not true in principle, because the drawings, diagrams and design of the structure itself are identical in both cases, the door slides in the same way, the roller mechanism is the same. The only difference is that a plasterboard box is mounted next to the door leaf, in which the leaf is hidden.

General diagram of hidden sliding doors.
Interior doors differ from similar designs in sliding wardrobes only in their more powerful mechanism, because the fabric here is much heavier. Therefore, it is not so important that you install a sliding door with your own hands on a cabinet or on a doorway, the technology is almost the same.
We’ve sorted out the main differences and design choices, now let’s talk specifically about how to make compartment doors with your own hands.
Two options for installing sliding doors yourself
Do-it-yourself sliding interior doors can be made in different ways, more precisely, for different rooms. Plus, the size of the budget plays a significant role; it’s one thing to assemble doors for a small dacha with seasonal accommodation It’s quite another to make sliding interior doors for a city apartment.
Option No. 1. A good door for an apartment
In this case, we will learn how to properly install sliding doors on rollers with our own hands.
You should immediately forget about homemade mechanisms, we're talking about only about the installation of ready-made systems. Of course, such designs are sold with a description, but there are nuances that are not in the description.
To install sliding interior doors with your own hands, you need the following tool:
- Hammer or electric drill with impact function;
- Hydraulic level;
- Bubble level;
- Screwdriver;
- Roulette;
- Set of open-end wrenches (from No. 5 and above);
- Manual frezer;
- Wood hacksaw;
- Hacksaw for metal;
- Pencil;
- Hammer.

We assume that the door is made from ready-made components, that is, we have a door leaf, guides, rollers, stops, etc. door furniture. The only thing you will need to buy additionally is a wooden block 50x50 or 50x70 mm.
Even before assembling the sliding door and even before going to the store for components, you need to make sure of the fundamental things:
- Check how smooth your opening is; if there is a skew, take a wide blade (with a margin);
- Make sure the wall can support the load. It is better for an amateur to work with brick or concrete wall, leave foam concrete and plasterboard false walls to the professionals;
- Absolutely all finishing must be completed. Door assembly is done at the very end.
How to make a compartment door with your own hands:
There are many models of rollers; we are interested in mechanisms on a supporting platform with the ability to adjust the gap between the blade and the guide profile.
Wide platforms are mounted on the edge of the door leaf, but if the door leaf is more than 80 cm, then you can step back from the corner by 1/6 of the door width.
Using a tape measure, we calculate the center and, attaching a roller platform to the end of the canvas, mark the entry points of the screws.

You shouldn’t immediately drive the screws according to the markings; you don’t know what quality the slab is; when screwing the screw in “live”, it may crack. Therefore, first drill holes, the drill diameter is about 2 mm. Next, apply the bar and screw in the screws.

Now insert the carrier plate itself, equipped with a rod for the roller, into the grooves of the roller bar. In this case, the plate is fixed to the bar by screwing the rod a couple of turns (open-end wrenches will come in handy here).

As you can see in the photo, the rod is equipped with a thread; we need to screw the rollers onto this thread. Of course, there is a possibility of adjustment, but the thread must enter the roller by at least 3 - 4 turns. It’s better to count the revolutions so that they are approximately equal on all rollers.

In order not to work in the dark later, it is better to embed handles and locks right away, especially when it comes to hidden handles, as in the photo. All such grooves in the canvas are cut with a hand router.

We are done with the rollers and fittings, now we move on to installing the guide bar. The guide bar itself is metal; we will attach it to a wooden block. It is important here how to calculate the cross-section and length of the bar.
Don’t be alarmed, for the calculation we only need a tape measure and a pencil. If your doorway is simply plastered, without platbands, then you can take a 50x50 mm block. The platbands will take up at least 10 - 15 mm, so you need to take a 50x70 mm block for them.
As for the length of the bar, it is calculated as 2 widths door leaf, plus another 50 mm for stoppers.
Now we lay the guide on the block and fasten it with self-tapping screws in increments of about 200 mm. The holes in the guide are drilled subtly, that is, so that the screw head does not protrude from above, otherwise the roller will begin to cling to it when moving.

Next we hang the structure. A professional only needs to take one measurement, after which the craftsmen attach the timber separately, and then attach the doors to it. It's better for an amateur to try on assembled doors, for this purpose we insert the rollers into the guide.

To make the measurement more accurate, you need to insert a wedge, preferably more than one, between the door and the guide bar.

You need to put a mark on the wall above the block and move upward from this mark by at least 7 mm, plus the thickness of the carpets, if any are planned.
Holes in the block must be drilled immediately. The step depends on what exactly you will hang the structure on. For anchor bolts with a cross-section of 6–8 mm, a pitch of 50–70 cm is sufficient, and for long self-tapping screws with plastic dowels, holes are drilled at a distance of no more than 25 cm.
We make markings on the wall through a block. The photo below shows how craftsmen drill a wall without removing the door; we do not advise you to do this. We have the markings, now we can remove the door, attach the block to the wall, level it and mark the future holes with a drill. Then you remove the block and drill it out.

To prevent the rollers from jumping out, you need to install stoppers along the edges of the guide, but they are installed after the doors are hung. The stopper is inserted into the groove and the clamping screw is tightened. The installation point is determined experimentally by the position of the rollers.

Our doors hang on a guide, but to prevent them from dangling, they need to be somehow fixed from below. To do this, a groove is cut from the bottom end along the entire length with a router; if the door is factory, then the groove should already be there.
The blade will control the flag pressure roller, which is attached to the floor directly next to the door jamb.

In order for the door to rub against the roller less, it must be set strictly plumb. The technology for installing the flag is shown in the photo below.

Control flag installation technology.
Basically retractable door installed with your own hands, it will work, but you still need to make it beautiful. To do this, buy a platband to match the door leaf and nail or screw it to the supporting frame wooden block. Such a bar will hide both the block itself and the hanging mechanism.

Option number 2. Homemade product for the dacha
Sliding doors are a good thing and they have a lot of advantages, but all these advantages fade into the background when a person finds out the price of such fittings. Don't get upset when creative approach this problem can also be solved. The design is not the most beautiful, but it is quite suitable for a summer house.
So, let's take a step-by-step look at how to make sliding doors for your dacha yourself without spending a lot of money.
The door leaf will cost the most. Although there are options here too, for example, you can restore old door and hang it up.

Old doors can be put to new uses.
Then we go to the store with furniture fittings and buy the simplest furniture wheels there. Rotary mechanisms Don’t take them on a hinge, they will only make things worse. Such wheels are attached to the doors with a pair of self-tapping screws. There are 2 reference points for each canvas.

At the top end of the canvas, above the wheels, we screw steel rings. The thickness of the metal in such rings must be at least 3–4 mm, otherwise they will quickly fray.

We will use as a guide steel pipe three-quarters of an inch, although this is not important, you can take any pipe as long as the rings fit into it properly. We calculate the length in the same way as in the case of a wooden block.
We install as shown in the photo below, the elbow and mounting “penny” can be found on any construction market, however, like the pipe itself.

Fastening the pipe to the wall.

Conclusion
As you can see, installing sliding doors with your own hands is not so difficult, and for those readers who found this information not enough, there is also a video on this topic.

A variant of a homemade design on the top suspension.
Manufacturing of sliding doors in Lately gaining momentum. This model is quite popular for many reasons. This is especially true for small rooms.
Today we will look at how to make a sliding door with your own hands. Although this cannot be said to be done completely on your own.
It will be easier and cheaper to purchase all the components in retail chains and then simply assemble them at home. But we have to do it right choice, because there are several types of this design. In the video in this article and photos you can select the right option.
The use of sliding doors creates an unusual and interesting interior for our homes. The implementation of this solution allows you to intelligently use the living space. When talking about how to make sliding doors yourself, you need to understand that there is nothing complicated about it.
A little understanding of the manufacturing process itself and some skill in using tools is required. Initially, you need to select the desired design option and then select all the nodes for it. There are even hidden options.
In the gallery you can choose the option you need:
When going to the store to buy all the necessary components, it is advisable to take simple measurements using a tape measure, the height -L and width -H of the existing door leaf.
The typical size of height -L is usually 2m, and width -H can range from 0.6 - 0.8m. Having this data, you can already purchase the following necessary components.
|
|
You can undoubtedly make a roller mechanism for sliding doors with your own hands. But its price is not high and it will be easier to purchase it ready-made. Without it, such doors do not work. Of course, you can rely on a sales consultant who will assist in selecting the right mechanism after you indicate your measurements L and H. The minimum you need to know in this case is that the length of the mechanism should be two sizes larger than the door leaf size. It’s okay if there is no specific size; you can take a mechanism with a small margin in length, which can be easily trimmed. |
|
|
These are various accessories for do-it-yourself sliding doors, decorations, latches and locks. |


All this is already enough to remake the ordinary swing door into a custom sliding beauty. But if you do it, then do it thoroughly and efficiently.
- We think about new box for the door (we use a regular rail, the size is equal to the width brickwork doorway and 5m long), a bar that covers sliding system, construction foam, platbands, dowels for fastening and support-thrust fixing strips, for doors equipped with a closing device (lock).
- We are thinking about a new door leaf - together, all this will create a luxurious doorway.
To your taste, all this can be selected and bought, just like in stores building materials, and in specialized markets.
Types of sliding doors
The design of sliding doors can be fundamentally different not only in the mechanism of movement, but also in its design. They are divided into three types according to the type of opening and closing:
Coupe
Movement is carried out along the wall
This typical door design is similar to the door leaves installed in train compartments; the opening is parallel to the door leaf, and not perpendicular.

Partition with sliding doors - compartment
So:
- The opening process is facilitated by an installed bearing unit; in addition, the blade has the ability to be fixed in the desired position using a locking device.
- The movement of the canvas along the guide is carried out using rollers installed in the lower and upper parts of the doorway (see).
- The use of this type of door will have a slight advantage in comparison with doors that open wide, due to the fact that when opening the door, it does not take up useful squares of our space.
An excellent option for average little rooms of a bygone era.
Pencil cases
In this type there is a similarity to the sliding door, a pencil case is used for the sliding door, but it has one distinguishing feature, giving it a touch of practicality compared to others.

- The difference is that when the door is opened, the panel goes in and hides in a niche in the wall partition.
- This option is small, significant in cost and has a relatively complex device, but its advantage is that the canvas is open door is not visible, thus there is no visual distortion of the interior; the door closer is also installed on the leading profile.
Folding
This type is divided into two subtypes: “accordion” and “book”.
| "Accordions"
|
The sliding one is composite; there are 10 or more sections (panels), which, when opened or closed, are assembled according to the principle of blinds. Sections of this type of door are assembled from elements manufactured in various options(array of ordinary glass, colored, with a tint, with the presence of stained glass). A wide range of materials for finishing and the panels themselves allow you to fit original door at any indoor space your home with a refined interior. |
| "Books"
|
They look vaguely like an accordion, but only remotely. These doors have fewer panels in a set, which makes them advantageous in terms of convenience and practicality, due to the fact that the sections practically do not leave the profile guide rail, saving space. Comparing the price range with the accordion, the books are a little more expensive. The standard package of such doors includes a pair of profiles, hinges, a rubber cushion, a latch, and roller units. |


Sliding door rollback mechanisms
Rollers for sliding doors are sliding mechanisms from the point of view of engineering mechanics - these are the mechanisms due to which the door opens (moves). In view of this, sliding canvases differ from each other according to the type of movement system.

So:
- The conditionally open sliding door system is a guide panel, which is mainly made of steel alloys. Fastening is carried out by installing it on the wall with dowels or liquid nails, and does not need to install additional parts on top of it. In this type, the rail is point-fixed with clamps to the wall or ceiling.
- A conventionally closed door system is often made from aluminum alloys, followed by covering with decorating panels to fit into any designer’s project.
- Sometimes, closed-type systems are modified in order to simplify opening and give additional functionality and aesthetics. One example of this modification is that the blade moves along inner surface profile, while hiding all imperfections from the outside.
Basic parameters of interior sliding doors
| Doors | Both ordinary swing doors and interior sliding doors can be double-leaf. From an operational point of view double doors They look advantageous because they practically do not break. It is advisable to install these doors where there is a large number of people and allows for a large doorway (see). |
| Canvas size | For those who are looking for an ordinary sliding door for a room, interior doors that are manufactured and comply with GOST and are relatively inexpensive are suitable. But, if this option is not suitable due to the existing large doorway, then you will have to choose from the meager selection of models available for sale or become an artist and order a set of two canvases. Our specialists will produce something to suit every taste, in accordance with the rules and regulations. |
| Width | Interior doors with wide leaves are usually installed with a large content of stained glass or mirrors. This gives a positive visual distortion to the small volume of the room and lighting. This effect has a positive impact on general interior creating a corner of peace. |
| High interior doors | For connoisseurs of large aristocratic sizes or hostages of their height doorways that do not meet the norms and rules, the solution will be to install models with a variety of transoms.
|
There is a variety of materials for the production of canvases; as a rule, the classic is solid wood. Consumers with a limited budget are offered an option that is not inferior in quality - these are mainly variations with veneer cladding.
We make sliding doors ourselves
Do-it-yourself sliding door into the wall is placed in a certain order. There is no need to change the sequences, because each subsequent one is based on the installation base of the previous one.
Preparing the canvas
Every action starts with preparatory operations tools - you will need an angle grinder, a household router, a screwdriver, a regular hammer, a screwdriver and a chisel. The choice of working tool will be yours. Briefly, the logic of preparing the canvas can be described as follows.

So:
- We make guides for sliding doors. They must be on the same axis.
- Now, using a handy tool, we cut a groove with a width of 0.3 cm, in the center of the axis, the lower end surface of the door - thanks to it, the lower guide bar prevents the door from swinging when opening and closing, while simultaneously providing fixation as a stop. How to do this will depend on the tool at hand. We take the package with the recoil mechanism kit and open it; the usual package contains a pair of plastic rollers and the same number of fastening brackets.
- First of all, we assemble the roller assembly using the existing holes for fastening using two nuts and washers. Then we apply the assembled roller assemblies to the upper end plane of the door leaf, mark the installation locations of the brackets at the required distance between ourselves and a pencil, tracing them along the contour, after which with the tool we make a sample for a recess in the door leaf with a depth equal to the size of the metal from which the brackets are made.
- Next, we use self-tapping screws to secure the roller units in the prepared sockets (slots) to the canvas. But, if all you have at hand from the available tools is a blunt chisel and a huge hammer, then it is advisable to do without cutting grooves for the staples - it is better to screw the panels on top with self-tapping screws, the appearance of the doors will suffer less from these actions. But, of course, if you are a connoisseur of manual cumbersome work and you have golden hands, then torment!
- The second step is to install the lock. There are also some nuances here, about which you can find special articles.
- The third step is the installation of special handles - we take the tool in our hands and cut out grooves for the handles on both sides of the door, or we drill an oblong hole and use a jigsaw to cut out seats for the handles.
At this point, the work related to our canvas reaches the completed stage, and you can begin the installation process sliding mechanism and the canopy of our doors.
Door canopy: installation process of sliding mechanism
The sliding door to the room moves with the help of a mechanism; it is attached without any problems - all that is necessary is to fix the horizontal guide profile relative to the doorway. Horizontalness is determined using a building level.
You can make a barn mechanism for a sliding door with your own hands, but it is not necessary. It's better to consider Japanese options. Speaking about this, several nuances can be highlighted.

So:
- It is necessary to release the outermost part of the guide by 4.5-5 cm on either side of the doorway. On the opposite side of our opening (where the door opens), the guide should extend to an amount equal to the width of the future door, This moment it is necessary to take into account and cut off the excess part of the door guide.
- To determine the mounting location of the sliding mechanism in height, it is also necessary to make calculations. This size is determined by two dimensions - the height of the door leaf taking into account the rollers plus the size between the floor and the door (taking into account the unevenness of your floor), equal to 10-20 mm
- When installing the guide from the wall surface, we again pay attention to the curvature of the walls. The guide is attached to the wall with dowels without additional effort or equipment. The main condition is the absence of curvature. If the wall is relatively uneven, then, as an option, you can resort to a simple trick, moving the guide away from the wall surface a small distance - in this case we use wooden slats, which we attach to the wall, thereby removing the existing unevenness, and now we install our guide on this rail.
Installation of the door leaf is done with minimal effort and is completely simple - we insert the rollers into the guide from the side, slightly shaking it so that the leaf does not jam.
- So, after installing the door in place, we proceed to install the stop, for which a slot (long groove) was made in the lower end of the door leaf. After checking the smooth movement of the door along the guide by repeatedly opening and closing, we fix the door as much as possible. open position, in order to determine the installation of a rubber cushion, which also serves as a travel limiter. Using a self-tapping screw designed for metal, we fix the rubber cushion with inside guide, then you need to insert the stop halfway into the groove made in the lower part of the canvas and screw it to the floor with dowels.
- By shifting the blade in the closing direction, we determine the “closed” position and again first attach the travel stop in the upper part of the blade, and proceed to fastening the lower stop with dowels.
In conclusion, we can say about the design, three words about the design of the doorway itself - without this part of the work, all efforts to install interior, your sliding doors, will be an attempt for the better.
Using a strip with a thickness of 10 to 20 mm and a width equal to the thickness of the partition, we twist an analogue of the door frame and install it in the opening using construction foam. When the foam hardens, remove its excess from both sides and carefully install the platbands.
- When installing the doors, under the closing mechanism, we replace one of the platbands that adds beauty to a beam with a persistent groove for the door leaf, where it is attached back side parts of the castle.
To summarize, I would like to make a reservation on my own, only that the rail described cannot be a constant and is not a dogma in the design of the opening. As an example, it would look nice to have a laminate lining the opening (it is also installed on construction foam), the selected option made of stones will look original according to your idea or the designer’s advice. natural origin or regular tiles.
The topic of focus in design is huge, and here you can think for a long time. Making decisions in choosing natural or artificial materials for the design of your opening will depend on your refined and sophisticated taste.
Making sliding doors with your own hands is not that difficult, you just need to approach the issue thoughtfully. Homemade structures will last a long time only if you have high-quality components.


