The idea of where to start repairs in the apartment begins to bother future homeowners long before the vending "three-ruble note" or "kopeck piece" was officially issued, and the keys to the front door migrated from the realtor to the new owners. With the purchase of housing in a new building, everything is clear, in this case, the best option would be to do a rough repair of the apartment with your own hands. With housing purchased on the secondary market, the situation is more complicated.
Which option is preferable, capital or cosmetic
It is clear that the decision on how to plan the renovation of the apartment, where to start and the sequence of work will be based primarily on the condition of the living quarters. To a large extent, the planned amount of work, what to look for and where to start repairing an apartment - a secondary housing, depends on a number of conditions, including plans for the future, the abilities and luck of the new owners:
- If the apartment was purchased in a relatively new house, 4-10 years old, complete with high-quality steel doors, plastic windows, shabby, but "live" floors, then it is quite possible that you can do with a cosmetic repair of the apartment;
- Buying an apartment from an intermediary, especially if the living quarters smells like freshly made cosmetic repairs designed to hide all the flaws and problems, will certainly require a major overhaul of most of the details;
- The third option is to buy a very old apartment, which has not been renovated for a long time. In this case, you will need to spend a fair amount of time and effort to identify all the shortcomings and problems.
In the latter case, the decision is obvious, it is necessary to renovate the apartment from scratch, it is easier and more convenient to carry out a major overhaul of the premises before the tenants move into the new apartment. In such a situation, you can move away from the standard sequence of work when repairing an apartment and decide on your own where to start repairs, based on financial capabilities and free time.

Apartment with a cosmetic renovation, where to start work
The second case is considered the most problematic in terms of planning the stages of apartment renovation. Not only is the cost of cosmetic repairs automatically included in the cost of purchased housing, it will also take the skill of a magician to determine the real state of the most important areas of the premises without breaking the freshly laid finish:
- The quality of the flooring, the condition and the degree of wear of the subfloor;
- Serviceability of water supply pipes, sewerage systems, heating systems;
- The condition of the wiring.
For your information! The flooring, flooring and electrical wiring is easy enough to check with your own hands. It is best to invite specialists for the inspection and repair of pipes, radiators and sewers.
As a result of the audit, the answer to the question of where to start, and what are the further stages of repairing a secondary apartment, becomes obvious. First of all, repair work is carried out on areas on which safety and the ability to use housing depend. Further, you can make repairs to the apartment in any order, it is clear that it is best to start with the dirtiest and dirtiest work and finish with painting and decorating.

How to properly organize and start cosmetic repairs
Experts recommend, when planning to buy an apartment on the secondary market, to reserve funds for capital repairs, even if, at first glance, the housing is in a tolerable condition. If you are lucky with the purchase of an apartment, and there are no pressing problems requiring urgent capital repairs, then you can start with "cosmetics", and plan a thorough alteration of the premises a couple of years in advance, when funds and time appear.

Redecoration of a one-room apartment
The most difficult thing is to plan repairs in the "odnushka", there is not enough free space, there is practically no place to place materials and tools for apartment renovation. Cosmetic renovation of the interior has to be done in a situation when there is practically no time left for heaving and thinking about where to start repairs, from day to day the residents will move into new housing.
In this case, repair work in the apartment, as they say, is carried out "on wheels":

At the end of the work, the wooden floors are painted or the parquet is varnished. If there is no time and opportunity to complete redecoration of the apartment in full, then it is better to start by restoring the floor covering.

Even if you had to move into an unrepaired apartment with furniture and property, in the future you can always find a couple of free days when you can make repairs in the apartment. Always, at all times, repairing the floor has been the most difficult and problematic, therefore, laying or replacing the floor covering should be done as soon as possible.
We are renovating a two-room apartment
Cosmetic procedures in a two-room apartment are much easier, since there is an opportunity, before starting work, to transfer furniture and some things to a free room.
The craftsmen recommend starting repair work in the apartment by changing the two most difficult parts to repair - replacing windows and elements of the heating system. In addition to the rather high price, both parts of the apartment's life support system are tied to weather conditions and the time of year.

Therefore, it is necessary to adjust the entire plan for the repair work under the replacement of radiators or window frames, for example, plan to start redecorating sometime at the end of August, during the next vacation. Prices for double-glazed windows and radiators are already starting to decline, it is far from cold weather, and the central heating system is not yet filled with water.

As early as September, it is possible to start repairing slopes and painting pipes. It's still warm enough outside to make final repairs to the apartment. If autumn frosts fall during the work, it will still be warm enough in the room to make repairs in a two-room apartment with minimal loss of time.
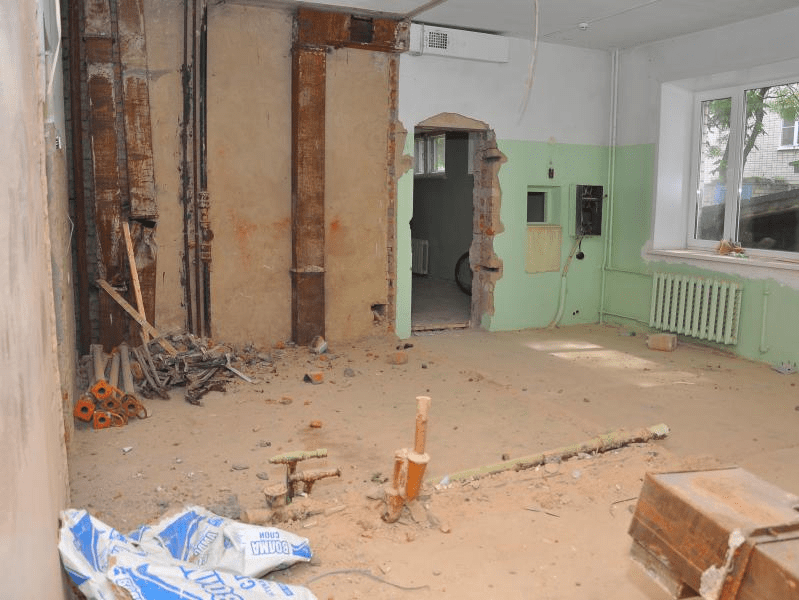
How to properly start the overhaul of a problem apartment
Unlike "cosmetics", which are planned on the basis of the principle - from dirty to clean, a major repair option should be started by solving the most complex and deep problems. Repair work can take several weeks, it is best to start in early spring, when most of the specialized craftsmen do not have so many orders, summer is ahead, and there is an opportunity to thoroughly prepare the apartment:
- Solve the problem of obtaining permits, for example, for redeveloping an apartment, transferring a meter, installing individual heating;
- Remove some of the furniture, flowers, household appliances to the dacha;
- Stock up on trash bags and plastic wrap;
- Purchase materials and tools.
The main thing is that you will need to draw up step-by-step instructions for yourself if a major overhaul in an apartment is done from scratch. A useful list of works will allow you to avoid inconsistencies and loss of time, especially if several craftsmen will work at the same time in the apartment.
Sequence of repair work
The preparation has been completed, the permits have been obtained, the materials have been purchased, and the renovation process of the apartment can begin. Traditionally, overhaul is planned in the following sequence:

Installation of interior doors, laying of flooring, installation of lamps are transferred, as the least urgent, to the final part of the repair. It is necessary to start the process of restoring the premises by removing the old rubbish.
Removing door strips, floor coverings and old plaster
In the opinion of most of the new settlers, it would be right to start the overhaul in the apartment with the installation of capital-type entrance doors. It can be armor, metal or double oak doors, all the same, as long as they have a sufficiently large opening, at least 90 cm wide, and have good sound insulation.
We must plaster the outer walls, the inner finishing of the slopes can be transferred at the time of plastering the walls. At the same time, you need to start cutting out all the doorways inside the apartment, dismantling the old wooden frames. We tighten the opening with a thick plastic wrap. Before starting plastering work, it is imperative to install double-glazed windows.
Moving partitions and aligning walls
Next, the dirtiest part of the work is done - the plaster is cut off, the chalk or lime whitewash of the ceiling is washed out. The flooring is removed down to the concrete base, the wooden floors are disassembled and removed from the apartment.
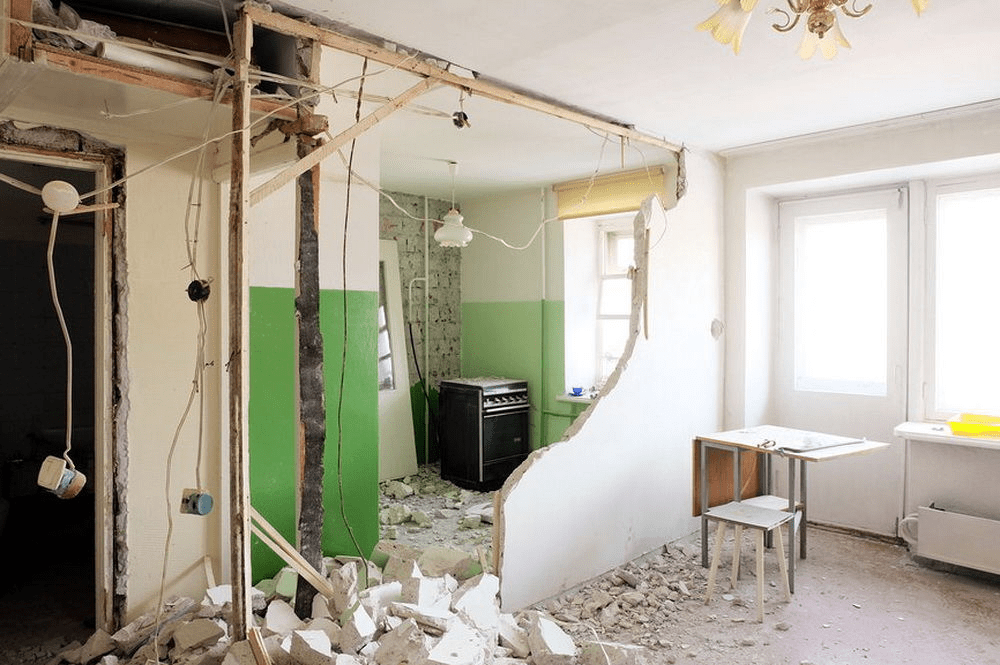
If the work plan provides for the transfer of partitions, the next stage will be laying out new wall structures from a gypsum block or drywall. First of all, plumbing is removed in the bathroom, water supply and sewerage pipes are changed. Further, the surface of the walls in the toilet, in the bathroom and in the kitchen is leveled for finishing. You can invite craftsmen to lay new communications, but for now you need to start working with plastering the walls and ceiling in the living rooms of the apartment.
Unexpected problems
Capital work associated with the use of a hammer drill, grinders, drills, any other "noisy" power tool should be performed only during the day.
Any repair work can be carried out from 8-00 to 20-00. In some cases, by order of the municipal authorities, it is prohibited to work with a tool with a high noise level from 13-00 to 15-00, so it will be useful to know in advance when and until what time you can make repairs in the apartment so as not to get into a conflict situation with neighbors.
Laying new electrical wiring
As soon as the process of leveling the walls with gypsum plaster is completed, you can start laying the wiring. If it is not planned to transfer the meter in the apartment, then channels are immediately cut, electrical wiring is done, installation of socket outlets and outlets for lamps. If the meter is moved, the wiring is taken to a new place of installation, connection and verification can be started only after the device is sealed.

Simultaneously with the installation of the wiring, you can start finishing the bathroom and kitchen, first of all the walls, then the floor and ceiling. Plumbing is installed at the same time. Before starting the renovation of the floor, the work in the kitchen-toilet must be completely completed.
Door installation and floor repair
As soon as the walls and ceiling are ready for finishing - painting or wallpapering, you can start repairing the floor. Most often, a laminate or parquet board is laid on concrete, but a real wooden floor can also be assembled. The floor covering is primed, dried and covered with foil.

At the next stage of the repair, loot of interior doors is collected. The doors themselves are not yet hung, the platbands are not nailed until the walls and ceiling are finished.
The final stage of repair
The final stage of the repair can be started by installing sockets, switches, lamps, adjusting window fittings. If the floor requires painting or varnishing, then a ventilation fan will need to be installed, otherwise the drying process will take several days.

Have you finally made a decision to renew the interior of your home? Then the knowledge of what stages of apartment renovation await us and how to observe their sequence will come in handy. So many, at first glance, imperceptible nuances can arise.
If you determine the sequence of actions in advance, the result will only please.
- This is a chance to significantly save your budget, because you don't have to redo anything and buy in a hurry, while overpaying.
- The duration of the work will be reduced. Self-organization always contributes to a faster completion of the case.
- The repair will be really high quality.
The first mistake of the owner, who decided to start construction work, is the thoughtless purchase of building materials. Often, due to haste, he buys a lot of excess, but what is actually needed, on the contrary, remains on the shelves. After all, even for groceries, it is better to go with a well-thought-out list.
Read on where to start your renovation.
It all starts with an estimate. In this case, it is advisable to invite a specialist for consultation, even if only independent work is planned in the future.
 Before starting the repair, it is necessary to develop a project and draw up an estimate
 With a well-defined plan and a competent list of everything you need, you can start.
Work order
We draw your attention once again: to avoid mistakes, alterations and downtime during the repair process, be sure to adhere to the ready-made plan.
 Step-by-step repair steps
 Dismantling the old interior
It all starts with total preparation. Such jobs include:
- removing old wallpaper;
- dismantling of plaster;
- destruction of walls and partitions not provided for in the new project;
- removal of floors;
- dismantling of surfaces intended for replacement.
Skip the dismantling stage and go directly to the next step.
 Dismantling the interior
 Installation of communications
First of all, they carry out work on the installation of communications. Before making repairs, you need to do all the operations that can destroy new coatings: installation of windows, doors, wiring and ventilation. Also, pipe wiring can be attributed to this stage.
Read more about this in our articles:
All old electrical wiring is removed and a new one is installed. The safety instructions for the placement of outlets will help you to position the electrical components correctly and use wires with a sufficient cross-section. For example, you should take care of the presence of thick wiring and grounding at the point to which the washing machine will be connected. 
Creating partitions
At this stage, you can change the entire layout of the apartment, bringing novelty and additional comfort to the interior. 
With the help of partitions (especially if the extra walls are removed), you can create an office, a nursery, divide a bathroom.
Most often, bricks or foam blocks are used for such purposes, less often drywall. By covering the new wall with soundproof plaster, you can achieve more comfort. When creating partitions, it is important to take into account the squaring of the premises, sometimes it is better to leave one large room than to make five small ones. In addition, the creation of unnecessary partitions can lead to a violation of the natural ventilation of the apartment. So when erecting additional walls, be sure to consult with professionals.
Articles on our site on the topic:
Plaster
For plastering work, it is recommended to use a ready-made cement-sand mixture (DSP) or gypsum plaster, which will eliminate possible mistakes in self-mixing the proportions of sand and cement. If there is not enough experience in such work, it is still better to hire specialists. Firstly, it saves time, and secondly, you do not have to redo unsuccessful work.
More details:

Screed
Pouring concrete, equalize the floor. The quality of these works will affect the subsequent placement of furniture in the room. Probably more than once faced with the problem of leveling a table, chest of drawers, armchairs and, more significantly, a washing machine. A good screed will help avoid such difficulties in the future.
More details:. 
Plasterboard installation
At least a week should pass between the screed and the installation of drywall for the room to dry out.
We install the iron sectional base, leveling the surface of the ceiling. Then we mount the drywall sheets.
More detailed articles on this topic.
Often, renovation of the interior in an apartment takes many years, it becomes boring, costly, difficult and stressful. But this difficult activity can be turned into a simple and even fun process. It turns out to be not so difficult to make a repair of a room with your own hands, if you follow the order and the planned sequence of work. It is important to plan everything in advance and carry out thorough preparation. So, how to make repairs in a room with your own hands so as not to get bogged down in this for years?
Work order planning
All stages of repair in an apartment must be planned in advance and strictly adhered to the intended sequence. This way you can not only save money, but also reduce work, as well as achieve a better result. It is necessary not only to decide on the room with your own hands, but also to draw up a design project, calculate the approximate cost.
A design project can, of course, be developed independently, but it is better to order it from a professional. Still, detailing the interior is a complex and creative business that requires appropriate experience.
To calculate the final cost, it is not necessary to go to a construction hypermarket or to the market. All prices for a specific city can be found on the World Wide Web. There are also contacts of companies that are engaged in both turnkey repairs and individual stages of construction work, for example, plastering, installation of plastic double-glazed windows or stretch ceilings.
If you choose a complex repair, that is, turnkey work, you can get a discount, since this is already considered a bulk order in the construction industry. But repairing a room with your own hands is a way to save on wages for builders.
In general, the repair is carried out step by step as follows:
- Dismantling work.
- Replacement of double-glazed windows.
- Plaster.
- Conducting communications.
- Floor preparation.
- Fine finishing.
Dismantling works
The second stage of work is dismantling. Here you need to consider what result you need to get in the end. Redecoration is the easiest, fastest and most economical option. In this case, you just need to refresh the surfaces (for example, re-glue the wallpaper and put laminate flooring instead of the old linoleum) and change the plumbing in some cases.
Overhaul and renovation is much more difficult. Such a do-it-yourself room repair requires a complete change in the space, which should begin with a comprehensive dismantling. What should be done:
- remove old wallpaper;
- dismantle skirting boards and flooring;
- remove plumbing;
- dismantle the old wiring.
After these works, it is necessary to clean the premises and take out the construction waste. As a result, the room should be literally "bare".
Replacement of double-glazed windows

The next step is to replace the double-glazed windows. You can exclude this stage if the bathroom is being renovated with your own hands (a step-by-step listing of the necessary work was given above). As a rule, in apartment buildings there are rarely bathrooms with windows. In other cases, you can order the replacement of double-glazed windows from the masters or do it yourself.
First you need to order a new window. To do this, you need to determine its size. Particular attention should be paid to the thickness - this parameter of the new glass unit should be the same as that of the old one. Otherwise, new glazing beads will have to be made. If the glass unit is of a non-standard shape (rhombus, triangle), a template must also be attached to the measurements.
When the new window is ready, you can start working. First you need to dismantle the old glass unit. Next, a new window is installed on plastic plates. The last one is glazing beads, first they are mounted short, then long.
When replacing double-glazed windows in windows with wooden frames, it is necessary to additionally process the joints with silicone. The most difficult thing to replace is in facade systems, since the glazing is fixed from the outside. In this case, it is better to use the help of professionals.
Plastering works

Plastering work with more or less even walls can be done independently. Firstly, it is necessary to outline the places of installation of the beacon profiles, secondly, to prime the walls, thirdly, to install beacons, and fourthly, to plaster the walls and make the slopes. It is not necessary to plaster on drywall, plastering work is carried out only on concrete walls.
If the bathroom is being repaired with do-it-yourself panels, you need to plaster the walls only if they are not very even in the places where the battens will be fixed. In other cases, you can limit yourself to removing the old coating and immediately begin to mount the panels on battens or liquid nails.
If you plan to use ceramic tiles in the bathroom or paint the walls, then plastering is necessary. A cement-based plaster is used: for concrete - cement-lime or polymer-cement; for brick walls, you can also take a sand-lime mixture.
Replacement of communications and plumbing

This is followed by one of the most important stages of repairing a room with your own hands - installing electrical wiring, installing or replacing batteries, laying telephone, Internet, television or alarm cables, installing or replacing switches and sockets.
First you need to draw up a wiring plan, determine the power required for all household appliances and lighting. If an electric tank for heating water, an electric stove or an electric oven will be installed, it is advisable to connect them to a separate wire. The markings must be transferred to the plastered walls, and only then begin gating holes for sockets and grooves for wires.
Before starting work, it is important to complete piping and other related work.
Floor preparation
It is necessary to make a screed, leveling, arrange a warm floor. The latter will be very useful when repairing a combined bathroom with your own hands. In a room with a warm floor, there is no dampness, and, therefore, fungus does not develop, it will always be warm there. Take your time to install tiles or other flooring. The next stage is finishing work, but it is better to install the floor covering when the walls and ceiling are already completely ready.
Finishing work

The most crucial stage is finishing. This is the final stage of any renovation. There are a lot of options for finishing today.
You can arrange a stretch ceiling, make the effect of the "starry sky" or the so-called floating ceiling. In this case, it is imperative to involve specialists. The ceiling can be repaired the old fashioned way: whitewash, wallpaper, decorate with special tiles. These types of work can be done independently. However, they are not relevant for the bathroom. The ceiling in this room is best made of PVC (stretch or panel) or ceramic.
There are much more wall decoration materials. It all depends on the budget and personal preferences of the owner. You can make a do-it-yourself bathroom renovation with plastic panels (the most budgetary option), or you can use the classic option: tiles. Another common type of finishing material is paint. In the room, you can paste wallpaper, make decorative plaster or cover the surface of the walls with artificial stone.

The most popular floor coverings are laminate, linoleum, carpet, parquet, decorative tiles. Each material has its own advantages and disadvantages. So, parquet is a natural covering, which is considered more durable, but requires special care. Linoleum is cheaper than other materials, but it does not always look good enough, squeezes, swells or fades over time.
The installation of doors can also be attributed to this stage of the step-by-step repair of a room with your own hands. True, in this matter it is better to trust the professionals. The performance of the door will depend on the quality of work.
Repair cost

The cost of repairs depends on many variables: everything will be done independently or with the involvement of professionals, at what stages hired workers will help, what quality building materials will be used, what is the footage of an apartment or room, what will be the design, and so on. The cost of a turnkey repair of one room (excluding building materials) in Moscow is 5-15 thousand rubles. Of course, there are a lot of expenses, plus everything you still need to buy furniture, household appliances, plumbing and so on.
It would be nice to calculate the cost of work and materials separately, then the most costly stages will become known. Next, you can determine which work is better to entrust to professionals, and which can be done independently. After that, the final picture with the cost and sequence of repairs will be clear.
When carrying out repairs in an apartment, you must adhere to the sequence of stages. Violation of this rule leads to numerous returns to the part already done. As a result, time and financial costs increase significantly.
With proper planning of work, the following is achieved:
- Substantial financial savings.
- Optimization of repair time.
- Achievement of high reliability of results and aesthetics of appearance of premises.
Bad planning invariably creates unforeseen jobs. It is necessary to draw up a detailed list of works, starting from laying a warm floor, if the apartment is in a new building, and ending with the arrangement of furniture.
Start
A common mistake when starting a renovation is to buy all the materials you want. Better not to start with this. Basically, a simple man in the street is able to carry out repairs in an economical mode. You need to choose materials with the best price-quality ratio. Naturally, you can first buy consumables for one step. It's easier to use the services of professionals, otherwise the budgeting will be very tedious. Next, you need to decide on the interior of the rooms, including the kitchen, bathroom and toilet.
Initial work during overhaul
Regardless of the option for performing repairs (by professionals or by your own hands), it always includes mandatory steps for any choice of interior direction.
Preparatory work consists in removing old materials (wallpaper, tiles, linoleum, etc.), if the apartment had a finishing finish, closing any surfaces that still need to be kept clean. Anything that might interfere with the repair is removed. If moisture is present, then the room is dried out, for example, an old bathroom.

Development of a plan before renovating an apartment
Mandatory work on rough finishing, examples of materials
Partitions in economy mode are usually created from foam blocks or drywall, as well as from bricks. At the same time, soundproof materials are used: plaster of a special composition. Drywall is usually installed using metal frames, additionally, mineral wool is inserted into them to muffle the sound.
Next, the walls are aligned with plaster and the formation of a cement screed. Plastering can be carried out using standard compositions, for example, a mixture of sand and cement or gypsum. Important elements for plastering are beacons that are installed under the angle. Due to such devices, an even angle close to 90 ° is achieved.
Electrical and Plumbing
If the dwelling is old with wiring running inside the walls, then removing the wires completely is not necessary. It is enough to de-energize and insulate. The new network is being laid in a slightly different place. The final wiring of the electrical network and plumbing is carried out after plastering the walls and pouring the floor screed. As a result, the absence of inaccuracies in the installation of sources of electricity and plumbing equipment is achieved, for which a convenient outlet of pipes is important.

Finishing work, more about drywall
The stage of finishing works has its own procedure, while it is necessary to comply with specific rules so that the finishing is durable and not “floated” in the very first days of the apartment's operation after renovation. Before starting finishing work, you need to once again remember your preferences, purchase materials, if they have not yet been purchased.
After a rough finish, the room is kept for some time so that the moisture leaves the walls. For example, when installing drywall, as an option for finishing, it is necessary to withstand the time (1-2 weeks) after plastering the walls with a mixture of sand and cement. Drywall is becoming more and more popular because it is inexpensive, easy to install and allows you to achieve completely flat walls.
If you violate the rules for the work, then the likelihood of cracks on the drywall increases significantly. When installing sheets of material, a carefully secured profile is required. Additionally, to obtain a smooth surface, fiberglass and a special putty that mask the joints is used.
Tile
It is difficult to lay tiles evenly and securely without special skills. It is better to entrust this stage of finishing to a specialist, having previously consulted with him about the purchase of materials. It is necessary to decide whether a lot of inserts and decor are planned on the walls. Plumbing is installed only after complete finishing work, up to grinding the joints between the tiles.
It is advisable that the plumbing was installed by the person who worked with the tiles. Cracking tiles when installing plumbing is a common occurrence. Usually the master replaces it.

Wall decoration with tiles (photo)
More about wall and floor work
Unlike where the standard surface finish is tiles, rooms are more often painted with walls and wallpaper. First, the stage of aligning surfaces and corners is performed. The finishing steps for leveling the walls include: applying a deep penetration primer, applying a paint net (2 × 2 mm), the first and second layers of putty. The smoother the surface, the better the wallpaper or paint (water-based or acrylic) will form.
Finishing repairs do not cause difficulties with even walls. Pasting wallpaper in a three-room apartment with two people usually takes 2-3 days. Specific terms depend on the complexity of the texture and pattern of the wallpaper.
The floor covering, according to most experts, should be installed at the end of the repair, regardless of the material (laminate, linoleum, parquet, carpet).
Briefly about the stages of repair and the importance of process knowledge
Regardless of the choice of the repair contractor or the decision to do it yourself, you need to know the stages of work. A knowledgeable landlord better controls the process and follows the master, clearly realizes the time and financial costs. A performer who does not like the meticulousness of the owner must be urgently abandoned. The specialist must discuss all stages with the customer during the repair. Consensus contributes to the achievement of the best result. One should not be afraid to “torture” the master with questions. He is a specialist and is obliged to bring the client up to date.
Brief renovation plan:
Definition with dimensions. The area of the room, the height and width of the walls, the dimensions of the openings, the assessment of the unevenness of the room (the difference in floor and ceiling), the marks of future or current switches and sockets. Suitable floor and ceiling levels can be marked.
- Dismantling of everything unnecessary that you want to get rid of or replace. In a new building, this stage of repair is relevant only when partitions are being demolished.
- Replacement of heating radiators (if necessary). You cannot leave this stage for later, it will be more expensive.
- Garbage collection after dismantling or at the entrance to a new building. Usually an apartment with a rough finish is not cleaned, it is polluted with sand and dust.
- Purchase of the necessary materials for the entire repair or the next stage, depending on the finances.
- Electrician. Laying of a new network or modernization (improvement, repair) of an old one.
- Pouring concrete screed indoors. All this should dry, you need to wait and take care of other rooms.
- Plastering the walls of rooms with bathrooms, leveling them before finishing.
- Finishing of bathroom and toilet walls (painting, tiling).
- Plumbing and piping installation.
- Checking the evenness of walls in living rooms and work on their leveling.
- Installation of slopes and window sills.
- If the screeds in the rooms are not mounted, then you need to start with them.
- Door installation. Before installation, it is necessary to assess their compliance with the dimensions of the opening.
- Planning of work with the ceiling, the choice of finishes (whitewash, tension, suspended). If a suspended or bleached ceiling is planned, then the work is carried out at the last stage of the rough finish.
- Wallpaper gluing. There are nuances in this process depending on the material. For example, vinyl canvases smell. There are soft wallpapers, pressing on which immediately leaves dents.
- Floor finishing, installation of skirting boards.
- Recommendations for some stages of apartment renovation
- How to make a plumbing installation with the least effort? It is better to use metal-plastic pipes, which are mounted without special tools.
- The floor in the rooms. With a dry screed, there are fewer problems due to the speed of installation than with a cement screed. The coatings may vary. The most expensive and warmest is cork.
- The choice of the type of ceiling. Rarely, when during construction, an even arrangement of the ceiling is obtained. Whether to engage in leveling or choose a stretch ceiling. The latter option is of course easier and faster.
- Wallpaper. It is better to choose one meter wide canvas. Gluing half a meter takes much more time.
More about the new building
A new house will definitely undergo a shrinkage process, so using an expensive material is a waste of money. The inevitable appearance of cracks on the walls and smudges in heating and water supply complexes. It is better to leave your choice on a domestic product.
It begins with the determination of the dimensions (fluctuations in the heights of the floor, ceiling, inclination of the partitions). Requires the use of a water level or state of the art laser level. Preliminary measurements allow you to determine the finishing technologies and eliminate drops.
Any demolitions or erection of partitions, the materials of which are a gypsum block or foam block, less often a brick, require approval from the BTI, otherwise a fine is inevitable with the requirement: to return the apartment to its original state at its own expense.
Next stage:
- replacement of windows;
- window sills;
- heating systems (radiators).
If necessary, riser taps are installed at this stage. Installation of plastic windows should be carried out taking into account shrinkage. Experts, realizing this, leave special gaps, as a result of which the window is not deformed.
Alignment of walls with plastering using beacons. It is better to carry out the process, having previously installed a reinforcing mesh. In rooms where tiles are planned, it is necessary to create perfect right angles (90є). In the case of straight joints, the material trims will be the same size.
Then the time came for the first stages of the installation of plumbing, electrical and ventilation systems. At this stage, the laying of sewer pipes and water supply, cable pulling, installation of socket outlets is carried out. You cannot carry out such work without a preliminary plan. It is better to use plastic pipes that do not deform when shrinking. The following are the standard steps:
- floor screed (dry or wet);
- finishing work.
Should you be afraid of overhaul? Think, because it is performed by the same people, only they clearly know how to do it. This means that repair work will be within your reach. Listen to the advice of the masters - and everything will work out.
What you need to know about the repair
First, repairs are required. Scientists in the course of many years of experiments and observations have come to the conclusion that a person cannot stay in a room for a long time, which is not being repaired for a long time. Because the kind of destructive changes in living rooms causes stress, mental disorder, reduces efficiency, interferes with living and positively perceived the environment. And cracks, cracks from which blows, mold and germs that have lodged in the walls lead to diseases.
Second, repairs are of different duration, monetary and physical investments are different: capital or cosmetic.

If you decide to change the wallpaper, flooring, baseboards, touch up or refresh something, this is a cosmetic repair. It is usually done every five years. It won't hit your wallet that hard.
Overhaul

But your desire to radically change the apartment, for example, make a studio out of the kitchen and the room, change the wiring, doors, plumbing, level the walls and cover them with Venetian plaster, will require capital investments. Such repairs are needed in twenty years.
Of course, you can invite specialists and they will do everything themselves. Yes, only the cost of services will be two to three times higher than the cost of materials. That is, everything that you bought to repair a room, multiply by two or three - this will be the amount that you need to pay for construction services. Now it is clear how profitable it is to make repairs yourself? Of course, without certain skills, it will not be possible to quickly complete the work, but this is the only drawback.
Where is major overhaul most often needed? First of all, in new buildings and very old apartments requiring replacement of wiring, pipes, windows and doors. When buying such apartments, it is better to immediately complete the necessary work. In other cases, you can get by with cosmetic repairs.
Where to start overhaul
1. First of all, put your desire on paper. Draw up a plan diagram with the dimensions of what is - walls, communications, sockets and switches, doors, windows, plumbing, water supply. Then sketch out a plan of how the apartment should look like, where the main structures will be located, how the wiring will pass, water pipes - in general, everything to the smallest detail. Be aware that it is necessary to agree on repairs, which will affect the demolition of walls and the unification of premises, in the sanitary station, fire service, housing office, BTI. Then you need to collect a package of documents for redevelopment, get the opinion of the expert commission on the technical condition of the apartment, order a project that only a licensed organization has the right to do. And only after that you can start redevelopment.

2. Make a list of required building materials and tools. Before making a major renovation of an apartment, do not forget to take into account the required number of garbage bags, gloves, goggles, respirators, clothing, films to protect the finished objects. Calculate the consumption of materials by room, it will be easier, do not miss anything and will not buy more.
3. Free the room or part of it. Remove bulky things, they can be moved to the center, cover with construction film to protect them from dust and mortars. Agree on the removal of unnecessary furniture, construction waste.

4. Warn neighbors about the temporary inconvenience they will have to endure. By the way, maybe one of the neighbors will be very useful to you: they will give you professional advice, share tools, temporarily take some things, and even give shelter for the period of dismantling the water supply system.
5. Replace the windows and the front door, if necessary, but it is better to have the installers do it so that you will not be deprived of the warranty.
Do-it-yourself phased overhaul of an apartment
Any repair work begins with communications and upper sections, such as the ceiling, and gradually moves down. That is, first the wires, pipes, ceiling, walls, only then the floor.
Imagine if you make the floor and then repair the walls, the flooring could be damaged. And painting the ceiling will definitely leave marks on the walls, there will be drops, even if you are working with a roller.

Advice. Be sure to turn off the machines on the meter before dismantling work, turn off the water so as not to flood the neighbors, turn off the gas tap.
Stage 1
To make something new, you have to remove the old - everyone knows that. So, we start repairs with dismantling. We do not grab onto everything at once - we make major repairs in each room gradually.
We remove the chandeliers, remove the old wiring: we cut the places for laying the wires, connect the new ones, calculating the load on each point and the entire system as a whole. We change switches, sockets.
We start work from the most difficult places - the kitchen and the bathroom, because there is the most painstaking renovation.
Stage 2
First, we dismantle the sink in the kitchen, carefully unscrew the taps, having previously shut off the common tap. Remove the door from the hinges, remove the old loot. We change pipes, prepare for a new connection. We disassemble, observing safety precautions, the interior partition, which is not a load-bearing one, we combine the kitchen with the living room.

Stage 3
We dismantle the partition between the toilet and the bathroom, making a common room. We dismantle the bathroom, toilet, washbasin, old pipeline. We replace old pipes with durable plastic. We remove the tiles from the walls. If the floor is flat and flawless, we leave it, but we dismantle the skirting board.
Stage 4
It is very important to align the walls in the bathroom, the type of cladding will depend on this. We cover the ceiling with putty and paint with a water-based emulsion. We level the walls, carefully sealing up all cracks and crevices, and revet them with new tiles.
Lay on a flat old tiled flooring. Now you can install a shower stall, toilet, washbasin, connect a washing machine.
Stage 5
In the kitchen, we dismantle the old flooring, trying not to get hurt, remove the apron. Renewing the ceiling, leveling the walls, covering the area at the sink and cutting table with tiles that will protect the wall from water and steam.

We level the floor with a special solution, give it time to settle. We paint the walls, lay the laminate, not forgetting about the substrate. We connect the sink. We cover or dismantle the gas oven for the duration of the work, and then the service department makes a new connection.
Stage 6
In the room, which has now been combined with the kitchen, we dismantle the doors and the floor. We start preparing the premises for finishing with plastering the ceiling and walls. If necessary, we install soundproof panels.
We install a new door on the foam. Only after the door is well fixed, at least a day will pass, we will plaster around the loot. After finishing the preparatory work, we glue the wallpaper, then lay the new floor and fasten the skirting boards. You can attach chandeliers and sconces.

Advice. Remember to wear gloves and a respirator when handling chemicals. When painting, stick on mounting tape to protect the adjacent surface.
Stage 7
We remove the old flooring in the hallway, fill the floor with a self-leveling solution, give it time to stand.
We repair the ceiling, filling up cracks and cracks. We align the walls, we go well with a primer, since the room is a walk-through, there may be dampness from the street. We install new floors by laying them on a soft backing. The walls can now be covered with wallpaper or other cladding materials such as cork panels.
As you can see, overhaul, although troublesome, is expensive, but your health and psychological comfort are more expensive. And if you make the repair yourself, then you will also save a lot, reducing the cost several times.