Various kinds Crafts made from plywood and wood, made by skilled craftsmen, are highly valued all over the world, causing universal admiration. Undoubtedly, carving is creativity and art, but you can certainly master it with effort and constantly honing your skills. This optimal hobby related to wood and plywood will not require too much free time from you and equipment that is not very expensive. Of course, this means carving plywood using jigsaws!
Openwork carving
It is rapidly gaining popularity: who doesn’t want to make an excellent piece of decoration for themselves, decorating their home, furniture, and creating an artistic ambience! Carved products different thicknesses optimally integrates into many existing styles decor, and we get, for example, frames for photo cards with ornaments, words, individual letters, figured shelves made with jigsaw carving on plywood. In addition, such creativity is an action that is accessible to anyone interested in the process, even a beginner. You just need to get an idea of “how it works.” And you can start creating!

Using a hand jigsaw is quite easy
Video to get started:
This wood material is chosen for the following reasons:
- moisture resistant;
- temperature changes do not have a negative impact;
- quite low cost;
- ease of learning to cut with a jigsaw;
- low weight of products.
It is also necessary to choose plywood of the 1st and 2nd grades for crafts. The rest are not suitable for creativity: the surfaces have cracks with knots and chips (unless they can be used for internal substrates). Most suitable for cutting birch plywood(3-10 mm thick).
At present, this material is divided into quite a large number of subspecies - each for specific purposes.
- Specialists and folk craftsmen It is recommended to use a sheet produced using a urea-formaldehyde composition. Such material is marked “FC”. This type of plywood can be bought “clean” or coated, for example, with varnish. It is most convenient to transfer the drawing to untreated plywood sheets for cutting with a jigsaw.
- Plywood marked “FOF” is intended for furniture production, and is often produced over 12 millimeters in thickness.
- The FB brand was originally developed as a boat material, which is why its cost is high (but if it is possible to use it, then it is suitable for cutting with a jigsaw).
- But masters do not recommend purchasing FSF. Although attractive in appearance, it is toxic because it is made using a composition of phenolic resins.

Produced grades of working material
Types of carvings on plywood
It is divided into:
- Openwork,
- Patterned, on a painted sheet of plywood,
- Ewing,
- combined method.
What additional materials and tools will be needed?
- Stencils and drawings with drawings for work. You can come up with them yourself or copy them on the Internet.
- Carbon paper to transfer patterns and lines according to the drawing;
- Glass paper and sandpaper, a set of files - for grinding parts;
- Joiner's (optionally casein) composition for gluing parts;
- Transparent varnish – for coating;
- To make holes inside the material to thread the blade through, use a drill and an awl.
- Before starting cutting with a jigsaw, carefully sand the material with glass paper, and only then transfer the patterns according to the drawing.
- Transfer elongated shapes of designs with narrow elements onto plywood so that they are located along the fibers of the “face” of the material.
Artistic cutting with a jigsaw: drawing, stencil and work
Let's get to know the devices
A jigsaw is a toolkit that is designed for working on different contours. The device includes a blade equipped with teeth small enough to cut the working material, practically without forming burrs or chips.
Manual
The “founder” of the genus is, of course, the manual jigsaw. Everything ingenious is simple: a metal U-shaped arc, and a working blade is stretched between the ends, which is secured with clamps. They hold the files during operation, and with their help, its tension is also adjusted. Handle for comfortable work located on one side of the frame. The tool clamps can be rotated, thereby creating a different plane for carrying out work, providing opportunities for carving plywood with a jigsaw of increased complexity.
- When creating with the help hand-held device Maximum care must be taken: the design is quite fragile, and with intense pressure the blade sometimes breaks and needs to be replaced. Every novice craftsman should stock up on additional working files.
- When working with a jigsaw, it is convenient to use an auxiliary board: it protects the table and solves problems with the convenient location of the plywood workpiece.
Jigsaws
This device operates using electricity. It is a housing where the mechanism is located, and the control handle is also located there. The sawing element is located at the bottom of the device at the front. The blade is protected, and this allows you to cut along the contour very smoothly, without deviations. Professional models of equipment have many attachments that greatly facilitate the work process, for example, leveling the edge of the material. Jigsaw blades can also have teeth that vary in shape and size. They should be selected in accordance with the material for the saw to avoid damage to the plywood sheets during operation.
- Household electric jigsaws for non-production purposes are usually of low power (from 350 to 500 W). For beginners, this is the most common option when you are just learning to cut out crafts and figures from plywood (as a rule, not large thickness). It is quite safe to operate such a device, especially when it is equipped with protection.
- A professional jigsaw is intended for industrial purposes, has a power of more than 700 W, high speed and cutting accuracy. It can cut sheets over 10 cm thick, aluminum, and thin steel.
Video: simple jigsaw:
Fraser
Sometimes used for carving this device. It is a type of special hand tool, with the assistance of which you can perform different types wood and plywood work. However, working with it requires some skill; but craftsmen who deftly handle this equipment can create real, highly artistic masterpieces of folk art.
Preparing the stencil
Drawings for creative works there are different sizes, depending on the scale of the products being manufactured. For example, for diagrams of a shelf or a piece of furniture, for a three-dimensional toy, you should take a sheet of whatman paper in A1 format, a roll of wallpaper left after repair may also be suitable, and for small figures (such as souvenirs) we take office paper (A4 or A3 format).
Using a marker or pencil, we draw the contours of the future object on the surface of the paper, adhering to the specified dimensions. Templates are presented in the public domain in a wide range, we choose the appropriate one (for beginners, as a rule, it is not too complicated). Or you can come up with your own options for cutting with a jigsaw and then transfer it to a paper base.
Then we transfer the images to the surface of the working material (plywood, boards). To do this, cut out a figure from paper, apply it to plywood and carefully trace along the contour with a pencil. The lines must be precise and even. If necessary, correct it by erasing it with an eraser.
The contours are applied “from the rear” of the material so that no remnants of the drawing are noticeable on the finished form. The internal areas can also be shaded so as not to cut off an extra piece, thereby indicating an inviolable fragment.
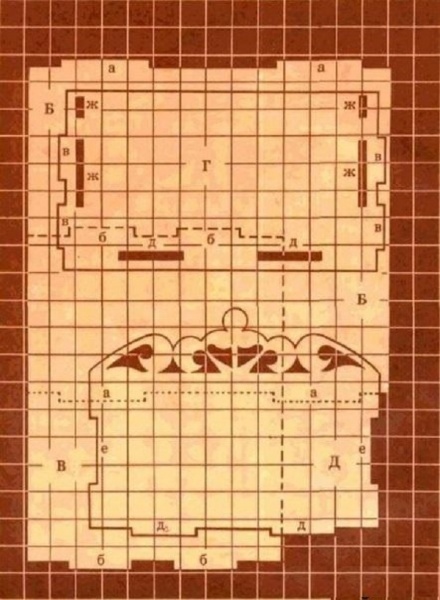
Example drawings


Snowflake


How to carve plywood
Working with the device will not be difficult if you properly prepare for the creative process.
- The work area must have good lighting;
- The working plane must be protected from damage. You can, for example, lay a sheet of plywood or cover it with film;
- All necessary tools and spare blades should be prepared in advance. And we can begin.
The first step should begin with drawing the inner outline of the drawing or drawing. To do this, you need to make slots into which the blades of the device will be inserted. Usually, when cutting large contours, there is no problem, but in small remnants, working with a jigsaw from the inside can cause chips, burrs or cuts. You must act very carefully.
Working with a jigsaw

How to saw with a hand jigsaw
- Secure the piece of plywood with one hand and hold the cutting jig by the handle with the other.
- Start moving along the drawn contours, moving the jigsaw up/down. This should be done around the perimeter of the drawing.

As you can see, there is nothing super complicated in this work. And you will acquire a real creative hobby by learning how to operate these devices.

How to cut plywood with a jigsaw
Sawing plywood with an electric or manual jigsaw is undoubtedly a creative process. And you will be able to create decorative items of various styles with your own hands: from fairy-tale cartoon characters for children to decorations for furniture and home.
Photo gallery of examples of work

Drawings for cutting out plywood allow you to create products of various themes and purposes. Sawing decorative panel, toys and household items are provided with a jigsaw. Among additional materials It is permissible to use plastic, ceramics, and metal.
Attention! A narrow saw blade allows for straight cutting and intricate patterns.
Working with a jigsaw
Sawing with a jigsaw will require a little skill. There will be no problems with straight cuts, but with beautiful curly patterns you will need correct selection files For a more detailed consideration of the recommendations, you can use the following list:
- Sawing out plywood with a jigsaw according to drawings requires an even cut. For this purpose, the correct selection of files for the equipment is provided.
- The cut on the front part will not have burrs if you use a thin file with teeth pointing down.
- The product submitted for processing requires strong fixation. Otherwise, the cut will be uneven.

Choosing a jigsaw
It will be easier to cut toys according to drawings with a jigsaw if you use the basic parameters :
- Saw or side divorce. Alternately bending the teeth to the right and left side and large teeth provide fast, straight cuts. The edges are rough, so they are finished using abrasive sandpaper. Below you can see how to correctly cut out plywood with a jigsaw in the photo.
- Undercut. The teeth do not form a streak. They are suitable for thin and clean cuts. However, the speed of work is reduced. If there is a small divorce, the process will speed up. The main bias is towards the quality of the cut.

- Wavy stains. For working with small and narrow saw blades that provide wider cuts, cutting edge has a wave-like shape. Typically, such tools are used when working with metal elements, but are often used for processing plywood. This allows you to get a narrow and clean cut in a short period of time.
Creating patterns
To implement sketches on plywood, it is necessary to provide a number of works:
- The pattern is transferred to a sheet of paper.
- A stencil is cut out using a utility knife or scalpel.
- The stencil is applied to the coating and outlined using a simple pencil.
- The pattern is cut out.

Execution of work:
- Cutting along a curve is carried out with a file with a narrow blade.
- You can cut a circle in the panel using a special attachment - a circle cutter. It is fixed in the center of the circle.
- Creation of grooves in solid wood workpieces is carried out with a rasp instead of a file. It also serves to clean up uneven cuts.
- Perfectly precise and even cuts are ensured by the rip fence. Its attachment to the jigsaw is ensured using screws.
- A guide ruler is mounted on the “ski” to ensure cutting parallel to straight edges.
- To create a straight long cut, an auxiliary guide is used. The jigsaw moves along a longitudinal fixed bar. This tool provides cuts with an inclination of up to 45 degrees. The slope can be set on a scale.

Drank the gaps. When forming ornaments, the master makes gaps in plywood sheet. There are 2 options for this:
In the first case, a recess is drilled with an electric drill, then a file is inserted into it and the pattern is cut out.
The second case involves the technology of mortise or plunger cuts. The starting gap is not drilled. The equipment is installed on the front edge of the “ski” without touching the workpiece with the panel.
The motor turns on and the fork is slowly lowered, driving the saw into the array until it forms a vertical arrangement and the “ski” touches the workpiece.

Correct jigsaw setting
Important! The plunge cut begins in the waste section of the plywood.
The tool should enter the panel far from the cutting line to prevent damage to the material.
If you are cutting thick boards, you can use a saw with pointed ends. Initially, the workpiece is sawed from one part, then it is turned and sawed from the reverse part. To cut out shaped elements, equipment is secured at the bottom of the work table. By feeding the workpiece evenly and smoothly, you can get a cut with clean, even edges.
Preparation of equipment and materials
Plywood. The best option will be the application thin sheet, including multilayer wood hardwood. Regular or moisture-resistant material is used.

Among the tools you can choose regular jigsaw or a power tool if extensive work needs to be done.
An awl creates gaps for cuts. The cut begins after inserting the saw into the recesses created by an awl or electric drill.
Files are used to properly clean all edges of cuts.
The thrust board is used to strengthen materials and equipment.
Transferring the drawing to plywood
For artistic cutting, tracing paper is used. The pattern is transferred to the workpiece manually.

What types of jigsaws are there?
An alternative is a projector, which projects the image onto the work surface. It is not allowed to move the plywood; it is important to provide the strongest possible fastening. The projector is used with small sketch parameters.
A jigsaw is used when gluing self-adhesive paper onto a coating. The image is printed using a printer and then attached to a sticker on plywood.
The dominance of gadgets in everyday life modern man has not destroyed many people’s desire to work with wood and plywood with their hands. An activity accessible to everyone - cutting out with a jigsaw - removes nervous tension, allows you to make useful and beautiful things.
A lot can be done when you have ready-made samples drawing. Stencils for cutting out plywood with a jigsaw allow you to choose the item that is most accessible for novice craftsmen or the most interesting and useful item.
What is needed for sawing
The work can be easily accomplished if thought out preliminary preparation when everything you need is nearby. You can enthusiastically cut out any crafts without being distracted by trifles.
Mechanical jigsaw
The main tool for cutting is a jigsaw: simple mechanical or electric. Regular manual model It is a metal arched frame with a handle on which a blade with teeth is fixed. Clamps ensure the tension of the tape in the required amount and position, allowing you to cut out a wide variety of shapes.
Jigsaw files heat up during operation, undergo heavy loads, and therefore often break. It makes sense for a craftsman to immediately buy a set that will allow him to do the job without being distracted by searching for a new blade. This is especially important for beginners who like to cut plywood, whose skills are still imperfect. Experienced craftsmen feel the material, automatically adjust the speed of movement and the force of pressure of the jigsaw on the plywood. They have to replace the blade much less often.
Note! For stencil cutting with a mechanical jigsaw, you can only use thin plywood(9 mm).
To cut out the internal patterns of stencils, you will need a board that allows you to secure the workpiece on any table. This will ensure ease of use and protect the tabletop from damage.
Jigsaw
For craftsmen who regularly do sawing, it is useful to have a jigsaw. The tool will save physical effort, increase work speed, providing high quality and accuracy of reproduction of the drawing according to the diagram.
Electric jigsaws of all models have a set of attachments that significantly simplify stencil cutting and ensure smooth edges on craft elements of any degree of complexity.
If an amateur plans to start working with not very thick plywood (9 mm or a little more), it makes sense to use a household electric jigsaw with low power ratings (350-500 W).
Professionals work with more powerful jigsaws, which allow them to cut patterns on wood not only using easily reproducible patterns, but also the most complex stencils. The process can be carried out quickly and accurately with thick plywood (up to 30 mm) and wooden planks thickness up to 140 mm. Setting up the instrument is carried out according to the instructions, the availability of which must be checked upon purchase.
Additional tool
In addition to a jigsaw and material for cutting, you may need a hacksaw, an awl or drills, with the help of which holes are made in the plywood in several places along the contour of the stenciled pattern. The edges of the patterns are processed with files; sandpaper can be used for these purposes.
Both beginners and professional carvers most often work using ready-made stencils. You can come up with an easy pattern yourself, but with the availability of a huge number of different sketches for cutting out plywood with a jigsaw in electronic and printed publications, the process of creating a pattern is simplified. Parts cut from a stencil can be glued together, covered with stain, varnish, or paint.
Preparing the stencil and transferring the design
If you have to cut out a small funny craft, then the drawing found in special online publications is printed on a regular printer. The A4 format allows you to make a small stencil.
When you plan to cut larger parts from plywood, such as trim, shelves, interior elements, the capabilities of ordinary home printers are not enough. You will have to look for a service that can print large-format sketches using special equipment.
The finished pattern for the stencil is first cut out of paper, paying attention to the contours of the internal slotted parts and the specularity of the display (if this is important for the part). Then they transfer it to the wood base, tracing lines on the back of the plywood sheet with a pencil or marker.
Note! It's better to use with a simple pencil, because, despite the less visible lines, if necessary, they can be erased with an eraser and corrected.
You can transfer the design for the stencil using carbon paper, tracing the lines with a sharpened pencil. Self-adhesive paper with a ready-made template is also sold. It is glued to plywood, and after cutting with a jigsaw it is removed. There are ways to transfer using a projector (when you need to zoom in) or pricking with a needle. With good drawing skills, you can draw a stencil directly on plywood, without carbon paper.
What can be cut from plywood
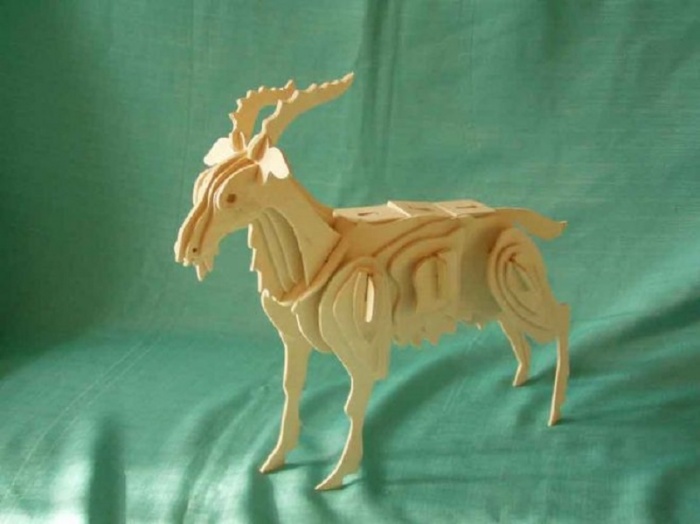
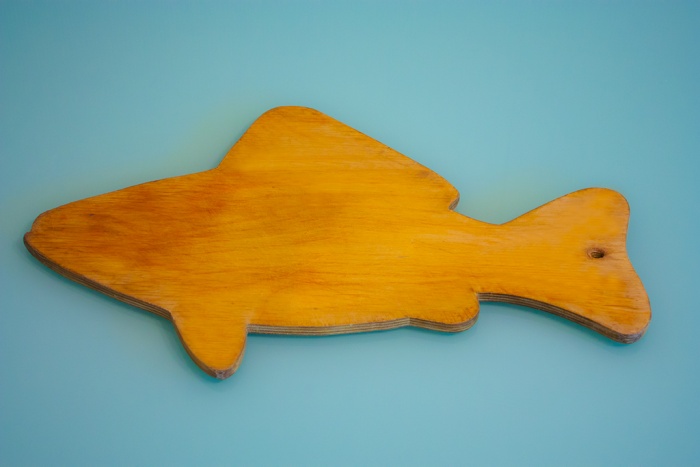
The possibilities of mastery are essentially endless. If you have the skills and desire, you can do a huge amount of useful and simple decorative items. The following crafts are most often made:
- toys;
- trays;
- keychains;
- caskets;
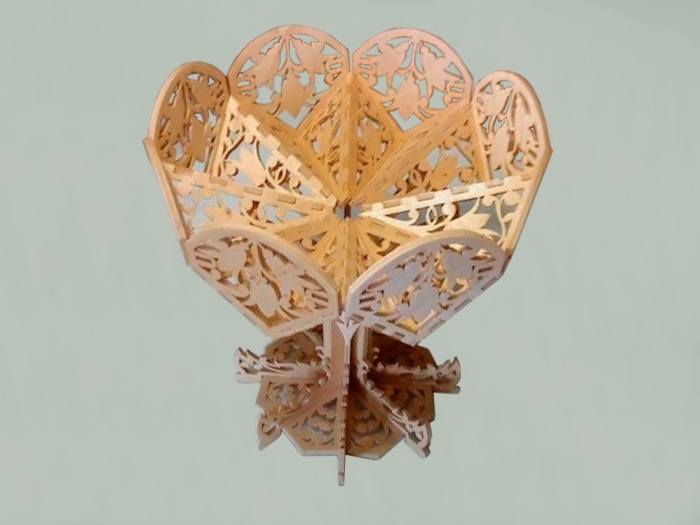
- stands;
- flowerpot;
- shelves;
- candlesticks;
- baskets.
The list of products can be continued as long as desired, because there are no limits to the possibilities of stencil cutting. It is important to choose suitable drawing, have quality tool and skills to use it.
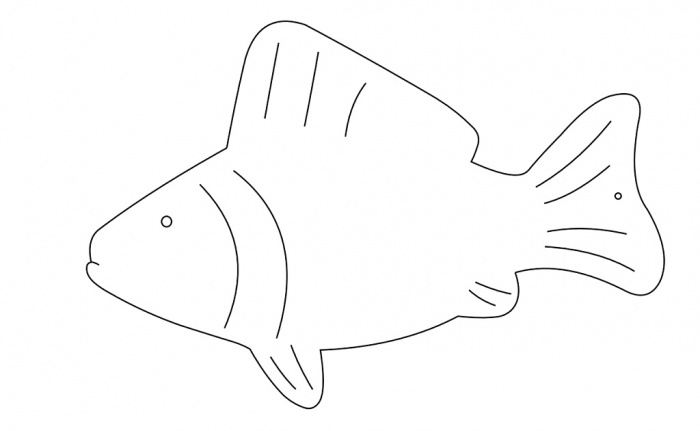
The most simple templates patterns on wood for working with a jigsaw - without through holes. These can be animal figures, hearts, fruits, toy cars. As skill develops, the complexity of the stencil will increase.
Features of the sawing process
Doing the job requires good lighting. It is advisable to prepare the tools in one place convenient location under right hand without cluttering the space with unnecessary details.
Sawing should begin with the internal elements of the design applied from the stencil. To perform slotting work on plywood, holes are first made in some places on the contour.
When cutting with a regular hand jigsaw, hold a piece of plywood with your hands. When working with an electrical apparatus, the workpiece is fixed on a workbench or table using a vice. If you have experience working with an electric jigsaw, cutting is easy and quick; As a result, the lines are smooth, neat, requiring minimal subsequent sanding.
Successful carving is only possible if the nail file is properly and firmly secured, which is subject to mandatory inspection. Carelessness leads to distortion of the drawing, which will turn out to be completely different from the stencil. Inattention can provoke traumatic situations.
The presence of stencils, a good jigsaw and the desire to start cutting - all this together can bring pleasure to the work process and the result both to the master himself and to loved ones or customers.
Crafts made by craftsmen with a jigsaw look elegant and stylish. In capable hands ordinary tool turns into a miracle jigsaw, with the help of which incredible masterpieces are created. Artistic sawing It can be just a hobby or a professional activity, because handmade products are always appreciated. About the features of the miracle jigsaw and the order of execution interesting crafts will be discussed further.
Characteristic features of a jigsaw
The miracle jigsaw provides convenient cutting of lines on wooden base, this is facilitated by a narrow cutting blade. More useful for woodworking band-saw, but cutting out plywood is a better miracle with a jigsaw. The main advantages of the tool are as follows:
- Accurate cutting of parts, the cut line comes out quite smooth and does not require grinding.
- Thanks to the narrow blade in the miracle jigsaw, cutting out sharp corners and small parts.
- Processing of internal grooves begins with a hole prepared with drill number 3.
Relatively technical characteristics the miracle of a jigsaw, the following features are noted:
- Easy stretching and fixing of the fabric.
- The cutting process is much easier than with a band saw.
- Cutting out a miracle with a jigsaw creates virtually no risk of injury.
- The tool does not require frequent adjustment.
There are several parameters that you should focus on when choosing a miracle jigsaw for cutting:
- The main thing is capacity, this indicator indicates the size between the back wall and cutting blade. There are miracle jigsaws with sizes from 12 to 26 inches.
- The thickness of the material that the tool can process.
- Number of moves in 1 minute.
- Saw stroke height.
To cut complex elements from plywood using a miracle jigsaw, two types of saws made of steel are used.
Advice! For beginners, it is better to practice on a large-toothed blade designed for thick plywood. It is also used to make cutting boards. Small teeth on a thin file allow you to cut out filigree elements of crafts from thin plywood.
The result of the work of a top-class professional is presented in the photo:


Preparatory steps
Sawing out a miracle with a jigsaw requires painstaking work from the master and develops perseverance and patience. Initially, you should take care of organizing your workplace. Prerequisites for comfortable work - high-quality ventilation and lighting. A private house provides more possibilities choice utility room, in the city suitable for apartment glazed balcony.
Second important stage is the purchase of material. High-quality plywood reduces the risk of part delamination or cracks appearing when cutting out a miracle with a jigsaw. The second reason for violating the integrity of the material is an incorrectly selected canvas or unprofessional actions. For cutting crafts, plywood with a thickness of 3-4 mm is intended. The following steps will help prevent delamination:
- Depending on the area of the surface to be treated, dilute the required volume of the mixture of water and PVA glue. For small areas, 2 tablespoons of water and a few drops of glue are enough.
- After thorough stirring, the solution is applied with a brush to back wall plywood blanks in 2-3 layers.
- The material is left until completely dry.
Comment! Glue solution will successfully replace furniture or parquet varnish.

Before cutting out the miracle with a jigsaw, the plywood needs to be cleaned. Chips, microscopic cracks, dark marks from knots are removed with sandpaper of various grain sizes. To give the surface maximum smoothness, stripping the plywood against the grain helps. First, work with medium-grain paper, finishing touches Apply with fine-grained sandpaper. The complete absence of burrs allows you to move on to the main stages of work.
A simple example of a craft for beginners is presented below:


The process of creating crafts
Preparing a drawing, cutting out a miracle with a jigsaw, assembling parts and decorative finishing- key steps to create original crafts.
Translation of the drawing
A well-executed drawing will ensure quick assembly of finished elements into a single figure. Otherwise, after painstaking work with a jigsaw miracle, there is a risk of encountering the problem of misaligned grooves and the need to remake individual parts. You can take drawings of crafts from this article or try to create a unique sample for cutting. After printing or drawing on paper, the drawing is transferred to plywood using one of the convenient methods. In the first case, the drawing is secured with buttons on plywood and copied using a pen and ruler.


To cut out crafts with a miracle jigsaw, the technology of thermal transfer of toner from paper to plywood can be useful:
- Select a material with a low toner retention rate (like glossy paper).
- In the printer settings, high-quality printing is selected to get more toner. In this case, the procedure for cutting out a miracle with a jigsaw is easier.
- The printed image is attached front side to plywood and ironed. For A4 format one minute is enough. Instead of an iron, a hair dryer is suitable.
- After the paper has cooled, it is removed. If there are gaps in the outline of the sketch for cutting out a miracle with a jigsaw, they are completed with a pencil.
Making holes and sawing
Cutting out the internal grooves with a miracle jigsaw is preceded by the design of the holes. The process includes the following steps:
- Prepare a drill with a drill diameter of 3 mm or an awl of appropriate sizes.
- The tool is placed in the middle of the groove and a hole is made.
- It is recommended to first protect the desktop with a board.
- Having an assistant is welcome.
To make a miracle with a jigsaw into internal grooves, a nail file is inserted into the hole and secured in the upper part of the tool. After processing small area about 2 cm check the evenness of the cutting. If the cut is of poor quality, it is better to replace the blade with a more suitable specimen. If the cut is not smooth enough, try correcting the imperfections with a flat file.
Important! Follow safety standards and do not let your fingers get caught in the file.


Cleaning parts
Upon completion of cutting out the miracle with a jigsaw, small chips on back side parts are cleaned with sandpaper. Also, the prepared craft elements need polishing. The ribs and back of the parts are first treated with medium-grain paper, and at the final stage fine-grained sandpaper is used. It is convenient to clean the internal grooves cut using a miracle jigsaw with a rounded file. Strive for a complete absence of irregularities and burrs at the end of sawing.
Having achieved the desired result, they proceed to assembling the parts of the craft, prepared with a miracle jigsaw. Interesting drawing for cutting and photos of the shelves are presented below:


The final stage
After assembling and adjusting all the parts, the crafts proceed to gluing using PVA or Titan glue. Depending on the design, it is recommended to tie multi-layer elements tightly with strong thread and leave to dry. The process lasts no more than 15 minutes. An example of a product that is difficult to cut out with a jigsaw is shown below in the photos and drawings:


You can add decorativeness by burning patterns on individual elements of the craft. First, the drawing is applied with a pencil, after which they work with an electric burner. An openwork vase for sweets will become worthy decoration table:


Sawing out a miracle with a jigsaw is a painstaking task. In order for the product to last for a long time, it needs decorative processing. Preservation of pristine beauty natural material varnish on wood helps. For work you will need high-quality composition varnish and a convenient glue brush. Try to ensure that there are no scratches or visible marks on the craft. When cutting out animal figures or models of mechanisms with a miracle jigsaw, sometimes they resort to fragmentary coating of the product with paints. This technique brings the craft closer to the original.

To start cutting with a jigsaw, diagrams and drawings are prepared in advance. When creating furniture, interior elements (shelves, doors) and performing finishing work, you may need the skill of sawing with a jigsaw. This process requires attentiveness, clarity of movements and accuracy.
Sawing with a jigsaw may be necessary when finishing works, but most often in the process of making furniture with your own hands, shelves and other things.
Preparatory work
First, the master transfers the drawing onto a sheet of plywood. During sawing, it is necessary to hold the tool correctly, observing safety precautions.
The quality of the product depends on how accurately the master performs the work at each stage.
To cut parts with a jigsaw you will need:

Usually, with experience, masters immediately apply drawings to the surface, but for beginners they will need special adhesive paper and tracing paper.
- tracing paper and adhesive paper (necessary for accurately applying the design to the wood);
- a sheet of plywood (moisture-resistant or regular, depending on what product is required);
- a jigsaw, manual or electric (the first is used for cutting out carved elements, patterns, small parts, the second is used if you have to work with a large amount of wood, large parts);
- an awl or a drill (they are used to make holes for cuts; the diameter of the hole should allow a file to be inserted into it; the choice depends on which tool is more convenient for the master to work with);
- files (sold in stores special sets, with the help of which, if necessary, the ends and edges of the product are cleaned);
- stop board (necessary for fixing plywood and tools);
- pliers;
- compass;
- hammer;
- pencil;
- knife with sharp replaceable blades.
When assembling furniture and creating large parts, straight cuts are made without artistic wood cutting. In this case, experts recommend using an electric jigsaw. When cutting out small parts and shaped elements, hand tools are used.

When choosing a tool, care must be taken to ensure that it is suitable for the job being performed.
To cut a high-quality part with your own hands, high-quality raw materials are used. Electric jigsaw it must be held vertically, without tilting or loosening, making smooth movements up and down while working.
In this case, the plywood moves towards the tool. The master must ensure that the jigsaw does not vibrate. Otherwise, the wood will split. Improper use of the tool may cause it to get stuck in the wood or cause the file to break.
In the first case, the product will be damaged, and in the second, the master may be injured. Before sawing internal contours You need to make holes with an awl or drill. Then the tool is inserted into the holes and sawing begins. Experts recommend monitoring the position of the saw teeth and making turns without stopping cutting. The blade must be sharp, well tensioned, correctly positioned and firmly fixed to avoid injury.

A pattern carefully applied to the surface of the plywood is half the success when creating quality parts.
A pattern carefully applied to the surface of the plywood is half the success when creating a high-quality part. To do this, use pre-prepared sketches and tracing paper. The cost of tracing paper is low, but the process of transferring an image onto plywood will require high concentration and precision of movements.
Transferring patterns onto wood using tracing paper can be replaced by projecting an image. The required pattern is displayed on a sheet of plywood using a projector. The working surface must be firmly fixed so that the pattern does not move. The disadvantages of the method are the need to purchase a projector, the cost of which is an order of magnitude higher than tracing paper. This technique is used to transfer small images. The third way to transfer a picture to work surface– self-adhesive paper. The sheet with the image is glued to the plywood. Using this technique you can get precise lines.
Cutting out simple shapes

Cutting simple shapes from plywood is quite simple, you just need to strictly adhere to the drawn lines.
To cut simple shapes from plywood, it is recommended to correctly transfer the drawing to the surface, following the rules for working with hand tools(taking into account the lines marked on the wood).
Arcs and smooth lines are cut out without turning the tool, but by directing the teeth strictly along the line. You can make neat obtuse and acute angles if you know a few nuances. Obtuse corners are cut using the rotating technique (the craftsman makes a straight cut and then unfolds the plywood sheet).
Loop formation is suitable for creating sharp corners. To do this, you need to cut out one side of the corner, and then a loop is cut along the outer contour, allowing you to immediately create the 2nd side of a sharp outer corner. The following sequence of actions helps to make neat internal cuts:
- make holes for cutting;
- cut the sheet according to the pattern to the top of the corner;
- return the plywood to its original position;
- cut out the 2nd side of the corner.
For creating decorative elements using a jigsaw, the craftsman will need plywood, tools, good lighting, eye gauge. The work is done slowly and carefully. Haste can result in uneven corners and oblique cuts.
Help for beginners step by step instructions, advice from professionals (to create artistic elements you need to know special techniques working with a jigsaw) and regular practice. Sawing with a jigsaw requires patience and diligence. Decorative wooden products Made with your own hands, you can decorate the interior of your home and office.


