Option 1.
The easiest way to make a New Year's paper lantern is as follows.
Cut colored paper or old postcards into strips of the same width (eg 2cm) but different lengths. You should get one central shortest strip, the remaining strips should be paired, each pair a few centimeters longer than the previous one.

Lay the strips together in the correct sequence, lining them up at one end, then staple or glue them together. After that, align the strips from the opposite end and also fasten them with a stapler or glue. The flashlight is ready!
Option 2.

One of the most popular Christmas decorations is Christmas lanterns. It is very easy to make them, and thanks to their spectacular shape, the lanterns will become a real decoration of the Christmas tree.
We fold a sheet of colored paper of a rectangular shape along in half. From the fold line we make parallel cuts at an equal distance from each other (the cuts should end without reaching the edges of the sheet 2 centimeters). We unfold a sheet of paper and fold it into a tube, glue the ends of the sheet. Now, simultaneously from below and from above, we squeeze this tube a little - we get a flashlight.

But that's not all. For a flashlight, you can make a core. To do this, we glue a tube from thicker paper, but of a smaller diameter. We connect the two parts together (we place the core inside the flashlight) using glue or a stapler. The flashlight is ready.

Paper lanterns can be used in a variety of ways. And just like a Christmas decoration. And as a decoration for a small vase or glass (only in this case, you don’t need to make a “core” for a flashlight). And several New Year's lanterns, suspended on a ribbon or serpentine, will turn into a multi-colored garland.

You can insert a candle inside the New Year's lantern. It is better to use safe LED candles. If you are using a regular candle, be sure to place it in a glass jar for safety reasons. See link >>>>


Option 3.
A cardboard box of juice or milk is a wonderful material for making a New Year's lantern. The easiest way to make this New Year's toy with your own hands is as follows:
1. Take a box of juice or milk, cut off the bottom of it, glue it with white paper.
2. Make an application on the New Year theme on both sides of the package.
3. And now the adult must prick holes along the contour of the drawing with an awl. If you put such a box on a flashlight or LED candle, the picture will glow in the dark. Link >>>>
Attention! If you are using a regular candle, be sure to place it in a glass jar for safety reasons.


Such a New Year's craft with your own hands can also be made from ordinary paper bag

or tin can.
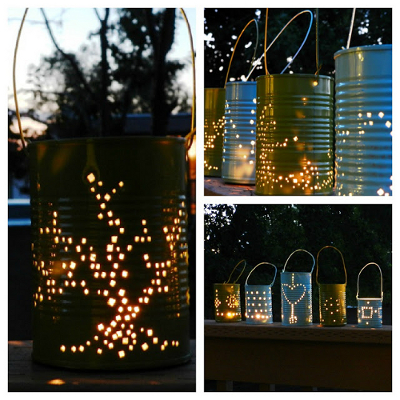
holes in tin can will have to be done with a sharp nail and a hammer. Useful advice: so that the tin does not warp when making holes in it, pour water into it first and freeze in the refrigerator.

At the end, paint your New Year's lantern with spray paint and attach a wire handle to it. For a detailed New Year's master class, see the link >>>>

Holes in a paper lantern can be made not only round, but also, for example, in the shape of hearts or stars, as in the photo below.
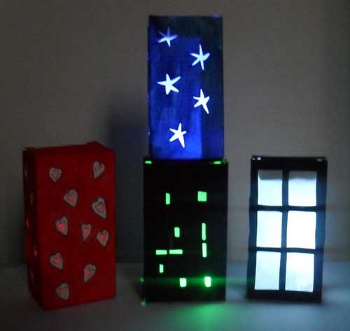
If the holes are large enough, then it is better to seal them on the back with special parchment paper. In another way, it is also called wax paper or baking paper.

Since we are talking about paper lanterns with large windows, it's time to move on to the next section of our article.
Option 4.
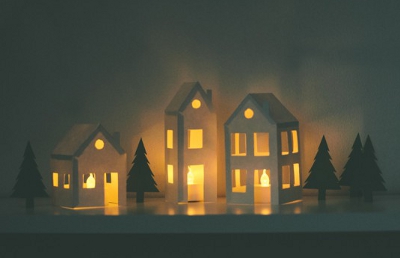
The house is a symbol of comfort, warmth, family hearth. That is why on frosty, winter days, a New Year's lantern in the form of a paper house will look most appropriate.

It is very easy to make a house out of juice or milk packaging. Just be sure to seal the windows with parchment (wax) paper. We already wrote about this a little higher.

We suggest you use ready-made templates for making three magnificent paper houses as in the photo below.
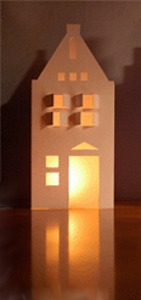

To make one house, you need to print the same template twice. Each house consists of two identical halves (front and back), connected to each other on the sides.
Cut out the templates, to do this, cut off everything that is marked in gray. Cut out windows. Glue them with reverse side parchment paper. Connect the two parts of the house together. Place the house on a light source (LED or real candle). Attention! If you are using real candles, be sure to place them in the glass vessel. For a detailed New Year's master class, see the link >>>>
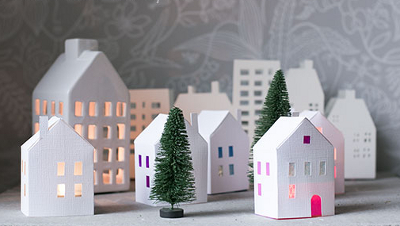
If you like New Year's lanterns in the form of houses, then there are a few more templates especially for you.
Option 5.
A New Year's lantern can be made not only in the form of a house. You can just do it yourself cardboard box make holes and seal them with parchment. The lantern will be decorated with a New Year's applique.


For detailed instructions on how to make Christmas tree lanterns as in the photo above, follow the links:
New Year's lanterns of such a shape look spectacular, as in the photo below. To make such a New Year's paper lantern with your own hands, use the ready-made template. Decorate the finished flashlight with store-bought stickers.

Option 6.
An interesting option is to glue a glass jar with corrugated paper. To do this, cut the paper into long strips, and then, using PVA glue, glue the jar over it. From ordinary colored paper, cut out some kind of New Year's picture and stick it on top of a layer of corrugated paper. Decorate the New Year's lantern with your own hands with a satin ribbon. Place a candle inside. original Christmas decoration ready!


You can also glue the glass container with pieces of corrugated paper different color. It will turn out very nice too!

Option 7.
You can simply draw a castle on parchment paper with a black permanent marker and wrap it around a light source: a flashlight, an LED candle, or an ordinary candle in a glass jar.
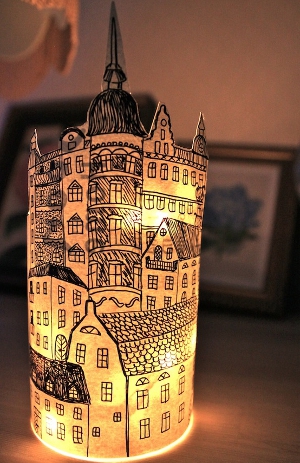
You can use a photograph of the castle, cut out along the contour. For detailed instructions on how to make such original lanterns, see.

Option 8.
And on parchment paper, you can stick the silhouettes of some images cut out of black paper. See link >>>>


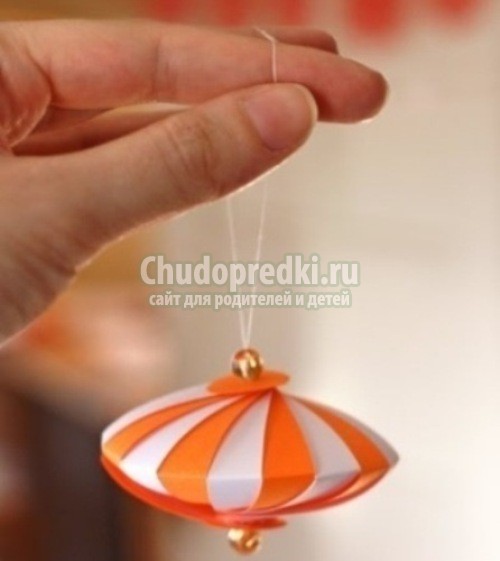
Option 9.

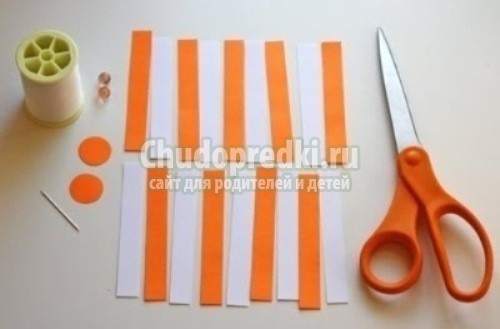
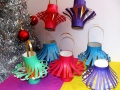
To make these wonderful Christmas lanterns, you will need to cut colored paper into strips of the same length and width. The length and width of the strips depends on the size of the flashlight you want to make. To make one paper lantern, you will need an average of 14-16 strips of paper.

Fold the paper strips together in a pile and make a hole with an awl from one end and the other. Pass the thread through one of the holes, secure the end of the thread with tape, glue or a sticker.

Pass the thread through the second hole.

Pull the thread so that the strips of paper are bent. Tie the thread in a knot. The knot should be large enough so that it cannot slip through the holes in the paper strips.

Flatten the strips so that they form a ball shape. The flashlight is ready. It remains to find a place where it would be possible to hang it.


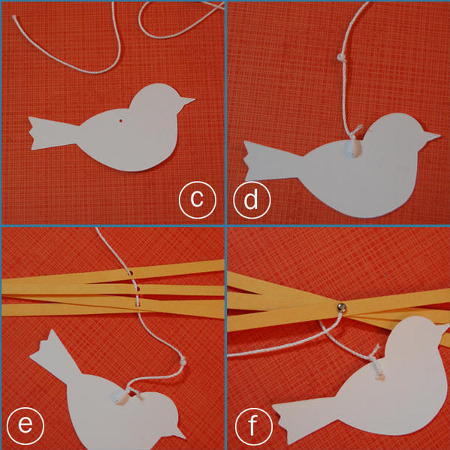
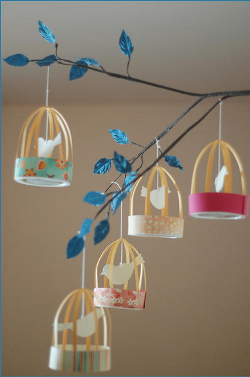
Option 10.

We invite you to make an original paper lantern in the form of a bird in a cage with your child. To make this Christmas decoration you will need:
Colored paper and cardboard
- awl
- scissors
- double sided tape or glue
- plastic cover

Work plan:
a. Cut colored paper into strips of the same length and width (for example, 1.5 cm - width, 30 cm - length). To make one lantern, you will need 4 strips of paper.
b. Make a small hole in the center of each strip with an awl.

c. Print the bird on thick paper (download). Cut it out. Make a small hole in the center of the back of the bird with an awl.
d. Pass a thread through it, tie the end of the thread with a knot. Make a second knot at a distance of about 4 cm from the bird.
e. Now you need to string paper strips onto a thread. Slide the strips along the thread to the top knot.
f. Tie another knot on top of the paper strips, on which you can put a bead for beauty.
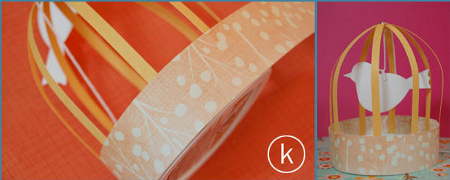
g. Now take plastic cover and put double sided tape around it.
h,i,j. Spread the strips apart and attach their ends symmetrically to the lid.

k. Cut a strip of colored paper and glue it around the lid. New Year's lantern is ready!
Option 11.
Very original New Year's craft- lace lamp.


The technique of its manufacture is similar to the creation of balls from threads, only lace is used instead of yarn. How to make a ball of thread, see the link >>>>
To make a lace lamp, you need to find a large volume balloon, inflate it and hang it on a thread. Lace well soak wallpaper paste and stick on the ball so that they intersect, overlap each other. Allow to dry thoroughly overnight, after which the balloon is pierced, deflated and removed. We insert a small light bulb into the resulting lampshade and hang it. That's all, a great DIY Christmas decoration for your home is ready! Read the detailed New Year's master class at the link
For him to become original decoration holiday table? It is quite simple, and the finished flashlight can be used as an unusual candlestick.
To make one, you need to prepare the following materials: paper napkin for decoupage with some beautiful pattern; wax paper; film, which is used for the manufacture of lampshades; parchment paper; a little brocade braid. In addition, you will need a glass glass, a candle, special hot melt adhesive and some double-sided adhesive interlining.
So, how to make a paper lantern step by step wizard- Class.
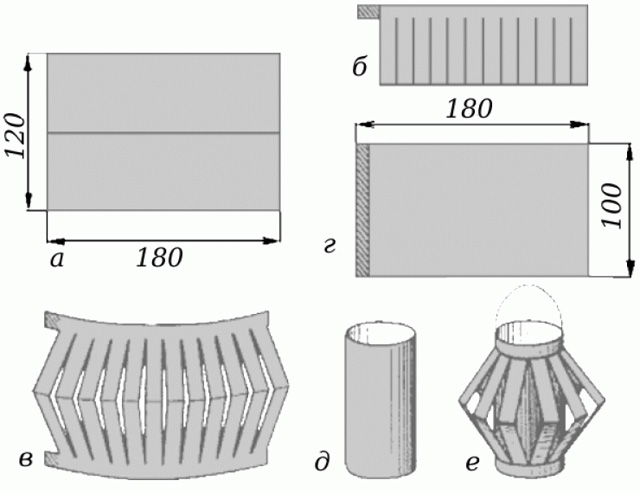
First you need to cut out a base for a flashlight measuring twenty-two by thirty-five centimeters from a piece of film for the lampshade. From the cut out rectangle, make a cylinder and glue it with hot glue. After that, it is necessary to separate the most upper layer with drawing. On the reverse side of the picture, glue the double-sided interlining. The best way to do this is with a hot iron. When the interlining is glued to the napkin, you can remove a layer of paper from it and stick it on parchment paper. Thus, you will prepare a blank from which you will need to make a beautiful lampshade for a flashlight. To do this, you need to make a rectangle from the workpiece, the size of which will correspond to the size of the lampshade, and fold it in half, aligning the shorter sides. Next, you need to make parallel cuts from the side of the fold, without cutting the paper to the end. The distance between the cuts should be a centimeter. The first and last cut should be two centimeters from the edge. After that, you can stick the lampshade on the flashlight cylinder. When doing this, make sure that the top and bottom edges of the cylinder and lampshade match. To decorate the craft, you need to stick a beautiful braid on top and bottom of the flashlight. That's it, now you know how to make a paper lantern! And to use it as a candlestick, you need to place a small candle in a glass and put it inside the flashlight.

How to make a paper lantern Ideas for the manufacture of such crafts can be very different. It all depends on what you want to get in the end result. For example, you can make very popular in recent times paper lanterns that are launched into the sky. There are also many options for simple, but very beautiful lanterns, which even a child can handle.

For children, making paper lanterns is a fun, but at the same time educational process. For example, together with a child you can make a beautiful flashlight in the form of a house.
For this you need to draw with a simple pencil on a paper sheet, a blank for the future flashlight, then cut it out and carefully cut holes for windows and doors. After that, glue all parts of the house with glue. If you want to do without glue, make special grooves on all parts of your house, and then just assemble it.
Another interesting model of a simple paper lantern is a lantern assembled from strips of paper.
How to make a flashlight out of paper: mk with a photo
To make such amazing ones, you will need: colored paper in two shades, scissors, thread and two beautiful beads.
First you will need to cut the sheets of paper into equal strips. In total they will need fourteen to sixteen pieces. The size of the finished flashlight will depend on the size of the strips. Also, from colored paper, you will need to cut out two circles of small diameter.
After that, you need to string a bead on the thread, and after it - a paper circle.

Then alternately string paper strips onto the thread different colors, first stringing them from above, and then from below.


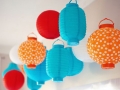
You can also make beautiful Chinese lanterns.
Thanks to detailed description making such a flashlight, you will understand how to make a lantern out of paper with your own hands.
For this you will need: thin trash bags light color, a piece of thin wire, a small candle, rice paper (or other very thin paper) and tape.

Garbage bags (you will need two bags) need to be leveled, placed one in the second and glue their edges with wide tape. The packages must be light colors, since the dark ones heat up much faster and at the same time they do not look so interesting. From a thin wire you need to cut off two pieces about thirty-five centimeters long. Then you need to wrap a candle with two pieces of wire, then straighten the wire and bend the hooks at its ends. You will need rice paper to make the outer shell of your flashlight. The shell itself is made large enough to fit the packages. But what form it will take depends only on your wishes. Look very nice, round, square lanterns or lanterns in the shape of a heart. If you want, you can make the flashlight bright by decorating it with paints or decorating it with ribbons. When making appearance such crafts must be borne in mind that it should not be too heavy, because then the flashlight may simply not take off. To give the paper shell the desired shape, use a thin wire to build a frame out of it, to which the paper will be attached. The easiest way to make a frame is to make a small circle of wire, after which the rest of the craft is attached to it. After the outer shell is ready, it is necessary to attach the garbage bags to the wire base, on which the candle is already attached. From above you need to put on an outer paper shell and secure it with a wide adhesive tape. By the way, the candle can be replaced with dry fuel in the form of tablets. If the flashlight does not take off at first (this can happen due to the weight of the fuel), let the fuel burn out a little, then try again to start your flashlight.
Flashlights do not have to be a source of light. For example, paper lanterns can be a wonderful decoration for your home in connection with any holiday: New Year and Christmas lanterns can be hung on a Christmas tree, and birthday or Halloween paper lanterns can be hung or placed around the rooms.
Such a decoration will go well with other holiday decor and fit into almost any style, since they can be different - it all depends on the flight of your creative thought if you want to make paper lanterns with your own hands.

![]()


A little patience and imagination - and you get a little miracle
A flickering flashlight, like a tiny light, immediately evokes a fabulous mood, creates an atmosphere of magic, mystery and mystery. Paper lanterns are so easy to make that even kids can get involved and help you make these wonderful decorations.
In order to make a paper lantern, it is better to take plain office paper in different colors. Corrugated paper is also suitable for you, but cardboard should not be used, as it often breaks at the fold, and the product may deteriorate.
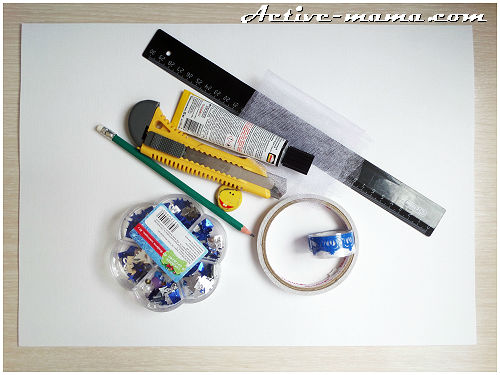
In addition, in the process of work, you will need glue, scissors, jewelry (if you want your craft to be exclusive and original), a pencil and a ruler, as well as special templates for cutting.
A little patience, imagination and perseverance - and your do-it-yourself paper lantern is ready! You can decorate your house for the holidays.

Making classic paper lanterns
The base of any lantern is rectangular, and in appearance resembles a cylinder, open at the top and bottom. Already on this basis you will glue or attach various volumetric decorations and decorations.

- Before you make a traditional paper lantern of this type, you can think of how and how you decorate it. There are no special templates for a classic lantern, but there is a diagram that you can focus on.
- First you need to make a base. To do this, you will need to cut a rectangle out of colored paper (determine the dimensions, depending on what size the future craft should be).
- Then this paper rectangular piece must be folded in half (in width), and stepping back a little from its upper edge, mark a horizontal line with a pencil.
- On the same workpiece, make markings for vertical stripes(take a small width, about 1-1.5 cm). Cut the paper along these lines, but in such a way that you do not cross the marked border line.
- Next, you'll need another rectangle. It can be cut out from the same colored paper, or take paper of a different color. The length of this rectangle should be the same as the first one, but the width can be slightly less.
- Also fold it in half, and then cut it into small strips from the side of the fold (as in the first case, do not make the cut to the end, because you need to leave at least a centimeter for gluing with the base).
- You can glue the blanks to each other (if you want, use a stapler). And so that the flashlight was easy to hang on Christmas tree or elsewhere, attach a small strip of paper to the two sides of the top of the flashlight.
If desired, for decoration for the New Year, you can decorate the craft with stickers, sparkles, stars, snowflakes, rhinestones, etc.
Several of these lanterns make a wonderful garland.
And if you do not make a core in a flashlight, then with the help of such a product you can decorate vases or other objects in an original way, making them elements of New Year's decor.

Other manufacturing methods
By connecting fantasy and imagination, you can easily figure out how else to make unique lanterns to decorate your home. For example, if you glue corrugated paper into cylinders, as in the case of classical technology, but do not make a second layer, but simply attach these forms to ribbons, and glue them along the bottom edge with light colored ribbons that will sway and flutter at the slightest movement. Such New Year's lanterns also look beautiful in a large garland.
If you want a candle to burn inside the product, then take two layers of paper for the base: plain paper for the top, and white parchment for the bottom, which will transmit light. Or use safe LED candles.
Another one simple craft- a flashlight made of multi-colored stripes. To make it, you need to cut a lot of paper strips (their length and width should be the same, the longer the strip, the larger the flashlight will turn out). These strips must be folded, and holes should be pierced at both ends. Then take a beautiful cord and fasten it first on one side, and then thread it through the other hole and pull it well so that the strips bend in a semicircle. It remains only to straighten the flashlight so that the stripes form the shape of a ball.
You can also do beautiful crafts in the form of an openwork lantern that will decorate any holiday table for the New Year at the Christmas tree, and for a birthday, and for other holidays.
- To make such a romantic decor element, you will need special cutting templates. If you are trying to make such a craft for the first time, then at first it is better to take a blank drawing in which there will be a minimum number of gaps, since cutting this part can take a lot of time and require some skills.
- The selected template must be printed and carefully cut along the contours.
- Choose glasses, goblets, jars or other transparent objects that will serve as the basis for the wrap (they should be able to put candles in them). Measure their height and width. You need to cut out the templates so that the containers can be completely wrapped.
- Try on the templates again and trim if necessary.
- If you want to make colored lanterns, then under the openwork patterns you will need to attach sheets of colored parchment (you also need to cut them to the size of the dishes). They are attached with adhesive tape.
- Then you can attach openwork patterns, also carefully attaching them with tape.
Light candles and enjoy the romantic atmosphere of a New Year's fairy tale.

Choose any way you like to make lanterns and create small crafts that will decorate your home in an original way for any holiday.
For the New Year, one of the most popular children's needlework is to create paper lanterns. As a rule, these are Chinese lanterns, easy to manufacture. However, older children will probably want to do something more original. An active mother offers to deviate from traditions in favor of originality and sophistication and make children with the help of mothers a stylish non-standard paper lantern that will decorate the New Year's interior.
For work you will need the following materials:
- 2 sheets of A3 watercolor paper (can be replaced with drawing sheets or drawing paper)
- eraser, ruler, pencil
- stationery knife
- thin double-sided tape or glue stick
- glue moment "Crystal"
- a small piece of white tulle
- decorative adhesive tape and confetti for decoration.
Master class on making a paper lantern with your own hands
To begin with, on a piece of paper, we make a drawing of a future flashlight according to this template:
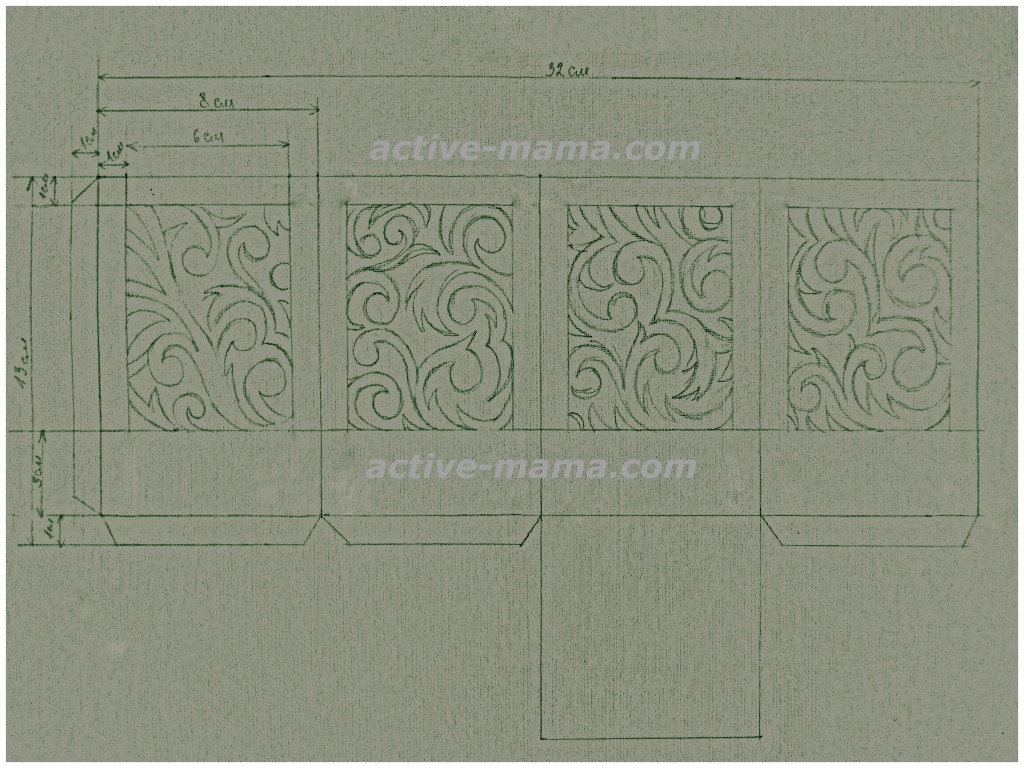
Cut out patterned "windows" (curls).

Cut out the entire piece.

We cut the tulle into pieces, the size of which should be slightly larger than the “windows” and with the help of instant glue glue the crystal onto the patterns with inside. We are waiting for drying.

Flip the item over front side and lightly go through the places of the fold with a clerical knife, so that the paper can be more easily transformed.

We bend the edges and glue them with thin double-sided tape or with stick glue.

We decorate the bottom edge with a decorative ribbon.
The main part is ready, it remains to make the upper part of the flashlight. We also make a drawing according to the template and cut it out. On the line with arcs, we cut only the arcs and turn them up.


Bend the corners and glue the edges.

We glue the upper part to the main one and close the junction with decorative tape. With her help, we decorate the top of the flashlight. Add confetti stars.

At the end, we make a loop (holder). To do this, cut out a square 3x3 cm and a strip 8x1 cm. Glue the edges of the strip to the inside of the square. At the end, we attach it to the top.
The flashlight is ready!
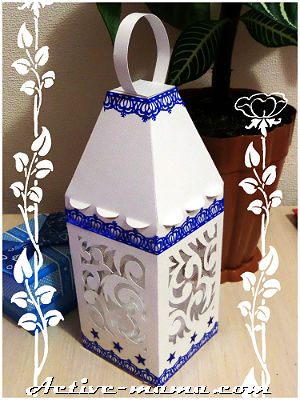
Paper lantern made by Marina Sivtsova
Photo of the author. Copying materials is prohibited
the day before new year holidays everyone wants to decorate the Christmas tree, the room to create a positive mood. Do-it-yourself Christmas lanterns are good because they can not only decorate any room or Christmas tree, but also make them with the whole family.
Children will really like this activity, and when creating flashlights, they will develop imagination, thinking and hand motor skills.
For manufacturing, you do not need to buy a lot of materials, it can be made from any paper, and then decorate in an original way different elements decor. You can hang lanterns not only in the apartment, but also in the office, school and other places. They will look beautiful in any room and give a festive mood to everyone who sees them.
This method is the most simple option making lanterns for the New Year. Moreover, the construction does not require much time and effort. The resulting flashlight can be hung on a chandelier or Christmas tree, it all depends on the size.
In some schools, in labor lessons, children are asked to make such lanterns in order to decorate the classroom with them later. Therefore, some children know how to make a New Year's lantern.
And for beginners in this matter, below is step-by-step instruction creating such crafts for the holiday.
For their manufacture you will need the following materials:
- colored paper;
- PVA glue;
- scissors;
- decor elements;
- thread or satin ribbon.
The first step is to make paper blanks. To do this, take sheets of colored paper (choose shades of your own choice) and cut strips of the same width. The most harmonious combinations of yellow, white and green look. The width can be taken 2 cm.
After cutting the same strips in width, it is necessary to divide them into identical pairs. Then make each pair 2 cm shorter than the previous one. The last segment should be without a pair and the smallest. Then lay them out in the correct sequence and fasten with glue or a stapler at the end.
Then align the bottom strips under one line and also fasten them. In order for the resulting craft to be hung somewhere, it is necessary to attach a loop of thread or satin ribbon to the top.
Step-by-step instruction.
When the glue dries, the lantern can be hung on the Christmas tree. To make the craft look more original, you can smear it with PVA glue and sprinkle it with sparkles of different shades or glue small beads, rain.
After the New Year holidays, the flashlight can be neatly folded together with the rest of the toys and hidden until the next New Year.
If you do not press it on top with other objects, then it will not lose its shape and will delight you with its appearance for another year.
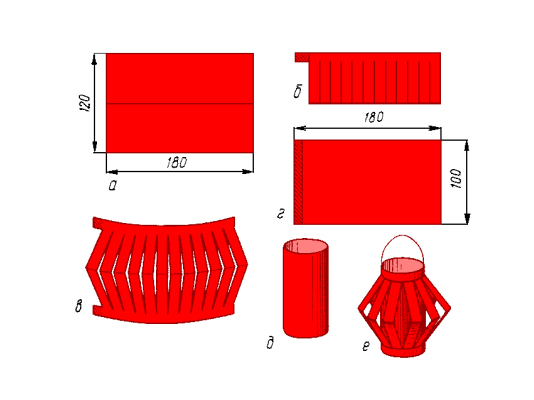
Chinese lantern
Everyone knows that Chinese lanterns are launched into the sky. In fact, such items can be made to decorate the Christmas tree. The Christmas toy is made quite easily, and despite this, it has a very beautiful look.
They can be made at once several pieces of different colors. As a result, they will look harmoniously with other toys, complementing them beautifully. It can also be hung in a child's room.
On the eve of the New Year, you can attract children to create such beauty, while creating it, the child will develop a fantasy, not to mention the fact that this is a great option for having fun with the whole family.

Stages of work.
For its manufacture you will need the following materials:
- scissors;
- colored paper;
- PVA glue;
- paper circles - 2 pcs. 4 cm in diameter;
- decor elements;
- thread with a needle.
The first step is to prepare blanks from colored paper. To do this, take 2 of your favorite shades and cut out 18 identical strips 2-3 cm wide from them.
Then fold all the strips in half. Take a needle, thread a thread into it and start stringing a circle initially, then one side of the strips. At the same time, it is advisable to alternate colors, you can take not 2, but more shades of paper.
After you string one side, you should proceed to the other, and close all 2 around from above. Then tighten all the strips so that you get a ball, and straighten them in the form of a spiral.
If desired, the lower part can be decorated with beads, for this, before you start stringing a circle, string a few beads of different sizes.
And on top, so that you can hang the flashlight somewhere, you need to make a loop of thread or use a satin ribbon. You can attach the tape with PVA glue.
Miraculous flashlight
The method of making such crafts is also quite simple. It will look original in any interior and on any Christmas tree.
The flashlight has long been used as a Christmas decoration on the eve of the New Year. You can make them with the whole family in large numbers and then decorate all the rooms.
For the manufacture will need the following materials:
- colored paper;
- PVA glue or adhesive tape;
- awl;
- scissors;
- thread or satin ribbon.
The first step is to cut strips of paper of the same size. For one craft, 20 strips will be enough. The width will depend on what kind of flashlight you want to make.
Then all the strips must be folded into a pile, after which they are cut with an awl. Thread a thread or satin ribbon at the end, and secure the end with tape. Then it is necessary to pass the second end of the thread through the second hole of the strips.
Pull the thread so that all the strips are bent, forming a semicircle, at which point the thread must be secured with a knot. At the end, distribute all the strips so that they form a ball. satin ribbon It must be mounted on top so that it can be hung on a Christmas tree.
It will look very nice if you hang New Year's lanterns made of paper of different shades in large quantities next to the ceiling or chandelier. If there is no colored paper, you can make it from ordinary paper by first painting it with watercolors in the desired colors.
Or smear a ready-made flashlight with PVA glue completely and sprinkle with sparkles. This kind of jewelry can be stored with other toys for several years.