As you can see, the scheme is simple. Basic elements: current-limiting capacitor, rectifier diode bridge on four diodes, battery, switch, super-bright LEDs, LED indication of flashlight battery charging.

Well, now, in order, about the purpose of all the elements in the flashlight.
Current limiting capacitor. It is designed to limit the charging current of the battery. Its capacity may vary for each type of flashlight. A non-polar mica capacitor is used. Working voltage must be at least 250 volts. In the circuit, it must be shunted, as shown, with a resistor. It serves to discharge the capacitor after you unplug the flashlight from the charger. Otherwise, you could get an electric shock if you accidentally touch the 220 volt mains terminals of the flashlight. The resistance of this resistor must be at least 500 kOhm.

The rectifier bridge is assembled on silicon diodes with a reverse voltage of at least 300 volts.
A simple red or green LED is used to indicate that the flashlight battery is charging. It is connected in parallel with one of the rectifier bridge diodes. True, in the diagram, I forgot to indicate the resistor connected in series with this LED.
It makes no sense to talk about the rest of the elements, so everything should be clear anyway.
I would like to draw your attention to the main points of repairing an LED flashlight. Consider the main malfunctions and how to fix them.
1. The flashlight stopped shining. There are not so many options here. The reason may be the failure of super-bright LEDs. This can happen, for example, in the following case. You put the flashlight on charge and accidentally turned on the switch. In this case, a sharp current surge will occur and one or more diodes of the rectifier bridge may be punctured. And behind them, the capacitor may not be able to withstand it and will close. The battery voltage will rise sharply and the LEDs will fail. So, in any case, do not turn on the flashlight when charging, if you do not want to throw it away.

2. The flashlight does not turn on. Well, here you need to check the switch.
3. The flashlight runs out of power very quickly. If your flashlight is "experienced", then most likely the battery has worked out its service life. If you actively use the flashlight, then after one year of operation, the battery no longer holds.

Problem 1. Doesn't turn on led flashlight or flickers when running
This is usually the reason for poor contact. The easiest treatment is to tighten all threads tightly.
If the flashlight doesn't work at all, start by checking the battery. Perhaps it is discharged or out of order.

Unscrew the back cover of the lamp and use a screwdriver to close the housing with the negative contact of the battery. If the flashlight lights up, then the problem is in the module with the button.
90% of the buttons of all LED lights are made according to the same scheme:
The button body is made of aluminum with a thread, a rubber cap is inserted there, then the button module itself and a pressure ring for contact with the body.

The problem is most often solved in a loosely clamped pressure ring.
To eliminate this malfunction, it is enough to find round-nose pliers with thin stings or thin scissors that need to be inserted into the holes, as in the photo, and turned clockwise.
If the ring moves, then the problem has been fixed. If the ring is in place, then the problem lies in the contact of the button module with the body. Unscrew the retaining ring counterclockwise and pull the button module outward.
Often poor contact occurs due to oxidation of the aluminum surface of the ring or the rim on the PCB. Indicated by arrows)

It is enough just to wipe these surfaces with alcohol and the functionality will be restored.
Button modules are different. Some of whom contact goes through printed circuit board, others, in which the contact goes through the side lobes to the body of the lantern.
Just bend such a petal to the side so that the contact is tighter.
Alternatively, you can solder tin to make the surface thicker and press the contact better.
All LED lights are basically the same.
The plus goes through the positive terminal of the battery to the center of the LED module.
The minus goes through the body and closes with a button.
It will not be superfluous to check the tightness of the LED module inside the case. It's the same frequent problem LED lights.

Using round nose pliers or pliers, turn the module clockwise until it stops. Be careful, it is easy to damage the LED at this point.
Flashlight repair video tutorial:
These actions should be enough to restore the functionality of the LED flashlight.
It is worse when the flashlight works and the modes are switched, but the beam is very dim, or the flashlight does not work at all and there is a burning smell inside.

Problem 2. The flashlight works fine, but dimly, or does not work at all and there is a burning smell inside

Most likely the driver is out of order.
The driver is electronic circuit on transistors, which controls the flashlight modes and is also responsible for a constant voltage level, regardless of the battery discharge.
You need to unsolder the burned-out driver and solder the new driver, or connect the LED directly to the battery. In this case, you lose all modes and remain only with the maximum.
Sometimes (much less often) the LED fails.
This can be verified very simply. bring the voltage 4.2 V / to the contact pads of the LED. The main thing is not to mix up the polarity. If the LED is on brightly, then the driver is out of order, if on the contrary, then you need to order a new LED.
Unscrew the LED module from the case.
Modules are different, but usually they are made of copper or brass and
The weakest point of such lights is the button. Its contacts are oxidized, as a result of which the flashlight begins to shine dimly, and then it may stop turning on altogether.
The first sign is that a flashlight with a normal battery shines weakly, but if you click the button several times, the brightness increases.

The easiest way to make such a lantern shine is to do the following:
1. Take thin stranded wire, cut off one vein.
2. We wind the wiring on the spring.
3. Bend the wire so that the battery does not break it. The wire should protrude slightly
over the swirling part of the flashlight.
4. Tighten tightly. We break off the excess wire (tear off).
As a result, the wire provides good contact with minus battery and flashlight
will shine with due brightness. Of course, the button with such a repair is not a lot, so
turn on - turn off the flashlight by turning the head part.
My Chinese man worked like this for a couple of months. If you need to change the battery, the back of the flashlight
should not be touched. We turn our head away.

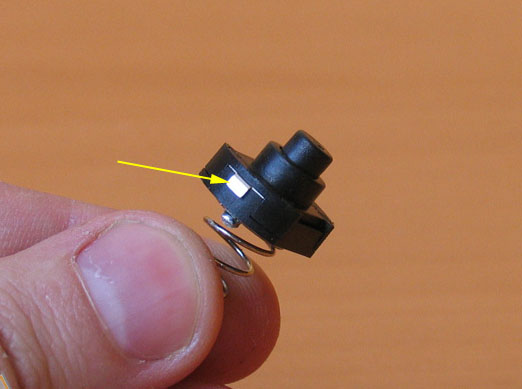
RESTORING THE PERFORMANCE OF THE BUTTON.
Today I decided to bring the button back to life. The button is in a plastic case, which
simply pressed into the back of the lantern. In principle, it can be pushed back, but I did it a little differently:
1. Make a pair of holes with a 2 mm drill bit to a depth of 2-3 mm.
2. Now you can unscrew the housing with the button with tweezers.
3. We extract the button.
4. The button is assembled without glue and latches, so it is easy to disassemble with a stationery knife.
The photo shows that the movable contact has oxidized (round bullshit in the center, like a button).
You can clean it with an eraser or fine sandpaper and assemble the button back, but I decided to additionally irradiate this part and the fixed contacts.

1. We clean with fine sandpaper.
2. We serve thin layer places marked in red. We wipe the flux with alcohol,
collecting the button.
3. To increase reliability, I soldered a spring to the bottom contact of the button.
4. Putting everything back.
After renovation, the button works fine. Of course, tin also oxidizes, but since tin is a fairly soft metal, I hope that the oxide film will be
easy to break down. It is not for nothing that the central contact on the bulbs is made of tin.
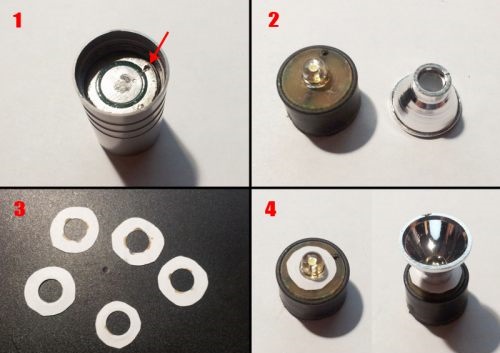
IMPROVING FOCUSING.
What is a "hotspot", my Chinese had a very vague idea, so I decided to enlighten him.
We unscrew the head part.
1. The board has a small hole (arrow). With the help of an awl, we unscrew the filling,
at the same time, lightly press your finger on the glass from the outside. This makes it easier to get out.
2. Remove the reflector.
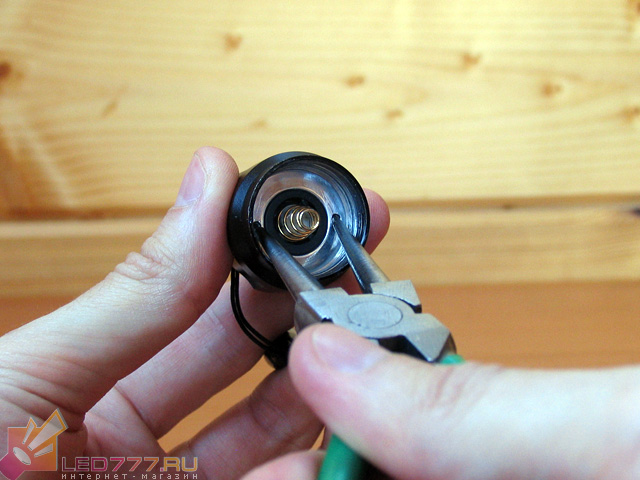
3. Take ordinary office paper, punch 6-8 holes with an office punch.
The hole diameter of the hole punch perfectly matches the diameter of the LED.
Cut out 6-8 paper washers.
4. Place the washers on the LED and press down with the reflector.
Here you have to experiment with the number of pucks. In this way, I improved focusing with a pair of flashlights, the number of washers was in the range of 4-6. It took 6 of them on the current patient.

INCREASE BRIGHTNESS (for those who know a little about electronics).
The Chinese save on everything. A couple of unnecessary details - an increase in the cost price, so they do not put it.
The main part of the diagram (marked in green) can be different. On one or two transistors or on a specialized microcircuit (I have a circuit of two parts:
choke and microcircuit with 3 legs, similar to a transistor). But on the part marked in red - they save. I added a capacitor and a pair of 1n4148 diodes in parallel (I didn't find a Schottky). The brightness of the LED has increased by 10-15 percent.
1. This is how the LED looks like in similar Chinese. From the side you can see that there are thick and thin legs inside. A thin leg is a plus. You need to navigate by this sign, because the colors of the wires can be completely unpredictable.
2. This is how the board looks like, to which the LED is soldered (with back side). In green foil is indicated. The wires from the driver are soldered to the LED legs.
3. Cut the foil on the plus side of the LED with a sharp knife or a triangular file.
We sand the entire board to remove the varnish.
4. Solder diodes and capacitor. I took the diodes from the broken one computer unit power supply, the tantalum capacitor dropped out of some burned-out hard drive.
The positive wire now needs to be soldered to the pad with diodes.

As a result, the flashlight gives out (by eye) 10-12 lumens (see photos with hotspots),
judging by the phoenix, which produces 9 lumens in the minimum mode.
LED flashlight just like any other electrical appliance, at some point may break. It practically does not depend on the manufacturer - both a cheap "Chinese" and an eminent brand can break. Usually breakdowns occur during the first time of use, so in our store site we give a 1 year warranty for LED lights. Do not be alarmed in advance - according to our statistics, the percentage of defects among the presented goods is extremely low, and in addition, we double check the lights: when they arrive at the warehouse and before they are sent to customers. However, some minor problems if they happen, you can fix it yourself (this also applies to flashlights purchased elsewhere).
Electrical is the science of contacts. Therefore, from the entire list of reasons, 90% of cases can be attributed to a contact failure in some part of the LED lamp circuit.
The flashlight does not turn on, or it lights up with flickering and loss of light
Most likely bad contact somewhere. However, if the flashlight does not turn on at all, start by checking the battery, it may be low or damaged.
Also make sure that all components of the lamp housing are screwed in to the end: the head part, the body and the rear module with the power button.
Unscrew the rear cap of the lamp and use a metal object to close the circuit between the negative terminal of the battery and the exposed part of the LED lamp housing. If the flashlight comes on, it means that the problem should be looked for in the button module.
99% of the button modules are made the same: a rubber cap on the outside, then the button itself is soldered to the PCB and a pressure ring that provides electrical contact between the module case and the button board. Most often, the problem is in an insufficiently tightened (weakened) pressure ring. Take a tool such as sharp-nosed scissors or fine tweezers, insert it into the holes in the pressure ring, and try turning it clockwise. If the ring moves, then it really has been weakened. If not, unscrew the ring completely (counterclockwise) and remove the button parts from the cap.
Wipe the bottom of the pressure end and the pin ring on the PCB with alcohol. As a rule, this should be sufficient to restore functionality.

If the contact between the button and the walls is not provided by the pressure ring, but by the side tabs, bend them slightly.

Also check if the LED module is well screwed into the LED torch body.

As a rule, these actions are enough to restore the work of the flashlight. More difficult situation when the flashlight does not work as it should.
The flashlight turns on, switches modes normally, but it burns very dimly
Probably, the LED driver or LED is out of order. This is a worse problem, it can only be dealt with with soldering skills, or under a warranty from the seller.
Unscrew the head part of the LED flashlight, unscrew the module. Briefly connect the power supply (no more than 4.2 V) to the contact pads on the LED board (they are marked "+" (red wire) and "-" (black wire)). If the LED is lit as dimly, it is out of order. If the LED is bright, the driver is out of order.
In both cases, replacement of the defective element or the entire LED module is required. If you are skilled in soldering, you can repair the module yourself.
LED (it is always soldered to aluminum radiator and constitutes one whole) can be attached to the capsule in two ways: either it is firmly glued with hot melt glue, or screwed on with screws. Unfortunately, in the first case, it is almost impossible to separate it from the capsule, so sometimes it is easier to replace the module. And if the LED board is screwed on, then it is enough to unscrew both screws, unsolder the wires from the contacts and remove the LED, then install a similar new one (after applying thermal paste to the radiator).

If the driver fails, you need to purchase a new driver. There are two criteria for selection: the outer diameter of the board and the supported current. To replace the driver, you need to unsolder the wires from the LED, remove the jumpers from the solder between the driver and the capsule walls, and remove the driver. If there is a spring, unsolder it, transfer it to a new driver. Install the new driver in reverse order.

Any electrical device can break down. This also applies to LED lights.
The online store gives a guarantee of up to 3 months for everything.
All lights are checked upon arrival and re-tested upon sale.
In most cases, flashlight repair is quite affordable. to an ordinary person with a standard set of tools.
In 90% of cases, all breakdowns occur due to contact failure in the flashlight circuit.
Problem 1. LED flashlight does not turn on or flickers when working
This is usually the reason for poor contact. The easiest treatment is to tighten all threads tightly.
If the flashlight doesn't work at all, start by checking the battery. Perhaps it is discharged or out of order.
Unscrew the back cover of the lamp and use a screwdriver to close the housing with the negative contact of the battery. If the flashlight lights up, then the problem is in the module with the button.
.
90% of the buttons of all LED lights are made according to the same scheme:
The button body is made of aluminum with a thread, a rubber cap is inserted there, then the button module itself and a pressure ring for contact with the body.
The problem is most often solved in a loosely clamped pressure ring.
To eliminate this malfunction, it is enough to find round-nose pliers with thin stings or thin scissors that need to be inserted into the holes, as in the photo, and turned clockwise.

If the ring moves, then the problem has been fixed. If the ring is in place, then the problem lies in the contact of the button module with the body. Unscrew the retaining ring counterclockwise and pull the button module outward.
Often poor contact occurs due to oxidation of the aluminum surface of the ring or the rim on the PCB. Indicated by arrows)
It is enough just to wipe these surfaces with alcohol and the functionality will be restored.
Button modules are different. Some in which the contact goes through the printed circuit board, others in which the contact goes through the side lobes to the body of the lantern.
Just bend such a petal to the side so that the contact is tighter.
Alternatively, you can solder tin to make the surface thicker and press the contact better.
All LED lights are basically the same.
The plus goes through the positive terminal of the battery to the center of the LED module.
The minus goes through the body and closes with a button.
 It will not be superfluous to check the tightness of the LED module inside the case. This is also a common problem with LED lights.
Using round nose pliers or pliers, turn the module clockwise until it stops. Be careful, it is easy to damage the LED at this point.
These actions should be enough to restore the functionality of the LED flashlight.
It is worse when the flashlight works and the modes are switched, but the beam is very dim, or the flashlight does not work at all and there is a burning smell inside.

Problem 2. The flashlight works fine, but dimly, or does not work at all and there is a burning smell inside
Most likely the driver is out of order.
The driver is a transistorized electronic circuit that controls the flashlight modes and is also responsible for a constant voltage level regardless of battery discharge.
You need to unsolder the burned-out driver and solder the new driver, or connect the LED directly to the battery. In this case, you lose all modes and remain only with the maximum.
 Sometimes (much less often) the LED fails.
This can be verified very simply. bring the voltage 4.2 V / to the contact pads of the LED. The main thing is not to mix up the polarity. If the LED is on brightly, then the driver is out of order, if on the contrary, then you need to order a new LED.
Unscrew the LED module from the case.
There are different modules, but as a rule, they are made of copper or brass and twist counterclockwise. Unsolder the wires from the star with LED and remove the driver.