The main purpose of the cellar is to store canned goods, vegetables and fruits. But not every cellar can guarantee the shelf life of food. Therefore, you should pay special attention to the construction of your subfloor. The main thing is to decide for what purposes it is needed.
In a cellar with a temperature of -7 degrees, you can store various products for about one year. Therefore, many housewives value and use such premises for long-term storage of vegetables and fruits. After all, its main advantage over a refrigerator is capacity.

Such construction is a serious step, so the work must be based on diagrams and drawings of the cellars. To understand which option is most suitable, you can look at the photo of the cellar. There are many options on the Internet. The picture will show finished layout buildings, all that remains is to comply.

What is important during construction?
When building a cellar with your own hands, you should adhere to the following recommendations:
- the use of wood materials requires pre-treatment with special means. This procedure protects the room from moisture;
- summer is the ideal time to install a cellar, since groundwater is low;
- It is advisable to immediately equip a ventilation system;
- It is best to build two doors inside the storage room. This will save the correct temperature regime;
- for optimal temperature it is recommended to provide thermal insulation;
- think about all the equipment in advance, so as not to delay construction work due to their absence.


Instructions on how to make a cellar
Place
It is necessary to choose a place for the future cellar. Dry, elevated areas are best suited; in the future there will be no need to install waterproofing. In this case, there is no risk of moisture ingress. The choice of depth depends on the desire of the owner, approximately 2-3 meters.

A certain distance between the base of the cellar and groundwater (50 cm) must be ensured, otherwise flooding may occur.


Material
The construction of a cellar should be approached responsibly, taking into account all the nuances, otherwise troubles are inevitable. Another main point is the choice of material for construction.

Natural stone, wood, red brick and others are suitable for such purposes. Wood lining is required when building an earthen cellar. Metal constructions It is best to avoid, as they are picky about climatic conditions.

Ventilation
This element is necessary to combat moisture and gas accumulation. Most often, a pipe is used that connects the inside and surface of the cellar. But you can install two pipes that will serve as an exhaust hood.


Advantages
A cellar under the house, built with your own hands, has many advantages:
- site saving;
- ease of use. Especially in winter time, you can quickly go down and just as quickly go up;
- waterproofing and underground drainage help you forget about dampness;

Characteristics of the above-ground cellar
When building an above-ground cellar, it is important to consider the soil level. Such a room is built on the surface of the earth, as opposed to underground structures. The above-ground cellar occupies less space, does not flood, functions all year round, has an impressive size and is very convenient to use.

However, such an extension requires hydraulic engineering work. The storage needs maintenance: periodic cleaning and disinfection.

There is a ground cellar three types: above ground, semi-buried, buried. You can build such rooms with your own hands using bricks, logs or concrete.


Features of building a wine cellar
Wine drinks require special storage, because this affects their taste characteristics. Building a wine cellar is very popular.

In such a room it is important to provide a thermal insulation system. Closed-porous materials are ideal for building a wine cellar. They are responsible for maintaining temperature.

The entrance door should be well sealed. Excessive air penetration will negatively affect the quality of the wine. Any materials are suitable for the floor, as long as they do not emit harmful chemical elements.

Drink bottles are stored horizontally and it is not recommended to move them. All necessary equipment must be good quality using natural materials.


Construction must take place in compliance with all necessary instructions to avoid additional work and product damage.

DIY cellar photo


A cellar in a household plot is simply necessary - it will help preserve a large number of products prepared for the winter that simply cannot fit in a regular refrigerator. This room may be located under the house, or it may be located near it, on the site. To know how to build a cellar on the street, you need to study all stages of this process, starting with digging a pit and ending with installing a roof.
A very important condition is the choice of time of year for constructing a cellar. Recommended do work in summer in dry weather, so that the pit remains dry and dense during the construction process.
Types of cellars
An outdoor cellar can be arranged in three main ways:
- completely located underground, in a dug pit, and having a roof over the entrance;

- dug out in an elevated area of the site, on top of which an embankment is made;

- a ready-made insulated body, which is installed in a pit and covered with soil.

Having purchased a ready-made version of the cellar body, you don’t have to worry about the process of building walls and waterproofing them; you just need to prepare the foundation pit and strengthen its bottom.
To determine which one existing options to the maximum extent suitable both for the conditions of a particular site and for the volume of upcoming construction work, we need to consider each of them in more detail.
Cellar on a flat area
This option for building a cellar is quite labor-intensive, but if it is not possible to purchase a ready-made building, and the site area does not have a pronounced elevation, then it will be the only one that is applicable in this case.

When resorting to this method of constructing a cellar, you need to take into account the height of groundwater in the given area and in the specific area where the pit will be dug. If the area is not enough, then soil water can ruin all the work done or, appearing later, render the products stored in the cellar unusable.
The approximate water level is determined by looking into a nearby well in the spring, when abundant snow melts. In summer, in places where groundwater runs high, moisture-loving grass grows, such as horse sorrel, horsetail, sedge and other similar varieties - there it is juicier and taller.
If you want to more accurately determine this parameter, you can call a specialist who will professionally calculate the best place for digging a pit and its possible depth. In any case, there is no need to choose a place in the lowlands where water can stagnate.
When arranging a cellar in this way, the pit must be planned at least two to two and a half meters deep. The work needs to begin with the process of digging a pit.
Pit preparation
The place chosen for the cellar must be thoroughly cleaned by removing the fertile turf layer, thereby marking the area for digging. The work is carried out manually, since the equipment will disturb the edges of the pit, which is undesirable for this particular option for constructing a cellar. To make digging easier, it is better to remove the soil in layers, loosening each of them and carefully leveling the edges of the hole as much as possible.

If the soil on the site itself is loose, then the pit is dug with a slope - then the earth will crumble less. In this case, the top of the pit is marked 30-50 cm in each direction more than its bottom should be.
If the groundwater level is sufficiently high, the pit is also made wider and deeper by 40-50 cm, and this space is filled with waterproofing material that will protect the walls from dampness. The walls and floor of the cellar can be waterproofed using clay extracted from the pit; it is poured into the bottom of the pit after digging is completed and around the already erected walls. The top fertile layer of soil is suitable for transferring to the beds of a vegetable garden or flower garden, and the rest of the soil can be used, for example, to fill the bottom layer of an “alpine hill”.
Materials for building a cellar
To build cellar walls, it is best to use natural materials that will not emit harmful fumes. The explanation for this is simple - in such a room there will be not only canned closed products, but also vegetables and fruits in special open boxes. They are capable of perceiving and absorbing odors and various kinds substances unnecessary for the body. Metal in open form It is also not recommended to use it in the construction of a cellar, since it will serve as a conductor of cold, violating the optimal temperature required for storing food.
Therefore, for arrangement you need the following:
- choose brick, foam blocks or concrete slabs for the walls;
— for the floor you need cement and sand to make the mortar, reinforcement to strengthen the screed being poured, sand and crushed stone for the “cushion”;
- the floor requires ready-made concrete slabs or boards for formwork and a base for pouring concrete, as well as reinforcement to create an appropriate reinforcing belt;
— on the outside, clay waterproofing can be supplemented with roofing felt, securing it to the walls using mastic;
- for the roof you will need wooden blocks and boards, roofing felt for waterproofing, roofing material;
- plastic pipes for ventilation will be required;
— for the manufacture of hatches and doors, lumber is prepared;
- interior wall decoration involves the use plaster mixture or boards for sheathing.
All wooden parts buildings must be treated with antiseptic agents in order for them to last long term without rotting, damage by insects or microorganisms.
Foundation
In order for the cellar to be reliable and dry, it is best to make it concrete, but before pouring it, you must make a good base for it. waterproofed basis.

- A sand cushion with a thickness of 100 ÷ 120 mm is poured into the bottom of the pit; it must be well compacted. To do this, the sand is slightly moistened and compacted.
- Crushed stone, 60 ÷ 80 mm thick, is poured on top of the sand, leveled and compacted.
- Next, it would be good to make a boundary around the perimeter of the pit and lay reinforcement. The height of the foundation floor can be from 70 to 120 mm.
- The next step is to pour concrete into the formwork and level it.
- After it hardens and the formwork is removed, the sides of the foundation can be coated with tar, which well insulates it from moisture coming from the ground.
It should be noted that the floor of the cellar is sometimes left earthen. This is possible if the groundwater is deep enough. An earthen floor will allow storage in the cellar natural ventilation and soil temperature at a given depth. In this case, to erect walls at the bottom of the pit, a strip foundation is poured around the perimeter.
Construction of walls, ventilation and waterproofing
- Walls can be erected on the prepared foundation. For laying brick walls of a cellar, a mixture of clay and sand is most often used, but the usual cement mortar can also be used.
- If the ceiling of the cellar will rest on the masonry walls, then their thickness should be equal to one brick.
- When using not only walls, but also the soil surrounding the cellar to support the ceiling, then their thickness of half a brick is sufficient.
- If space is left between the earthen walls of the pit and the brickwork for waterproofing, then, as it is carried out, this space is filled with clay, spilled with water and thoroughly compacted.

- Between the clay backfill and brick wall a layer of roofing material can be fixed.
- After laying one or two rows of bricks, in the opposite corner from the entrance, in the wall to the entire height of the basement, a niche is cut in the ground for the ventilation pipe.
- In the second or third row of masonry, opposite the niche, install a ventilation pipe with a corner outlet, which is built into the wall. Later, this hole should be closed with a fine grate to prevent rodents from getting inside the cellar.
- The pipe above the surface of the cellar covering should rise no less than one and a half meters.
- The walls are erected to the top of the pit, with constant monitoring of their verticality and horizontality using a plumb line and a building level.
An important note - if the groundwater comes close to the foundation-floor, then it is worth building around the brick walls. It is usually filled with crushed stone or broken brick. It will drain moisture from the cellar into a specially constructed container or pit near the cellar.
Cellar cover
The basement can be covered different ways. The simplest of them is to lay concrete slabs on top of it, which should, in addition to the walls, rest on the ground around the cellar by 400 — 500 mm. But not every site can be visited by equipment capable of lifting the slab and placing it in the intended place, so very often you have to do the flooring yourself. In addition to ready-made concrete slabs, a home-made concrete, wooden or combined floor can be installed. The latter is convenient because it is convenient to lay insulation between the wooden beams from the inside of the cellar, as well as to secure the ceiling boards.

- If this option is chosen, then roofing material is laid on top of the walls and on the ground around them, on which processed bars measuring 150 × 100 mm are laid - they will act as beams. The distance between them should be no more than 500 mm.
- A flooring of boards is placed on top of the beam bars, and a hole is provided for the hatch.
- Then, from above wooden planks waterproofing made of dense polyethylene film is laid. The film should be placed on the ground, around the cellar.

- A reinforcing grid is laid on top of the film, a boundary formwork is installed, and then the resulting space is filled, which is leveled and left to dry. Thickness concrete floor, poured onto wooden base should be 40 ÷ 50 mm.
- After the concrete has hardened, the hatch hole, if necessary, is raised to the desired height and a cover is installed on it.

When constructing such an entrance, the staircase can only be the simplest.
Roof over the cellar
A gable roof will be installed above the hatch, and the rest of the space above the cellar will be covered with the film remaining on the surface and sprinkled with soil.
Since the concrete area will be larger than the cellar room, gable roof installed over its entire width. Thus, a small triangular shed is formed above the hatch, in which you can even stack some firewood.
The roof structure is assembled from high-quality lumber. The rafters of the slopes are fastened at the bottom with bars, which will become a reliable basis for the roof. They need to be secured to a concrete base with anchor elements.

You can do it another way. Along the perimeter of the concrete site, it is necessary to build a low wall in two or three rows of bricks, and install a roof structure on top of it. The brick part of this mini-shed must be covered with waterproofing.
The front part of the roof is sheathed with boards, and roofing felt can be laid on the slopes, and slate or metal tiles on top. Some people prefer to cover the slopes with plywood and then lay soft roof. On the one hand, the pediment is completely sewn up, and on the other, an opening is left for installing the front door.
When the cellar is no longer affected by precipitation, you can light the interior and finish the walls and ceiling.
Cellar lighting
The interior decoration of the room can, of course, be done before installing the ceiling, but there is no guarantee that it will not be spoiled by sudden rain. Therefore, it is better to conduct electricity and make lighting after the hatch is closed with the roof.

Lighting should be done not only in the basement, but also at the entrance to it under the roof.
From the house to the roof above the hatch into the cellar they stretch copper wires in reliable double insulation, they are already led down from this entrance room. The lamps must be placed so that under no circumstances can they be touched when going down to the basement. It is best to cover the light bulbs with a protective cap.
The wiring must be done in such a way that the light bulbs turn on simultaneously - under the roof and in the cellar. The switch should be placed under the roof at the entrance, on comfortable height, approximately 1.2 ÷ 1.5 m from the floor. It is prohibited to install sockets in a cellar or basement due to safety precautions.
If you do not have experience with conducting and connecting electricity, then it is better to entrust this to qualified specialists, since, without knowing the wiring system, at best, you can leave the entire house without light.
Finishing walls, floors and ceilings
If the cellar is good waterproofed, then any material can be used for finishing. If the ceiling is built on bars, then it is worth laying insulation in mats between them - this will maintain an even temperature in the cellar room and in winter frosts, and in the summer heat.

To strengthen the insulation to the concrete ceiling, you can mount a lattice structure that can press the mats to the surface. From below it will not be difficult to sheathe the ceiling with boards or moisture-resistant plasterboard, screwing it to the bars.

Roofing felt and mastic can be replaced with liquid rubber or liquid silicate glass, which will also create a waterproof layer.
Many people leave the walls brick, without additional covering, but it is better to finish them plaster mortar, rubbing to perfect evenness. They can be soaked liquid waterproofing, which is able to penetrate deep into the plaster and, having crystallized, make it waterproof. After the waterproofing has dried, you can whitewash the walls with lime - this will make the cellar room neater and brighter.
After all the finishing of the cellar is completed and dried, you can think about where and how many shelves to place and where to organize boxes (boxes) for storing root vegetables.
There is one trick that will help site owners naturally remove excess moisture from the cellar. To do this, you just need to plant berry bushes around the cellar, which will actively absorb moisture from the soil. Trees of any species should not be planted close to the building, as their roots can destroy the waterproofing, and over time, even the walls of the cellar.
Prices for various types of thermal insulation materials
Thermal insulation materials
Video: stages of construction of one of the cellar options
Cellar with an inclined entrance and an earthen embankment
The second version of the cellar is located on a small hill, if there is one on the site. If the groundwater is high and there is such a place on the territory, this is exactly the kind of cellar that will become the best option. However, such an “elevation” can also be created artificially.

The peculiarity of this approach is that all the soil that is removed from the pit is used for embankment on top of the roof and entrance. A thick layer of soil will not allow the cellar room to heat up in the summer, and will keep it inside in the winter. desired temperature for food preservation.
When building such a cellar, a door is used for entry, and not a hatch, as in the first option. The staircase leading down is made of cement mortar, brick or treated boards, and has wide, steep steps rather than simple rungs.
The most important advantage in building such a cellar is that the pit for it does not need to be made too deep, since the embankment of soil built on top creates everything the necessary conditions. The floors and walls are arranged in the same way as in the first case, but the work of the corridor leading down also complicates the work.
- The first thing they do is, as in the first option, they dig a foundation pit, but not so deep, since the walls will be raised above it.

- Then, on the other side, where it is planned to install the door, steps are cut into the ground leading to the surface. They are subsequently necessarily strengthened by one of the options mentioned above.
- The optimal solution would be to strengthen the steps with reinforcing mesh and pour concrete with a layer of 40 — 60 mm, having previously made enclosing formwork. Steel corners are built into the edges of the steps - they will allow the stairs to last longer. If the steps are securely reinforced, they can serve as a foundation for the walls of the corridor leading upward.

- When the walls are removed, you can move on to installing the ceiling. It can be folded in the form of an arch or have flat surface, running parallel to the direction of the stairs.
- The brick walls of this cellar option rise higher above the pit than in the first option, so much so that the ceiling height is at least two meters.
- After raising the walls to the required height, a ceiling is placed on top. It must be strong enough to support a thick mound of soil. Waterproofing the walls is carried out in the same way as in the first option, but in this case it will also have to be done from above, under the roof.
- There is no need to insulate the ceiling or screed the cellar roof. There are enough floor beams for which flat or regular slate is laid on which and a mound of soil is made.

- The exit to the surface can be designed in different ways, but in any case it should be a brick wall in which the door is installed. Upper and lower door reliably close the room from external cold or summer heat. Doors are usually made of thick boards, which themselves are natural insulation.

Such a cellar is sometimes made not in a dug pit, but by digging downhill. This method is more complicated in the sense that it is not as easy to remove soil from a closed space as from a pit.
When making a cellar in this way, as you go deeper down the walls, you install supports that will hold the vault. At the end of the dug room it is necessary. For it, a hole is drilled from above into which the pipe is installed.
The interior is usually finished with bricks or stones, which are laid along the walls in concrete or clay mortar. Raised walls can turn into an arched ceiling or be covered with massive, impregnated with antiseptic compounds logs, which can be covered with boards on top.
But this method of building a cellar is rarely used today, since it is quite labor-intensive, requires careful calculations and, it must be said, is quite unsafe due to the risk of the vault collapsing during the digging process.
Installation of a finished structure for a cellar
Currently, industrial enterprises produce ready-made housings cellars from different materials, which eliminate the labor-intensive processes of wall construction and waterproofing during their installation. If you purchase such an insulated cellar, then you do not need to do additional thermal insulation for it.
 Very good decision- ready-made barrel cellar
 This structure can be installed on the street or even under the house. The entrance to the cellar is a hermetically sealed hatch, which means that there is no need to build a massive staircase.
For example, a cylindrical body is presented, the side parts of which are made in the form of hemispheres - this is exactly what geometric shape will withstand external dynamic impact well when the soil swells during freezing.
Barrel cellar it is quite compact: its diameter is only 2.2 m, the length of the room inside the case is 3.3 m, and the total volume is 10.40 m³. In fact, it is a small cozy underground room with shelves arranged on the walls and ventilation.

The walls of the barrel are reliably insulated and absolutely sealed. They are multi-layered and consist of polyurethane foam and carbon steel, and the outer shell is made of fiberglass. The surfaces inside the barrel are primed and coated with enamel.
The ventilation system is made according to all the rules, and consists of two pipes - exhaust and supply. They are located on opposite side walls of the barrel and maintain optimal humidity conditions indoors.
The floors, shelf system and stairs are made of well-dried, varnished wood, which creates a favorable atmosphere for storing workpieces, fruits or vegetables.
In addition, inside the cellar there is a lighting system that uses a reduced voltage of 12 V, which is safe for working at depth and in wet conditions.

Installation of the cellar barrel is quite simple. Considering the size of the structure, a pit is dug under it. A reliable base is arranged in it, on which the container is lowered, and then buried with soil. If the cellar is made in street conditions, then it is recommended to build a shed or at least a canopy with a roof over the hatch, which in winter will not allow the entrance to be covered with snow.
The installation of such a cellar is usually carried out by a manufacturing company, whose specialists during this process take into account all the available nuances of the technology, so the owner of the site is tasked with only the simplest work.
Video: installation of a finished insulated cellar
Which of the presented cellars located on the street should be chosen by the owner of the site depends on the available capabilities and characteristics of the territory. Some people prefer to do everything themselves from start to finish in order to be confident in every stage of the work done. Others trust the construction of the cellar to qualified craftsmen who know all the intricacies technological process. Still others opt for ready-made designs, which will cause a minimum of hassle during installation.
Read interesting information on how to do it in our new article.
Construction of a cellar involves not only the construction of walls and ceilings, but also proper ventilation, high-quality waterproofing and interior layout. If you make an entry incorrectly or save on usable area, using the cellar will be inconvenient, and it will be too difficult to remodel. Therefore, before you build a cellar with your own hands, you should think through everything down to the smallest detail.

A standard cellar is a rectangular room with a low ceiling. For entry, a hatch with a movable ladder or concrete steps are installed. The first option is cheaper, but not very convenient, since it is quite difficult to descend into the cellar along the crossbars and even with a load. Concrete or brick steps are much more reliable, and they are not at all difficult to make.

Already at the design stage, you should think about materials for ceilings. The width of the cellar directly depends on this. Some use ready-made concrete slabs as flooring, others pour and reinforce them themselves directly above the cellar, others use multi-layer floors made of timber, layers of waterproofing, boards and insulation.

Basic cellar parameters
- The width of the pit should not exceed 4 m, taking into account the thickness of the masonry walls and the outer layer of waterproofing.
- The length of the cellar depends on the needs of the owner, usually it is 4 m.
- The height of the ceilings should be between 1.8-2 m. With good insulation, there is no need to dig deep; two meters is enough to ensure that the room does not freeze in winter and does not heat up in summer.
To save a little when arranging the stairs, when digging a pit you need to leave a 1 m wide area and remove the earth at a slope, forming steps with a shovel. But this option is only suitable for dense, hard soil, otherwise, under the weight of the brick, the soil will begin to settle and the stairs will collapse.

Another important point– wall cladding. Most often they are made of brick or concrete, pouring mortar between the walls of the pit and the formwork. Both methods are quite within the capabilities of a novice master, the main thing is to think through everything in advance. For brickwork you need brick and mortar; for a monolithic wall, you need to prepare material for formwork and spacers.
Video - Cellar. Theory and drawings

When all the details are thought out, the materials are prepared, you can start working. A layer of turf is removed from the selected area and markings are made using pegs, taking into account the additional space for waterproofing.
During the work you will need:
- bayonet and picking shovel;
- roulette;
- building level;
- crushed stone;
- roofing felt;
- bitumen mastic;
- concrete mortar M 100;
- tamper
Step 1. Digging a pit

According to the markings, they begin to dig a hole. At the location of the future staircase, steps are immediately formed, choosing soil at a slope. The steps should be 1.5 times wider than in the project, because the thickness of the riser is added to the tread. If the staircase to the cellar will be mounted separately, the pit is dug evenly around the entire perimeter. When the depth of the pit reaches 2 meters, the walls and base are leveled, lumps of soil are removed and construction of the base begins.
Step 2. Pouring the base

Fine crushed stone is poured into a 3 cm layer at the bottom of the pit, leveled, and the base is compacted using a tamper. Prepare a solution: take 3 parts sand to 4 parts crushed stone and add 1 part M400 cement. The thickness of the concrete layer must be at least 6 cm.

Step 3: Waterproof the floor
When the concrete dries, mark the walls of the cellar and lay 2 layers of roofing felt on the floor, coating them with bitumen mastic. The edges of the roofing material should extend beyond the perimeter of the marking by 10 cm; strips of material are laid overlapping, shifting the seams of the top layer by several centimeters.
Construction of brick walls

Step 1. Laying the first rows
To lay the walls of a cellar, you do not need to have the skills of a mason. All irregularities and defects in the masonry will be hidden under a layer of plaster. You can take used bricks, as long as they are red fired. White brick and cinder block is not recommended for these purposes.
The first row is laid out according to the markings on a sand-cement mortar. The second row is staggered with ligation of the seams. Excess mortar is immediately removed with a trowel and checked every three rows. building level. A space of about 50 cm wide is left between the masonry and the walls of the pit.


Step 2. Installation of ventilation holes
You can lay out no more than 5 rows at a time, otherwise the solution will not withstand the load and the walls will “float”. It takes 8-10 hours to harden the masonry. In the 3rd or 4th row from the floor, a hole is made between the bricks for the ventilation pipe. The second hole should be left in the opposite corner of the cellar at a height of 1.6-1.7 m from the floor. The dimensions of the ventilation holes depend on the diameter of the pipe; usually these are square niches 25x25 cm.
Step 3. Installation of mortgages for fastening shelves
To attach the shelves, they are built into the masonry. metal corners or profile pipes with thick walls. They must go out outer wall by about 10-15 cm, and with inside match the width of the shelves. The distance between the corners is about 70 cm horizontally and about the same vertically. This method is quite convenient and reliable, and also saves money on the manufacture of individual racks.
Step 4. External waterproofing
When the walls are completely laid out, ventilation pipes are inserted and secured into the holes, brought to the top and temporarily fixed with wire to the top row. The outside walls are coated with liquid bitumen and roofing felt is fixed. It is laid with an overlap of 10 cm, the joints are covered with bitumen and pressed firmly. After this, the space between the walls of the pit and the masonry is filled with clay and compacted every half meter, not reaching the top by about 40 cm.
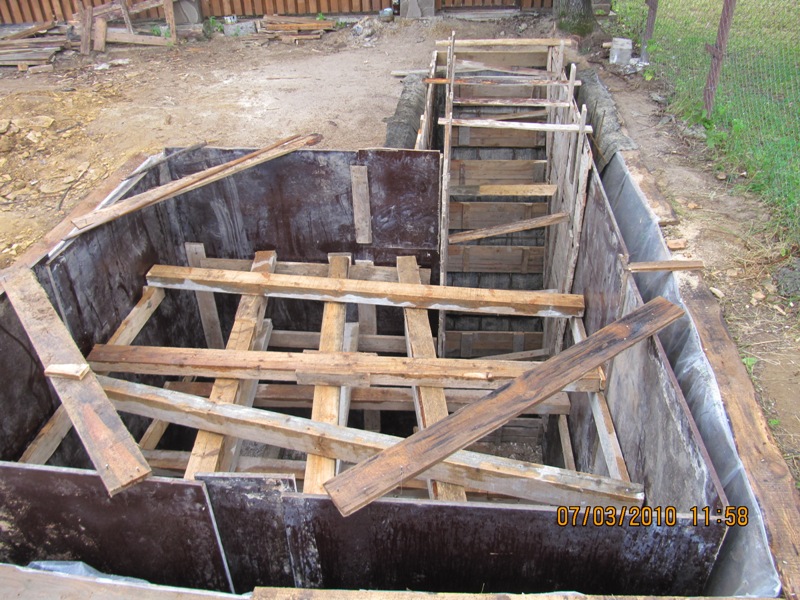
Concrete walls

Metal rods are driven into the walls of the pit along the entire perimeter, leaving 15 cm on the outside. Shields are knocked down from boards, chipboard or plywood to the size of the walls, covered with polyethylene and installed flush against the reinforcement. Strengthen the formwork wooden beam and pour the concrete solution. It is advisable to fill the entire wall at once, then the surface will be the most durable. After a day, the formwork is removed and the wall is allowed to dry thoroughly.
Floor installation
If reinforced concrete slabs are used for floors, the installation method is quite simple. The trench along the perimeter of the cellar is filled with stone, reinforced with a lattice of rods and filled with concrete. The slabs are laid after the concrete has hardened; they must completely cover the pit and foundation around the cellar. The joints between the slabs are sealed with a thick mortar.

If there are no slabs, you can do monolithic ceiling differently, using beams, steel channels, beams or pipes.
Step 1. Laying beams
In the last two rows of masonry, on opposite walls, holes are left for floor beams, the length of which should be 1 m greater than the width of the cellar. Wooden beams with a cross section of 150x150 mm are impregnated with waste machine oil and dry. Then they are wrapped in roofing felt, which is secured with staplers.
Pipes or channels do not need such treatment. The prepared beams are laid on the walls, leaving an opening for the entrance, and then the trench and the edges of the beams are poured with concrete. Protruding edges ventilation pipes cover so that the solution does not get inside.
Step 2. Overlap device
The bottom of the beams is sheathed with boards 25 mm thick, and the top is covered with roofing felt. Expanded clay is poured between the beams or 2-3 layers of mineral wool are laid, covering everything plastic film, then again with roofing felt, coat the joints with mastic. Soil or clay is poured on top.


If the beams are metal, you can attach a chain-link mesh with small cells between them, lay reinforcement and metal scraps on it, and install a removable board made of plywood or chipboard covered with film underneath. The shield is supported by a 100x100 mm beam in several places so that the structure can withstand the weight concrete mortar. They fill everything with concrete and let it sit for several days, then remove the shield, remove the excess mortar that has leaked around the edges, and let the slab stand well.

Video - Building a cellar yourself
Interior work
The next stage is installing the stairs. If a base of soil was left, a brick is laid on top, placing it on the edge vertically and flat on the tread. The side walls are also lined with brick, all gaps and joints are rubbed with mortar. You can replace the brick with a reinforcement frame and pour the steps out of concrete; you can also install a light metal staircase.

Next, the walls, floor and ceiling are tidied up. If the wall masonry is smooth and neat, it is enough to cover the surface with two layers of lime. Uneven masonry is pre-plastered with cement-sand mortar and then treated with lime. Additional coating for walls is not required, although it is possible various options finishing. The ceiling is checked for the absence of cracks and gaps, if necessary, the joints along the walls are sealed and also whitewashed.

The floor is covered with roofing felt cement screed 3-4 cm thick. In some cases, plank floors are installed on top of the screed or covered with linoleum, but this is completely optional. Finally, shelves are attached or racks made of boards treated with an antiseptic are installed. The shelving should accommodate everything you need so that nothing stands on the floor. This will ensure good preservation of vegetables and make cleaning the room easier. Do not block the space in front of you with racks and drawers. ventilation holes, otherwise air exchange will be disrupted and condensation will appear in the cellar.

The door to the cellar is made of durable boards 3 cm thick and is additionally insulated from the inside. In cold regions where frosts reach 30 degrees, it is recommended to install another door at the bottom of the stairs. The top floors must also be carefully insulated with a layer of soil, sawdust, clay and other available materials. Ventilation pipes should be covered with special caps with a protective insect net.


Video - How to build a cellar with your own hands
In our country, suburban housing has, which are usually used for gardens and vegetable gardens. A spacious and dry cellar in the house is necessary to preserve the harvest. An office space for this purpose can be equipped in a garage or shed. It is also possible to build a separate structure. The final decision on the location of the cellar should be made based on the results of a study of the house and land.
For which specialists from design organizations are involved. In order to save money, you can do it yourself and conduct soil research and hydrogeological conditions terrain on your own. A good result is obtained by interviewing neighbors and inspecting their cellars or basements.
When studying site conditions, you should pay attention to the following points:
- soil composition, depth of soil layers, tendency to accumulate moisture and heaving;
- groundwater level and the height of its rise during snow melting or intense precipitation;
- average depth of soil freezing.
This data will be necessary in the process of choosing the most optimal type of cellar for the given conditions and the method of its construction. Specialists use the obtained data in the process of design, calculation and estimate work. The best option for the homeowner is, without a doubt, a cellar under the house with an entrance from interior spaces. It is better to lay such a structure at the construction stage. The option of constructing a buried structure during the reconstruction process is also possible, but it is quite troublesome and time-consuming.
 Small cellar
 Basics of cellar design
A country house with a basement equipped for storing supplies is being built taking into account the requirements of SNiP 31-02-2001 and SNiP 2.08.01-89, as well as RSN 70-88. IN regulatory documents the geometric dimensions of residential and office premises have been determined. When equipping cellars, special attention is paid to the issue of waterproofing the walls and floors of buried storage facilities, as well as the necessary air exchange.
The main task that is solved during the construction of this room is to ensure a relative constant temperature at 8-12 °C with low air humidity.
During the design work it is necessary to provide. In the vast majority of cases, a vertical duct with an external exhaust pipe is sufficient. This method of air exchange does not require complex equipment or any operating costs.
 Cellar ventilation diagram
 A cellar in a private house is designed taking into account overall size building. When making calculations, the following points should be taken into account:
- It is recommended to locate the storage facility near the geometric center of the building at an equal distance from the outer contour of the foundation.
- The depth of the cellar is selected taking into account the groundwater level and the degree of seasonal fluctuations.
- In the process of design activities, such a factor as soil composition must be taken into account.
The central placement of the cellar minimizes the impact of temperature fluctuations due to the cooling of soil masses and their freezing during the onset of cold weather. It is good if the entrance to the service premises is directly from the house - this will significantly reduce heat loss. For the convenience of residents, it is recommended to install a stationary staircase with a flight inclination of no more than 45 ° and a step width of at least 200-250 mm.
 Drawing and diagram of the construction of the simplest cellar under the house
 Cellars are classified, first of all, according to the degree of their deepening, which, in turn, depends on the level of groundwater fluctuations:
- Underground structures are built when water layers are lower than 3-3.5 m or under houses located on a hill.
- A semi-buried cellar is erected when the depth of soil water is no more than 0.8-1.2 m from the surface.
- Above-ground storage facilities are constructed in areas where there is no possibility or use of underground or semi-underground premises due to the high probability of flooding.
Read also
Construction of a bathroom in a private house
The choice of a specific type of cellar should be based on objective data and the results of long-term observations.
 Cellars can be made different designs
 How to make a cellar in your home with your own hands
Preparation for the construction of an underground storage facility under a residential building
At the stage of laying the foundation, it is necessary to mark the pit and dig it. Excavation work is carried out in compliance with rules and safety measures. The total depth of the pit should be about 2.7-3 m, and the diameter should be at least 2.5 m. Round form for a buried structure is optimal and ensures its maximum strength. On the other hand, rounding a wall requires quite high qualifications from the mason.
Another option is to build monolithic walls made of concrete reinforced with steel or composite rods. This technology can ensure maximum resistance of underground structures to external mechanical loads. To make a cellar in a house correctly, you should evaluate your financial capabilities and practical skills in performing construction operations.

The choice of a specific technology for the construction of an underground structure will allow an assessment of the required amount of building materials. For construction load-bearing walls we need red brick. The amount of material is calculated based on minimum thickness the walls, as they say among professional masons, are one and a half bricks long. When choosing a brick, special attention should be paid to its quality.
In this video you can see how to build cellar walls with your own hands from bricks
For underground structures, the use of bricks of heterogeneous composition, having deep cracks or inclusions is unacceptable. Construction material must be stored in proper conditions. Prolonged exposure of bricks to high humidity conditions can lead to a deterioration in its qualities and properties. When purchasing materials, you should ask the seller for certificates of conformity.
The walls of a buried storage facility must be built on reliable foundation. Typically, the role of the base is performed by a reinforced reinforced concrete belt at the bottom of the structure. It is quite possible to build a cellar in a house with your own hands, especially if you strictly follow the construction technology.
Waterproofing floors and walls
Buried structures require high-quality protection from moisture penetration through building construction. The most likely ways for water to enter a cellar or basement are:
- the presence of through gaps;
- violations of technology during bricklaying;
- penetration of moisture through capillaries in an array of building materials;
- the formation of condensation on walls or other surfaces due to temperature changes or insufficient air exchange.
Typically, waterproofing of walls, floors and ceilings is done using roofing felt. This roll material It is recommended to lay in two layers. The overlap of the sheets should be at least 10-12 cm, and each subsequent row should be laid perpendicular to the previous one. Under the waterproofing it is necessary to pour gravel-sand cushion thickness of at least 100-150 mm.
 Scheme of the cellar waterproofing device
 It is possible to correctly build a cellar under a house with high-quality waterproofing of the walls during the process of laying the foundation.
In this case, the work will not be interfered with by other structures and elements of the building. During the construction of walls, bitumen mastic is applied to their outer surface, onto which, in turn, roofing material is glued. When performing this operation, the sheets are arranged vertically with an overlap of 8-10 cm.

The floors in the cellar are poured with mandatory reinforcement with a two-layer steel coarse mesh. The screed is filled with a cement-sand mixture with the addition of a fine fraction of crushed stone as a filler. The mixture is prepared on site by hand or using a concrete mixer. It is possible to order concrete from a specialized enterprise with delivery to the work site by vehicle with the appropriate equipment.
 Scheme correct filling cellar floor
 Overlapping device
As soon as the load-bearing structures of the walls and floor are ready, you can begin to build the ceiling above the cellar. Taking into account the fact that the structure is of a buried type, the best material for overlap there will be reinforced concrete slab. The calculation of the required number is carried out taking into account the length and width of the structure. When laying floor slabs, heavy construction equipment is used - a crane on a vehicle chassis.
Read also
Construction of a terrace on the second floor of a house
 Cellar floor plan
 Another method allows you to do without lifting mechanisms. Building a cellar in a house using this technology involves casting a floor slab directly on site. Wooden formwork for these purposes it is made from boards with a thickness of at least 40-50 mm. It is strengthened by horizontal beams and vertical posts that rest on the floor.

Construction of stairs and entrance equipment
A visit to the cellar located under the house can be organized in two ways: through the hatch in ceiling cellar or normal stairs. Calculation of a straight flight with a step length of 20 cm and a height of 250-300 mm shows that its horizontal length with a slope of 45 ° will be equal to the height. One of the walls is equipped doorway, in front of which a rectangular platform is arranged.
 Simple wooden staircase
 Along the outer surface of this wall is installed flight of stairs, resting on one side on it, and the other on an additional pier. The steps of the stairs can be cast from concrete and reinforced with a mesh of rolled steel or made from a metal profile. The use of wood is undesirable due to the high probability of damage by fungi or other pests.
 Complex drawing concrete stairs leading to the cellar
 A trap with door leaf, opening outward due to the relatively small size of the cellar. Doors must have seals to prevent heat loss and temperature fluctuations. The process of making a staircase and installing it is quite complex.

Ventilation in the basement or cellar
To organize high-quality air exchange, it is necessary to install two vertical pipes. One of them serves as an exhaust hood, and the other is necessary for the flow of fresh air. Air is taken from under the ceiling and supplied closer to the floor. In order to create maximum draft, the duct should be installed above the roof ridge. Natural ventilation of the cellar is made with minimal cost and investment.

The air ducts in the upper part are covered with metal mushrooms to prevent the ingress of precipitation. Steel or asbestos-cement pipes can be used as air ducts internal diameter over 150 mm. Deflectors are made of galvanized steel sheet, 0.55 mm thick, and are fixed to the end of the pipe using a clamp and support posts.
The inside of the cellar must be plastered and treated with a special antibacterial primer. Instead, ordinary slaked lime can be used, which provides the necessary protection against the formation of colonies of pathogenic fungi on the walls. Experts do not recommend covering basement walls with clapboard or wood-based composite materials. In the gap between the wall and the facing panels, air stagnates with the formation of condensation.
To preserve food, it is necessary to ensure the correct thermal conditions and optimal humidity. For most fruits and vegetables, and the cellar is built primarily for storing them, optimal temperature ranges from +5 to +15 degrees. In addition, it is necessary to protect food from rain and provide ventilation, without which the moisture released from it will lead to mold and spoilage of food. A properly built cellar fully satisfies all these requirements - regardless of the temperature outside, it provides a comfortable temperature inside, and natural or forced ventilation protects products from spoilage.
What types of cellars are there?
There are four main types of cellars:
- not buried;
- shallow;
- deeply buried;
- combined;
- basement
A shallow or shallow cellar is also called a storage shed. It is a small hole in the ground, above which there is a wooden roof. Both of these cellars differ only in the depth of the hole - the shallow one is made in a natural depression, and for the shallowly deepened one they dig a hole up to 1.5 meters deep. A deeply buried cellar goes 2–4 meters underground and is essentially an ordinary dugout. It is more effective than the previous two types, but construction requires a suitable site - most often a small hillock. The combined cellar combines the best features of all the models described above.

It is built in a natural depression, making the walls as strong as possible, and then covered with earth to turn it into a hill. To do this, you will have to use imported soil, but this approach seriously reduces construction costs, because the cost of delivering soil cannot be compared with full-scale excavation work. This type of cellar is especially effective on rocky soil, where the cost of excavation work is many times more expensive than on other soils. A basement cellar is the most effective and does not take up free space on the site, but it is the most demanding on soil and labor-intensive to manufacture.
Where can you build a cellar?
Despite the fact that theoretically a cellar can be built on any soil, there are a number of requirements, the fulfillment of which greatly facilitates construction. First of all, this is the absence of high groundwater at the construction site. After all, the higher the groundwater, the higher the requirements for the foundation and waterproofing of the cellar. You can determine the groundwater level either by contacting a construction or design organization working in your area or by conducting test drilling. In addition, you can use the traditional method, for example, checking with an egg, a woolen rag and a glass.

For such a check, at the site of the future cellar, make a flat area slightly larger than a glass, place a piece of woolen cloth on it, then an egg and cover it with a glass. This procedure should be done at lunchtime or in the evening on a clear sunny day. If by morning the glass, egg and rag are dry, then there is no high groundwater in this area and you can make a cellar of any depth. If only a rag or just an egg is damp, then the groundwater level is from three to five meters. A damp rag and an egg indicate that the water is less than three meters away, and if even inner surface glasses, drops of dew appeared, then groundwater directly below the surface of the earth.
Secondly, these are the mechanical properties of the soil. The worst conditions for building a cellar are rocky soil and the so-called quicksand, that is, muddy soil. The first is due to the fact that it is very difficult to dig, and the second due to its strong mobility when wet. If you don’t have to choose and only an area with rocky soil or quicksand is available for building a cellar, then you will have to either hire special equipment, or build a shallow storage shed. To compensate for the mobility of quicksand, a hole under the cellar is dug noticeably larger than necessary, then a concrete, wooden or stone box is placed, after which the space between the box and the wall of the pit is filled with a mixture of clay and sand.
It is possible to build a cellar on land with a high groundwater level, but this will require the creation of a concrete box and very serious, and therefore costly, waterproofing. If you don't know what kind of soil is on your site, contact any construction or design company that builds houses in your area. When choosing a location on the site, keep in mind that a small hollow or hole is better suited for a storage shed, and a hill is better suited for a deeply buried cellar.
Preparing for the construction of a cellar
As we have already said, you need to start by determining the composition and properties of the soil, as well as the groundwater level. This can be done using “folk” methods, but it is much safer to contact those who build houses in your area for advice. After this, you need to decide what type of cellar you will build. The next step is to create a project that you can create yourself. During the design, you will determine the size and shape of the future cellar, its depth, measures to strengthen the soil and the amount of materials.

It is at the design stage that it will become clear whether you can dig a hole yourself required sizes and forms, or you will have to contact professional builders. It will also be necessary to determine a place to store building materials and protect them from rain. In addition, you will need to find a place for storing soil, located next to the pit, but not interfering with other work. If you start construction without preparing a project, then there is a very high probability that you will not take something into account and this will lead to various troubles. For example, you can put the soil in the most convenient place for storing building materials, which is why you will have to carry the latter much further.
Groundwork and waterproofing
Excavation work means not only digging a pit, but also creating a sand and crushed stone cushion, as well as a waterproofing layer. On dry ground, it is enough to lay a layer of crushed stone 20–30 cm thick and sand cushion 10–20 cm thick to prevent humidity from increasing in the garage during heavy rains. A drainage layer of this thickness will ensure rapid absorption of moisture by the soil, so a wooden or concrete floor can be laid on top of it. However, in land with high groundwater levels, these measures are not enough. In such conditions, it is necessary to make not only a drainage layer, but also a waterproofing layer. The latter can be made from roofing felt or silicate concrete. If you use roofing felt, then be sure to pour a reinforced concrete pad 10–15 cm thick on top of it.

If you do not use roofing felt, then you need to fill the concrete cushion with the addition of liquid glass(silicate concrete). The thickness of such a pillow is 10–15 cm. Steel, fiberglass or carbon fiber reinforcement is used to reinforce both pillows. The main problem that arises for everyone who works with liquid glass is the rapid setting of the solution, because the greater the concentration of liquid glass, the shorter the setting time. At a concentration of 10% (optimal for creating a waterproofing layer), the setting time does not exceed 15 minutes, so the solution must be prepared either in a large concrete mixer and immediately poured onto the drainage layer or poured concrete in parts.
Walls
In dry soils, walls can be made from brick, various blocks, including the entire FS series or treated protective compounds wood, covering them on the outside with thick cellophane or polyethylene film to protect them from rainwater. In an area with a high or even average groundwater level, the walls of the cellar must be made of reinforced concrete. As waterproofing, 1–2% liquid glass is added to concrete, then coated on the outside with a cement-silicate mortar, for which the following is mixed:
- 2 parts cement;
- 6 parts sand;
- 1 part water;
- 1 part liquid glass.

The lifetime of such a solution is 10–15 minutes, so it is prepared in small portions and applied in a layer 0.5–1 cm thick. The same solution can be used instead of a film, because its waterproofing properties are much higher. After concrete or Brick wall will gain maximum strength (25–28 days), or after 3–5 days for a wooden wall covered with a cement-silicate mixture, you can begin backfilling.
Roof and ventilation
The only requirements for the roofs of deeply buried and combined cellars are strength and good waterproofing. After all, a hill is poured over the roof of the cellar, which not only ensures the correct temperature conditions, but also holds a large amount of earth. Therefore, rafters are most often made from debarked logs 15–20 cm thick, and the flooring itself is made from logs 5–10 cm thick, but sawn boards can also be used. All logs are pre-treated with antiseptics, which we described in the article on how to choose an antiseptic. For shallow or non-buried cellars (storages), I most often use a pitched or gable roof with slate, shingles or metal profile flooring.

Typically, ventilation for a cellar consists of two pipes, one of which rises 1.5–2 meters above the other. Moreover, the greater the height difference, the more efficient ventilation. If it is not possible to install a high pipe, then an exhaust fan is built into one of them. This scheme is preferable, because it allows you to periodically change the direction of air movement in the cellar, which improves its microclimate. Both outlet pipes are equipped with either fungi or an inverted U-shaped elbow, which protects the cellar from water ingress during rain. Inside the cellar, the pipes should be located at different heights, one under the ceiling, the other under the floor. With natural ventilation, the exhaust pipe should be at the top.
Basement cellar
To create a basement cellar, you will have to dig out the soil from under an existing building, so you need to consult an experienced engineer or builder. After all, without inspecting the foundation and checking its condition, as well as without analyzing the soil, it is impossible to determine the permissible dimensions of the cellar, and also to choose The best way waterproofing.
Staircase and interior decoration

After completing the construction of the cellar box and filling it with earth, it is time for interior decoration. A cellar is a place for storing fruits, vegetables and other products, so it should have:
- convenient shelves;
- safe and comfortable staircase;
- good lighting.
The stairs and shelves can be made from any materials, such as boards or metal. The main requirement is strength and safety. Often the cellar is decorated with interior decoration, including brick, which gives the interior of the room new features. Also, any cellar needs lighting, so wiring is laid in it, a lamp and a switch are installed. After all activities related to construction and finishing are completed, the cellar is loaded with products and used all year round.
Conclusion
Now you know what a cellar can be, how these or those types of buildings differ, and how to build it with your own hands. This will help you build a place to store food yourself, so that the harvest from your garden, or vegetables and fruits from the store will not be lost, but will remain intact for several months.


