Of course, it is better to build correctly right away than to redo it later. Well, if you do do any modifications, then do it thoughtfully so as not to turn the reconstruction into an endless process.
We first evaluate any structure by its appearance. And as often happens (this is especially true for country houses old building): the structure seems to be of good quality, but it looks unsightly. So what - break everything down and build again? Or should I try something less expensive? For example, apply techniques that allow you to create the optical effect of changing the size of an object in width and height, combining this with cosmetic finishing of the facade and minor design modifications ( rice. 1).
Rice. 1. A small modification to the house allows you to change the perception of the size of the object in width and height.
This can be done by different orientations of the architectural elements of the building in the vertical and horizontal directions. Let’s say we need to “stretch” the roof in width, and “raise” the frame upward. To do this, we will “extend” the existing window in both directions (at the same time it will be lighter in the attic) and install a gable ebb (the protection of the facade from rain will improve). You can install a ridge ebb, which is also structurally justified. An attic window will improve the ventilation conditions of the attic and, to some extent, its lighting.
Thus, all these decorative innovations not only improve the appearance of the building, but also prove useful in functionally. On the contrary, the main facade of the log house should be made visually higher. The simplest solution is not to trim the corners with boards, but to paint them in lighter colors. The actual height of the log house can also be disguised by planting trees and shrubs, as well as installing a fence of appropriate height.
There are many ways to influence the appearance of a building in the arsenal of designers and architects. You need to select the most effective and simple ones.
However, our the main task- to reduce construction errors to a minimum. Can this be achieved? Even if we have a whole statistical “bank” of errors, we will not be able to use this information effectively without integrated approach. It is necessary to systematize errors, and on the basis of this, develop rules that should be followed during the construction process. In other words, it is necessary to regulate the requirements for each part of the building under construction. Following them will prevent serious mistakes and help you look “in the right place.” A list of such requirements can be formed not only based on building codes, but also on the basis of survey results, considerations common sense, taking into account the materials and tools used.
However, requirements are only half the battle. Another critical component of success is the control system. After all, country houses are often built by non-professional builders. It is for them that they need a systematic approach that will allow them to build with high quality, quickly and without extra costs.
An example would be the construction of a country house from timber - the most common and relatively inexpensive material.
Foundation
The construction of any house begins with the foundation. The most common are shallow strip reinforced concrete foundations. They are simple and technologically advanced to manufacture, reliable, well protect the underground from cold, snow and wind, and are quite versatile for almost any type of soil.
In cross section, the foundation consists of underground and aboveground parts which are poured with concrete separately. For example, when building on clay soils (in the Moscow region their area is about 70%), concrete for the base of the foundation is poured directly into a trench dug in the ground, and then the formwork panels are installed and the base is poured.
The arrangement of the foundation begins with its marking. Many developers at this stage “fence the garden”, believing that they cannot do without cast-offs. Of course, cast-offs are necessary when constructing large construction projects. However, when we are talking about a rectangle with dimensions of 6x9 m, shouldn't we mark it in a simpler way? And horizontal marks can be easily obtained using a hydraulic level without a level: after all, the area is insignificant. Casting means extra labor costs, additional costs of lumber, and subsequently - inconvenience and interference during the installation of formwork panels, as well as difficulties in maneuvering concrete trucks.

Rice. 2. Marking the foundation
Let's consider the simplest technology for marking a strip foundation (Fig. 2). First, the basic position of the main angle is determined in the right place - in relation to the road, terrain, plan, etc. A peg is driven in at this place.
Then, using a triangle, a right angle is set from this point. Now, having the given dimensions of the sides of the foundation, it is not difficult to determine the position of all the corners. The accuracy of the work is checked by comparing the diagonals of the rectangle.
Pegs are driven in at the marked points. Then, according to the given width of the foundation strip, an internal rectangle is built and the pegs are driven in again. The position of the foundation for the veranda is also determined. Pegs are also driven in here. Thus, having driven in only 12 pegs, the work of marking the foundation can be considered completed.
After installing the pegs, an incision is made and the turf is removed along the contour of the foundation. To do this, take a board with a cross-section of 50x150 mm, first apply it to the outer pegs and, moving along the board, cut the turf with a shovel. Then the board is placed against the inner pegs and the turf is cut again.
They act similarly along the entire contour of the future building. All that remains is to remove the trimmed turf, after which the laying out of the foundation can be considered completely completed.
Such simplified markings make it possible to obtain the outline of the trench without precise millimeter measurements, the need for which may arise at subsequent stages of construction. After this, the excavation of the trench begins.
Some critics of strip foundations consider their large volume to be their main disadvantage earthworks. However, this is not quite true. My colleagues and I have never used an excavator to remove soil. This is expensive, and the trench turns out to be extremely sloppy, which requires subsequent manual modification. In addition, the consumption of concrete increases. But for a house with dimensions of 6x9 m, we only need to select about 9 m3 of soil. A team of four people will do this (including markings and smoke breaks) in just half a day. I dare say that drilling two or three dozen holes in the clay for columnar foundation, and even with broadening - much more difficult. When removing soil from a trench for a strip foundation, vertical markings are simultaneously made: the depth of the trench and the height of the panels are determined. Measurements are made using stakes and a hydraulic level (Fig. 3).

Rice. 3. Vertical marking of the trench
They fill the bottom of the dug trench with sand cushion layers of 10-15 cm and compacted. Then the reinforcement is installed and concrete pouring begins.
There is no point in preparing concrete yourself. The concrete truck will bring it and pour it into the trench ready mixture. However, it will be necessary to make room for equipment to approach the trench in at least 2-3 places. If you pour it at one point, then the concrete will have to be pushed far with shovels, and the coarse aggregate (crushed stone) will settle in one place. Only the liquid part of the solution will reach remote parts of the trench.
After pouring concrete into the trench, you can start preparing reinforcement and making formwork panels. In the meantime, while the base concrete has not yet hardened, you need to insert pins into it every 1-1.5 m to connect the base of the foundation with the base. Reinforcing bars ø14-16 mm and 50 cm long are buried 30 cm into the concrete of the base.
In order for the foundation to work reliably, it must meet the following requirements:
- the foundation strip must have sufficient strength and stability;
- the foundation must provide the necessary underground ventilation;
- the surface of the base bed must be straight and located strictly in a horizontal plane;
- the walls and corners of the plinth must be strictly vertical;
The surface of the walls should not have peeling, chips, empty spaces, sinkholes, or open areas with reinforcement;
- the height of the base must be at least 50 cm.
All further actions should be aimed at meeting these requirements, and only then the list of errors when laying the foundation can be reduced or eliminated altogether.
To fill the base, you need to make and install shields. In the case under consideration, 42 m2 of external formwork panels and 30 m2 of internal panels will be required. External panels are subject to more stringent requirements, since they form the front part of the foundation. For them, it is advisable to use boards with a section of 50×150 mm, which were purchased for rafters. After dismantling the formwork panels, they are used for their intended purpose.
It makes sense to make internal panels (as experience suggests) from boards with a cross-section of 25×150 mm, which were purchased for sheathing. However, to ensure the strength of the formwork, they need to be knocked down in 2 layers.


Rice. 4. Manufacturing of formwork panels
In addition to the economical production of formwork panels, it is advisable to use a simplified scheme for installing and fastening formwork panels, which my colleagues and I have been using for quite a long time. Its essence is as follows. First, the outer panels are assembled (4 boards per panel). To have fewer gaps between the boards, you can use a simple method of joining the boards together using shovels (Fig. 4). Shield ties made of bars with a cross-section of 50×50 mm and a length of 80 cm are laid out on the ground. Boards with a cross-section of 50×150 mm are laid on them. The result is a shield 60 cm wide, which allows you to get a plinth of the desired height. The boards are pressed together with shovels and nailed to the ties. The boards are not nailed together at the ends of the shields. Locks will be placed there, which are nailed into place when installing the shields. The ends of the ties protruding at the top are used to place twisted wires.
Internal contour panels are made in the same way, but they are assembled from boards with a cross-section of 25×150 mm in two rows with a slight offset. Here, for assembly, instead of nails, it is advisable to use self-tapping screws. Before installation, finished panels are wrapped in roofing felt, since glassine and film tear when pouring concrete, forming unnecessary patterns on the surface of the concrete.
The main thing when assembling formwork- ensure its stable position at the time of pouring concrete. Insecurely fastened panels at the time of pouring can cause a lot of trouble. To prevent them from tipping over, various braces, stakes and stops are often used. As a result, material is wasted, work takes a lot of time, and the reliability of formwork installation leaves much to be desired. The most important thing is that the fastening elements take up a lot of space on both sides of the base, which interferes with work and complicates the movement of concrete trucks.
There is an alternative to such an irrational method of attaching formwork. To install and fasten the panels, reinforcing pins are used, which are inserted into the base of the foundation along its central axis. The formwork panels are secured to the pins with wire ties. As a result, the panels will be securely tied to the base of the foundation and firmly attached to it without external structures interfering with the work. The pins are installed at the corners of the foundation at the junction with the lintels, and in the spaces between them they are placed in increments of 1.0-1.5 m.
Let's look at the technology for installing panels with reinforcing pins in more detail.(Fig. 5). First install inner circuit shields It is placed taking into account the width of the base. Since the base of the foundation is slightly wider than the base (40 cm versus 25-30 cm), there is some space for arranging the panels. The panels are connected at the corners using locks and temporarily secured with scraps of lumber. Correct installation is checked by comparing the diagonals. The temporarily fastened inner formwork box serves as the basis for installing the outer contour.

Rice. 5 Formwork installation diagram
Then they act in this order. Spacers are placed on each pin, the position of the pins is marked on them (since you cannot place them exactly in the center), nails are hammered into the spacers according to the marks and they are bent around the pins. After this, wire is wound around the pins.
External shields are placed close to the spacers, and the ends of the wire are wound around the fastening nails (they are not bent yet). Both walls of the formwork are temporarily fixed, and 2-4 reinforcement rods ø12-16 mm are placed on the spacers.
The most important point is the formation of products. These structural elements determine the ventilation conditions for the underground. They are often formed using scraps of asbestos-cement pipes or wooden boxes are knocked together. The disadvantage of these methods is that with a slight deviation of the shield, a gap is formed between it and the liner, where it immediately flows concrete mixture. As a result, work often goes down the drain.
We do things differently in our practice. We take a piece of timber with a cross-section of 150×150 mm or a piece of round timber ø130…150 mm, wrap it in 2-3 layers of roofing material and insert it between the panels. To make it easier to push out the insert and allow water to drain from the vent to the outside, we make the inner part of the insert smaller in cross-section. I note that in the future these plugs can be used to protect air vents in the winter.
To improve ventilation conditions, vents on opposite walls of the base must be placed co-ordinated. And to ensure that rodents are not interested in your underground, it is advisable to place a mesh with bent edges between the liner and the internal shield. After pouring the concrete, the underground will be reliably protected.
After installing the liners between the panels, the upper spacers should be inserted and secured with nails, which (together with the lower ones) determine the width of the base. The rods of the upper reinforcement belt of the plinth are also placed on these bars, which are secured with nails against lateral displacement at the time of concrete pouring. All that remains is to bend upward the nails with the wire wound on them, and the panels will be securely pulled to the reinforcing pins.
Vertical reinforcement elements may not be installed given the dimensions of the structure and the loading conditions of the foundation.
Now you need to set the height of pouring concrete into the form. To do this, set the filling height at the lowest point of the base. From this point, using a hydraulic level, other points are “beat off” along the entire contour of the foundation. Then nails are driven through the shields every 1.0-1.5 m, along the protruding ends of which the top of the base is rubbed.
After marking the concrete pouring level and installing the top twists, you should check everything thoroughly again (compare the diagonals, make sure the panels are installed vertically).
For rigidity, the inner and outer contours of the shields near the corners need to be tightened with overlays (Fig. 6). And if there are cracks at the bottom of the shields, they should be filled with sand.

Rice. 6. Formwork box
Unfortunately, not all concrete trucks unload concrete with pumps. Therefore, you should be well prepared for receiving concrete - clear the entrances and mixer stops for unloading. It may be necessary to make receiving trays. You can also make your own concrete.
Concrete must be poured in layers, carefully monitoring the position of the boards. Compaction of concrete is done with the help of vibrators, but you can do without them. Good results are also obtained by simply tapping the shields with the butt of an ax - then the surface of the base will be free of holes and flaws. But in the corners, to prevent the formation of chipped formations, the mass of concrete must be pierced with a piece of reinforcement (Fig. 7).

Rice. 7. Compacting concrete in corners
I note that with the traditional (using stakes and spacers) system of installing panels at the time of pouring concrete, troubles often arise. For example, the top or bottom of the shield may be partially deflected. This process can be stopped with various supports, but after the concrete hardens, swellings (“belly”) may form in this place, which will spoil the appearance of the foundation. It's even worse when the concrete ends up on the ground.
If a deviation of the shield is detected, the supply of concrete should be immediately stopped and the solution should be thrown away from the emergency area with shovels. At this time, other craftsmen hammer in the stakes. Then a brace is inserted, one end is rested against the peg, and the other, together with the wedge, is brought under the shield (Fig. 8). The bottom of the shield is also fixed with an emphasis on the stake. After this, carefully tapping the wedge, raise the shield slightly. This operation is repeated several times until the formwork is completely restored.

Rice. 8. Straightening the formwork
If the bottom of the shield has come off, then they also drive a stake into the ground and install a spacer between it and the shield. After this, using the butt of an ax or a sledgehammer, the spacer is gradually driven into place and the “belly” is eliminated.
Concrete is a plastic material, and it is precisely this property that is used to restore formwork. However, this property of concrete must be taken into account. When the solution vibrates, significant expansion forces arise, and the mixer feeds concrete intensively. In this regard, I would like to draw the attention of readers to typical mistake when attaching shields, when the twisted wire is hooked to the boards, and not to the cross-bars (Fig. 9). As a result, the boards move away from the bars and the shield deviates from the vertical.

Rice. 9. Shields cannot be mounted this way
When installing formwork using the method proposed above, some difficulties may arise. For example, when the pins and crossbar ties of the shields do not match (see Fig. 5). And this is natural, since it can be difficult to combine them. If the difference is large, then it is better to install additional ties. This means that you need to have a supply of the necessary material on hand, just in case.
The poured concrete is protected from cracking with sawdust, roofing felt or film and moistened with water. After the concrete has hardened, dismantling the formwork begins. There are different opinions on this issue. Some people think that this should be done after 2 weeks, others are convinced that the form cannot be disassembled until the concrete has gained full strength.
In my opinion, there is no need for a long curing period for concrete. It can be very difficult to tear off the boards (many of them split), and minor irregularities You can’t fix it; you can disassemble the formwork already on the third day. By this time, the concrete will have already gained 25% strength, and some irregularities will not be difficult to remove mechanically. At this time it is also convenient to repair various chips and sinks.
The finished foundation (Fig. 10) should be carefully inspected and the horizontality of the upper cut (viewpoint /) and the flatness of the plinth walls (viewpoint II) should be checked. If an instrumental control method is necessary, a tape measure, hydraulic level, plumb line, etc. are used.

Rice. 10. Foundation control
Preparation for installation of timber frame
Any construction project as a whole and each of its parts separately (foundation, walls, floors, roof) can be characterized using concepts such as verticality, perpendicularity, parallelism, flatness and straightness.
Most of these parameters are regulated building codes and rules. Unfortunately, amateur developers are not always guided by them, and sometimes are not even aware of the existence of relevant standards. However, this does not reduce the importance of the design requirements that are enshrined in these regulatory documents. Even for the reader uninitiated in the intricacies of construction, it is obvious what, for example, non-parallel walls or their different heights can lead to. Today we will talk about walls.
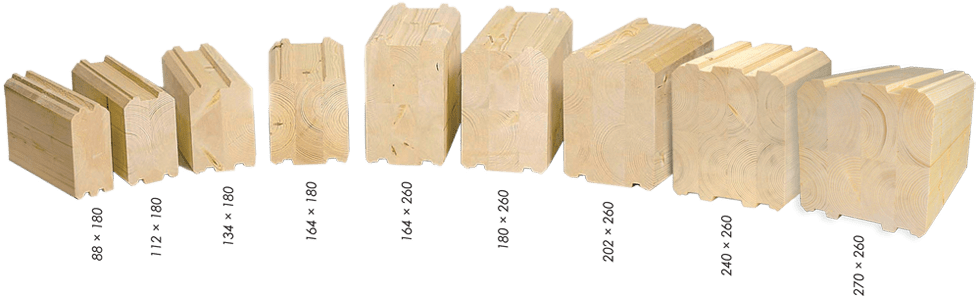
Natural moisture timber
Most often, country houses are built from timber natural humidity. This material, which is much cheaper than profiled or laminated veneer lumber, allows you to build a warm and reliable house.
However, without knowledge of the basic rules for working with natural moisture timber, success in construction cannot be achieved.
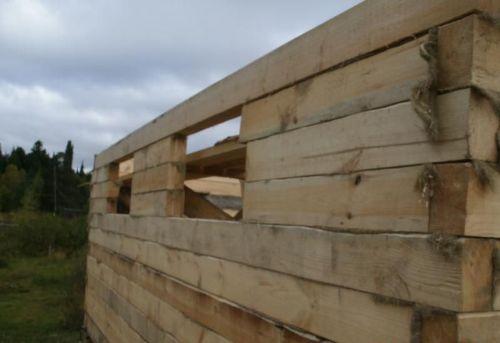
The purchased timber should not be dried. It is necessary to build walls from it as quickly as possible, since when drying the material is greatly deformed: it bends, takes on a rhombic shape, or even worse - it is twisted by a “propeller”.
Some developers prefer to plan the timber, believing that this will allow them to avoid sheathing the walls later. Others believe that it is necessary to sheathe and insulate walls only on one side and plan only one edge of the timber. In my opinion, it is still better to sheathe the walls on both sides. In this case, there is no need to plan the timber and chamfer its edges.
However, if you decide to plan the timber, consider the following. The edge of a beam with a cross-section of 150×150 mm can be planed in 2 passes, since the working width of planes is limited. To ensure that there are no steps on the planed surface, the plane is first planed along the beam, and the second pass is made, holding the tool at an angle a = 25°-45° to the longitudinal axis ( rice, 11).

Rice. 11. Planing the edges of the timber. To ensure that there are no steps on the planed surface, the planer is first used to plan along the beam, and the second pass is made at an angle to the longitudinal axis.
The beams laid in the walls dry out. As a result, deep cracks are formed into which water gets in, which does not bode well for the structure. The most important thing is that as the beams dry out, they decrease in size. This property of wood must be seriously taken into account when constructing timber houses- shrinkage reaches 3-10% of the wall height.
Wall requirements. Walls are a fundamental part of the structure, which determines the living conditions in the house and its architectural appearance as a whole. In accordance with this, the following basic requirements can be presented to the walls.
1. The main overall dimensions of the walls must have an optimal ratio.
2. The walls must be straight, and the joints between them (corners) must be strictly vertical.
3. Opposite walls must have the same dimensions throughout their entire height.
4. The plane of the upper frame of the building must be strictly horizontal.
Of course, this is far from full list requirements for walls in general and timber frames in particular. However, in amateur construction, monitoring only these parameters gives good results.
Bottom trim and overlap
The lower trim should be reliably waterproofed from the foundation. Ruberoid is not the best choice for this. Over time it dries out bitumen impregnation evaporates and the wood is practically defenseless. The following method of waterproofing is more reliable. The surface of the base is coated with bitumen mastic, and a layer of waterproofing is laid on it, which, thanks to the coating, is connected to concrete base no gaps. The beams of the lower trim are laid on this bedding, which are pre-treated with protective compounds ( rice. 12).

Rice. 12. Installation of the bottom trim and ceiling
Biosecurity wooden structures - the most important construction operation. And here everything needs to be done right away to ensure the durability of the building. It is no secret that any antiseptics evaporate after a few years. Getting to the structural elements in order to reprocess them is difficult, if not impossible. In this regard, it is advisable to first saturate the material with an adhesive agent, and to prevent it from evaporating, cover the outside of the beam with bitumen mastic. The antiseptic penetrates deep into the wood, and the mastic protects it from evaporation. Floor beams are processed similarly.
After checking the diagonals, the laid lower trim is connected with staples ( see Fig. 12, Node B), and the position of the assembled structure is marked on the waterproofing of the base. This is necessary to control the position of the frame on the foundation. For reliability, the harness can be attached to the base with crutches or long nails through plugs. There must be at least two such fastenings on one side. After installing the lower trim, the ceiling is installed. In construction practice, the following two structural schemes are most often used, one of which is the “beam-clag” scheme. In this option, beams are first laid, and logs are installed across them. The latter are placed more often than beams. Placed on edge, boards together with beams form a rigid structure capable of bearing specified loads. It is advisable to use this scheme if thin tongue-and-groove boards are intended to be used for the floor. With the “beams + joists” scheme, it is easier to solve issues of effective floor insulation, however, the consumption of lumber with this flooring option increases.
It should be noted that in dacha construction much more often they use a floor plan consisting only of beams, on which floor boards are laid. In this case, beams with a cross section of 100×200 mm are used as beams. In combination with cranial bars, such beams have sufficient bearing capacity and, no less important, due to their height they also allow you to effectively insulate the floor. When using thick floorboards, such beams can be spaced in increments of up to 1 m.
The beams should be laid so that between their ends and the frame there is ventilation gap(2 cm). This is done using gaskets, which are removed after fastening with staples (see Fig. 12, node B). The ends of the beams must be carefully treated with an antiseptic.
The technology for installing beams is simple. First, the outer beams are mounted and aligned in a horizontal plane. After this, a board is placed on edge between them and intermediate beams are installed on it. The work is usually monitored visually, and if necessary, a level is used. Technological flooring is laid on the beams.
Labour Organization
You need to prepare for assembling the box, since both the quality of construction and its pace depend on the organization of work. To ensure the work progresses, the beams are laid out in a stack at a distance of 5 m from the building on one or, better yet, both sides (Fig. 13). Inch boards are laid between the rows of beams. To do this, it is advisable to use material intended for subfloors.

Rice. 13. Organization of the workplace
Between the stack and the log house, work stations are equipped for marking the beams and cutting them. You can do it like this. On required height(depending on the height of the worker) insert between the rows of beams support boards. The timber is carefully laid on them and marked using a template. Then the workpiece is transferred to the cutting site, the necessary operations are performed, after which, using a rope, the workpiece is lifted along the slopes onto the walls and laid.
To facilitate the ascent to the slopes, it is advisable to nail wedge-shaped stops. They will prevent the beam from sliding down uncontrollably, which can pose a serious danger to workers on the construction site. In addition to safety, the stops allow you to get by with little force. Even one person can lift the load if necessary, securing it with stops at intermediate points.
Marking the bars
This stage of work is very important, since the quality of further construction depends on the correct marking. Traditionally, marking is done using a tape measure. Overall dimensions are taken directly from the walls, and then grooves, tenons and other profiles are marked on the ground using a square.
For example, in the case under consideration, each crown consists of 7 beams from 3 to 6 m long. To assemble the box, hundreds of measurements must be taken. You can make your work easier and increase its accuracy if you use templates instead of measurements. Marking in this case is reduced to simply tracing the contours of the templates with a marker, which allows not only to reduce labor costs, but also to minimize measurement errors. When using templates, the blanks have identical dimensions, which ultimately makes it possible to achieve high-quality assembly of the timber box.
Note that if you use traditional templates (one for two mirror-positioned blanks), then for the construction of walls you will need 7 marking devices, which will inevitably clutter working space(Fig. 14). This may be why many builders don’t like templates, despite the obvious advantages of using them. This means that you need to make sure that there are not too many marking devices.

Rice. 14. Schemes for cutting beams: 1.1′ - main beam of the longitudinal wall (right and left); 2.2′ - additional beams of the longitudinal wall (right and left extensions); 3 - marking holes; 4 - marks on the edges; 5 - parts of the workpiece to be removed; 6 - transverse wall template; 7 - partition beam; 8 - transverse wall beam; 9 - marking holes.

Rice. 5. Scheme for developing templates for longitudinal walls: 1 - main beam; 2 - additional beam; 3 1 partition; 4 - corner grooves; 5 - groove for the partition beam; 6 - longitudinal wall template; 7 - extras; a,d - cuts on the edges; b, c - marking holes.
Let's look at the principles of template development (Fig. 15). So, let’s say we have to assemble a lumber box with dimensions of 6x9 m. If we have standard lumber (6 m), this can be done, at first glance, without unnecessary waste. However, it is not. It is possible to assemble a crown 9 m long without loss of lumber only if you join pieces 6 m long and 3 m long end-to-end (this masonry is often called “brick”). However, this connection is a gross construction mistake, since such a joint turns into a “cold bridge”.
The correct connection of “half-tree” beams with an overlap of 15...20 cm. But then the total length of the spliced parts will not be 9 m, but 8.8 m. The joints are arranged in a checkerboard pattern, which should be taken into account when developing template profiles.
The internal wall (partition) should be positioned with some offset from the joint to the right or left. Thus, on one crown, long beams are laid on the left, and extensions on the right. On the next crown, installation begins in a similar order, but on the right.
Having decided exact dimensions parts included in each crown, you can begin to detail the contours of the templates for the right and left versions.
Templates can be made from edged “inch” boards prepared for lathing. The surfaces of the boards should be pre-planed.
To mark the extensions, you can not make separate templates, but place them on the main templates by making 4 small cuts (“a” and “d”) on their edges and drilling two holes (“b” and “c”). Thanks to the through holes, the template becomes technologically “transparent” while actually being “opaque.” Thus, a typical technical contradiction can be resolved quite simply.
After marking the template, the shaded parts are cut out. The marking devices are ready.
As a result, we manage to reduce the number of templates from 7 to 3 (2 for longitudinal walls and 1 for transverse walls). Two longitudinal templates (right and left) provide the ability to obtain blanks for longitudinal walls, and one transverse template allows you to prepare parts for transverse walls and partitions.
Moreover, only a partition installed asymmetrically forces you to make 2 longitudinal templates. With a symmetrical installation, one marking device would be enough.
When developing templates, it should be taken into account that on a construction site, marking devices can be rotated 180° relative to the longitudinal axis, and also moved along the longitudinal axis. It is strictly not recommended to rotate a long template 180° around the vertical axis, since it will be almost impossible to do this during work. Now let's look at how templates are used. To mark the first beam of the crown (for example, starting from the left), the left template is laid on the beam and the end of the template on the left is outlined with a marker, then two grooves and, finally, a recess for the “half-tree” connection. The marked timber is transferred to the cutting site, where unnecessary fragments (it is better to shade them when marking) are cut out with a chain saw.
The same is done with the second beam. On the longitudinal wall to each full beam we need to make a “dobor”. To do this, place a template on the beam (position I in Fig. 14) and trace it. The sample for the “half-tree” connection at the end of the workpiece is marked with an awl, pricking the beam at points “c” and “b” (see Fig. 14, node A).
Then the template is shifted (position II in Fig. 14) and the contour is traced again. The timber with two marked additional parts is placed on pads in the cutting area. After cutting out the shaded areas, extensions are obtained for both longitudinal walls. Arrows in Fig. Figure 14 shows manipulations with the installation of additional parts in the walls.
Since the joints of the beams are staggered, the markings of the crown located above begin right side. Here the elements of the corner locks are already changing: if there was a groove on the longitudinal beam, and a tenon on the transverse beam, now everything should be the other way around.
However, how to mark parts with spikes? Should I make separate templates for them or make do with the marking devices that I already have? It is quite obvious that the tenon and groove are elements of the same unit, and therefore must correspond to each other in size and location, which means that a template with grooves can be used to construct tenon profiles on timber blanks. In Fig. 14 (node B] shows a template for a transverse wall with a groove and parts with a tenon obtained using it. Moreover, to make the partition, holes are drilled in the template, which set the width of its tenon.
As for the size of the tenon, in no case should the tenon be allowed to fit tightly into the groove. The thorn will subsequently dry out, and as a result a channel will form, which will certainly turn into a “cold bridge.” Therefore, if the dimensions of the groove are 5x5 cm, then the tenon should have dimensions of 4.5x4.5 cm. The gap is filled with insulation.
Until now, speaking about marking, we assumed that the template profile was transferred to the upper edge of the beam. Various grooves and tenons are sawed from the side. This means that the horizontal markings need to be transferred to the vertical edge of the beam. This is done using squares. Accurate cuts are made using these markings.
Practical construction experience shows that keeping in mind the sequence of marking elements corner connections unreal. Therefore, mistakes often occur here when a tenon is marked instead of a groove, and vice versa. And this is no wonder if you do not use a system that makes marking grooves and tenons extremely simple. The diagram (Fig. 16) shows walls with the designation serial number crowns, such as connecting elements at the ends of the blanks, and also indicate the positions of the openings in the wall. Such a diagram, which can be applied directly to the template, simplifies the organization of work and prevents marking errors.

Rice. 16. Scheme for marking corner joints of timber frames: 1 - joints of parts of longitudinal walls; 2 door openings
Owning a country plot gives you the opportunity to fully enjoy the fruits of your dacha labor and get some relaxation at a fragrant barbecue festival. But what is a plot without any building on it. And if there are no funds for capital construction, then you can build economy class country houses photo, which will become a seasonal haven for vacationers or those working in the country, and will also serve as storage for all gardening equipment.
Read about what is cheaper to build a garden house from and how to do all the work correctly in our material below.
Materials for the construction of an inexpensive country house
To understand what you can save on when building a country house, and how to build a cheap country house, you need to study everything possible options building material. So, you can build an inexpensive cottage with your own hands from the following materials:
- Frame-panel fragments. Here, timber is used to install the frame, and chipboard, fiberboard, OSB, etc. slabs can be used as cladding. To insulate such a house (if desired), you can use polystyrene or mineral wool slabs. As a result, the house can be used not only in the warm season, but also in winter. The installation feature of this frame-panel house is its undeniable economy. After all, it is fashionable to assemble a building using practically available materials, of which every summer resident/gardener/craftsman probably has a lot. As a last resort, you can borrow leftover material from your neighbors.
- A log house can also be made in a country house. Such construction will cost a little more, but the house will be stronger and more durable. The only drawback of wood (especially if the cheapest planed timber is used) is that it shrinks. As a result, cracks and gaps appear in the walls. It will be necessary to additionally insulate the building so that the country cottage can be used without problems.
- In response to the question of how to build a cheap dacha, we can advise building clay building. That is, to make a kind of adobe house. The construction technology is simple and similar to modeling. Materials for installation will cost the craftsman practically nothing, since the clay and straw from which an adobe house is built is practically underfoot. So clay country house If all installation rules are properly followed, it can become a durable building for any season. The only drawback of an adobe house is that it will take a lot of time to build. Perhaps even more than one season.
- Caravan house. This option for setting up an inexpensive country cottage is the simplest. You can find a more or less decent trailer that is simply installed on the site. If desired, water and sewerage are supplied to such a trailer.
Important: for any type of inexpensive country house, you can install lightweight types of foundations - pile or shallow strip foundations. And this is an additional point of savings during construction.
Frame-panel house: technology of work

To build such a house frame technology you will need to prepare material in accordance with the given perimeter of the building. The materials you will need are:
- Beam with a section of 100x100 to create the frame of the house;
- Self-tapping screws and metal corners for fastening frame posts;
- Panels or slabs of fiberboard, chipboard, OSB;
- Insulation material (if desired);
- Piles for the foundation and a metal channel for tying the piles.
We carry out the work in this way:
- It is worth installing driven piles in the designated places in the corners of the future house. Supports are also mounted under wall joints and under load-bearing partitions, if there are any in the house project. Monolithic concrete pillars and brick supports can also be installed as supports. In any case, the pillars are mounted on a sand cushion to a depth of at least 60 cm. In this case, both concrete and brickwork should be reinforced.
- The finished supports are tied with a channel or I-beam, and waterproofing material is laid over the pillars.
- Then a timber sheathing is laid on the resulting belt, which will become the base plate of the frame. That is, the timber should lie around the perimeter, and on top of the timber frame they arrange wooden joists in increments of 50-60 cm. All wooden elements are securely fastened together with metal corners and screws.
- Now it’s the turn of the vertical timber racks. They are mounted in increments of 50 cm, firmly resting against the timber frame. For additional fixation of the longitudinal supports, jibs are installed on each side. You can also install crossbars.

Advice: it is better to assemble the frame on the ground in parts, and only then lift it and fix it to the base.
- Once the entire frame is ready, perform top harness vertical racks. And attic or floor joists are laid on top of the upper belt.
- The finished frame is sheathed with selected panels, securely fixing them and leaving space for window and door openings.
- The top of the house is sheathed with any insulating material, not forgetting to install vapor and waterproofing materials.
- For exterior finishing, you can choose corrugated sheets or siding.
Important: in order to further save on the construction of a summer house, the roof is made pitched and covered with lightweight roofing materials.
- You can save additional money by installing simple wooden window frames and doors. This is how you can quickly build a house.
Timber country house

In this case, the work will be performed in a different sequence. First of all, you should prepare the following material:
- Beam of any section. But it is worth remembering that the larger the cross-section of the material, the stronger the finished house will be.
- Wooden dowels made of hardwood.
- Roofing material.
- Floor board.
The work is carried out in this way:
- First, the foundation is laid. It can be either a shallow strip (40-60 cm in height, including the base) or a columnar/pile type. But in any case, the concrete must dry well, and its top and all other sides must be properly waterproofed.
- A backing board made of moisture-resistant wood is laid on top of the foundation. In this case, the board is fixed to the foundation with construction anchors, deepening them 15-20 cm into the base.
- After this, they begin laying the timber, joining it at the corners into a bowl. That is, you will have to do additional work, forming grooves for laying the timber.
Important: each crown must be controlled horizontally.
- After 2-3 rows of crowns, the timber is additionally fixed construction dowels. To do this, holes are drilled to the full height of the three stacked crowns and arranged in a checkerboard pattern. Pins are stuffed into the holes. It is worth remembering that next time the dowels need to be shifted relative to those already mounted below.
- Fully assembled walls covered with floor beams, cutting them into the upper crown. The beams are laid in increments of 40-60 cm, and then covered with a floorboard.
Important: the same principle applies to the flooring in the house. If desired, both the upper and lower floors can be insulated with mineral wool or polystyrene slabs.
- Roof finished timber house can also be made lean-to to save money.
Advice: a house made of timber needs about six months to a year to shrink. It is recommended to cut window and door openings after the wood has settled. Otherwise, the house may suffer greatly.
House made of clay

If you don’t know what to build a dacha from, then try installing an environmentally friendly adobe house in your dacha. You'll have to tinker here. The fact is that to construct such a structure, a large volume of clay and straw should be prepared in advance in the summer. It is these components that will become the main ones in the construction of a cheap house.
- So, after the clay has rested for the winter, it can be used. To do this, clay is loaded into a specially prepared pit and moistened with water in an amount of 20% of total mass material. Cut straw moistened with water is also added here. The straw cutting length should be 9-16 cm.
- The whole mass is thoroughly mixed. You can use your feet. And to make the adobe mixture stronger, you can add lime to the solution. It will strengthen the strength of the finished house.
- The mass is left overnight, and in the morning adobe blocks are made from it. To do this, the mixture is compacted into a specially prepared form, cutting off the top of the mixture with fishing line or wire. Five holes are made in the blocks so that moisture can freely leave the brick.
- The finished blocks are knocked out and laid on a platform in the sun, arranged at an angle.
- After two to three hours, the blocks can be transferred to the shade and left on edge until completely dry.
- In this way, you should prepare a sufficient amount of adobe bricks.
- The construction of the house is carried out on a pre-laid foundation. Laying is carried out according to the principle brickwork. And the same clay mass is used as a solution. The width of the seam in this case should be no more than 1 cm.
Important: you need to lay adobe blocks no more than two rows per day. This is necessary so that the adobe mixture can dry thoroughly. At night, the rows of masonry are covered with film.
- Once the walls of the adobe house are ready, they can be plastered outside and inside.
- The floor in such a house is made on the ground, first laying waterproofing, and then laying joists and insulation between them.
- The roof of an adobe house can be anything, but it is important to make good overhangs (at least 70 cm) so that moisture from rain or snow does not spoil clay walls. When installing windows in an adobe house, it is worth making canopies over the frames and ebbs in the area of the window sills. A house built in this way will serve the family for decades.
Caravan house

The simplest type of country house for a seasonal stay, as an answer to the question of how to build a country house. Moreover, the trailer can be installed simply on brick pedestals-supports, installed simply on a sand cushion. For every meter of trailer length there should be one support pillar. If desired, the trailer can be insulated, and then such a country house will become cozy in winter.
Remember: build country house You can do it yourself from any material, the main thing is to comply with all the basic requirements for each type of raw material used.
After a week of work and the bustle of the city, I want to relax in the lap of nature, breathe fresh air. Perfect option– a small dacha plot with a house. Often called dachas simply land plots, which are distributed to citizens for growing crops. Sooner or later, the owner of such a plot has a desire to have a house where he can relax after working in the garden beds and spend a weekend in nature. Hiring a crew is expensive; you can build a simple small summer house yourself.
How to build a country house without outside help?
When thinking about a house on a summer cottage, you should decide whether they will live in it temporarily during the summer season or whether it will be possible to live in it throughout the year. This determines how much money will be spent on construction. For year-round living, you need to build a permanent structure with communications and heating. This requires a lot of funds and manpower.
If you plan to live only seasonally, you can build a house with your own hands. At first glance, it may seem that this is a complex and difficult task for a person far from construction. But, starting to understand the nuances of construction, it is clear that you can gain construction experience during construction, if you wish.
There are several technologies that allow you to easily and quickly build a small country house. The simplest and most economically advantageous technology is frame construction. It allows you to build a house yourself without outside help. This is the cheapest option when choosing materials, since you can use used materials. True, they must be of high quality for the structure to last a long time. Another plus frame construction is the speed. If you put in the effort, you can build a house for finishing in a season.
What material is suitable for the walls of the dacha - choose the appropriate options
On construction market big choice various materials from which walls can be built. The choice depends on the preferences of the developer, the purpose of the future home and operating conditions. For a country house, you should select inexpensive, easy-to-install materials that do not require a solid foundation. Let's consider several options for such building materials:

You can build a country house from other materials. For example, you can use building materials from a dismantled house if they are in a condition suitable for construction. But all loads must be correctly calculated.
It must be remembered that the heavier the walls, the stronger the foundation needs to be made.
Layout – convenience and ease of use
Any construction consists of stages and begins with design. Even a simple country house needs a plan and construction project. A country house must have a kitchen, which can be combined with a living room to save space, dividing the rooms light partition. If a second floor is planned, then it is better to place bedrooms on it. For summer cottage good option obtaining additional space for relaxation is the veranda.

After design, further steps include:
- Floor installation.
- Preparation of the site for construction and installation of the foundation.
- Walling.
- and ceiling.
- External and internal finishing works.
Each stage requires certain knowledge and skills. Therefore, before starting this or that type of work, you should study the nuances associated with their implementation.
How to make a strong foundation and save money?
Having decided on the place where the house will be located, you need to carry out preparatory work for foundation construction. To do this, stumps are uprooted, bushes are removed, the top fertile layer of soil is removed and the surface for the foundation is leveled. Then, using a tape measure and a corner, markings are made for future corners and walls. Pegs are driven in at the corners, and threads are stretched between them to limit the size of the pit. The foundation depth should be below the freezing depth. Usually a pit is dug about a meter deep.
Since a lightweight foundation is needed, it can be made from railroad sleepers. First of all, a geotextile fabric, Dornit 150, should be laid at the bottom of the pit. It is used as an additional reinforcing layer, as well as preventing the penetration of capillary moisture into the house structures. Next, sand is poured in several layers, each of which is well compacted. A layer of gravel or crushed stone is placed on top of the sand. On next stage Sleepers are laid on a layer of concrete and tied together. The structure is then filled with concrete.

For a small house, a strip foundation made of concrete is suitable. To do this, you need to dig trenches about 50 cm wide around the perimeter of the house and interior walls, install the formwork, lay reinforcement in it and fill it with concrete. The foundation must stand for about 3-4 weeks for the concrete to gain strength.
More thorough, but also more expensive. It can be used if a basement is being built. In this case, the blocks will play the role of walls. The ceiling can be made of slabs or a reinforced frame can be arranged, formwork can be built and poured with concrete.
A popular foundation for the lungs frame houses is a columnar foundation. A sufficient diameter of the pillars will be 30 -40 cm. The pillars are either dug into the ground to a depth below the freezing depth, or are installed on a solid foundation directly on the ground. Corner posts must be installed. Intermediate ones are placed at a distance of 2-3 m from each other.
The floor is made of tongue-and-groove boards along joists laid on the foundation. First, the subfloor is installed. Beams are laid along the perimeter of the installed pillars. Then you should install the cross beams on opposite posts. This creates a subfloor frame. Beams can be made of wood, metal, concrete - depending on financial opportunities and developer preferences. Moisture-resistant insulation is laid between the joists, and a flooring. An easier way to install a floor is concrete screed.
Reliable and warm walls – longevity of the building
The simplest house for a summer residence is a house with frame walls.The technology for constructing walls is simple:
- 1. To protect the walls from moisture, two layers of roofing material are laid on top of the foundation. The timber frame is laid first on the foundation. At the ends, the beam is cut in half to connect the beams to each other at the corners.
- 2. Next you need to install support posts in the corners. For stability, they are temporarily strengthened using jibs.
- 3. Racks along the walls are installed at a distance of 50 cm from each other and also secured. Window and door blocks are attached to support posts.
- 4. After placing all the beams, it is necessary to secure the upper beam for strapping and secure all the posts well. To one support post, you need to attach two slopes to the bottom trim beam and two slopes to the top trim. The installation of the beams must be checked with a building level to prevent vertical and horizontal deviations.
- 5. The outside walls of the frame must be covered with a special windproof and waterproofing film, which, in turn, is secured with a counter-lattice.
- 6. The walls are sheathed on top with either OSB boards or sheets of plywood that are resistant to moisture.

At the same time as the wall frame, the ceiling frame is made. Beams are installed along the perimeter, and then transverse beams are installed. At the stage of interior finishing, the ceiling is sheathed with plywood, plasterboard or other finishing material.
Roof – reliable protection from bad weather
Best suited for a country house simple roof– single-pitched. But if you want to have a big attic space, which, if desired, can be improved and receive additional usable area, then you need to install a gable roof.
A rafter system is installed for the roof. It consists of several farms. It is more convenient to assemble individual roof parts on the ground using a template. After the individual elements have been assembled, they begin to install the rafters and install trusses on them. First, the façade truss is installed. The correct installation is checked by the building level. The façade truss is then secured using slopes. A similar truss is installed at the opposite end of the roof, and is also temporarily secured using slopes.
A cord is stretched between the installed outer trusses, along which all intermediate structures are installed. When all the trusses are installed, their lower ends are secured with brackets to the floor beams. The trusses are secured at the top using a ridge beam. The outer part of the roof is covered with a windproof and moisture-proof film, on top of which a counter-lattice is mounted.
The roofing material should be selected before installing the roof, as the manufacturer of the roofing material indicates which rafter system is needed. To avoid problems when working with roofing materials, when purchasing them, you should take a laying diagram. The roof can be made from ondulin, bitumen shingles, slate or any other roofing material that will be most beneficial.
Cottage for a summer residence - comfort for the soul
During construction, it is important to treat all wooden elements of the house with special chemicals that protect the wood from rot, fungus, and biological effects, and increase fire safety.
When the walls and roof are ready, all that remains is the exterior and interior finishing. A budget option facade finishing– painting OSB boards oil paint. Another attractive finishing material is siding. With its help, you can give your home a beautiful appearance and choose the color of your choice. The slats are easily attached to the frame of the house using screws.
You can use the remaining cladding boards to cover the slopes of windows and doors. Window openings should be carefully processed with a jigsaw and plane. Window slopes should be covered with wooden slats 19 mm wide. Cladding boards are nailed to the slopes on the outside. If wall insulation is necessary, it is better to do it from the outside so as not to take away the usable space inside the house. Mineral wool is an inexpensive and easy-to-install insulation material.
To conduct electricity, you need a waterproof power cable, which is best laid underground. To protect the cable from damage, it must be laid at a depth of at least 60 cm, sprinkled with a layer of about 10 cm of sand on top. To protect the cable from shovels when digging, it is better to put it on top protective film and bricks.
If you do not have extensive experience in electrical work, then it is better to entrust the electrical wiring to specialists.
Interior decoration you can create an atmosphere of comfort and peace, where you would like to relax and unwind. Therefore, despite the fact that the dacha is a seasonal habitat, you want it to be cozy and comfortable like home. This is achieved by interior and furniture corresponding to the chosen style. Often frame houses are lined with clapboard from the inside. Suitable for a small cottage country style. You can also make furniture with your own hands, then the house will be filled with homely warmth. How more work do it yourself, the cheaper the construction will be.
If you prepare in advance all the materials necessary for construction frame house, then you can build a house on your own in one summer season. Finishing work can be done gradually, whenever possible, the main thing is to build the box of the house and install the roof. The better the work is done, the longer the house will last.
Probably, among summer residents there is not a single person who would not dream of their own small, cozy, country house. Such a building can become a wonderful place to relax and live. the whole family for the whole summer.
But the stay will be even more pleasant if the owner builds the house with his own hands, because this is not at all difficult to do, especially if you have already encountered construction or at least repair work in your life.
Well, even if you have never held a drill or hammer in your hands, you should not despair, because this article will present the most detailed step by step instructions construction.
Preparatory activities
Before you begin the construction process itself, you need to familiarize yourself with some rules, prepare a project for a country house made of timber, and also purchase the necessary Construction Materials.
Note!
We will consider all stages of construction using the example of a one-story building 4x5 meters with access to the attic, but without an attic.
Primary requirements
There are several basic rules that everyone who undertakes construction should know:
- Selecting a building site. The location should be chosen in such a way that the structure is accessible and practical. It should exclude the possibility of fire from neighboring structures. It is also necessary to provide for the supply of communications to the selected area;
Note!
The choice of a building site must take into account the basic rules: the distance from the street must be 5 meters or more; from the fences of neighboring areas from 3 meters or more; and wooden structures should be 15 or more meters away from your home.
- Soil analysis.
Before starting construction work, it is necessary to carry out a soil analysis on the site in order to determine:- Groundwater level;
- Soil freezing level;
- Preparation of a place on site where materials necessary during the construction process will be stored.
Advice. Also consider the availability covered areas in order to protect purchased building materials from rain.
Project work

Drawing up documentation consists of indicating the parameters of the structure and creating a sketch:
- First you need to indicate the dimensions of the building. Since we are talking about a one-story building, the length, width, height of the walls and roof will be sufficient. In our case, this is: length – 4 m, width – 5 m, height – 3 m, which means the structure will have an area of 20 m2 and a volume of 60 m3;
- After the location of the main walls is outlined on paper, you need to decide on the number and location of partitions that can divide the building into 1-2 rooms. The building in question is small, so one partition separating the kitchen and sleeping areas will be sufficient;
- The design documentation must indicate all construction materials that will be used in the construction of the building.
Construction Materials
Timber is an environmentally friendly building material that is perfect for the construction of country houses. The roof for such a structure can be made of metal tiles or corrugated sheets, which is a fairly economical option.
As for finishing, in this situation best choice there will be varnish or paint that will not only allow you to create beautiful interior, but also protect building materials from moisture, positively affecting the strength of the structure. But in order to paints and varnishes adhered well to wood, it must be prepared for finishing work by treating it with specialized protective substances.
Note!
The price of such construction depends directly on what kind of timber will be purchased.
Dacha houses are built from both profiled and laminated timber, the latter option being more expensive, but easier and more convenient to work with.
Tools for work

During the work you will need the following set of tools:
- Screwdriver;
- Electric drill;
- Roulette;
- Plumb and building level;
- Jigsaw;
- Hacksaw;
- Furniture stapler;
- Mallet and hammer;
- Roller and brushes for finishing work.
Working on the base
After all the preparatory activities have been completed and the tools have been purchased, it’s time to start. Often, small log country houses are not suitable for heavily loading the soil, so the most cost-effective option is to build a columnar type foundation.
It is not difficult to build this type of foundation yourself if you carry out the work according to the following instructions:
- Digging holes. The holes are dug in such a way that their bottom is located below the freezing level of the soil;

Advice. For the convenience of further work, you should dig a hole about 0.5 m in diameter so that the finished post, processed, can be easily lowered into it. waterproofing materials, and then fill the gaps with soil.
- Sand pillow. A layer of sand about 10-15 cm thick is poured into the bottom of the hole and compacted thoroughly;
- Construction of formwork. Formwork for a post with a cross section of 15x15 cm is constructed from plywood or boards in a hole so that the post is 20-30 cm above the soil level;
- Mixing the solution.
In a prepared container or on a spread plastic wrap, mix a solution of the following ingredients:- Cement;
- Water;
- Sand;
- Crushed stone;
- Filling. The resulting thick mass is poured into the previously created formwork;
- Reinforcement. In order for the post to have the required level of strength, 3-4 metal rods must be inserted into the freshly poured solution;

- Waterproofing. After the solution has set, i.e. after 5-7 days, it is necessary to remove the scorch and coat the resulting column with bitumen;
- Backfill. The gaps are filled in layers with soil, which is carefully compacted;
Note!
The pillars should be located at a distance of 1-1.5 meters from each other.
- Checking horizontality. After all the work on creating the supports has been completed, it is necessary to check the horizontality of the resulting structure. If the error between the heights is no more than 3-5 mm, then it is necessary to cover the tops of the supports with roofing material;
- Base. Now that the foundation is ready, all that remains is to lay a base made of beams on it, fastening them together using ordinary nails.
Walling

When building country houses from profiled timber, material with a cross-section of 10x10 cm will be sufficient. This size is quite enough for the structure to withstand possible loads.
The process of constructing walls is divided into the following stages:
- First of all, you need to lay out one row of material directly on the base;
- The second row of timber is laid with fixation along the entire length using dowels, which are located in increments of 1 meter;
Advice. This type of fastener must be recessed into the material to a depth of 1-2 cm in order to prevent its contact with the material of the next row.
- It is better to start work from one corner, building two perpendicular walls, not forgetting where they will be located internal partitions buildings, if any are provided for by the project;
Advice. To build internal walls, it is necessary to provide additional grooves in the beams and lay the internal and external walls simultaneously.
- Window and door openings must remain empty until the structure has completely settled. This is necessary in order to avoid distortions and unevenness.
Roof construction
Installation of the roof is one of the most important and responsible stages of construction, since the reliability and durability of the entire structure directly depend on the roof:
- Horizontal logs are installed, which are also ceiling slabs;
- These same logs are attached to the center vertical supports, equal in height to the size specified in the gable roof design;
Advice. If you decide to build not gable structure, then the vertical supports must be positioned depending on the type of roof you choose.
So, for example, for a single-pitch type of roof, the supports are mounted directly above the load-bearing wall.

- Rafters are installed, which should be secured with metal corners on self-tapping screws. The rafters are positioned in increments of no more than 60 cm;
- Using horizontal boards, the rafters are attached to each other;
- The inside surface of the roof is sheathed with windproof fabric using a furniture stapler;
- All that remains is to fix the roofing materials you have chosen and the roof is ready.
Advice. The inexpensive and most popular sheets of corrugated sheets in this business are attached without the need for additional drilling using galvanized self-tapping screws and a drill with a suitable drill bit.
If you plan to use such a structure not only in the summer, but all year round, then you will need to insulate the roof using insulation for timber fixed between the rafters.
Insulation and finishing work

But, on the other hand, no one bothers the owners to live in the country in winter, but then it will be necessary to do the following:
- Polystyrene foam is the most accessible, inexpensive and easy-to-use insulation material;
- Before attaching it to the walls, you need to decide what kind of insulation you will have, external or internal;
Note!
External insulation can spoil the appearance of the facade, and internal insulation can eat up the area of the building;
- Before laying the insulating layer, the wood must be treated with antiseptic agents, protecting it from insects and mold formations.
After the thermal insulation has been carried out, it is necessary to carry out finishing. As mentioned earlier, the timber must be painted or varnished in order for the wood to retain its strength characteristics and texture.
Finally

As one might understand, building a country house with your own hands is a process that does not require special skills or specialized equipment from the master; it is enough to strictly follow the technology.
In order to build such a structure on own dacha you will not need to rent construction equipment. 2-3 people are enough to work with timber, and the house will be ready in just a few weeks. Most importantly, do not forget to wait for the shrinkage time before moving into such a building.
The video in this article will tell you even more about the intricacies and tricks of construction from timber.
OLYMPUS DIGITAL CAMERA
Every person who purchased small area land for a summer residence, strives to build a house or a similar easily erected structure in a short time. To have a place to relax after a hard day at work, or to hide from inclement weather. Well, it’s natural to get settled in everyday life. Of course, it is advisable to build a house so that it can accommodate the whole family and guests who come for the weekend. The task is, of course, enormous, but quite doable if you have accumulated savings to build a country house, because you will need a large number of new building material.
If possible, you can hire hired workers to build this structure.
Of course, this will significantly increase financial expenses for your family, and if this is not possible, you will have to build a country house with your own hands.
Mostly, dacha owners build their houses with their own hands in order to save money on hiring a construction team and invite relatives and friends to help with the construction, which naturally reduces the cost of the construction process.
Summer residents also sometimes use used materials, which can be purchased at half the price compared to market prices, but this will reduce the durability of the structure by half.
When building his country house, the author decided not to skimp on the basic material and buy everything on the construction market so that it would last for a century and the house would last a long time, delighting his family and his guests with its comfort and aesthetic appearance.
Of course, wood was chosen as the main material for construction, what could be better and more beautiful than a tree. The author purchased bars and boards at a local sawmill, which turned out to be much cheaper than in a hardware store.
When starting construction, I pre-drilled holes for the supporting pillars, inserted and filled cement mortar. I tied the poles with boards and left them for a day for the solution to dry. Then he began construction, step by step moving towards his cherished goal.
And so now let's take a closer look at how he built his country house, and what he needed for this.
Materials: board 30 mm, timber 100 by 100, timber 40 by 60, batten 50 mm, insulation, professional sheet, lath, fiberboard.
Tools: circular saw, drill, drill, screwdriver, hammer, shovel, electric plane, angle, ruler, tape measure, circular saw.
And so the first thing he did was invite his neighbor and together they drilled holes to install the pillars.

Then I installed the posts and filled the holes with cement mortar.

I made a screed at the bottom and top so that the pillars would stand level, and after a day, after the solution had gained hardness, I began further construction.

The author makes the top harness.

Then he moves on to creating the roof ridge.


Next he makes the roof sheathing.


Shows the rafter attachment point.

The remains from sawing will also come in handy somewhere.

Next, he proceeds to installing the roof from a professional sheet.


Then he moves on to installing the floors of the house.


So we have a place to store boards from precipitation.

Prepares a batch of boards, cutting them apart on a circular saw.


And begins finishing the cornice.


She covers the walls with boards, and seals the gaps between the boards with slats.

Next we move on to the ceiling trim.


