For many city dwellers, the basement in the garage is the only place where they can store canned food and other supplies for the winter. Subject to compliance with building regulations, safety precautions and the main points of the instructions, the cellar can be built with your own hands in a short time.
Do you need a cellar in the garage?
Many owners of their own garage are wondering whether it is worth equipping a basement under it. They believe that this involves significant difficulties and requires major renovation of the building or construction of a new structure.
In a modern metropolis, a garage is a place that can be equipped for storing canned food and other food supplies. Despite the presence of a refrigerator in most apartments, it is in the cellar that the preservation of potatoes and pickles is ensured.
The main advantage of a cellar equipped under a garage is support optimal temperature even in severe frost. If the hole is deepened by 2–3 meters, then the cellar will not freeze, regardless of the weather.
Other advantages include:
- Possibility of storing supplies for the winter. Not everyone has the opportunity to equip a basement in their home or utility room. However, anyone can make a cellar for storing food in the garage.
- Ease of construction. You will not need specific construction knowledge and skills, professional tools and equipment. It is enough to comply with the basic requirements of the technology.
- If available separately standing garage, you can equip a basement of any desired size. It is enough to be guided by a simple principle: what more family, the larger the cellar. For four people, 8 square meters will be enough.
There are two main disadvantages to a cellar located in a garage: exhaust gases from a car penetrate inside, and basement dampness comes out. Both of these problems can be solved.
Preparation
When setting up a garage basement, you have several basic options to choose from. The difference between them is the depth of depth.
- Semi-buried cellar. The building can be structurally combined with a conventional one inspection hole. Another option for a ground-based design is to use a special container made of plastic. It is dug into the ground and can be used for temporary storage of food.
- Semi-buried pit. It has its own walls, made of cinder block or brick. Depth - up to a meter. During construction, you need to take into account some nuances. Thus, when the groundwater level is high, the moisture-bearing veins are first plugged with several layers of clay, then the walls and floor of the basement are waterproofed.
- Deep cellar. This is the most common way of arranging a basement in a garage. Depth - up to three meters.
When choosing the depth of the basement, you need to take into account the occurrence of groundwater. The foundation of the basement is laid at a distance of at least half a meter from the source of high humidity.
Dimensions are approximate. If necessary, the hood is equipped with a tap to remove condensate
Preliminary work
A deep cellar is built in permanent garages. Before implementing such a project, it is necessary to carry out some preliminary work. Their essence is as follows:
- Before building a basement, you need to make sure that such a project is technically possible. The soil of any large city is literally crammed with numerous communications, and it is rarely possible to dig to the required depth the first time. To minimize costs and determine the feasibility of building a cellar, you can invite a specialist or use design documentation developed during the construction of a garage building.
- The foundation must be protected from being washed away by groundwater. If possible, this should be provided for during the construction of the garage by installing a circular drainage system. Otherwise, carefully waterproof the basement.
Selection of materials
In the process of building a cellar, you will need a set of tools and building materials.
When building walls you can use:
- Concrete plates.
- Cinder block and brick.
- Natural stone.
Concrete slabs can only be used if you are building a garage from scratch and equipping the cellar before erecting walls and ceilings. In addition, you will need a team of professional installers who have powerful lifting equipment, for example, a truck crane.
To fill the base with your own hands, you can use ready-made M-100 concrete or a solution you made yourself. To do this you will need a standard set of components:
- Gravel.
- Crushed stone.
- Sand.
- Cement M-400.
The resulting solution is used both for preparing the screed and for finishing the walls during plastering.
For formwork you will need an edged board. The quantity is determined individually and depends on the size of the basement. To waterproof a room, you can use regular roofing felt.
Tools
The construction of a cellar in itself is not challenging task. However, certain knowledge and skills are required.
When you independently build a small basement in the garage, you do not need complex professional equipment. It is enough to acquire a standard set of tools. Some of them are interchangeable.
- Jackhammer.
- Sledgehammer.
- Spatula, trowel.
- Hacksaw.
- Electric drill with a set of drills.
- A screwdriver or a set of screwdrivers.
- Pliers.
- Shovel.
- Measuring tools: building level, plumb line, tape measure, metal ruler.
Instructions for making a basement with your own hands
Ideally, the cellar should be planned during the construction phase of the garage. This will make a number of jobs easier. If the construction of a basement is carried out in an already constructed garage, first of all it is necessary to dismantle the concrete floor. The screed is removed over the entire area of the future cellar. The work is carried out either using a pneumatic jackhammer, or the old fashioned way, using a chisel and sledgehammer.
Pit preparation
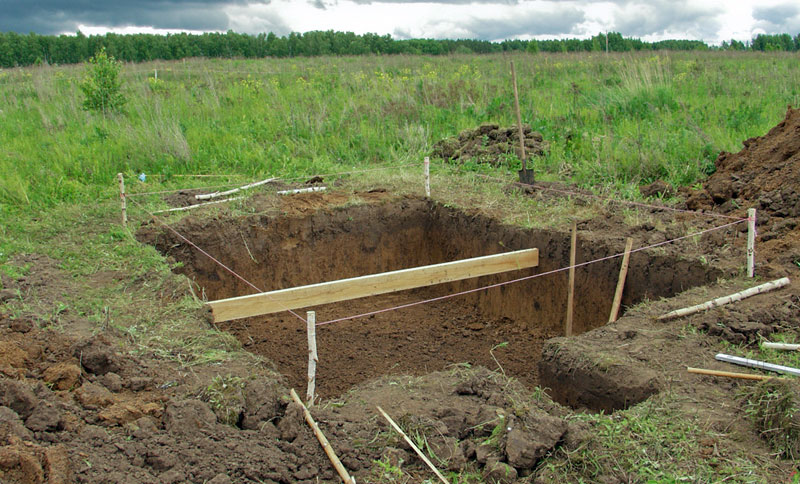
The initial stage of building a garage basement consists of preparing the pit. For a completely buried cellar, its depth is about three meters; other dimensions are selected individually, in accordance with the planned dimensions. Preparation of the base proceeds as follows:
- A pit is being dug.
- The walls and floor of the pit are carefully leveled and compacted. This is necessary so that in the future the cellar will have smooth surfaces.
- Alternating layers of crushed stone and gravel are poured onto the bottom. After each backfill, the surface is leveled and compacted.
- The prepared coating is poured with a thin layer of concrete.
The thickness of the resulting base should be 8–9 centimeters or more.
If the basement is being built in a ready-made room, you will have to dig it with your own hands
After the concrete has hardened, primary waterproofing work is carried out. Two layers of roofing material are laid and glued together with molten resin. The edges of the waterproofing sheets should extend beyond the boundaries of the cellar by about 10–15 centimeters. After this, the formwork is installed and the solution is poured.
How to build a staircase
The staircase is the most important structural element connecting the basement to the main building.
There are two types of design:
- Standard (attached), made of metal or wood.
- Marching. It is installed ready-made, often during the construction of the cellar. In some cases, installation in an existing building is possible.
The staircase can be made of the following materials:
- Wood. The cellar is a cold and often damp room, as a result of which the wood needs additional treatment with antiseptics, fire retardants or complex compounds. This will protect the material from bacteria, insects, and lichens.
- Metal. If a used one is used, the first step is to treat it with an abrasive material. This will save the future staircase from corrosion. After this, the metal is wiped with detergent and rinsed. After installation, metal steps must be coated with several layers of oil paint or enamel.
- Concrete. This material has increased strength characteristics, however, it also requires additional protection. The steps are covered with several layers of paint or covered with floor tiles.
Cross bars are welded to the two main posts
When independently building a staircase to the garage basement, you must be guided by the following indicators:
- The permissible width of the structure is in the range of 70–90 centimeters.
- The clearance of the stairs in the constructed basement is calculated from the bottom step to the floor beam. When building a new cellar, this parameter must be at least 1.9 meters. In this case, the risk of hitting the floor beam is minimized.
- Slope - from 22 to 75 degrees. The indicator 45–75 degrees is typical for ladders.
- The width of the step is from 25 to 32 centimeters. If the tread is wider, it will create inconvenience when climbing. If already, it will make the descent more dangerous.
- The height of the step is from 12 to 22 centimeters.
To make a wooden two-meter staircase 80 centimeters wide, the height of the steps is 22 cm, you will need two boards 20x15x200 cm, six planks 6x20x80, 12 small bars 5x5x15 and 60 nails or wood screws. This staircase is installed with a slope of 30 degrees, which is taken into account during the assembly stage.
The manufacturing of the structure occurs in several stages:

Walling
The walls in the garage cellar are built exclusively from hard materials. The use of lightweight parts (chipboard, plywood, etc.) is not allowed.
The easiest way is to lay the walls out of brick. During the work, it is enough to ensure that the masonry is level and vertical.
Another convenient way is to build monolithic walls made of concrete. To do this you will need to perform a number of actions:

In any case, it is very important to control the verticality of the walls. All seams are rubbed with mortar, and upon completion of the masonry they are painted with lime.
How to make a floor?
For most basements, a reinforced concrete floor is the ideal option. It is done in stages:
- The surface is leveled. During the work, a building level is used.
- 10–15 centimeters of crushed stone is poured in and distributed evenly.
- After this, a small (about 5 cm) layer of sand is poured, carefully leveled and compacted.
- The floor is equipped. To do this, you can use a reinforced concrete slab or lay a strong metal mesh and screed.
- If the second method (screed) is chosen: reinforcing bars are installed around the perimeter of the cellar. The step is one meter. A metal mesh is laid on the floor, after which 3–5 centimeters of cement are poured.
The surface is leveled and leveled
Simultaneously with the installation of the finished floor, a number of thermal insulation works can be performed. This is discussed below.
Cellar ventilation equipment
A high-quality exhaust system will help eliminate dampness and foreign odors (for example, exhaust) from the basement. Ultimately, this will increase the shelf life of supplies.
There are two types of ventilation systems designed for cellars:
- Natural. An ideal method if it is possible to provide fresh air.
- Forced. The main difference from the previous version is the presence of a fan.
The exhaust pipe rises 0.3–0.5 meters above the roof of the building
Arrangement of a natural ventilation system
Natural ventilation of the basement does not require significant costs and can be easily equipped with your own hands:
- An exhaust pipe is installed under the ceiling. Its output end extends half a meter higher garage roof. Heated air passes through this pipe to the outside.
- A supply pipe is mounted just above the floor, at a height of 7–10 centimeters, and led outside the garage. Through it, fresh air will flow into the cellar.
- The ends of both tubes are covered with special nets that protect against pests and insects. Small covers are installed on top.
IN winter time natural ventilation may not work due to blockage of both openings with frost. To prevent this from happening, they are insulated and cleared of snow from time to time. You can make the outlet parts of the air ducts removable, this will make the work easier.
Forced exhaust equipment
The main difference between forced ventilation system from natural - in an improved hood. An electric fan is built into its cavity, generating a vortex and expelling exhaust air from the garage.
As the forced exhaust removes old air, fresh air enters the basement through the top vent pipe.
Unlike natural, there is a fan here
As an option, you can equip a fully mechanized ventilation system for basements. To do this, you will need to install a monoblock controlled by a specialized software. The price of the equipment is about 50 thousand rubles.
Insulation of the cellar
In the absence of high-quality insulation of the basement, the garage will be exposed to cold air. In addition, thermal insulation increases the degree of protection of the cellar from dampness. One of the simplest and inexpensive methods of insulation is to cover the inside of the walls with foam plastic.
The work consists of thermal insulation of walls, floors and ceilings.
How to insulate a basement ceiling?
You can insulate with polystyrene foam or other suitable material
Thermal insulation of the ceiling is carried out as follows:
- All possible gaps, small cracks, etc. are eliminated.
- A layer of vapor barrier material is laid. Penofol, which also performs thermal insulation functions, can act in this capacity.
- Suspensions for mounting the sheathing are installed. The distance between the elements is equal to the width of the insulating boards.
- The sheathing profiles are attached to the hangers. Self-tapping screws are used for fastening.
- A thermal insulation material, such as polystyrene foam, is placed between the profiles. The joints are insulated with polyurethane foam.
- It is recommended to lay an additional vapor barrier layer at a distance of 4–5 centimeters from the thermal insulation. This will provide micro-ventilation of the layers.
Theoretically, a heated floor system can be installed in the basement. In practice, few people will install it in a utility room. Therefore, you can perform the following procedure:
- The surface of the subfloor is leveled to the building level.
- A layer of waterproofing material is laid.
- Insulation, such as polystyrene foam, is installed. Thickness - 5–6 centimeters.
- Penofol is laid on top.
The insulation is laid on a layer of waterproofing
A reinforced screed and a finished floor can be laid on the thermal insulation.
Thermal insulation of walls
The cold penetrates into the basement through the walls. High-quality thermal insulation will protect the room from the effects of the surrounding soil.
The work is carried out as follows:
- A layer of waterproofing is laid. It prevents moisture from getting into the basement and onto the insulation. If necessary, the surface is leveled before laying the heat insulator.
- Foam plastic is laid on top of the waterproofing. Any adhesive composition is used for fastening to the surface.
- After finishing the wall with foam plastic, it should be covered with a thin cement screed. For additional strengthening, reinforcement can be used.
- Since the basement is a room with initially high humidity, an additional layer of waterproofing is laid on top of the insulation.
All joints are carefully sealed
Wall decoration
After hydro- and thermal insulation work has been carried out, the walls are covered with tiles or similar finishing material. You can also paint the surfaces, whitewash them with lime or cover them with plaster.
Let's look at wall decoration using plastering as an example. The main objective of the procedure is to bring the basement walls to optimal sanitary and hygienic condition. The process occurs in several stages:
- A metal mesh is attached to the wall. It must be remembered that in rooms with high humidity, the plaster will not stick exclusively to the surface of the blocks. To attach the reinforcing mesh to the wall, parachute-type dowels are used. The ventilation holes do not close.
- The plaster solution is applied to the surface with a trowel, after which it is smoothed with a polisher. If installation is planned ceramic slabs, the solution is applied in a thin layer, minimally hiding the mesh and leaving room for glue.
Hatch and ceiling
The material that will be used to make the ceiling depends on the size of the cellar. If the dimensions do not exceed a standard inspection hole, the top is made of forty boards. For a large cellar, you need a powerful and reliable ceiling that can support the weight of a car. The best option in this case is a concrete slab and a reinforcing frame.
Laying a standard concrete slab is possible if the cellar is done before building the garage. If construction is carried out in a finished building, you must do the following:
- Load-bearing beams are laid. For this purpose, old railway rails are often used, which can be purchased at any scrap metal delivery point.
- Reinforcement and load-bearing formwork are laid between the beams.
- Concrete is poured.
Everything is leveled and set to the building level
The resulting structure will resemble a homemade reinforced concrete slab. When laying reinforcement and beams, it is necessary to leave space for the cover.
You can make the hatch yourself from sheet steel or purchase a finished product. To do all the work yourself, you will need a set of materials and tools:
- Five-millimeter sheet steel. More thin material deforms over time.
- Bulgarian
- Welding machine
- Metal corners
- Insulation, for example, penoplex or polystyrene foam
- Screwdriver
- Tin
- Loops
- Roulette.
- Sealing rubber.
The process of making a hatch with your own hands takes place in stages.
- A steel plate is cut to the size of the hole.
- A metal corner is welded along the perimeter of the plate. For optimal sliding in the future, a small gap remains between the edge of the sheet and the shelf of the corner.
- Insulation is placed on the inside of the lid. The foam sheets should fit very tightly to the welded metal corners. Possible gaps are foamed.
- A sheet of tin is attached on top of the insulation, the corners are bent. It will play a decorative role, so this stage is not mandatory.
- The hinges are welded and, if necessary, the hatch handle is attached.
- The finished structure is hung on hinges.
In the future, the basement lid can be decorated with a floor covering that is in harmony with common interior. The hatch in the garage can be painted with any suitable composition.
Getting rid of mold and water in the basement
One of the main problems in the cellar is mold. It appears due to poor quality waterproofing and ventilation, leading to high humidity. In addition, among the reasons for the appearance of mold are long-term storage of rotten supplies and the use of contaminated wood for making shelves.
Mold and mildew are harmful to health and reduce the shelf life of food.
Before carrying out major work, the room must be disinfected. This is done as follows:

When working with chemicals, protective clothing is required: mask, suit, gloves
Mold prevention
To prevent mold from appearing, it is first necessary to ensure high-quality waterproofing. An alternative is to lay an additional insulating layer.
In addition, it is necessary to carry out a number of preventive measures annually:
- Thorough cleaning and inspection of the cellar.
- Drying the room. Depending on its condition, the drying process can last from two days to several weeks.
- Washing and drying racks. After this, they need to be treated with an antifungal compound.
- Treatment of dry cellar with antifungal and antibacterial drugs. After this, it is dried again for 2-3 days.
- If there is an earthen floor, it is covered with a solution of copper sulfate. After this, you need to let the mixture soak in, and add lime and sand to the place where the vegetables are stored.
- After all necessary procedures the racks are being brought in. The cellar can be used for its intended purpose.
Video: How to make a dry basement in the garage with your own hands
Self-construction of a garage cellar requires the availability of appropriate knowledge and skills. If you have construction experience, you can easily make a basement with your own hands, and it will serve you for many years.
A basement in the garage is the best option for storing pickles and vegetables. You can also equip a workshop or recreation room in such a room.


Peculiarities
Many people want to build a basement in the garage, as this place is optimal for storing vegetables and fruits. You can also equip the basement with shelving for conservation or install a workbench and shelves for tools, turning the room into a comfortable workshop. But the basement is suitable not only for economic purposes - you can arrange a recreation area in it by adding a bar or billiards to the interior.


When building a basement room in a garage, you should familiarize yourself with some features:
- You will need to consider high-quality insulation of the basement from moisture. Groundwater should not penetrate into the room, so you should take care when purchasing waterproofing materials.
- In some cases, a waterproofing layer will not be enough, so you need to be prepared with equipment drainage system.
- There must be ventilation in the basement. It allows you to maintain the required temperature and creates an optimal microclimate in the room. If you abandon the ventilation system, mold and mildew will appear during further operation of the cellar. It is not allowed to store preserved vegetables in such conditions.
- If you plan to use the basement in the garage as a workshop or recreation room, you need to insulate the walls, ceiling and floor. This solution eliminates dampness and prevents fungus from appearing. Only fire-resistant materials should be used as finishing.


To get rid of mold, you will need not only to create the right climate, but also to disinfect the room. This will require the following steps:
- The basement must be cleared of all pieces of furniture and jars of pickles.
- The walls should be cleaned with a wire brush.
- Shelves and other furniture need to be dried in the fresh air and treated special drugs. The best results are shown by the sulfur bomb. The room itself can be disinfected with slaked lime.
- To prevent mold from reappearing, you need to create a high-quality waterproofing layer in the room, as well as prevent fungus every year.


The basement in the garage has the following positive qualities:
- The structure can become an ideal place for storing food. With its help, you can unload the free space in the garage. The microclimate of the basement is considered optimal for the preservation of preserved vegetables and fruits throughout the winter season.
- With the help of special finishing materials You can create a relaxation area in the basement.
- No allocation required for basement equipment extra space on the territory, since the room will be the zero level in the garage itself.
- A garage equipped with a cellar has a higher cost compared to buildings without a basement.
- The basement is reliably protected by the garage from bad weather conditions and temperature changes.


Disadvantages include:
- If you choose the wrong construction or waterproofing material, your basement can become a breeding ground for mold and dampness. In worst cases, this room can turn into a well with water accumulation.
- A basement in a garage can only be created manually. Therefore, you will need the help of friends or additional expenses for the services of specialists.
- If the site has a high groundwater level, a large amount of materials will be required to create a waterproofing layer, which means additional costs.
Projects
There are several options for equipping a basement in a garage. If we talk about the depth of the bookmark, the cellar can be semi-buried (depth - up to 1.5 meters) or buried (up to 3 meters). The last option is different in that the humidity and temperature indicators in it are always at the same level, regardless of the time of year. Due to this quality, preservation can be stored indoors without danger.


There is a scheme according to which many garages are equipped with an inspection hole. Some users place cellars under a pit.
The construction of semi-buried cellars is considered a necessary measure. As a rule, this option is resorted to if the soil does not allow creating a deeper recess or the groundwater is located too close at a high freezing point without the possibility of high-quality waterproofing. In practice, sometimes there are ground-based variations of cellars, but such a structure cannot be created in a garage.
Recessed cellars under the garage will be reliable if the foundation part is located higher than 70 cm from any water source. In this case, you can even create a cellar that will be larger than the garage area. Experts advise developing a project in advance and making all the calculations.


It is best to build a basement at the same time as building a garage. However, most people buy a space for their car rather than build it from scratch. Therefore, basements have to be built under the finished structure.
Possible problems
When building a basement, many people may encounter some problems that they need to be prepared for in advance.
First of all, you will need to get rid of the water that is present in the cellar. Excess moisture leads to the formation of fungus. Mold is considered main problem when operating cellars. It is formed due to a poor waterproofing layer and poor-quality ventilation, which cause an increased level of humidity in the room. Also, fungus can appear due to prolonged exposure to spoiled food in the cellar or the use of contaminated wood.


Some basement owners are faced with the fact that food in the room freezes. Therefore, special attention should be paid to insulation measures. Insulation not only eliminates sub-zero temperatures, but also maintains an optimal microclimate in the room.


However, with the help simple insulation it is impossible to lower the humidity level. It will be necessary to create high-quality ventilation, which will be responsible for controlling the level of water vapor in the cellar.
If the basement in the garage freezes, you will need to buy heat-insulating materials. There is a wide range of special raw materials on sale that can be used for insulation. The insulation must retain its geometric shapes, have high-quality insulating properties and resistance to moisture and soil.
Most often, expanded clay, fiberglass, expanded clay concrete, mineral wool, ceramic brick red, polystyrene foam and cellulose insulation.


How to build?
The construction of a basement in a garage consists of several stages. Every step is an important event, without which it is impossible high-quality construction structures. To build a basement with your own hands, you should study the sequence of actions and follow the work manual step by step.
Preparation for construction
For construction buried cellar required capital garage. To realize your idea, you need to make preliminary preparations. It consists of several stages:
- Before construction work, you need to make sure that it is technically possible to equip the basement. In the soil of large cities there are a large number of communication lines, so making a hole of the required depth is quite difficult. To reduce financial investments and determine the possibility of carrying out work, you can seek help from a specialist or use project documentation, which was used to create the garage.
- The foundation must be protected from groundwater. This step should be taken into account during the construction of the garage using a drainage system. If this issue has not been resolved in advance, careful waterproofing of the basement will be required.


Purchasing the necessary materials
Building a basement will also require special tools and materials. To build walls, you can use concrete slabs, cinder blocks, bricks or natural stones.
Concrete slabs are only suitable when building a garage from scratch. The arrangement of the cellar is carried out before the construction of walls and ceilings. You will also need professional help installation team, which, using a lifting mechanism, can install the slab.


To fill the base, you will need ready-made concrete M-100 or a solution made by yourself. The solution is created from gravel, crushed stone, sand and M-400 cement. The resulting solution is suitable for preparatory work before screeding and finishing walls during plastering.
To create the formwork you will need an edged board. The required quantity will depend on the dimensions of the basement. Roofing felt is used as waterproofing.
When building a cellar with your own hands, you don’t need professional equipment. For this purpose, a traditional list of tools that every home craftsman has on hand is suitable.


To work you will need the following elements:
- jackhammer;
- scrap;
- sledgehammers;
- spatula with trowel;
- hacksaws;
- electric drills;
- screwdriver;
- pliers;
- construction shovel.


You also need to prepare measuring instruments, without which not a single construction project can be completed. You will need: a plumb line, a construction tape, a metal ruler and a level.
Step by step guide
Planning the cellar should be done at the stage of constructing the garage. This will make the work process easier. If thoughts about getting a cellar appeared when purchasing a ready-made garage, the concrete floor will need to be dismantled. It is necessary to remove the screed from the area where the basement will be located. Work can be carried out using a jackhammer or sledgehammer.
First of all, you need to prepare the pit. The depth of the pit in the buried cellar is three meters. Other sizes are allowed, which should be selected individually depending on the planned size of the basement. For a room whose size is 8x12 meters, a depth of 3 meters will be enough.


The preparation of the base is carried out as follows:
- First you need to dig a pit.
- The floor and walls must be carefully leveled and compacted. This action ensures the evenness of surfaces in the room.
- You will need to fill the bottom with crushed stone and gravel in layers. Each layer also needs to be leveled and compacted.
- The prepared surface is poured concrete mortar small thickness (8-9 cm).
- After the concrete has hardened, you can begin initial waterproofing measures. They consist of laying two roofing felt layers glued together with molten resins. The edges of the sheets should protrude 10 cm beyond the basement. Then you can install the formwork and pour the mortar.


Ladder - important detail, which connects the basement to the garage.
There are two types of structures:
- Traditional ladder made from wood or metal.
- Marching. Installation is carried out ready-made during construction work.


Several materials can be used to build stairs:
- Tree. Since the basement is a cold and damp room, the wood must be additionally treated with antiseptic agents. This will protect the material from attack by insects and bacteria.
- Metal. If the work uses used material, it should be treated with abrasive materials. This action protects the future structure from the corrosion process. Then the metal should be wiped with detergents and rinsed with plain water. After installation, the steps are covered with oil paint or enamel.
- Concrete characterized by high strength indicators, but protection of the material is also necessary. The steps should be painted or tiled for floor surfaces.


While creating metal structure The following nuances should be observed:
- Products whose width is 80-90 cm are allowed for use.
- Clearance of stairs in basement should be calculated from the lower steps to the floor beams. In new cellars this value should be more than two meters. Compliance with the dimensions allows you to minimize the likelihood that a person will hit his head on the ceiling.
- The slope of the product should be 22-75 degrees. If an extension ladder is being built, an angle of 45-75 degrees is allowed.
- The width of the steps is 25-32 cm. If you make a wider tread, climbing up such a structure will be uncomfortable. Narrower steps make the descent dangerous.
- The height of the steps should be maintained within 12-22 cm.


Construction wooden stairs consists of several steps:
- Initially, you will need to attach bars to the supports, on which the steps will later be mounted. You should count 26 cm from the top support point and fix the block. An angle of 60 degrees must be maintained. Each bar is fixed using two nails or self-tapping screws.
- Other support bars are fixed in increments of 26 cm.
- Then the steps are attached to the bars. Nails or screws are used as fasteners.
- The installation of the structure takes place at a slope of 30 degrees. This way the steps can take a horizontal position.


The walls in the basement are made only from solid material. The use of chipboard, plywood and other lightweight products is not allowed.
Brick is most often used in construction. During work, you will need to ensure that the masonry is vertical and its surface is level.


Some garage owners use monolithic concrete when constructing walls. For such work, the following sequence will be required:
- for every wall goes astray wooden shield, which will be used as formwork;
- metal pillars are driven in around the perimeter of the room;
- the formwork is fixed on the racks;
- then you can start pouring the concrete solution.


Regardless of what material the walls are built with, you need to ensure that they are positioned strictly vertically. Each seam is rubbed using mortar. When the laying process is completed, the seams are painted with lime.
In most basements when creating flooring reinforced concrete is used. Such a floor is created in the following sequence:
- First of all, you need to level the surface. To do this you need to use a building level.
- Then a 15 cm layer of crushed stone is poured onto the base. It must be distributed evenly around the entire perimeter of the room.
- A layer of sand (5 cm) is poured. It also needs to be leveled and compacted.
- Then you can start creating the floor itself. For this, a reinforced concrete slab or a strong metal mesh with a screed is used. For the second method, you will need to install reinforcing bars along the perimeter of the basement in 1-meter increments. A metal mesh is laid on the floor surface and cement is poured. The layer should be 3-5 cm.


Ventilation
A properly equipped hood helps eliminate dampness and foreign odors from the cellar. It also ensures long-term storage of canned goods and vegetables.
There are two types of ventilation used for the cellar:
- Natural. The best option for providing the room with fresh air.
- Forced. This option uses a fan.


Creating natural ventilation does not require significant costs. It is easy to create such a system yourself. To do this you will need:
- A hood is installed under the ceiling. The pipe outlet should be located at a height of 0.5 meters from the roof. Heated air masses will flow through it.
- A supply pipe should be installed at a distance of 10 cm from the floor surface, which will be discharged outside the room. It will bring fresh air into the basement.
- The outlets of both pipes should be covered with a special mesh, which will provide protection from insects. Small covers are mounted on top.


IN winter period natural ventilation may not function as both outlets become clogged with frost. To prevent blockage, it will be necessary to insulate the exits and timely clear them of snow. Some craftsmen create removable output parts.
Forced ventilation differs from natural ventilation in that its design includes an improved exhaust hood. An electric fan is inserted into the cavity of the system, which creates a vortex flow and expels waste air masses from the room. Fresh air flows through the upper pipe into the basement.


Some users use entirely mechanized ventilation. To create it, you will need to install a monoblock, which will be controlled using special software.
Insulation
If you do not take care of high-quality insulation of the basement in the garage, the room will be cold. Using thermal insulation, you can protect the cellar from dampness. Most often, garage owners use foam plastic as insulation. The thermal insulation process involves working with walls, floors and ceilings. In addition to polystyrene foam, you can use other suitable material.


Ceiling insulation is as follows:
- All cracks and crevices must be eliminated.
- Then you need to cover the surface with a vapor barrier material. For these purposes, you can use penofol, which provides high-quality thermal insulation.
- The installation of hangers for the sheathing is in progress. The distance between the parts must match the width of the insulation board.
- The next layer of vapor barrier should be located at a distance of 4-5 cm from the previous level. This method can provide microventilation.


Floor insulation consists of several steps:
- The rough base must be leveled using a building level.
- Then a layer of waterproofing should be laid. Most often, foam plastic is used for these purposes, the thickness of which is 5 cm.
- Penofol is mounted on top of the insulation.
- A reinforced screed and a finished base must be placed on the thermal insulation.
- Since the cold enters the basement through the walls, insulation will be required to ensure a high-quality microclimate.


The process of wall insulation consists of several steps:
- First of all, you should lay the waterproofing layer. It will provide protection from moisture. If the surface of the walls is uneven, you will need to level the base.
- Then a layer of foam is laid. For fixation, you can use any adhesive.
- The finish should be covered with a light layer cement screed. Auxiliary reinforcement consists of reinforcement.
- A cellar is a room in which there is a high level of humidity. To minimize dampness, an additional waterproofing layer will be required.


Hatch with overlap
The choice of material for making the ceiling depends on the dimensions of the basement. If the area of the basement does not exceed the size of a regular inspection hole, the upper part is created from a forty board. Large cellars will require a reliable ceiling that can cope with the impressive weight of the car. It is best to use a concrete slab and a reinforcing frame for these purposes.


Installation of a concrete slab is allowed only during the construction of a cellar before the construction of a garage. If construction work is carried out in a finished structure, the following actions will be required:
- Load-bearing beams are installed. For these purposes, you can use railway rails, which are sold at metal collection points.
- Then the concrete is poured.
- The created product will be similar to iron concrete slab. When laying beams with reinforcement, an area for the hatch should be provided.


The hatch is easy to make with your own hands from steel sheet. For work you will need a list of tools and materials:
- electric grinder;
- welding machine;
- steel sheets 5 mm;
- metal corners;
- polyurethane foam;
- insulation material – polystyrene foam or penoplex;
- tin;
- screwdriver;
- loops;
- construction tape;
- seals.


Creating a hatch consists of several stages:
- A steel sheet should be cut according to the size of the hole.
- Metal corners are welded along the edges of the sheet. To ensure optimal sliding between the sheet and the corner shelf, a small gap should be provided.
- The inside of the hatch is covered with insulation. The foam should fit tightly to the metal corner. All gaps should be foamed.
- The tin is laid on top of the insulation. All corners should be folded. The tin has only a decorative component, so this step is optional.
- Then you can start fixing the loops. If required, a handle is attached.
- The finished product is hung on hinges.


Some people decorate the hatch under the floor surface. A wide range of finishing materials allows you to create a floor that is in harmony with general style basement. The lid can be painted with any paint that is suitable for working with the finishing material.
What to finish with?
When the work on the thermal insulation of the walls is completed, you can begin finishing the ceiling, walls and floor surface. Walls are most often covered with tiles and other similar materials. You can also use paints, lime or plaster.


When finishing with plaster, the process consists of several steps:
- A metal mesh should be fixed to the surface of the walls. Since there is high humidity in the basement, the plaster will not be able to adhere to the base alone. To secure the reinforcing mesh, you will need dowels. There is no need to close the ventilation.
- The solution is applied to the wall using a trowel, and then smoothed with a trowel.
- If finishing is planned on top tiles, the solution should be thin.


To simplify the process of building a basement in a garage, you should familiarize yourself with the recommendations of experts:
- Before building a cellar, you need to study the procedure for selecting materials that are suitable for the job. You should also consider the size of the future structure and familiarize yourself with the standard requirements for the dimensions of basements.
- Work begins with the development of a small diagram, which should include not only the location of the object, but also the dimensions. Using the sketch, you can calculate the required amount of materials.
- When constructing a basement yourself, you need to pay attention to choosing a place for constructing a pit. The pit should be located at a sufficient distance from the supporting structures of the building.
- The basement must have high-quality waterproofing and ventilation.
- The most optimal option for descending into the cellar is an extension ladder that will be lowered through a hatch.
- A staircase equipped with concrete steps is suitable for a large basement.
- The hatch cover should be made of lightweight materials so that no special effort is applied when opening it.

Construction Materials
Peter Kravets
Reading time: 4 minutes
A A
Construction of a storage facility for vegetables at personal plot country house can be produced as a separate structure, or built into an existing structure. Arranging a cellar involves, first of all, providing the necessary temperature for storing vegetables, since this is its main purpose.
The room in the basement is more functional; things and materials are stored there, and various engineering equipment is placed.
Building a storage facility under a house with an outbuilding and integrating it into an already in use structure is much more difficult than building a separate element of outbuildings on a free site.
The difficulty arises not even in the consumption of materials, but in labor costs and in calculating parameters that should not damage existing communications. In a private house, as a rule, the arrangement is carried out in a garage or under a shed.

Building a cellar in a garage with your own hands - convenient solution to save space on the site and in the house itself, where there is no space for additional storage rooms. A “garage with cellar” project is being drawn up, and it is necessary to approach the solution of the problem in a comprehensive manner, since these are two rooms with different purposes.
If there is a viewing hole in the garage, you can make an entrance to the storage in it. Let's consider step by step how to build a cellar in a garage that is reliable, long-lasting without repairs, and dry.
How to build a cellar in the garage suitable type of all that exist? Everything needs to be studied possible options arrangement and choose an acceptable one.
Arrangement of a cellar in a garage with a utility unit is possible in two types - located under the house or standing separately. Since the do-it-yourself cellar in the garage that interests us is not built separately, its type can be determined by the depth of its placement.
A do-it-yourself garage with a cellar can be equipped with a pit for storing products for the winter. It is very easy to make such a structure even from an inspection hole, especially if you take a tank and dig it into the ground. This is the most basic method of arranging a cellar.
In the finished garage, you can dig a small hole for storing vegetables. This option is not at all difficult to do, the work is approximately the same as in the case of an inspection hole installed in a garage, but some owners simplify the work by using a container for these needs, which is buried entirely in the ground.

Semi-recessed
Such storage can be made even in waterlogged areas, since its depth is only about a meter. The walls of such a pit are filled with slag concrete or ordinary concrete mortar and lined with bricks. Waterproofing requires the use of adhesive type or coating.
Fully recessed
The most popular type of underground storage facility, the pit of which is dug 3 meters deep. Such arrangement requires studying the groundwater level. The optimal bottom of the structure would be half a meter above groundwater.
Construction of a garage project with a cellar and inspection hole begins with planning its size. Initially, you should take into account the recommended standard parameters - depth up to 1.9 meters, width up to 2.5 meters. Even if space allows, other cellar sizes are not recommended. Once the dimensions are determined, you need to create a view of the room and draw its plan.
- The drawing must be correct and clear, since it will be used to calculate the materials upon purchase. Experts recommend building a cellar under the garage, maintaining about half a meter from the walls. This will ensure good waterproofing on the sides, especially when the strip foundation acts as the walls;
- With this method of arrangement, you can save money without violating the floor height requirements - 0.3 m higher than the foundation line. The option is quite applicable if there is confidence that construction work will not damage the foundation;
- The drawn up work plan must certainly include waterproofing work and installation of a ventilation system. To enter through the hatch they make metal staircase, and if the garage space allows, you can make a descent for the basements from concrete steps.
Requirements for choosing a location when arranging a storage facility
When making a basement or subfloor in the garage under the house, you need to do it based on the overall dimensions of the building. When making calculations, it is necessary to take into account that the location will be successful precisely in the center of the house, equidistant from the external contours of the structure. The depth of the place is chosen taking into account the level of water passage in the soil and the indicators of their fluctuations throughout the year.
If the room is located under a garage, then projects for garages with underground floors are carried out according to certain rules, arranging them step by step, taking into account the requirements:
- Work begins only if there is confidence that the hole you dig, 2-3 meters deep, can be made without damaging communication pipes and systems;
- Before making a cellar in the garage with your own hands, it is important to examine the groundwater level. In fact, it is impossible to build a recessed room under the garage, but if a decision has already been made, then you need to make high-quality protection against erosion groundwater grounds. For reliability, it is worth equipping a ring drainage system.
Material selection
Modern production offers a wide variety of materials for construction. The choice is determined by the size of the estimate for the arrangement, as well as the personal preferences of the owner. If you still need to make storage as soon as possible, Special attention should be given to reinforced concrete slabs.

- Monolithic concrete and wild stone can be considered inexpensive and high-quality materials. If red brick is used, you need to make sure that it is fired well. Experts warn against using cinder blocks or sand-lime brick. To fill the foundation, use concrete grade M 100, silt cement M400 mixed with crushed stone, sand and water. How to properly mix the solution is worth studying further;
- A mixture of sand and cement is also used for floor screeds, as well as for plastering walls indoors;
- The formwork is assembled exclusively from solid boards, and it will be more economical to lay roofing felt in layers on molten mastic as waterproofing.
Construction of the foundation
When building a foundation, the first step is to dig a foundation pit. The instructions are very simple:
- Once the required depth is reached, the bottom must be compacted and leveled. A layer of 3 centimeters of crushed stone is laid and filled with concrete. The total layer thickness should be about 8 centimeters.
- As soon as the concrete reaches the required hardness, waterproofing is done. 2 layers of roofing material are laid out, they are poured with molten resinous mastic. It is important that the edges of the layer extend 15 centimeters beyond the boundaries of the walls. Formwork is made and concrete is poured;
- To avoid flooding, it is important to create a drainage system.
Walling
How to make a cellar with your own hands so that its walls are reliable and last a long time? The masonry method varies greatly depending on the material chosen.
- Brickwork is used in a simplified manner. It is important to maintain the verticality of the wall, and also carefully rub down all seams and joints. The final finishing is done with whitewash or lime;
- If the walls are made monolithically of concrete, then it is necessary to make high-quality formwork for pouring mortar. Shields for the walls are knocked down from smooth and strong boards, metal tables are driven in around the perimeter, to which the formwork is fixed and poured with concrete.
Ceiling arrangement
To simplify the assembly of the ceiling, reinforced concrete slabs are used.
- Holes are drilled in the slab for mounting the hatch, and a mark is made on the base for its installation.”
- Once the slab is installed, it must be coated with resin and insulated. Use glass wool or a mixture of cement and sawdust. This layer must be at least 20 centimeters;
- The final finishing is done with clapboard or slate, especially if there is thermal insulation. The furnished ceiling in the cellar in the garage is covered with plaster.
Waterproofing
The design of a garage with a cellar makes waterproofing mandatory. For these purposes they use various materials, including the newest ones, but you can also use old proven methods:
- Bitumen-based lubricants will cost minimal costs. They are laid in several layers, between which roofing material is placed. The entire structure is sprinkled with coarse sand;
- The walls of the room from the inside must be treated with penetrating mixtures that penetrate deep into the material, without forming a film on the surface. The material becomes monolithic and does not allow moisture to pass through;
- It is almost impossible to damage penetrating insulation, because its lifespan is many times longer than its analogues, and sometimes even exceeds the service life of the storage facility itself. This waterproofing is also suitable for outdoor use. Surfaces should be slightly moistened before application, since water helps solution particles penetrate into the structure of the base material;
- Before applying the mixture, it must be diluted with water. This will improve the application, which should be done in 2 mm layers. According to the manufacturers, the mixture penetrates 0.9 meters inside, creating formations of crystals;
- Such crystals are able to fill all the voids inside concrete, blocking access to moisture. But the wall remains vapor-permeable;
- All work can be done independently, without the involvement of specialists and equipment.
Flooring
A reinforced concrete floor is considered optimal.
- The floor is leveled, covered with crushed stone and sand and compacted. You can make the floor from a slab;
- Reinforcing bars are made to strengthen the structure, reinforcing mesh is laid;
- The entire structure is poured with concrete in 4 layers.
Thermal insulation of a cellar under a garage
You can choose any of the known thermal insulation materials. But the most common and well-known is polystyrene foam, which is also mounted outside the room. It is resistant to fungus and mold, different for a long time operation without losing its qualities.
- Insulation is installed on both sides of the wall, which significantly increases resistance to temperature changes. If only the inside of the room is insulated, condensation may settle due to the temperature difference;
- Sawdust can be used as thermal insulation, placed 40 centimeters deep and compacted. Cover the roofing material and fill it with concrete mortar for screeding. As soon as the surface hardens, it is coated with bitumen;
- If a concrete slab is used for the ceiling, then a false ceiling is needed. It is done simply - pipes are fixed in the walls 15 cm from the floor slab, and a mesh for fencing is made from reinforcement;
- The structure is painted with moisture-resistant paint. The space between the ceiling and the reinforcement is filled with insulation. Then you can use mineral wool.
Cellar ventilation
It is imperative to equip a cellar under the house with ventilation. In open sources there are a lot of videos and photos of examples of arrangement, with a detailed display of all the options for air exchange in an underground room.
Any home needs a cellar or basement - it’s hard to imagine a full-fledged one without them. household. On small plots of land, a cellar is most often built in the garage - the area is sufficient, and less additional work is needed to arrange an underground storage facility, since the temperature in the garage is maintained at a lower temperature than in the house. But, even if you don’t have a house outside the city, then if you have a garage, you can and should make a cellar in it, although even the simplest structure requires compliance with complete technological cycle– waterproofing, insulation, ventilation. Therefore, before making a cellar in the garage, you need to have at least a general understanding of these works.
If a garage is just to be built, then the cellar is immediately included in the project - this way, optimization of all construction processes is achieved, saving materials and labor costs. In addition, building a cellar along with a garage from scratch will in itself be cheaper for you than adjusting the process to the finished premises.
Types of cellar designs
In terms of depth, a garage cellar can be semi-recessed (up to 1.0-1.5 m) or recessed (1.6-3.0 m). Buried buildings are distinguished by the fact that the temperature and humidity in them are at a constant level all year round, so you can store vegetables, fruits and canned goods without fear for their safety.
Semi-buried arrangement of a cellar in a garage is rather a forced option, and it is implemented for many reasons. For example, if the soil does not allow you to go deeper, if groundwater comes too close, if the freezing point of the soil is high, and it is not possible to carry out waterproofing work in full, etc. There are even above ground cellars, but it’s impossible to build such a structure in a garage.
A buried cellar under a garage will be reliable if its foundation (or the foundation of the garage) is located at a distance of at least 50-70 cm from any source of water - underground, above-ground, artificial or natural. The size of such a cellar under the garage can be even larger than the base area of the above-ground building, but in reality it is cheaper and without loss of functionality to build cellars on a pit ≤ 2.5 meters wide and ≈ 2 meters deep. The project, layout and estimate should be drawn up and calculated in advance. 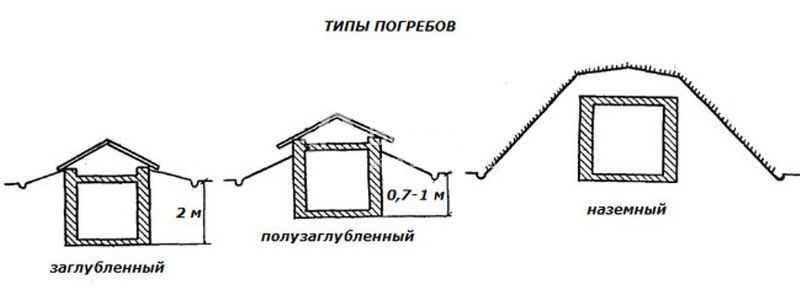
It is best to construct a garage basement together with the construction of the garage itself. But, since more often you have to deal with the purchase rather than the construction of a garage, you have to build a cellar under a ready-made object, especially since these options are technologically similar, except that it will not be possible to dig a foundation pit under a ready-made garage with an excavator - earthen work will have to be done manually.
- When groundwater occurs, when the area is waterlogged (flooding, floods, proximity to other water sources), when loose or weak ground The bottom and walls of the pit are built according to the principle of monolithic concrete structure to increase structural strength, wall density and moisture resistance of the entire cellar;
- As a monolithic structure, builders offer a reinforced strip base, which, with the simultaneous construction of a cellar and garage, will also perform the functions of above-ground walls;
- In dry soil, it is allowed to build cellar walls from asbestos-cement slate, which is used to cover the roofs.

Correct choice of material and selection of tools
Traditionally, a cellar in a garage is built with your own hands from red (but not white silicate) brick, reinforced concrete slabs, concrete blocks or natural wild stone. Due to the low density of the materials, it is not recommended to use cellular concrete, cinder block or rubble blocks. Reinforced concrete slabs will help facilitate the construction of the cellar, since they will serve as a floor, but to move them you will need to rent a crane. The remaining options can be implemented alone, without assistants or special equipment.
Standard list of materials and tools that you cannot do without when building a cellar under a garage:
- Concrete mortar - it is prepared independently and ordered from the manufacturer with delivery and pouring. A homemade mortar is a mixture of cement, crushed stone and sand in a ratio of 1:3:3, mixed with water until sour cream thick;
- Concrete blocks, red brick, slabs for covering concrete walls;
- Edged boards, thick plywood, chipboard or other sheet material - for assembling formwork;
- Waterproofing materials - roofing felt, bitumen or bitumen mastic, polyethylene, membrane roll insulation;
- Thermal insulation is carried out using polystyrene foam or mineral wool;
- Entrenching tool - for digging a pit;
- Level, tape measure, hammer, trowel, spatulas, rule (for leveling the concrete floor);
- A tank for mixing mortar, or a concrete mixer;
- Pegs and cord for marking the area.
Construction of the foundation
First, they dig a pit according to the size of the perimeter of the future garage. For strip foundation in the garage, the level of the floor surface is made higher than the lower level of the base by 30-40 cm with a pit depth of up to 3 meters. To save money, you can dig a pit manually.
Projects may be different, and if the cellar area is smaller than the garage area, then it will be more economical and rational to lower only the basement foundation to this depth, and not the entire base. In this way, it is possible to reduce the amount of excavation work while maintaining the calculated size of the pit. The base is deepened evenly, removing 30-50 cm of soil on each layer or up to 100 cm per 1 linear meter of the foundation.
The base is poured onto a pre-prepared cushion of crushed stone and sand (5-7 cm of sand and 10-12 cm of crushed stone), which is moistened and compacted. Board formwork will prevent concrete from penetrating into the ground, and for this purpose it is protected with a layer of polyethylene waterproofing. When building a foundation from blocks or bricks, the mortar is prepared according to the same recipe. In any wall (concrete, block or brick), technological openings are left for ventilation, water supply and sewer pipelines, as well as for electric cable. The outer surface of the walls is insulated with expanded polystyrene. The concrete solution must be reinforced, and for this purpose a reinforced frame made of rods Ø 12-16 mm is used. 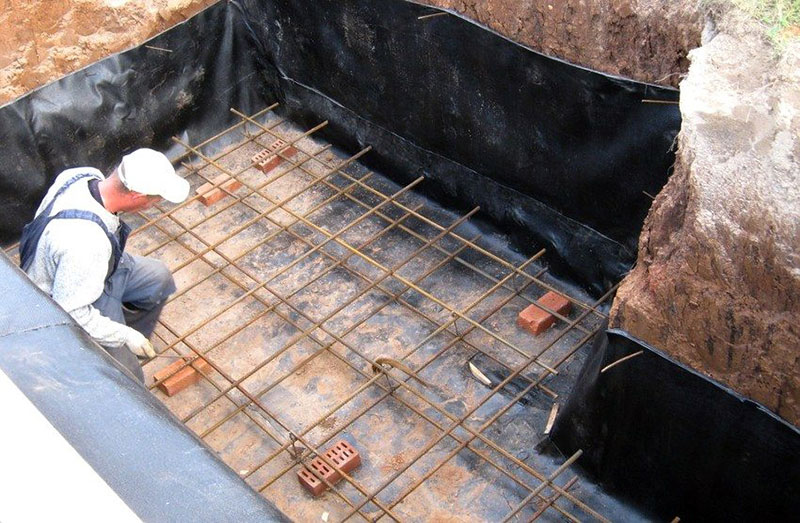
Cellar floor
First of all, you need to level the bottom of the pit, which, according to the results of excavation work, should be 5-10 cm lower than the future floor. The bottom is covered with sand up to 30 cm thick, the sand is moistened and compacted.
A deep garage cellar may have a concrete, earthen or clay floor. A compacted clay floor is the cheapest and not the worst option, since clay does not allow moisture to pass through. Such a surface is developed in two stages: roofing material is laid on the first layer of clay 10 cm thick, on which another layer of clay is poured.
With a floor on the ground, it is protected with a layer of sand and a layer of crushed stone, which will protect the ground from waterlogging. The sand-crushed stone (gravel) cushion is covered with roofing felt, on which a layer of soil for the floor is poured.
The construction of cellar walls involves the use of a wide range of materials, but the base cannot be chipboard, plywood or other lightweight materials. Brick, concrete blocks, pouring walls into formwork with concrete mortar - all these surfaces after construction must be protected with a layer of waterproofing made of polyethylene, roofing felt or hot bitumen. For walls it is allowed to use foam blocks, which are also protected by hydro- and vapor barrier. 
- Walls made of any material, including concrete blocks, are reinforced every 3-4 rows with mesh or rods;
- Formwork for poured walls is assembled from any wood, since it is covered with waterproofing materials on top;
- Concrete M 400 and fine crushed stone are used for the solution. The semi-liquid mixture is poured in layers of 25-30 cm, each layer is compacted by bayoneting, last layer reinforced so that the walls can withstand the ceiling.
The construction of cellar walls made of foam concrete will be much faster, since the blocks are lightweight and equipped with a tongue-and-groove system for combining and maintaining the dimensions and geometry of the masonry.
Thermal insulation of the cellar
Expanded polystyrene, which is usually used to insulate a cellar in a garage, is attached with outside walls when arranging the foundation, until the space between the pit and the walls is backfilled. In terms of its performance characteristics, expanded polystyrene is better suited than other thermal insulation materials, and also in price. Most popular in individual construction insulation – PSB-S-25. 
After insulating the walls, they move on to insulating the ceiling of the structure. The ceiling in the cellar is the ceiling and floor of the garage, so the structure must be strong and powerful to support the weight of the car and all spare parts, tools, furniture and equipment. Therefore, the recommended ceiling is a reinforced concrete slab with a hatch for entering the cellar. If there is no hole for the hatch, it can be cut with a grinder or hollowed out with a hammer drill. The hatch itself is reinforced around the perimeter with a metal corner or channel, and the hatch hinges and the hatch itself are attached to the corner by welding. 
Most economical option insulation - use mineral wool– stone, fiberglass, basalt. Before the insulation process, the floor is protected with a layer of waterproofing. To do this, use the same material as the waterproofing of the cellar wall. The ideal thermal insulator for any building is polystyrene foam. Eps boards are mounted both on the outside and on inner surface walls and ceilings. An economical option is ordinary sawdust, which is compacted in the space between the floor beams if it is made of wood or metal. The disadvantage of such insulation is that it is not protected from moisture, so the sawdust is covered with a vapor barrier and waterproofing materials.
Ventilation in the cellar
Ventilation - required condition operation of any cellar, so it is designed at the garage design stage so that there is constructive possibility combine both systems into one. With proper air exchange in the cellar, the safety of food will be ensured all year round. Ventilation is arranged according to one of two possible schemes: natural ventilation or forced movement of air masses. The best effect will be obtained by combining these schemes. 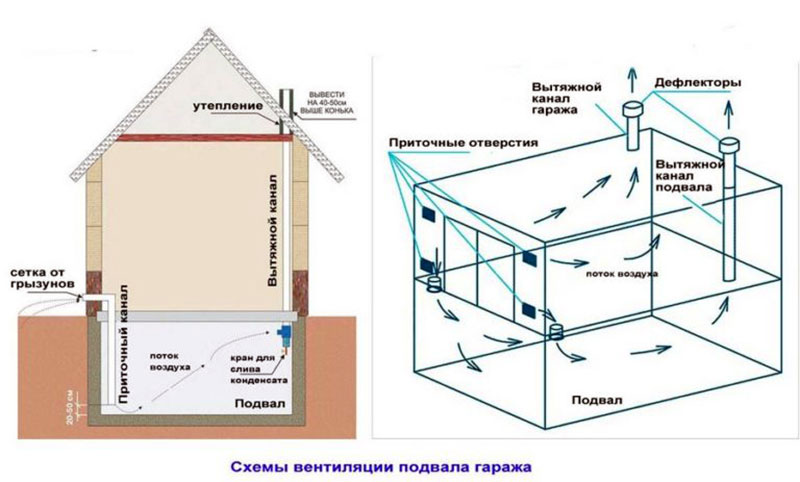
- Before you ventilate your garage cellar, make sure which option will be most effective. Natural ventilation of the room is the easiest to do, since this requires installing only two pipes - supply and exhaust. The end of the supply pipe should be located 20-30 cm from the cellar floor level, its upper part will be led out. To protect from wind and precipitation, it is covered with a cap, and from rodents - with a fine-mesh metal mesh. The exhaust pipe should start 20-30 cm from the ceiling and end 1.5-2 meters above the garage roof;
- Forced exhaust in the garage cellar is distinguished by the ability to adjust it and control the air flow. It costs more, but is much more reliable in operation, as it works in any weather conditions.
Before properly making ventilation in the cellar, it would not hurt to find out the wind rose in the region from the local meteorological service, which will help you decide on the choice of a scheme - forced or natural.
Waterproofing works
Since the cellar is an underground room, the humidity in it will be constantly high, and a room with high humidity requires reliable protection in the form of several layers of waterproofing materials. 
The walls occupy the most large area in the design, therefore they are given the greatest attention. A fairly reliable and cheap option is to coat the walls, ceiling and floor with hot bitumen. But with very high soil humidity and, accordingly, air in the cellar, it is better to waterproof the walls with lining roll materials- roofing felt, for example. To enhance the effect, a layer of oily clay is applied to the roofing material.
If the base of the pit is located below the point of passage of groundwater, then it is necessary to supplement the protection with underground multi-layer waterproofing made of roofing felt sheets. To enhance the effect, a layer of crushed stone mixed with rich clay is poured under the floor. 
https://youtu.be/aFwWY6Z2Odk
Organizational and practical conclusions when building a cellar
Before building a cellar, it must be calculated in all respects. High-quality arrangement of underground utility storage is planned when designing a garage, taking into account the following priority tasks:
- Check the construction site for the passage of extraneous underground engineering communications. For high-quality operation of the cellar, it must be buried 3-3.5 meters into the ground, no less;
- Conduct environmental and geological surveys to calculate the level of soil and groundwater contamination, groundwater levels and soil properties;
- Draw up a project plan for a garage with a cellar. The simplest, and therefore the cheapest, project is a rectangular building in which the entire area under the garage is allocated to the cellar, sometimes some of it;
- Choose the optimal construction technology taking into account your capabilities - rental of special equipment, powerful devices slab foundation, etc.
Environmental and geological surveys
If it is necessary to build a deep foundation, it must be protected from erosion groundwater arrangement of a drainage system around the garage. Otherwise, there will be constant flooding of the cellar, which will require not only pumping out water, but also taking measures for enhanced waterproofing, and these measures can be very expensive for the owner, since no technology for surface waterproofing of underground premises can fully protect the cellar from ground moisture, much less - from flooding.
The fastest way to build a cellar yourself is to use reinforced concrete slabs and blocks to build and form the foundation and walls of the facility. If you have a limited budget, you can use concrete pouring of slabs and floors.
If you have a lot of vegetables every year and you don't know where, pay attention to how you can build a basement in the garage. The underground room can be used to store not only the gifts of nature, but also other things. We offer you to understand in detail the intricacies of the process.
Read in the article
Types of cellars in the garage with photo examples

How to make a pit for a cellar in a garage with your own hands: possible options
The method of forming a pit depends on the type of soil in a particular area. If the earth is dense and heavy, the question of how to make a pit for a cellar in a garage usually does not arise. It is quite difficult to dig it out with your own hands. If the soil is soft and the volume of soil removed is relatively small, you can use a shovel.

A comment
Team leader of the repair and construction company "Dom Premium"
Ask a QuestionIn order not to think about how to properly dig a pit for a cellar in a garage, carefully study the drawings. They contain all the necessary information about size and shape.

How to lay a foundation and make a basement floor in a garage: sequence of actions
After the pit is completely formed, you can begin to form. The service life of the structure as a whole depends on its strength characteristics. The work is performed in the following sequence:
| Illustration | Description of action |
 | Pour a layer of sand onto the bottom of the prepared hole and compact it thoroughly. |
 | Place a layer of film on top. To prevent it from moving, we use pins. We lay the reinforcing mesh according to the level. |
 | Now about how to make a floor in a garage cellar. We pour the concrete slab. The surface should be formed strictly according to the exposed beacons. If work is carried out in winter, special anti-frost additives should be added to the solution. Let the solution dry completely. |
The process of pouring the floor can be seen in more detail in the following video:
Usually the cellar is quite deep, so care should be taken to ensure availability. Most often, preference is given to the following designs:
- traditional, the so-called attached;


- marching, installed directly during the construction process.

For the manufacture of both structures can be used:
- tree. In this case, all elements must be treated with an antiseptic solution;


- metal. Such a staircase should be protected from corrosion using;

- concrete. Robust design, requiring strict compliance with technological requirements during the construction process. For additional protection against negative impacts, it can be used paintwork or .

Having decided on the type of construction, it is important to know how to make comfortable staircase in the basement of the garage. To ensure the safety of systems, the following requirements are established:
- opening width 80 – 90 cm;
- slope 22 – 75º. Values above 45º should be selected for attached structures;
- The width of the steps should be selected from the range 25 – 32 cm;
- The height of the steps is 12 – 22 cm.
How to properly make cellar walls in a garage: possible options
To figure out how to properly make cellar walls in a garage, you need to know what materials they will be built from. If it is decided to give preference to a monolithic structure, the work is performed in the following sequence:
- it is installed along the perimeter of the underground structure, fixed on metal poles for reliability;
- concrete solution is prepared;
- the wall is being formed.
Installation of vertical slabs is carried out using special equipment. In this case, the verticality of the formed wall and a strong connection of the elements must be ensured.

It is possible to use expanded clay concrete blocks:
| Illustration | Description of action |
 | If this has not been done previously, a base is formed from which the walls will be installed. |
 | The first layer is laid on the strip. |
 | We form the walls, carefully controlling their verticality. |
Arrangement of cellar ventilation in the garage
To create optimal conditions in the basement, you need to properly arrange the cellar in the garage. can be natural and forced. Let's look at the features of each type.

Natural ventilation
Arranging natural basement ventilation in a garage does not require significant costs. When performing installation yourself, the work is performed in the following sequence:
- We install a hood under the ceiling so that the pipe outlet protrudes half a meter above the roof. Through it, air from the underground structure will flow out;
- We install the supply pipe 10 cm from the floor. It is designed to supply fresh air;
- We install nets on the outlet holes to prevent insects from entering the basement.
In winter, such a system stops functioning due to the formed frost if it is not taken care of. Exits should be carefully insulated and snow should be removed from them in a timely manner.


Forced ventilation
Design difference compulsory system consists in the presence of a special electric one that ensures the circulation of air masses. The vortex flow it creates ensures the timely removal of air masses outside the room. Fresh air is supplied to the cellar through the top.

Attention! It is possible to install fully mechanized ventilation, equipped with a programmable monoblock.
We invite you to watch a video about the operating features similar system to make it easier to build later exhaust ventilation with your own hands:
Floor and hatch construction
Before starting work, you should decide how to cover the cellar in the garage. The choice will depend on the size of the underground structure. If its width corresponds to the dimensions of the inspection hole, you can take a forty board. In other cases, more reliable elements that can withstand the weight of the car will be required. As a rule, the choice is made in favor of a reinforcing frame or. The latter should be chosen if the garage has yet to be built.


You can create a ceiling for a cellar in a garage with your own hands, with properties comparable to a concrete slab, as follows:
- Using railway rails, we mount load-bearing beams. They can be purchased at metal collection points;
- installing formwork;
- pour concrete.
To make a hatch, you can use various materials, but most often this element is formed from a steel sheet. For this:
- elements of the required size and configuration are cut;
- We weld metal corners along the edges, providing a small gap;
- insulate the inside. We foam all the gaps;
- We lay tin or other material on the insulation as decoration;
- attach the hinges and handle;
- We hang the assembled structure on hinges.


Do-it-yourself insulation of a basement in a garage

How to build a basement in a finished garage: video example of the work
If the garage has yet to be built, building a cellar usually does not pose any particular difficulties. We invite you to watch a video that tells you how to dig a cellar in a finished garage. It can be used as a video instruction:
Getting rid of water and mold when repairing a cellar in a garage
Over time, dampness may appear in the basement, and sometimes water begins to accumulate. In such situations, repair of the cellar in the garage is urgently needed: it will help get rid of mold and other negative consequences of high humidity.


