From time immemorial, wood has been a priority building material, raw material for the manufacture of household utensils and decor. The emergence of new products in this area does not prevent the tree from maintaining high popularity and being in demand. One of the important qualities of this natural material is its easy processing. This allows not only experienced craftsmen, but also amateurs, creative people to create unique decorative elements, building structures. Special tools for woodworking are indispensable helpers in such operations.
The main types of tools
Specialists in the field know very well what devices and mechanisms can be useful in various works with wood. It is quite difficult for a beginner to understand the huge assortment. In order to create your own universal arsenal that allows you to perform any operations, you need to get acquainted with the classification of tools, their types and features.
These products include professional and household, universal and specific products. In the category of tools for woodworking, you can choose:
- mechanical hand products;
- electrical devices;
- machine tool equipment.
Most owners who prefer to independently engage in repairs and construction have simple hand tools. The use of various electrical devices, networked and mobile, simplifies the process, allows you to conveniently and efficiently perform complex operations.
Electric woodworking tools make the process much easier
Wood processing machines are installed not only in specialized enterprises. In the model range of equipment, there are also household options that have compact dimensions and are easy to operate.
Hand tools for the DIY master
In the line of mechanical tools for wood, there are many universal devices that are used in a variety of works. They should be in stock for every craftsman. The presence of this tool makes it possible to perform a lot of chores around the house, on the site. A practical owner should have:
- saw a hacksaw;
- axe;
- chisel;
- hammer;
- plane;
- brace.

Hand tools for wood
These are the main assistants of the carpenter, without whom it is impossible to do in construction and repair. A hacksaw is a tool that consists of a plastic or wooden handle and a metal blade with teeth. Saws are produced in a large assortment, differ in size, size of teeth. The tool is intended for dividing a whole part into elements, eliminating excess. In performing small operations, a special jigsaw with a thin blade is used. Cleavers and axes are used for splitting, chopping, cutting.

Thin blade jigsaw for small operations
A metal chisel, consisting of a working part and a handle, is useful in chamfering, forming recesses, etc. In working with this tool, a special hammer is used, which is called a mallet. A plane will help to make the surface even, to give the board ideal geometry. If you need to use it regularly, you should purchase a power tool for woodworking. There are several types of devices of this type: sheet piles, jointers, etc. In the formation of holes in wooden materials, a brace is used that works with various types of drills.

The plane will help to flatten the surface.
In the work, the master will also need special materials for processing, which make it possible to create a perfectly flat, smooth surface. In such operations, sandpaper is used. You need to stock up on material with various sizes of abrasives in order to carry out roughing and finishing work.

Sandpaper for finishing works
Electric tool in working with wood
Qualified specialists and many home craftsmen prefer to acquire electrical equipment that allows them to quickly and efficiently perform various types of work. This woodworking tool is offered in a wide range. The most demanded devices are electrical:
- planers;
- drills;
- chain saws, circular saws;
- screwdrivers;
- grinders, etc.
The electric planer greatly simplifies the process of giving the ideal performance to a wooden surface. Using a drill, holes of the required size are created. You can use this device in the installation of fasteners, mixing solutions.

The electric planer greatly simplifies the process
Electric grinders are very popular among professionals and amateurs. The production uses tape models designed for large volumes of work. In everyday life, in repairs, vibration, planetary tools are used for grinding wood.
A chain or circular saw is an indispensable piece of equipment for a craftsman who has to carry out large-scale woodwork. Modern multifunctional models perform a variety of operations.

A circular saw for wood is an indispensable tool
A home craftsman, a specialist who is engaged in the manufacture of complex structures, will need a milling device. Mechanical, power tools for wood processing allows you to create curly elements, stairs and frames for windows, furniture.
Not only hand jigsaws are used in the creation of small elements, in work that requires special precision. An electric woodcarving tool is also available.

An electric jigsaw will do jobs that require extreme precision
The advantages of electrical devices include the efficiency of operations, the absence of the need to spend a lot of effort. For stationary work, it is advisable to purchase models that operate on the network. Battery powered mobile devices allow you to perform operations anywhere.
Additional accessories
In addition to the main tool, additional devices are used in working with wood. The home master will come in handy:
- work bench with a vice;
- pliers and pliers;
- clamps;
- rulers and tape measure;
- carpentry pencils;
- corner and protractor;
- plumb line.

Workbench guarantees ease of use
The presence of a workbench guarantees ease of use. This design is used to perform a large number of operations. It is equipped with drawers, they store various little things that the master should always have at hand. Using pliers, pliers, you can easily remove hardware, quickly dismantle. Clamps of different configurations are useful for fixing elements.
You can competently choose the necessary tool for wood in a large assortment without spending extra money. Experienced craftsmen give several recommendations:
- When choosing a hand tool, special attention must be paid to the quality and reliability of the working part. In working with him, you have to use effort. Durable, perfectly sharpened products will allow you to spend less time and effort.
- Any tool should be comfortable. Handles, configurations, dimensions of equipment, devices are selected taking into account personal characteristics. Comfortable models will eliminate inconvenience, fatigue, and ensure safety.
- Home craftsmen who rarely use tools for wood processing, if necessary, should give preference to manual types. This will significantly save the cost of purchasing equipment. If such work is performed regularly, it is better to purchase electrical counterparts.

For regular work, purchase an electric woodworking tool
You don't have to have all kinds of tools in your arsenal. You can limit yourself to several types of universal devices, if woodworking is not a professional activity, a favorite hobby.
Wood carving assistants
At all times, the skill of wood carving was highly valued. Exquisite figured elements adorn the facades of houses, furniture items, and household utensils. The advent of CNC machines that perform this operation at a high level did not make hand carving less popular. She remains one of the most popular hobbies for creative people. Special tools for wood cutting allow everyone to master this skill.

Wood carving remains one of the most popular activities for creative people.
There are several types of this art. The flat carving technique is used to create silhouettes with shallow contours. In the embossed mode, the decor protrudes above the recessed background. For geometric patterns, a line deepening technique is used. In the execution of openwork carving, gaps are cut out. With this art, you can create volumetric images in 3D.
The carving specialist uses a wide variety of tools. They are selected depending on the type of work. In the arsenal of the master there are universal products that are used in many operations with wood. These include hacksaws, chisels, milling cutters. There is also a specific tool:
- knives;
- engravers;
- incisors.

Wood tools are selected depending on the type of work
Carving knives
Knives help the master to create skillful carving. There are many types of this hand tool. The most popular options include:
- tatyanka;
- Bogorodsky;
- jamb.

Wood knives for skillful carving
The tatyanka knife has a long handle. The beveled blade during work is 2 centimeters from the hand of the master, which allows you to create small elements. Bogorodsk knives are available in several models, they can be used for rough and fine carving. The handle of this tool has a semicircular contour, the blades are partially sharpened, similar to a penknife. The jamb is identical in structure to a professional shoe tool. Its blade is beveled at an angle of 45 °, sharpening is one-sided.

Bogorodsk knives for fine carving
In the process of work, the tool for cutting wood becomes dull, regular sharpening is required. The master should have on hand special tools to maintain the necessary sharpness of the blade. To do this, use:
- bars with surfaces of various grain sizes;
- fabric skins of several numbers;
- leather belts and special grinding paste.

Wood cutting tool needs regular sharpening
Chisels in wood carving
An important working tool is a chisel. These devices also have several types. Craftsmen use devices:
- straight,
- reverse,
- corner,
- curved,
- cranberries.
Chisels differ in profile shapes, create a groove of the desired configuration. The tool uses a mallet. The sharp working part allows you to do without power loading. There are electric chisels in the modern assortment that can be operated from the mains or from the battery.

Chisels differ in profile shapes
The choice of tools must be guided by the purpose:
- jigsaws and chisels are used in the manufacture of sculptures;
- wooden posts, balusters are decorated with a hacksaw, milling cutter;
- an engraver and cutters will help to make ornaments on platbands, planks, furniture.
Engravers in carving
A popular carving tool is the engraver. It is an excellent replacement for the traditional cutter, it performs complex operations faster and better. There are several types of such devices. The work can be used:
- manual engraver with a set of working attachments;
- flexible shaft;
- laser apparatus.

The manual engraver performs complex operations with high quality
Hand engravers can be installed on a screwdriver or drill, a sharpening machine. Such a complete set is a convenient electric tool for making ornaments, openwork, curly or applied carving.
The flexible shafts are equipped with chucks for fixing on a standard drill. The working tool can be a drill, cutter, bur. It is advisable to have a sharpening machine available, which will allow you to regularly edit the equipment, ensure the sharpness of the working blades.

To category: DIY furniture
Devices and tools for woodworking
Gadgets
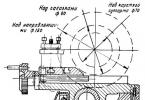
Bench board (fig. 1). It is made from a board with a width of at least 600 mm, a thickness of 40-60 mm and a length of at least 1750 mm. The front side is rounded off smoothly.
At one end of the bench board, two stops are attached - the upper and the side, at the other - a groove is made 100 mm wide and 200 mm deep. For strength, thick bars are nailed from below to the ends of the board across the entire width.
On the working side of the bench board along the face and edge at a distance of 50 mm from each other, holes with a diameter of 20-25 mm are drilled for inserting the dowels. Holes are through on the face, on the edge - 50 mm deep. At the bottom of the workbench, three or four fingers are arranged, which can be retractable or swivel, like a pinwheel. Sliding ones are fastened with brackets, and swivel ones - with screws. The fingers should not protrude from the edge of the board. One, or even better, two vertical stops are made against the groove.
The upper and side stops are necessary so that the material rests against them when planing. The fingers keep the material in a horizontal position as it is secured to the side stop. To keep the workpiece or board firmly in place, you can clamp it, put a dowel behind it and drive a wedge between the dowel and the part.
Instead of one dowel, you can arrange an adjustable stop, that is, a board with two dowels, fixed at a distance of 50 mm from each other, so that the dowels freely enter the holes.
Stops against the groove are needed in order to abut the material against them when sawing across. When planing the edges, wide boards should be secured in the side stop, placing them on the extended fingers.
If you want to cut across, raise the stops, press the material against them with your left hand, and hold the saw with your right hand and cut. After sawing, the stops are lowered. When filing the spikes at the ends of any part, insert it into the groove and secure it with a wedge.
Rice. 1. Bench board: 1 - top stop; 2 - side stop; 3 - groove; 4 - boss; 5 - mpez-yes; 6 - fingers; 7 - vertical stops; 8 - workpieces; 9 - wedge
The workbench is fixed at a height that is comfortable for work. The board can be attached to the tragus or arranged on four legs.
There should be no nail heads or screws on the face of the board that could blunt the tool.
Miter box and base (Fig. 2). The miter box is used when sawing wood at the desired angle. This is a box of any length, consisting of a bottom and side walls, nailed to the bottom at right angles. The walls must be strictly parallel. Risks are carried out on them at the right angle and cut to the bottom. Sawing is performed as follows. The board or block is marked out, placed in the miter box so that the mark is exactly opposite the cut in the wall, the saw blade is inserted into the cut and sawed.

Rice. 2. Miter box and bottom: a - miter box; b - bottom: 1 - planing the end of the bar at a right angle; 2 - planing at an oblique angle; 3 - base; 4 - guide: 5 - straight stop; 6 - oblique emphasis
The bottom is used for precise gouging of the ends of wood at right and oblique angles, as well as planing the edges of veneer and thin boards.
The length of the bottom is from 1 to 2 m. The base is made of a board 200 mm wide, 30-50 mm thick. A guide rail of the same length as the base is glued to the base, at least 120 mm wide, 5 to 15 mm thick and with a precisely cut edge, since the sole of the plow block moves along it during planing. Above the guide rail, a stop of the same width as the rail, with a thickness of 25-50 mm, is attached. This permanent stop can be attached to the other, but with a side cut off at an angle of 45 °. On these stops, you can plan the ends at different angles.
Planed with a double piece of iron or a jointer. The piece of iron is released quite a bit. The end of the material to be planed should protrude from the plane of the guide board by no more than 1 mm. When planing the ends on the bottom, chipping of wood is excluded.

Rice. 3. Clamps, clamps, tsulag
Clamps, clamps, tsulagi, presses (Fig. 3). Clamps are used to press the material against a workbench, compress parts during gluing, etc. They are wooden and metal, ordinary, parallel and angular. A common clamp is a U-shaped frame with a screw and a handle.
Parallel clamps consist of two bars and two screws with handles.
The clamp clamp is a wooden frame with several screws. They are used for veneering various products and especially wide boards.
Clamps are used when gluing boards from separate boards. There are many of them. The simplest ones consist of two cut-out bars. The boards to be glued are placed in the cutouts, a gasket is attached to them and squeezed with wedges. In the cutouts of the clamps, you can drill holes for the dowels; this simplifies the gluing of narrow panels, since there is no need to insert wide spacers. You can arrange clamps with adjustable stops, which are attached to the bars with metal clamps.
Tsulagi are presses for the production of bent parts. Tsulaga consists of lower and upper profiles and screws with nuts. The number of screws depends on the size of the holder.

Rice. 4. Devices for marking: 1 - thickness gauge; 2 - comb
Presses are used for the same purposes as clamping clamps. However, the press is more powerful. The frame is solid wood or metal, screws with a diameter of 20-25 mm or more. Wedges can be used instead of screws. For work, it is necessary to have two or three frames or more, depending on the size of the products.
The gage (fig. 4) consists of two bars and a block. The bars are fixed in the block with a wedge. There are pegs on the bars that scratch the wood, leaving risks on it. When marking the spikes and lugs of corner joints, several marks have to be made. In this case, it is better to use a comb - a piece of a bar with a cutout and studs stuffed into it.
Saws
The tree has to be cut lengthwise, across and at an angle. Depending on this, the saws are subdivided into transverse saws with teeth 4-5 mm high and the shape of an isosceles triangle, swing or spreading - for sawing along with teeth with a height of 5-6 mm and the shape of an oblique triangle, mixed - for sawing along and across fibers with teeth of different the height and shape of a right-angled triangle, jigsaws - for cutting out parts of complex shapes.
The cross-cut saw works when the blade moves forward and backward, the other saws only when moving forward. The saws required for operation are shown in Figure 5.
Hacksaws are used in carpentry work, especially for making precise cuts. To file the thorns, use wide hacksaws with a backing running along the top of the canvas. Such a saw does not wobble and it is convenient to saw through thorns with it.
Rewards are used for sawing grooves on wide surfaces, that is, where it is impossible to work with ordinary saws, therefore, the reward handles are attached to the upper part of the blade. The canvases of the awards are 150-200 mm long.
Bow saw. This is a wooden loom-bow, consisting of two stands, a centerpiece, two handles, a string-string and a twist. The saw blade, 1.5 mm thick, is fastened in the handles.

Rice. 5. Saws: a - the shape of the saw teeth for various sawing: 1-transverse; 2-longitudinal; 3-mixed
Plows
After sawing, the wood becomes rough. To make it smooth and, if necessary, give the desired shape, the wood is planed using various tools called plows.
Scherhebel is used for the initial rough planing of wood along the grain, across and at an angle.

Fig. 6. Plows: a - sherhebel; b - a plane; c - a plane with a double piece of iron: 1 - humpback; 2 - piece of iron; g - jointer; d - tsinubel; e - end plane; g - faltsgezh 3 ~ zenzubel; and - tongue and groove; k - kalevka and a set of pieces of iron for it; l - humpbacks; m - fillet; n - cycles
The scherhebel piece of iron is released beyond the plane of the sole by 3 mm, which allows you to remove thick 3 mm shavings. The oval blade leaves indentations on the surface of the wood. Planes the tool roughly.
The plane can be with single and double pieces of iron. A plane with a single piece of iron is used for planing wood after processing with a scherhebel. For cleaner planing, use a double iron plane. In addition to the main cutting iron, it has a so-called humpback, which breaks the shavings after it is cut off by the cutting iron. Chip fracture prevents wood chipping.
Planers plan cleanly, but not precisely. Having a block of short length, they freely pass over large irregularities on the planed surface.
The jointer is used for more accurate leveling of the planed surface, which depends on the length of the block and the angle of installation of the piece of iron (for the jointer - 1000 mm and 45-47 °, respectively, except for the jointer there are half-joiners with a block length of 500 mm).
The grinder is used for especially clean planing. This is a planer with a double piece of iron set at an angle of 60 °.
Tsinubel is a small plane with a single piece of iron, set at an angle of 80 °, on the blade of which there are many small teeth.
They are used to give the surface a slight roughness, which ensures better adhesion of wood. It is mainly used for veneering, with a strict basis.
The end planer is designed specifically for planing the ends of a tree. The piece of iron is placed at an angle to the longitudinal axis of the shoe. This plane can also be planed along the grain of the tree.
Falzgebel - a plane for folding seams. The block has a stepped sole, which makes it possible to select folds of only one size (the piece of iron is placed at an angle of 80 ° in relation to the axis of the block; the chipping notch is arranged on the left side of the block).
Zenzubel - a plane for selection of quarters and folds, as well as their stripping, if they are selected with another tool (chisel or ax).
Groove - a plane for cutting grooves on the surface of * parts. It consists of two blocks connected by screws, which makes it possible to install them at the required distance from the edge of the part. There is a piece of iron in one of the blocks. There is a set of pieces of iron for sampling grooves of different widths. But with one narrow piece of iron 3 mm wide, you can choose grooves of any width, that is, choose two grooves at the required distance from each other and select the remaining wood with a zenzub, or gradually move the pads. The pads are moved using nuts, and they are secured with lock nuts.
Kalevka - a plane for profiling the edges of parts. The sole of the pads and the piece of iron are inverse to the profile of the part. For work, a set of appropriate kaleviks is required.
Gorbach is a planer for planing concave and convex surfaces, and, depending on this, the sole of the shoe has a concave or convex shape. The piece of iron is placed at an angle of 45-50 °. For humpbacks, you can use a regular plane, but attach the lining of the desired shape to its sole.
The fillet is designed to make grooves of different widths and depths, with different radius of curvature.
The stamp is used for rounding the edges of parts, shields, etc., as well as for the selection of rollers. The sizes of the pads, the width and shape of the pieces of iron are different.
Cycles are used to remove the finest shavings and pile from wood (scraping). Cycles are thin steel plates made of strong steel with a thickness of 0.5 to 1 mm. The cycle can be made from a saw blade. The length of the plate is 100-150 mm, the width is 50-90 mm. For convenience, the plate is attached to the handle. In addition to rectangular loops, figured ones are made. The cycles remove chips or fluff with burrs, which are guided after a careful point and straightening of the cycle. If the cycle is sharpened like an ordinary ruby-and-night piece of iron with chamfering, then it is refueled on one side, and if they are sharpened without a chamfer - at right angles to the plane of the canvas, then burrs are brought in from both sides.
To obtain a clean wood surface, planing is performed in three steps. First with a sherhebel, then with a plane and then with a jointer.

Rice. 7. Planing technique: a - planing of a straight long board; b - planing with a zenzubel; c - planing with a moulder with preliminary chamfering; g - miter box for planing kalevok: 1 - nails; 2 - a block in a miter box; d-planing of the groove; e - facing: 1 - wrong; 2 - correct
Always plan in the direction of the grain, applying even pressure to the tool. The planing technique is shown in Figure 7..
In order for the piece to be planed to be completely even, at the beginning of gouging, you need to press harder on the toe of the last with your left hand, and with your right hand, make a slight pressure on the heel. At the end of gouging, the toe is only slightly pressed against the planed wood, but the pressure on the heel is increased.
If you do not follow these rules, then the ends of the planed part will be thinner.
When selecting the folds, the part is firmly fixed, the tool is installed and, with the necessary pressure, lead it forward.
The rebate can be planed from the opposite side (shown in the circle).
When selecting a kalevka on a bar, sometimes it is necessary to first remove the chamfer.
To fix the part when planing the moulders on it, it is best to use a miter box, driving several nails into one of its bars with pointed ends up.
Since during trimming with a plane, you can chip wood from the opposite edge of the part, it is necessary to attach a block to it at the same level with the end.
Thin sticks of exactly the same thickness can be cut as follows.
Chisels and chisels
When connecting parts to each other, you have to chisel various holes, using chisels or chisels for this (Fig. 8).

Rice. 8. Chiseling holes: a - chisel: 1 - blade; 2- neck; .3 - rim; 4 - shank; 5 - stalk; b - chiseling sequence; c - cutting technique
Both of them consist of a shank, on which the handle is mounted, and a rim - a broadening near the shank, which creates a stop for the handle; the necks are located below the rim and form a transition to the blade. The blade is sharpened and a blade is obtained. Chisel width from 4 to 50 mm, blade thickness from 3 to 4 mm. The blades can be of different lengths. Chisel width from 6 to 20 mm, thickness, blades from 8 to I mm. To protect the handle from quick splitting, metal rings are put on the lower and upper parts of it.
Holes are hammered according to the previously made markings. Shallow holes equal to the width of the chisel can be chiselled like this. They put the chisel vertically with a blade exactly at the risk, strike it with a mallet (a large wooden hammer), driving the chisel to a shallow depth.
Then the chisel is removed, rearranged to the middle of the hole at an angle to the slot, and a blow is applied to it, cutting off the first shavings. Then, in exactly the same sequence, repeat the operation on the other side of the hole, etc.
Deep holes can be hammered from both sides according to the previously carefully drawn risks.
When it is required to make nests with especially smooth walls, they are hammered in the same way, leaving the necessary margin for finishing. After chiseling, first of all, the end surfaces are cleaned, then the longitudinal ones.
Rasps and files, in addition to working with a chisel, are also used for processing wood with a large curvature, for example, curved surfaces, half-covered corners, etc. Rough work is first done with a rasp with a large notch. Then the part is processed with files with a fine notch, achieving the necessary surface cleanliness. Sometimes they are additionally treated with fine sandpaper.
Drilling is more productive than chiselling. Sometimes the holes are pre-drilled and then hammered.
Drills of different design are used for work (Fig. 10). Some drill cleanly and quickly, others vice versa. In this case, some drills can only drill holes across the fibers, others both across and along.
A brace or drills are used to rotate the drills. In addition to drills, drills are used - these are the same drills, but longer, rotate them by the handle, which is inserted into the hole at the end of the drill.
Pen, or spoon, drills are used to drill holes with a diameter of 3 to 16 mm along and across the fibers. The holes are not very precise and clean.

Rice. 10. Tool for drilling holes: a - simple drills: 1 - drill; 2 - screw; 3 - center; 4- spiral; 5 - spoon; 6 - drilling; b - drills for metal: 1 - ordinary; 2 - sharpened for woodworking; c - universal drill: 1 - main part; 2 - clamping bar; 3 - screw; 4 - groove; 5 - movable cutter; 6 - road builder; 7 - cutting edge; 8 - bottom view; 9 - a cutter with a road builder; g - brace: 1 - fungus; 2 - crankshaft; 3 - handle; 4 - cartridge
Awl (cone) drills are used to drill holes for screws with a diameter of up to 5 mm. The holes are torn and rough.
Center drills are used to drill holes that are sufficiently clean and correct only across the fibers with a diameter of 13 to 51 mm.
Centerless, or cork, drills are used to drill blind holes with a clean, flat bottom, for example, in places where knots and other defective places are sealed (wooden plugs of a slightly larger diameter are inserted into these holes with glue than the drilled holes).
Twisted, or screw, drills are used to drill clean holes of different depths with a diameter of up to 58 mm, but only across the grain of the tree.
Countersink - a metal cone with cutting edges directed from the top to the base - is used only for drilling holes for the heads of nails or screws. Instead, you can use metal drills with a diameter larger than the drilled holes.
The universal drill fully justifies its name, since it can be used to drill holes with a gradual increase in their diameter, in increments of 0.5 mm. There are sets of universal drills of various diameters with small and large movable knives.
A brace is a device for rotating drills. Bracers are simple and combined with a ratchet. The latter should be preferred. They consist of a fungus, a crankshaft, a handle and a cartridge. The fungus and the cartridge rotate freely around their axis.
- Devices and tools for wood processing
Woodworking tools make the work of home-made and specialized professionals easier. The toolkit is categorized into three main types: amateur, semi-professional, and professional. The offered units are suitable for almost any wood finishing operation.
Classification
To simplify work with a tree, a lot of different tools have been created, the classification of which is carried out according to various criteria. Fixtures are mainly classified according to the following parameters:
- Manual tools.
- Portable electrical devices.
- Woodworking machinery.
Home tools for woodworking are mainly included in the following list:
- Axes and saws.
- Brace (mechanical drill).
- Hammer, plane, square,
- Sets for fine wood finishing (sandpaper, varnish, brush, chisel).
The above set of tools is considered the main set, with the help of which a lot of do-it-yourself operations are performed. Listed below are the features and properties of elementary woodworking tools.
Planer and hacksaw
A woodworking tool called a plane is designed for planing boards. With this device, you can level the surface, reduce its thickness, build different depths of the excavation.
This tool has been known for a long time and is constantly being improved. Nowadays, electric models are quite popular, which increase productivity and accuracy of work with less physical effort.
A saw or hacksaw is a multi-tooth blade for cutting a variety of materials with a wood or polymer handle. The saw is a metal plate, on the working part of which there are teeth of different sizes and differing in divorce.

Chisel, hammer and mallet
A chisel is one of the main carpentry devices, it serves to create recesses in wood, clean grooves, and chamfer. The chisel design includes a blade and a handle. Flat modifications have one-sided sharpening, for oval models, the grooves are located outside the blade. When performing work, the chisel is pressed manually, sometimes tapping with a special hammer (mallet) on the handle.
A hammer is used to drive nails into wood and adjust other hand tools. Using a mallet, you can process thin plywood or chipboard. In addition, this device allows you to flatten and bend easily bendable material using the impact method.
Jigsaw and sandpaper
Hand-crafting wood often requires attention and precise calculation. The manual or mechanical model consists of an arched frame with a handle and clamps to fix the working blade as accurately as possible. It allows you to correct the direction of the cut. There is a gap between the frame and the canvas, which makes it possible to bypass the edges of the workpiece during work. You can also cut along a line within the workpiece.
A significant disadvantage of a mechanical jigsaw is the low mechanical strength of the blade and the small size of the frame, due to which the working part can burst, and it is also difficult to cut at a large distance from the edges of the workpiece.
Sandpaper or sandpaper has different grain sizes and is used for finishing the part. This process allows you to get rid of burrs and gives the product a presentation.

Mechanized devices
The electric woodworking tool greatly simplifies and speeds up the production process. The main mechanized devices include:
- Electric plane. It is used for planing a wooden surface, quickly makes it smooth and ready for further maintenance.
- Disk or allows you to efficiently, smoothly and quickly cut the product in accordance with the required dimensions.
- An electric drill is used to drill holes of the required size.
- A screwdriver is a device that allows you to quickly screw and unscrew fasteners.
As a tree tool, it is used.It can be used to perform complex work:
- Making furniture with your own hands.
- Production of window frames, stairs.
- Figured processing of a wooden blank.
It is not difficult to use the device, provided that you have some experience and skills in woodworking. Angle or belt sanders are perfect for finishing. They allow you to get into hard-to-reach places.
People learned how to process wood many millennia ago. In the beginning, for obvious reasons, everything was done by hand. Today there are a large number of power tools, but hand tools have not been forgotten either. Woodworking tools are essential for carpenters, joiners and anyone who decides to make something with their own hands.
Variety of tools
Wood processing is understood as a large number of operations, and each of them requires its own tools. The tree can be sawn, drilled, planed, cut out objects of simple or intricate shape. The totality of all tools is divided into two groups:
- manual;
- electrical.
In addition, they are divided into professional, amateur and intermediate categories. At home, it is most convenient to carry out woodworking with amateur or semi-professional tools. In addition, their price is significantly less than professional ones.
Hand tool
Hand tools are those tools that use the physical strength of a person. Since woodworking was carried out at a time when no one knew about electricity, all manipulations with wood can be performed manually.
It is considered one of the most ancient in origin. It is still used at home - in many private households one cannot do without an ax.
Power tool
Electrical devices are easier to use. They allow you to complete the job several times faster and with less effort. Power tools for woodworking at home are produced from the network and on batteries. When buying such units, you need to pay attention to their power, service guarantee and basic capabilities. Priority should be given to those features that you plan to use most often.
It is worth noting that the power tool can also be hand-held or stationary. Hand-held power tools for wood processing can be carried, carry out work, holding it in your hands. In the second case, the tool is fixed, human intervention is minimal, often it is, which can be slotting, milling,.
Wood sawing tools
You can saw wood or materials made from it with several types of tools:
- saw;
They are all manual and electric. The hacksaw is ideal for garden work, it is used to cut not too thick bitches, boards, blanks for carpentry work.
With constant sawing of wood at home, you just need to have (circular). It cannot make curly cuts, but it cuts boards, plywood, and some types of plastic as quickly as possible.
If you need to cut trees, prepare firewood, then chain saws are used. There are also hand saws for logging, you have to work with them together.
Freeform figures are cut with a jigsaw. It is suitable for cutting out blanks of models, art panels, various crafts, furniture parts, kitchen appliances.
Axes and cleavers for splitting
From time immemorial, carpentry works have been performed with axes. They were used to cut logs, make windows, doors, and use them to erect log cabins. Axes and cleavers are needed to split logs into firewood. A certain type of ax is a combat weapon.
Note! Splitting tools differ in size, shape of the metal part and the handle, which is made of wood or fiberglass.
Today, electric cleavers (wood splitters) are produced, with which you can quickly chop logs of a certain length and diameter. Their cost is two orders of magnitude higher than ordinary quality axes.
Planers for planing
It is necessary to plan wood with a plane. It removes a thin layer of chips for an even, smooth surface. Neither a joiner nor a carpenter can do without a plane. They are used by masters of musical instruments, furniture, dolls, kitchen utensils and much more.
Advice! When choosing an electric planer, pay attention first of all to its power, blade width and planing depth declared by the manufacturer.
It is not bad to have a whole set of planers, at least one universal in extreme cases. As you master the work of a carpenter or joiner, there will be a need for other types of planer.
For rough planing, a bear is used; for finishing, a jointer or semi-jointer is suitable, the tongue and groove are sampled with a groove (tongue and groove). There is also a cycle, kalevka and many other highly specialized tools for planing.
Grinding and Roughing Tools
To make the tree perfectly smooth, it is necessary. Small figures and details made of wood are sanded by hand with sanding paper, sandpaper, performing monotonous mechanical movements.
Rasps are used to smooth the edges and ends of the products. These are special files for coarsely cut wood.
For large areas, electric woodworking machines are used, these include:
- grinders with grinding attachments;
- belt grinders;
- eccentric (orbital);
- surface grinding (vibration).
The tape tool is more suitable for rough sanding, removing thick paint or smoothing the surface. Thinner grinding is carried out with eccentric and surface grinding units.
Chisels and chisels for chiselling
Spikes and grooves in the wood for connecting parts are made with chisels and a chisel. This is a hand tool. A chisel is used to gouge a deep and wide enough socket or eyelet. The working part of the bit is a steel bar sharply sharpened on one side.
Shallow holes are gouged with a chisel, the surface of the wood is cleaned, and the parts are adjusted. The shape of the chisel blade can be flat or semicircular.
Before starting work, markings are applied to the part, then it is firmly fixed in a clamp on a workbench and begins to hollow out. The fibers are cut at an angle of 45-60 °, each time deepened by 4-5 mm, the chips are immediately removed.
Drilling tools
Hand drills, bracers, augers are necessary for drilling holes. It is much easier to carry out woodworking with an electric drill. You will need special attachments for it.
There are a large number of types of nozzles, including countersink, center (feathers), spiral, screw. The drill can be used to drill holes for bolts, studs and other types of connections. By choosing a nozzle of the desired shape, you can expand the range of work performed.
Fraser
One of the most important electrical tools for woodworking at home is the hand router. They grind the edge with it, making it rounded, curly, cut out grooves, drill holes. They produce various types of milling cutters with a wide and narrow spectrum of action. They differ in power, cutter shank diameter, maximum rotation speed. In addition to wood, plasterboard, plastic, and acrylic are processed with a milling cutter.
Workplace and accessories
Carrying out woodworking work at home, you will not be able to do without clamps. They help to fix parts one by one and among themselves when cutting, gouging, drilling, gluing.
Other important tools in woodworking are pliers and nailers. They pull out nails and other foreign objects from the tree.
In the process of woodworking, it is important to properly prepare the workplace. Required for locksmith work. First of all, it is a table at which it is convenient to perform various manipulations. The workbench also contains useful tools:
- front and rear screw clamps for fixing workpieces;
- holes for wedges against which the workpiece rests;
- tray for storing carpentry tools.
A rack is often installed near the workbench, where the necessary fixtures, materials, templates are stored. You will need a comfortable chair. It is also necessary to take care of the socket for connecting the power tool and quality lighting.
Additional accessories, which should always be available from any master, include rulers, protractors, levels, squares. Most likely, you will need consumables (sandpaper, files, circles). Since a full production cycle is usually established in a home workshop, it is necessary to allocate space for varnish, paints, brushes.
Any tools must be in good condition. If a breakdown occurs, then they are restored as soon as possible or they are removed to a place where they will not interfere.
All novice carvers ask: "What tools do I need first?" First, we need a small number of tools. Instead of buying a complete set of cutting accessories, purchase tools as needed. Usually, when buying a set, you do not save a penny, but there are always things that you almost never need. Get the best quality tools you can afford; Good, sharp, high-carbon steel tools will last you long and save you money.
Knives
You will need a good knife - one that is comfortable to work with. There are three types of knives - folding blade (pocket knife), fixed blade and interchangeable blade. I prefer to use fixed blade knives because they are the safest. Knives also differ in blade shape and steel type.
I recommend a 55 to 60 RC high carbon steel blade - it will last longer than a stainless steel or mild steel blade. For finishing and shaping, I use a blade that is 4mm thick and 3.8 to 5.1cm long. A knife with a narrower, shorter blade is better for detailing. Some carvers prefer knives with a replaceable blade, because in this case, instead of sharpening the knife, it is enough to simply change the blade. Another advantage is that. that the handle of such a knife can be used with small chisels.
Chisels
Chisels come in different widths and curvatures. Curvature is indicated by a number. The steeper the curvature, the larger the figure. So, chisel number 3 is almost flat, and number 11 is U-shaped. Of course, a 10 or 11 chisel cuts deeper and removes more wood than a 3 chisel. On the other hand, a 3 chisel is handy for finishing. The corner chisel with number 12, which has a V-shape, is characterized by a wide range - from 24 to 90 degrees, but the most common chisels with an angle from 60 to 70 degrees.
When choosing a chisel, pay attention to the handle so that the tool does not roll to the floor when you place it on the table. Otherwise, you will have to constantly repair the blade.

When choosing a chisel, also keep in mind the size and type of thread you want to make. For manual work, palm-sized chisels are more suitable, and even less tools are needed for small parts. Sculptural and embossed carvings involve the use of standard heavy-handled chisels.
Saws
Carvers use saws of various types depending on the task, but the bow saw ("snake") is most often used.

It includes a replaceable high carbon steel blade mounted on a steel frame with a handle. A bow saw can be used to draw narrow, curved lines, although a fair amount of patience is required to prevent the blade from breaking or warping. The saw is also used to remove excess wood.
Special tools
The staple is used to remove bark and to quickly, roughly remove excess wood, such as when working on furniture. The spoon knife has a double-edged circular blade, ideal for making spoons, cups or masks.
Abrasives
Files and rasps remove excess wood quickly and smoothly. They differ in the nature of the surface, which can be rough, medium or relatively smooth. Always use flat, semicircular or round tools with a handle. Riffler files and rasps have two-sided teeth and a variety of shapes. They are used to penetrate hard-to-reach places and remove small chips. Tools with a rough surface are used for cleaning small areas.
The flexible sanding belt is convenient when working on curved surfaces. Grinding cylinders as part of a hand drill or press are indispensable for finishing. Polishing tools differ in surface texture and material, meeting a wide variety of requirements. Use sandpaper only after finishing work, otherwise the abrasive particles will get stuck in the wood and your tools will quickly become dull.
Electric tools
When you start making your own blanks, you will need a band saw. A huge selection of blades allows you to easily make the most difficult cuts, far surpassing anything that can be done with a bow saw. An openwork saw will help cut the inside surface, but not every wood can handle it. Belt and disc sanders are good for both finishing and removing bark. Many carvers use rotary tools with a wide range of heads to cut parts such as nibs. There are hand-held grinders and small high-speed cutters. There are also at least four types of reciprocating electric chisels that allow arthritis sufferers and people with "tennis elbow" to enjoy carving.
Strengthening devices
If you are holding the workpiece in a vise, choose a tool that will not leave marks on the workpiece (or insert some material between the workpiece and the vise). I often use a 6mm wood grouse and wing nut to attach the workpiece to the workbench. If you are a beginner, you can wear a steel wire glove to protect your hand.

I have an old friend, also a carver, who puts on a heavy leather apron when working towards the chest. When finishing or painting the product, you can use an awl or a dye stick.
SUPPORT
To help the workpiece hold better when you cut wood with a snake saw, I recommend using a support - a regular board that supports the wood while cutting. Simply attach it to a workbench or table and hold the saw upright in the V-piece as you cut the workpiece.
MAKE-UP VISE
If you are planning to do embossed carving, I suggest you also make a simple bench vise. One clamp holds the vice at the bottom in a stationary position, while the angle formed by the other two at the top prevents your work or workpiece from sliding out of your hands during operation. Attach a bench vise to the work surface.
Additional accessories
Electric burnout tools can be used to paint, texture, and sign work. For this, you will need a dust mask and a vacuum cleaner. You also need the artist's tools and various brushes if you want to paint or varnish the item. To transfer the pattern to the workpiece, I advise you to use tracing paper or copying. A good light source and a magnifying device are needed when doing fine work on parts.
Instrument care
You should periodically inspect your tools, wipe them with an oiled cloth to prevent them from rusting. Store instruments in individual compartments or wrapped in cloth to protect them and reduce the time spent sharpening.

SHARPENING TOOLS
Keep your tools sharp at all times and pause to sharpen from time to time. All the carvers I know have developed their own dressing system; everyone has found their own procedure, which is convenient for him personally. Some use whetstones with oil, others with water, and still others use electrical devices.
The first step is to sharpen the blade using a fine-grained abrasive such as diamond chips or sandpaper. First, one side is processed until burrs appear on the metal, then the other. At the next stage of dressing, surface irregularities that have arisen at the beginning are eliminated. Finally, a special compound should be used to grind the blade to a mirror finish, reducing friction between the blade and the wood.
How to tell if the blade is sharp enough? Take a piece of unnecessary wood and run the knife across the grain. If there is an even mark, then the blade is sharp. If the fibers stick out in different directions and the track is rough, then you need to sharpen the blade more.
TOOLS REQUIRED
Cutting tools
Knife (preferably with a fixed blade)
Four straight chisels (palm-sized enough)
No. 3 sloping chisel 1/2 width (1.3 cm)
No. 7 semi-circular chisel 1/2 (1.3 cm) wide No. 11 steep chisel 1/4 (6 mm) wide
No. 12 chisel corner 1/4 wide (6 mm)
Drawing supplies and patterning tools
Copier (MFP)
Bow saw ("snake")
Support (see above)
Drawing accessories
Pencil
Copy paper