At current prices for materials and finished products, there is only one way to save money - to do the manufacturing work yourself. This also applies to metal swing-type garage doors, which you can weld yourself if desired. You will need to study the assembly algorithm, prepare tools and materials, and involve one assistant in the process.
Welded swing gates for garage
Gate manufacturing methods
There are 3 ways to cook Garage Doors:
- When construction is not yet completed, the swing gates are welded separately as a single product. They are then delivered and installed at the site of the future opening, after which the front wall of the garage is built around the steel frame.
- When the garage has already been built, the doors can be made according to the size of the opening, brought to the site and installed.
- Along the finished opening, gradually welding the elements right in place.
The last assembly method is well suited for motorists who are taking on the task of constructing a garage entrance with their own hands for the first time. Not needed here high accuracy measurements, straightening the diagonals of the sashes and moving heavy iron parts. If all operations are performed correctly, then homemade design will function successfully and last for many years.
Procurement of materials
To the right amount To purchase metal to fill the entrance opening, you need to measure the dimensions of the latter and the thickness of the front wall. You will need the following rolled metal:
- an equal angle corner of at least 75 mm wide - for framing the walls around the entrance and for making sashes;
 Equal corners of different sizes
 - the same, 60 mm wide for braces;
- steel sheet with a thickness of 2 mm or more for door leaves and connections between frames;
 Stainless steel sheet 2mm
 - simple cylindrical canopies (hinges) outdoor installation;
 Main types of cylindrical hinges
 - valves - 4 pcs., can be welded from round timber or bought ready-made;

- locks.
Ties in the form of metal strips 10-15 cm wide, equal in length to the thickness of the wall, can be cut in advance. Since in the process of welding garage doors with your own hands you will need different supports and linings, you should keep on hand pieces of corners, profile pipes and other rolled products available on the farm.
The list of tools is also small:
- welding inverter;
- Angle grinder - angle grinder (grinder);
- electric drill;
- clamps;
- measuring instruments - tape measure, ruler, square and liquid level;
- ordinary plumbing tools - hammer, pliers, etc.;
- consumables: welding electrodes with a diameter of 3 mm, metal circles, drills.
To install locks, you will need fastening hardware - bolts, nuts, washers. At the end of the work, the canvas must be primed and painted with your own hands, for which the composition GF-021 and pentaphthalic enamel (PF) are usually used, respectively.
The initial stage is framing the opening
At this stage, it is important to correctly cut and weld the corners into a single structure - a frame, which will support the outward opening doors. Framing work begins at the threshold of the garage and is carried out in the following order:
- Cut 2 corners the width of the opening and lay them along the threshold on both sides. Weld them with steel strips (ties).
- Cut off 4 more side corners with your own hands, whose length is equal to the height of the opening plus 2 widths of their shelves. The resulting racks must be cut at both ends so that they clearly fit into the corners of the threshold.
- Attach the racks to the side ends of the walls and connect them together using ties. The latter must be placed opposite the joint welding points.
- Weld the frame of the threshold and walls together.
- Repeat the action described in step 1, only install the corners on the upper end of the wall. Weld them to the side posts.
During the work, it is necessary to ensure that the framing elements fit as tightly as possible to the walls. Steel tie strips must be laid between the corner flanges and the wall, and then welded.
 The first stage is making the frame
 Manufacturing of sashes
The essence of the method is that first, one solid sash is made directly in the opening and attached on both sides with hinges. The result is a frame inserted into a frame, which is finally cut in half. In order for future gates to open well, it is important to properly maintain the gaps between these frames:
- from ceiling beam to the frame of the sash – 1 cm;
- the gap between the side pillar and the same frame is 5 mm;
- the lower gap above the threshold is 2 cm.
The process begins with the installation of the side frame posts and is carried out in this order:
- Corner cut taking into account the upper and bottom clearance, you need to attach it to the side frame with a gap of 5 mm and grab it to it using a piece of metal. Repeat the operation on the other side end.
- Weld the horizontal corners from the bottom and top to the vertical posts, cutting them properly. Before this, you need to make a slot for one shelf with your own hands exactly in the middle of each jumper.
- Install the canopies and weld their lower part to the frame, and the upper part to the sash frame. The hinge should be opposite the connection connecting the inner and outer parts of the gate frame.
- Put 2 vertical racks in the middle of the opening, securing them to the frame by welding.
- Make 2 horizontal lintels exactly in the middle of each sash.
The resulting frame, built into the frame of the opening, remains to be cut into 2 parts, which open independently thanks to hinges. Considering that the shelves of the upper and lower corners are already trimmed, you just need to cut them from the front side.
To prevent gates without leaves from immediately sagging under their own weight, temporary braces should be installed from the inside and secured by welding. Then, using a grinder, you need to remove the potholders holding the side corners, after which the doors can be opened.
At the last stage, you need to cut and weld the sheets to the garage door with your own hands. When closed, they should overlap the frame by about half, which is how you need to cut the sheet of metal. Then weld it to the frame and remove the braces. All that remains is to install the lock and latches, and then clean and paint the gate.
When building a garage important element are the gates. To keep your car safe, it is better to make them out of metal. It’s worth noting right away that welding garage doors requires special skills. Otherwise, you will not be able to do without additional help specialists. Moreover, even if you have experience in such work, it will be impossible to make garage doors without welding equipment. Therefore, if you have necessary equipment, then you will be interested in this article. It will tell you how to do all the work yourself. We also offer you for your reference diagrams and photographs that depict the main stages of the work.
Important requirements for garage doors
Garage doors must meet a number of important requirements, including:
- The gate should not impede the free entry and exit of vehicles. With this in mind, the gate must match the size of the car.
- From the extreme slopes of welded garage doors to the car, a distance of at least 300 mm is required on both sides. But it is better to have a small reserve, since suddenly you change the car.
- If the car is a passenger car, then the height of the gate must be at least 2 m.
- The standard opening can be 2400×2100 mm and up to 5400×2400 mm.
- Garage door welding must be done in such a way that there is no possibility of break-in.
- Garage doors should be reliably protected from negative influence environment. For example, install a small visor.
Gate manufacturing methods
There are three methods for making garage doors:
- They are welded separately as the garage is being built, and then delivered to the garage.
- You can weld along the finished opening, and then deliver it.
- All work can be performed directly on site.
The last option will be optimal for those who are doing this kind of work for the first time. After all, you will have to perform measurements more than once.
Necessary materials
To cook homemade gate for a garage with your own hands you need to prepare necessary materials, among other things you will need:
- Facing material, suitable sheet metal, thickness not less than 1.5 mm.
- profile pipe, metal corner for making a frame.
- Material for the manufacture of stiffeners.
- Liquid for degreasing surfaces.
- Primer and paint.
- Locks, bolts and awnings.
Important! At the time of buying source material, pay special attention to its quality. After all, welded garage doors are built to last for a long time.
In addition to the material, the following tool is also required:
- Automatic welding machine with a power of 220 W.
- Nylon thread.
- Bulgarian.
- Cutting and grinding wheel.
- Building level.
This is the basic set of tools that is needed for work. Now let's proceed directly to the gate manufacturing process.
Making a garage door frame
Garage doors must start from the frame. A corner is used for this. So, you need to cut the corner into pieces that fit the frame. In this case, the vertical and horizontal elements must be completely identical in length. Afterwards, lay out all the cut elements on a flat horizontal surface. Use a thread or tape measure to check the diagonals so that all sides are equal. Now you can weld the corners together.

Advice! When welding a garage door, be sure to check the evenness of the product. This is an important condition, since fixing it after welding will be problematic.
So, you should have a ready-made frame from a metal corner. This frame will be installed directly into the garage opening, and the gate will be attached to it.
Gate leaves and their installation
On next stage it is necessary to make a frame of the sashes. They should be slightly smaller in size than the manufactured frame. And at the same time it is easy to enter the opening. Garage panels are welded according to the same principle as the frame. Cut a metal corner or profile pipe to size. You should now have two sashes. Place all the elements on flat surface, check the diagonals and weld together.
When the frame of the doors is ready, it is necessary to weld the hinges. Two canopies must be welded onto each garage door. After using sheet material, sheathe the frame of the sashes. Apply a sheet of metal to a frame made of a pipe or angle and secure it with welding machine tacks or bolts. The first option is more reliable.
Important! If you decide to secure the sheet metal using welding tacks, then be careful not to weld a hole in the sheet of metal. It is important to control the strength of the welding arc.
The next stage is the installation of the gate. To begin with, mount the frame with ready-made canopies strictly according to the level. Having secured the frame with anchors to the garage door opening, all that remains is to hang the doors in their places. At this stage it is possible to make final adjustments. Pay attention to the fact that the trim on one sash should be several centimeters larger. That is, there should be a slight overlap when closing the gate. If this cannot be done, then a metal strip is welded onto the junction of the two gate leaves.
For more information on how to weld a garage door with your own hands, without the help of specialists, watch the video:
Installation of locking elements and other finishing
We have discussed with you the question of how to weld garage doors. Now let's pay attention to their improvement. For complete security, a lock must be installed. It must be reliable and proven. For this reason, buy a lock from a reputable company. If we talk about the types of locks, then it is better to give preference to pin stoppers and powerful deadbolts. You will use them to close the gate from the inside. However, in addition, you will need to make a small gate in one of the doors.
In this case, cut an opening in the sash, which is reinforced along the perimeter with a profile pipe with inside. Next, weld the canopies. Make a small gate from the cut sheet. The process of this work requires precision. Therefore, follow the rule: measure seven times, cut once.
The lock is usually installed from inside the garage. To install it, it is recommended to weld a small frame. This will allow it to be securely fixed in the garage door leaf. This will ensure high reliability and safe storage of the car.
It is important to take care of it from time to time shut-off valves. Eliminate the complete possibility that the lock has direct contact with atmospheric phenomena. Rain, snow and other precipitation can negatively affect the performance of the lock. Moreover, there is a risk that the well may freeze and you will not be able to insert the key. For this reason, a small canopy can be welded onto the garage doors.
So, we have looked at the main features of how to properly weld garage doors. This work is not easy, since the metal itself has heavy weight. For this reason, you cannot do it without outside help. The welded frame and frame will need to be installed strictly level, and doing this yourself will be extremely difficult.
Considering the fact that all the subtleties and features of the process of welding garage doors cannot be described, we invite you to familiarize yourself with the prepared video material in this article. This will allow you to consolidate the theory visually. If you have any questions or already have experience in this work, be sure to leave comments at the end of this article. Your experience will be invaluable to all our readers. After all, you can save a considerable amount of money.
A garage is a structure that receives special attention, especially in terms of burglary resistance. And an element such as a gate must have double strength and reliability, and, of course, an attractive appearance. Traditionally, garage doors are a swing structure of two leaves, hung on a frame. Making them yourself is not a problem if you have the skills to work with simple plumbing tools and a welding machine. This will be discussed in the article: about options swing gates, about manufacturing technology and the nuances of the installation process.
Types of garage doors
In addition to the fact that swing garage doors are traditional and very reliable, they have other advantages.
- The cost of construction is cheaper than all other models.
- The swing modification can be insulated using various thermal insulation materials.
- Can be installed in limited space.
- They can open outside or inside the garage, depending on the owner’s requirements.
- Possibility of installing an electric motor for automatic opening.
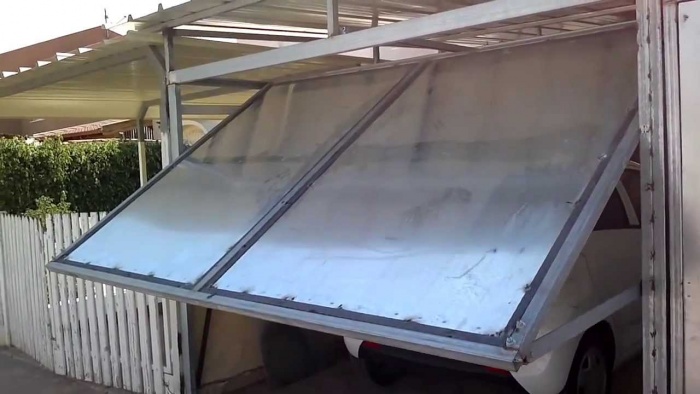
The only big drawback is that free space is required to open the doors of the structure. This is sometimes problematic in winter, when snow piles up in drifts in front of the garage. Therefore, you have to swing a shovel.
The disadvantage of swing gates is that you have to clear the area of snow from the area in front of them
In addition to swing gates, other types are installed in garages.
Folding
This is a sectional type of gate, the elements of which are installed vertically and connected to each other using a hinge method. The outer sections are attached, like the swing sections, to the frame with hinges. Additional fastening– along the upper or lower guide. Sections are made from different materials, more often from aluminum alloys or wood.
Design advantages:
- unusual appearance,
- ease of opening and closing,
- do not occupy open state a lot of space
- sections can be individually changed, repaired,
- low price.
Cons: rapid wear and low protective functions.
Folding gates
Lift-and-swivel
Purely structurally, it is a solid shield that covers the entire entrance opening. To open the gate, lift and rotate 90° so that it is at the top horizontal plane. For this, a system of levers, a gearbox and an electric motor are used.
Pros of the model:
- high reliability,
- V open form the gates do not take up any space,
- amenable to insulation,
- amenable to automation.
- high installation accuracy is required,
- the gate remains in the opening, reducing its height by 20-30 cm,
- It is not recommended to use them intensively.
Lifting swing gates
Lifting sectional
This is a structure of several sections located horizontally and interconnected by special hinges. Using a lifting mechanism located on the ceiling, the gate is lifted along guide profiles and positioned horizontally along the ceiling. Sections are mainly made of sandwich panels.
Pros of the model:
- versatility in terms of opening sizes,
- saving space when opening,
- good resistance to deformation and mechanical loads,
- full automation,
- presentable appearance,
- high heat and sound insulation qualities,
- long-term operation.
- high price,
- constant maintenance is required: lubrication of hinges and guides, checking electrical and automation systems,
- low burglary resistance.
Up-and-over sectional doors
Rolled
These garage doors got their name from the way they open. Purely structurally, these are several strips (lamellas) assembled into one sheet, which is rolled into a roll. Therefore, in addition to the door leaf, the gate includes two guides that hold the structure in the opening, a shaft on which the slats are wound, and an electric drive.
Advantages:
- compactness,
- acceptable price,
- ease of installation,
- long term service,
- presentable appearance,
- possibility of automation.
- almost zero burglary resistance,
- it is not possible to carry out insulation, because there are always gaps between the lamellas,
- do not work well at low temperatures.
Rolling gates
Recoil
In this design, there is one leaf, which is supported on a guide profile located on top and rests against the rail from below. The device is opened by rolling it to the side along the wall.
The advantages include:
- functionality does not depend on snowdrifts,
- does not take up space when opened,
- high burglary resistance,
- possibility of automation.
- rapid wear of the rollers,
- The width of the wall along which the gate is moved must be greater than the width of the leaf.
Sliding gates
Do-it-yourself swing garage door manufacturing technology
So, swing gates for a garage are two doors (usually equal in width), which are hung on a U-shaped frame using hinges. Therefore, when the task is set to produce gates of this type, several issues are resolved:
- manufacturing of sashes,
- making a box (frame),
- installation of the latter,
- installation of sashes on the frame.
Before you start making swing gates, you need to decide on their dimensions.
Sizes of garage swing doors
There are no strict size requirements. The main thing is that the car can freely enter the garage without hitting the gate. And this allows you to make any opening, the width and height of which is 30 cm larger than the dimensions of the car on each side. But this is inconvenient, especially for novice drivers.
- height for cars – 2.0-2.2 m, for minibuses – 2.5 m;
- optimal width is 2.5-3 m, maximum – 5 m.

Standard sizes of swing gates
Preparing to make gates
Required tools:
- welding machine and electrodes;
- grinder with cutting and grinding disc;
- tape measure, ruler and marker (chalk);
- level and corner.
Required materials. Outer side a gate is a sheet steel sheet with a thickness of 3-4 mm or corrugated sheeting with a thickness of at least 1.2 mm. If the first material is used in the design, then the entire connection process is carried out by electric welding. If the latter, then the corrugated sheeting can be fastened to the frame using metal screws.
As a material for assembling the frame, you can use either a 63x63 mm corner or a 40x40 mm profiled pipe with a thickness of 2-3 mm. The second option is cheaper and easier to use.
Drawing of swing gates for a garage made of profile pipe
And the last element is the hinges, which are made from a steel bar with a minimum diameter of 25 mm. There must be at least four hinges, two for each sash.
Now, as for the U-shaped box. It consists of two racks and a crossbar (crossbar). The first ones can be made from a 63x63 angle or pipe round section with a diameter of 80-100 mm, or a profiled pipe with a cross-section of at least 80x60 mm. The crossbar is made of the same materials. If construction is planned two-story garage, then it is better to use channel No. 12 as a crossbar.
Gate assembly drawing
Manufacturing of frames for sashes
The first stage is cutting eight pieces of material prepared for assembling the frames. Four of them should be equal to the height of the gate minus 1-2 cm, four to the width of the leaves, that is, half the width of the gate structure minus 2-3 cm. For example, if the total width of the gate is 3 m, then it is necessary to cut four elements 1 at a time. 48 m.
Aligning the frame on blocks in a horizontal plane
An important point is that the frames must be assembled on a horizontal plane. It is not necessary that it be a flat area; any type of stand will do, the upper ends of which are aligned in the same horizontal plane. You can use bricks or blocks for this. They are installed in the corners of a rectangle, the length of which is equal to the height of the leaf, the width is equal to the width of the gate section. Appropriately cut sections are laid on them, and then a level is checked to see if they lie horizontally. Deviations are leveled out by placing blocks of thin planks, stones or sheet metal under them.
The laid sections are fixed to each other spot welding with precise alignment of adjacent elements at 90° to each other. A construction corner is used for this. This important point, defining exact dimensions future gate structure that will fit exactly into the frame without distortions or large gaps.
Scheme of stiffeners
Two frames have been formed, now it is necessary to increase the rigidity of the structure by installing additional elements: horizontal or vertical. If the gate is large, then both are used. Sometimes they are supplemented with oblique elements. The material used is a corner or a smaller profile pipe. For example, if the frames were assembled from a 40x40 mm pipe, then 40x20 mm can be used for reinforcement. Additional elements are evenly distributed relative to each other.
After assembling the frames, it is necessary to weld the joints on both sides and sand them to remove scale and metal stains.
The rigidity of the frame structure is determined additional elements, installed vertically and horizontally
Connection of frame and steel sheet
A rectangular section must be cut from a sheet of iron for each sash. There are certain requirements for their sizes:
- the length of the segments should be 3-4 cm greater than the height of the gate opening;
- One of the rectangles should be 2 cm smaller in width than the width of the frame, and the second one should be larger by the same size.
For example, if the width of the doors is 1.5 m, the height is 2.5 m, then one sheet will be 1.52x2.54 mm in size, the other 1.48x2.54 mm.
Now, in height, two sheets are placed on the frames so that their edges protrude beyond frame structure 2 cm on each side. The protrusions of the sheets will close the gap between the sashes and the frame. As for the width, on the hinge side the sheets are laid flush with the profile pipe. In one sash, the sheet will protrude from the opposite side by 2 cm, in the other, on the contrary, its edge will not reach the edge of the frame. This is done so that when the gate is closed, the protruding sheet closes the gap between the leaves.
Attention! The sheets are welded to the frame pointwise from the edge to the center. After that, welding is carried out in small sections within 3-4 cm in increments of 10-15 cm.
The sheet is fastened to the frame using short seams
Assembling the swing gate frame
The dimensions of the box are determined by the dimensions of the opening. In this case, half a meter is added to the length of the support posts, with which the structure will be recessed into the prepared pits, followed by concreting.
The box is assembled using the same technology as the sash frames, with installation on bricks or blocks. Box sizes according to inner contour the width is slightly larger than the total width of the sashes. The difference is 2-3 cm. In height, the difference can be significant - up to 5-6 cm. Although optimal is 3-4 cm.
Box for swing gates
Installation of hinges
To do this, the sashes are laid on a U-shaped frame with an exact location in the plane, forming gaps between all elements. The assembled hinges are placed at their required location and welded: their lower parts to the frame posts, their upper parts to the frame of the sashes.
To strengthen the fasteners, you can additionally weld metal strips or reinforcement to the hinges.
Correct and high-quality loop welding
Installation of swing gates
Ideally, the gate frame should be installed during the construction of the garage, when half of the walls are already raised from bricks or blocks. But regardless of this, installation is carried out using the same technology.
- Holes are dug for the racks with a depth of 0.5 m.
- One or two crossbars made of reinforcement or a corner 10-20 cm long are welded to the lower edges of the racks, the purpose of which is to serve as holding elements in the concrete.
Preparing the stand before concreting the pit
- At the bottom of the supports, metal plates are welded in the form of a nickel to rest on the ground.
- The half-meter ends of the racks are treated with a waterproofing compound, for example, hot bitumen or covered with roofing felt.
- The box is installed in the pits with precise alignment in the opening, for which a building level is used.
- The racks are welded to the embedded parts, which are installed during the wall laying process. Reinforcement with a diameter of 12-16 mm and a length of 50 cm is often used as mortgages. The laying step is every 6-8 rows.
- Concrete is mixed at the rate of cement-sand-crushed stone in the ratio 1:2:2, if the cement grade is M400.
- Pouring concrete into pits with a tamper. This is done not only to compact concrete mortar, but also in order to squeeze out the air that got there during the kneading process. Air pores reduce the strength of concrete.
- You can hang the sashes on the frame after the concrete has set and dried.
How to make a gate with a wicket?
The process of assembling swing gates with a door is exactly the same. Simply, four elements are inserted into one of the leaves to form an opening for the door. Vertical ones are installed at full height, horizontal ones between them in the form of crossbars. The doorway structure is assembled at the stage of manufacturing the frame for the sash.
Door location in gates with standard dimensions
The door itself is manufactured in exactly the same way as the gate sections, with the assembly of the frame and installation of the metal sheet. The complexity of the manufacturing process of the leaf itself, in which the door is installed, lies in the fact that the doorway remains uncovered by a sheet of metal, and the remaining planes must be closed with it. All of them will not be equal to each other, so each section must be accurately measured, transferred the dimensions to the sheet and cut them out. After which, each cut piece is transferred to the frame with spot welding around the perimeter. In this case, the laid sections of sheets must be joined on additional profiles that create rigidity of the frame structure.
Drawing of a swing garage door with a wicket
The size of the gate is selected taking into account the convenient passage through it, as well as the dimensions of the gate leaf. For example, if the leaf width is 1.5 m, then the width of the gate should not exceed 1 m. As for the height, the height of the gate and the location of the door itself relative to the lower elements of the gate frame are also taken into account. At the same time, the maximum height of the location is 40 cm. The height of the door itself is within 1.8-2.1 m.
Welded wicket for garage doors
Options for ready-made swing gates
Video - how to make a garage door with your own hands
Conclusion
Despite the apparent simplicity of the assembly process, it should be noted that the manufacture of swing garage doors requires attention from the manufacturer and the ability to accurately carry out all measurements and calculations. At the same time, one must not let go of measuring instruments. A slight deviation in shape or size may result in the doors simply not fitting into the frame. You will have to make adjustments in place, which will affect the evenness of the elements.
A garage door is necessary for many reasons. The most obvious is an obstacle to prevent unauthorized persons from entering. But the entrance to the garage also serves other functions, it protects interior space from wind, precipitation, isolates building from the environment.
The choice of car owners often stops at metal garage doors. This is due to their relatively low cost and ease of manufacture. Metal is much stronger than wood, so it provides reliable protection from thieves. Even if the garage is located on a site without permanent security, metal will still become a serious obstacle for attackers.
Usually drawing for metal gates, choose from a ready-made, standard option. There is no need to carry out calculations and draw up a diagram yourself. The vast majority of garages will fit standard drawings. When choosing, you should take into account the complexity metal structure, relate it to your welding and installation skills.
A big mistake would be to choose too complex model , which you can’t make yourself. In addition, it is necessary to take into account practicality, GOST standards, and the final appearance (whether it will suit you or not).
Below is a drawing of a metal garage door (several options):


The most common materials for metal garage doors are: aluminum or Cink Steel. Reliable protection will provide steel with a thickness of 1.5-3 millimeters. The disadvantage of a metal gate is heavy weight. This is especially true for models with a thickness of more than three millimeters.
Galvanized steel is different cheapness. Aluminum analogues will cost almost twice as much. Aluminum will be much lighter steel sheet, but this is where its weakness lies. It is easier to deform by brute force than steel.
In total, there are five main models of gates: sectional, sliding, overhead, roller and swing. The easiest for self-installation are hinged.
The main elements of this model are the frame, the canvas and the mounting loops. Today manufacturers offer ready-made kits, which save labor costs and reduce the level of required skills.
Iron gates for the garage - photo:


Manufacturing
Metal swing gates for garages are the most accessible option. It also makes sense to include in the design gate. It will allow you to enter the garage without opening the doors. There should not be any particular difficulties with the gate. In the drawing it will be limited by a frame and reinforced with additional beams.
The first step in production will be drawing development. As noted above, they usually take standard scheme and complement it at will, for example, with a gate. Metal swing gates will consist of three elements:
- Canvas made of metal sheets. This element will be the heaviest in the structure.
- Frame. It is made from a rolled corner.
- Fasteners The materials you will need are steel corners 65 by 65 millimeters, galvanized steel/aluminum, profile.
After purchasing building materials, you can start manufacturing external And internal frame. Blanks of the required size are cut from the corner. The blanks are laid out on the ground in the form of a future frame. The shape is measured by a level. Pay attention to absence irregularities and distortions. They have an extremely negative impact on the reliability of the structure and its durability.
To fix the workpieces on the ground, you can use scrap materials. Make linings out of them and check the shape again for unevenness.
How to weld a garage door?
After checking, you should proceed to welding. The quality of the welds will affect the strength of future gates, so the process must be taken seriously. Then comes the turn of the inner frame. It is made in a similar way - blanks are laid out on the ground, checked and welded. Welded seams must be sanded Bulgarian.
 The next step is to work with sheathing. As in the case of the frame, there will be two elements - the right and left sash. Material, for example, galvanized steel, is cut based on the size of the sashes.
You should trim, taking into account overlap. A sufficient overlap is 1-2 centimeters of the sheet. After this, the canvas begins to be attached to the frame.
First of all, the sheet must be welded at the corners and to the middle. Then they move to the bottom of the sheet and its perimeter. The points remaining at the corners trimmed.
Now you can start working on the hinges and lock. The lower parts of the hinges are welded to the frame. Upper ones on the outer sash. To strengthen the structure, use reinforcement or metal strips. You can install a pin stopper or a deadbolt on the gate. Solutions allow you to securely close your garage from the inside. The stopper is easy to make yourself from a piece of pipe.
After all the preparatory and welding work design needed paint And install to the garage. To do this, first fasten the outer and inner frames using metal plates. The plates are 4-5 centimeters thick. The fastening pitch is 50-60 centimeters. Then the gates are hung and insulated.
Coloring
Before the last stage(installation) should be done painting garage door. The paint protects the metal from corrosion and gives it a pleasant appearance. The coating increases the durability of the gate.
How to paint a garage door? First of all, you need to choose suitable paint. You should pay attention to adhesion level. It must match the metal from which the gate is made.
In addition, the paint must not contain chemicals that interact with the metal surface. Otherwise they may start oxidative processes. The paint must also have good water-repellent properties, as this is its primary task.
Best for coloring metal gates Three types of paint are suitable - acrylic, silicon-organic, alkyd. Acrylic paint – the most modern solution. It meets all requirements, is durable, but the downside is the high price. The silicone coating will be durable and very resistant to sunlight.
 The paint is well compatible with most metals. Alkyd paint has an increased elasticity And stability to physical impact (for example, scratches).
What color should I paint my garage door? Color paints it is advisable to select it so that it is more or less compatible with the surrounding color scheme. But there are no special regulations in this regard.
The most common colors are shades of green, blue, and gray.
From tools you will need a solvent, a roller/brush, sandpaper, a stiff brush, a primer and the paint itself. After purchasing paint and the missing tools, you can begin preparatory work.
How to paint garage doors?
At the first stage you should clear surface free of rust and marks old paint(if there is one). The procedure can be performed using a rigid, wire brush. Then the surface polished sandpaper. The surface becomes rougher and can better accept primer.
After this they begin to apply primer. This will serve as a base for the paint. The primer is applied in two or three layers. It is necessary to wait completely dry one layer, only after that can the next one be applied.
The last step is directly painting. For application, a regular roller is often used. The paint is applied starting from the top edge. This technique will help prevent the appearance of smudges. The stripes should overlap. Recommended to paint with reserve, swiping along the border of the previous stripe again.
Best to paint vertical lines, apply paint in two or three layers. Multi-layer painting will make the color rich and prevent the appearance of missing areas.
note that painting work should be carried out at mild temperature – from +10 to +25 degrees.
Conclusion
There is no need to carry out calculations or make drawings yourself. There are many standard drawings, you can take one of them and slightly change the scheme to suit your needs. It is recommended to plan for the presence of a wicket in the gate. Swing iron gate for a garage consist of two frames, doors, hinges, and a lock. You will also need paint and a set of tools.
After making the gate, you should take care of it painting. The most modern solution is acrylic coating. Silicon-organic and alkyd paints. Special attention needs to be given adhesion level And water-repellent properties . Metal sheets are cleaned, primed and painted.
Useful video
How to weld a garage door from a profile pipe with your own hands? Watch the video:
Ready metal gates For a garage they are not cheap. If you have a regular household welding machine, then it’s quite possible. Consumables will cost inexpensively, and the work will take three to four days.
The type of gate construction depends on the size of the end wall and free space for free opening of the sashes:
- – mechanical, convenient and simple design, it’s not difficult to do. The disadvantage of swing gates is that you need a lot of space in front of the garage and on the sides, and this is not always possible;
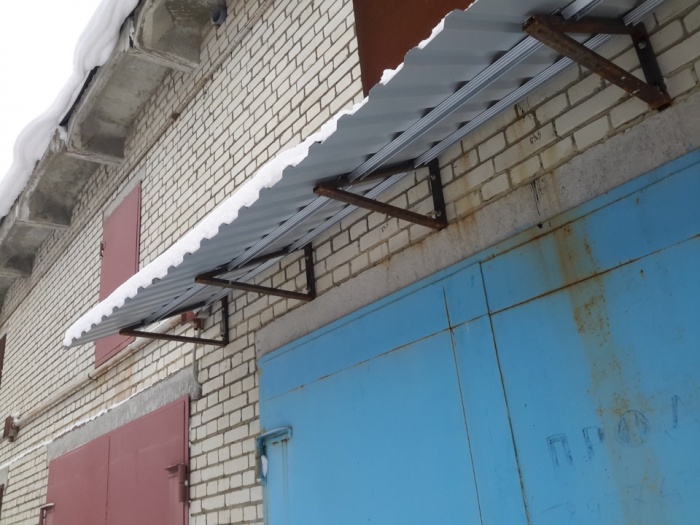
- lifting rotary - the metal sheet rises up like a curtain. You can buy a hinged lever mechanism ready-made or make it yourself; you need few parts for this device. This design is convenient for garages in the yard, on a small garden plot. There is practically no need for free space to open. Great advantage overhead gates– excellent tightness;
- Roller shutters are an unreliable option for garage doors, but they are economical. Metal plates are folded like blinds and collected in a special box under the ceiling. Opening such protection is a couple of trifles, so roller shutters can only be installed in protected areas;
- sliding gates are reminiscent of wardrobe doors. They require enough space to open on one side (the entire length of the sash leaf). The downside to this design is that the travel rails often get clogged and need to be cleaned regularly, which is annoying.
Of these four design options, the most popular are simple swing and overhead gates. How can you weld them yourself using available and inexpensive materials?
Materials, components and tools
Before welding a garage door, you need to think about the dimensions of the structure, it is better to draw a drawing, then it will become clear how many components are needed for the chosen option.
For novice DIYers, there are ready-made kits of ready-made roller gates on sale that are easy to install by following detailed instructions. Those who are familiar with the welding machine need to count the number necessary details, based on the drawing.
Why do you need a drawing?
So as not to have to redo it later finished work, it is better to calculate in advance and find out the important points:
- calculate optimal size of the doors, make sure once again that nothing in front of the garage or on the side interferes with the free opening and closing;
- it is important that the distance from the side pillar to the driving car is more than thirty centimeters. Even if you currently have a Lada, still calculate the dimensions of the jeep, maybe buy your dream in a few years, don’t overthink the gate later;
- standard height is two meters;
- the optimal opening for a garage box is 2.4 by 2.1 or 5.4 by 2.4;
- the material for the sashes must be reliable, strong and durable - the best option galvanized steel, five millimeters thick. You can also take a thickness of two millimeters for a lightweight frame garage design;
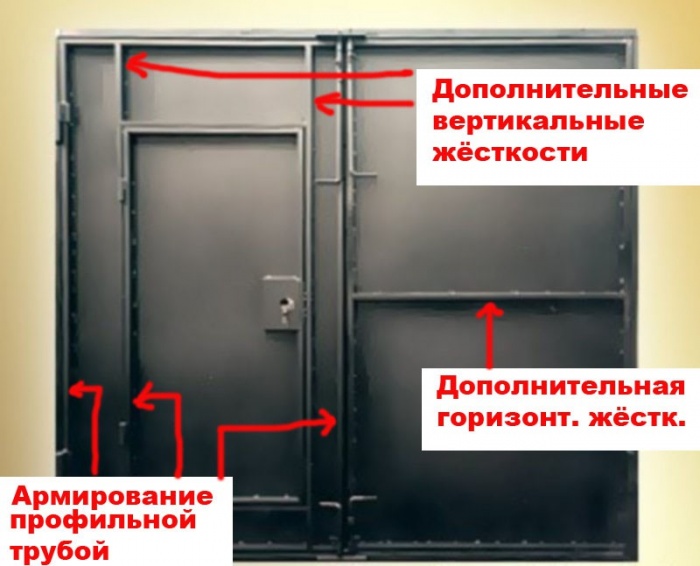
- consider a locking mechanism. The simplest option is locking on external pads; the more difficult option is armored linings.
On the drawing it is easy to mark the location of all the elements and calculate what sheet size is needed and how much fasteners are needed.
Required materials and tools
Here is a short list of components and materials that each master can add at his own discretion:
- steel corner - the mounting frame is welded from it. We take a 75th corner, no less, heavy doors are attached to the frame, so strength and stability are important;
- material for the sashes - galvanized metal sheet, profiled sheet or wood. Metal is more reliable, and wood is warmer, but requires impregnation with fire retardants;
- hinges - internal hinges on bearings are more reliable and safer, do not freeze in cold weather;
- locking system - the choice is limited only by the availability of money, there are a lot of designs;
- grinder with a circle for metal, wood and for cleaning;
- profile pipe;
- tape measure and square;
- welding;
- water level.
It is better to carry out work on a table or in an open area, placing a channel bar as a stand. Before starting work, be sure to check with a level that the surface is on the same axis (diagonal).
Gate manufacturing work - step by step
First of all, you need to make a supporting frame, which is installed in the garage opening; the doors will be attached to it. We need to make external and internal metal carcass frames
Let's look at the sequence of actions in detail.
Frame making
How to weld gate frames:
- the frame must match the height and width of the finished opening. Be sure to measure the outside and inner size, if they were built by non-professionals, then they sometimes differ by 2 - 3 cm;
- let's start cutting blanks from the corner;
- we lay out the corners on the surface and set them clearly to the water level using pads (it is better to measure a right angle diagonally);
- We weld the entire structure and clean all weld seams with a grinding wheel. The frame must be smooth, without roughness or bulges, so that the gate closes hermetically;
- We weld a lever into each corner for rigidity and strength of the frame (the remaining trim for the corner will do);
- having laid out all the frame elements, lightly weld the structure so that you can try it on and adjust it with a hammer to the size of the opening;
- We cook the second frame in the same way.
Before installation, it is better to immediately treat the welded structure with anti-rust metal impregnation, let it dry, and only then proceed with installation.
Frame installation
It is better to install the frame together so that there are no distortions:
- we attach both the outer and inner frame structure to the wall with pins, the length depends on the weight of all the gates from 15 to 20 cm;
- We weld the frame to the pins, cut off all excess and clean the seams with a grinder;
- We fasten the outer and inner frames with plates, the spacing of the lintels is 60 cm.
You can start making gate leaves.
Manufacturing of sashes
The simplest gate design is swinging doors:
- lay the pipes on a completely flat surface face up;
- We place guides in the rectangle and check with a level;
- We take into account that the size of the sashes should provide a gap of 1 - 2 cm between the frame and the frame so that the sashes can be easily opened. Having grabbed the frame by welding, you can try it on and use liners-gaskets to determine right size valves;
- We set the corners using a square and a level and cook;
- when you have welded two gate leaves, you need to do another fitting, already two halves of the gate, only after that do the final welding;
- For standard sashes, two stiffening ribs are made on each. The quantity depends on the thickness of the metal and the weight of the entire structure; the heavier the gate, the more stiffeners need to be installed.
A few words about stiffeners, why they are needed, and how to properly secure them in the frame:
- We place vertical corners in the center, fasten them diagonally in the upper and lower square of the sash frame;
- if you plan to make a door in one of the doors, then around such a door we place an upper and lower horizontal stiffener. In this case, the sash is divided vertically into two halves, and not horizontally, as in the usual version.
We make a door in one of the doors. To do this, we weld several vertical and horizontal corners; the approximate design of such a frame is shown in the diagram;
All that remains is to weld the hinges onto the frame and sashes. Be sure to measure several times before finally cooking. It’s better to grab it first and hang it, adjust it, and only then cook it thoroughly. We clean out all the irregularities and grind them with a grinder.
Gate trim
This is an important stage, because the gate must be welded precisely, observing the geometry; the slightest discrepancy with the dimensions and a mistake will cause the entire structure to skew:
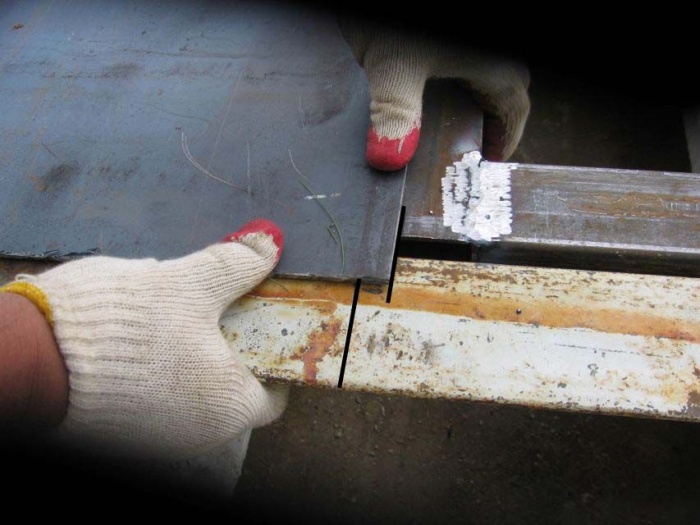
- Cut the galvanized sheet to size. It's important to remember that left-hand side should overlap the right sash (2 - 3 cm);
- We weld the sheet to the frame spotwise in half a meter increments;
- cut off the extra centimeters of the right sash;
- Now we proceed to welding the entire structure of the valves;
- You need to weld a sheet of metal to the frame with a continuous seam, but only in spots; if you weld the metal completely, then the frame can lead. An option is a clamp, which can be used to firmly fix the frame to the channel. Then you can weld with a continuous seam, but in stages - 10 cm on one side, then 10 cm on the other, so the metal will not overheat.
It's time to weld the hinges, lower and upper.
How to weld hinges
It is clear that we weld the lower half of the hinge to the frame, and the upper half to the sash. A few important points:
- the metal strip will strengthen the connection between the hinge and the frame. Having bent the strip, we apply it to the hinge and to the sash;
- Internal inserts made of thin reinforcement will give additional strength to the hinges.
We clean the seams using a grinder. Now you can install the lock.
Locks, latches and latches
If planned the padlock, which is not very convenient, then everything is simple here. We weld two ears made of a curved metal rod to the frame from the outside and clean it with a grinder. But opening such locks in the cold is extremely inconvenient.
A bolt and additional pins - slings from the inside will increase reliability. If you install slings, then the two halves of the gate will be tightly fixed from the inside; it will be possible to make an additional one on one of the leaves front door to the garage.
When choosing a lock for a garage, keep in mind that cylinder locks are very difficult to open in cold weather; they freeze faster and more firmly. Better to buy mortise locks with a key handset.
Painting and insulation
Metal gates must be painted and primed. It is advisable to renew the paint every two years. Important nuances Things to remember when painting gates:
- degrease surfaces with solvent;
- treat with a metal primer with an anti-rust additive;
- we paint, it is more convenient to paint metal from a special apparatus in which the paint is applied under pressure. In this case, the paint consumption is less and the coating performance is higher. The device can be rented, as it is not cheap.
After painting, we proceed to insulating the gates, because metal is the best conductor of cold:
- it is more convenient to lay the insulation along wooden sheathing on the gate leaf, which is mounted from the inside;
- Expanded polystyrene can be used as insulation, but in this case it will be necessary to protect the insulation with non-combustible finishing sheathing. It is better to choose glass wool in mats or mineral wool– it is a non-flammable material;
- Additionally, all the cracks that remain around the perimeter of the frame installation must be foamed polyurethane foam, then cut off the excess foam and plaster;
- it is important to fill all voids with insulation so that cold bridges do not form;
- for middle latitudes, where there is no severe frosts insulation layer 5 cm, for the north - not lower than 10 - 15 cm.
The finishing of the gate from the inside on a wooden lath is made from plastic lining or from plywood.
Making swinging garage doors with your own hands is not difficult, the main thing is to have free time, desire and a welding machine. Make simple things more comfortable to use swing structure It is possible with additional automatic door closing.


