Having an intercom has long been an indispensable condition ensuring comfort modern apartment. The main purpose of these devices is to enable homeowners to accept calls from visitors and open doors remotely. Intercoms turned out to be much more convenient than outdated combination locks. Let's find out how to connect the apartment intercom handset yourself.
Types of modern intercoms
An audio or video intercom is used to reliably identify visitors. The latter is more often installed in private cottages and is created for additional visual control space in front of the front door. As for city apartments in multi-storey buildings, then they often install an audio option, the design of which includes the following elements:
- A handset that is equipped with buttons for accepting a call and opening an entrance electromagnetic or electromechanical lock. The device is installed by a company that provides intercom installation and maintenance services. If such devices were not installed when installing the entrance to some apartments, there is a possibility that they self-installation. You can also use the services of a specialist service company.
- A call panel equipped with a numeric dial field that allows the visitor to signal the intercom by pressing the required code, usually the apartment number. In addition, there is a reading device on the panel, with which you can use a special key to open electromagnetic lock blocking the entrance doors.
- Locking device with power supply. The most common type of lock today is electromagnetic. Until recently, electromechanical latches equipped with sliding mechanisms were ubiquitous. Such devices are often present in entrances apartment buildings and now. To operate a remotely controlled unit, you must use a DC voltage of 12 or 24 V.
- Switch. This device is designed to transmit a signal from the call panel to the subscriber handset of a specific apartment.
Depending on the type of signal processing, digital and analog intercoms are distinguished.
Important! Receivers are used for digital and analogue models various types. Before purchasing such a device, you should definitely find out what type is installed in the entrance.
Digital intercom
To connect devices of this type, only a cable with two cores is used, through which an encrypted signal is transmitted. The handset installed in the apartment, the number of which was dialed on the call panel, responds to the signal. To set the correspondence between the dialed code and the handset, special jumpers are used - jumpers - which bridge the required contacts in the answering machine.
To correctly program the operation of the handset, jumpers are placed between the numbered terminals so that the sum of the numbers equals the apartment number.
The advantages of such intercoms include ease of installation and connection of new subscribers.
The main disadvantage of such equipment is the influence of each tube on the operation of the entire system. When replacing a device due to its breakdown, as well as when connecting new subscribers, it is extremely important It has correct installation jumpers.
Attention! If there is an error connecting the digital handset or short circuit the supply wires may cause problems with the system.
Currently, to partially eliminate this drawback, floor controllers are used, which allow the fault to be localized within one level.
Another disadvantage of digital intercoms is their relative high cost, which does not allow these devices to become widespread.
Analog installations use a coordinate matrix connection and operate on the principle of a telephone exchange. Additional element Such a system is a switch in which the signal is processed and analyzed, as well as its redirection to a specific subscriber.
To connect the intercom handset to the switch, two buses are used. The contacts of the first of them (D0–D9) correspond to tens, and the second (E0–E9) to ones. Thus, to connect an intercom to an apartment whose number, for example, is 74, you need:
- connect the conductor from the positive terminal of the subscriber handset to the contact corresponding to number 7 on the tens bus;
- the conductor adjacent to the negative terminal is to the contact corresponding to number 4 on the units bus.
In the considered connection option, a device was used that was designed to serve up to 100 subscribers. There are models that can work with a large number numbers, but their principle of operation is no different from that discussed above.
Connection procedure
The sequence of actions will be as follows:
- At the first stage of work, the location of the intercom handset is selected, then it is fixed to the wall using quick installation.
- Next, the installation location of the switch is determined (for analog intercoms). On each floor they are installed in distribution box for low current circuits. All of them are connected in parallel, which greatly simplifies the installation process. In the general case, just one switch per entrance is sufficient, but when using such a scheme, you have to stretch wires from the apartments on the upper floors to the installation site of the device.
- After removing the protective cover of the switch, the terminals corresponding to tens and ones are determined, then the connection is made so that the sum of the numbers of these contacts shows serial number apartments.
- The wires are connected to the tube. It is extremely important to observe polarity. The positive terminal is connected to the contact of the commutator corresponding to tens, the negative terminal to ones.
Important! If the polarity is not observed when connecting the coordinate matrix system device, the operation of the devices of the entire entrance may be disrupted.
Thus, installing an intercom handset is not particularly difficult. However, before you begin to do such work yourself, it is important to determine the type and brand of device used, as well as the location of the switch and the subscriber connection diagram.
Access intercoms - devices with magnetic keys, electric intercom, push-button and public order control in residential and public spaces. This device is connected to or to power sources that operate autonomously. The device helps to carry out control, in which the user can not only identify a guest by voice or video image, but also open the door without leaving the apartment.
Existing types of entrance intercoms
This is possible thanks to the advanced intercom functions.
All components of the structure are mounted on the entrance door and in the residents’ apartments. The calling panel, on which the buttons are located, is installed at the entrance. A digital code is recorded in the intercom memory, which activates the switch that transmits the signal. How does a digital entrance intercom work:

Multi-apartment intercom system
An audio intercom is simple and reliable, but, unfortunately, it begins to become outdated very quickly. Color panels based on a sensor are becoming fashionable, since their cost is constantly falling; there are models that have the ability to record all incoming calls to a flash drive. The user has the opportunity, upon arriving home, to see who came in. Like apartment intercom stands on almost every entrance in many cities.
 Intercom connection diagram in apartment building
Intercoms are divided according to the method of codifying incoming guests and the principle of addressing the number of subscribers who need to be served.
Intercom brands and number of subscribers
Maloabonensky - installed at facilities and in. These devices can serve only one subscriber, for example, in cottages, at security posts, at the entrance to a house, or. Multi-subscriber – designed for entrances to multi-storey and administrative buildings.
Not so long ago, these structures could only serve 6 people, but progress does not stand still, and this moment you can buy intercoms various configurations, which can serve more than 1000 subscribers, while making dozens of entrances accessible.
 Various brands intercoms
 The installation of an entrance intercom must be carried out by specialists from the company that will subsequently service it. Device types:

What is the indication of guests on intercoms?
An intercom with a camera allows you to view the area from the side, in front, or into the stairwell. A special feature of the device is covert filming from inside the building. Particularly prestigious intercoms can provide audio and video surveillance; they have a control panel with a perceptive and particularly sensitive screen. Can record and save events and faces of visitors in the amount of 16 pcs. 
Some manufacturers have gone further - through an intercom screen they began to use identification using a mobile or TV. This is done manually or automatically: the signal arrives at the device and the intercom role is activated, and after the conversation is completed, it switches to standard mode. Wireless types of intercoms have such properties. The above aspects affect the price and popularity of blocks. Ordinary audio intercoms, unlike video intercoms or the most elite modifications, have a low selling price.
Device Manufacturers
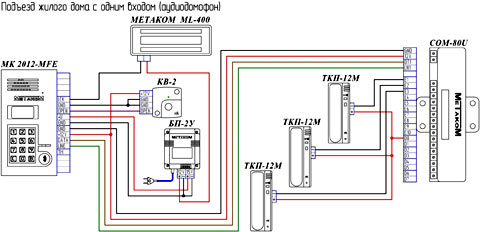
Metacom
Metakom intercoms – innovative systems. By purchasing these devices, we can be sure of their flawless operation for a long time. The principle of operation and installation is no different from other similar devices. Metakom intercom is the simplest and consists of a handset and a panel. The intercom will work correctly if it is installed correctly.
 This is what the Metakom intercom looks like
 Installation of entrance doors with Metakom intercom is carried out by specialists from a company that sells intercoms. The systems have a number of advantages:
- there are no mechanical switches on the panel, which helps eliminate the problem of keys blocking and oxidation of wire contacts;
- doors are opened with a key;
- you can open the entrance door using a special, programmed digital code;
- easy maintenance, installation and reprogramming.
For the Metakom intercom to work correctly, you need to install it correctly, connect it and configure it. It is better to entrust this work to a company that employs specialists in the installation and maintenance of entrance intercoms of this brand.
Visit
Manufacturers have developed inexpensive and high-quality Vizit intercoms.
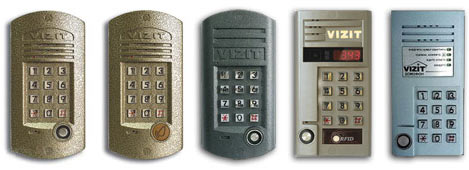
The external panel of this device is made in a housing that prevents break-ins. At the same time, the intercom can operate in very harsh weather conditions. Vizit intercoms have various components and are assembled at the request of the client; often the installation of access doors is associated with the installation of a Visit audio intercom. You can select a control unit for the call block, which determines how many subscribers will be connected, video cameras - dome or case, electromechanical locks. There are dozens of options for completing the installed equipment.
Cyfral
Installation of the intercom must be carried out strictly according to the instructions. Cyfral includes this with every kit they manufacture. You can install the intercom yourself by reading this manual, but if you don’t have enough knowledge, then do not risk your safety and the integrity of the device, contact the installation company.
These digital intercoms are connected using a telephone cable, to which the subscriber handsets will be connected in parallel.
When connecting Cyfral intercoms, you need to program it correctly.
Commax
Commax intercoms are produced by a Korean company; they are one of the leading manufacturers in the market for the sale of these products. The Commax video intercom kit includes:
 Commax video intercom equipment
 - calling panel with camera;
- monitor;
- electric lock.
Video intercoms "Commax" differ in characteristics, since they have different models they are not the same:
- can be monochrome or color;
- can be equipped with a handset or speakerphone;
- There are kits with motion sensors;
- There is a function for taking photos or video recording, with data saving.
This video intercom can be connected to a regular intercom using an interface unit - a module that helps connect almost any video intercom. This interface unit will allow not only a video intercom, but also several cameras that are installed in the entrance and a panel installed directly on the subscriber’s floor. An interface unit with an entrance intercom is connected for devices with a coordinate or digital device.
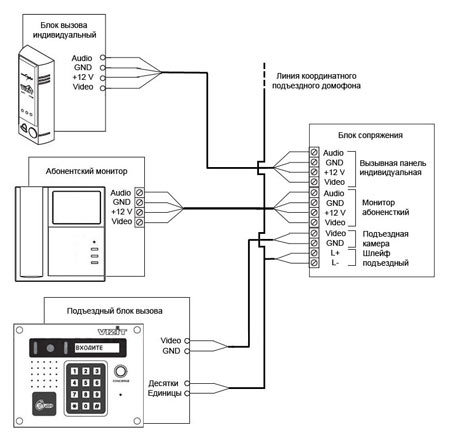 Intercom connection diagram via interface unit
 Many people who have private houses or summer cottages are increasingly beginning to think about convenient system security and access control to your territory. The simplest and affordable option today is individual intercom, which can be easily installed on our own without the involvement of specialists. To do this, you just need to strictly follow the manufacturer's instructions. If you have such a device, you can completely protect yourself from the visit of uninvited guests.
Why is it necessary to install an intercom in a private house?
The main task that an intercom should perform is to ensure the safety of home owners and protect them from unauthorized visitors. It is very important to have an audio or video intercom if there are elderly people living in the house or if there are small children who most need the maximum degree of protection. The presence of an intercom will help protect people from danger that may arise due to excessive carelessness.

Installing a video intercom in a private house helps ensure the safety of residents due to full control over the area in front of the gate
Thanks to the intercom, you don’t have to leave the house and walk across the entire yard to the gate in order to see who has arrived, since you can communicate with the visitor via audio or video communication and, if necessary, let him in by pressing a button on your device.
But before purchasing such a device, you need to decide exactly for what purpose it will be used and how much you are willing to spend on your safety. That is why every person should know what types of intercoms currently exist, what functions they perform, what types of locks exist for these devices and how much all this equipment costs. It is also very important to know whether, if necessary, you can install an intercom in a private house with your own hands.
Types of intercoms and standard connection diagrams
According to their own design features Intercoms differ in the type of signal they transmit. Devices can transmit a signal from the call panel to the main unit via audio or video:

Often audio intercoms are installed in entrances multi-storey buildings, where they mainly play a warning function. A video intercom is more useful for private houses, since in a high-rise building it is installed only near the apartment door and is not intended for public use.
In a private household, a video intercom will play a big role, since the owner can not only hear, but also see the visitor and, if necessary, not allow him into his territory.
Modern intercoms, in addition to the basic elements (ringing device, locking lock, telephone handset and power supply), can be equipped with additional functionality:
- answering machine. If the owner is not at home, then thanks to this function he will be able to listen to the recordings left by people who came, and even receive them on his mobile phone;
- motion sensor. This device detects a visitor who is within its coverage area. When a person appears near the device, his image is instantly transmitted to the monitor of the TV connected to the intercom;
- memory block. Thanks to this function, the visitor's image is recorded on special device from the moment the call button on the intercom was pressed. As the memory becomes full, old entries are erased and replaced with new ones.
At the request of the home owner, the intercom can be equipped with an unlimited number of monitors and additional CCTV cameras.
Basically, all intercoms are connected to calling panels using wires. There are also wireless devices, but their range is quite limited. Today there are three standard schemes wired intercom connection:

Home intercom device
Video intercoms are very popular among private home owners. Therefore, we will look at their device in more detail.
The outdoor unit, which is mounted at the entrance to the house, is equipped with a video camera and a call button. There is also a negotiation device here, which allows you to communicate with the owners if video communication is not enough. The video camera can transmit black and white or color images.

From the call panel you can call the monitor and talk with the owners, who will see the visitor on the screen
Depending on the installation method, call devices can be mortise or overhead:
- mortise panels are more expensive, but they are better protected from burglary and various climatic conditions;
- overhead blocks are produced in durable plastic cases, but they still wear out more and are subject to various mechanical damage. For such panels domestic producers offer durable protective covers that protect the device from damage.
Indoor unit (monitor)
The indoor unit is a black-and-white or color monitor, depending on the model. Black and white monitors are already a thing of the past and are practically no longer produced. Color models are equipped with a screen with a diagonal size of 10 cm and a handset or speakerphone button for answering calls. The monitor also has a button to open the lock, keys additional functions and buttons or knobs for adjusting sound and picture.

Most modern video intercoms have a speakerphone button instead of a handset
Types of intercom locks
You can connect an electromagnetic or electromechanical lock. Both options work from the network, so we will look at the principle of their operation and characteristics.
The electromechanical lock is modern locking device for an intercom, which opens with one press of a button or a special key. It operates on 12V, so it requires a step-down transformer.
Advantages of the castle
- Allows you to open a gate or door at a certain distance (when connected to an intercom).
- Can work even in the absence of electricity (without the possibility of remote control).
- Produced with high level privacy and security.
- It can be equipped with a motor that is powered by a small electric motor.
- It has an electric latch that opens by turning the handle.
When choosing such a lock for outdoor use, you must keep in mind that it front side There is a button that you can reach with your hand, leaning over the fence, and open the gate. A street lock with electromechanics can be mortise or overhead.
You also need to know that in the event of a power outage, only the overhead version of the lock will be able to work.
Before purchasing such a lock, you need to find out for what type door leaf does it fit and what is the principle of its operation. Experts recommend Polis or Fass Lock brand locks for a private home.

The electromechanical lock has a manual opening button, so intruders can enter unnoticed by leaning over the gate or reaching the button through cracks in the door leaf
An electromagnetic lock is designed to close a door or gate and keeps it closed by means of a powerful electromagnetic board that attracts a steel plate mounted on the door or gate. The electromagnet is mounted on door frame or piping the gate, and the steel plate is attached to the door or gate itself.
In closing mode, a current is supplied to the magnet winding, which creates a powerful electromagnetic field that quickly attracts the steel plate. As a result, the gate, held by the magnet, is in a closed state. In order for it to open, the tension must be removed from the lock. This is done by pressing a button on the intercom: the circuit opens, the electromagnetic field disappears and the gate opens.

The electromagnetic lock only works when voltage is applied to it, so if your power suddenly goes out, the gate may remain open
By their design, locks can be pull-off or shear, as well as overhead and mortise.
The most popular are overhead models that work on tear-off. Due to the fact that such locks do not contain moving or rubbing elements, they last for many years and can work in any weather conditions.
But if the power supply suddenly stops, the lock will stop working and the door will remain open. To prevent similar situations, you will have to install an uninterruptible power supply system.
Electromagnetic locks vary in the strength with which they hold the front door. This value is set in kilograms and should be much greater than the mass of the wicket. For medium-sized gates, a lock with a holding capacity of 300–400 kg is sufficient.
How to install and connect a video intercom yourself
In order to begin installing the intercom, we will need the following tools:
- Sharp knife.
- Powerful hammer drill and drills.
- Electric screwdriver.
- A spatula and a peak or a wall chaser for creating grooves in the walls.
- Grinder and discs for cutting metal.
- Various screwdrivers.
- Convenient pliers.
- Nice hammer.
- Spatula and kneading utensils.
In addition, you need to prepare:
- Power cable (length is calculated individually).
- UTP cable (twisted pair).
- Several outlets.
- Automatic switch.
- Self-tapping screws and dowel-nails.
- Electrical tape, protective clothing.
- Corrugated pipe for wires (straight can be used).
- Cable channels.
- Putty mixture for sealing grooves.
- Drills of different diameters.
- Perforated tape and hardware.
Step-by-step installation diagram for a video intercom with an electromechanical lock
- We choose a convenient and accessible place on the wicket or gate to place the calling panel. We disassemble the panel and mark its installation location. We drill holes for fasteners and wires.

The calling panel can be installed at an angle to the surface of the gate, for which a special adapter is included in the kit
- We run a four-wire wire from the end side and connect it as indicated in the instructions.
- We lead the cable to the installation site of the controller, which is a plastic box located near the lock. This way we will have to run fewer wires and it will be more convenient to make connections. The controller can be installed in a panel on the street or walled into a wall.

The lock controller is a small printed circuit board, which can be mounted in a plastic box next to the lock or walled into the wall
- We install a reader next to the calling panel, and with reverse side gate - exit button. We connect the wires (two wires) from each device to the controller and connect them to the appropriate connectors (DALLAS and “EXTERNAL SD” for the controller and “BUTTON” for the exit button). We connect the wires from the calling panel parallel to the exit button.
- We check the correctness of all connections. Unscrew the call panel and screw it on back wall screws to the installation site. Let's put it back together.
- Next, we go into the house and install the monitor. We attach the bracket included in the delivery kit to the dowels. There should be a 220V outlet nearby. If it is not there, you will have to get a power cord from electrical panel. Then it is better to connect the equipment to a separate machine and sign it. This will make it much easier to deal with the wires in the future. After this, we hang the monitor on the bracket.

The video intercom monitor is hung on a bracket, which is attached to the wall with self-tapping screws
- We do wiring in the house. It can be either open or recessed into the walls. But for hidden gasket We will have to tap the wires into the walls, and then cover them with putty and alabaster. It is best to do preliminary closed wiring for the intercom when the house is just being built or renovated. If there are no embedded cables, but you don’t want to spoil the wallpaper or paint, choose open type wiring. To do this, we lay cables along the walls outside, running them into plastic cable channels.
- We connect a four-wire cable to the intercom according to the following diagram:
- yellow - audio channel;
- black - general;
- red - 12 volts (“plus”);
- white - video image.
- We install a lock on the gate. The surface of the counter plate must be installed without distortions, otherwise the lock will not fit tightly to it and close. Since the lock operates using a relay, a common wire is connected to it, and the positive contact is connected to the controller (terminal “+12 V”). All work must be carried out with the power turned off.

The electromechanical lock has a tongue that must fit tightly into the strike plate
- We program the keys. In order for the owners to enter the house, they need to be provided with access keys. Information about each identifier is recorded in the controller's memory. When turned on for the first time, it will respond with infrequent signals of sound and light. First you need to create a master key using a special procedure described in the instructions. Then, one by one, we bring each subscriber key to the reader and wait for the confirmation signal. In this way, we record the required number of identifiers into memory, making sure that the time between records is no more than 16 seconds.

After programming, information about the access code from each key is recorded in the controller’s memory, and the device is allowed to pass
- We check the operation of the intercom. To do this, we make a call from the panel - the monitor must give a signal. We pick up the phone, talk to check the volume and sound quality, and also try to open the gate. If all actions were successful, it means that we installed the intercom correctly and you can use it. Difficulties usually arise with the installation of the lock and controller. Therefore, when problems are detected, the first thing you need to do is carefully check that all connections to this device are correct.
Install the power supply. It must supply voltage to the lock and all devices located on the gate. It is best to use an outdoor device and mount it next to the lock. For electromechanical locks, a 12 V and 3 A power supply is required; for an electromagnetic locking device, a 12 V and 1 A source is sufficient.

It is better to power the lock, controller and other components of the access control system from a source located nearby
We lay the cable. Wires running along the street are run underground in special engineering tubes made of plastic or metal. In total, you need to lay one four-wire cable to connect the monitor and the calling device and one two-wire cable to supply voltage 220 V. But since the cables will go underground, it is better to lay them with a reserve, taking into account the appearance in the future of new elements of the system: additional video cameras, gate control devices, security sensors etc.

To lay underground, cables are pulled into corrugated hoses and laid in a dug trench in plastic or metal pipes
Video: how to install an intercom with your own hands
Device and features of connecting a video intercom
To connect a video intercom you will need a cable with four cores. You can purchase a special wire in the store, where two copper wires are located next to a two-core coaxial wire. It's called a video combo cable. Typically, cable brand KVK-P 2x0.75 is used.

The video intercom is connected to the calling panel using a combined video cable, which has one shielded core
Two more wires are added to the lock, which will allow you to control its mechanism without leaving your home. The call panel is usually screwed at a height of 150 cm from the ground.
If we install a wireless intercom, there is no need to lay and connect a cable. You just need to supply the power correctly.
Video intercom Quantum QM-4HP
Many people prefer to install a convenient, practical and reliable Quantum QM-4HP video intercom in their private home.

Quantum QM-4HP is one of the most popular models among private home owners
Its main characteristics:
- four-inch (approximately 10 cm diagonally) CRT monitor;
- parallel operation of up to 4 monitors in one system;
- door open button;
- connection of one calling panel;
- installing a video memory unit;
- connecting an additional audio tube.
Connection diagram for video intercom Quantum QM-4HP
The video intercom is connected using a standard four-wire circuit, which we described above. Therefore, this model can be used to install an access control system in a private house according to the step-by-step instructions we provided.

Quantum QM-4HP video intercom can be used with an additional video camera and a memory unit for 32 frames
In order to install the intercom correctly, you must strictly follow all the manufacturer’s recommendations and understand the intricacies of installation electrical wires and devices. If you do everything according to the instructions, you will not have to involve specialists and spend additional money on installing this device. And in the end, you will get an excellent intercom with an audio or video system, which will make your life in a private home much easier.
Installing an intercom in a private house is perfect solution issue of security own safety. Today, many companies provide this service, however, you can install an intercom yourself.
Preparation for installation
To perform this work, you need to prepare tools for installation:
- hammer drill with a set of drills;
- screwdriver;
- a spatula and a peak for wall grooves or a wall chaser;
- Angle grinder with a metal disc;
- Screwdriver Set;
- pliers and side cutters;
- hammer;
- spatula and mixing container;
- wire stripping tools.
This does not mean that all of the above tools will necessarily come in handy. Their set may vary depending on the chosen method and location of installation of a particular element. The most interesting thing is even when you have full car tools you will definitely need something that you forgot, gave to a friend or broke yesterday.
Then we prepare materials and equipment. The recommended set of equipment is indicated in the article. Although I recommend reading articles about electromagnetic and electromechanical locks. The list of materials depends on the installation location of the equipment and the method of cable installation. The following materials are purchased as standard: 
- wire for power supply;
- UTP wire (twisted pair);
- sockets and plugs;
- circuit breaker for all equipment;
- a set of self-tapping screws, a fastening set of dowel-nails;
- electrical tape, safety glasses and gloves;
- corrugated or straight electrical pipe;
- cable channels;
- putty, alabaster;
- drills, metal discs;
- punched paper tape, hardware;
The list of materials can be continued, but I repeat: it is prepared depending on the preferences of the customer, the installation location of the intercom in a private house and is formed after calculating the lengths of the routes.
Installation of calling panel

Installation and connection of the intercom handset
The next step is installing the tube. It can be installed in any convenient location in the house. The holder is also attached to dowels. Near the installation site of the tube there must be standard socket 220V, or we start the power supply from the panel. To do this, we connect all the equipment to a separate machine and sign it. This is more convenient and practical, although more difficult to install.
You can buy it, or we can connect a video camera to the system via a controller. It will only record arriving guests at the moment the call button is pressed. Of course, the video camera can be configured for other modes: constant cyclic recording, motion-based recording, recording on a DVR, as they say: who pays the call. Additionally, for night shooting, you can install a CCTV camera, and add a monitor to the handset.
Connecting the power supply
 The power supply is included in the electrical system of the house and all wires pass through it. As a rule, this unit is included in the kit, so its power is specifically designed for a specific intercom. If the power supply is purchased separately, you need to carefully study everything specifications calling panel and handset, so that the power supply matches them in power and the installed intercom works without failures.
We need to power the following devices: controller, monitor, if there are video cameras. If the set consists only of an intercom and an audio handset, then the power supply and socket are placed next to the controller, otherwise, it is more advisable to connect the power supply: Where do you think? — That's right, in the electrical panel. And then we need not one from the kit (since there are already three or more of them), but another one, sufficient for all devices at once. The total load is calculated, a tolerance is added, rounded up, and a power supply for our system is purchased.
Cable routing and sealing
When the installation of all intercom elements is completed, the most important process begins - laying the cable and connecting all the currently scattered parts. If you didn’t guess, then the intercom, or rather all elements of the system, is controlled in the controller (models JSB-CL002, Z-5R, VIZIT are on sale , and other companies). It also stores all data about the keys in memory. It turns out that this is the brain of the system. Therefore, all wires are connected to it. It is only supplied with power and supported by all means (batteries are installed). The intercom connection diagram is standard.

There are two ways to lay wires: open and closed. Closed method better suited for that part of the wires that run along the street. They are released underground in plastic or metal pipes to avoid premature deterioration. Both open and closed wiring of wires is possible indoors. However, for a closed one you will need to ditch the walls and then seal them with alabaster and putty. It is much easier to lay cables externally by running them through corrugated pipes or cable channels.

The intercom is connected to a four-wire cable. The wires of this cable are numbered and each have their own purpose. So, the yellow cable number 1 is responsible for the audio channel and is connected to the corresponding contact number 1 on the handset or on the monitor. The black cable is responsible for general connection intercom and connects to contact No. 2. The purpose of the red wire signal is +12V, it comes from the lock and connects to contact No. 3. The white wire is a video channel, it connects to contact on the monitor No. 4.
To seal holes, joints, seams, you can use polyurethane foam, putty or alabaster.
Key programming
In order for the intercom to work, it must also be programmed and the keys stored in memory. There are keys different types and types. But there must always be one master key. It is programmed first. In other words, the first key programmed will be the master key. Store it separately and do not use it.
When turned on for the first time, the calling panel will respond with short sound and light signals. In order to write the master key into the intercom memory, you need to touch the contact reader with it. In the future, it will be he who will provide access to programming or reprogramming the intercom and keys. The cessation of signals will mean that the key has been written to memory. Thus, you can record several keys, however, the interval between their records should not exceed 16 seconds. Simple and blocking keys are added to the system in the same way as a master key.
Intercom connection methods
Various methods and intercom connection diagrams are discussed in this video, quite clearly and understandably.
Functionality check
To check the operation of the intercom, you need to make a call from the panel, the monitor or handset must play a signal. Then you need to pick up the phone, talk into it, check the sound quality and open the gate. If all the manipulations performed gave a positive result, it means that the installation of the intercom in a private house completed successfully and the intercom is ready for use. If something doesn’t fit somewhere, modify it. Usually, difficulties arise with the lock, closer and door. The lock may not close the door due to an unadjusted closer that does not press the door.
Alexei
Nowadays, installing a video intercom is becoming popular not only in offices, but also in private cottages, houses or apartments. Their functionality expands the usual audio intercoms by the presence of a camera and monitor, which displays an image of what is happening outside.
The standard contents of the kit sold on the market include:
- Handset for conversation
- Screen panel
- Up to three surveillance cameras
Unlike conventional audio models, installing a video intercom in an apartment guarantees a higher degree of security organization, allowing you to visually observe everything that is happening near the entrance to the yard or house. The completely safe equipment connection scheme can be called unique.
How to choose a video intercom
 There are many modifications of video intercoms on the market, which differ in design, quality, cost, parameters, and number of supported functions. But all models can be divided into several groups:
- Black and white or color
- With or without video recording function
- With open or closed camera
When considering the installation of a video intercom, you need to take into account each of the characteristics.
Transmitted Image: CRT or LCD
The first parameter that people pay attention to is the type of image being transmitted. All devices, as in video surveillance systems, can be divided into color and monochrome - this is the main pricing factor.
More often they choose to install video intercoms in a private home, based on cathode ray tube or CRT technology. They have slightly exaggerated dimensions and are capable of transmitting black and white images.
Among the main advantages of CRT technology are:
- Durability
- Endurance
- Low cost
LCD or liquid crystal models are more modern and transmit color images. However, differing more elegant design, smaller dimensions and instant switching on, their cost is an order of magnitude higher than that of CRT.
Watch the video, selection criteria:
Type of connection and manufacturers
It is possible to install an intercom that operates autonomously (in private cottages and houses) or connected to the entrance (in apartments). In the second case, you will have to contact the organization that installed the equipment at the entrance and clarify the list of models that are compatible with the access system.
When purchasing equipment, it is recommended to give preference to one manufacturer to avoid compatibility conflicts. Today, many of the companies producing security systems offer video intercoms to their clients. Most of them are adapted for use in any conditions.
Camera type and display diagonal
 It is possible to install video intercoms in an apartment, to which more than one camera is connected. Popular removal devices – Pinhole.
They are easily hidden in a wall or on a call panel thanks to the small lens diameter. Sometimes they use video eyes that are mounted directly into the door or gate - their picture quality is much higher.
If you need to monitor more than one door, you should install a video intercom with support for several tracking devices. The more cameras there are, the wider the display diagonal should be.
Memory
Majority modern models are equipped with flash memory, which can store from 128 to 512 frames. In this case, the camera saves images after pressing a specific programmed button.
Increasingly, a video intercom with a DVR is being installed, which is equipped with a separate slot for memory cards. The device is capable of saving not only individual pictures, but also video of everything that happens, which can then be viewed on personal computer or TV.
Additional functions
 There are two types of video intercoms offered on the markets:
- With speaker
- With handset
Models with a speaker are more compact, usually equipped with a large display and have a remote control. However, choosing between the two options comes down to personal preference.
Another useful feature is connecting the intercom to the TV. If the front door is located too far away, this function can become simply indispensable.
Don’t forget about the possibility of expanding security systems and connecting additional equipment.
Price
Often the main selection criterion is the cost of installing video intercoms with all the necessary equipment, which reaches tens of thousands of rubles. It is directly proportional to the quality and functionality of the equipment. For those who prefer cheap but cheerful things, you should pay attention to devices in the price range of 4-7 thousand.
Video intercom installation
 The installation can be divided into the following stages:
- Planning work and concluding an agreement with the organization performing installation
- Cable routing
- Installation and testing of equipment
To plan installation work recommended before in the hallway and around front door finishing will be completed. This will provide several advantages: it will be possible to install a hidden power supply, wall the panel into the wall and hide the wires.
In the event of a voltage drop, an installation with a backup power source is provided to ensure battery life in unforeseen circumstances.
Next, you need to select the kit to be installed and determine its exact location. The calling panel and cameras are mounted at a height of 160-170 cm. To achieve optimal viewing angles, there should be no obstacles nearby:
- Horizontal - within 50-70 degrees
- Vertical – within 70-90 degrees
In the apartment, the control panel is installed in any convenient place so that the bell can be heard in any of the rooms.
Let's watch the video, the stages of installing an intercom:
One of the most important stages Installing a video intercom with your own hands - laying wires. The stability of the entire system depends on how competently it is done. Experts recommend using special signal cables or twisted pair.
The maximum cable laying distance is 35-40 meters, otherwise the signal will begin to fade significantly. The location of power wires next to each other can cause interference in the circuit. An additional cable with a cross-section of 2x0.75 mm is provided for installing an electric lock. And don't forget about the power cable.
Then the installation of equipment is carried out: power supplies, external and interior panels, additional cameras, etc. All together it must be connected according to the diagram included in the kit. If the components security system purchased separately, you should ensure their compatibility (220 V).
Watch the video, instructions for installing an intercom with your own hands:
There is nothing difficult about installing a video intercom in an apartment with your own hands. However, feeling any lack of confidence in their abilities, they entrust each stage to professionals. Only they can guarantee the quality and stability of the system.
 Despite the simplicity of the described work steps, they require a lot of time and maximum concentration. Any, even minor errors, can affect the quality of audio and video signals. To protect yourself from mistakes, install video intercoms by trusting specialists.
Before choosing a contractor, it is recommended to familiarize yourself in detail with the offers on the market and look through the reviews of past customers. Buy everything necessary equipment And Consumables It is recommended to contact the installation company.
When concluding an agreement with a contractor, his specialist must visit the customer. He is obliged to make a small sketch of the premises and territory, photograph the most important areas, take measurements and provide an estimate.
Of course, the price for installing a video intercom along with the equipment depends on many factors, but the main one is the type of living space:
- For an entrance door near an apartment – from 7 thousand rubles
- For a private cottage or house – from 10 thousand rubles
- For office space or apartment building– from 18 thousand rubles
Before starting work, it is necessary to conclude a contract. It details the responsibilities of both parties and the cost of performing the entire range of work. The Contractor must guarantee the proper operation of the entire system and take measures to eliminate possible malfunctions caused by his fault. In turn, the customer undertakes to operate the equipment correctly. Additionally, it is recommended to conclude an agreement on periodic maintenance of the system.
 When installation is completed, it is necessary to check the functionality of the system in the presence of the person performing it. The customer must confirm that everything is in good order and meets his requirements. Having discovered problems within warranty period, the contractor must eliminate them.
A competent specialist, before leaving the client, must show all the features of using the installed device. He is also obliged to give a copy of the contract, all Required documents and warranty cards for equipment.
Let's sum it up
Video intercom installation – great way protect yourself from unwanted guests and intruders. After all, you can observe everything that happens behind the door from inside the room.
The factors that determine the quality, convenience and stable operation of the system are the competent selection of equipment and its installation. When faced with such a task for the first time, you should trust the specialists. And there is no need to save - the money spent will quickly pay off.


