The main advantage of the device is the economical consumption of hot water when minimum costs. To heat water, craftsmen use different sources: electric heating element, solar energy, heat from the boiler. This article will describe how to make a water heater.
Indirect heating boiler design
An alternative to baku is gas cylinder.
Boiler from a gas cylinder
If you decide to make a boiler from a gas cylinder, then it is better to purchase it new and without a valve. If you are using an old container, then hot water may smell of gas.
The cylinder requires preliminary priming. For this purpose, it is cut into two halves. To prevent an explosion, we recommend filling it with water first. The interior of the structure is cleaned and primed. This prevents rusting. After this, the balloon is brewed.
Two holes are cut into the container to drain hot and cold water. At the cold water inlet, the supply pipe is equipped with a check valve. This prevents water from leaking out of the tank.
To obtain an indirect type heater that will operate from the heating system, in addition to outlets for hot and cold water, two more holes are made for installing a heat exchanger. In it, one pipe is adjacent to another.
The coil is installed in the center of the tank or along its walls. Nozzles are welded to its inlet and outlet pipes.
If you want your device to stand, then you should weld supports to it. The attachment will require loops in the form of “ears”.
A 32 mm nut is welded to the place where the heating element will be installed. She must have internal thread. It is advisable to install a heating element for water with thermoregulation or an alarm sensor. Its power should be 1.2-2 kW.

The result is a boiler indirect heating. In this case, the main structural element is the gas cylinder.
How to make a coil?
The coil is important detail devices. It can be based on a metal or metal-plastic pipe with a small diameter. Typically copper or brass is used as they are different high level heat transfer. The manufacturer can choose the diameter of the coil at his discretion. The main condition is that its contact with water is maximum.
The serpentine tube is wound in a spiral onto a cylinder-shaped mandrel. For this purpose, a log or pipe with a large diameter is used. When winding the coil, it is necessary to monitor the turns. They shouldn't touch each other.
Do not make the winding tight, as it will be very difficult to remove the coil from the mandrel.
The number of turns on the coil is directly dependent on the volume and height of the tank. Typically, for every 10 liters, 1.5 kW of coil heating power is used.
Thermal insulation
To minimize heat loss, the tank should be wrapped in a layer of thermal insulation.
For this purpose, use:
- construction foam;
- isolon;
- polyurethane foam;
- foam;
- mineral wool.
Some craftsmen use a foil-based backing for the laminate. The water heater is wrapped in this case like a thermos. The insulation is attached using wire, glue or strip ties. We recommend insulating the entire building.
The lining will not only ensure long-term preservation of hot water, but will also shorten the duration of heating of the tank, which will reduce coolant consumption. Without well-equipped thermal insulation, the water in the device will quickly cool down.
Often they resort to the construction of a double tank: a small tank is placed inside a large one. The space created between them also performs a heat-insulating function.
To secure the container, top part hinges are welded onto its body, and it is installed on the wall metal corner to which they are attached.
Other methods of making a water heater
You can build a water heater powered by the sun. This is a fairly common design, which is distinguished by its efficiency. The device is often found in country houses. Making the device is not particularly difficult, so many can build it with their own hands.
You will need:
- large capacity tank (100 l or more);
- PVC pipes for filling the container and supplying water to it;
- steel corners measuring 20 mm or square blocks of wood measuring 50 mm for a frame for a container.
It is more advisable to use polyethylene barrels as containers. They are distinguished by their strength. They should be placed in a sunny place where there is no wind. As a rule, the roof of a summer shower is chosen for installation.
In order for the barrel to heat up better, it needs to be painted black. Screens are installed for protection. They are constructed from boards coated with reflective material similar to foil. In this case, the sun's rays are directed towards the tank and increase the temperature of the water. In hot weather, in a container of 200 liters you can get water whose temperature will be 45 ºС.
Water heater made from polyethylene bottles
Do-it-yourself water heater made from ordinary ones plastic bottles can be done in one day. They form the basis storage tank. The number of bottles depends on the desired capacity.
For installation you will need:
- sealant;
- PVC pipes;
- drill;
- two valves or taps with a ball design.
First of all, the bottles are prepared. A hole is drilled in the bottom of each, the diameter of which is equal to the diameter of the neck. The neck of another is inserted into the hole in the bottom of the bottle. This is how they connect. Each battery consists of 10 bottles. The number of batteries is unlimited. All joints are treated with sealant.
The finished modules are located on the south side of the roof on the internal waves of the slate covering. The output of each section is connected to a PVC pipe, which is located perpendicular to them. The cutting of each section is carried out in the same way as connecting bottles into a battery, followed by treating all joints with glue.
In the main pipe, to which the outputs of each battery are connected, valves are installed on both sides for supplying cold water and discharging hot water.
This one has a fairly high level of functionality. One person needs 100 liters of water to take a shower. Based on this indicator, it is possible to calculate the volume of the structure.
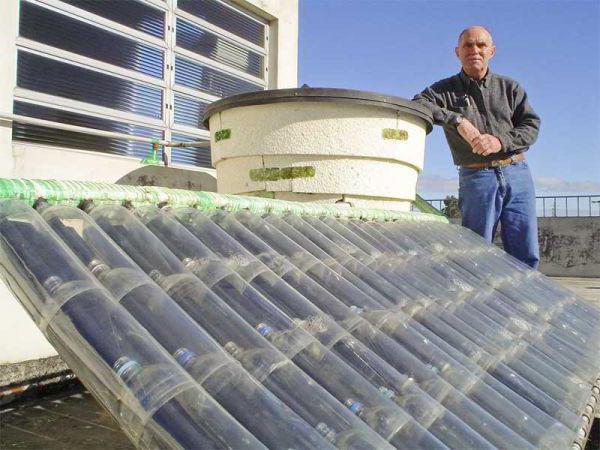
In summer, in sunny weather, in an hour you can heat 60 liters of water to 45 ºС. This temperature is quite suitable for domestic and household needs in the country.
Conclusion
The rapid rise in price of energy resources is forcing many to create cheap alternative devices. Many people build a water heater with their own hands and create comfort at minimal cost.
Hot water supply is familiar and convenient, but what to do if you connect to central system difficult? There are a number of ways to solve this issue, and the simplest and most economical of them - installation of an indirect heating boiler.
Unlike water heaters, an indirect heating boiler uses the energy of the coolant used for heating. To do this, a heat exchanger, usually in the shape of a coil, is built into the storage tank. Passing through it, the heating system coolant heats the water in the tank.
Heating water in a boiler, as in a water heater accumulative type, occurs within a few hours, but its temperature then remains stable for a long time, which increases the convenience of using hot water for showers and baths. 
An indirect heating boiler is not only economical, it is also safer, how . In the event of an automation failure in heating element heaters, water may boil and destruction of the device itself or fitting connections may occur, which will lead to leakage. In a boiler, the water cannot heat up more than the coolant; usually this figure is in the range of 60-90 degrees, which is safe for both pipes and humans.
Advantages of using an indirect heating boiler:
- the heat exchanger can be connected to either central heating, and to a boiler of any type;
- heating water does not require electricity, gas or other fuel, which reduces the cost of installing and operating the boiler;
- the water temperature is stable, without sudden changes;
- safety of use even without installing expensive automation - the water does not boil, and if there is a leak or interruption in the supply of cold water, the device does not fail;
- simple design and installation allow you to save additional money by making and installing an indirect heating boiler yourself.
Minuses:
- quite large dimensions and weight, comparable to a storage-type water heater;
- an indirect heating boiler is used only during the heating season; for summer use it is equipped with a heating element;
- prolonged heating of water, during which the temperature of the coolant in the radiators decreases;
- Salt deposits on the coil require regular cleaning and maintenance.
Design
The boiler design is quite simple. In a tank made of non-corrosion material, there is a heat exchanger in the form of a coil or a smaller tank. To increase heat transfer, the heat exchanger is made of a material with high thermal conductivity, usually copper. 
The tank is equipped with fittings for supplying and withdrawing water. The cold water inlet is located at the bottom of the tank and is equipped with a check valve, through which, using a bypass valve, drainage is performed. The outlet pipe for hot water is located at the top of the tank.
To reduce heat losses, the walls of the tank must be well insulated. For this you can use various materials, But best option- polyurethane, it has high thermal insulation qualities, at the same time, it is not afraid of moisture, well dampens the noise of water that occurs when heated, is durable and environmentally friendly.
To make a boiler with your own hands, the easiest way is to place the storage tank in a tank or a body of a similar shape slightly bigger size and fill the space between them with polyurethane foam from a balloon.
To measure and regulate temperature, the boiler is equipped with a thermometer and thermostat. This element is not required, but significantly increases the ease of use of the heater. To reduce internal corrosion, you can also build a magnesium anode into the tank, designed for heating element type water heaters. They are sold in service centers service or in hardware stores.
DIY manufacturing technology
Before you start self-production boiler, you need to decide on its parameters and characteristics:
- water consumption and tank volume;
- type of coil and calculation of its dimensions;
- the presence of additional devices - heating elements, thermostat.
Based on the answers received, you can choose a container for the storage tank, a material for making the coil, as well as decide on the dimensions and make a sketch of the future boiler. 
Volume calculation
To provide sufficient quantity hot water, you need to imagine its daily consumption. It is generally accepted that each person permanently living in a house needs 50-80 liters of heated water per day.
This amount will allow you to take a shower or bath, and will also satisfy the need for hot water for laundry, cleaning and washing dishes. Thus, for a family of 3-4 people you will need a boiler with a 200 liter tank.
If water is needed only for household needs, for example, washing hands and dishes, A smaller tank of 50-70 liters is sufficient. Don't unnecessarily select a tank too big size- this will increase the water heating time and lead to a decrease in the efficiency of the heating system.
Selection and calculation of the coil
 The coil in the boiler can be made of metal pipe in the form of a spiral or snake, or be a smaller internal tank. It is better to make it from a material that has high heat transfer and resistance to corrosion, for example, copper.
You can also use a stainless steel pipe, but it is more difficult to bend and give it the desired shape. Regular steel pipes use is not recommended - running water when heated, it will release oxygen bubbles, which will cause rapid corrosion of the metal. The most convenient is a copper tube with a diameter of 10 mm - it bends without using a torch according to a template.
Some masters also use metal-plastic pipes. They are resistant to external and internal corrosion, but they must be used strictly at temperatures below 90 degrees. Any overheating will lead to deformation of pipes, leaks and mixing of water in the circuits. Under certain conditions this can lead to air jams and poor circulation.
The pipe coil is wound in the form of a spiral from the calculated number of turns and placed in the lower part of the tank round section. For normal heat transfer, it should not touch the walls. When making a tank rectangular shape the heat exchanger is made in the form of a snake and placed near one of the walls.
The dimensions and number of turns of the coil will be determined using the formula:
In this formula:
- R - thermal power coil, which should be 1.5 kW for every 10 liters of tank volume;
- d is the diameter of the pipe used, expressed in meters, we take 0.01 m;
- l is the total length of the pipe, in meters;
- ∆Т - temperature difference before and after heating, usually for preliminary calculation take 65 degrees.
For a 200 liter tank with a power of 30 kW the calculation will be as follows:
Having measured the required length of the pipe, you also need to calculate the diameter of the coil. To ensure that the spiral does not touch the walls, it is taken 10-12 cm smaller than the diameter of the storage tank. The calculated values for some tank sizes are given in the table.
It is advisable to make the distance between the turns 5-8 cm to improve the heat transfer conditions. In this case, it is important to calculate the total height of the coil so that it does not block the inlet and outlet pipes for heated water.
The heat exchanger in the form of a tank is usually made of the same material as the tank itself, and its dimensions are 1/5-1/8 of the total volume of the boiler.
Heating element, thermostat and other auxiliary devices
One of the disadvantages of an indirect heating boiler is that it can only be used during the heating season. There are two ways to solve this problem:
- install a short closed circuit from the boiler, designed only to heat water in the boiler;
- install a heating element in the tank itself.
The first method is associated with unnecessary consumption of time and fuel - when loaded at partial capacity, the boiler will operate with reduced efficiency, and if used solid fuel- also with the formation of an increased amount of soot and soot. In addition, it will take time to maintain, load and clean it.
Installing a heating element in the boiler tank itself will allow you to use it in the summer as a regular water heater. To reduce energy costs, heating can be done at night at lower tariffs or a solar collector can be connected to the system.
The power of the heating element must correspond to the volume of the tank. On average, a heating element is required for a volume of 50 liters electrical power 1.5-1.8 kW, and for a 200 liter boiler - 5-6 kW. These values can be slightly changed, but it is worth remembering: the higher the power, the shorter the heating time, and vice versa.
When installing a heating element in the boiler tank, be sure to install a thermostat that turns off the heating at a temperature of no more than 90 degrees!It is also recommended to install a magnesium anode in the tank, which distracts the processes of electrochemical corrosion inside the tank. It gradually dissolves as it does so and may need to be replaced after a few years.
Manufacturing and installation procedure
After all necessary calculations and preparing a sketch, you can assemble an indirect heating boiler with your own hands.
- Assembly begins with the preparation of the most important part - the storage tank. You can use any ready-made container made of stainless steel, aluminum or heat-resistant plastic, or weld a tank from sheet metal and pipe scraps of a suitable diameter. The main requirement is sufficient wall thickness and strength of the tank and resistance to corrosion.
- It’s enough just to make a tank from waste. To do this, the top part of the cylinder is cut off, the inner walls are thoroughly cleaned, washed several times and ventilated for fresh air within 3-5 days. Otherwise, the water will smell like gas. After drying, the surface is primed with waterproof paint.
- In the tank, in accordance with the sketch, you need to make several holes: to connect the coil, for the inlet and outlet pipes, as well as for the heating element and thermostat when installing them.

- The pieces of pipe - pipes - are welded, and threads are cut on the outer part to connect the hot water supply circuit and the outlet from the heating circuit.
- Next you need to make a coil according to the calculated dimensions. It is convenient to wind the spiral according to a template, which is used as a pipe required diameter, log or any strong cylindrical object. The winding should be loose enough so that the finished coil can be removed from the mandrel.

- The coil is attached to the nozzles by soldering, checking the tightness of the connections. This can be done using compressor air and soapy water. Pressure during crimping must exceed operating pressure in the heating system at least 1.5 times.
- If necessary, install a heating element, thermostat and magnesium anode in the tank. Connect to electrical part copper cable required cross-section - for a heating element of 2 kW - 1.5 mm², for 4 kW - 2.5 mm², for 5 or more - 4 mm².
- Place the tank in the housing, if provided for by the design. Temporary or permanent spacers are installed between the walls of the tank and the housing to maintain the same distance on all sides. Fill the space with insulation, for example, polyurethane foam.
- After the foam has dried, the excess is cut off, the pipes are processed and the housing cover is attached. You can paint it with metal paint bright hues, for less heat emission and longer service life.
- Connect the boiler to the DHW according to the diagram shown.

Making an indirect heating boiler with your own hands is quite simple and inexpensive, and its efficiency and economy will quickly pay for all costs. Hot water with a stable temperature will make life in country house will provide the comfort familiar to city residents.
The problem of hot water becomes relevant where there is no centralized hot water supply: in country houses, private city and country houses. Today, installing a ready-made device for heating water to the required temperatures requires serious investment. Alternative way hot water supply is one that you can make yourself. Its advantage is that hot water supply to residential premises is carried out economically and at minimal financial costs.
Features and diagram of making an indirect heating boiler with your own hands
In appearance, an indirect heating boiler is a large storage capacity, independent of energy sources (gas, electricity, etc.). Inside the tank, made of corrosion-resistant material, there is a spiral-shaped tube through which the coolant circulates. Cold water the tank is supplied through an inlet tube, usually located at the bottom. Water is heated evenly due to the moving coolant of the heating system. The hot water outlet pipe is installed at the top. For ease of use, the pipes are equipped with ball valves. The outside of the tank is covered with a layer of thermal insulation.
A drawing for the manufacture of an indirect heating boiler with a volume of 100 liters is shown below:

Schematic diagram of the boiler operation:

Heating water from the boiler enters the water heater tank, where, passing through a spiral tube, it is converted into cold water at the outlet. Return chilled water flows back into the boiler.
Advantages and disadvantages of an indirect heating boiler
The advantages of using a DIY boiler:
- connection to the central heating system;
- installation near a heating boiler;
- low costs for installing the circuit;
- significant reduction in energy consumption;
- providing water at a constant temperature.
The disadvantages include the following:
- required for boiler installation big square or a separate room;
- heating a large volume of water requires a long time, while heating of the premises will be carried out with less intensity;
- rapid formation of deposits on the serpentine tube, requiring cleaning with chemical or mechanically Twice a year.
This option for obtaining hot water is suitable during the period heating season. At other times, the role of coolant can be played by an electric heating element built into the boiler tank.
Then the water will be heated using electricity. In this case, you can turn on the boiler at night, when night, low tariffs are in effect, or as needed.
Making a boiler yourself
Due to the rather simple principle of operation, such a device can be made independently. Now let's look at how to make an indirect heating boiler with your own hands.
All work on the manufacture of a water heater consists of assembly components designs:
Tank
A tank is used as a boiler capacity. Its volume depends on the needs of the home owners for hot water and is calculated from the amount of 50–70 liters per person daily. Approximately, a 200-liter boiler is suitable for a family of 4 people.
For the heating device, the tank must be made of of stainless steel, aluminum alloys or other corrosion-resistant material. An alternative is a gas cylinder, but its walls must first be cleaned and primed. Without this action, the hot water will smell like gas.

5 holes are made in the tank: 2 on the side for mounting the coil, one at the bottom for the inlet pipe, one at the top for water intake and one at the bottom for the drain valve. To use the boiler outside the heating season, it is necessary to install a heating element. The bottom hole is also drilled for it. Attached to the holes made locking elements or ball valves.
Coil
A copper or brass tube is suitable for this element, the diameter and length of which depend on the volume of the tank. On average, for every 10 liters, 1.5 kW of thermal power of the serpentine tube is calculated. You can use a tube made of metal-plastic or other metal with good heat transfer.

The tube is wound in a spiral onto a cylindrical mandrel. To do this, you can take a log or a pipe large diameter.
When winding the coil, it is important to monitor the turns:
- in order to best contact the heating surface of the tube with heated water, the coils should not touch each other;
- You should not wind it with excessive force, otherwise it will not be easy to remove the coil from the mandrel.
- The number of turns on the coil is calculated from the volume and height of the tank.
Thermal insulation
The outside of the tank must be covered with a layer of insulation. It is necessary to increase efficiency and reduce heat losses. Polyurethane foam, mineral wool or any other material is suitable for insulating the container. thermal insulation material, which is attached to the base with wire, glue or strip ties. For neat appearance It is better to cover the tank body thinly sheet metal or foil insulation.
You can also insulate the tank using another container of larger diameter. To do this, a do-it-yourself boiler is inserted into a large tank, and the wall is filled with insulating material or foam plastic, using the principle of a thermos.
Installation
 Assembly of a self-made boiler is carried out after preparing all the components:
- the coil is mounted in the center or along the walls inside the tank, and pipes are soldered to its inlet and outlet pipes;
- for a vertically standing boiler, supports are welded to the bottom, for attachment– loops “ears”;
- the heating element is installed;
- the boiler is tightly closed with a lid;
- connecting the coil according to the diagram for making an indirect heating boiler with your own hands to the heating system circuit;
- connecting the inlet/outlet pipe for water;
- pipe distribution to the kitchen or bathroom at the water collection point.
Video: how to make an indirect heating boiler with your own hands
Video: making an indirect heating boiler
To provide a private home hot water on economic needs different Appliances. This includes instantaneous water heaters and various boilers - electric, gas and indirect heating. The latter are of the greatest interest because they do not require any energy resources for their operation. On the other hand, such factory-made units are very expensive. That's why to do indirect boiler with your own hands - good decision, and we will tell you how to implement it in this article.
Design and principle of operation of an indirect heating boiler
What makes these units so attractive is their ability to supply a large amount of hot water to several consumers at once. In this case, heating occurs without additional connections to electrical network or a gas main, the heat source is the same boiler that we use to heat the house. The only condition is that the heat generator must have a power reserve in order to have time to work with heating system and a water heater.
It must be said that the design of an indirect heating boiler is quite simple, so if you have some skills you can make it yourself. Essentially, this is a round sealed tank of decent capacity (at least 100 liters), inside of which a coil made of a copper tube is placed. The outside of the tank is covered with a heat-insulating layer, which prevents the water in the tank from cooling quickly. The water heater structure is shown in detail in the diagram:

The figure shows a conventional indirect boiler in a minimum configuration; more advanced models are additionally equipped with:
- second coil for connection alternative source heat;
- an electric heating element to maintain the water temperature in the event of a boiler shutdown;
- thermometer and pressure gauge.
The very principle of operation of an indirect heating boiler is to transfer heat indirectly from the boiler to the mass of water located in the container. The mediator is a coolant heated to a temperature of 70-80 ° C and circulating through the copper tube of the coil. This allows you to bring the temperature of the water intended for domestic hot water to 60 °C. In order to exclude electrochemical corrosion A magnesium anode is placed inside the metal tank, forming a more active galvanic couple copper - magnesium than copper - steel.
Also, an indirect storage water heater is equipped with a connection pipe safety valve safety and temperature sensor connected to the thermostat. In cases where it is necessary to provide instant hot water supply to the mixers, the boiler is equipped with a pipe for connecting the return recirculation line.
To make an indirect heating boiler at home, you will need 2 main elements - the tank itself and a heat exchanger made of a copper tube. The ideal shape for a tank is cylindrical, so it is better to use some kind of cylinder for this purpose, metal barrel or thin-walled pipe of large diameter. Copper tube should not be too thin, such a heat exchanger will not be effective. Suitable diameter is 15-20 mm.

Advice. Corrugated steel is also suitable for making a heat exchanger. stainless pipe, used for heating and water supply systems. It is easier to bend than copper.

Having selected a suitable tank and decided on its size, you can begin winding the coil. It is recommended to use a template in the form of a pipe or log, whose diameter is half smaller size containers. Having fixed one end of the tube, wind it onto the template as tightly as possible, turn to turn. In this case, you need to monitor the height of the product so that it subsequently fits inside the boiler made by yourself.

The finished heat exchanger is installed in the center of the tank so that the tube does not touch its walls anywhere. Now you need to arrange a sealed passage of the tubes through the tank, which is done by soldering and threaded connections, as shown in the photo:

Now all that remains is to insulate the tank using roll insulation and bandages made of wire or thin steel strip. You have to finish everything first welding work– attach the bottom and lid, cut in all the pipes and weld the supports. A decorative casing made of sheet metal or other convenient material.
Advice. In order to extend the service life of homemade steel tank It is recommended to purchase and install a magnesium anode inside the water heater.
Boiler to boiler connection diagram
Assembling a storage water heater is only half the battle; you still need to complete correct installation unit and its connection to the heat source. Since the water tank has enough heavy weight, it is better to place it on the foundation and align it vertically. If your boiler room floors are flooded concrete screed 100 mm thick, then you can do without a foundation. After installation, you can begin piping the boiler.

Advice. Perhaps someone advised you to connect a boiler to the water-heating circuit of a double-circuit boiler, or you found a similar diagram on the Internet. Remember that these units cannot be connected in this way; the water heater must be connected to the same line as the heating system.
The fact is that a double-circuit boiler heats water for domestic hot water needs only to 60 °C. This means that it will heat a large volume of water in the boiler to no more than 50 °C, spending a lot of time. There is another point: when the heat generator operates on the DHW circuit, it is completely disconnected from the heating system, as a result of which the latter will cool down significantly, and with it the entire house. All the nuances are described in detail in the following video:
In order to properly combine the water heater and boiler into one properly functioning system, it is necessary to connect them according to one of the diagrams presented below. In the first, the distribution of coolant flows is organized by installing three way valve with servo drive. When the temperature of the water inside the boiler begins to decrease, the drive, based on a signal from the sensor, directs the flow of coolant into the coil of the unit.

In another connection diagram with two circulation pumps the indirect heating boiler is loaded by turning on the pump in its circuit. In this case, the heating circuit can function continuously or be switched off, which depends on the automation. If the thermal power of the boiler is sufficient, then both branches can operate simultaneously. You just need to choose the right pumps so that they do not interfere with each other.

Another method of tying a boiler is used in complex systems with several circulation pumps and hydraulic separator.

Here, the water heater with its pump is simply connected to the common collectors located behind the hydraulic valve. More details about correct connection an indirect heating boiler is shown in the video below.
Installing a water heater safety valve
This small device plays an important role in the boiler connection diagram. When the water in the tank begins to heat up, it expands in volume and as a result the pressure increases.

When it reaches a critical value, it is triggered and releases some of the water to reduce the pressure. Therefore, the valve pipe must be connected with a flexible tube to the sewer outlet.

In large-capacity tanks it is customary to additionally install a membrane expansion tank(expanzomat). It is able to compensate for a larger volume of expanding liquid. It is important when buying a tank to choose one that is intended for water supply systems, not heating. You can recognize it by the maximum operating pressure of 7-8 Bar (for heating tanks 3 Bar).
In addition to these elements, other elements must be present in the boiler piping on the water supply side. necessary details: taps, valves, filters and other fittings. How to tie it correctly indirect water heater with the water supply of a private house, shown in the diagram with a reverse circulation circuit:

Conclusion
In essence, the design storage water heater It is not complicated, so if you wish, you can make it yourself. At the same time, it is possible to equip the boiler with all possible functions and integrate sensors into it for collaboration with automatic boiler. But you will have to tinker with the strapping; it depends on the correctness of its execution effective work total heating of the house.
If your dacha or country house does not have hot water or you do not want to depend on seasonal outages, read this article. We will tell you how to make a boiler yourself. An indirect heating device can be assembled with minimal financial costs.
How does a water heater work?
The indirect boiler depends on additional source energy: solid or diesel fuel. Therefore, it is the most economical among other water heaters.
How does the device work? A coil with coolant is installed inside the housing. When started, it circulates, heating the contents of the tank. The boiler design diagram is as follows:

The storage tank is connected to the boiler. Thanks to the constant circulation of the coolant, the temperature is maintained at the optimal level. The equipment is capable of providing several points of intake, instantly supplying hot water.

Advantages and disadvantages of DIY assembly
An indirect water heater allows you to use water not only for household purposes, but also for heating. And:
- IN summer time A heating element can be used as a heater.
- Installation is carried out near the heating boiler.
- Inexpensive installation of the structure.
- Energy saving.
- Constant availability of water at the required temperature.
Flaws:
- To install the circuit you will need a lot of space, or better yet, a separate room.
- During heating large quantity The battery water heats up less intensely.
- Impurities in the water quickly stick to the spiral pipe. Requires periodic cleaning.
How to make a heater correctly
There are several options - homemade design so simple that you can choose any:
- A container containing a coolant coil inside.
- A tank in which the heat exchanger is placed along the walls.
- One large and one small tank. Water is poured into the small one, and coolant circulates in the large one.

Additionally you will need: check valve, faucet, heating element, .
What stages to go through:
- Tank selection.
- Production of coolant.
- Insulation of the body.
- General assembly.
- Boiler piping.
- Crane installation.
Heating power is based on:
- The temperature of the coil contents.
- Circulation power.
- Inlet water temperature.
For example, for a 120-liter container, a 1 Atm pump is suitable. It will be able to move 200 liters per hour. Maximum temperature heat exchanger - 85 degrees. This should be taken into account when making the device.
Construction drawings:

Preparing the tank
As a tank, you can choose any container made of stainless steel or plastic. It can be made from plastic barrel, old water heater, gas cylinder.

The following features are taken into account:
- The gas cylinder must first be cleaned, cut lengthwise and processed special means. Then prime and weld the two parts.
- If taken as a basis steel sheet, bend it, weld it into a cylinder and weld the bottom. You can use a log as a form.
- The old boiler also needs to be cut, cleaned of scale and deposits, and treated. Finished plastic barrels are inspected for integrity and prepared for pipe installation.

You need to make 5 holes in the housing: two on the side for installing the coil, one on top for water intake, two at the bottom for water intake and drainage.
Spiral for heating water
It is best to make the coil from the same material as the tank. But this is not always possible, so most often a brass or copper coil is made. Before you get to work, you need to calculate the length of the product using the formula:
L=V/S=V/πR²=0.0044/3.14x0.0185²=4 m
Take a hollow tube with an outer diameter of 42x2.5 cm.

To calculate the size of the coil, you need to calculate the radius. For example, let's take a radius of 15 cm. Make sure that there is space between the walls and the spiral.
L=2πR=2x3.14x15=94.2 cm
Four turns come out. Don't forget to leave extra tube for installation.
Take a suitable base and screw the pipe onto it. In doing so, follow these rules:
- The turns should not touch for better contact.

- Do not screw tightly to the base - it will be difficult to remove.
Thermal insulation of the body
High-quality thermal insulation allows you to increase the efficiency of the device and reduce heat loss. Any material can be used: polyurethane foam, mineral wool. Cover the top of the body with a sheet of metal or install the tank in a larger container.
Assembly of the structure
All elements are prepared, proceed to assembly:
- Place the spiral in the container so that it does not touch the walls of the boiler. If the container is metal, pre-weld the bases for the coil.
- The outlet and input to the heat exchanger are brought out. Seal them by welding.
- Weld the pipes for water inlet and outlet.
- Install a check valve.
- Weld supports or ears for hanging on the bottom of the body.
- If you plan to use the boiler in the summer, additionally install a heating element and thermostat in the lower part.
- IN convenient location install a magnesium anode.
- Cover the structure with a lid on top.
- Connect the coil to the heating system circuit.
- Connect the water inlet and outlet pipes.
- Check the structure for leaks.

To determine how tightly the elements are soldered, a test run is performed. A video on the topic will help you understand the work:
An indirect heating boiler can be placed in the basement of a private house. You will independently control the heating strength and the amount of fuel consumed.


