Plastic bottles, along with plastic bags, have become the main source of pollution on the entire planet. In order to somehow combat this problem, people are developing various ideas for the rational use of empty containers. Today, boats are made from PET bottles, greenhouses and houses are built, fences are erected and furniture is designed.
A simpler and more accessible way for the average person to recycle plastic is to make various decorations from it. This idea is especially relevant in playgrounds or gardens, because multi-colored bottles make wonderful crafts: bright, interesting and useful.
Garden decorations from plastic bottles that is what this article will focus on.
Features of plastic material
Before you start building something from plastic bottles, you need to get to know this material better and become familiar with its properties. So:

Advice! It is much easier to work with plastic bottles of the same color.
And if you are planning a large product (for example, outdoor furniture), it is recommended to collect bottles of the same shape and size. On the contrary, bottles are suitable for some small crafts different shapes, color and volume.

What crafts can be made from plastic bottles for kindergarten?
Crafts for the garden from bottles can be very diverse: from fencing sandboxes to making fairy-tale characters, flowers or lanterns. Here, a lot depends on the imagination of the performer, as well as on the amount of collected plastic containers.

Important! In children's institutions, it is better not to use long-drying toxic dyes. Therefore, when painting plastic crafts, it is recommended to use water-based acrylic paints - they dry quickly, lay down in an even layer on the plastic, and have a bright palette of shades.
Bottle palm
You can build not only an exotic palm tree from plastic, but also any other tree - the principle of its manufacture will be almost the same. To work, you will need plastic bottles, scissors and a knife, metal wire or a long wooden rod, acrylic paint (if you couldn’t find bottles of the desired shade).

The entire process of making a palm tree from plastic consists of several stages that are very easy to implement:
- Dark brown plastic bottles will be used to make a tree stem. To do this, you need to cut off the bottom of the bottles - it will not be needed in the work.
- A metal or wooden rod, imitating the frame of a palm tree trunk. The length of this frame should correspond to the desired height of the tree.
- Cut brown plastic bottles are strung onto a reinforced rod, neck up.
- When almost the entire rod is hidden behind the plastic, the last part is strung - it is better if the bottle is green and blends in with the crown of the palm tree.
- To roughen the trunk and make it even more similar to the original palm tree, you can use scissors to cut teeth on the free edges of the bottles and bend them outward a little.
- Now leaves are made from green plastic bottles. Here everyone can act at their own discretion: you can cut a plastic bottle lengthwise into four segments, leaving only the neck intact, and form carved edges of the leaves; someone uses a different method - cutting green plastic into long thin strips and collecting them into something like hanging palm leaves.
- All that remains is to fix the leaves on the trunk, and the plastic palm tree is ready. It is quite possible to supplement it with plastic coconuts or bananas.
- If transparent bottles were used for work, they must be painted with suitable paint.
Advice! Several palm trees will look more organic than a single tree. It is better to immediately make a small “oasis” of three or five palm trees of various sizes.
Such plastic palm trees are not afraid of either rain or snow - they will decorate the playground for a long time and delight the kids (an excellent example of a palm tree is shown in the photo below).

To prevent children from getting hurt on the plastic cuts, it is recommended to melt them a little with a simple candle or match.
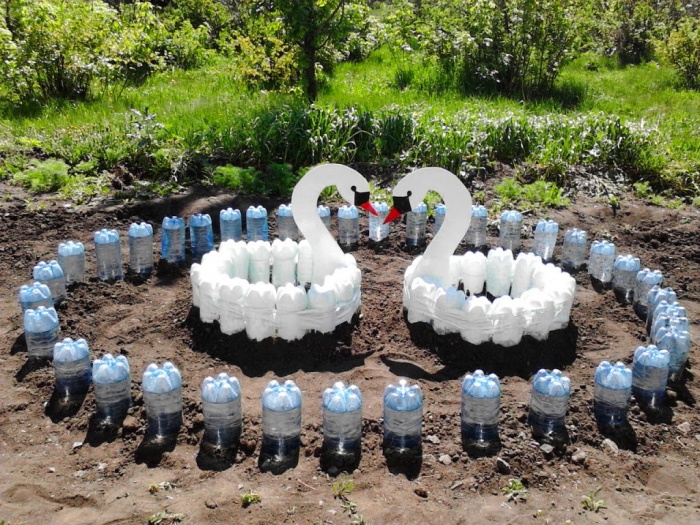
Plastic flower beds made from bottles
Many parents and kindergarten workers know how difficult it can be to create a beautiful flower bed on the site. After all, children often trample on flowers, and it happens that there is simply no one to care for the plants.
But this is not a reason to leave the site without bright colors- fresh flowers can easily be replaced with artificial ones, and the easiest way to make them is from plastic bottles. To do this, it is not even necessary to cut out the petals of each flower; you can create a larger composition from plastic.

For such a flower bed you will need the bottoms of plastic bottles - they are cut off with a knife or scissors, cutting the bottle approximately in half. Now the prepared elements need to be painted in the desired color, using thick and uniform paint and a soft brush or spray paint.
When the paint dries, the halves of plastic bottles are inserted into the ground with their bottoms up - you get beautiful and bright flowers, collected in a certain composition.

Attention! To make the flowerbed organic, it is better to first draw its design on a sheet of paper. This will allow you to clearly see the result and correctly select the shades of “flowers”.
Using this simple technology, you can make plastic flower beds of unusual shapes and the most different sizes(like in this photo).
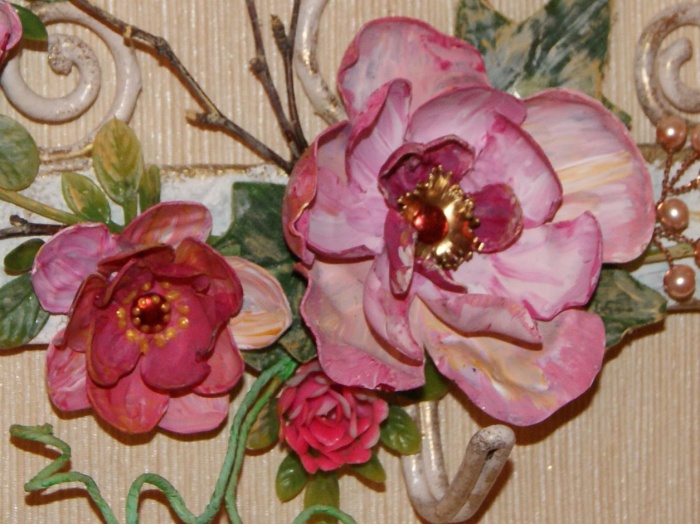
For those who are able to do more delicate work, the method of creating elegant flowers, the details of which are cut from plastic bottles, is suitable. Such flowers can become a decoration not only on the street, they can be used to decorate a group or assembly hall.
To work you will need simple tools:
- plastic containers;
- dyes based on acrylic or latex (they are more uniform and non-toxic);
- sharp scissors;
- decor in the form of beads to create the core of the “flower”;
- strong wire for the stem and thinner wire for the stamens;
- glue gun or other reliable fast-curing glue;
- candle for melting edges and shaping plastic petals.
Petals are cut out of bottles the right size and shapes - for this it is convenient to use a cardboard template. Then they need to be heated over a candle and the edges and middle given the desired shape. Now the petals are painted in the chosen color and allowed to dry thoroughly.
Collect the petals from the inflorescence and attach the plastic parts to the wire stem. The middle is made of wire, thick fishing line and multi-colored beads. Also, flower leaves are cut out of plastic and attached to the stem using a glue gun.
An excellent example of creating such a flower from a plastic bottle is shown in the photo below.

Bottle fencing
From plastic bottles you can create beautiful and strong fences for flower beds or sandboxes, for example. Those who have been working with plastic bottles for a long time recommend strengthening vertical structures by filling the container with ordinary sand, earth or pebbles. This way, if a child steps or falls on the fence, it will not break or become deformed.
Using the same paints, plastic bottles are given the desired shades and placed dropwise around the perimeter of the flower bed or sandbox. Fences made from several rows of painted bottles look even more beautiful - you can even create some kind of pattern inside the fence.
Mosaic of lids

The container can also be used for educational activities with the children themselves. One of these lessons could be a simple drawing made from multi-colored plastic stoppers. If the children in the group are very small, the leader can make blanks for such a mosaic by drawing circles on paper in the places where the lids should be located.
All the child has to do is pick up the cork desired color and use glue to fix it on your panel.
This technique allows you to assemble more complex patterns from plastic bottle caps. Good masters made from plastic caps different diameters and the shade of entire paintings on walls and fences (you can see them in the photo below).

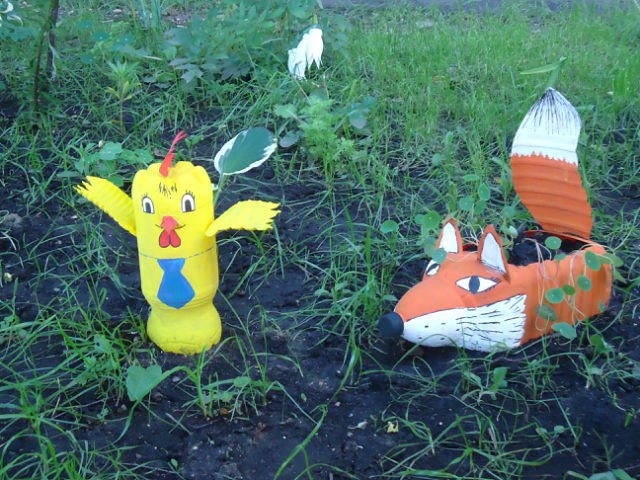
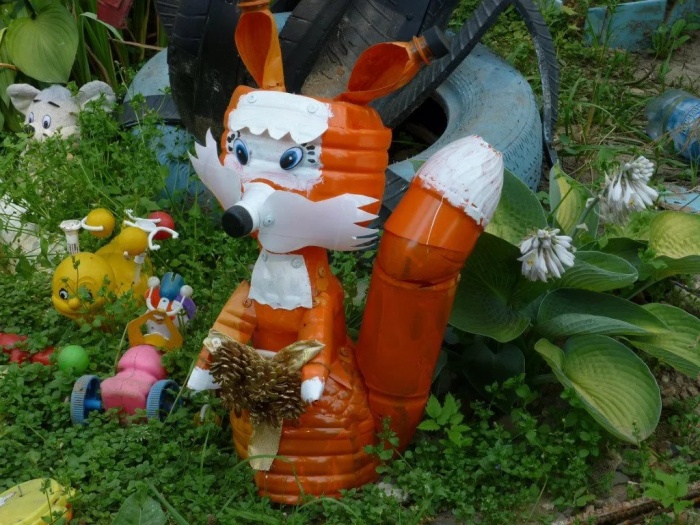
Animal world and fairy-tale characters from a plastic bottle
Most of all, children love the heroes of fairy tales and cartoons - these characters can also be easily made from plastic bottles. You just have to be patient and apply some skill to making such crafts.

The size of the hero and its complexity depend entirely on the skill of the master. Talented performers make real masterpieces out of ordinary plastic waste. These are firebirds, flamingos, peacocks with huge tails, big wolves, foxes, owls and bunnies, small funny bugs and bright butterflies.

As a rule, in such crafts it is used metal carcass from a rod onto which plastic parts of the character’s torso, head and limbs are strung. The easiest way is to make a funny pig out of containers - you can also involve children in this process.
To create a plastic pig you will need:
- five-liter water bottle;
- five regular one and a half liter plastic bottles;
- knife or scissors;
- pink paint and brush;
- wire or something else for the pig's tail;
- beads for eyes;
- glue or a gun with silicone.
The piglet's body and head will be made from a single five-liter bottle. You need to cut off the necks of four small plastic bottles, making one side of the cut slightly lower than the other. These will be the legs of the pig, and such cuts will help to better attach them to the body.

Ears are cut out of the last plastic bottle. The easiest way is to cut them off near the neck, since in this place the plastic is already curved and has the desired shape. If you need ears bigger size, you can cut them out from the “body” of the bottle and give them shape by heating the plastic with a match.
Now the entire structure is put together and all the plastic elements are fixed with glue. All that remains is to color the piglet in its characteristic color pink color and glue on the eyes and tail (the finished pig is shown in the photo below).

Gazebo made from plastic bottles
For those who are not afraid of difficulties and have a sufficient amount of plastic containers, the method of constructing a gazebo is suitable. This could be the most simple design of four supports and a roof or a more complex gazebo round shape with windows and doorways - it all depends on the skills of the master.
The main thing is that children will find it interesting and safe to play in such a house, so it is worth making it for the garden.

A building made of plastic can be made on the basis of a metal or wooden frame, or you can use plastic containers themselves as supports, only after filling them with sand or earth.
The roof is being covered lightweight material, such as ondulin or polycarbonate. Also for these purposes, you can use the bottles themselves, connected like a raft or flattened into flat petals and fixed with wire or screws.

The walls are fastened with small self-tapping screws. To facilitate the process or when there is not enough “building material”, you can use waterproof fabric or bright film, the same polycarbonate, which is stretched and fixed between adjacent plastic supports.

The door and windows of the gazebo can be curtained with curtains made from corks from the same plastic bottles. You can assemble such curtains together with your children. To do this, make a small hole in each cap and string all the plugs on a thread with knots or on a long fishing line.
Very beautiful gazebos made from plastic bottles are shown in the photo in this article.
conclusions
Instead of littering the planet, you can use plastic bottles for good - decorate a playground or kindergarten group with them. Plastic is safe for babies, and it is also quite lightweight. If suddenly the structure made of this material is damaged, the children will not be harmed.

Another big advantage of this idea is that the students themselves can easily be involved in the work - even kids can assemble simple crafts for the garden from plastic bottles.
at 05/28/2017 148,798 Views
You can make many useful things for your garden and dacha from plastic bottles
While lovingly arranging our city dwellings, we are no less touching about our summer cottages. We try to improve them, create comfortable conditions for ourselves and add special notes of attractiveness to the even rows of beds and berry bushes. Many summer residents have chosen the most accessible and flexible material- ordinary plastic bottles. We will talk further about what products can be made from it for the garden and dacha!
- House made of plastic bottles
- Country crafts from plastic bottles step by step: palm tree made from plastic bottles
- Plastic crafts: some tips
- Master class from plastic bottles step by step

Wonderful hanging cactus pots made from plastic bottles

Resourcefulness in ways to place many plants in the garden area

Plastic bottles in skillful hands will become a wonderful decoration for your landscape

Beautiful flower from plastic caps
Crafts from plastic bottles step by step: from flower pots to fairy-tale towers
The idea of making useful devices and decorative items from plastic containers is not new. The first attempts led our grandparents to build low fences for paths. Having appreciated the plasticity and low cost of the material, craftsmen from among the people moved on. And now the summer cottages are decorated with full-fledged fences, funny figures and unusual devices made from plastic bottles.

Your children will definitely like this beautiful ostrich from a pet container!

Thanks to imagination and such excellent material as plastic bottles, we have almost limitless possibilities for creating crafts for every taste, any complexity and direction

Paintings made from the caps of plastic bottles and other containers have grown into an entire art movement.

Plastic bottles have long been in great demand among gardeners

Gorgeous orange flowers from pet containers
Crafts and decorations for the cottage and garden made from plastic bottles do not require any use complex instruments and specialized skills. The main thing is to have time and desire, as well as enough material. Those who have both have convincingly proven the limitless possibilities of such handicrafts, and we have prepared a review of the best examples of crafts.
DIY furniture, flowerpots and a vase made from a plastic bottle

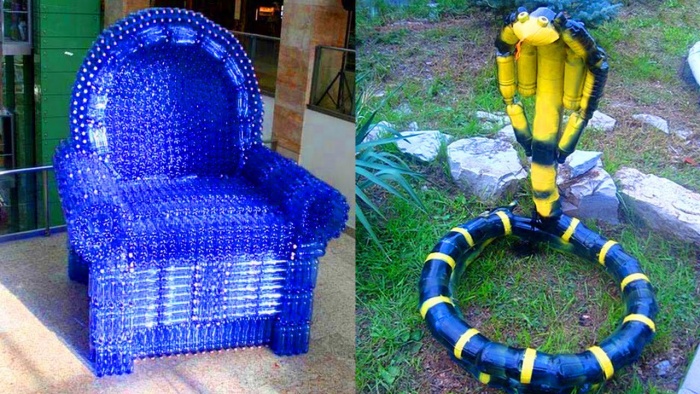
Comfortable and very stylish chair made from plastic bottles
A sheet of plywood, sixteen one and a half liter bottles, adhesive tape - and your site will have a comfortable and durable coffee table. Plywood can be replaced with plastic or hardboard, an old countertop or plexiglass. From the same materials, slightly changing the design, you can make a garden bench. Some diligent and patient craftsmen manage to assemble full-fledged sofas and armchairs from bottles.

You can even make the basis for a full-fledged sofa from plastic bottles if you fasten them firmly and carefully

Hanging flowerpot or base for flowerpots
DIY ottoman made from plastic bottles

How to make a pouf from pet containers
House made of plastic bottles
Among the summer residents there are also real builders who know that they can build whatever their heart desires from plastic bottles. They collect gazebos, toilets, sheds and even from plastic bottles. The only difficulty with such structures is not in their assembly, but in assembling them required quantity bottles

House with a roof made of 7,000 bottles

Plastic bottles are a good base material for building the walls of a summer house, greenhouse, shower, toilet or other partitions

Greenhouse walls made of containers on a wooden frame

Bottoms from plastic bottles will help you decorate garlands for the garden
Children's playground: flowers made from plastic bottles and toys made from plastic bottles

Crafts made from plastic bottles will help decorate the playground
All kinds of crafts made from plastic bottles are especially attractive for decorating a children's playground. Absolutely safe, they can become the basis for toys, fun decorations, and for creating story compositions. Funny elephants, bees, bunnies and hedgehogs, bright flowers, cheerful lanterns will turn the country island of childhood into a fairy-tale kingdom.

A whole plot for a children's playground from the caps of plastic bottles and canisters

Together with children, you can make small crafts and large plot mosaics from the caps of plastic bottles
Plastic bottle doll

Examples of a variety of crafts that will help the gardener with placement, easy transportation and care of plants

Piglets from large plastic bottles - stable stands for germinating seedlings or small plants

Craft for garden or lawn decor: parrot from pet container
Crafts for the garden and useful little things

Multi-colored turtles will be an excellent element of your garden decor.
With what ease the “crazy” hands of summer residents transform used plastic containers into useful summer cottage devices, you can see by walking through suburban areas. Here, on the trunk of a tree, a washbasin was nestled comfortably, and in the next yard, the gazebo was decorated with multi-colored, fragrant and ampelous geraniums. We have also prepared for you several descriptions of crafts made from plastic bottles for the garden.
DIY bird made from plastic bottles

DIY painted garden owl lanterns
Birdhouse made from a plastic bottle

It’s very easy to make a birdhouse from a plastic bottle

Plastic bottles cut in half will become cute flower pots; it is important to carefully paint them. It is also advisable to take opaque bottles for this.
The ever-tangling and stuck twine for tying seedlings will stop tormenting you if you hide the ball in a plastic bottle. Just cut the bottle in the middle, insert a ball into the top, pass the end of the twine into the neck, connect the parts, secure the cut with tape - and your convenient storage is ready.
Drip irrigation from plastic bottles
Your seedlings will not wither, even if you go away for several days: install semi-automatic watering. Once again, plastic bottles come into play. We cut off the bottom of the bottle, about 2/3, drill 4-8 holes in the cork, close the neck, bury the bottle upside down, pour water - and the seedlings are provided with moisture during your absence. A similar garden made from plastic bottles (photo confirms this) will significantly save your time and money.

Automatic watering "Aquasolo" - these are conical nozzles on a bottle with a thread that do not require wasting time on drilling slots, digging into the ground, and so on.

Anthurium with convenient system automatic watering "Aquasolo"

Maximum space saving: plastic bottles suspended one above the other with a cut tube with water passing through them
- For the same seedlings, plastic bottles make excellent containers. After cutting the bottle in half and taking the bottom, pour the prepared substrate into it, plant the plants and place them on a shelf made of wooden planks. This design is also suitable for decorating your home with flowers.

Beautiful hanging pots made from plastic bottles will not only decorate the interior, but also make it unique

Excellent flowerpot made from a shampoo bottle with your own hands

Arrangement of compact placement of seedlings or small plants at the dacha
Bird feeder made from a plastic bottle
Some crafts made from plastic bottles for the garden amaze the owners with their ingenuity. By placing a bottle on a hose and making many holes in the bottom, you will get an excellent diffuser for watering your garden. From a five-liter container you can build an elegant lamp for the veranda, and a mineral water container is suitable as a bird feeder.

Bird feeder made of plastic container

A simple and convenient hose sprayer for garden watering
- Plastic bottles will help you save trees from pests. Cut the bottle lengthwise into two halves, fill it with a mixture that is attractive to pests and add insecticides, and bury it at the base of the trunk.
- From bottles you can make a magnificent decorative all-weather and all-season flower bed. Just paint the bottoms of the bottles different colors and make a wonderful carpet out of them, sticking their open side into the ground. The carpet pattern can be pre-reproduced on paper.

Decorating flower beds with pet containers has become very popular
- One Brazilian engineer did the calculations and built a solar collector from plastic bottles. The structure can be placed on a summer cottage, connected to a storage tank, and you will always have a warm shower.

Construction of a solar collector made of plastic bottles

Automatic watering of seedlings and ornamental plants in your absence, using a plastic bottle dug next to the roots with small holes drilled in the neck or cap

Cut plastic containers suspended one above the other are the fastest and most economical way out of a situation when you need to germinate a lot of seedlings in a limited space

Making an owl from a plastic bottle with your own hands

Bottles for germination and winter holding of plants - an opportunity to save space and ensure good irrigation and drainage
Products made from plastic bottles: artistic masterpieces

Magnificent dandelions from pet containers will never cease to delight you and your guests
The imagination of folk craftsmen is so diverse that it leads to the appearance of summer cottages and strange animals, and characters from fairy tales and cartoons, and exotic plants, and original thematic compositions.

We cover the bottom of a plastic bottle or cup with dry twigs and get an unusual candlestick, protected from the wind.

Rainbow decor for a garden, workshop, garage: a fountain of spirals cut from multi-colored plastic bottles

Plastic bottles are used not only to decorate the garden, but also to decorate the home.
Country crafts from plastic bottles:
If you have a small pond on your site, you can decorate it with a plastic palm tree. It's not at all difficult to make. You will need:
- 10-15 brown plastic bottles (for the palm trunk);
- 5-6 green bottles (preferably long);
- iron or willow rod;
- an awl or drill for making holes;
- sharp knife or scissors for cutting bottles.

A palm tree made from plastic bottles looks very beautiful
Now let's start making the decoration.
- Cut all the brown bottles in half. We take the lower parts and use an awl to make holes in the bottom of each of them, equal in size to the diameter of the rod.
Advice! You can also take the tops of the bottles, then you won’t have to make additional holes.
- For green bottles, cut off the bottom by about 1 cm. Leave one of the blanks with a neck, cut it off for the rest to make a loop.
- Carefully cut the green bottles lengthwise into three equal parts up to the loop.

Making palm leaves
- We cut out the edges of the brown parts with jagged edges to create an imitation of a rough palm tree trunk.
- We securely fix the rod in the soil. We calculate the length of the rod by laying out the brown parts on the ground in one row, plus 2-3 cm for the leaves.
We put brown bottles on it. 
Making a trunk for a palm tree
- We string our leaves onto the free top of the rod, finishing the work with a blank with a neck. We make a hole in the lid and screw it onto last page, securely securing the entire crown.

Connection of trunk and leaves

Assembling a palm tree from plastic bottles
Using several rods of different lengths, you can create a real oasis. As you can see, making garden crafts from plastic bottles with your own hands is not so difficult, the main thing is to find sufficient quantity material and take one of the proposed ideas as a basis.

Step-by-step guide: making fabric pots on bases from plastic bottles.


Hedgehog from a plastic bottle and twine rope: growing seedlings and small creeping plants
Crafts for the garden from plastic bottle caps

You can create real masterpieces from plastic lids
Don't throw away bottle caps. Decorative crafts made from caps from plastic bottles for the dacha and garden can also beautifully fit into its landscape. They will serve as an excellent mosaic material for decorating fences and walls of a country house.

Bright compositions made from plastic lids will help make your landscape design more fun.
Video master class (from plastic bottles of standard capacity):

A path made of plastic covers is not only economical, but also very beautiful

Large-scale red and blue mosaic of caps of different sizes
Having tinkered a little with the pattern, painted and drilled holes in the sides of the covers, you can use them to assemble a curtain for the door. An excellent option for protection against insects!
Lids can also be turned into beautiful tabletop, and into a practical doormat. Use them for decorative finishing internal space.

Gorgeous door curtains made from plastic covers

Carport that diffuses sunlight

Beautiful lanterns in Hawaiian style
Before starting work, remove the labels from the bottles and wash the container thoroughly.
For stability vertical structures fill the bottles with sand or small pebbles.

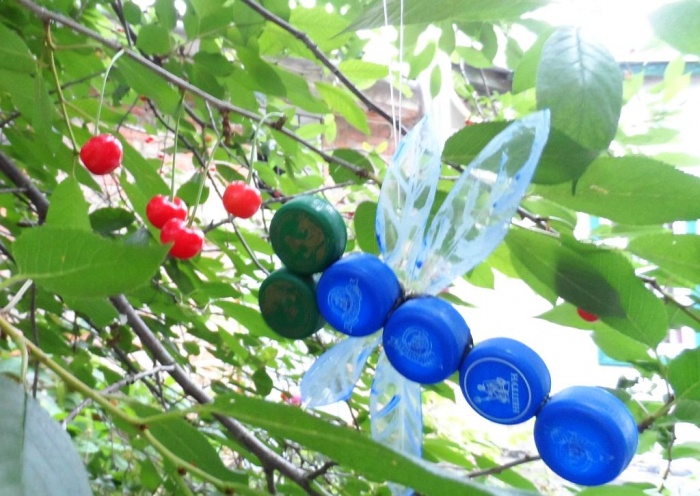
Dragonflies made from corrugated plastic bottles

An ingenious device for collecting fruit from trees

Hanging pots made from pet containers with images of animals will fit perfectly into the interior of a children's room
Choose plastic bottles of different softness for crafts. For example, for the body of a dog or elephant, take a strong base, but for the ears it is better to use softer plastic.
Master class from plastic bottles (step by step):


From an ordinary plastic bottle you can form products that will be useful in playing with children, in the household, and in the interior of the house. From simple material you can prepare a craft for kindergarten. Children can independently cope with basic manufacturing schemes with virtually no adult help. In addition to plastic bottles, you may need a glue gun, paints and scissors.
To make any craft from a plastic bottle, you need to prepare the necessary tools and materials:
- plastic bottles are the main material;
- scissors, blade and stationery knife - used for cutting;
- acrylic paints - useful for decorative finishing;
- brushes of various thicknesses for painting;
- candle for burning sharp cuts;
- glue gun for joining parts;
- a construction stapler to attach other elements to the base.
Depending on the complexity and decorative finish, additional materials are selected.
DIY ottoman made from plastic bottles
A craft made from a plastic bottle for home improvement is the best option in terms of price and quality. From raw materials you can make a variety of furniture, in particular an ottoman.
You will need the following tools and materials:
- 38 plastic bottles of the same volume and shape;
- a roll of wide stationery tape;
- plywood sheet;
- jigsaw, scissors, stationery knife;
- rolled synthetic winterizer;
- construction stapler;
- measuring tape and pencil;
- thick fabric for upholstery.
 DIY craft from plastic bottles: step by step production round ottoman
 Algorithm for creating an ottoman:
- Arrange the bottles so that their shape resembles a honeycomb. There are 4 elements in the 1st row; in the 2nd – 5; in the 3rd – 6; in the next one - 7. The remaining 3 rows are set according to the principle of 1st, 2nd and 3rd.
- Wrap tightly with stationery tape. You need to make several layers and wind them from the top of the bottles to the very bottom in a spiral - you will get the basis of the future ottoman.
- Measure the diameter of the resulting honeycomb. On plywood, draw a sketch of a circle with the resulting diameter. Make 2 such parts. It is advisable to try on the circles so that they match the parameters of the base figure.
 DIY craft from plastic bottles: step-by-step production of a square ottoman
 - Using a staple gun, nail the plywood circles to the top and bottom of the pouf base.
- Wrap the sides with padding polyester. Cover the circles too soft material. Secure the soft base with a construction stapler.
- Take measurements from the resulting blank and make patterns from textiles. Sew a cover, which is then placed on the body of the pouf.
Furniture of this type can be made in a few hours, it looks presentable, and the costs are minimal.
Flowers from plastic bottles
There are many options for creating flowers from plastic bottles.

The easiest way to create a three-dimensional flower:
- Cut off the bottom of the bottle so that the height of the resulting object corresponds to 5-6 cm.
- Divide the circle by 5 with a marker equal parts. The marking is done so that each part includes a convex bottom. Cut the plastic all the way down to the bottom at each of the marks.
- To form attractive petals, you need to round each resulting strip.
- Treat the edges of the cuts by dusting them over a candle flame.

Make a hole in the center of the bottom using a heated nail, awl or soldering iron. Thread a thick wire through it, which will become a stem. plastic flower.
Toys made from plastic bottles
A craft made from a plastic bottle can become a strong, interesting and budget toy for a child of almost any age.
Several toy options:
| Apple-box | Octopus | piggy bank |
| Cut off the bottoms of two identical bottles. The height of each element must be the same and be more than 6 cm. Make a hole in the center of one of the parts with a hot nail. Cut a strip from the canvas of a green bottle, twist it into a tube - you get a stalk. Cut a leaf from the same strip.
Glue a leaf to the cutting and thread the tube into the hole in the bottom. Everything is fixed with a glue gun. If you insert one bottom into the other, you will get a full-fledged apple in which you can store small items. | Cut the bottle in half. Measure a distance of 5-8 cm from the cut. Divide the circle into parts, the thickness of each should be 1-2 cm. When cutting the plastic along the marks, strips are obtained. Tighten the elements using the blade of scissors.
Make eyes from the lids. Use a marker to draw the pupils, and then attach the blanks to the body of the octopus using a glue gun. Make a hole in the bottom and thread a thread through it. You will get a toy analogue of “Y-Yo”. | Choose a bottle with a wide bottom. Using a marker, draw nostrils on the lid and eyes on the bottle itself. Cut a narrow rectangular hole in the base of the body.
Make stable legs-stands from the lids, attaching the elements with a glue gun. Cut out ears from thick cardboard and glue to the base. |


You can make any toy from bottles by creating a mock-up of the product:
- Zhukov;
- fruits;
- vegetables;
- transport;
- dolls;
- figurines.
House made of plastic bottles
From plastic bottles you can create a house that will be a refuge for children in the yard, the basis of a sandbox.
You need to make preparations:
- more than 500 bottles of the same volume and shape;
- timber and plywood;
- nails, wire, construction stapler;
- sharp knife, nails;
- 4 hemp;
- tools for taking measurements and markings.
"Construction" algorithm:
- Make the body of the future house from timber. The wooden bases are knocked down in such a way that frames are formed - the foundations of future walls. Knock down 2 more frames, which will become roof slopes. Place the body on stump legs. Place plywood underneath.
- Determine the diameter of the container. Mark the upper and lower beams in accordance with the obtained parameter. Drive a nail into the center of each strip.
- Cut off the neck of each bottle so as to remove the narrowing areas of the element. Use a hot awl to make a hole in the center of each bottom.
- String so many pieces of wire onto a piece of wire so that they form a full strip from the upper beam to the lower body. In the process of forming a strip of wall, you need to ensure that all parts fit tightly relative to each other.
- Secure one end of the wire to a nail driven into the top beam. Stretch the metal base like a string and secure it to the nail of the lower wooden base. Make enough stripes to form a wall.
- To strengthen the walls, you can knock bottles together with a construction stapler.
The roof is made using the same principle. The ceiling can also be made flat using a wall manufacturing algorithm. By changing the direction of the “strings” on which the containers are strung, windows can be made.
Plastic bottle doll
A craft made from a plastic bottle can be a completely functional doll that you can play with.
List of tools and materials:
- plain fabric pastel color;
- padding polyester;
- 2 buttons;
- Knitting;
- printed fabric;
- needle with thread;
- marker;
- bottle;
- glue gun
Manufacturing technique:
- Formation of the head. Cut a circle from a plain fabric. Sew along the edge with a fine line stitch. Pull the workpiece a little and fill it with padding polyester. Fully tighten the thread and secure the seam. Sew on eye buttons and draw a nose and lips with a marker.
- Making the neck. Cut a wide strip from the same textile. Sew a cut on one side, pulling the textile a little. Attach the element to the seam of the head and sew the pattern. You will get a kind of skirt at the bottom of the head.
- Creating a hairstyle. Cut the knitting thread into equal pieces. Thread each part through a needle. Make a stitch on the doll’s “head”. Pull out the needle and tie the thread into 2 knots. You get 2 hairs at once. After repeating the manipulations, use scissors to trim the hair.

- Making hands. Cut 2 strips from pastel colored fabric. Sew each strip, forming a tube. Fill the space with padding polyester and sew up the edges.
- Torso. Cut off the bottom of the bottle. Treat the area near the neck with a glue gun. Place the head on the top, and lay the skirt-neck along the adhesive part. Using a glue gun, attach the arms to the base of the container.
- Take measurements from the container and sew a sundress or dress for the doll. Put clothes on the doll. You can fix the element with glue.
More can be done complex model dolls using others auxiliary materials.
DIY bird made from plastic bottles
It is easy to make a parrot or an owl from plastic containers, since the silhouette and manufacturing principle are identical.
Preparation:
- 2 identical containers;
- several colorful bottles;
- scissors or stationery knife;
- glue gun;
- 2 caps and a marker.

Manufacturing algorithm:
- Make a base from identical containers. From one container, cut out the middle part and connect the sections together, from the second, cut off the bottom to the expansion. Using a glue gun, connect the bottoms together. It will turn out to be unique hourglass.
- Cut out the middle parts from the remaining containers. Using a marker, draw the number of ovals that will fit on the canvas.
- Using a glue gun, attach the ovals to the base. You need to make sure that each next element covers 1/3 of the bottom one. The result is feathers applied in layers.
The ovals are laid out in a specific pattern. When making an owl, the eye circles are first formed, then the rest of the head is filled in. A parrot's feathers are distributed evenly throughout its body - from top to bottom. The lids make eyes.
Flowerbed made from a plastic bottle
A two-tier flower bed made from plastic bottles is neat, compact and at the same time roomy.

Manufacturing technique:
- Prepare a place for a flower bed, decide on the parameters and shape of the product.
- Dig a small ditch that will become the outline of the flowerbed fence.
- Fill the containers with sand or soil and screw on the lids.
- Bury the filled container in the groove. Immerse the containers in the ground a little more than halfway. Bury with the neck down.
- Having formed the lower tier of the flowerbed, you need to fill the inside with soil. To prevent the bottles from spreading out under the action of the soil, you can tie them together with wire. Compact the earth.
- Using measurements and calculations, determine the center of the flowerbed and make another fence of the same size, but smaller. Cover with soil and compact.
The flowerbed is ready for planting. The structure can be further strengthened with natural stone, brick, and tiles.
Birdhouse made from a plastic bottle
To make a birdhouse, it is better to take a 5-liter plastic bottle. Additionally, you need to prepare scissors and a glue gun.

Manufacturing Features:
- Cut off the bottom.
- Remove half of the bottle base.
- At the base of the neck (parallel to it), using folds, form the silhouette of a house with gable roof. You can bend the plastic using scissors.
- In accordance with the layout, bend the rest of the bottle.
- Attach the layout to the cut bottom and cut out a shape from it. Glue to the house using a glue gun.
You will get a full-fledged house, the “entrance” to which is through a wide neck.
Bird feeder made from a plastic bottle
A craft made from a plastic bottle can be a bird feeder.

Simple manufacturing option:
- Choose a barrel-shaped bottle with a volume of 1.5-2 liters.
- Cut out large arched windows at the base of the container. It is better to make 4 openings.
- In the neck area, burn 4 holes at the same level. Thread wire or threads to create fastenings.
Grain is poured into the bottom; birds can get inside the feeder through the windows.
Palm tree made from plastic bottles
For creating plastic palm tree you need to collect more than 100 brown and 100 green bottles, prepare a construction stapler.

Manufacturing technique:
- Cut off the bottom of each brown container. From the container fabric, form 5 rounded petals 5-7 cm long.
- Inserting the neck of the bottle into the bottle with the petals up, fix each element with a construction stapler.
- The neck and bottom are cut off from green containers. Bend the cylinder in half along the heights. Cut the element along the fold. Along long sides Make a terry out of a rectangle using scissors, cutting the edges into thin strips.
- Place the green part on half of the other and secure with a stapler. Leaves are obtained.
At the end, the crown and trunk of the palm tree are assembled. The parts need to be connected tightly - it is advisable to use wire. In order for the barrel to stand, you need to thread the workpiece with a metal pin.
Crafts from plastic bottles for preschoolers
A child can make a toy or craft from plastic bottles preschool age, which is relevant for all kinds of competitions in kindergarten.
Worth choosing simple options and work patterns so that the child can do everything at once, minimizing help from adults.
Chamomile
Choose containers for yogurt or milk. It is desirable that the lid be orange and the container itself white. Cut the bottle in half. Divide the base of the top of the bottle into 8-10 equal parts.
Cut into strips up to the neck. Round the edges and twist a little with the blade of scissors. Bend each petal towards the bottom. Screw on the lid.

Make a hole in the center of the twist by burning the base with a hot nail. Thread the wire and you get a stem. Cut out leaves from green plastic and glue them to a metal base with glue.
Penguin
Take 2 identical shaped bottles. Cut one in half - leave the part with the bottom. Cut off the larger half from the second, leaving only the lower part. Connect the blanks, fastening them with glue.

Paint the form with black paint, the bottom with any other paint. Use white paint to paint the base for the front part. Form the muzzle. Glue a thread pompom to the colored bottom. At the transition point, tie a ribbon that will act as a scarf.
Crocodile
2 green containers will come in handy. From the first, cut off only the bottom and the hard part of the neck. Glue the edges of the smaller cut. Cut off the dense part of the bottom and top from the second container. At the narrowing point, cut half the bottle lengthwise.


Cut out 20 triangles from white paper. Make eyes out of colored paper and fix on the base. Glue the elements along the cut. Connect the bottles together. At the bottom of the mold, glue 4 lids - these are paws.
Bees
Paint a small bottle yellow, form black stripes along the entire “body” of the bee. Glue decorative eyes to the lid. You can draw with a marker. Cut out a medium-sized oval (wings) from a transparent or brown bottle.

Attach the manufactured parts to the base of the container. Make legs from narrow strips cut from the same container as the wings. Make a hole between the wings through which you can thread a thread - such a detail will allow you to hang the insect.
Butterflies
Cut out the soft part from the plastic container, forming the canvas in the form of a rectangle. Select a butterfly stencil according to the size of the base. Place the plastic base on the stencil, secure the components at 4 points with clothespins or office clips. Trace the outlines with a marker, transferring the design onto the plastic.

Place the sketch on the board and cut out the shape using a stationery knife along the contour. Additionally, you can cut out some parts of the wing pattern. You can use nail polish to paint the product along the marked lines. To add shine, you can use sequins, beads and rhinestones.
Hedgehogs
Prepare 20-25 brown plastic containers. A transparent base will also work, which will then have to be painted over. Cut all parts in half. Make a fringe by cutting strips to a tight place in the neck area.

Assembling is done - insert the bottles into each other. On the first container draw the eyes of the animal. The plug represents the animal's nose. You can place an apple made from bottles on the “needles”.
Helicopter
Select a table tennis ball and a container whose diameter will be the same as that of a sports equipment. Additionally, you will need cocktail straws, glue, scissors, and a safety pin.

Procedure:
- Cut off the bottom of the container, leaving the neck closed with a lid. It is enough to use a part with a length of 5-8 cm.
- Make a cross out of the straws and fasten it by piercing it with a safety pin. Attach to the bottle cut.
- Cut a strip from the container around the circumference, divide in half.
- Glue a piece of straw to a narrow strip along the edges. Use the part of the device that has a bend.
- Glue the part to the bottom of the helicopter body - on the other side relative to the blades.
- Insert a tennis ball into the cut hole of the container.
Glue a tail, which is made from cocktail straws, onto the lid. A model of this part of the helicopter can be made based on a real aircraft.
Matryoshka
The matryoshka doll is made using two techniques - working with plastic containers and papier-mâché. Select the maximum shaped container. Glue pieces of white paper dipped in PVA glue onto the surface.

Cut off the tough throat. Seal the hole using the same principle as the base of the bottle. When the base is dry, smooth the surface with a damp brush. Paint the blank according to the sketch of the matryoshka doll. You can use gouache or acrylic paints for these purposes.
Fly agarics
Prepare 2 containers – 2 liters and 0.5 liters. Cut off the bottom from the larger one and paint it with red paint. Make white dots. Treat the smaller container with white paint. Cut a rectangle out of paper and form a fringe on one side.

Glue to the middle of the white bottle. Fix the “cap” of the fly agaric on the white stem. You can make an additional fly agaric of smaller sizes and glue it to a larger element.
Household supplies made from plastic bottles
From a plastic bottle you can make not only jewelry or children's toys, but also functional products that are relevant in everyday life.
Item options:
- Flowerpots for indoor and garden flowers. Cut the container in half, shape the base into an original shape and paint.

- Country washbasin. Cut off the bottom part. Place the container upside down. When the lid is loosened slightly, water begins to pour out.
- From 10 identical containers you can make a broom for cleaning the street. Cut off the bottom parts. Fold each element in half lengthwise and make a fringe. Thread the elements, connecting them with wire.

- Containers cut in half can be ideal containers for seedlings in the garden. If you remove the covers, the cover will be additionally ventilated.
- If you cut off 1/3 of the top of the bottle, you get a wonderful container for storing pencils, crayons and other small items.

- Plastic containers can become the basis for weaving a variety of baskets that can be used around the house.
- If there is a zipper between the two parts of the cut container, then it will turn out original organizer for storing cotton wool and bandages.
- Cut the bottoms from several containers, string the pieces through the center of the element onto a metal rod. Distribute the bowls evenly along the rod. You will get a stand for jewelry.

- Cut the bottle in half. Cut a square at the base. This device will become a pocket for your phone, which fits onto the base. charger, and the phone fits into the bowl.
The craft can be decorated decoratively by using paints, rhinestones, beads, glass stones, beads, and ribbons. Elements can be attached to a plastic bottle by using a construction stapler or a glue gun.
Article format: Natalie Podolskaya
Video about plastic crafts
DIY craft from a plastic bottle - video instructions for making:
The amount of garbage that each person “produces” is growing every year. The problem is becoming global as flying plastic bags and the plastic bottles lying everywhere have become an eyesore for everyone. I’m grieving, it turns out that you can help, and even for your own benefit. In any case, this applies to plastic bottles. You will be surprised how diverse and, importantly, useful crafts You can make one from plastic bottles in just a few minutes. Well, or a watch... Depends on the scale.
The buildings
PET (polyethylene terephthalate) is a thermoplastic from which bottles are made. It will be useful to know its physical properties:
- density - 1.38-1.4 g/cm³,
- softening temperature (t size) - 245 °C,
- melting temperature (t pl.) - 260 °C,
- glass transition temperature (t st.) - 70 °C,
- decomposition temperature - 350 °C.
Plastic bottles are very convenient to use, but are harmful to the environment, since the polyethylene from which they are made takes more than 200 years to decompose. This same property allows the use of almost waste raw materials as construction material. Craftsmen already even build houses from plastic bottles, as well as sheds, dachas, greenhouses, greenhouses, and fences. Worked out various technologies- the approach is quite serious.
How to build a house from plastic bottles
The main idea is to pour into bottles bulk material, screw them on with lids and use them as bricks. Fill the bottles with sand and soil. Sand is preferable because there is too much plant debris in the soil that can rot. It must be sifted, dried, filled into bottles, compacted well, and topped up. The result is a kind of brick.

To build a house from plastic bottles, you will need a solution that fills the gaps between the “bricks”. There are options here too. It could be ordinary solution, which is used when laying brick walls, you can make a clay mortar. To keep the “bricks” in the wall until the mortar sets, they are tied with twine on the side of the lids. Later, these “grids” will come in handy when you plaster the walls. They turn out uneven, so you can’t do without leveling.
We make a greenhouse, barn, greenhouse
You can build a greenhouse or greenhouse from plastic bottles. In this case, only transparent plastic is used, since it is necessary for sufficient light to pass through. For the construction of a shed, on the contrary, it makes sense to choose darker plastic - it will be less visible what’s inside.

The first technology - one to one
The second requirement for bottles as a building material is an even shape. This one, you know, without recesses. Otherwise, folding the walls so that they retain heat will not work - it will “siphon” into the curly cutouts. Remove labels from bottles and dry. You also need to prepare pins or rods - bottles are strung on them. Their diameter is small so that the neck passes freely. Now you can start building a greenhouse/shed from plastic bottles.
To build a greenhouse or shed, pillars are dug in the corners. Frames are assembled from timber according to the size of the walls. These frames will be the base for the bottle walls. We assemble them (the frames) on the ground and, ready-made, attach them to the dug-in pillars. When you make the frames, don't forget the doorway and windows.

We build a frame, cut off the bottom of the bottles, and string them onto a pin. From such “columns” we assemble walls, roof
The construction process begins with cutting the bottom. We string the cut bottles onto pins, pointing the necks in one direction. We insert the bottles with force so that they become very tight. Having collected a number required height, attach it to the frame. You can fasten it with clamps, strips cut from metal, nails... In any way available to you. We press the second row against the first so that there is a slight deformation. We fasten it in this position. So, row by row, we assemble all the walls, then the roof.

Using the same technology you can make a gazebo. But here there is no need for tightness, so you can collect shaped and colored containers. This will make it even more interesting (example in the photo).
Second technology - sewing plastic
Bottles will also need to be smooth, transparent or yellow. The central part is cut out of them, resulting in a square-shaped piece of plastic. The pieces are sewn together into long strips. In the strip, the pieces are placed so that they curl in one direction. Then the strips are sewn into canvases. To make the canvas even, the strips are positioned so that they curl in different directions. As a result, they equalize each other. The finished canvases are nailed to the frame. This completes the construction of the greenhouse for plastic bottles.
This type of “cladding” for greenhouses withstands winters well; it does not need to be removed. Due to the firmware (many small holes), there is no absolute tightness, which allows you to regulate humidity. You won’t be able to heat such a greenhouse, but it will delay autumn for you and speed up the arrival of spring.
You can sew plastic for a greenhouse by hand, but it is not easy. It will be easier for those who have non-capricious Sewing machines. Old Podolsk machines cope with this task. There may be problems with others.
Fence and enclosure
You can make a fence from plastic bottles different ways. If you need a serious monolithic fence, you can use bottles as bricks. The technology is the same as when building a house. To avoid plaster (after all, there is a high risk that it will collapse) - select the color of the plastic to obtain the required Rusinka. But in this case, you will have to look for “building materials” of the same diameter or lay out patterns from different sizes. In general, the process is creative, no matter how you look at it.

You can also make filling for the fence from plastic bottles. Make a frame, say, from wood, and come up with a beautiful filling from shaped containers and their parts.
Furniture from scrap materials: recycling plastic bottles
Not only can you make a house and a fence from plastic bottles, they are also used as a basis for upholstered furniture. The idea is to use plastic containers rather than wood for the frame. With the lids screwed tightly on, they have a high bearing capacity, and assembled into blocks, they are quite capable of withstanding loads of up to 100 kg or more.

A bed made of plastic bottles... you need a good mattress, and the base is not too difficult to make
Although the furniture is made differently, the general algorithm of actions is the same:
- Select “building material” that is the same height and tighten the lids well.
- Assemble blocks of the required size, securing them with tape.
- Having assembled the base of the required shape, sew the cover. For softness, adding furniture foam.
The trick is to ensure that the bottles fit very tightly against each other and do not move. The slightest play can lead to destruction of the structure. Therefore, assemble the blocks slowly, carefully securing them. You can stack bottles in layers, securing each layer in several places. For the inner layers, it is better to use double-sided tape - the fixation will be more reliable.
Ottomans/banquettes
The easiest way is to make an ottoman or banquette from plastic bottles. We proceed in the order described above. You need to find bottles of the same height. It’s better if they are the same shape - it’s easier to assemble. From plastic containers With the lids tightly screwed on, we assemble the base in the form of a cylinder. It is advisable that the radius of the base be greater than the height of the bottles - this way the bench will not tip over.

Next, you need to cut out two circles from fiberboard, which will be slightly larger than the resulting radius of the base - this is the “bottom” and the base of the seat. We secure them with tape. We take furniture foam rubber and, according to the obtained dimensions, cut out the necessary parts. We sew the cover from furniture fabric in a color that matches the interior.

Such a banquette can be not only round. It is quite possible to make it square. And so that this furniture is not too light, it can be made heavier by pouring water. But water is not very reliable. It's better to pour sand. Both heavier and more reliable.
Sofas, chairs, armchairs
If you need furniture higher than one bottle, proceed as when creating walls for a house. Find “material” of the same shape and height. Leave the first bottle intact, screw the cap tightly (you can add sand to prevent it from turning over). The bottom of the other is cut off and one is placed on top of the other. The bottle goes a certain distance and does not move further, no matter how much effort you make. If the resulting height is enough, great; if not, put on the next one. This is how you assemble rows of the required height, then fasten them into blocks.
There is another way. It is more reliable in the sense that the bottles are not held by compressed air, but due to mechanical stop. And they have double walls, which is also important. Minus - more work, more feedstock is needed. The whole process is illustrated step by step.

- Take the bottle, cut it approximately in the middle of the height ( top part with a smaller neck).
- We insert the upper part of the neck (the lid is screwed on) until it stops into the lower part.
- We take a whole one, the same size and shape, and insert it bottom down into the prepared structure.
- We cut the third approximately in half and put the lower part on the top (with a lid).
From such modules we assemble blocks of the required configuration, fastening them with tape. Don't skimp on scotch tape. You can first fasten two bottles together, then assemble larger blocks from the double ones.
As you understand, with this technology there are a lot of bottle tops left (half of the third bottle). They can be used to make other crafts from plastic bottles: flowers, more practical things for the household.
Flower making methods
The most common crafts made from plastic bottles are garden figurines and flowers. Read about garden figurines. There are other interesting ideas, but there are many collected interesting animals and insects. And we’ll tell you about flowers made from plastic bottles below - these are probably the crafts made from plastic bottles that bring the most pleasure. The process is simple, there are a lot of possibilities, the result is amazing.
You've probably noticed that the bottom of a PET bottle looks like a flower. All you have to do is find the bottle beautiful color, cut off the bottom of it. Now you have a nice flower. In the middle you can add petals cut from the central part, a core from plastic strips cut into noodles, or glue beads inside, but more on that in a little more detail.

Using the power of fire
To work, you will need a marker, a lighter or a candle (it’s more convenient with a candle). If available, take pliers, tweezers or pliers to hold the workpiece while processing. You will also need acrylic paints, glue and beads may be needed. The entire manufacturing process comes down to a few steps:

There are a lot of options here. Just start doing it. It may not work out perfectly right away, but you will understand what and how you can fix it. Look at a few more pictures with step-by-step photos of the process of making flowers from plastic bottles.
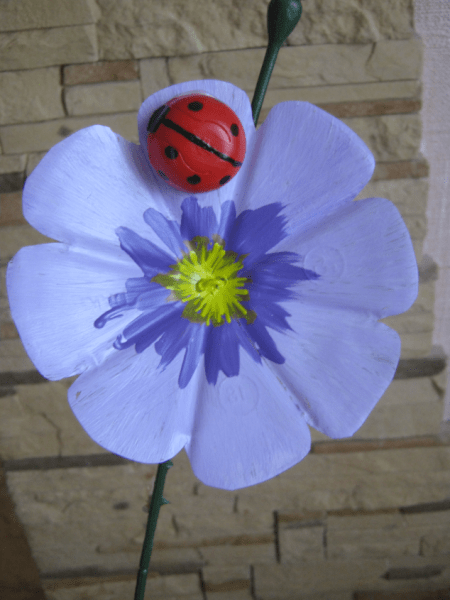
The simplest
For beginner crafters, you can try making flowers from plastic bottles simple shapes for garden decoration. In this case, you can also use milk containers. To avoid painting plastic, look for colored ones. And it doesn’t matter so much whether they are transparent or not. They can be combined to produce flowers of different shapes.

To create such flowers, use the part near the neck. It is cut to form petals. Next - warm it up a little, giving the desired bend to the petals, a little paint, the core from a melted piece with a thread (a bottle of a smaller diameter, a pharmacy bottle will do). So it turned out to be a buttercup.
Another option is to cut from the neck into strips of equal width - 1-1.5 cm, bend them (warm up a little at the base). Make a middle whisk from the side of a milk bottle or paint clear plastic with acrylic paint.

The middle is any bright. Here is a piece of cork, but you can cut it into thin noodles, roll it up and then heat it. You will get a shaggy core.
It's all about the form... Despite the imperfections, they decorate the site
The topic is actually inexhaustible. A variety of flowers are made from plastic bottles. From simple and uncomplicated to very realistic. It's not so much a matter of skill as it is different tastes and desires.
Useful ideas for the home
PET containers turned out to be so good material that they make a lot of useful things. In this section we have collected useful crafts made from plastic bottles that can be used around the house.
For the kitchen and more
If you cut off the bottom of a bottle with a capacity of 2–3 liters, you get a bowl or a bowl, and so that its edges are even, they can be melted on a heated iron. But so that you don’t have to clean the sole later, use a special silicone pad. If you don't have one, you can do this through a sheet of baking parchment.

Container for food. The plastic is food grade...
From the same bottle we cut off the threaded part. There should be 1-2 cm of plastic left around the thread (we melt the edges using a well-known technology). Now it won’t be difficult to seal any package hermetically: we pass it through the cut neck, wrap it outward, and screw on the lid.

The bottom of the bottles attached to the bar makes an excellent newspaper shelf (photo on the right). You can also store umbrellas.
You can weave containers of different shapes from plastic cut into strips. Bottles need an even shape, with thick walls. They are cut into strips of a certain thickness. You need to cut in a spiral - the result is quite long strips. If their length is not enough, they are sewn perfectly.

Lampshades
You can even make a lampshade, but under one condition: you will use similar crafts from plastic bottles in lamps - only they hardly heat up. Plastic is incompatible with other lamps. We will describe three ways to make a lampshade from a plastic bottle.
First. You need a large capacity bottle. We draw it into strips of equal width. At the beginning and at the end of each strip, we make holes with a heated soldering iron or a nail heated on fire. We insert scissors into this hole and cut. The result is smooth stripes.

When the strips are cut, we also make a hole in the bottom, pass a thick fishing line through the neck, bring it out through the hole in the bottom, with reverse side we attach the decor. Maybe a button, maybe a pebble suitable color. Now, by pulling the fishing line, we get an interesting shaped lampshade. You can put a low power light bulb in it.
Another lampshade was made using a similar technology. But then they cut part of the bottle with the neck into strips, wrapped the strips and secured them to the neck. To give the desired shape, the bend can be slightly warmed over the flame of a candle or lighter. We attach the resulting “flowers” to the base. So we get an unusual design.

They also make lampshades from the bottoms. You need to find a sufficient number of identical bottles, cut off the bottom of them, and glue them together using universal glue (choose transparent). The main thing is that it glues the plastic and hardens quickly.
Flower vases
Making a vase from a plastic bottle - what could be easier... Just cut off the neck and you're done. But there is a technique that allows you to get patterned walls. You will need a soldering iron with the thinnest tip possible. Its power should not be too high. Then everything is simple: use a heated tip to burn out the patterns.

Magically! To make the drawing appear brighter, take acrylic paint and paint the resulting beauty. The paint can be in a regular can, but it’s faster and more convenient to work with a spray can.

These are the options...
Photo ideas
Crafts from plastic bottles is such a broad topic that it is impossible to talk about everything. What’s nice is that if you know a few tricks, you can easily find out how and what to do just by looking at photographs. So here we have collected a few ideas that we found interesting.


You can even make a boat...

And this is just decoration...


