The chimney is one of essential components heating systems in private or country house. Even an inexperienced person can handle its installation, but in this matter you need to know certain nuances, SNiP standards, as well as possible errors.
Features of brick chimneys
In a private house with a heating boiler system there is a chimney. It is designed to remove fuel combustion products outside. Now there are many chimney designs. Required Tools and materials for installation can be found in a hardware store. Although new types of chimneys have now appeared, brick structures are still in demand.
Advantages of brick chimneys:
- Relatively low costs for laying a brick chimney.
- Variety of materials for manufacturing.
- Excellent performance characteristics, brick chimneys can withstand temperatures up to a thousand degrees Celsius.
- Aesthetic component. Brick chimneys are beautiful in appearance and will become a separate element of home decoration. Ceramic material is most often used to decorate them.
- Excellent thermal conductivity.
Types of brick chimneys
There are 2 varieties brick pipes: root and mounted. They are used for different ovens.
The mounted type of structure is directly connected to the furnace, being its continuation. The main pipes are located near the boiler, autonomously. A special pipe is used to connect them to the furnace.

The radical design is best suited to cast iron products in the heating system. In addition, several stoves can be combined into one main chimney. In such a situation, you need to correctly determine the diameter of the pipe that will cope with the load of removing combustion products.
Recommendation: sometimes when installing a basic structure and connecting it to the stove with a special pipe, it is necessary to install a metal pipe inside the chimney. A brick chimney must be built in accordance with all building codes.
The top pipe comes directly from the boiler and passes through the roof. It is suitable for connection to only one oven.
Brick chimney design
Both types of chimney have a similar structure. The only difference is that the basic design of the method includes several ovens. In this case, you will need several risers and sections. And here it all depends on how many floors the building has.

Elements included in the chimney design:
- Pipe cutting (also called fluffing). It is intended to protect flammable floors. The groove has the largest wall thickness in the entire structure, in the range of 35-40 cm. The exact value depends on specific situation. The result is approximately 25 cm of insulation.
- Kiln neck. This chimney element is located in the area from the stove to the cutting. The furnace neck includes a smoke valve designed to regulate draft.
- Pipe riser. It is made of brick, inside it there is a channel for removing combustion products. The riser is placed in the attic ceiling, as well as before cutting.
- Otter. This chimney element is designed to waterproof the pipe passage in the roof. The otter is installed above the roof.
- Cap. It is installed on top of the cap in the head of the pipe (more details: " "). This element protects the chimney channel from atmospheric precipitation. In addition, proper placement of the hood increases the efficiency of the entire system.
Requirements for a brick chimney
SNiP is a special document regulating construction standards for the construction of objects. It also includes heating systems in private homes. These standards should be taken into account when laying brick pipes with your own hands.
The main points of SNiP regarding brick chimneys:
- Changes in the internal diameter are not allowed in the chimney; the walls must be smooth.
- The thickness of the chimney must be determined based on fire safety requirements. Most often, the optimal figure is 10 cm.
- The materials used for laying brick pipes must be able to withstand high temperatures without problems.
- It is necessary to maintain a distance of 38 cm between the pipe and the wall.
- In no case should you forget about installing extensions; they are installed at the point where the pipe passes through the ceilings.
- Discharge of combustion products in a vertical position is allowed. But in some situations it is impossible to build a chimney without horizontal sections. In this case, their length should not exceed 1 m.
- For flat roofs it is necessary to make the outer section of the chimney 1 meter.
- For a pitched roof, a pipe is installed at a distance of one and a half meters from the ridge, and it must rise above it by at least 50 cm.
- If the pipe is located 3 meters away from the ridge of the pitched roof, then they will be level in height.
- In situations where the distance from the roof ridge to the chimney pipe is more than 3 meters, special calculations of the height of the external section are necessary. It is necessary to conditionally draw a line at an angle of 10 degrees to the horizon of the ridge. The intersection location will determine the height of the pipe.
- For gas fuel boiler systems, it is necessary to install the pipe so that it rises at least 5 meters above the roof.

Correct placement of the chimney pipe is extremely important, as it affects the efficiency of the entire system. The chimney height instructions must be strictly followed. The length of the pipe is calculated in different ways, depending on a number of indicators. In each individual case, its outer section may vary in height.
There are special requirements for industrial brick chimneys. The length of the pipe must be 25 meters greater than the height of any building within a certain radius.
Brick for laying a chimney
To install a brick chimney yourself, you need to first calculate the amount of materials. It is necessary to know in advance how many bricks and cement mortar. Special attention It is also worth paying attention to the choice of material, because the reliability of the laying of the chimney above the roof, as well as the rest of the structure, directly depends on its quality. And there are some useful recommendations here.
It is worth understanding that for the material used in laying such a structure, there is a requirement for fire resistance. The shape of the brick needs to be even, so that there are no cracks or other defects. Experts recommend purchasing material with a grade of 200 and above. The optimal brick size for building a chimney is 25x12x6.5 cm.

The bricks are fastened together using a special mortar mixed with cement, sand and water in certain proportions. Its quality can be determined by the grain size of the sand. From fine-grained fractions it turns out ideal solution for laying a chimney. Sometimes clay is included in its composition. Need to take pure material, without any impurities.
The opening of the pipe passage in the roof must be waterproofed. This prevents liquid from flowing down the pipe into the building. To accomplish this task, otter is most often used - a thickening on the outside of the masonry. But it can be replaced using metal part- "apron".
Do-it-yourself dismantling of a brick pipe
Outdated brick chimneys not only provide poor removal of combustion products, but also pose a threat to human life. After all, at any moment the old structure can collapse. Such chimneys must be demolished and replaced with new ones.

When the outer section of the chimney is demolished, you can move on to dismantling the part of the pipe in the attic of the house. To avoid a possible collapse of plaster from the ceiling, it is necessary to place special grooves on the pipe.
A hammer, sledgehammer or similar tools will do the job perfectly. With their help, it will be possible to relatively quickly demolish a chimney in a private house.

Stages of installation of a brick chimney:
- The first step is to install the mounted pipe. For laying the chimney, the bandaging method is used. But first you need to attach the pipe itself to the mortar to the stove. The essence of this method is that in each row there is a step of half a brick. This approach allows you to achieve best indicator clutch. The laying is carried out until there are 5-6 free rows left between the ceiling and the structure.
- Now the laying of the fluff is already underway. Here it will be necessary to expand the outer perimeter. Suitable dimensions for external expansion are 59x45 cm. In such a situation, you need to make an internal expansion of 14x27 cm. The expansion is quite simple to implement. It is enough to move the bricks at the edges of the rows. The approximate size of the shift is 4 centimeters.
- During the third stage, the otter is being installed. It is required to approach this task with extreme care in order to avoid possible errors. For laid rows, during installation of the otter, it is necessary to create an indentation outward by a third. In this case, the first row on top of the extension must correspond to the previous one.
- It is necessary to organize a riser for the butt pipe in the roof. Its masonry is carried out in the attic of the house. The riser is carried through the roof; it should rise above it by 50-80 centimeters.
- The final stage includes installation of the chimney neck. When it is completed, a head with a cap must be placed on the end of the neck. It will protect the structure from precipitation.

If you follow all the rules and take into account the advice of specialists, the installation of the chimney pipe will be completed without any complications. This design will last a long time.
It was already mentioned above that the wall of the fluff is mounted under the expansion of the perimeter. This structure must be additionally thermally insulated to ensure its reliability and durability. You need to insulate the entire section of the pipe that passes through the roof.

Most often, thermal insulation material for these purposes is made of asbestos. But there is still alternative options. Insulation can be made from a metal box placed around the perimeter of the pipe. Free space between it and the pipe is usually filled with sand or expanded clay. Clay-impregnated felt can also be used as thermal insulation. Mineral wool is also suitable for these purposes. High-quality insulation is achieved if its layer is at least 10 cm thick.
Common installation mistakes
The text described above contains important tips, following which will help in installing a brick chimney with my own hands. But since it's pretty difficult process, during its execution you may encounter some difficulties.
Common installation mistakes:
- The most common problem is that the pipe is not high enough. Such a chimney will not have proper draft, which will negatively affect its efficiency. Particular attention should be paid to calculating the size of the chimney. This approach will avoid this problem.
- The chimney does not comply with SNiP standards. These standards were created to ensure that facilities built according to them were as reliable as possible.
- Another common mistake is using low-quality or incorrectly mixed cement mortar. The brickwork will not be able to hold securely with it; over time, it will completely collapse. The cement mortar must be mixed in such a way as to achieve a uniform consistency.

Important advice: it is necessary to lay the cement mortar evenly during the laying process.
- You should be very careful when tying bricks during laying. When constructing a chimney, half parts of bricks, quarter parts, and so on can be used. To separate them, it is best to use a grinder.
- Bricks should not be laid on cement mortar that is too thick. Otherwise, this will negatively affect the service life of the structure. Optimal thickness- 4-5 millimeters.
- Among other things, it is worth remembering about regular chimney maintenance. This mainly concerns its cleaning. Soot and other combustion products settle on the walls of the pipes. Structures with uneven interiors are the most contaminated. Regular cleaning will help maintain the performance of the chimney, otherwise they will begin to deteriorate.
Unlike a brick stove, the design of a chimney made of this material is less complex; it does not have numerous internal channels. The pipe contains only one central passage, but its surface must be smooth and even to ensure the required traction.
Collapse
It is quite possible to lay a brick chimney on your own if you carry out the calculations correctly and purchase quality material and understand the basics of masonry.
Types of brick chimneys
There are several varieties:
- Mounted. Structurally, it is located on top of the furnace and serves as its continuation. This type of chimney is installed on sauna and conventional heating units.
- Wall-mounted. Such a pipe is mounted in the walls of a building or a capital interior space. If a wall chimney is installed near the external surfaces of the house, then it must be insulated so that condensation does not accumulate inside the duct due to strong temperature differences. This worsens draft and promotes faster collection of condensate.
- Indigenous. Brick pipe for a stove with a side exit, it is installed next to heating structure. It can be used simultaneously for several ovens.
Brick chimney design
The chimney in any house consists of several parts, each of them has its own purpose.
A typical and frequently used chimney consists of the following segments:
- The neck extending from the surface of the oven to the cutting (fluff). A valve is installed on it, with the help of which the fuel burning rate and traction force are regulated.
- Fluff. It is performed before each segment of the ceiling and protects against exposure to high temperatures. Its walls are made thicker than in other parts of the chimney; they must be at least 40 cm.
- Riser. This part of the pipe connects the attic and the roof.
- Otter. Her responsibilities include protecting the chimney from water, snow and dust entering the pipe riser. The pipe sector is located on the roof and is distinguished by thick walls that protect the roof sheathing from exposure to flammable materials.
- Pipe neck. It starts above the otter and is placed similar to a riser.
- The head of the pipe is an extension above the neck. A cap or umbrella is installed above it to protect the chimney duct from precipitation.

Elements of a brick pipe (chimney)
Parameter calculations
The size of the chimney for a brick stove should remain the same along its entire length; its optimal value is selected depending on the dimensions of the heating device.
Sectional size
Suitable device parameters depend on the combustion chamber and furnace power. The inner walls need to be made smooth without sagging mortar or protrusions, then they will remain clean longer.
Most often, brick chimneys of square and rectangular cross-section are used; their masonry is made of 4, 5 or 6 bricks; when calculating the cross-section, one side of the structure is multiplied by the second. Standard sizes consider: 12.5 × 25 cm. The calculation is carried out according to the internal chimney channel. The indicated parameters refer to a masonry of 4 bricks, the cross-sectional area is 156.25 cm 2.
When calculating a cross-section of five bricks, the result is a value equal to 312.5 cm 2, and with six - 625 cm 2.
When installing a brick chimney on a metal stove, you need to connect its square section to the round outlet hole of the stove. So for a chimney cross-section with an area of 156.25 cm 2 it is suitable round pipe with a diameter of 130 mm, its area is 133 cm 2, the next parameter of 150 mm has higher value than stated.
When calculating a circular cross-section, the required radius is taken into account, the area is calculated using the school formula:
S = π×R 2, where the number π=3.14
Knowing the diameter of the pipe, you can easily determine the desired parameter.
Calculation depending on power
The internal channel depends on the optimal ratio of pipe sizes and the power of the heating device. Among the guidelines for choosing a suitable section, the size of the opening provided for the blower door is highlighted. The pipe size should be smaller hole under the door.
If, when calculating, we take into account the productivity of the furnace, then we can select the cross-section from the tabular data, but they do not take into account the thickness of the seams; they range from 6 to 10 mm.
Chimney height
When calculating this parameter, you need to pay attention to the following features:
- if a highly flammable type is used as a roofing material, the chimney must rise above the roof by at least 1.5 meters;
- height difference between top point the head and grate should not be less than 5 meters;
- if there is near the house tall building, then the pipe should be 0.5 meters higher than its extreme point;
- on roofs with non-combustible coating, the minimum distance to the top of the pipe should be 0.5 meters.
When calculating the height of the pipe, the size of the firebox and the cross-section of the chimney are taken into account. So, if the total area of the combustion window is 0.35 m2, and the cross-sectional area of the channel is 0.04 m2, then a height of 7 meters is suitable for these parameters. To make calculations with other parameters, you need to establish this dependence and select the height.
The height of the chimney pipe affects the draft, so this size of a brick chimney pipe should not be less than 5 meters, otherwise turbulence may begin and all the soot will go inside the house.
How to correctly position the pipe from the roof ridge is shown in the photo below:

How to choose the “right” brick?
For laying the chimney, solid fireclay (fireproof) brick is used; its grade must be higher than 200. The externally selected material must have smooth edges and have rectangular section. The sizes may vary, but it is better to use the following: 25x12x6.5 cm.

Masonry mortar
It contains clay, sand, water and cement. The liquid is taken into pure form, without various inclusions, that is, it cannot be taken from reservoirs and artificial ponds. The clay used should also be as clean as possible, without foreign inclusions.
Differences in solutions depending on the masonry area
For each part of the chimney, it is advisable to use a specific cement mixture:
- the pipe under the roof is erected with cement-lime or lime mortar;
- For the part of the chimney above the roof, a cement-sand composition is used.
If a brick chimney is made for metal furnace with your own hands, you should know that the thickness of the mortar layer will depend on the sand fraction; the finer it is, the neater the seams will be. 
Making the mixture
The mixture is prepared from sifted river sand and pure clay, mined from the depths of the earth at least 1.5 meters. It also needs to be sifted, and the sieve cells should not exceed 5 mm. Before mixing, the clay must be soaked in water and left for 48 hours.
After this preparation, the clay is mixed with sand in a ratio of 2 to 1, and then the whole thing is filled with water, maintaining a ratio of 1 to 4. In order for the batch to brew, it must be left for 12 hours, and then moved until a homogeneous mixture is obtained.

The cement-lime composition is prepared in almost the same way, only lime is also added to it, which is sifted through a sieve with 3 mm cells.
Chimney laying
Even if a person has never encountered brickwork before, if he has the right tools and step by step guide, he can build a chimney. But if the house is two-story or has a complex pitched roof, then it is better to entrust this matter to professionals.
Required Tools
To build a chimney of any complexity, you will need the following tools from the list:
- roulette;
- building level;
- pickaxe hammer and its analogue with a rubber tip;
- Bulgarian;
- buckets or containers for solution;
- trowel;
- sieve;
- drill with a nozzle for stirring the solution.
Masonry technology
The arrangement of the chimney is thought out at the design stage of the heating device, the ideal option is when it is also brick, but an iron stove with a brick pipe is also often found and its pipe will be made in a similar way.
The solution should be laid no thicker than 1 cm to avoid its subsequent cracking when hot air flows pass through the chimney.

Laying a brick chimney with your own hands looks like this:

Advantages and disadvantages
Brick chimneys have the following advantages:
- relative cheapness, in comparison with modern materials used for it (now popular “sandwich” panels);
- long service life, can reach up to 30 years;
- brick chimney as an architectural element is ideally combined with many roofing materials.
But due to the fact that brick still belongs to the “old-timers” of construction, it has many disadvantages in comparison with its modern analogues:
- the significant weight of the brick structure requires the creation of a reliable foundation;
- erecting a pipe takes longer than when using a “sandwich”;
- for a chimney, the ideal cross-section is round, and the brick is rectangular in shape; square structures are better made from it;
- The inside of the pipe, even after applying plaster, remains rough, which is why it quickly becomes covered with soot, which impairs traction.
Conclusion
Everyone can assess their own strengths, and if a person decides to independently build a brick chimney in a house or country house, then he must realize that not only the heating of the entire room, but also its safety will depend on this. After all, if you install the pipe incorrectly or make its internal part with protrusions, then all the fumes from the burnt fuel will remain in the house.
←Previous article Next article →In new private houses equipped with heating boilers, they are installed to remove flue gases. traditional brick chimneys, and also increasingly used chimney systems made of steel or ceramics.
Which chimney should you choose? How to properly make a chimney for a boiler in a private house? Where can I buy quality chimney pipes of steel?
For a solid fuel boiler - a brick chimney
A brick chimney is usually costs less, than modern chimney systems. A traditional ceramic brick chimney pipe can easily withstand high flue gas temperatures. The pipe can even withstand ignition of soot accumulations in the chimney.
A brick chimney for a boiler in a private house is a rather heavy structure. The chimney is located on the foundation or a solid reinforced concrete floor. The construction of such a chimney requires certain skills; it is better to entrust the laying of a sealed and durable chimney to a qualified stove mason.
Channels and chimneys and ventilation are often placed in a brick chimney
The chimney is laid from high-quality solid ceramic bricks of a grade not lower than M125 using ordinary masonry mortar. The upper section of the pipe, above the roof, can be laid out of facing or clinker bricks. The thickness of the chimney walls must be at least 120 mm(half a brick).
 Brick chimney laying. Ventilation ducts are usually placed next to the chimney in one vertical block. Templates make it easier to lay even channels with smooth walls.
 The size of the chimney and ventilation channels is chosen as a multiple of the brick size, taking into account the thickness of the vertical joints. For example, channel cross-section can be 140x140 mm(1/2x1/2 brick) or 140x200 mm(1/2x3/4 bricks), or 140x270 mm(1/2 x 1 brick). In practice, a smoke channel is often made measuring 20 x 20 cm(3/4x3/4 bricks). If necessary, it is easy to select and insert a round steel or ceramic liner of the appropriate diameter into such a channel.
The flue gases in the chimney duct should not be very cool. Therefore, they try to build the chimney into the masonry of the internal wall of the house or attach it to the wall. Sections of the chimney that pass through an unheated room (attic) or outside the house insulated with mineral wool.
Brick the chimney serves reliably and for a long time only at high flue gas temperatures, which prevents condensation from forming in the pipe. As a rule, this condition is met when the chimney is operated with a conventional one.
When working with modern boilers on gas or liquid fuel, as well as with solid fuel pyrolysis boilers, pellet and others, operating for a long time in a slow burning mode of low intensity, a brick chimney is destroyed quite quickly.
Modern boilers are designed in such a way that the exhaust gases have a fairly low temperature. As a result, condensation of water vapor contained in the flue gases occurs in the chimney. The pipe walls are constantly moistened. In addition, when combining with other combustion products, water forms aggressive chemical compounds on the inner surface of the pipe.
In particular, the exhaust gases of boilers contain sulfur, which, interacting with water, forms sulfuric acid in the chimney, which corrodes its walls. External signs destruction - dark wet spots on outer surface brick pipe.
The operating mode of a solid fuel pyrolysis boiler also contributes to the formation of aggressive condensate in the chimney, which quickly destroys the brick chimney.
Rough chimney walls contribute to the accumulation of solid soot particles on them. Wall roughness and rectangular shape the chimney channel makes it difficult to clean the chimney from deposits.
For connecting gas and other boilers with low flue gas temperatures to a brick chimney, in a brick channel it is necessary to place an insert - a steel or ceramic chimney pipe.
A chimney made of ceramic pipes is a universal solution for a boiler in a private house
 Chimneys from special chimneys ceramic pipes can be used for all types of boilers. The material is resistant to high temperatures and to any aggressive chemical compounds that can form in the chimney during the combustion of different types of fuel. This type of chimney is the most durable.
Ceramic chimney pipes are distinguished by the permissible maximum temperature of the exhaust gases.
Brick chimney, which is famous for its good draft and aesthetically pleasing, do not replace metal structure. It retains functionality much longer than the pipe. To create a chimney from bricks, you need to clearly understand what this structure is and learn the special rules regarding the features of the masonry.
Advantages of a brick chimney
A chimney made of bricks is most often mounted on a stove, taking into account its advantages such as:
- the ability of the material to resist fire;
- duration of operation;
- ease of brick laying;
- no need for specialized maintenance;
- easy repair.
A brick chimney can also be characterized by negative side: it is rough inside and therefore quickly becomes contaminated with soot, the accumulation of which negatively affects the traction force. The disadvantages of a brick chimney also include its heavy weight, which often requires placing the stove on a separate base.
Construction of a brick chimney
You must undertake the construction of a chimney from bricks, being thoroughly prepared for this process.
 Chimney laying requires special skills and care
 Brick selection
In most situations, the building raw material for constructing a chimney is ordinary red brick. But since there is an opinion that simple material will not withstand high temperatures, some lay out the chimney from refractory bricks, the price of which is much higher.
Builders claim that the use of refractory bricks is justified in cases where it is necessary to build an overmount chimney. It will be exposed to gases with the highest temperature.
The myth that ordinary red brick is not suitable for building a kiln can be debunked. Ordinary bricks are not at risk even at temperatures above 800˚C. And it doesn't get that hot inside the chimney.
 Red brick is actively used for the construction of chimneys, as it is resistant to high temperatures.
 Simple bricks will not become a reason for frustration if you take their choice seriously. It is worth taking only material with smooth side walls. Bricks with uneven surface will do inner space the chimney will become even rougher, which will lead to significant contamination of the pipe with combustion products.
Irregularities that appear on bricks during the process of laying and creating joints must be eliminated with a sponge moistened with water.
Sand-lime brick is definitely not suitable for the construction of a chimney. This construction raw material, when heated, releases toxins into the environment, which is why it can be used exclusively for finishing the outside of a house.
 Sand-lime brick is never used for the construction of chimneys, because it emits harmful substances when heated
 When purchasing bricks, it is important to examine the edges on several pieces. They should be completely even. A good brick is one that is distinguished by an ideal parallelepiped shape, sufficient strength and uniform firing.
It is better to lay the chimney from bricks measuring 25x12x6.5 cm.
Brick for chimney over roof
It is strongly recommended to cover the chimney in the area where it exits the roof with facing bricks. True, there are opponents of this rule, who believe that the material used for cladding will collapse almost immediately, which cannot happen with other construction raw materials - clinker bricks.
The part of the chimney above the roof can be created from rough bricks and then covered with clinker material. But there is another option: to immediately assemble the “top” of the pipe from clinker construction raw materials - about 50 bricks.
 To give a brick chimney beautiful view, it is lined with facing bricks
 Calculation of brick pipe parameters
It is impossible to build a pipe without deciding on the cross-sectional size inside the structure. This parameter is very important because it affects the stove’s ability to get rid of fuel combustion products. The width of the smoke channel always depends on the power of the furnace equipment.
To find out what the internal cross-section of the pipe should be without resorting to complex calculations, you can use one of three standard sizes:
- “four”, formed by a line of four bricks and creating a pipe with a cross-section of 12.5x12.5 cm, is an ideal option for the smoke duct of a low-power stove;
- “five”, formed by a row of five bricks, resulting in a rectangular chimney with a cross-section of 25x12.5 cm, is a version of the pipe for heating and cooking stoves and fireplaces;
- “six”, created in a row of six bricks and allowing you to build a square smoke channel with a cross-section of 25x25 cm, is a variation of the chimney, suitable for fireplaces and Russian stoves, in which it is necessary to organize minimal resistance to the movement of heated combustion products.
 Calculation of the chimney cross-section can be simplified if you are guided by standard sizes, which differ in the number of bricks in one row
 Another significant parameter for the smoke channel is height. When calculating the length of the pipe, take into account where the pipe exits onto the roof (in relation to the ridge).
A chimney, one and a half meters or less away from the ridge, should rise 50 cm above the roofing material. When the interval between the highest point of the roof and the chimney is 2 or even 3 meters, the height of the smoke duct above the roof is made equal to this distance.
 The height of the pipe depends on the distance at which the smoke exhaust duct is removed from the roof ridge
 Mortar for smoke duct made of bricks
The mortar used to glue the chimney bricks together is a composition of water, sand and clay. Thanks to these components, the mixture becomes similar to brick in terms of linear expansion. This means that the solution will protect the masonry from the appearance of defects.
The clay used as one of the components of the solution must be clean. There are no other requirements for it, so it’s okay if the taken natural material will be fatty or lean.
 The clay mined to prepare the solution should not contain earth or other impurities
 Sometimes the clay for preparing the solution does not need to be mixed with sand. We are talking about a situation where the found clay is already saturated with sand in a ratio of 1:3 or 1:4.
If the clay portion is too large, the solution will become covered with cracks when it hardens. And an insufficient amount of this component in the special mixture leads to its crumbling in a dry state.
 In masonry mortar, it is important to maintain the correct proportions of components, otherwise it will not be able to perform its functions
 You can find out whether the content of components in the solution is optimal simple method: knead the mixture with your fingers. If there are no deviations from the requirements, then the mixture will feel neither slippery nor rough, like a piece of sandpaper.
Sand has different requirements. It’s good if its grains have a large diameter - 1 mm. Raw materials of this size feel rough to the touch. Pulverized sand mined in the floodplain of a stream or river should never be used.
 To prepare the solution, you need to take coarse sand, which can form good connection with clay
 Preparation of the composition
The solution for creating a chimney from bricks is prepared as follows:

For fear of making a mistake with the quantity of mortar components, you can purchase a ready-made masonry mixture of sand and clay in dry form. The main thing is that the purchased composition is fireproof, otherwise it will not be suitable for laying bricks.
Making a brick smoke channel
Most stoves are suitable for a pipe with a cross-section of 25x12 cm. A smoke channel with these dimensions is created from bricks, which must be specially divided into 2 parts. The bricks are sold in this form. But if you wish, you can cut them yourself using a grinder with a mounted diamond blade.
 Brick can be cut not only with a grinder, but also with a saw with a special blade
 When laying bricks, the mortar must be applied in a layer no more than 1 cm thick. A thicker layer may crack as it expands due to heat.
It makes no sense to build a relatively complex brick chimney for a metal stove. For such equipment, it is better to find an ordinary iron pipe.
 To assemble the correct brick pipe, you will need to complete the masonry according to all the requirements, including the creation of fluff, otter and other parts of the structure
 To assemble a smoke channel from bricks, perform certain tasks:
- Armed with tools, that is rubber mallet, grinder, spatula, building level and tape measure. Measure the distance from the stove to the damper and flue flap.
- Starting from the stove, the first lines of bricks are laid out. For each laid out row using building level control the evenness of all four planes. Having created the next 3 lines of bricks, remove the excess sand and clay composition with a damp cloth.
- There, a gate will be placed and the frame is secured. Due to its installation, the upper plane of the bricks should not bend. Therefore, you need to make a hole in them the same size as the gate frame.
 The gate is mounted so as not to disturb the horizontal level of the masonry plane
 - The bricks are placed in rows until they reach the place where the fluff is installed. At this moment, count the number of lines from which the expansion of the pipe will be formed at the intersection with the attic floor. It is taken into account that one row of bricks increases the perimeter of the smoke channel by 1/4 of the width of the brick.
- The fluff is built so that it adjoins the ceiling beams without gaps. In the case of a significant distance between the chimney and the lower surface of the building's floor, special structures are created in the form of frames that help strengthen the fluff. The fact is that a leaky connection between the bricks and the ceiling will lead to loosening of the pipe and leaks in the attic and in the rafter system. By the way, the fluff can be not only square, but also rectangular.
 The fluff is assembled so that in the middle there are rows of more bricks
 - Step by step, they move from fluffing to masonry according to the dimensions of the chimney. Rows of bricks are placed until the chimney reaches the roof.
- They begin to build an otter on the lower tier of the roof. Here you will have to act extremely carefully, since the expansion of the channel must be carried out step by step, taking into account the degree of slope of the roof. To facilitate this work, builders recommend placing pieces of sheet metal into the otter during the laying process and fixing them on the rafter legs.
 The otter is assembled with a gradual expansion of the chimney channel, taking into account the angle of inclination of the roof
 - The end edges of the bricks are shortened to reduce the gap between the roofing materials and the otter. If you don’t want to cut with a grinder, then metal sheets are installed at the junction of the lower zone of the otter and the roof. With their help, it will be possible to prevent raindrops from seeping into the supporting structure from the roof.
- Create a decorative part of the smoke channel - the head. To do this, the outer perimeter of the chimney is expanded by a quarter of a brick. The head is formed literally from one row, after which they begin laying out the finishing line of bricks. The last chain of material is mounted metal mesh- a barrier for birds.
 The head of the brick pipe is made with a quarter-brick extension
 - The top of the chimney is covered with a protective cap using dowels. After two days, during which the mortar between the bricks hardens, the oven is heated for testing purposes. If you detect weak traction, there is no need to panic: the situation will improve after several times of operation. heating equipment. Seams brickwork carefully rubbed down so that the chimney looks aesthetically pleasing.
 The protective cap is attached to the head and protects the pipe from precipitation
If you doubt your ability to lay a chimney out of bricks, you can resort to test assembly of the smoke channel. This involves doing the work on the ground without using mortar.
Photo gallery: brick chimneys
The four-brick masonry scheme is used in chimneys for small ovens The chimney is closed on top with a special cap - a weather vane. It protects against precipitation from penetrating into the pipe and can serve decorative element Such large chimneys are built mainly for powerful gas boilers. Some chimneys are covered on top with a protective cap with a ventilation outlet. Most often this is required for gas boilers
Video: example of building a brick chimney
Lining a brick pipe
Lining is a method of restoring the tightness of a chimney by inserting a stainless steel pipe inside it. The need for such an operation arises for certain reasons.
The meaning of the chimney liner
In any case, you will have to deal with deterioration in the operation of the chimney, because the internal walls of the channel become contaminated with soot over time. It forms quickly and in large quantities if the temperature inside the chimney constantly changes and the fuel combustion products contain chemical substances.
It is most common to become clogged with fuel combustion products. brick structures. This is due to the roughness of the inner surface of the brick chimney.
 A pipe clogged with soot does not remove smoke well
 A smoke channel clogged with soot stops functioning normally, causing reverse thrust- a phenomenon due to which gases do not go up, but down - straight into the house. To normalize draft, they resort to lining the chimney, which allows you to transform the uneven walls inside the chimney into a perfectly smooth surface. In addition, after sealing the channel becomes more airtight, easy to clean and retains heat better.
Most correct option sleeves are a pipe with an oval or round cross-section. A product of a different shape will allow soot to accumulate in the corners.
 The liner extends the service life of a brick chimney, as it protects it from soot
 Instructions for lining the chimney
Lining a smoke brick channel involves performing the following actions:

Video: chimney lining
Brick pipe repair
To put the pipe in order, you can go in two ways: restore the masonry or perform lining - treat the channel inside with special means.
Reconstruction of masonry
In case of minor damage to the chimney masonry, they act quite predictably - instead of destroyed bricks, they install whole ones. To do this, the crumbled elements are carefully cleaned of the solution and removed. The empty cell is scraped out, after which a new element is placed in place of the taken brick, using a fresh mixture of clay and sand.
 In case of minor damage to the masonry, it is restored by replacing individual bricks with new ones
 Sometimes a situation arises when cracks appear in the pipe, through which moisture seeps in during heavy rains. In these cases, the outer surface of the pipe above the roof is primed and then plastered.
When the bricks in the masonry are damaged by more than 20%, o partial renovation a chimney is out of the question. The smoke channel with severely damaged elements is completely dismantled to create a new masonry.
Video: one way to repair a brick chimney
Brickwork
Lining is an excellent way out of the situation if the problem is the loss of smoothness and strength by the chimney walls. To complete this task you need a mixture of Masan or Mordax. These compositions simplify the restoration of the chimney’s functionality and do not reduce its cross-section at all.
It will take only a few hours to complete the lining. The operation consists of the following steps:

You may need several different brushes during the lining process. This is explained by the fact that the cross-section of the chimney in certain areas may not be the same. In general, the size of the brush should correspond to the parameters of the smoke channel.
If you comply with the requirements for the masonry process in a house or bathhouse, you can create a safe and durable chimney. A self-made structure can look no worse than the structures of real masters. If you have learned how to build chimneys with your own hands, then you can also make repairs of any complexity without outside help.
Chimneys are used to remove combustion products and generate draft in furnaces. According to their design and location relative to the furnace, chimneys can be root, mounted, or in the form of a channel in the main wall. Mounted pipes are called pipes installed on the stove. This is actually a continuation of the smoke channel of the furnace; They are convenient because they do not take up space in the room. Main chimneys are installed in the form of a separate one near the stove on own foundation pipe riser.
Their use is especially justified in wooden houses with group arrangement of heating devices. In brick buildings, it is better to install smoke ducts in the internal main walls.
Wall chimneys do not take up living space and do not require materials.
The cross-section of the chimney flue is determined depending on the heat transfer of the furnaces. The cross-sectional size of the channels must correspond to the amount of flue gases flowing through them and be at least 130x130mm for furnaces with heat output up to 3500W. For furnaces with a heat output of more than 3500 W, the pipe cross-section is made 130x250 mm. For Russian stoves and fireplaces with a large portal, the chimney cross-section is 260x260mm.
Depending on the size of the channel, the masonry is laid in different ways: four bricks “quadruple”, five bricks “five” or six bricks “six”.
The chimney consists of the following parts:
Laying a chimney is no different from laying a stove.
The difficulty is in laying it at the place where it passes through attic floor and a widening device above the roof. The main requirement is the verticality of the array, dense filling of the seams, achieving a smooth surface of the smoke channels.
The laying of the mounted pipe is a continuation of the laying of the furnace, since it is installed on its ceiling and is carried out using the same mortar before passing through the attic ceiling.
At the point where the pipe passes through the ceiling, a horizontal cut is made - widening the walls. Horizontal cutting is done for fire safety.
The groove and pipe are laid simultaneously with the ligation of the seams, the outer wall gradually expands, and the internal channel runs in one section.
This is achieved by overlapping the outer masonry by 4 cm in each row.


Between cutting and wooden beams it is necessary to lay non-combustible thermal insulation, for example basalt mats.
In a freshly cut wooden house, the cutting should be done taking into account the shrinkage of the walls, lowering it below 4% of the height of the walls.
It is better to lay the riser within the attic space along the beacon.
To do this, lay 2-3 rows of pipe over the cutting. A plumb line from the roof plane is lowered to one of the corners.
Laying a brick chimney pipe
A nail is driven into the point on the roof sheathing from which the plumb line is dropped. A nylon thread is tied to the nail, and the lower end of the thread is tied to a nail driven into the seam of the chimney masonry in the corner. The masonry is laid along this corner, checking after 3-4 rows with a square or measuring the diagonals.
The greatest difficulty is when laying pipes above the roof.
There the masonry is laid using a complex clay-cement mortar. I make the solution like this: add 1 liter of cement, a little water to the clay-sand mortar from which the stove is used, per 10 liters, and mix thoroughly with a mixer.
If the pipe is laid without adding cement, it may turn out like this.
The pipe riser is placed above the lower edge of the roof by 2 rows and they begin laying the otter - widening the pipe to protect the riser from precipitation.
They place it with careful bandaging of the seams. The first row is increased by overlapping bricks by a quarter in one direction to form an overhang over the roof towards the slope. In the second row, they begin to form an overhang from the sides and make it by overlapping a quarter of a brick on both sides.
The inner walls of the channel lead strictly vertically. Since the pipes can be of different sections, and the roof has a different slope, the otter is installed individually each time. Here is one of the options for the otter order and the fluff order.

Laying fluff is quite labor-intensive and time-consuming work. To increase productivity, the fluff can be made of reinforced concrete. For reinforcement, use 5-7 mm reinforcement at the rate of 4-5 rods on each side of the slab.
Two reinforcement bars must lie on the brickwork.
The fluff board can be made on site or separately and then installed. In both cases it is necessary to make formwork. When fabricated on site, the formwork is secured as firmly as possible. The width of each side of the formwork must be at least 250mm from the “smoke”. Between the fluff and the ceiling it is necessary to put thermal insulation material. In this photo there are two layers of 5mm asbestos.


When a double-circuit metal pipe passes through the ceiling, the hole in the ceiling is closed with a sheet of galvanized iron, on which basalt insulation is placed and wrapped around the pipe.

Sometimes, to simplify the laying, instead of laying an otter, I make such a belt.

Above the otter, place a pipe neck of the same cross-section as the riser.
The masonry is completed with a head. To protect the pipe from precipitation, it is advisable to install a cap made of galvanized iron or other material on it. The cap protects top part pipes and prevents moisture from penetrating into the channel.
The head of the pipe plays only a decorative role; it can be omitted.
If a pipe is made to have a head, then the internal cross-section in this place should not change so that there are no smoke turbulences in the pipe.


To ensure that water does not stagnate on the horizontal surfaces of the otter and the head, they are plastered with a slope.


The height of the pipe above the roof has a significant impact on the operation of the furnace.
If the pipe is located in the area of wind pressure, then in windy weather smoke can enter the room. To prevent this from happening, it is necessary to set the height of the pipe relative to the roof ridge according to the drawing.

If you do not adhere to this rule, then this may happen.
After finishing laying the pipe, to prevent precipitation from getting into the attic and damaging the pipe riser, you need to close the gap between the pipe and the roof with galvanized iron or other material.


Here is a version of the pipe without the otter.
To prevent water from flowing down the pipe under the roof, an incision is made through the pipe with a grinder to a depth of 10mm.


Then the apron sheet is inserted and the groove is filled with sealant.


You can learn more about laying chimneys and working on the roof from the video guide “Do-It-Yourself Stoves.”
Here are photos of the finished pipes.


Protective materials for wooden structures
Furnace pipe insulation: teploizol
You can wrap the chimney with foil insulation
To the rescue - sandwich pipes
Pipe insulation in a traditional Russian bathhouse
Fire protection of the furnace
If you decide to build a bathhouse, then do not forget about high-quality insulation of the stove, chimney, walls and ceiling. Otherwise, you may have serious problems with fire in the ceiling of the building. Therefore, we will try to dwell in more detail on a pressing problem today - insulating a pipe in a bathhouse with our own hands.

Protective materials for wooden structures
Due to the fact that the chimney and stove heat up quickly, a fire may occur. Moreover, according to tradition, the material for the bathhouse is wood.
Back in the old days, it was customary to insulate the walls, ceiling, stove, chimney with an asbestos layer, clay and other available materials, quite poorly conductive thermal energy and resistant to elevated temperatures.
So how to cover the stove pipe today? Insulation of the chimney structure is necessary both for fire safety and protection from condensation, so that cooling occurs more slowly and the smoke exhaust system lasts longer.

It is a mistaken belief that a few will be enough to insulate from fire. metal sheets, which are used to cover the ceiling around the chimney. After all, metal also heats up quickly, so it will not protect against fire, and it will also not be suitable as a heat insulator.
Red brick is not always needed for pipe lining, although it is endowed with excellent thermal insulation properties.
The reason is that such a design does not match the design of every bathhouse.
To better understand how to wrap a chimney pipe against fire, consider two options for insulating materials in the form:
Furnace pipe insulation: teploizol
This is a unique material, the structure of which includes foamed polyethylene, located between a pair of sheets of foil.
Using thermal insulation, you can qualitatively insulate a chimney, and do it yourself.
The thickness of the thermal insulation varies from 2 to 10 mm, and the thicker the material, the greater its resistance to high temperatures.
The top layer of foil serves as reliable protection for the pipe from significant overheating. Using wire or adhesive tape, a metal craftsman attaches thermal insulation, which is then wrapped around the chimney.
You can wrap the chimney with foil insulation
Modern material includes two layers: heat insulator and foil. The second one plays a reflective function and can save up to 90% of the thermal energy in the building. Folgoizol is a harmless material compared to other analogues, since the foil is compacted food grade. The material is resistant to ultraviolet radiation and elevated temperatures within the range of -65 to +175 degrees Celsius, a good insulator.
For those who don’t yet know how to insulate a chimney pipe in a sauna, we recommend covering the steam room ceiling, walls and chimney with foil insulation. As a result, you will get a room whose design resembles a thermos. The heat will remain in the sauna, but the bathhouse will quickly gain temperature and then slowly cool down.
To the rescue - sandwich pipes
For those who want to install a safe chimney in their bathhouse, we suggest using a sandwich pipe.
This design includes several sections that can easily be placed inside each other, i.e. looks like a multi-layer cake.
Laying out a brick chimney
Here are the main components of a sandwich pipe:
- stainless steel layer (inside);
- insulation in the form of basalt/mineral wool (in the middle);
- steel with zinc coating (outside).

This creative design represents the insulation of a chimney built into common system, and is designed to solve two problems simultaneously:
- protection against soot accumulation inside;
- maintaining optimal temperature outside.
The sandwich pipe is easy to assemble yourself and can be used for a sauna with an iron stove or bathhouse.
What to do if you built a Russian steam room with a brick stove? Below we will consider how to line the pipe in this situation in order to protect it from ignition.
Pipe insulation in a traditional Russian bathhouse
At elevated temperatures, fire-resistant red brick retains its performance properties, therefore it is in demand when constructing a chimney in a bathhouse with a stone stove. In this case, you are guaranteed protection of the pipe from fire and long-term heat retention.
The service life of the structure depends on how well the brick pipe is constructed. Do not skimp on materials during the construction of the chimney, because...
then the repairs will cost you much more.

Let's take a closer look at how to insulate a pipe in a bathhouse from the ceiling:
- Use asbestos to cover the pipe outlet on the ceiling and through the roof.
- Using galvanized material, insulate the walls on the inside of the pipe.
Standard iron sheets are completely unsuitable for this purpose due to their tendency to corrosion.
- Make a box around the pipe where it passes through the ceiling.
- Pour expanded clay inside the box to retain heat and protect the wooden floors from fire.
You have professionally wrapped the pipe, but this is not the end of the chimney installation work.
The next step is measures to insulate the stove, ceiling and walls of the bathhouse.
Fire protection of the furnace
Modern metal stoves are mounted on a foundation, while sheathing the walls on the back and sides with sheets of the same material. If you cover the stove yourself with only metal, then it will appearance will not be very aesthetic. It is better to make external masonry with red brick, which insulates the stove from fire and retains heat in the bathhouse.
Due to the fact that asbestos elevated temperature It releases toxic substances and is not recommended for use in a steam room.
Natural felt is considered harmless and is also a good insulator. In terms of price, this material is more expensive than asbestos sheets, and when smoldering it emits a specific smell (felt does not catch fire), which can be immediately felt.

If you intend to install the stove on a wooden floor, then first it is better to lay felt material in a couple of layers, then lay brick in three rows. For walls and floors, it is recommended to lay metal sheets as an insulator, the height of which varies from 50 to 70 cm.
And you will no longer have questions about how chimney pipes are wrapped.
Before the beginning construction work smoke brick channels must be prepared, corresponding special design stoves, features of the interior layout of the premises, structural differences in the roof.

Further, until they cover the neck of the cut (workpiece). It should be noted that regardless of the external size of the internal section, the vertical smoke along the entire length is the same and is approximately 140x270 millimeters (average parameters, but in fact it can vary depending on the power of the heater and the size of the smoke).
After five rows of doors, the cut begins to engage with the external dimensions of the first row of approximately 590 x 450 mm, which is achieved by inserting half and quarter bricks. To avoid deflection in the smoke duct section, insert 60mm brick slabs inserted inside. In the third row, the dimensions of the brick chimney change again and are already 510 × 650 millimeters.
Brick slabs are also inserted inside. The external dimensions of the fourth row are made of 570x710 millimeters, and the inside is made of bricks 90-100 millimeters thick. The fifth and sixth lines are made of solid brick and strictly follow dress codes. If necessary, cutting can be continued for another type.
Once the wall is completed, the brick structure is moved to the attic where the hoist is constructed.
To reach it outside, there must be a first hole on the roof. The foundation is built very quickly and easily, since it involves the implementation of conventional masonry and does not require manipulation of pipe sizes.
When it comes to the roof, all the work moves towards the roof. The vortex pattern continues to rise one or two rows above the roof, after which the construction of the otter begins.
 This chimney segment consists of nine types, while it is arranged so that the outer dimension of each successive course exceeds the previous block of brick.
At the same time, the size of the smoke duct must remain the same, so carefully select the internal panels with which it is configured. At the beginning, the bricks are laid in such a way that only one gap is formed at the front, and the external size of the chimney does not change at the edges. In the third row, the otter becomes wider due to the advanced bricks, which means that the front lip gradually begins to appear on the sides.
In the fourth row, the side projections increase in length. The more their length increases in the fifth line, the greater the difference between the chimney and the roof slab. In the sixth order, this gap is closed almost completely, and in the seventh case, the formation of the side surfaces is completed.
As a result of all the transformations described above, a front and two lateral projections are formed, the last protrusions remain.
As you can see, on this moment There is nothing that even many experienced builders would ask about how to build a brick chimney, because the matter is quite complex and requires the greatest attention and compliance with all technological requirements.
The last fourth projections are formed in the eighth order. Of particular importance is the observation of the ligation of bricks and the careful selection of brick slabs that allow the smoke channel to remain unchanged with constant changes in the external dimensions of the pipe.
Brick chimney - we build a reliable structure independently
Finally, the ninth type of otter is defined similarly to the eighth, and at the same time, the chimney neck already begins at this stage. Its size may vary depending on the height of the chimney. At this stage you must adhere to the rules and regulations that apply to the height of the chimney above the roof, as this will have serious consequences for drafts while the stove is running (see "Chimney with arms"). 
So, we have found out how to build a chimney out of brick, but you need to look for some nuances and problems that you will have to face during the work process.
During the implementation of the wall, it is necessary to control the thoroughness of the ligation of bricks with each other, especially into half, quarters and other parts and brick slabs.
It will not be much of a problem for a skilled stove worker to distribute the required size portion of the entire brick, but for those with little experience it can be very difficult.
The best way out of this position would be to purchase a special grinding machine. This makes it easy to obtain chimney brickwork of the required size, which is especially important if panels are needed to form a smoke channel between the cutter or otters.
It is important to remember that the thickness of the joint directly affects the strength of the brick, and since it is thinner, the chimney will become stronger.
In this regard, you must carefully measure the location of the future installation, according to these data, use the cutting line of the knives, and only then do you cut. Sometimes it may even be necessary for some bricks to be the wrong shape, so a mistake here could cost broken bricks and time in waste.

To summarize all of the above, it is easy to understand that it is very difficult to install a brick chimney with your own hands on a person who does not have sufficient experience.
But don't give up because this is an easy way for beginners to take advantage of the building's benefits. Also read: “Do-it-yourself wind chimney.”
Alternative brick chimney design
If the above method of laying a chimney seems to be too difficult and an impossible task for some, then don’t give up and don’t give up. There is an alternative way to install a brick chimney, which has the least skill. This means carrying out a conventional masonry in which the entire chimney, arising from the pipe and ending at the head, will be of the same size.
There is a logical question: what is cutting and tearing in this case? They will also be, but they will also be made of concrete. Also read: “Chimney diagram for a gas boiler.”
Brick brick for gas boilers and ventilation, detailed video instructions:
Before starting work, it is necessary to pre-position metal rods, wire or reinforcement with a diameter of 5-7 millimeters.
When installing a chimney in areas where an otter needs to be cut, the envelope pieces must be set into the brick. It is important to ensure that metal elements do not cross the smoke channel. After completing the chimney wall, you only need to install the support in the right place, prepare the cement mortar and fill it (see also: “Do-it-yourself chimney cleaning - methods”).
As you can see, even without much experience and with minimal knowledge of brick bricks, your hands to build a chimney without the help of builders, but instead opted for installation metal pipes, which when executed are much worse than brick chimneys.
If you have something that doesn’t work right away, don’t panic, just study the diagram more carefully and see the tips experienced craftsmen, try to figure out what is causing the problems, the next attempt will probably be successful.
The reward for hard work and inertia will be good and functional chimney, which will work for more than a decade and ensure the correct operation of heating equipment.
Also read: “Installing a chimney in the bathroom.”
The technology for laying a brick chimney itself is quite simple and understandable, since, unlike the brick stove itself, the pipe usually does not have internal channels that are complex in configuration. However, despite the relative simplicity of the design, one cannot ignore the colossal importance of this section of the stove, since the quality of heating of the house and the safety of both the building itself and the people living in it directly depend on it.
Therefore, in order for all the work to be crowned with success, it is necessary to approach it with the utmost care, relying on the recommendations of experienced craftsmen and on developed and tested design schemes.
When erecting a chimney, you should remember that the evenness of the internal walls of the channel is no less important than the aesthetics of the external masonry. Not only the stability of the required draft in the stove depends on this circumstance, but also the duration of operation of the chimney without cleaning, since the smoke rising through the pipe leaves smooth walls, without protruding mortar and deep seams, there is much less waste from fuel combustion, and the channel overgrows much more slowly.
What types of brick chimneys are there?
Chimneys for brick stoves can be of different types, depending on the location of their installation, the design of the stove, and also on how many heating devices will be connected to the pipe. Thus, there are three main types of chimney brick pipes: mounted, root and wall.
Mounted chimneys. The most widely used designs are mounted pipes. They are good because they are compact and do not take up any additional space in the room, but are simply a vertical extension of the stove.
A mounted chimney is essentially an upward continuation of the stove. Very often, the furnace layout immediately includes a layout diagram for the initial section of the pipe.
They are erected on top of the last row of bricks covering the stove, around the left hole.
Then the pipe is passed through the attic floor, attic, rafter system and rises above the roof.
Root chimneys. This type of pipe is installed in cases where it is planned to connect a metal stove, or several heating devices located on one or even several floors.
The main chimney allows you to connect metal stoves to it. As well as several heating devices located at different levels of the building.
In addition to metal ones, such pipes can also be connected brick kilns. This type of chimney is especially convenient if it is necessary to build two stoves in the house in adjacent rooms.
For example, for a kitchen you need a stove with hob, and for the next room - only heating. In order not to lay out a separate pipe for each of them, a main chimney is built between the rooms, to which both heating devices are connected.
Not only two, but also three or four stoves located on different floors of the house can be connected to a pipe of this type. In any case, it is necessary to very accurately calculate the size of the internal chimney channel, otherwise normal draft may not be ensured when simultaneous work several devices.
Wall chimneys are built near main (external or internal) walls or built into them. They can be used, just like main ones, to connect several furnaces located on different floors of a building.
The convenience of this design lies in the fact that it is located outside the residential premises, without occupying their space. For example, on the first floor of a house a fireplace can be built and connected to a wall chimney (there the pipe will be more similar in structure to a mounted one), and on the second floor a smoke exhaust pipe of a metal stove can be cut in (the same as in the version with a root pipe).
The disadvantages of this chimney option are the considerable cost of the project and the labor intensity of the work. Firstly, the construction of this structure will require much more building material.
Secondly, the chimney, if it is partially on the street, requires serious insulation measures, otherwise winter period, with temperature changes, condensation will form in the internal channels, which will significantly reduce the efficiency of the heating device. Therefore, if this chimney option is chosen, then it would be more prudent to sacrifice the area inside the premises and route the pipe along interior wall Houses.
Parameters of brick chimneys
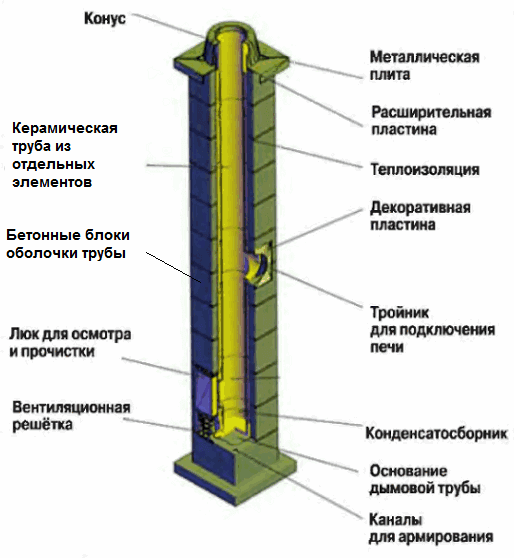
Main sections of a brick chimney
A brick chimney is divided into sections that have their own purpose and are named differently.
These features must be clarified immediately so that in the future it will be easier to understand the description of the pipe construction work (Figure 5).
1 – Pipe head. When laying out this part of the chimney, the bricks are moved to the outside to create a kind of “canopy”, as if hanging over the lower sections, partially protecting the walls of the pipe from precipitation.
2 – The neck of the pipe is located immediately below the head and has the same perimeter throughout its entire height, without protrusions, expansions or narrowings.
3 – “Otter” has more complex circuit masonry, since it is entrusted with protective function. Firstly, the “otter” masonry, hanging over the gap formed at the junction of the roofing material and the walls of the pipe, closes it from the penetration of precipitation and creates a space for the installation of waterproofing material.
Secondly, its expanded walls become a guarantee of safety - at the point of passage through the roofing, due to the increased thickness, the necessary level of thermal insulation is created.
4 – A metal or other sheet (apron), mounted at the bottom of the otter, forms a kind of flashing that covers the joint between the brick wall of the pipe and the roofing material.
5 – “Fluff” - this is the expanded part of the pipe, located in the area where it passes through the attic floor.
The walls of the “fluff”, like the “otters”, are thicker than other flat sections of the chimney - this is necessary for fire safety, since the attic floor very often consists of flammable materials, and their overheating must not be allowed.
6 – Roof covering design.
7 - The riser is a straight section of pipe that has smooth masonry along its entire height and is located in the attic space from the “fluff” to the “otter”.
8 – Attic floor.
9 – An umbrella cap is often attached to the top of the head, which will protect the internal channel of the chimney from water and debris getting into it.
The main function of the chimney is to effectively remove combustion products from the combustion chamber into the atmosphere.
How to build a brick chimney: a treasure trove of useful tips for DIY construction
To do this, the chimney pipe is connected to numerous channels located in the stove structure, with which it must interact harmoniously. If the stove and chimney are built correctly, in accordance with the developed parameters, then when operating the heating device, good draft should be created inside the ducts, which will facilitate the timely removal of smoke to the street. However, at the same time, this should not lead to the heat generated by it literally flying out of the furnace.
In a word, everything needs a “golden mean”.
Diagram of the correct ratio of the height of the chimney depending on its location on the roof (Figure 6):
If the chimney exits through the roofing at a distance L1 not exceeding 1500 mm from the ridge (when measured horizontally), then its upper end edge should be raised above the ridge by no less than 500 mm.
A chimney pipe passing through the roof at a distance of 1500 to 3000 mm from the ridge (L2 in the diagram) must be at least at the level of the ridge.
A chimney installed more than 3000 mm from the ridge (L3) must have its upper edge located on a conventional line drawn through the ridge point at an angle of 10 degrees to the horizontal.
In any of the above cases, regardless of the distance to the ridge, the height of the pipe above roofing covering cannot be less than 500 mm. This fully applies to all flat roofs.
To conclude the topic of chimney parameters, there is an important remark. Independent calculations are great, but the role of a properly designed and built chimney is so great (both for heating efficiency and for safety) that the best option There will always be a professional design carried out.
Self-activity in such important matters is a very risky business.

The brick chimney is classic solution, which has been used in everyday life for quite some time and does not lose its popularity, despite the fact that today more and more modern solutions are being introduced.
This structure is erected at the construction stage of the facility and can have different configurations.
- Features of brick chimneys
- Types of bricks used for chimneys
- Pros and cons of brick construction
- Preparing for work
- Step-by-step description of work
- Features and nuances of masonry
A little about chimneys made of brick
The heating system and the outflow of combustion products in the house must be organized without fail.
For this purpose, in particular, a brick chimney is used, through which exhaust air is removed during the operation of heating devices. Typically, a discharge structure made of such material is used for single heating and heating devices.
The configuration of a brick chimney can be square or round.
But the second option will cost more due to the complexity of the masonry. The drainage structure is erected in parallel with the construction of the walls of the building. Today it is allowed to build a chimney with a side length of at least 140 mm, and if the configuration is round, then the diameter should be 140 mm. In earlier times, the permissible limit was 150 mm.
Let's watch the video, a little about installation work brick chimney:
The thickness of the walls is also regulated by certain standards.
It is not recommended to violate the integrity of the structure with holes for cables, etc. The brick chimney must be solid, and in addition to this inner surface the pipes should be as smooth as possible, without brick protrusions and cement deposits at the seams.
Type of bricks for chimneys and their features
 Gas heating determines the type of material used in the construction of the exhaust structure.
The difference between them lies in the temperature withstand.
So, in the first case we're talking about about 800 degrees, and in the second - about 1,000 degrees.
All other options, for example, lightweight, porous or hollow material, are prohibited. Unlike the walls of a house, brick chimneys of various types cannot be plastered from the inside.
The construction of different parts of the structure is marked by the use of cement mortar, different in composition.
For that part of the chimney that is located above the roof, a cement-sand working mixture is used.
Brick chimney - what you need to know
For masonry below the roof level, cement-lime or lime mortar should be used.
If we compare brick chimneys of different types with other structures, for example, with a sandwich chimney, then in this case a single-wall solution is used. “Sandwich” is a double-walled version, that is, it is assumed that the chimney consists of two pipes: a larger and a smaller diameter.
Advantages and disadvantages of brick construction
Brick chimneys of various types have gained a high degree of popularity due to a number of features that will be discussed below:
- Increased resistance to high temperatures, as already mentioned, fireclay brick can withstand a limit of up to 1,000 degrees, while combustion products from the stove and fireplace reach a limit of 750 degrees;
- The increased degree of thermal conductivity ensures high efficiency of heating equipment, since brick chimneys of various types do not contribute to the rapid outflow of heat;
- The cost of construction made from this material is low;
- Aesthetic value is no less important, especially in cases where a building is built in a certain style.
But in addition to the advantages, the brick square chimney also has a number of significant disadvantages:
- The angles of the structure contribute to the formation of vortex flows, which in turn represent a factor countering the outflow of combustion products;
- The walls of the outlet structure are not always perfectly smooth, which allows soot to settle on the rough surface, and this over time leads to a decrease in the working space, as a result of which traction deteriorates;
- Regular exposure to aggressive environments and temperature changes, which contribute to the formation of condensation, leads to the fact that chimneys for red brick stoves are gradually destroyed.
Taking into account all of the above, and also taking into account the features of other types of outlet structures, the user decides for himself which option is preferable.
But still, the most common one today is brick chimney masonry.
Preparing for work
The beginning of any type of construction work is drawing up a project. In order for the outlet structure to function effectively, it is necessary to take into account a number of rules:
- The dimensions of the pipe, namely its height and diameter, are determined by the characteristics of the heating equipment. But a multi-format brick chimney pipe cannot be less than 5 m.
The relationship between these parameters and traction force is obvious, since the larger the cross-section of the pipe with insufficiently powerful heating equipment, the weaker the air outflow will be. And if the diameter of the pipe is too small, then even if there is sufficient height, chimneys for red brick stoves will “smoke.”
- The construction of a drainage structure in rooms that are well heated is carried out without pipe insulation.
But in the area adjacent to the ceiling (up to 60 cm in length), a “sandwich” structure is installed.
- The construction of a brick chimney implies the need to provide free access for maintenance. To do this, the butt seams of the structure are located at different levels with ceiling covering. Otherwise, if difficulties arise in the operation of the system, it will be very problematic to get to the desired section of the pipe.
Watch the video, the beginning of the pipe:
It is important to have a good idea of what elements go into building a brick chimney.
So, the main structural components:
- The top pipe is led from the furnace itself;
- Fluffing is the name given to the laying of a brick chimney pipe, which is made with a widening of up to 300 mm, but the original internal diameter of the pipe is preserved;
- Riser - rises in the attic and goes all the way to the roof;
- Otter - laying a chimney pipe, which is carried out with a widening of up to 100 mm and is an obstacle to the penetration of precipitation into the room;
- The neck is built on the principle of a riser and is erected immediately after the otter;
- The head is the last section with a widening that crowns the pipe.
Description of work
We have already discussed above what kind of brick a multi-format chimney is made from.
Having understood the stages of work, you can begin laying:
- The riser pipe is being built. Masonry is carried out using the ligation method. At this stage, you should stop about 6 brick rows short of the ceiling.
- A do-it-yourself red brick chimney is then built with a widening called fluff.
Recommended dimensions of this element: 140X270 mm along the inner perimeter of the pipe, and values of 590X450 mm are selected on the outside. Construction is carried out using plates to achieve the desired result. The next row has parameters: 510X650 mm, while 60 mm thick plates are also used. The result is a row with dimensions of 570x710 mm. When the widening is ready, another row of the same dimensions is erected, taking into account the dressing.
- A multi-format brick chimney for a metal stove is built further along the dimensions of the top pipe, but higher than the fluff.
This part is called the riser. At this stage, you need to first prepare the outlet for the pipe in the roof.
- Chimneys for red brick stoves are built after the riser is removed beyond the roof no higher than 2 rows. Then the otter's laying begins. This is another expansion. The height of this section is nine rows, each of which is wider than the previous one by about half a brick. Brick plates are still installed inside the widening. As you can see, it is possible to build a multi-format brick chimney for a metal stove and other heating equipment yourself, but the main difficulty is precisely these widened areas.
- When thinking about how to build a red brick chimney with the highest quality possible, you should take into account the need to block the hole formed between the roof and the pipe.
This is done by increasing the width of the brick rows.
- When choosing which brick is suitable for a chimney, you need to take into account the aesthetic side of the issue. Since when building a neck, it is desirable that its quality and color fit harmoniously into the overall picture of the house.
The head is built according to the fluff principle.
Features of masonry
In addition to which brick to choose for the chimney, you should also pay attention to the thickness of the seams. The thinner they are, the more durable the resulting structure can be obtained. If it was not possible to give beautiful shape widening, the defects can be corrected using a concrete mixture.
Let's look detailed video, stages of work:
Lining a multi-format brick chimney is not a prerequisite.
But this measure allows you to obtain a completely sealed pipe, which will increase the reliability and efficiency of the structure. Lining involves installing a stainless steel pipe inside the brick walls of the chimney. This option is only possible on straight sections.
Thus, in addition to the main stages of work, there are a number of nuances that you also need to know about in advance so that the chimney design turns out without flaws and lasts as long as possible.


