How to make an earthen cellar with your own hands. It is almost impossible to imagine a private one with its local area without a cellar, since this is where the owner of the house stores all the harvest and preserves. Not every refrigerator can be a full-fledged replacement for a cellar - it is in this place that it is maintained comfortable temperature and the right level of humidity, which allow vegetables and fruits to remain juicy.
It's great if there is already a cellar or barn under the house. But what to do if you don’t have such a room? It doesn’t matter - you can easily build an earthen cellar at your dacha with your own hands. We will tell you about the construction features, as well as the installation rules, in this article.
Today there are many options for basement buildings: burial vaults, above ground structures, glaciers and storage sheds. These can be complex buildings from an architectural point of view, or the simplest ones, made from available materials. An earthen cellar is one of the simplest structures.
Please note that this design is not suitable for every site - construction is possible only under the following conditions:

Note, that trees cannot be planted near an earthen basement, since their powerful root system can damage the walls of the building.
It is generally accepted that it is easy to maintain a pleasant microclimate in an earthen cellar, which is excellent for storing potatoes, turnips, carrots and beets. Thanks to natural moisture, vegetables will not wrinkle or dry out, and even in spring last year’s harvest will be healthy and appetizing.
The process of creating an earthen cellar
Where to start
Although the design is considered simple, the question “how to make an earthen cellar?” still remains relevant. To do this, you don’t have to be a professional builder, since even beginners could cope with this task. You should start by creating a drawing/sketch, and it should be done taking into account the scale, and also indicate on it all the dimensions of the cellar and its elements.
Here it is important to remember the following important factors:
- Should be indicated inner dimensions the buildings.
- There should be a distance between the pit and the cellars - at least 50 cm more. In the future, this gap can be filled with clay, which must be mixed with straw - this will create a side lock that will prevent the walls from getting wet and liquid from seeping from the soil into the basement.
- Typically, they try to make the entrance to an earthen basement from the north side in order to minimize the loss of cooled air when opening the door in the summer.
- Be sure to provide for the provision of electricity to the basement, and in the construction plan, draw the electrical wiring and take care of the input and connection.
- For such a structure, ventilation is also required. It should also be developed during design.
- Thickness of embankment outside should also be calculated at the planning stage. But the thickness should be selected taking into account the climate in the region, precipitation levels and wind strength.
You should know that it is best to carry out such construction in the summer, when the groundwater level is at a minimum and nothing will interfere with the work.
Creating a Foundation
So, when everything has been verified and calculated, and the location has been chosen, you can begin the construction itself. You should start by digging a base - a hole/pit, which will act as a storage area for fruits and vegetables.
For a cellar, you can dig a hole without using special equipment, since it is usually made in a small size - approximately 200 * 200 * 300 cm. You can reduce the height, this is especially true when groundwater lie close to the surface (150 cm).
It is also important to remember that the hole itself needs to be made larger than the construction site by 50 cm. When digging by hand, you can maintain the density and relief and thanks to this the walls will not crumble. The shape, namely an inverted trapezoid, will also help protect the basement surfaces from collapse: the distance between the opposing walls should be less at the bottom than at the top.
Now let's think about how to make a floor in an earthen cellar. It can be different:

Advice! If in this case the earthen floors get wet, then make all the pallets and racks on a hill.
For example, you can assemble wooden gratings and put boxes and drawers on them.
Walls for an earthen cellar
Important!, foam concrete, cinder block and other porous materials are not suitable for cladding, since after some time water will seep through them, which can cause the walls to be destroyed.
Roof of an earthen cellar
Most of the heat loss occurs through the roof and ceiling of the cellar, and for this reason it is important to pay as much attention as possible to this element of the building. The ceiling needs to be strengthened so that it does not collapse. In bulk basements, wooden poles or woven vines are often used for this, but more can be used. resistant materials, for example, boards or stone.
But you will have to tinker with the roof, and first insulate it. The structure above the earthen basement should be made gable. Thereby rainwater will drain quickly and will not penetrate into the cellar. Insulation and waterproofing should be laid on the base itself under the roof. By the way, it is perfect for insulation, and you can insulate the roof with any material that is not afraid of moisture (stone wool, glass wool, etc.).
Moisture-resistant plywood should be placed on the roof, a metal sheet or OSB. The angles on the slopes should be 45 degrees. For the best protection of the basement from freezing, it is recommended to pour a layer of peat (about 25 cm) onto its roof, and then cover it with another insulation (roofing felt or film) and cover 12 cm of fertile soil.
Helpful advice! If you sow low-growing grass like lawn grass or moss into the ground, you can provide the roof with additional protection from cold and getting wet. In addition, greenery will make the roof spectacular and give it an unusual, sophisticated antique look.
Ventilation
As with all storage facilities, even an earthen cellar must be equipped. If this is not done, then there will be stale air inside, and it will be impossible to store vegetables there, since it is in such conditions that fungus and mold feel best. The rules for creating ventilation in an earthen cellar at the dacha are as follows:
- Use metal or plastic pipes, the diameter of which will be more than 10 cm. You can make ventilation ducts from wood.
- The supply pipe should be located slightly above the floor level, and exit from the outside no lower than 0.5 m above the ground.
- The hood should be located right under the ceiling, and the outer edge should be 150 cm from the ground level.
- Both pipes must be covered with a protective cap, which will prevent atmospheric moisture from entering inside.
Important the fact that in a small cellar you can install only one supply and exhaust pipe.
Finishing the basement from the inside
In the very earthen basement at the dacha, everything can be arranged the way its owner wants, since everyone has different needs: someone stores potatoes in it, while others want storage for wine. In this case, the storage is usually divided into two zones - on the right are bins, where there are wooden boxes/compartments for apples and other things, and on the left are racks for canning and wine. The shelves should be 0.5 m apart, but the size may vary depending on the height of the cans.
The material of the shelves can be different - metal, wood. In the first case, the racks should be protected from corrosion by regular painting, and in the second, the wood should be treated with antiseptic agents or coated with oil enamel in a timely manner.
An indispensable attribute is a ladder. It must be safe and durable, and it must also be processed in a timely manner so that there is no corrosion or rotting.
The final stage is supplying electricity. Do not forget about the microclimate and safety standards - in such rooms lamps should only be installed with low level tension!
Conclusion
An earthen cellar is the most The best way creating storage for harvest and conservation. This basement will not only last for many years, but will also not require repairs or additional maintenance, since all surfaces will be protected by a layer of earth.
In our country, suburban housing has, which are usually used for gardens and vegetable gardens. A spacious and dry cellar in the house is necessary to preserve the harvest. An office space for this purpose can be equipped in a garage or shed. It is also possible to build a separate structure. The final decision on the location of the cellar should be made based on the results of a study of the house and land.
For which specialists from design organizations are involved. In order to save money, you can do it yourself and conduct research on the soils and hydrogeological conditions of the area yourself. Good result gives a survey of neighbors and inspection of their cellars or basements.
When studying site conditions, you should pay attention to the following points:
- soil composition, depth of soil layers, tendency to accumulate moisture and heaving;
- groundwater level and the height of its rise during snow melting or intense precipitation;
- average depth of soil freezing.
This data will be necessary in the process of choosing the most optimal type of cellar for the given conditions and the method of its construction. Specialists use the obtained data in the process of design, calculation and estimate work. The best option for the homeowner, this is, without a doubt, a cellar under the house with an entrance from interior spaces. It is better to lay such a structure at the construction stage. The option of constructing a buried structure during the reconstruction process is also possible, but it is quite troublesome and time-consuming.
 Small cellar
 Basics of cellar design
A country house with a basement equipped for storing supplies is being built taking into account the requirements of SNiP 31-02-2001 and SNiP 2.08.01-89, as well as RSN 70-88. IN regulatory documents the geometric dimensions of residential and office premises have been determined. When equipping cellars Special attention focuses on the issue of waterproofing the walls and floors of buried storage facilities, as well as the necessary air exchange.
The main task that is solved during the construction of this room is to ensure a relative constant temperature at 8-12 °C with low air humidity.
During the design work it is necessary to provide . In the vast majority of cases, a vertical duct with an external exhaust pipe is sufficient. This method of air exchange does not require complex equipment or any operating costs.
 Cellar ventilation diagram
 A cellar in a private house is designed taking into account overall size building. When making calculations, the following points should be taken into account:
- It is recommended to locate the storage facility near the geometric center of the building at an equal distance from the outer contour of the foundation.
- The depth of the cellar is selected taking into account the groundwater level and the degree of seasonal fluctuations.
- In the process of design activities, such a factor as soil composition must be taken into account.
The central placement of the cellar minimizes the impact of temperature fluctuations due to the cooling of soil masses and their freezing during the onset of cold weather. It is good if the entrance to the service premises is directly from the house - this will significantly reduce heat loss. For the convenience of residents, it is recommended to install stationary stairs with a flight inclination of no more than 45 ° and a step width of at least 200-250 mm.
 Drawing and diagram of the construction of the simplest cellar under the house
 Cellars are classified, first of all, according to the degree of their deepening, which, in turn, depends on the level of groundwater fluctuations:
- Underground structures are built when water layers are lower than 3-3.5 m or under houses located on a hill.
- A semi-buried cellar is erected when the depth of soil water is no more than 0.8-1.2 m from the surface.
- Above-ground storage facilities are constructed in areas where there is no possibility or use of underground or semi-underground premises due to the high probability of flooding.
Read also
Finishing and waterproofing a bathroom in a wooden house
The choice of a specific type of cellar should be based on objective data and the results of long-term observations.
 Cellars can be made different designs
 How to make a cellar in your home with your own hands
Preparation for the construction of an underground storage facility under a residential building
At the stage of laying the foundation, it is necessary to mark the pit and dig it. Excavation are carried out in compliance with rules and safety measures. The total depth of the pit should be about 2.7-3 m, and the diameter should be at least 2.5 m. Round form for a buried structure is optimal and ensures its maximum strength. On the other hand, rounding a wall requires quite high qualifications from the mason.
Another option is to build monolithic walls made of concrete reinforced with steel or composite rods. This technology can ensure maximum resistance of underground structures to external mechanical loads. To make a cellar in a house correctly, you should evaluate your financial capabilities and practical skills in performing construction operations.

The choice of a specific technology for the construction of an underground structure will allow an assessment of the required quantity building materials. For construction load-bearing walls we need red brick. The amount of material is calculated based on the minimum thickness of the wall, as they say among professional masons, one and a half bricks. When choosing a brick, special attention should be paid to its quality.
In this video you can see how to build cellar walls with your own hands from bricks
For underground structures, the use of bricks of heterogeneous composition, having deep cracks or inclusions is unacceptable. Construction material must be stored in proper conditions. Prolonged exposure of bricks to high humidity conditions can lead to a deterioration in its qualities and properties. When purchasing materials, you should ask the seller for certificates of conformity.
The walls of a buried storage facility must be built on reliable foundation. Typically, the role of the base is performed by a reinforced reinforced concrete belt at the bottom of the structure. It is quite possible to build a cellar in a house with your own hands, especially if you strictly follow the construction technology.

Waterproofing floors and walls
Buried structures require high-quality protection from moisture penetration through building construction. The most likely ways for water to enter a cellar or basement are:
- the presence of through gaps;
- violations of technology during bricklaying;
- penetration of moisture through capillaries in an array of building materials;
- the formation of condensation on walls or other surfaces due to temperature changes or insufficient air exchange.
Typically, waterproofing of walls, floors and ceilings is done using roofing felt. This roll material It is recommended to lay in two layers. The overlap of the sheets should be at least 10-12 cm, and each subsequent row should be laid perpendicular to the previous one. Under the waterproofing it is necessary to pour gravel-sand cushion thickness of at least 100-150 mm.
 Scheme of the cellar waterproofing device
 It is possible to correctly build a cellar under a house with high-quality waterproofing of the walls during the process of laying the foundation.
In this case, the work will not be interfered with by other structures and elements of the building. During the construction of walls, bitumen mastic is applied to their outer surface, onto which, in turn, roofing material is glued. When performing this operation, the sheets are arranged vertically with an overlap of 8-10 cm.

The floors in the cellar are poured with mandatory reinforcement with a two-layer steel coarse mesh. The screed is filled with a cement-sand mixture with the addition of a fine fraction of crushed stone as a filler. The mixture is prepared on site by hand or using a concrete mixer. It is possible to order concrete from a specialized enterprise with delivery to the work site by vehicle with the appropriate equipment.
 Scheme correct filling cellar floor
 Overlapping device
When ready load-bearing structures walls and floor, you can begin to build the ceiling above the cellar. Taking into account the fact that the structure is of a buried type, the best material There will be a reinforced concrete slab for the floor. The calculation of the required number is carried out taking into account the length and width of the structure. When laying floor slabs, heavy construction equipment is used - a crane on a vehicle chassis.
Read also
Construction of a garage in a private house
 Cellar floor plan
 Another method allows you to do without lifting mechanisms. Building a cellar in a house using this technology involves casting a floor slab directly on site. Wooden formwork for these purposes it is made from boards with a thickness of at least 40-50 mm. It is strengthened by horizontal beams and vertical posts that rest on the floor.

Construction of stairs and entrance equipment
A visit to the cellar located under the house can be organized in two ways: through the hatch in ceiling cellar or normal stairs. Calculation of a straight flight with a step length of 20 cm and a height of 250-300 mm shows that its horizontal length with a slope of 45 ° will be equal to the height. One of the walls is equipped doorway, in front of which a rectangular platform is arranged.
 Simple wooden staircase
 Along outer surface this wall is being installed flight of stairs, resting on one side on it, and the other on an additional pier. The steps of the stairs can be cast from concrete and reinforced with a mesh of rolled steel or made from metal profile. The use of wood is undesirable due to the high probability of damage by fungi or other pests.
 Complex drawing concrete stairs leading to the cellar
 A door with a door leaf is installed in the wall opening, opening outward due to the relatively small large sizes cellar Doors must have seals to prevent heat loss and temperature fluctuations. The process of making a staircase and installing it is quite complex.

Ventilation in the basement or cellar
To organize high-quality air exchange, it is necessary to install two vertical pipes. One of them serves as an exhaust hood, and the other is necessary for the flow of fresh air. Air is taken from under the ceiling and supplied closer to the floor. In order to create maximum draft, the duct should be installed above the roof ridge. Natural ventilation of the cellar is made with minimal cost and investment.

The air ducts in the upper part are covered with metal mushrooms to prevent the ingress of precipitation. Steel or asbestos-cement pipes can be used as air ducts internal diameter over 150 mm. The deflectors are made of galvanized steel sheet, 0.55 mm thick, and are fixed to the end of the pipe using a clamp and support posts.
The inside of the cellar must be plastered and treated with a special antibacterial primer. Instead, ordinary slaked lime can be used, which provides the necessary protection against the formation of colonies of pathogenic fungi on the walls. Experts do not recommend covering basement walls with clapboard or wood-based composite materials. In the gap between the wall and the facing panels, air stagnates with the formation of condensation.
Cellars and underground spaces are best suited for storing crops. But not every house can have an underground space, and a cellar can be made even on a plot with high level groundwater. It is important to know where and how.
Choosing a place for a cellar
The optimal place for a cellar is on a natural or man-made hill. If there are no differences in the area, you need to find the “dryest” area with low groundwater. You can tell by the vegetation - where it is the shortest, the water is far away.
Ideal if you have a geological study of the site (ordered when planning a house). The location of aquifers is indicated there with sufficient accuracy. If there is no such study, the approximate groundwater level can be determined by the depth at which the water surface is located in the wells.

The most the best place where you can make a cellar - on a natural hill
Another option is to drill a well about 2.5 meters deep in the proposed location. If there is no water in it, you can make a cellar buried 2 meters or a little more. It is necessary to drill either in the spring, after the snow melts, or in the fall after heavy rains. At this time, the groundwater level is at its highest and you won’t have to worry about surprises in the form of flooding.
Based on the research results, the type of cellar is determined:
- If the groundwater level is below 1.5 meters from the surface, you can make a deep cellar.
- If the water is at a level of 80 cm, you can make it semi-buried.
- Above ground cellar- It's more like a vegetable storehouse. It requires a large amount of work and is rarely done in private households.
There is another type of cellar - an underground floor, which is installed under the house if the house has a high enough base (1.5 meters or higher). Then they dig a small pit about 2*2 meters in size, going no more than a meter deep. At the bottom, extending onto the walls of the pit, waterproofing is laid, gravel (10-15 cm) is poured, and a plank floor is laid. If the water is already close, it is better to fill it concrete slab using standard technology.

The walls are laid with bricks or a frame is made of impregnated timber, and the outside is well insulated. The roof of the cellar under the house is made below floor level and is also insulated. A slightly larger lid is installed in the floor. At this point, the construction of the underground floor is completed. This type of cellar makes sense only in the house permanent residence— it will always have a positive temperature. In houses seasonal residence without heating in winter it will freeze, so it makes no sense to cost such a cellar at the dacha.
Materials
The choice of material for the cellar also depends on the groundwater level. In a dry place, you can build from whatever you want - any material suitable for these purposes: impregnated wood, brick, concrete, building blocks.

If the water is close to the surface, it is necessary that the material is not afraid of moisture, has low hygroscopicity (preferably close to zero) or has the ability to significantly reduce it. But, in general, only concrete and metal meet these requirements. Concrete is preferable - it is definitely not afraid of getting wet, it does not absorb water very much, although it can conduct it through capillaries. Concrete is good for what it is various ways, making it practically impenetrable to water in any form:
- Additives are additives that give concrete certain properties. There are also additives that make it practically non-conductive and non-absorbent of water.
- Hygroscopicity can be reduced by vibrating the concrete during laying (there are special vibrators for concrete). Due to the compaction of the structure, its density becomes significantly higher, and its hygroscopicity decreases.
- Treatment with impregnations deep penetration. For concrete, cement-based compositions containing polymers are used. Polymers block capillaries through which water leaks. Double treatment allows you to reduce the amount of moisture seeping through the concrete by 6-8 times.
- Rubber paint. It is used for swimming pools, but in extreme cases it can help prevent moisture from entering the cellar.
All of these products in combination, or one or two to choose from, will help keep the cellar dry even in areas with high levels. groundwater.
You can also build a cellar on high groundwater from metal. A sealed box of the required size is prepared, and spacers are welded to the bottom and walls. This metal box is treated on the outside with an anti-corrosion compound (several times) and buried in the ground. If the seams are made well, water will not leak out, but there is another problem - if there is a large amount of water, this box can be pushed to the surface. To prevent this from happening, spacers are welded, but they only help up to a certain pressure created by the water. It may well happen that such a cellar will “pop up”.

A metal cellar will not leak, but it may “float”
When building a cellar with a high groundwater level, it is still acceptable ceramic brick. But over time, it crumbles from water, although it is possible to significantly reduce its hygroscopicity - treat it several times with the same deep penetration impregnation. And yet, brick in high water is only a last resort.
How to make a concrete cellar with movable formwork
The standard technology for constructing a concrete cellar has been described many times. It is not very good, because a large amount of material is needed to install the formwork, and digging a pit is not fun - it must be significantly larger than the dimensions of the cellar in order to be able to install this formwork. There is a more rational technology - with a concrete knife and gradual filling of the walls. This tactic is used in the construction of wells, but can be used to construct a cellar.

Filling the knife
It all starts with filling the knife. His profile is shown in the figure. In the picture it is drawn round - under a well, but it is better to make the cellar rectangular. This concrete knife is poured right on the spot. So, we dig a small pit around the perimeter of the future cellar. The pit should be triangular in cross-section, with a bevel directed inside the perimeter (as in the photo above).

We knit a frame from reinforcement of the same shape. In this case it was used fiberglass reinforcement— it’s cheaper and easier to deliver. Steel will be used for the ceiling and floor.

When making the frame, we leave reinforcement outlets 15-20 cm long, directed upward - the next reinforcement belt will be tied to them. The frame is installed in a finished foundation pit covered with film. This is necessary so that the walls of the knife are smooth and penetrate the ground well.

We make concrete in a concrete mixer - the small volumes required for one pour do not allow ordering at the factory. We make concrete grade M 250 (1 part of M 500 cement requires 1.9 parts of sand and 3.1 parts of crushed stone, water - 0.75). To increase strength, polypropylene fiber is added, and Penetron-Admix (an additive for greater strength) is dissolved in water.

The concrete is made low-flow, as it will be processed with a vibrator. The sides were filled in stages, immediately treating with a submersible vibrator.

Making walls
Next, the concrete was covered with film and periodically moistened. While it was setting, the formwork was being assembled. A 40*150*6000 mm edged board was passed through with a plane, and the formwork panels made of four boards were knocked down. They turned out to be about 80 cm in height. When assembling, the boards were fitted tightly so that the solution leaked out less.

We waited until the concrete reached its design strength (more than a month had passed since the pouring). To make a cellar using this technology, the knife must be durable. The frame of the next row was tied to the previously left reinforcement outlets. At the same time, we also leave releases of about 15-20 cm for “tying” the next belt.

To increase the rigidity of the frame, the corners are reinforced with a metal rod bent in the shape of the letter “L” (side length 40 cm).

We install the formwork panels. To prevent them from falling apart when pouring concrete, they are fastened with corners inside and outside. There are 4 corners installed inside (with screws), and 2 on the outside. The distance between the two panels is fixed using pins (they are visible in the photo below).

To ensure that the walls of the cellar are smooth and water does not escape from the concrete, inner surface The formwork was covered with polyethylene. The surface of the first standing concrete must be cleaned of dust that has accumulated. We do this using a sink high pressure(available on the farm). Next, we install the formwork, pour concrete, and process it with a vibrator.

Cover the poured concrete with polyethylene and water it periodically. After two or three days you can remove the formwork. After a few more days, you can begin to lower the walls. To do this, we remove soil from inside the perimeter. We dig evenly so that the walls sit without distortions.

During the first time, the walls sank by about 60 cm. This is the height of the wall filling (about 20 cm of the formwork overlaps the previous filling.

Next, using the “knurled” technology - we tie the reinforcement, strengthen the corners, and install the formwork. Only this time, to make it more convenient to install the shields, pieces of boards were stuffed inside, about 15 cm below the edge. The internal shield rests on them.

Then the outer panels are installed. They “hang” on the lower pins threaded through both shields. The upper studs fix the required wall width. The shields are tightened in the corners with metal corners.

The pins on which the shield “hangs”
Next - filling, vibrating, covering, waiting. After a week or a week and a half, you can continue deepening. We do this until the walls are at the design height. In this case, 4 fills of 60 cm each were required. The total height was 2.4 m. They buried it so that the upper cut was slightly below ground level.

Those bottles that are placed on the reinforcement are necessary so that the film covering the concrete does not tear. It turned out to be a very useful idea.
It was spread on the earthen floor. It will compensate for uneven loads. It also serves as a “mat - then there’s a lot of work on your knees.
Stopper

Knitted frame for the “stopper” of the knife
To install it, we drill holes in the knife into which we drive reinforcing bars. We tie a connected frame to them, leaving reinforcement outlets for connection with the floor reinforcement.

We put up the formwork and fill the “stopper” with concrete.

The former knife turned into an “anchor”
Concrete cellar floor
After the concrete has set, we dismantle the formwork, it’s time to make the floor. First the base is made. Sand was poured onto the geotextile (about 10 cm), leveled with a shovel, then with a rake, then with a roller. Two buckets of cement were scattered over the entire surface, mixed with a rake with the top layer of sand, and compacted again with a roller. They poured water with dissolved Penetron-Admix additive from a watering can and compacted it with a hand tamper. After compaction, the sand is not crushed underfoot.

This operation was repeated two more times. Upper layer turns out flush with the edge of the stopper. Let the preparation under the stove dry. Once dry, the crust is very durable.
The base was washed and dried. We laid the finished stack of 6 mm wire in 10 mm increments. The mesh was connected to the releases of the reinforcement from the knife. It was placed on pieces of boards, which were removed as they were poured.

Beacons for pouring concrete were made from two strings stretched from corner to corner - the total height of the slab is 10 cm.

Covering and ventilation
We disassemble one formwork panel, nail the docks, retreating 40 mm from the upper edge of the wall - this is exactly the thickness of the boards. In one corner we install a meter pipe, fasten it with one clamp, in the opposite corner we install a three-meter pipe with three clamps.


Three formwork panels fit perfectly onto the attached boards. We disassemble the rest and cut them so that there remains a hatch for entry. The gaps between the boards are sealed with polyurethane foam; after polymerization, the excess is cut off flush with the boards.

Below, from the cellar, spacers are installed. At the top they are fixed with corners, at the bottom, scraps are laid under the boards so as not to push through the not fully matured concrete.


The top of the boards and the wall were washed with a high pressure washer and dried. Covered with a layer of roofing felt, which was attached to the boards using brackets made of construction stapler. The entrance to the cellar is chosen to be 1*1 meter in size, its edges are limited by formwork boards.

Next, the formwork is installed around the perimeter. We fasten the boards and tighten them at the corners with long nails. Then we wrap it in roofing felt and install spacers that rest on the driven stakes. You need powerful spacers - the weight will put a lot of pressure on it.

We also make three reinforcing beams - two lower rods of 16 mm, two upper ones of 14 mm, they are connected to each other with an 8 mm rod. The two beams were tied together and laid ready in place, tying them to the reinforcement outlets from the walls. The third was assembled on site - its rods pass through ready-made beams.

Then we knit a mesh from 12 mm reinforcement in increments of 20 cm. We tie the rods to the outlets from the wall. Some difficulties arose while getting around ventilation pipes. I had to bend the reinforcement. The rods that ended near the entrance were bent 15-20 cm upward. The reinforcement frame for the entrance will then be tied to them.

In order to conduct electricity into the cellar, two holes were drilled, and the wires in the corrugated pipe were routed through them. Next, everything was filled with concrete.

A few days later, when it had set, formwork was installed above the entrance. First the inner box, then the frame made of reinforcement, then the outer one. It was also filled with concrete.

After the concrete reached its design strength (28 days from pouring), the wall half a meter down and the floor slab were sheathed with insulation - EPS (extruded polystyrene foam). He was put on bitumen mastic- at the same time waterproofing.

The supports were left inside for two months. Then almost everything was removed, leaving only a couple, just in case. The first harvest appeared in the cellar.

Now you know how to make a concrete cellar with step-by-step filling of the walls. It took a lot of time, but the expenses turned out to be extended over time.
Cellar at the dacha made of brick (under)
Our dacha plot is 100% suitable for the construction of a brick cellar - groundwater is below 3 meters, the soil is dense, non-heaving, so we dug a pit 2.5 meters deep. The dimensions of the cellar are 2.2 * 3.5 m, the pit is, accordingly, a little larger. The entrance to the cellar will be from inspection hole, and a utility block (metal container) will be installed above the entire “complex”. To save money, the brick was used.
The floor was made as the old people advised: crushed stone and broken brick were poured onto the bottom in layers, all of this was covered with clay and compacted. They leveled the floor by pouring sand, which was also compacted, after wetting it. Next they began to lay the walls in half a brick. The soil is not heaving, so there is no need to worry about the walls being squeezed out.

The gap remaining between the brick and the wall of the pit is filled with clay, which was also compacted well - protection from the high water, which will look for where it will seep.
The walls were driven out just above ground level, and they were laid on edged board. They laid it tightly - this will be the formwork for the cellar floor slab. The boards were supported from below with spacers, and a film was laid on top to prevent concrete from leaking into the existing cracks. We put up board sides, limiting the future slab. The boards in the corners were secured with corner ties.
Two plastic pipes are inserted into the future ceiling, in opposite corners of the cellar. This - ventilation system. The slab will be insulated - 5 cm of EPS (extruded polystyrene foam) will be laid.

A mesh with a pitch of 20 cm is connected on top of the insulation from reinforcement with a diameter of 10 mm. The mesh rests on pieces of brick. It is raised above the EPS by 4 cm, the total thickness of the slab is about 10 cm.
The concrete was ordered from the factory - there is an entrance to the dacha. When pouring, they bayoneted it well.


While the concrete is “ripening”, the walls of the inspection pit and steps into it are laid out.

After removing the formwork, it will be possible to place a metal utility block on top.
It is hard to imagine modern house or a personal plot without a cellar. This structure allows you to preserve the harvest and preserve it until spring. A typical cellar design involves its exterior design. This free-standing building creates a unique atmosphere of a rural house and adds coziness to the site.
The following two concepts are distinguished:
- cellar;
- basement.
The basement is located under the floor in the house and can serve as either a storage room or any other room. Near the cellar specific purpose– be a storage facility for agricultural products and conservation.
To ensure reliable food safety, the cellar must meet the following requirements:
- Maintain optimal temperature regime in any season.
- Create a microclimate, preventing drying out and waterlogging of products.
- Constant supply of fresh air to remove gas odors.
- Reliability and spaciousness of racks and shelves.
- Prevent rodents and insects from entering the premises.
- Reliable waterproofing system.
- Free access to provisions, easy accessibility.
The following requirements also apply to materials and design:
- structural strength;
- durability of materials;
- weather resistance;
- good waterproofing;
- reliable supply ventilation system.

Types of cellars
The method can be divided into three types:
- recessed;
- semi-recessed;
- ground.
Based on their location relative to the house:
- underground;
- wall;
- separate cellar.
A free-standing structure is usually built into a natural hill. If the personal plot is located on a plain, the cellar is partially or completely dug into the ground, artificially creating a mound above it.


The building must be equipped with a vestibule. This requirement is due to the fact that cold air may damage the safety of the provisions. Protection from drafts is also necessary. In the cellar, supplies are arranged in accordance with storage temperature, according to the principle: the lower the shelf, the colder.
Important! A good location for a home cellar would be shaded areas. Entrance door It is recommended to face the north or northeast side. This technique will help avoid overheating of the room from scorching sun in summer.
For a standard family of four, a storage unit measuring 7 square meters. The cellar can be larger. It all depends on the needs and financial opportunities owner.


Deep cellar
Buried structures include structures that are completely below the surface of the earth.


If a buried structure is built under the floor of a house, it is a basement. A typical project includes:
- waterproofed walls and floor;
- shelves and racks;
- ventilation vents;
- stairs;
The interfloor ceiling of the basement must have increased strength, therefore, most often, it is concreted. The entrance to the storage can be arranged both from inside the house and from outside. In the second case, a recessed platform with a staircase is additionally equipped. The walls are made of brick, cinder block or wood. But monolithic poured structures are quite acceptable. This arrangement method is the most common.

A free-standing deep cellar is built as a separate building. The design scheme is quite simple. A pit is being prepared on the site, about two meters deep. Then the floor is drained and the walls covered with waterproofing are installed. The ceiling is made of fairly light materials: beams covered with a mixture of clay and straw. The thickness of such a shelter is 40-50 cm. The floor is protected by a layer of clay, up to 15 cm high. It is necessary to equip the perimeter of the cellar drainage system 50 cm thick. The project of a cellar with a cellar is the most complex design. This structure consists of underground and above-ground parts. The recessed part is used directly as storage for products. Aboveground part(house) can be used to store household equipment. A cellar equipped in this way very well protects the basement from precipitation and temperature changes.

Semi-buried cellar
The semi-buried cellar design can be built on both flat and hilly terrain. The basement part is deepened into the ground by 75-150 cm. The walls are laid from brick, cinder block or concrete. The ceiling is covered with beams and filled with clay coating, on top of which it is laid waterproofing layer from roofing felt. The surface of the semi-buried structure is covered with earth. This allows you to maintain approximately the same temperature in the cellar both in winter and summer.
Above ground cellar
An above-ground food storage structure is erected in cases of high groundwater. The entire structure must be above the ground surface, or with a slight depression of up to 50 cm.

The most important task when constructing this type of structure is to achieve the effect of a thermos. Most often it is poured on top of the cellar earthen layer up to 1 meter high. The height of a cellar built above the ground is usually 2 meters.
Important! The facade of the above-ground cellar is carefully insulated so that the temperature inside the storage always remains the same.
An interesting type of ground basement is a glacier. A special feature of its construction is that it is 40-50 cm deep into the ground for storing ice. Hence the name. It is very important to arrange high-quality ventilation.


Wine cellar
A wine cellar is usually built in basement Houses. The area of such storage can be 7-10 square meters. A very important condition is compliance with temperature and humidity conditions. The temperature in the wine cellar should be between 12-16 degrees. Humidity should be maintained at 70%.

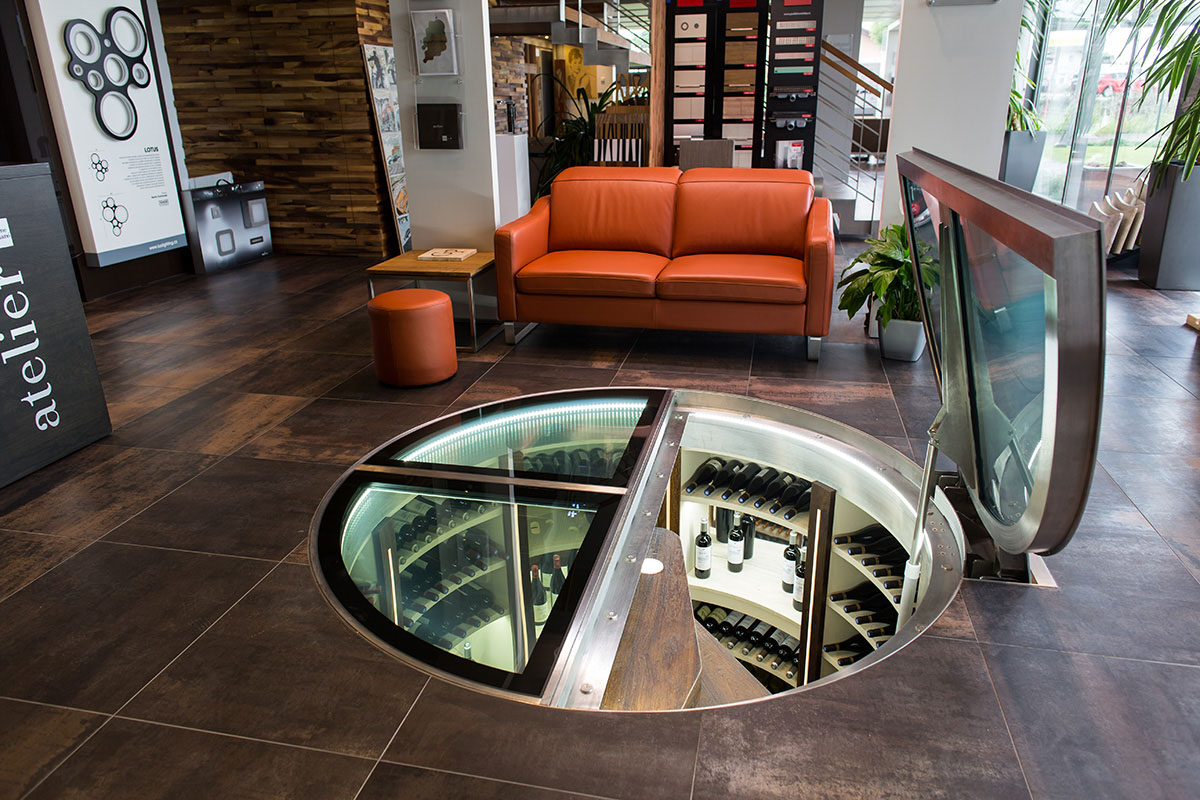
Such a cellar should be located away from workshops and garages to avoid exposure to vibration. An equally important condition is the cladding. All materials must be safe and environmentally friendly, and must not emit odors. Walls must be thoroughly coated thermal insulation materials. The space is equipped with shelves with cutouts for bottles or kegs. The best material Brick is used to build walls, and sand is used to fill the floor.


Construction of a cellar
Before proceeding directly to the construction of the storage facility, it is necessary to select a location for the construction of the cellar. The location for the construction of a food storage may well be an area with a hill where atmospheric moisture cannot enter and accumulate. If groundwater is high, it is necessary to build an above-ground cellar.

Advice!It is recommended to equip a semi-buried building with a groundwater height of 1.5 m.

The construction of the cellar is carried out in stages:
- Preparing the pit.
- Laying a drainage cushion made of gravel, expanded clay, crushed stone, sand.
- Laying a waterproofing layer.
- Reinforcement and concreting of the floor.
- Preparation of formwork for the construction of walls.
- Installation of fittings.
- Concreting walls.
- Vibrator compaction.
- External waterproofing.
- Internal waterproofing.
- Plastering ceilings and walls, cladding.
- Arrangement of space with racks and shelves.
- Ventilation equipment.
- Ceiling arrangement.
Basic principles when laying a cellar
Laying the foundation
- The size of the pit around the perimeter must be increased by 30-40 cm from the actual dimensions.
- The minimum foundation depth is 30cm.
- The perimeter is strengthened with formwork to prevent the soil from collapsing.
- Posts 10 cm high are installed in the corners.
After installing the foundation, they proceed to waterproofing and pouring the floor with concrete. Waterproofing is achieved using a layer of crushed stone, gravel or construction waste. For greater effect, dry mixtures are poured with heated bitumen. Sheets of roofing material are laid on top. On top of the waterproofing layer, the basement cellar floor is covered with sand.


Walling
If the site has wet soil, the walls of the cellar are mounted from reinforced concrete grade 350. The most suitable replacement for concrete is brickwork or stone. But the use of these building materials is recommended on dry soils. Basement wall installation steps:
- Installation of formwork.
- Installation of reinforcing mesh.
- Layer-by-layer pouring of concrete with careful compaction.
- The top of the reinforcement sheet is attached to the ceiling.
- After thorough and lengthy drying, the formwork can be disassembled. Dismantling should be done after 4 weeks.


Arrangement of the vestibule
In front of the storage room there is a vestibule with two doors. The air that accumulates in the vestibule acts as thermal insulation. Thanks to it, the necessary microclimate is created in the storage facility. When creating a cellar layout, you need to carefully consider the number of steps in the staircase. The width of each tread is at least 200mm. A well-designed space will provide access and accessibility to any shelf and storage rack.

Ceiling
The basement ceiling is made using permanent formwork. Concrete grade 250 is used as the main material. Stages of installation of the ceiling:
- From wooden beams a transverse frame is performed.
- A reinforcing mesh with 20cm cells is laid on top of the frame.
- The wall fittings are connected to the ceiling fittings using tying wire.
- The formwork is being constructed.
- Pouring concrete occurs in several stages. Each layer must be thoroughly compacted and allowed to dry.
Complete hardening of the ceiling fill occurs after 3 weeks.
Waterproofing
The basement requires careful waterproofing. The installation of a moisture-protective layer in the cellar is carried out using mastic and bitumen liquid mixtures.


Sheets of roofing material are fused over the walls, which are carefully connected to floor covering, additionally coating the seams with mastic. External walls and ceilings are protected with polystyrene foam boards. The ceiling is insulated with a double layer of roofing felt. A layer of crushed stone and sand is poured on top. Then, geotextiles are laid. The final covering is a land rampart. Soil is a natural thermal insulator. To strengthen the earthen embankment it is necessary to plant ground cover plants with a developed root system.
In the garage
Cellar ventilation
Without constant air exchange, products will not be stored indoors. Therefore very important stage In the arrangement of the cellar is the installation of a ventilation system. Principle of ventilation arrangement:
- The exhaust pipe is fixed. It must be secured in the most high place under the ceiling.
- The supply pipe must be placed slightly higher than the floor covering.
- The ends of the pipes are brought out.
- The resulting vents in the walls between the pipes must be insulated with polyurethane foam.
- Moisture canopies and a rodent and insect net are hung on the outer ends of the pipes.
Ventilation vents can be made of concrete. Using formwork, mount the pipe and insulate it with mastic and roofing felt.

Facade decoration
The facade of the external cellar must meet increased requirements for the durability of the material. In addition, the door must fit tightly to prevent drafts.


A cozy cellar mound fits perfectly into the landscape of any personal plot. Laying out to the basement beautiful path and clad the façade of the storage facility with natural natural stone, an ordinary cellar will turn into the most beautiful part of the site.
We will send the material to you by e-mail
In the territory suburban area It wouldn’t hurt to build a cool room for storing pickles, fruits, vegetables and other food products. In this regard, it is worth considering how to make a cellar in the country with your own hands. By completing all the steps step by step, you can create reliable and durable storage.
Even small design allows you to store many products
The cellar is usually located in separate place on the street or under residential building. Its main purpose is to store food supplies. Due to the device, shelves and other devices, it is possible to increase the functionality of the room.
Classification of cellars by depth level:
- underground structures are installed in dry places;
- semi-underground structures are erected in damp places with average groundwater levels;
- above-ground buildings are made when groundwater is too close.

Note! In an area with too high humidity, a special cushion made of sand and gravel mixture. It will separate the structure from groundwater.
The construction of a cellar does not require obtaining permission from any regulatory authorities, however, the developer must in any case decide on its location, taking into account some nuances. You should choose a site that is as dry as possible, away from trees.

DIY cellar at the dacha step by step: basic work
After choosing a suitable location for the country storage, you can begin basic work. The listed stages are relevant for underground and semi-buried structures. As for above-ground structures, they have a slightly different construction technology.

Pit preparation
When digging a pit, the following points must be taken into account without fail:
- the depth of the pit is determined by the design of the building;
- the area of the dug pit should be somewhat larger, since a certain part of the space will be occupied by walls and floor;
- You can avoid shedding of earth from the side walls by installing formwork;
- the removed soil should be left for embankment and design of the structure.

Important! Setting up a cellar with your own hands under the house deserves special attention. In this case, the need for laying floors is completely eliminated, since this function is successfully performed by the floors of the first floor.
Base structure in the form of a floor
Most suitable option is the fill of the bottom plane concrete mortar. To do this, all debris is removed from the pit. The surface is leveled and compacted, after which it is covered with a 15-20 cm layer of sand. waterproofing membrane and reinforcing mesh, then concrete is poured.

Thus, when asking the question of which floor in the cellar is best to install, first of all you should pay attention to the concrete base.
Construction of the walls of the structure
The side parts of the structure must withstand soil pressure. Mainly used in their construction are:
- concrete mixture;
- building blocks;
- brick;
- wood.

Laying floors
The first version of the floors - wooden beams. Load-bearing elements they are laid with edges on opposite walls, after which they are sheathed with boards. A waterproofing membrane is spread on top. The second option is to use ready-made reinforced concrete slabs. They are durable, which is why they are popular. They are laid on the end parts of the walls, after which they are covered with earth.

Creating high-quality ventilation
Constant air exchange will make it possible to avoid the appearance of mold and rot in the room, and will also allow you to maintain optimal temperature conditions. For ventilation, two pipes must be installed. One of them will be a supply, and the other will be an exhaust.

For ventilation, plastic pipes of medium diameter are suitable. However, their sizes depend on the volume of the room. The supply elements are usually located on one side, 20 cm from the floor, and the exhaust elements on the other, 30-40 cm from the ceiling.

Problem with high groundwater levels: do-it-yourself cellar
A certain category of developers may have the following dilemma: if groundwater is close, how to make a cellar? It’s worth mentioning right away that this is quite possible. To do this, first of all, it is necessary to make a ring drainage of the site where construction is planned.

Perforated elements are located below the depth of the soil along the perimeter of the pit. Their slope should be approximately 2 cm per linear meter towards the well or waste pit. Pipes should be covered with crushed stone and wrapped with geotextile.

If the floor and walls are made of reinforced concrete, then high-quality waterproofing should be done from the inside and outside.

A large plastic container can be used as a sealed room. It is completely buried in the ground. By building a plastic cellar at your dacha with your own hands step by step, you can avoid mistakes associated with waterproofing the structure.

Related article:
Work after building a cellar with your own hands: photos + additional recommendations
Ensuring unhindered ascent and descent is carried out using. Its width should not be less than 40 cm, otherwise moving can be very difficult. It is allowed to make a slope of up to 75 degrees. The material can be wood, metal or concrete.

To store supplies, it is necessary to build special shelves or racks. Typically, 100x100 timber is used for their manufacture. The height of the structure depends on the height of the room itself.


