Rotted manure has always been considered the best organic fertilizer. But it is not always and not always easy to find, so many summer residents prepare their own manure substitute - compost. Almost any organic waste is suitable for it, and after a while you get practically free fertilizer.
How to make compost yourself
Compost contains the same nutrients, as manure, and in most cases these two fertilizers are interchangeable. It is only important to prepare the compost correctly.
What is compost
Compost is a natural fertilizer obtained from various wastes of plant and animal origin through their decomposition. It is formed during the biodegradation of organic matter under the influence of microorganisms. Composting requires the presence of air, so they try to place the waste not in a pit, but in some kind of structure on the surface of the soil. In addition to air, biodegradation of organic matter requires high humidity and the ability to maintain internal heat.
During the season, the pile is constantly growing: the lower layers may already be almost ready, and fresh raw materials are still being placed on top
Properly prepared compost is a highly effective fertilizer that is free of helminths, weed seeds and pathogenic microflora. Composts have an acidity favorable for most crops (pH 6.7–8.4), contain about 3% nitrogen (half of it in ammonium form), up to 3% phosphorus and up to 2% potassium.
The list of microelements contained in compost is wide: zinc, copper, boron, molybdenum, etc.
Compost not only fertilizes the soil, but also improves its structure: it becomes loose and moisture-absorbing. Compost is widely used for mulching: it conserves moisture and suppresses the growth of weeds. Preparing compost allows you to save money on purchasing fertilizers and makes it possible to get rid of a large amount of garbage and waste.
How to prepare compost
You can start composting at any time except winter. As a rule, the first layers begin to form already at the beginning of summer, when the weeds are pulled out, and by autumn the compost heap is growing rapidly. For accelerated decomposition, it would be better for the process to take place during the warm season. But life makes its own adjustments; the bulk of waste at the dacha occurs in the second half of summer and autumn.
Compost container
If possible, prepare a special box, but you can do without it by simply fencing it off. compost heap boards made of boards or slate sheets. To build the box, you can use any boards, just not painted or rotten. It can be any size (at least 1.5 x 1.5 m), but the height is convenient in the range of 1.0–1.2 m: with a higher stack, the compost will be more difficult to care for.
The options for arranging a compost bin are very diverse; it all depends on the owner’s imagination and the availability of materials.
The box is built on level ground or on a small hill so that the compost is not washed away by rainwater. When constructing it, there is no need to adjust the boards: it is necessary to ensure sufficient oxygen access. Often the front wall is made removable to make it easier to add material and take ready-made compost. Many people place oilcloth or old linoleum, but this is not required.
What you can and cannot put in compost
A variety of things are put into the compost. natural materials; the wider their list, the more microelements the fertilizer will contain. The most common “participants”:

You also need to know what does not belong in the compost heap. You should not put in it:
- large bones;
- meat and fish waste;
- perennial weeds with living roots;
- sick and pest-infested plants;
- waste containing toxic substances;
- products made of metal, rubber, plastic, glass, etc.
Fresh manure can only be added to compost if it is expected to cook for at least a year.
Compost preparation technology
As waste is generated, it is crushed and placed in layers into a compost heap, periodically interlayered with layers of earth. The soil layer is only 3–4 cm; it is poured when 15–25 cm of organic matter has accumulated. If the weather is dry, the pile must be watered to keep it constantly moist.
If the pile is small, it should be shoveled from time to time to increase air access. In winter, no one will do this at their summer cottage, but in the spring, with the beginning of the season, it is highly advisable to turn over the contents. If there is peat, it is periodically added to the pile. If possible, it is useful to water the pile with slurry.
Compost can be ready for use in 6-8 months. Ready fertilizer is a loose homogeneous mass Brown, without a strong odor: it should only smell a little like earth.
Video: how to prepare compost
Compost is an almost free organic fertilizer that every gardener can easily prepare on their own plot. The only important thing is to know what you can use to make compost and put in a little effort.
Any owner of a summer cottage is faced with the need to fertilize his garden. To do this, you can use chemical fertilizers, or natural ones. The optimal solution in this case it becomes the use of a compost pit. Another advantage of creating garden composter is a concern for the environment, since all organic waste can be turned into useful compost, rather than being taken to a landfill.
Where to set up a compost heap
First of all, you should take care of cleanliness drinking water, therefore, the well or well should be removed at a distance of about 25 m from the heap and preferably located higher (if there is a slope on the site).

Of course, the composter may smell unpleasant, so it is important to place it further from the kitchen, gazebo or veranda (yours and your neighbors), taking into account the most common wind direction. It is ideal to locate the compost pit closer to the vegetable garden or garden in the shade of trees, while providing easy access to it for a garden wheelbarrow or aisle with a trash can.


At a summer cottage where vegetables, fruits and berries are constantly grown, additional feeding is always needed. Use regular mineral fertilizers It is not advisable for your family, except in small quantities. They change the physical and chemical parameters of the soil and contribute to acidification of the site.
Organic fertilizers are more expensive, but they restore soil well and stimulate crop growth. One of them - compost - can be made from components that can be found in abundance in any country house, and setting up a compost pit with your own hands will require little financial investment and a little time. But at any moment there will be something to feed the plants on the site.
The benefits of compost and how the fertilizer works
Compost is plant residues processed by soil microorganisms and earthworms. Passing through digestive tract, beneficial nutrients - nitrogen, potassium, phosphorus and other trace elements receive an organic shell.
In it they are better preserved and better absorbed by plants. People have learned to produce such fertilizers artificial method. They are called chelate, but they are expensive. A large plot requires many complex mixtures, which significantly increases the cost of the crop.
If you make a compost pit correctly and learn how to lay compost for maturation, you can significantly reduce the cost of renewing the land and increase the yield for free.

Raw materials for composting
Everything can be composted:
- leaves;
- green freshly cut grass;
- manure;
- branches, sawdust, bark, paper;
- algae and other pond plants;
- peat;
- fecal matter from the sewer.
It is better to take several components. It is desirable that the composition include nitrogen and carbohydrate ingredients, as well as soil from the site. Nitrogenous substances include: fresh grass, manure or droppings, fresh vegetables, fruits. Carbonaceous components include paper, dry grass, sawdust, straw, and cardboard.
Ash adds nutritional value. To make the compost more saturated, you can add complex or single-component mineral fertilizers at the end. In any case, compost will help increase the amount of humus in the soil and revitalize the soil with the help of bacteria.
Composting methods – with and without oxygen
There are two methods of composting – aerobic and anaerobic. In the first case, microorganisms work that require oxygen to live. Such bacteria live in the soil and decompose plant debris - grass, roots, manure.
To obtain aerobic fertilizer, you need to know how to properly make a compost pit with your own hands to ensure air access. In addition, the mixture must be periodically loosened and turned over so that oxygen reaches all components. The disadvantage of the aerobic method is that some of the nutrients are eroded or oxidized and are not beneficial, as well as time-consuming.
Video: How to make a compost pit with your own hands
Another method is anaerobic. This is the fermentation of components without air access. How to make a compost pit at your dacha like this: to prevent oxygen from penetrating inside:
- the material should be tightly knitted, and the inside can be lined with film;
- the components are stacked tightly and compacted to remove excess air.
The top of such a collar is sealed with a film, which is pressed to the ground with heavy stones or earth. Further, the process occurs without human intervention. The advantage of this method is that almost all nutrients are preserved. The downside is that it is difficult to achieve complete sealing of compost pits. Sometimes it is better to buy a container for storing raw materials.

Types of composters
A simple DIY compost bin can be made in one day. No special materials or tools - whatever is at hand will do - boards, slate, plastic panels, plexiglass, mesh.
It is necessary to decide which method of making compost will be a priority: aerobic or anaerobic. If the first, then there are more options for making a compost heap with your own hands. If it is anaerobic, then every effort will have to be made to make the structure airtight. You may have to use concreting, but such a collar will last a long time.
Classic earthen pit
A compost pit is made in the ground as a recess no more than 50 cm, to make it convenient to care for the ripening mixture. The sizes are arbitrary. You can make any length and width.

More often, this design is used for anaerobic fermentation, but for this it is necessary to concrete the walls and bottom. The point is that when decomposing plant residues the liquid flows down. If the bottom is left open, the nutrients will disappear and be absorbed into the soil. But if you put a layer of earth, straw or peat on a closed bottom, they will be preserved and will benefit the plants.
The easiest way to make a compost pit is from concrete ring. For this:
- Digging a shallow hole - 60 cm.
- The bottom is filled with solution and allowed to dry.
- A concrete ring is installed using a crane or tractor height 90 cm.
- Plaster the connection between the bottom and the ring.
The convenience is that the edges will rise above ground level and prevent sediment from getting into the compost. Concrete can be painted any color or decorated as you wish to create a beautiful compost pit - you can plant it yourself tall plants around a concrete ring and they will hide the storage. If desired, a ceiling with a hole for a hatch is installed on the ring.

Slate pile
If you have old slate lying around, you can strengthen it on boards and make walls for a compost pit. This will not be quite a hole, since it is located on the surface of the earth. More like a pile or a heap, but decorated and protected. A do-it-yourself slate compost pit is suitable for the aerobic (oxygen) method of making compost.
Stages of work:
- Select a location and make preliminary markings - length, width. The height of the collar should be no higher than 1.5 m. At higher altitudes, air will be less able to get inside and ripening will slow down. The raw materials may even rot or sour.
- Dig holes in the corners with a drill and place pillars.
- Nail boards between the posts to hold the slate.
- Using a drill, carefully make holes in the slate and attach it to the boards.
On one side, the height is made smaller to make it convenient to get ready compost. The roof must be done, because rain will disrupt the maturation of the mixture.
The bottom is made as desired - open or closed. Peat, soil, chopped branches or sawdust, and straw can be used as drainage.
DIY board composter
A DIY compost pit made from boards is the most common method. First, markings are made and corner posts are installed. Below is one of the options:
- the arrangement of the boards is dense, without holes for air - more suitable for cold storage of manure or anaerobic composting;
- with air holes - they can be up to 5 cm wide.
It is better to make the composter mobile - on wheels, so that winter time it could be hidden in a warm place. When the temperature drops, bacteria slow down their activity and the maturation of the mixture is disrupted. In warm weather, the process continues and by spring the fertilizer will be ready.
If you use worms for composting, then the most effective look are red California worms. They reproduce quickly and eat a lot, but do not tolerate low temperatures. They die in mid-latitudes. Vermicompost is prepared in a warm room with good ventilation. In summer the box is put outside, and in winter it is kept warm.
Mesh compost pile
An economical version of the composter is made from ordinary metal mesh. It is secured to poles or metal pipes dug into the ground. The advantage is that the collar is completely open on all sides to air. To speed up the maturation of compost, it is advisable to add a solution of EM preparations when forming layers.

Sealed plastic container
Sealed containers are used for anaerobic fermentation of components or silage of grass. Such composters look presentable and aesthetically pleasing and do not spoil appearance plot. The downside is that you cannot increase the volume, and you will also have to loosen the layers when preparing aerobic compost.

Septic well as a composter
There is a technology in which fecal matter is processed by anaerobic bacteria and becomes organic fertilizer. But for this you need to comply with the following condition: do not pour water from the well into the well. detergents and chlorine, since these substances cause the death of microorganisms.
Every gardener knows how important it is to fertilize the soil in the garden and in the garden in a timely and efficient manner in order to obtain good harvest. You can purchase ready-made compost, spending quite large sums on it, almost equal to the cost of the harvest itself, or you can, without investing special effort, make it yourself.
A do-it-yourself compost pit, the options of which will be discussed in this publication, will help not only to produce high-quality fertilizers, saving on their purchase, but also to functionally use waste from products of plant origin. There are several approaches to its creation, but first, a few words about the purpose and importance of this agricultural structure.
Purpose and general principles of creating a compost pit
Why are compost pits made?
On every plot of land at least some are sure to land cultivated plants, and without feeding they will eventually lose their vitality, wither and die as the soil around them is depleted.

Therefore, whether it is a tree, shrub or annual vegetable crops, the soil for them must be periodically fertilized. Today, specialized stores offer a large number of fertilizers made on on different basis, but not all of them are equally beneficial for plants and unsafe for humans. Some manufacturers produce compost, however, and they are not always conscientious. To speed up the maturation of humus, some of these “agrochemists” use not biological, but chemicals, quickly decomposing various organic matter, and it is simply impossible to check how the processing took place for an ignorant person who does not have special knowledge. Therefore, if you come across such a product, you may not only not achieve an increase in the yield of your garden or garden, but, on the contrary, spoil the soil to such an extent that it will take many years to restore it.
That is why the best option seems to be manufacturing organic fertilizers independently, especially since almost all the necessary components can always be found literally under your feet or in the kitchen after cooking.
Any area is periodically tidied up, and during the cleaning process heaps of grass and fallen leaves are collected, mixed with fallen fruits, as well as branches after trimming trees and bushes - all this is perfect for making compost.
If the loaded compost pit is not touched, the compost will mature for quite a long time. And provided that special biological solutions containing live bacteria are added to it, fertilizer can be obtained in 3-4 months. However, in order for the “ripening” process inside compost pits and containers to proceed evenly, the mass must be periodically mixed and drugs added to it that accelerate the processes of natural decomposition of organic matter.
Requirements for setting up a compost pit
In order for a compost pit to function properly, its design must provide all the necessary conditions for the development and active activity of bacteria that will process plant waste.

The conditions necessary for the normal functioning of bacteria include the following factors:
- Availability of free access of oxygen to the container (pit), so that the plant waste placed in it does not rot, emitting unpleasant odors, but breaks down under the influence of earthworms and beneficial bacteria.
- Special temperature regime
- Constant high humidity.
High-quality fertilizer can only be obtained if all these conditions are met, and for this you need to properly build or assemble from finished materials compost container.
The requirements that must be met when constructing this useful structure can be listed as follows:
- The container must have holes in its walls for free access of air, which means that the best option would be to install it above the soil level.
- To make it easier to remove finished compost from the container, it is best to make the front or side wall in the form of a door, or assemble it from removable boards.
- If the compost pit is installed in a pit dug in the ground, then it should not be buried more than 500 mm. The mass placed in such a pit must be mixed quite often, adding a solution with live bacteria to it.
- A mobile compost container looks like a very attractive option - if it has at least some aesthetic appearance, it can be installed anywhere on the site. The only thing that needs to be taken into account is that it should not be constantly in the sun. Therefore, it is best to find a place for the container in partial shade under trees. In addition, if desired, it can be decorated with a removable

- The size of the compost container or pit depends on how much fertilizer is expected to be produced for the needs of the site. But it is best that its dimensions do not exceed 1000×2000 mm. If the area is large and you need a lot of humus, then it is recommended to make several small containers with an approximate size of 800x1000 mm.
- You should not make the container box too high - it should have a height that will allow you to easily loosen the mass, and this must be done quite often. Therefore, it is most reasonable to provide the height depending on the growth of the gardener.
- Whatever material the compost container is made of, its bottom should not be covered - it always remains earthen. Thus, the box will maintain moisture, which will come from the soil. In addition, free movement will be ensured for earthworms, which also take an active part in the production of humus.
What kind of waste can be put in a compost container?
Compost will be of high quality and beneficial for plants only if it is made from environmentally friendly plant products. Therefore, you need to know what can be placed in a container and what absolutely cannot.

- Tree branches (but they are placed only on the bottom of the composter - this will be a kind of drainage layer).
- Fallen leaves, pine needles, roots, bark and shredded tree branches.
- Mown or weeded grass.
- Peelings of vegetables, fruits and berries, as well as spoiled fruits.
- Chicken droppings, aged two-year rotted manure.
- Zola and charcoal left over after burning wood.
- Sawdust, straw, hay, shavings and other small wood waste.
- Remains of tea and coffee brewing.
- Paper bags, corrugated cardboard, used napkins and paper (of course, if there is no printing ink or office glue on the paper waste).
- Sometimes the lower branch drainage layer is sprinkled with lime to quickly split the wood.
All plant waste, for example, layers of freshly cut grass, must be sprinkled with a layer of garden soil, since without it decomposition will be slower.
It is also very important to know what should never be put into compost, otherwise it may not help, but harm the plants.
Prices for garden containers
garden container
So, you cannot put inorganic substances into the container that do not decompose or, when decomposing, release toxic substances that are dangerous not only for plants, but also for humans. In addition, there are other substances and products that are contraindicated to be placed in compost pits. These include:
- Plastic bags, products made of plastic, rubber, metal and synthetics.
- Plants treated with chemicals.
- Tops from potatoes and tomatoes - they can be infected with late blight.
- Bones from fruit trees and animal bones.
- Pet feces may contain helminths and their eggs.
- Pet hair, as it will take a long time to decompose.
- It is important to ensure that no glass gets into the compost, since when processing the beds it can seriously injure your hand.
- It is not recommended to place thick branches in the upper layers - they will take too long to decompose.
What types of compost pits are there and how to make them yourself?
Compost pits or containers are made from different materials- it can be wood, metal, smooth or wave slate, metal grid And polyethylene film or geotextiles, polyethylene black bags and more. The design of containers can also be different, but they must function according to the same principle. Next, we will consider the designs of various compost pits, from complex to the most simple options, so the reader will have the opportunity to choose the most suitable one for a particular case.
The first option is a ready-made plastic container
To begin with, it is worth considering a ready-made version of the composter, which can be purchased in specialized stores. These are plastic containers manufactured taking into account all necessary conditions for the production of humus.

Containers of various volumes and shapes have quite affordable prices, which start from 1,300 rubles, and if there is no opportunity or desire to make a compost pit yourself, then the best solution would be to purchase this agricultural structure ready-made.
Containers are fairly compact products with a neat and stylish look that won't spoil landscape design plot. Moreover, most often the plastic of such composters is colored green color, which helps the container visually “get lost” against the background of the vegetation of the area.
The containers are sold unassembled, so they can easily be delivered to the installation site, even by public transport. They come with assembly instructions, and it will not be difficult to assemble such a container yourself, since this does not require any tools.

To make it easier to remove finished humus from the composter, the design includes a side door that simplifies its operation.
Composters are made of frost-resistant UV-stabilized plastic, which perfectly withstands the effects of ultraviolet radiation, precipitation, wind and temperature changes. The advantage of this design compared to the “classic” one compost pit installed in the ground is that it will not become a source of unpleasant odor, since the aeration system provided in the container does not allow waste to rot.
The second option is a homemade wooden compost container
This version of the compost pit will not be so easy for those owners to make with their own hands land plots who do not have carpentry tools or do not know how to work with them. However, knowing the dimensions of the blanks, they can be ordered from a carpentry workshop, and assembling the box yourself should not be a problem, since this process does not require special tools. If the “carpentry tool arsenal” is available, and there is at least a little experience working with it, then the manufacturing process will be simple and quick.
So, for a wooden compost container you will need 24 boards 1500 mm long, 25 mm thick and 150 mm wide.
The tools you will need are a circular saw or jigsaw, a regular or electric plane, clamps, a tape measure and a simple pencil.
| Illustration | |
|---|---|
 | The first step is to make parts for the container. For this purpose, it is advisable to use high-quality durable wood that will be resistant to external natural influences, such as moisture, wind, temperature changes and ultraviolet rays. This is due to the fact that the container will be located constantly on the street. And in addition, the wood will be exposed not only from the outside, but also biologically - from the inside, since the processes of decomposition of plant waste will actively occur there. |
 | The boards are sawn and planed on all sides so that they look fairly neat. This is especially important if the container is located on an area that is clearly visible - probably no one would want the box to spoil the landscape design. |
 | After the boards are prepared, they are folded together and tightly tightened with clamps on both sides. Next, 100 mm is measured from each edge, then another 25 mm is set aside and marked with a pencil - this will be the width of the groove to be cut. The groove depth should also be 25 mm. |
 | Then, cuts are made on the marked boards. To do this, manually circular saw The cutting depth is set, and in the area marked on the boards many cuts are made at a distance of 1÷2 mm from one another. When the wood is broken into small pieces, it can be easily removed from the boards with the same saw. |
 | When the grooves are ready on one side, the boards are turned to the opposite side. Markings are also made on it - first 100 and then 25 mm are laid off from the edge. After which the process of cutting the grooves is repeated. The grooves on one and the other side along the width of the boards should be exactly opposite each other - as shown in this illustration. |
 | The next step is to take two boards with grooves, fold them and fasten them together with clamps. A line is drawn dividing the boards exactly in half - in this case it is 75 mm from the edge, and the boards are sawn along this marking. These parts will be used to install the lower and upper, that is, the last row of the structure. |
 | Next, all surfaces of the finished boards, including cut grooves, must be treated with one of the antiseptic solutions. This product will prevent putrefactive processes and extend the life of the wood. The antiseptic is applied with a wide brush. It is important to ensure that there are no untreated areas left, otherwise the wood may begin to decompose from them under the influence of processes occurring inside the container and external natural factors. |
 | After the wood has completely dried, you can proceed to assembling the structure. The container should be installed on bricks, since there must be space below for air to enter. The bricks are displayed on the site where compost bin will be installed on a permanent basis. The installation site must be relatively flat so that there is no distortion of the container walls during its assembly. |
 | Assembly begins with two boards that have a groove on only one side being installed on edges of securely laid bricks. They are positioned so that the groove points upward. |
 | Next, perpendicular to them, boards with two oppositely placed grooves are installed, that is, on each side. The bottom groove of the top board should fit into the groove of the bottom one, standing on the bricks. This is clearly shown in the illustration. |
 | The next step is to install boards located parallel to the lower structural elements. The entire box is assembled using the same system, all the way to the top. The work goes quite quickly - if necessary, the board installed on top is knocked down by hand or, carefully, with a hammer. |
 | The last to be installed are two boards that have grooves on only one side - they are, naturally, mounted with the cutouts facing down. The result is a “well” with the necessary distances between the boards, through which oxygen will flow into the compost. |
 | It is not enough to make and install such a box - it is also very important to fill it correctly. The bottom layer of filler is branches (in this design it will be located between the bricks installed under the container). And the thickness of such a layer should reach half the width of the bottom wide board, which has grooves on both sides. The branches need to be laid quite tightly, as they will act as drainage. Lime 70÷80 mm is poured on top of the branches, and then waste, then a layer of soil (its thickness should be about 100 mm). Next again comes waste, ash and soil. Then, waste, manure, soil and more waste. In this case, ash, manure and lime can be periodically swapped. It should be noted that this is only one of the filling options, since each gardener invents his own “recipes” and uses different components to make compost. |
This design is good for everyone, except that getting ready compost out of it will not be very convenient. Most often, the option of a compost bin with an installed door or with removable boards is chosen.

In this design, I would like to consider the front side of the container, which is equipped with removable boards installed at an angle to additional corner vertical posts.

To fix them at an angle, complex grooves are cut at an angle on one side of the boards that form the side walls of the container. To make them the same, the boards are folded together in pairs, fastened with clamps, and then the marked part of the groove is selected with a jigsaw.

The result of the work done will be the container shown in the illustration below. It clearly shows the boards installed at an angle and two added vertical posts holding the side walls on the “facade” side.

One more circumstance must be taken into account. This means that wood that has not been treated with an antiseptic and unpainted can swell under the influence of moisture, and when exposed to the sun, begin to dry out, causing cracks. In this case, it will be very difficult to remove the boards from the grooves. Therefore, I make the grooves in such a way that initially the boards come out very freely, and before assembling the structure, it is recommended to process and paint its elements. Besides, wooden structure It is best to install under the roof or under the canopy of trees.
The container can be one- or two-section, open or closed. It is better, of course, to build a two-section version, or to place two composters side by side, since they can be used in turn - using ready-made humus from one container while it matures in another. Having emptied the first composter, they move on to using compost from another, and the first one is filled with waste again.
If the site area allows the container to be located away from residential buildings, then it can be made open. If the composter is installed near the house or recreation areas, it is recommended to equip it with a lid.
The third option is making a compost bin
This method of making a container for compost production is so simple that any gardener can do it independently, since the process does not require any special effort or the ability to work with complex tools.

To make this version of the container you will need the following materials:
- Metal welded mesh with cells 40x40 or 50x50 mm - length 3000 mm, width from 700 to 1000 mm - this will be the height of the basket. The width of the material is chosen at the request of the master. You can choose normal steel mesh, but it is better if it has a polymer anti-corrosion coating.
- Thick polyethylene film or black geotextile, 3500 mm long and 750÷1050 mm wide (depending on the planned height of the future basket).
- Stationery clips – 8÷10 pieces.
- Flexible and strong knitting wire for fastening the mesh.
The tools you will need to prepare are regular scissors and metal scissors, pliers and a tape measure.
| Illustration | Brief description of the operations performed |
|---|---|
 | The metal mesh is unrolled and leveled. A strip 3000 mm long is measured and cut from it. |
 | Then the cut strip is rolled into a cylinder so that the edges overlap by approximately 200 mm. This connection point along the entire height of the cylinder must be carefully tied with wire or plastic clamps - puffs. |
 | Next, polyethylene film or geotextile is spread, the fabric of the required size is measured and cut. (The work will go faster if you have such an assistant))). |
 | The next step is to roll up the cut film or geotextile and install it inside the basket. Then, the material is distributed along the walls. |
 | The top edge of the film is folded over the edge of the mesh outward and hooked to the walls of the basket using office clips. They will securely fix the canvas and will not allow it to come off even when mixing the compost. |
 | That's it - the compost bin is ready. It is not heavy at all, so it can be easily moved to any area of the site. |
 | Next, the resulting container is filled with various waste of plant origin, which is stacked in layers. The first, lowest layer is branches, which are covered with soil, then any grass, fallen leaves, waste from cleaning vegetables from the kitchen, etc. Then comes another layer of soil, and then plant waste. After filling the basket, its contents must be poured with water so that it reaches the bottom of the container. After which a special environmentally friendly product is diluted and infused, containing bacteria that promote the rapid decomposition of plant products, which will significantly accelerate the maturation of the compost. Taking compost out of the basket is quite simple - you just need to lift one edge of the container, scoop out the finished compost with a shovel, put it in a garden cart and take it to the area to be fertilized. |
Here it is necessary to clarify the point that if polyethylene film is used for the inner covering of the basket, then holes must be cut in it to allow oxygen to enter the processed mass. If you decide to use geotextiles for the compost bin, you won’t have to cut it, since it is a “breathable” material, that is, it allows air to pass through well, and also retains moisture and prevents its rapid evaporation.
The fourth option is a concrete compost pit
The construction of a concrete structure is quite labor-intensive work. In addition, if the hole is placed below the top level of the ground, it is not quite convenient for removal finished product. In addition, construction will cost much more than arrangement wooden version or making a basket. However, if you want to work with concrete and build a permanent structure, then you need to know how the work on its construction and maintenance is carried out.
Prices for geotextiles
geotextiles

You can build a pit with one or two compartments. If the second option is chosen, then one compartment is intended for mature humus, and the second for constant replenishment.
Since oxygen can only enter such a pit through the top, the lid for it must be made of mesh.
The bottom of the pit is not concreted or waterproofed, since it must remain earthen so that earthworms had access to plant waste, and also to ensure that the mass was moistened by soil moisture.
In such a space that does not have aeration, the waste placed in it may begin to rot, so you will have to loosen it quite often, providing access to air.
Work on the arrangement of a concrete structure consists of the following stages:
- The first step following the marking is to dig a pit in the selected location. It can be of any size in length and width, ranging from 1000 mm or more. Here you need to take into account that the internal space of the pit will be reduced due to the construction of side walls. The depth of the pit can vary from 500 to 800 mm, but the deeper the pit, the more difficult it will be to get ready-made humus from there and the more difficult it will be to regularly loosen the mass.
- The next step is to install formwork made of boards or thick plywood along the walls, to the entire height of the pit. It is mounted at a distance of 100÷150 mm from the ground surfaces - this space will be the thickness of the walls.

Before covering the formwork frame with boards or plywood, a reinforcing mesh is installed between it and the ground walls. After this, the formwork sheathing is secured to the frame.
- Next, sand, gravel and cement are mixed in a ratio of 2:4:1. This process is best carried out in a concrete mixer or in a large container, for example, a bathtub or a spacious garden wheelbarrow, since it is advisable to pour the solution into the formwork at one time.
- The next step is to pour the solution into the formwork and “bayonet it”, that is, repeatedly pierce it with a pipe or a piece of reinforcement reaching to the bottom - this process is carried out so that air pockets do not form in the concrete. After the formwork is filled, the poured concrete is left to dry and gain strength. It is advisable to carry out stripping no earlier than after 10-12 days.
- After the mortar has hardened, the walls of the pit must be raised above the ground using brickwork, or again by building formwork on top finished walls, strengthening the foundation pit, reinforce it and fill it with concrete. The height of the side framing the edges of the pit should be 150÷200 mm.
- The walls of the pit can also be strengthened brickwork, but underneath it, along the perimeter of the bottom of the pit, you will need to fill a strip base with concrete.
If it is decided to decorate the walls with brickwork, then it should not be made solid. It is best if there are holes in it that will allow ground moisture and earthworms to penetrate into the pit.

In such a pit (without air access to its lower part), the waste processing process until the humus is completely ripe will last about two years. And to speed it up, you will need to pour a special solution into the plant mass containing live bacteria designed for such conditions.
Fifth option - slate composter
Building a compost pit from slate is quite simple and affordable way, especially in the case when the farm still has old, seemingly unnecessary roofing material.

It doesn’t matter if the sheets have slight damage, since the flow of air into the plant mass will only be a good thing, especially since slate containers are most often made open. The slate will only serve as walls, preventing the contents from scattering beyond the boundaries of the area organized for the composter. To create such a box you need to do the following:
- As in previous cases, you first need to decide on the size and design of the container, that is, how many sections it will have. Optimal size the sides of each section of the two-section version are 800×1000 or 1000×1000 mm. The height of all walls, except the front one, should be 700÷1000 mm, depending on the expected amount of waste. The front wall can have a height of 300÷500 mm, which will be convenient for loading waste and sampling finished humus.
- Having chosen a site for installing the box and marking it, the top layer of soil is removed from it by 200÷250 mm for free penetration of soil moisture and earthworms into the mass.
- To secure the slate sheets in a vertical position, wooden or metal posts are installed around the perimeter of the site. They may be required from four to six, depending on the design of the composter.
- Then slate is attached to the vertical posts. It is desirable that a gap of 20÷25 mm remains between the lower edge of the sheets and the soil surface, which will allow oxygen to freely flow into the lower layers of the plant mass.
For faster processing, it is recommended to moisten the stacked waste by adding composting agents with live bacteria to the water.
The sixth option is a compost pit in the ground
This is probably the most common method of arranging a compost pit, which is often chosen by less experienced gardeners. As you can see from the information presented above, this is far from the most good option composter, since the plant waste in it will begin to rot rather than decompose.
Prices for metal mesh
metal grid

Such a pit is best used simply for dumping organic waste that is not intended for the production of humus. If a pit is built specifically for this purpose, then it is best to locate it away from residential buildings, since rotting garbage attracts a large number of flies that will try to visit not only the garbage pit, but also the premises of the house.
If this option nevertheless turns out to be attractive as a compost pit, then the plant waste stored in it will have to be loosened very often in order to provide the aeration necessary for proper processing.
It is not difficult to equip such a pit - to do this, dig a pit 400÷600 mm deep away from the house. The size of its sides may vary, but best option- this is 600×600 or 700×700 mm. Big sizes an unsupported pit can lead to erosion processes in the soil around it, that is, it will begin to crumble and expand. If you need a hole of larger size, then its walls need to be reinforced with at least slate, placing it to the full depth.
It is recommended to sprinkle kitchen waste, such as vegetable and fruit peelings, dumped into a pit with grass and a small amount of soil - this will partially help hide the unpleasant odor that attracts flies.
It would be useful to add special substances to such a composter, however, it is necessary to choose environmentally friendly preparations, since the chemicals can spread with rain and ground moisture into the garden beds or get under the roots of trees.
The seventh option is composting waste directly on the ground
Another method of preparing fertilizers, which is often used in rural areas- This is the storage of plant residues in the form of a stack. This is the simplest method of producing compost, accessible to any owner. However, it has some inconveniences, since loosening the mass folded in a stack, as well as getting ready-made compost from under the upper fresh layers, is quite inconvenient.

If you still decide to opt for this option, then before laying the waste it is recommended to lay a layer of branches on the ground, which will allow oxygen to freely penetrate into the lower layers of the stack. In this option, the compost will reach full maturity after one and a half to two years.
If it is not possible to build a composter and even carry out the labor-intensive work of erecting and loosening stacks of plant waste, then there is another the simplest way for the production of compost. It can be called “female”, since all this is done without any special physical effort.

In this case, the waste is also placed directly on top of the soil. The best place for this there will be partial shade, which can always be found under the trees of the garden. You can organize such a composter directly on a temporarily unused garden bed, covering the plant waste with any dark material. This compost pile does not need to be high, so it can be easily loosened with a fork. If there is a lot of waste collected, then several piles are organized, on different areas garden With this approach, the finished humus will not have to be transported from one corner of the garden to another, since it will be produced in the area that needs to be fertilized.
Find out how to do with step by step instructions, V new article on our portal.

However, in this case, there is no way to do without bioactivators. Work on compost production takes place in the following order:
- A pile of plant waste no more than 500 mm high is placed on the soil. Each layer is sprinkled with garden soil.
- Then, all waste is watered, since all layers must be wet.
- Next, according to the attached instructions, the bioactivator is diluted, infused, and the entire heap is watered with this solution.
- The wet biomass is covered with dark material, but in such a way that the lower part of the heap is slightly open for free access of oxygen. If there is no dark film or, then an old oilcloth that does not let in sunlight will do. The corners of the covering material are pressed against the ground by heavy objects, such as stones or bricks.
- The finished structure is left to reheat. Well, you need to loosen it about once every two weeks.
- According to experienced summer residents who use this method of producing humus, its full ripening occurs within 5-6 months.
Biological products for making compost
Now a few words should be said about the preparations that are used to prepare compost.
Today in specialized stores you can find a large number of different products that help reduce the decomposition period of biological waste.

When bioactivators are used to make compost, it matures much faster than when plant waste decomposes in natural conditions. And this is especially important when the site needs to be fertilized annually, since it is constantly used for growing crops.
Bioactive agents containing , contribute not only to the rapid production of humus, but also to the destruction of harmful microorganisms, the elimination unpleasant odors, as well as enriching the soil with minerals. The preparation of solutions from concentrates is carried out according to the instructions provided by the manufacturer on the packaging. However, experienced gardeners advise adding a little sugar or old jam to them after diluting bioactivators. This will help give a kind of “acceleration” to the initial activation of living bacteria that are in a “dormant” state before breeding. After dilution, the solution should sit a little. It’s interesting - if you mix it in a bucket, you can even visually observe how the activation process goes.
The table below presents several preparations that can be found in stores that sell products for treating and fertilizing garden plots.
| Names of bioactivators | Weight or volume of packaging (grams or milliliters) | Average price in rubles (summer 2017) |
|---|---|---|
| "Compostar" | 50 | 200 |
| "Compost" (compost in 15 days) | 100 | 360 |
| "Baikal EM-1" | 40 | 380 |
| "Compostello" | 70 | 200 |
| "Happy Summer Resident" | 45 | 120 |
| "Bioforce Compost" | 250 | 580 |
| "Sanex EcoCompost" | 100 | 300 |
| "Doctor Robik 209" | 60 | 180 |
| "ETISSO Kompost vital" | 1000 | 670 |
| "Sanex Ecocompost" | 1000 | 280 |
| "Compost 25" | 1000 | 300 |
If the above-mentioned products are not found in the nearest store, the seller will definitely offer other options for bioactivators. Before purchasing the selected drug, you should carefully study its characteristics, the manufacturer’s recommendations for use and instructions for preparing the working solution.
In conclusion, I would like to say that according to the information presented above about existing options arrangement of a composter for processing plant waste, it is quite possible to make a choice suitable option. It depends on the financial opportunities And practical experience work with various materials and tools. And the presence of a compost pit on garden plot, in any incarnation, is always a big plus.
And for complete information, watch a very informative video that contains recommendations on self-production compost from plant waste.
Video: Tips for a gardener on making quality compost
Often, summer residents come across an area with infertile soil on which plants grow poorly. Of course, you can bring in black soil, but it is quite expensive. Excessive use of chemicals is also undesirable, because the harvested crop will be used by family members. The only way left is to prepare healthy compost. These are organic fertilizers obtained during the decomposition of natural waste due to the activity of microorganisms.
Choosing a place for a heap
Before throwing organic waste into a huge pile, it is important to decide on the location. Usually, an area is allocated at the end of the garden or behind outbuildings so that it does not spoil the overall appearance. It is advisable that the site is not blown by winds and is located in the shade. You can decorate a bunch of climbing ornamental plants.
It is also necessary to find out the direction of rain flows during heavy rainfall. It is advisable that they do not flow down to the source of drinking water, and that the products obtained during the process of decay do not spoil it.
Compost bin made from boards
A rational option for storing organic fertilizers is wooden box with three special sections: for waste, saturation of fertilizing with oxygen and ready-made humus.
Making containers from boards with your own hands takes place in 5 stages:
- 1. They dig into the ground wooden beams in the amount of 8 pieces. To protect the wood, parts located in the ground are lubricated with tar or other moisture-repellent agent. If the box is placed along the fence, some of the pegs can be tied to it so as not to dig additional holes.
- 2. The dug bars connect wooden planks for the formation of partitions. It is important to leave gaps between adjacent slats to improve air exchange. In the front part, sections 1 and 2 of the board are fixed to the middle. In the future, doors will be made in this place. In the last compartment with big door Only one bottom strip is nailed.
- 3. Ends, partitions and back wall reinforced with additional crossbars. Install doors that simultaneously serve as covers in the first two sections. In the last compartment, 1 large door is installed.
- 4. For protection, all sections of the box are coated with two layers of paint. Color selection paint coating- it’s a purely individual matter, but it’s better that it fits into the overall landscape design.
- 5. Install fittings: handles, latches. The box is ready for use.
Compost bin made from boards
A place for storing organic fertilizers is installed for a long time. Experienced summer residents recommend concreteing the bottom of the box and putting in drainage. You can use plastic boards or slate.
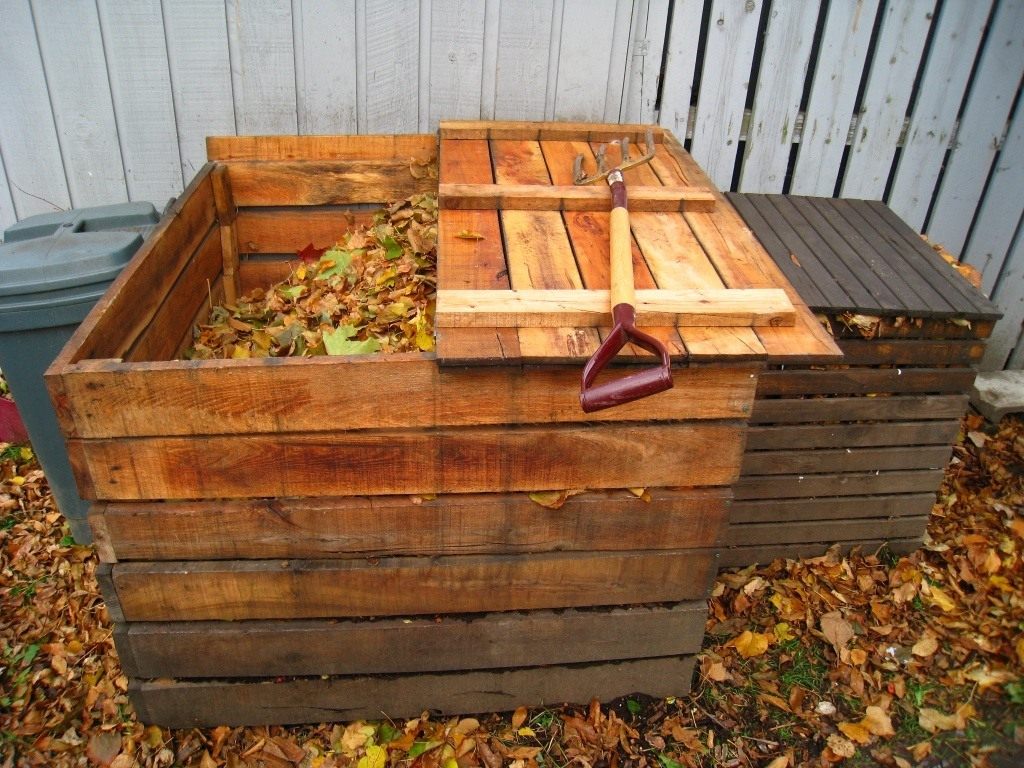
Box for humus from pallets
Putting organic waste into one pile is the first step in obtaining fertilizer. The convenience and neat appearance of compost requires wooden fence. The use of such material will help it become enriched with oxygen. The construction of a pallet box is simple. It's easy to do by following the following plan:
- 1. To obtain a single sheathing, the pallets are disassembled.
- 2. Using a chisel and hammer, remove excess elements.
- 3. The remains of protruding nails are cut off with an electric grinder.
- 4. One crate is removed from the bottom, where there will be a hole for extracting the finished compost.
- 5. For structural stability, the partitions are installed level.
- 6. Wood screws are used to fix the walls.

Box for humus from pallets
By properly organizing the accumulation of organic waste, you can ensure country cottage area high-quality fertilizer after six months. Under normal conditions, compost maturation lasts 1-2 years.
Compost Heap Ingredients
High-quality fertilizers are obtained if the pile is formed by a variety of organic waste. Thus, humus is enriched with minerals. It is important to maintain the correct nitrogen and carbon content. The main component of fertilizing is carbon, in large quantities found in the stems of green plants. Microorganisms are fed by nitrogen found in bone meal, chicken droppings, weeds, legumes and stems. vegetable crops, growing in the garden.
To activate the chemical reaction in humus, the amount of nitrogen relative to carbon is 1 to 10. Excess substances are eliminated through the formation of carbon dioxide and ammonia. You can get high-quality fertilizer by saturating it with minerals. To do this, just add superphosphate.
Components undesirable for compost
Do not add diseased green plants or weeds with seeds to the container. Remember, compost is not a garbage dump. It is strictly prohibited to use the following as organic waste:
- poorly chopped plants;
- fruit seeds;
- litter of domestic dogs and cats;
- spoiled food.
Some ingredients speed up chemical reaction in a compost heap, forming humus. Others, on the contrary, slow down the processes, increasing the period of formation of fertilizing.
Rules for preparing organic fertilizers
Preparation of high-quality organic fertilizers in the shortest possible time implies compliance with certain rules. Experienced gardeners recommend:
- 1. Mix different components, laying them in layers. At the bottom of the box, lay out 30 cm of soil, 10 cm of dry and high-quality chopped grass, covering everything with leaves and weeds of 25 cm each.
- 2. Regularly add waste to the compost food products, containing no bones or fatty tissue.
- 3. When laying, wet all layers with water.
- 4. Apply bone meal and mineral-based fertilizer at regular intervals.
- 5. Turn the pile regularly to maintain adequate moisture levels. For work it is better to use a garden fork.
You can determine the readiness of the fertilizer by color and smell. Ripened compost is crumbly, with pleasant aroma forest soil and dark brown hue.
Humus from fallen leaves
Fallen leaves in the garden in autumn are the best component for nutritious fertilizer. When the foliage falls, it loses most of its minerals. Lignin and hemicellulose, poorly soluble substances, remain in the tissues. These are valuable elements of high-quality humus, although their decay period lasts more than a year.
When arranging a pile of fallen leaves in the garden, you should take into account the high concentration of tannin. This is a component with disinfectant properties that slows down the process of compost formation. The maximum tannin content was found in beech, oak and chestnut leaves. Therefore, they are rarely used as a main ingredient in a compost heap. Experienced gardeners recommend using leaves of fruit trees.
Features of heap care
To speed up the process of decay after compost is formed, it is important to follow the simplest rules of care. In order for fertilizers to be ready for use in a year, you must:
- 1. Loosen the compost at least once a month. It is advisable to mix all the ingredients to the very bottom. This enriches the humus with oxygen, allowing it to burn out efficiently. If you can't turn the whole pile over, at least pierce it with a garden fork and different sides. The main thing is that the fertilizer does not rot.
- 2. Maintain optimal moisture content of organic waste. If the compost is dry, you need to moisten it generously. But you shouldn't create a swamp. Excess moisture pushes air out, slowing down the microorganisms important for composting. Gently water the compost pile with water using a watering can rather than a garden hose. You can protect the fertilizer during heavy rains by covering it with plastic wrap.
- 3. To speed up the process of humus burning, add nitrogen in large quantities, contained in green plant stems and manure. Additionally, add superphosphate, which enriches the mixture with minerals.
By creating a compost bin at their dacha on their own, summer residents will ensure high-quality soil fertilization for many years. At the same time, they will get rid of organic waste that accumulates during human activity. In turn, fertile land will allow you to obtain rich harvests in the garden and vegetable garden without additional costs.


