Boring door slopes are a thing of the past - now the variety of finishing options is simply off the charts! What interior designers don’t come up with, and what kind of experiments customers don’t agree to. Review best ideas and ways to implement them are ready for viewing.
Do-it-yourself door slopes - everything is in your hands
Most companies responsible for the delivery and installation of doors only care about outside question. It’s understandable - install doors and decorate front side You can do it with platbands in one evening, but with the slopes from the side of the apartment you need to tinker much longer. However, this is the point positive side question - you can make and design the slopes yourself as your heart desires.
In the modern art of interior design, door slopes have long lost their role as a standard space around the opening. Now they can become business card your home, because it is them that the guest meets at the entrance. But first, let’s refresh our memory about what, according to building regulations, slopes should represent, and what functions they should perform.
So, slopes are the end part of the walls surrounding the door frame, if there is one, or components of the opening in the wall when the door is not installed, for example, in an interior passage. The main functions of this architectural element: protection of door fastenings from burglars, strengthening of the door and wall and improvement of the entire doorway, opened by craftsmen during the installation of doors.
However, modern designers look at things from a different angle - slopes can be, if not the central design element, then one of the main ones. The design of the entire room may depend on this element; with its help, you can visually improve the space and bring harmony to disproportions.
How to make slopes on doors - slope design
The modern installation of door slopes is like a multi-layer cake - behind the decorative layer there is a base, under the main one there can be insulation, sound insulation, vapor barrier, vibration protection, lathing, and only under it there will be a brick or foam block. The doorway is no exception - do not forget that in addition to external beauty, we must take care of protective function.
The simplest and fastest finishing option is to install door slopes made of sheet material, with which the sheathing is sheathed or glued to rough surface.
However, this option is best used when arranging interior openings, where security issues are not so pressing. If you need to decorate slopes on metal doors, or increase moisture and heat insulation, the best option would be.
However, this is only one layer of the “pie”, apart from the obligatory primer.
- Insulation is a desirable, but not mandatory layer. Most often it is made of foam plastic (in the case of plastering) or mineral wool(lathing and plasterboard sheathing).
- Reinforcement - at a minimum, is the installation of reinforcing corners over the external corners of the slope. The corners have a special perforation, with the help of which they reliably “cling” to the layer of putty.
- Putty is a finishing, leveling layer. In some cases, it may be absent if further finishing with durable materials follows.
- Decorative layer - can be made from the most different materials. The easiest way is to apply a layer of paint, complex options are not limited by anything except the imagination of the customer and designer. In each specific case, the method of attaching decorative elements may differ.
DIY door slopes - original ideas
How to make original slopes on doors without special costs? Even the simplest option - painting - can be turned into a fun way of finishing. Alternatively, you can apply two layers of paint: the background layer is applied with a regular roller, and when it dries, a second layer of lighter or darker paint is applied with a texture tool. You can buy one or make one yourself - just wrap a standard paint roller with a piece of suede, so that the material forms waves, bends, indentations, in a word, texture.
- Another effect - colorwash - will allow the slopes and walls to look more airy, soft, if you want. To begin with, the main background is also applied, on top of which a lighter paint, closer to the background, is applied with a sponge or cloth. Light detergents Using movements or criss-cross movements, you rub the second layer, due to which a picture of airy lightness is formed. If you don’t have any time to fuss around, use stencils, which you can either purchase ready-made or cut out yourself.

- If you still have wallpaper after renovation, you can cover the slopes with it. This is quite practical, especially if the wallpaper is washable - after all, the doorway gets quite dirty.
- Slopes made of laminate or are installed very quickly and look original. Just don’t forget to buy special corners to hide the joints of the dies at the corners. If you think about it, this method is very practical - only on the floor laminated coating can last about 25 years, and even longer on walls. Laminate is easy to clean, does not fade and is resistant to mechanical damage.
- Another quick and durable option is slopes made from MDF boards. It should be noted that MDF is still not as durable a material as laminate, but its installation is even simpler - you just need to cut strips in accordance with the width of the slopes, fix them with glue and decorate them with corners.
- Slopes made of artificial stone are more complex in design, but very beautiful and durable. Depending on the shape of the stone and its color, you can achieve the effect of antiquity or, conversely, create modern designs. The stone is attached mainly to a special adhesive base; to adjust individual elements you will need at least a grinder with a diamond wheel. To give a wet effect, be sure to coat the surface of the stone with polymer varnish.

- Ceramic tiles or mosaics look great doorway very impressive, especially if you choose the right colors and placement. The option is very practical: durable, easy to clean from any dirt, does not attract or accumulate dust.
- Mirror tiles or mirror mosaics will give the doorway greater height and width. A do-it-yourself finishing option for modern interior design; slopes for interior doors.
- The use of cork panels will allow you to create a very harmonious finish for the slopes, especially if there is parquet in the hallway, parquet board or laminate. To increase the wear resistance of the material, it can be coated with a special elastic varnish for cork.
Installing a new door is a joyful event for every owner. However, the work is not limited to just installing the box and the canvas - in the end, it is necessary to design the slopes so that the structure looks beautiful and organic.
Of course, you can invite a specialist to carry out this activity. However, does it make sense to overpay for the services of a third-party master, if such a simple job can be done on your own?

For the design of slopes ( - article), materials such as plaster, polyvinyl chloride-based panels, plasterboard and MDF panels are most often used. Study the presented guides, select the design option that suits your case and get to work.
First step. Seal all gaps between the base and the door frame with foam. Allow the foam to harden and carefully trim off any excess blow-in with a sharp knife. Carefully smooth out any uneven surfaces using sandpaper.
Second step. Start surface treatment for future finishing elements. Apply a coat of primer to ensure better adhesion of the plaster to the surface.
The primer usually has to be applied in several layers. Focus on the situation - as a result, you need to get a perfectly flat and smooth surface. Start applying a new coat of primer only after completely dry the previous leveling layer.
Third step. Proceed with plastering. Buy ready-made facade plaster or prepare the solution yourself from a lime mixture, clean fine sand and cement.

Start plastering from the top door slope. Apply the mixture in a thick layer. Level and remove excess putty using a wooden lath.

To further strengthen the outer corners, install a perforated corner profile. It needs to be pressed a little into the still wet plaster mixture.
Allow the starting coat to dry completely and apply finishing layer plaster mixture. It should be more subtle. the main task This layer is reduced to leveling out minor irregularities. Wait for the finishing plaster to dry completely. Simple door slopes are ready.

Plastering is the most cost-effective option for decorating slopes. Whether to give preference to this method or choose some other finishing method - each owner has the right to decide independently.
Video - Door slopes

Beautiful and inexpensive slopes can be made from plastic panels. First, the frame is prepared, and then the finishing is done.
Frame
For the frame, prepare a beam with a cross-section of 2x4 cm. They will be attached to the frame plastic panels.
Cut the timber into pieces according to the dimensions of the future slopes. Fix 4 perpendicular strips on each wall part of the doorway. Attach 3 strips to the top. Use nails to secure the elements.
Side elements
Finishing panels should be slightly wider than the surfaces being decorated with them. The finishing elements will need to be bent so that they beautifully “beat” the corners.
The plastic panels have a hollow structure at the end. Voids correct form are present along the length of the elements. To give the panel the required shape, make appropriate cuts along the mentioned voids. An ordinary stationery knife will help you with this.
If desired, even the columns can be finished with plastic panels, so there will definitely not be any problems with finishing the corners of the slopes. The joints will be barely noticeable.
Make the cuts exclusively on the back side of the finishing elements.
Attach the cut modules to the frame. For fixation, you can use self-tapping screws or small nails. Fix the bent elements to the wall surface. Work in this order:
- determine the border of the finishing element;
- make five holes in the wall so that in the future they will be covered by the edge of the panel;
- drive wooden plugs into the prepared recesses;
- screw the panel to wooden plugs using self-tapping screws (nail).
- Install all panels according to this algorithm.
Excellent door slopes can be made from plasterboard.
Video - Installation of plasterboard slope on entrance doors, part 1
Video - Installation of a plasterboard slope on entrance doors, part 2
First step. Drill holes around the entire perimeter of the opening at a distance of about 200 mm. Hammer the dowels into the holes and screw the screws into the dowels, not tightening the ends a little.
Second step. Determine the appropriate dimensions for the starting guide rail. To do this, you need to measure three sides of the opening. Cut the guide according to your measurements.
You can make the upper guide according to the width of the opening, since in the future the side sheets will rest precisely on upper slope. You can make the side guides a little shorter.

Third step. Screw the starter rail to the wall using self-tapping screws. The long side should be placed outside the door slope, and the short side should be placed inside.

Fourth step. Mark stripes on a sheet of drywall required size. Cut the drywall according to the markings.
It is very important to follow the cutting technology. Otherwise, the cut edges will be unsightly.
To cut, attach some long, flat object to the marking line, for example, a piece of a fastening profile. Cut through the top layer of paper. By carefully tapping the cut strip on the back of the sheet, break through the plaster, and then cut through the second layer of paper.
Fifth step. Prepare the adhesive mixture. Follow the instructions specifically for your adhesive.
Sixth step. Apply a uniform adhesive mixture to the back of the drywall strips. You also need to coat the pre-installed dowels with glue.

Seventh step. Proceed directly to finishing. Place the edge of the strip into the starting guide. Align the trim piece and then press it to the base. Secure the side slopes in the same way. Remove excess glue immediately, otherwise it will lead to deformation of the drywall in the future.

The slopes must be supported with spacers while the glue dries.
You can fill the gaps between the base and the drywall with removed excess glue.
Give the slopes 12-24 hours to dry and you can begin finishing: putty, paint or other finishing of your choice.
Such slopes will serve for many years without any complaints.

Beautiful door slopes can be made from MDF.
First step. Prepare the basis for future door slopes. To do this, treat the base with a simple lime-cement mixture. Let the mixture dry and apply a primer over it.
Second step. Cut the MDF into three slopes of the required sizes. Before you start cutting, carefully measure the joining angles of the sides of the opening. Next, you need to cut the ends of the trim pieces according to the measured angles.

Before you begin installing the panels, make sure the joints are correct. To do this, attach the elements to be connected to each other. Try not to have any gaps - they will ruin appearance finishing.
Third step. Apply to top part required number of doorways glue mixture. Press the corresponding trim element onto the glue and support it until the glue dries completely. Fix the side elements in the same way.
For maximum quality fixation of the elements, place spacers between them.
Hide the gaps between the base and the fixed slopes using plastic corners. To attach the corners, use liquid nails or other suitable glue.
Try to select panels for making slopes whose appearance would be as close as possible to the appearance of the door leaf. This finish will look as complete and beautiful as possible.
Thus, a wide variety of materials can be used to arrange door slopes. Select suitable option, follow the instructions given, and you will be able to cope with the tasks as well as any specialist.
Good luck!
Video - Do-it-yourself door slopes
After installing a brand new door, the opening has an unsightly appearance, spoiling the entire impression of the renovation. And it’s not just about beauty - drafts appear in the cracks, unprotected polyurethane foam quickly gains moisture, which causes heat loss in the entire room to sharply increase. Moreover, it is correct installed slopes for entrance doors they play the role of additional sound insulation. What types of slopes exist, what should you consider when choosing how to do the finishing yourself?
From the outside, a small gap between the opening and the frame can be closed using platbands - special shaped strips, usually included in the door installation kit. However, from inside the room there remains a fairly wide area open brickwork with layers of concrete mortar, and to ensure the proper level of tightness it must be finished with not one, but several types of materials - insulating, load-bearing and decorative.
Finishing slopes improves the microclimate and is part of the design
Modern methods and available finishing options
According to the installation method, there are 3 options for finishing slopes for entrance doors:
- Application cement mortar directly on the wall and its further plastering. It is considered the most reliable and cost-effective method, but at the same time the most labor-intensive. To lay out perfectly flat surfaces, you must have some experience in preparing plaster mortar, and in its application.
- Gluing finishing panels using a suitable adhesive mixture. Finishing door slopes using this principle is more expensive, while the “wet” installation process is quite long (each layer must be allowed to dry), but it is quite accessible even to a beginner in the repair business.
- Fastening finishing elements to a pre-assembled frame. The fastest solution that allows you to achieve a perfectly flat surface, hide telephone or electrical communications, install lighting equipment in door block. The downside is the low mechanical strength required to protect the door fasteners from breaking.

It is advisable to isolate slopes from concrete walls layer polyurethane foam or mineral wool
So that the slopes can withstand temperature changes, especially noticeable if the door leads directly to the street, and not to the corridor or to the landing, it is advisable to install a layer of thermal insulation on the wall: it can be mineral wool, polystyrene foam or its modification - penoizol. If installing insulation does not allow the width of the opening (according to SNiP, the dimensions of the doorway must be at least 0.8 x 1.9 m), cover the slopes with sandwich panels.
Frame slopes are indispensable when the opening is too wide and a large volume of cement mixture is required to seal it. They are also chosen when there are damp walls, or there is no time to do finishing work - plastic or wooden panels themselves look presentable. In order to fix thin sheets, the space between them and the walls is filled with polyurethane foam sealant, which also serves as a heat barrier.

To match the color front door you can choose the shade of the sandwich panel
Selection of facing materials for home renovation
In addition to the protective function, the slopes perform the task decorative design opening. To cover the rough surface, one of the following materials is layered onto concrete or drywall:
- paint – thanks to the varied palette, you can choose any shade, and, if desired, a textured pattern, thereby decorating the hallway space in an original way;
- wallpaper - good choice for those who, at the same time as replacing the door, are making repairs in the corridor, since the use of the same wallpaper on the wall and slopes creates the impression of a monolithic surface (a step-by-step algorithm showing how to decorate the slopes of the front door with wallpaper is described in the section on finishing operations);
- one-sided sandwich panels - due to the peculiarities of their structure (a layer of extruded polystyrene foam is attached to a sheet of polymer plastic), there is no need for additional measures for insulation and sound insulation of surfaces, and their minimal weight allows them to be mounted directly on the wall glue method;
- plastic panels are considered a compromise option, since, despite the external similarity with sandwich panels, plastic is very fragile, and when finishing deep slopes it is very problematic to achieve uniform rigidity over the entire area;
- MDF is quite durable (withstands medium impact loads without causing scratches or dents) and easy to install material, allowing it to be installed even under conditions of increased operating load;
- laminate or parquet board - a wide variety of colors and textures allows you to choose a panel tone-on-tone with the canvas and door frame, and high strength, designed for use as a floor covering, determines the long service life of the slopes.

Laminate cladding
IN Lately designers, trying to include the doorway into the overall interior picture, use atypical building materials to decorate it - ceramic tiles, mosaic, natural or artificial stone.

Artificial stone in the hallway looks modern

Tiling
Installation technology using frameless and frame methods
Before finishing the slopes of the front door, make sure that it is installed vertically and check the tightness of the installation seams. To do this, pass a lit candle around the entire perimeter of the opening and add sealant in places where the flame has deviated to the side. Don’t forget to cover the door leaf and frame with masking tape and cut off the remaining dried foam with a stationery knife. After that delete old plaster and loose areas of brickwork.

Wallpaper decor
Plastering - complete process algorithm
It is important to thoroughly clean the leveled sections of the wall from construction dust and coat them with a primer. deep penetration(it will strengthen base surface and will ensure high adhesion of layers). Pay special attention to the concrete lintel above the door - it should be treated with “Betonokontakt”, a special primer for surfaces that do not absorb moisture well.
After the primer has dried (after approximately 5–8 hours), the most accurate installation of the beacon profiles required for leveling the plaster slopes of the entrance door is required:
- Using a laser or regular level on the side wall 3 cm from the door, mark the position of a strictly vertical line.
- Drill holes with a diameter of 6 mm along it in increments of 30 cm.
- Insert 6x30 mm dowels into the holes and use twine to level the caps.
- Install the beacon on the clips and check the verticality of the installation again with a level.

The corner protection profile simultaneously serves plaster beacon
In a similar way, set corner profiles on top and along the sides of the doorway so that they are flush with the end walls and the area above the door.
After installing the beacons, you can begin preparing the cement-sand mixture. The simplest and cheapest option is to use quarry or river sand and cement grade M-150 or M-200. To get the right consistency, follow a certain sequence:
- Sift the building materials through a sieve with 3x3 mm or 5x5 mm cells.
- In a prepared container, mix 3 parts sand with 1 part cement.
- Gradually start adding clean, settled water to the dry mixture and at the same time mix the solution with a trowel or a special electric drill attachment.

If the technique is followed, plastered slopes last for decades
As soon as the mixture begins to envelop the instrument, like dough, the solution is ready for use. Use a trowel or spatula to force it onto the wall, trying to completely cover the profiles. After going through a small area, apply the rule to the beacons and smooth the plaster with it. This way you will achieve a perfectly flat surface.
Instructions for installing drywall or finishing panel
Adhesive finishing of entrance door slopes with laminate, plasterboard, sandwich panels or thin MDF sheet does not require smoothing the surface. It is important that the base is aligned vertically and does not have obvious defects. In this case, a slight collapse of the side wall can be corrected with a layer of plaster 8–10 mm thick. If you are lucky and the original surface is level, the task is extremely simplified and is reduced to a minimum of actions:
- Carefully prime the base on which the panels will be attached.
- Measure the dimensions of the slopes, mark them on the building material, double-check the marks with a tape measure and a square.
- Using a jigsaw, cut the sheet into the required number of fragments (you can install laminate and MDF vertically, with one lamella per slope, or horizontally - by installing small pieces of lamellas from bottom to top).
- Apply glue to the prepared part using the square-cluster method in increments of 15–20 cm in spots approximately the size of a Soviet nickel.
- Let the glue stain dry - a film should appear on its surface.
- Place the element in the desired location, align it with a small amplitude and, starting from the top edge, firmly press the panel against the wall with your palms.

Installation of the top strip made of gypsum plasterboard with polyurethane sealant
As a construction and installation mixture, you can choose liquid nails, for example, Titebond or “Instant Grip” (“Moment”). Polyurethane adhesive PUR 501 (Kleiberit) and even polyurethane foam are also suitable. However, you need to be careful when using the latter: if you apply it in large quantities to the material, further polymerization may cause the finishing details to shift.
In case if inner surface slope is badly damaged, there is no other choice but to level the doorway with plaster (for a step-by-step description of this process, see previous section), and only then proceed to the above algorithm. After complete drying, it is time to install the painting profile on the outer corners and final processing.
How to install door slopes on a frame with your own hands
The heavier the front door, the more likely it is that the slopes will experience excessive load. For example, after installing an iron door, finishing the doorway with plaster may cause it to crack already in the first year of operation. That's why frame method optimal when the need arises:
- preventing surface deformation;
- installation of heavy MDF sheet (more than 4 mm thick);
- eliminating excess space around openings.

Assembly of aluminum profiles into a frame
This option is also suitable for installing slopes in the bathroom or in other rooms where moisture regularly penetrates the walls, and it is not recommended to directly glue finishing sheets, especially if it is laminate or drywall. The simplest solution is to use it for a load-bearing base aluminum profile for the construction of walls and ceilings from plasterboard or wooden slats of suitable thickness, pre-impregnated with an antiseptic.
Scheme of preparation of opening walls and construction frame base looks like that:
- Clear the walls of debris and check them for cracks and cracks.
- Repair the surface if necessary cement composition.
- After the plaster mixture has dried, treat it with an antiseptic primer.
- Level the outer beam or profile and secure it with dowel nails with plastic sleeves.
- Install a second rack parallel to the first element and firmly attach it to the solid base.
- Install parallel posts around the entire perimeter of the front door opening.
- Reinforce the structure with longitudinal jumpers connecting both parts of the sheathing.

MDF slopes
Next, run communication cables through the upper part of the structure and place insulation in the cells. After this, make slope strips exactly to size and install them on “liquid nails,” ensuring that the gaps between them are minimal. Reinforce the fastening with self-tapping screws, hiding their heads under the decorative caps, and carefully fill the gaps between the parts with transparent sealant or tinted putty.
Video: How to make a slope on an MDF front door with your own hands
Finishing touches - finishing the slopes
As you can see from the results of the work in the video, there is no need to additionally finish the MDF door slopes with your own hands - the material on them looks advantageous as is. This applies to laminated and plastic surfaces: the finishing operation for them is to install platbands and mask the joints with furniture stickers or matching mastic.

Decor metal door
A roughly plastered doorway needs to be refined with paint, decorative plaster or wallpaper. Before painting, the slope must be covered with two layers of putty - a starting one, designed to eliminate the main irregularities, and a finishing one, necessary to obtain a smooth surface. The next step after puttingty is applying a primer and two layers of paint - water-based or acrylic.

Wood finishing
Due to the routine nature of the process, wallpapering is often abandoned, even when the required amount of finishing material is available. However, you can handle the process quite easily if you take into account some secrets:
- glue the surfaces not immediately after installing the slopes on the front door, but simultaneously with the entire hallway;
- for finishing the area around the door, choose wallpaper without a pattern;
- calculate the position of the canvas so that it covers the entire width of the slope;
- cut off the excess fabric taking into account its overlap beyond the corner line onto the adjacent plane.
Before sealing the opening above the door, cut a piece from the roll that is long enough to wrap onto the slope. Glue the wallpaper to the wall, eliminate all the unevenness and you can enjoy the result of the work you did yourself.
Video: how to stick wallpaper on a door slope
The above technologies do not show all the nuances - in each specific case a sober assessment of many factors that influence the choice of materials and structures is required. To be sure to protect yourself from mistakes and, along with replacing the front door, to bring the slopes into proper form, involve professionals in the reconstruction - they will relieve you of the burden of these far from easy troubles.
After replacing the door structure, the slopes are often a sad sight, so decorative finishing of the front door jambs is an essential part of the work. It is quite possible to complete it without resorting to the help of professionals. Today we will tell you how to level and refine the front door opening with your own hands, as well as what materials can be used for this.
Methods for making jambs and finishing materials
Depending on the amount of damage and unevenness remaining after installation of the structure, the slopes are designed in one of the following ways:
- filling the voids with mortar and plastering;
- fixing the facing material with an adhesive or solution;
- by installing the finishing panels on the frame.
Which option will be more suitable for your home depends on the characteristics of the door, general style interior, as well as personal preferences and needs. If it's important to you reliable sound insulation, then you should opt for continuous filling of the slopes with mortar. This will eliminate all voids and give the structure additional strength.
In some cases, when the consumption of solution for filling irregularities is too high, it is more advisable to mount the materials on a frame made of metal or wood. Thus, making the jambs perfectly even will not be difficult. Another advantage of this method is the ability to hide communication wires inside the slope and install a lamp or switch in it.
As for finishing materials, the most commonly used are plasterboard, plastic and MDF panels, artificial stone, laminate, wood or decorative plaster. They all have their own characteristics that should be taken into account. For example, plastic is quite fragile and is easily damaged by mechanical stress, and applying smooth, high-quality plaster will require a lot of effort. Based on this, we can say that drywall and MDF are the most versatile materials, but the final decision on how to decorate the doorway of the front door is up to you.
 MDF – universal material with a wide color palette
 Preparatory work
Regardless of the chosen method of decorating the slopes, finishing the front door with your own hands should begin with preparing the door structure and walls. First, you need to cover the surface of the frame and the door itself with masking tape or protective film to protect their coating from damage. Then the slope is leveled, eliminating too protruding fragments that may interfere with plastering or installation of the frame.
Next, the jambs should be cleaned of dust and small debris using a brush or vacuum cleaner and a primer should be applied. For priming it is better to use deep penetration compounds. To improve thermal insulation properties At this stage you can attach the insulation sheets. They can be polystyrene foam or polystyrene foam, which is mounted with special glue.
Plastering the slope
Finishing the doorway of the entrance door with plaster begins with the installation of beacons, which can be used to navigate when leveling the surface. They are set according to the level, and it is best to attach them to a gypsum solution. You need to install 2-3 beacons on the sides and top.
After the plaster under the beacons has set, you should begin applying the plaster itself. To do this, you will need to prepare a solution of water and sand with cement (in a ratio of 1:4), you can also add a little gypsum to the plaster. Then the mixture is thoroughly kneaded using a special attachment on a drill and brought to the consistency of thick sour cream.
 Make sure the mixture is evenly distributed
 The prepared mixture is distributed over the surface of the slopes with a plaster trowel and leveled along the beacons. First of all, the upper slope is plastered, and then the side slopes. After applying and leveling the solution, it must be allowed to dry for at least 24 hours.
Next, perforated corners made of plastic or metal are attached to the outer corners of the slopes. If the room has high humidity, then the first option is preferable, since the metal in such conditions can rust over time and ruin the appearance of the structure. Then a layer of starting putty is applied, a reinforcing mesh is placed on top of it and finishing putty is performed. After drying, the coating can be painted or left in its original form.
Formation of a slope with finishing material
Finishing the front door with stone or other decorative material is a modern and popular way to decorate slopes. Priming and leveling are carried out similarly to the method described above, and then the selected finishing panels are fixed on the door slopes special glue or solution.
To check the uniform distribution of the solution during leveling, it is recommended to screw into door jambs screws aligned. The material will subsequently rely on them. The remaining voids are then filled with mortar, leaving the screws protruding slightly.
The filler is a standard cement mixture, the same as in the option of preparing slopes for plastering. To obtain a stronger adhesion, a layer of adhesive is applied to the dried solution so that the remaining small space up to the screw heads is filled with it. Glue is also applied to the back side of the selected material.
 Stone finishing
 Further decorative panels applied to the slopes and pressed until they meet the screw heads. Before the glue has time to harden, you must check the correctness of their location and, if necessary, correct it. Sometimes, if there were errors during alignment, gaps may form in places after the glue dries. In this case, they can be covered with sealing compounds and hidden under the door trim.
Advice! If you plan to put wallpaper in the hallway, it is better to do this before installing the trim.
Installation of slopes on the frame
And finally, let's look at how to finish the front door by securing the materials to the frame. For this type of finishing, priming is also performed; it helps prevent the surface from crumbling. Then you need to prepare everything you need to build the frame structure, namely:
- metal profile or wooden blocks;
- fasteners;
- tools (drill or hammer drill, screwdriver, level).
 Metallic profile for frame
 The slopes should be leveled so that the frame fits tightly with the walls. Next, holes are drilled along the entire length of the slopes and dowels are inserted, two profiles or wooden bars, located parallel to each other. It is recommended to strengthen the structure in the corners by placing lintels between parallel frame elements.
Once the frame is ready, you can place communication cables inside it and proceed to attaching the finishing panels. Depending on what material was chosen, the installation process has some features.
If you decide to make slopes from plasterboard, then you should fix it to the frame using small self-tapping screws. Usually there remains a small gap between the wall and the material, which can be hidden by sealing it with mortar. The joints between the drywall and the edge of the slope must be reinforced with reinforced perforated corners, and the remaining joints must be glued with sickle tape, paying particular attention to Special attention the junction of the top and the sides.
The final finishing of the jambs consists of filling the surface and leveling it with a finely abrasive trowel. Then the slopes can be painted or wallpaper can be glued on top.
Note! Painting drywall is usually done water-based paint, using a roller to apply it, since a brush does not provide the desired uniformity of coverage.
 It is better to hide the joints between MDF panels under special trims
 When installing MDF panels, which are one of the most durable finishing materials, fastening occurs in a similar way to drywall. However, in terms of labor costs, MDF even wins, since the mass ready-made solutions This material significantly reduces finishing time and simplifies it. The joint lines formed during the installation of MDF panels are best hidden under the platbands, which are attached to liquid nails.
Do-it-yourself interior decoration of the front door can be done using laminate. It is laid lengthwise or crosswise, with the individual fragments being connected to each other by means of a lock. When the lamellas are arranged transversely, every third lamella must be secured to the frame with self-tapping screws, and when lamellas are arranged longitudinally, all side lamellas are fixed in three places (at the top, bottom and middle). After completing the installation, all that remains is to attach the trim and perform minor finishing work, for example, inserting lamps or a switch, if these elements were planned.
 Installation of lighting - the final stage of work
 As you can see, decorating slopes, be it decorating the front door with decorative stone, drywall or plaster, is a completely feasible task even for a non-professional. All you have to do is choose the option you like and get to work. Good luck!
Finishing the entrance door slopes can be done in various ways. Each of the available options has its own advantages and disadvantages and is selected individually. It is advisable to take into account many factors, which include the overall interior design, possible financial costs, as well as the skills needed to complete all stages.
How to finish the slopes of the front door? This question always arises when there is a need for this kind of finishing. There can be many reasons for this work:
- Installation of a new structure. This is the most common situation. During installation work, adjacent areas are destroyed. It often happens, especially in old houses, that the old layer of slopes completely crumbles, because they are made of plaster. Should be considered, new door must be installed correctly, without distortions, to eliminate subsequent repair work.
- The appearance of defects. Over time, any finish becomes unusable. The same situation occurs with slopes, especially if they frame the entrance opening. Cracks, shedding, and traces of mechanical impact appear on the surface. It is very important to assess the situation in time in order to install new door slopes without unnecessary work.
- Changing the general appearance of the room. Really, new cladding DIY entrance and interior doors are necessary when the design of adjacent rooms changes. Sometimes it seems that the door slope is an area that does not affect the overall appearance of the interior. This is a mistaken opinion, because even such a seemingly insignificant detail plays an important role.

On a note! There is another reason for replacing slopes, which is the appearance of mold and mildew. This situation will require cleaning the surface to the ground, cleaning all affected areas and impregnating it with antiseptics. You should immediately find the reasons leading to this problem.
What material to choose for constructing slopes?
There are many options that allow you to make the front door slopes yourself.
- Plaster.
This finishing material used everywhere. It must be taken into account that this option has the lowest cost. All work is carried out independently, without the use of special tools. More recently, this method was one of the main ones, but recently its popularity has begun to decline. There are many reasons for this, among which stands out - not the most beautiful visual appearance. Of course, this state of affairs can be easily corrected if you use decorative and textured plaster.
- Drywall.
The popularity of gypsum boards is only growing. This material allows you to complete all work quite quickly. But this is true for large areas. If you only finish the slopes of the front door from the inside, then there will be a need for additional manipulations. The fact is that during installation, numerous cracks (joints) appear that need to be filled with putty.
- MDF panels.
This includes laminate flooring. Such products are excellent for finishing work. The panels are installed very simply, the resulting surface has an excellent decorative look. But there is one drawback: if the width of the opening is greater than the material used, then it becomes necessary to join. Laminate creates less noticeable seams, but they also worsen visual perception. Finishing the MDF entrance door opening
 - Natural wood.
Of course, make door slopes using natural wood- This is a rather expensive procedure. But we must not forget that the result is a very beautiful coating that has unlimited durability. If necessary, restoration work can be carried out. All activities must be carried out in compliance with numerous technological nuances.
- Laminated chipboard materials.
This option allows you to veneer even very wide openings. Many people mistakenly perceive laminated chipboard as exclusively a material for making furniture. In fact, for cladding areas adjacent to the front door, more thin sheets, which have very impressive characteristics.
Advice! Currently exists big choice Chipboard. For installation, sheets are used that have a thickness of 6 to 10 mm.
- PVC panels.
Plastic slopes are an option that is more suitable for working with window openings. The fact is that this type products often come into disharmony with the material entrance structures. Of course, modern technologies make it possible to choose suitable solution, but this is not always possible.
- Decorative stone and brick.
There is an opinion that this method is rapidly going out of fashion. In reality, the situation is not so sad. This material allows you to obtain an individual and reliable surface. Please note that laying the parts will require large quantity time. Many masters point out that in the future it will be very difficult to perform Finishing work walls After all, to work you will have to use a limited set of options. So, for example, cladding with any types of panels will be difficult - they are difficult to fit under the masonry.
- Extras.
This material is most suitable for mounting slopes on interior doors. A box of such designs assumes the use of this option. Therefore, door manufacturers are developing a whole line of extensions that are completely identical in color and texture to the door leaf.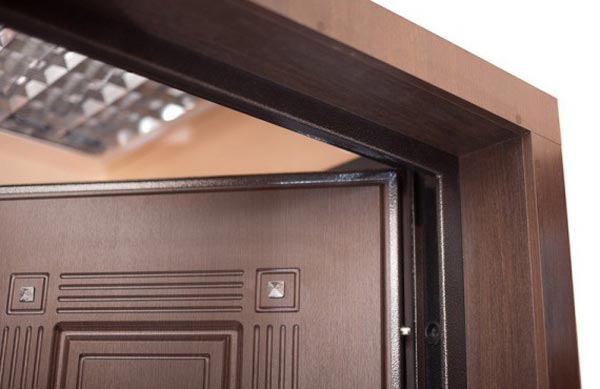
Preparatory activities
Installing slopes on the front door begins with preparation. It is important to perform the work efficiently to avoid correcting possible problems.
The activities are:
- The surface is cleaned of existing remnants of the old layer. If the coating crumbles, it should be completely removed to the base.
- If a new structure was installed, then excess polyurethane foam remains. It is cut using a stationery knife. We must not allow excess to be removed.
- All joints and cracks between the frame and the wall are coated. Sealing is carried out around the entire perimeter.
- Sections of the walls are finished with plaster. If sheet and panel materials, then the entrance door slopes are sealed without thoroughly leveling the surface.
- Treatment with antiseptic and priming compounds is mandatory. This will help prevent mold and mildew from appearing. It will also improve adhesion if the door slopes are finished with decorative mixtures after installing the front door.
- It is necessary to ensure the complete absence of areas that may contain small cracks. It is precisely these, sometimes unnoticeable defects, that are the source of drafts and unpleasant howls when it comes to entrance openings.

Slopes on the door are installed only after complete preparation.
Technological aspects of working with certain materials
Each material has its own characteristics and technological aspects, which should be considered in more detail.
Working with plaster: simple and decorative (textured)
Slopes on the front door using ordinary plaster are made as follows:
- The required amount of mixture is prepared, which should be enough for 35-40 minutes of work. If there is a surplus, they will quickly lose their properties.
- The solution should be applied in layers equal to 1-1.5 centimeters. It is taken into account that more than two layers require reinforcement with reinforcing mesh.
- To obtain a flat surface, beacons are installed. They are fixed to a small amount of plaster.
- The existing experience should be realistically assessed. If it is not enough, then a wooden strip is laid along the outer edge along the entire perimeter. It should protrude to the width of the applied layer. That is, it will serve as a guideline in order to prevent curvature.
- After drying, the beacons are removed, which leave behind small defects. They are eliminated with a newly prepared solution. Care must be taken when removing slats. Corners can be reinforced with perforated corners.

After the surface has completely dried, the slopes for the entrance doors are finished decorative materials. This could be paint, wallpaper. But it will look much more interesting decorative plaster(). It is applied after priming:
- The decorative mixture is placed on the surface.
- With the help of various devices, the relief is formed (watch the video). If a decorative solution is used, the coating is obtained by proper smearing.
- Subsequently, depending on the material used, paint, varnish or waxing is carried out.
Thus, plaster can still be great solution for finishing slopes, especially if simple repairs or interior renovations are being carried out.
Drywall: installation with putty
How to make front door slopes using gypsum plasterboards? The work is carried out according to the following principle:

How to seal the joints and cracks that appear? Indeed, when you install plasterboard fragments on the front door yourself, finishing measures are necessary. They consist in the fact that the corners are formed using perforated pads, and the surface is covered with a layer of putty.
Installation of gypsum plaster boards differs from plastering in that the base is formed much faster. The work does not require any special skills.
MDF panels: fastening to the lathing
Finishing of slopes using MDF panels is carried out on the sheathing. This method is preferable for situations where the installation seam is more than 4 cm.
The product should be installed using the following technology:
- A wooden beam is installed around the entire perimeter of the opening. The parts are laid horizontally. Fixation is carried out using dowels.
- It is advisable to treat the planks with an antiseptic before installation.
- The resulting cells are filled with insulation.
- All areas are measured. Panels are cut out. They are tried on in their places.
- Fastening occurs with self-tapping screws that are screwed into the very edges. They will be covered with decorative corners.
- Thus, all elements are fixed to the frame.
See photos before and after finishing with MDF panels:
 Sheathing MDF slopes: doorway before and after finishing
 Laminated chipboard: installation on vertical racks
Door slopes with your own hands using laminated chipboard - this is not the best The best decision. But if installed correctly, the coating will be durable.
- The whole process almost completely repeats the work with MDF panels. The difference is that the wooden beam is installed vertically. That is, you need to get two racks that are fixed on each edge.
- For work, LDPS is used, which is most suitable in thickness. After taking the dimensions, the parts are cut.
- To avoid repairs to the material due to water ingress, all open ends are coated with sealant.
- The elements are fixed through pre-drilled holes, which at the initial depth should be slightly larger than the diameter of the cap. This will allow you to recess the screws so as not to damage the front side. All holes are covered with special wax or sealed with overlays.
- All corners and joints are covered with decorative corners.
This method is convenient if you are covering the slopes of interior doors, which are less susceptible to moisture.
PVC panels: fastening with glue
This material is less often used for such work. Also, many people mistakenly believe that they can give preference to the cheapest options. In fact, such a choice leads to the fact that the coating begins to deteriorate immediately after installation: defects appear, color changes.
Most often, plastic panels are fixed with glue:
- Executed carefully preparatory work. Differences should not be more than 2 mm per 1 m.
- The panels are cut according to the dimensions taken from the areas to be covered.
- Please note that the fastening is done with glue. Therefore, before installing slopes on the door with your own hands, all surfaces must be pre-treated. A primer is used for the walls, and the plastic is sanded a little with inside sandpaper. Such procedures will increase adhesion.
- The glue is applied with a snake. It is important to consider that excess mixture is removed immediately, otherwise the surface may be damaged, which will lead to repair or replacement of parts.
- The elements are pressed against the base, but are not held in place, but immediately come off. After waiting a few minutes, they are finally installed.
- Now all that remains is to secure the decorative fragments.
 The simplest and quick way PVC installations panels on slopes - this is fastened with glue
 Modern PVC options have sufficient strength and beauty. As an alternative, sandwich panels are used.
Decorative stone and brick (tiles): the main thing is to draw up a diagram
How to make slopes on doors made of artificial stone or similar materials? The procedure is:
- It all starts with drawing up a diagram. It should reflect the actual position of the elements. If laying bricks can be outlined on paper, then more work will have to be done with stone.
- Initially, the surface is marked. It is immediately taken into account whether the parts will lie only inside the opening or frame the outer part.
- Detailing is done on the floor. It should be quite detailed.
- Now they start facing. The stone is fixed with glue or a special mixture. It is important to consider whether suture or seamless technology will be used.
- After installation, if the surface is not protected, it is varnished.
We encourage you to additionally watch this video:
Thus, door slopes can be made of various materials. Each option is selected individually.


