Buying a good-quality garage structure in our time is not a cheap pleasure. It is cheaper to make a garage door yourself, but certain knowledge and skills are required. It is also advisable to have the skill welding work. Therefore, how to make a garage door with your own hands is a question that needs to be thoroughly understood. But then it will be possible to begin to complete the task.
Near a private house
Most users choose them for their compact size.
Advantages: convenience, burglary protection, universal use. Disadvantages: high cost, folding structures are subject to damage.
Swing gates
Shown in the photo swing option designs.
On a suburban area
Sliding gates
Rollback option
Up and over gates
These are the most practical and convenient vertical structures. When opened, the sheet of metal rises up and lies horizontally in the form of a visor. The design of such a mechanism is simple. The canvas is attached to the frame and moves around an axis, changing its horizontal position to a vertical one. Folding gates are easy to use.
Lifting structure drawing
Advantages: resistance to corrosion and burglary, do not require additional space.
Comparison of characteristics
Based on the indicators in the table, we can say that the choice is only up to the buyer. It all depends on cost and reliability. For example, swing and sectional models are good to install in a home garage, but they are not suitable for garage cooperatives, as they have a low degree of reliability.
Up-and-over garage doors are suitable for any building, but their main drawback is their high cost. Due to the low price, they are suitable for a private garage swing gates. If necessary, they can be insulated, automated and reinforced with an additional sheet of metal. In addition, it is easy to weld garage doors at home.
Frame structure diagram
The frame is made from metal corner, which is welded around the entire perimeter of the doorway. This is how the slope is finished inside and outside. The inner and outer corners are welded together with metal strips in several places. You should get a frame frame.
After the frame is ready, collapsible hinges are welded on the sides. The lower part must be connected with an outer corner, and the upper part with the frame frame. This design is also suitable for a garage made of
When buying a car, every owner thinks about how and where to store it. Ideal place There has always been and remains a garage. Its convenience determines the quality of life, no worse than other rooms in the house. The installation of garage doors is becoming more and more convenient and practical every day due to the fact that the industry does not stand still. Classic swing gates fade into the background. Practical overhead garage doors are becoming increasingly popular today. Creating them yourself does not seem difficult if you have minimal skills in performing such construction work. To find out how to arrange them correctly, quickly and efficiently, read this article.
To make a homemade overhead garage door, first determine suitable option designs.
Based on this principle, the following types are distinguished:

Features of sectional structures
The most common type of garage door this moment- sectional garage doors. They are made in the form of panels 40-60 cm high. 
Panels are made from several types of materials:
- plastic;
- metal;
- wood.
Important! Determine the choice specific type material to create a garage door design, car dimensions, expected number of cars, as well as features design idea design of both the garage itself and the architectural ensemble on the site as a whole.
To maximize the quality of thermal insulation, such panels are filled with polyurethane, and the surface is protected with a special coating. The individual elements are fastened together with hinges. All moving parts, such as clutches and rollers, are made from reinforced plastic combined with steel components, and the guide skids are made from materials that do not corrode. 
The operating mechanism of sectional garage doors is quite simple - they are pulled along runners to the ceiling when opened and fall vertically down when closed.
Advantages
The main advantages of such gates include the following features:

Flaws
In addition to the advantages sectional doors lifting type also have a couple of disadvantages:

Distinctive characteristics of lift-and-turn solid mechanisms
When determining the features of such structures, it is certainly worth noting the following nuances:

Advantages
The solid-panel type garage door has a lot of advantages:

Flaws

Important! The main difference between these two designs is that sectional Garage Doors must be mounted only as a set, while all elements overhead gates able to prepare and install with my own hands.

Video
Watch a video review of overhead gates to get a clearer picture of their operation and design.
Garage door installation tools
To install any type of garage door you will need the following tools:

Installation rules for overhead sectional garage doors
To correctly install sectional overhead garage doors, follow these steps in exact sequence:
Video
The video below will help you quickly complete the task of creating overhead garage doors. Please read it carefully.
Installation technology for overhead gates
Considering the fact that the construction of this type of gate will have to be done entirely on your own, we will highlight the main stages of the work in somewhat more detail. 
What type of rotary mechanism should I choose?
Homemade garage doors are the most economical option for filling a garage opening without restrictions in convenience, functionality and design solutions. 
Before you start work, decide on the choice of mechanism by which the gate is directly opened:

How to make a project correctly?
To properly design a garage door, do the following:

What materials should I prepare?
Once you have drawn up or selected a sketch, purchase following materials and tools for work:

Installation procedure

Additional equipment
If you want to increase the attractiveness and reliability of the door leaf, equip it with the following additions:

Additional reinforcement
If necessary, strengthen the structure itself using one of the appropriate methods:

How to save money when installing garage doors?
The only thing you can do to save money when choosing overhead sectional garage doors is to install such a mechanism yourself. All other points, when trying to save money, will still require sacrificing certain advantages, although some options are quite acceptable. It all depends on your personal vision of the garage design and the regularity of its use.
Check out some of the most popular solutions to reduce the cost of garage door construction:

Conclusion
Overhead garage doors - modern way protect your garage from burglary with a convenient and beautiful shield. Whether you entrust installation and installation to specialists or do the work yourself is up to you to decide. The main requirement for further convenient operation — right choice suitable type of garage arrangement, competent interior layout and compliance with all assembly instructions.
This option and type of gate will be optimal for self-production. This does not require much time or any specialized skills. Basically, to make a gate with your own hands, you will need:
- welding machine;
- metallic profile;
- rollers;
- The shield itself is for the gate.
Basics of work
First, you should finish any work inside the garage. The design feature means that dust getting into the guides or rollers can interfere with normal operation and malfunction. Again, the floor should be finished after installing the gate, since it (the frame) must go at least 2 cm deep. The walls and garage opening must be level so that the guides can be easily installed.
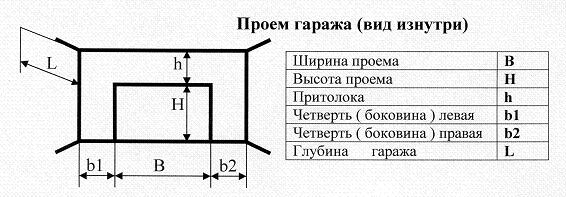
The next step will be to take measurements of the opening. This is how you can determine what height the guides are needed and what size the shield will be. In Fig. 1 is an example of what sizes you will need.
Frame making
The next action that should be taken is the manufacture of the frame, the base of the gate. Here are several options available for use:
- steel structure can be used;
- you can use wooden blocks.
The final choice is yours, but still, metal will be more reliable. As soon as the frame is welded, it should be tried on in the opening to eliminate various errors or miscalculations. If the frame is level, you have checked its position both horizontally and vertically, it should be secured at least with anchors. Your frame should look like this:

If you have gaps between the wall and the frame, the gaps should be blown out construction foam, and then secure the horizontal guides that should be under your ceiling.
After you install the frame, you should weld the brackets for the rollers to the guides and install the rollers themselves. The upper brackets with rollers should be installed a little further forward. This will ensure normal operation - the gate will not cling.
The image below gives you a closer look at what your frame should look like from the outside.

Selecting and creating a gate shield
Since it will be located outdoors, the shield should be made most resistant to various climatic conditions. The shield is made from any available materials. It can be:
- wooden blocks covered with metal on the outside;
- you can use a solid sheet of metal;
- you can make a frame from several steel profiles, With minimum distances from each other, and then sheathed with pieces of metal.
Again, no one forbids you to use, say, plastic as a finishing material. In this case, the appearance of your gate will be aesthetically pleasing. Moreover, the color of the plastic is offered in a wide range.
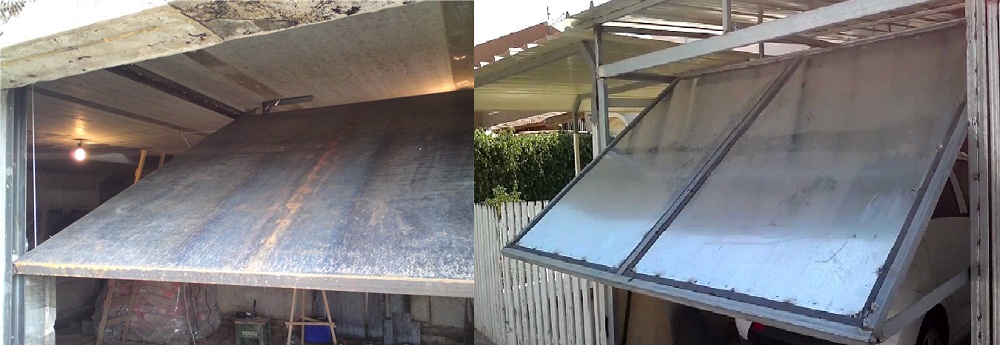
In the picture below, you can see ready-made options. In the first case, a solid a metal sheet, in the second - a shield covered with metal is presented.
When making a shield, there are several little tricks that will be relevant for any owner.
Firstly, you can knock down your gate special materials which will help keep the room warm even in frosty weather. Such materials will be quite easy to find. And hitting the gates with them will not be difficult and will not take time.
Secondly, it's worth giving one more helpful advice. In order not to once again use the entire structure of the gate, and not to open it completely, you can make a gate in the shield through which the owner can enter. In the figure below you can see an example of such a solution.

Many people make windows in the gates. In this case, you also have two solutions. You can cut a hole in the canvas and seal it yourself with glass or plastic, or you can buy a ready-made gate window at a specialized store.
Having completed all the work, the finished shield should be placed on the runners and the functionality of the structure should be checked. Next, install (weld) the springs. They will ensure smooth opening/closing of the gate, and will also facilitate this process.
In the photo below you can see finished design how it should look outside and inside the garage.

Installation of additional parts
These include:
- handles for opening;
- latches for fixing the gate;
- locks and temples.
Handles should be made at the bottom of the canvas, both from the inside and from outside. This approach will allow you to easily close and open the gate without clinging to the edges with your fingers. And in the cold season this will be very problematic.
The latches should be installed with inside canvases. So, if you have made a gate, you can only open the gate from the inside. This will completely secure your garage. If the garage is attached to the house, and there is an entrance to the garage from the residential part, then the purchase and installation of latches and latches can also be called the optimal solution.
If the garage is a separate building, then it should be closed with special locks. Or, you can buy ordinary, hinged ones, having previously made bows on the canvas and on the vertical frame (on the side facing the street, outward).
In fact, this will be the final stage self-installation and creating overhead gates with your own hands. All you have to do is paint the frame and the shield in the desired color, or, as mentioned above, do the upholstery of the shield thermal insulation materials or soundproof.
But this is not all the work that can be done. Eat alternative options in the mechanism, as well as modification of existing gates.
In particular, you can install a counterweight system. To do this you will need a winch and cables. In this case, you can achieve a smoother ride, and it also opens up great opportunities for modifications.
The basis for safe operation
In the process of working on the gate, having finished the basics and checking the functionality of the structure, it is worth taking care of safety. It is necessary to make stoppers that will not allow the canvas to leave the guides. This is very important point which can protect you from injury.
Gate automation
In most cases, DIY overhead gates are opened and closed manually. It's simple and reliable. But, on the modern market there is a wide range of various drives that can be installed on your gate. In this case, you can open or close the gate only by pressing the corresponding key.
Installing such a system will also be quite simple. The drive, along with the necessary components, is sold in any store specializing in the sale and installation of gates.
Again, you can make your gate open remotely. It's very simple. On almost all drives you can find a control panel, and in the instructions you will find sawing of the contacts. Connecting everything correctly will not be a problem - it will be difficult to give an example here, since different manufacturers use their own standards. But in any case, such information can be found in the instructions for the drive.
By installing the drive, you will receive a gate that is in no way inferior to the factory one, with the ability to open remotely, with all the advantages and features, but much cheaper. Final version appearance The DIY gate can be seen below.
By following this guide, you will surely be able to create your own gate easily and simply. And you can see the results of the work of other people who also set out to create lifting gates with their own hands in the video below.
Video - Do-it-yourself lifting gates, drawings and assembly features
Up and over gates have become especially popular today. All more people they choose them. They will reliably protect the room from burglary and will not take up much space.


Design Features
Previously, all gates were the same, with large, heavy metal leaves painted in unpleasant colors. Today they have changed dramatically in terms of constructive solution, materials and appearance. To keep your car safe and protected, choose a garage with reliable swing-up overhead doors. Distinctive feature from other models is theirs unusual design. These gates are the most convenient and reliable type of garage structure, which is quite expensive.


When installing gates of this type, several conditions must be met for further high-quality operation. First of all, this is the size of the opening. The width should be no more than 5 meters, and the height should be no less than 2.85 m. The distance from the wall to the edge of the opening for installing guides should be at least 120 mm, from the ceiling to the upper edge of the opening 210 mm.
Taking into account the dimensions of the vehicle, the dimensions are adjusted.


The design is quite simple. The gate rotates around its own axis, moving from a vertical to a horizontal position and vice versa. Their constituent element is a frame that is mounted in the opening of the room or behind it and is the most important element to open the gate. In most cases, it is made from pipes with a rectangular cross-section.


When opened they work roller mechanism and lifting levers, which move the gate leaf along guides and secure it under the ceiling of the room. The bottom rises up, thus creating a visor. When the gate is closed, the compensation springs immediately stretch, and when they are open, they are in their normal state.

It is known that automatic structures can be made to order. But, despite the difficulties in manufacturing, you can design them yourself.
The complexity of manufacturing depends in most cases on the model you choose, the dimensions and your skills in working with drawings, electric tools and a welding machine.

When making a drawing of a product, it is necessary to indicate on it the main points:
- wall size;
- opening parameters;
- size of main racks;
- corner joints;
- length of guides and tires.

If necessary, you can use ready-made sketches of these models by selecting required drawing. Before starting work, first be sure to familiarize yourself with the basic operating principle, as well as the specific installation of this structure.

Kinds
According to state standards and standards, this design is presented in three types:
- Lifting sectional design, consisting not of a single piece of fabric, but of several sections that are attached to each other with loops. There are usually three loops - at the edges and in the middle. On the sides of the gate there are guides with recesses into which rollers are installed. When opened, the sections move along the grooves in the guides and rise upward one after another. When such a gate is opened, the top panel moves relative to the previous one, and an arc is formed. Such gates have good thermal insulation, reduce the distance to access the garage, but have a complex, expensive design. Mainly used in industrial areas.


- Lift-and-swivel design is the most optimal and convenient to use, despite its cost. When opened, it lies horizontally and protrudes slightly outward. It is easy to use and install. It's quite difficult to hack.


- Lift-vertical design usually used in industrial premises With great height ceiling.
How to do it yourself?
If you decide to make up-and-over gates yourself, then you need to take measurements and sketch out a drawing, prepare the necessary tools and materials for this, namely:
- return springs;
- brackets;
- counterweights;
- cable;


- roulette;
- level;
- drill;
- components for making the sash;
- welding machine;


- corner;
- screwdrivers;
- profile pipe;
- channel;
- guide skids;
- metal for finishing, etc.


Materials needed to make your own up and over gates:
- wooden beams with a section of 100x100 and 120x80 mm;
- 2 springs with internal diameter 30 mm;
- corners 40x40 and 4 mm thick;
- anchor bolts and screws;
- steel rod with a diameter of 8 mm.


Before installing the structure, it is necessary to take into account some nuances. Sometimes installation of the product is impossible, since it is attached only to rectangular openings. The height of the opening decreases when open gate. If the sash of the structure is sheathed with a solid fabric, it is dismantled, changing the entire casing.

Main components of the design:
- the frame, which is the main element, on which all other parts are attached;
- a swing-type sash, which is mounted in a steel frame;
- spring required for manual closing;
- the mechanism that makes the doors work.

Installation
The mechanism that makes the doors work is best made from lightweight materials, which will make the load on the product lower, thereby extending its long-term use. Next, select the mechanism that is used to open the sash. The articulated lever is the most common because of its simplicity as well as reliability. You can also choose a counterweight mechanism. It is used in the construction of large, heavy gates.

TO next stages installations include:
- Assembling a box from three beams fastened together with corners or metal plates. The bars are deepened into the floor by at least 2 cm.
- Hinges are installed. A top bracket is installed at the top under the roof.
- The sashes are made by cutting the metal corners to the required length. Using a welding machine, they are used to make a frame into which the sash elements are mounted and everything is secured with screws.

- Installation of rails is the part of the product into which articulated rollers are inserted. They should move easily and normally.
- To secure the lifting mechanism, the sashes are pre-installed.
- Attaching the hinge mechanism to the sash. For this purpose, hinges are attached. The levers must move freely and be parallel to each other.
- Connection of counterweights and springs mounted on the guide bracket. The springs must be attached to the left and right of the sash in parallel.
- Overlays are installed at the ends of the product.
- Plaster the joints.
- They install the lock. You can also control the gate opening process using the remote control.


As finishing coating surfaces can be used plastic or metal sheets.
When installing the product you must:
- measure and make the frame;
- measure the diagonal of the entire opening;
- the elements of the canvas frame must be grabbed using a welding machine so that the sash passes easily and the gaps are minimal;
- weld the lintels and all frames using the machine;
- install jumpers;

When purchasing a car, owners first of all think about a cozy, warm, comfortable and spacious home for their steel friend. This individual space is called a garage. It can be attached to the house, or it can be a separate small building.
In any case, the garage simply must be equipped with a personal car entrance. Garage doors are the very first option in search queries for those who want to create this miracle of mechanics and technology with their own hands.

Types of structures
It would seem that there is nothing simpler: choose standard gate under your opening - and not have additional headaches. But folk craftsmen, proving to themselves and the world that they are no strangers, continue to look for new ways to save money and use their own creative powers and technical skills.

Among the wide variety of garage doors, there are basic designs that daily delight even the most demanding car owners with their functionality.
The simplest of them are classic swing models.. They usually consist of two leaves, in one of which the entrance door is installed. As a rule, swing gates are very massive and take up quite a lot of space. Since their opening requires a fairly large amplitude. They are installed on a metal frame, to which they are attached with durable canopies. Such gates require increased attention: lubrication control hinged mechanisms. Due to insufficient maintenance of swing gates, you can sometimes find them sagging.


Sectional doors for the garage are several metal movable panels connected to each other by hinges. The edges of each part are equipped with special rollers that move along special guides installed in the gate opening. They go under the ceiling, thanks to which the sectional doors smoothly go up, while saving space in the room.
There is a convenient variation of this type, when the gate slides to the side.

Folding garage structures also consist of vertical sections. But more often they are swing gates that fold like an accordion on the sides. They can be installed in an opening of any width (the number of sections - canvases - will depend on this).
They can be installed in such a way that they will fold both inward and outward, depending on the size of the room and the need to save it. The main load falls on the walls and ceiling, thus leaving the space free and unused.


One of the most common and easy to install types of garage doors are overhead structures. Like others, they can be automatic, but also have their own unique lever mechanism.
The mechanical model of overhead gates opens and closes with a slight movement of the hand., and by installing an additional bar with a motor, you can get excellent automatic gates on the remote control.

Materials
Any garage door is made from the following basic materials:
- metal (corrugated sheeting);
- tree;
- steel.

Structures made from corrugated sheets have quite long term operation and have high strength. Treated with special anti-corrosion agents, such gates will be resistant to moisture and temperature changes. In addition, care metal structures much easier than any other materials.
Corrugated sheeting is very easy to cut and divided into the necessary sections/sections, removing additional weight load on the guides. However, when independent work above the garage door, it should be taken into account that it is very easy to get deeply cut on the cut edges of the metal. Basic safety rules will protect you from getting an unpleasant injury.

Wooden garage doors are less in demand on the market, but also have their own functional value. Along with metal ones, they have a low price. Wood is always beautiful and natural. Perhaps, this is where all the advantages of the material end.
Wooden gates are fire hazardous, less durable and have very low strength. They are susceptible to rotting even after treatment with antiseptic and other impregnations.

Steel structures They are somewhat more expensive than wooden and metal ones, but are just as durable and strong as the latter.
The main horse that most modern car enthusiasts and professionals bet on is sandwich panels. Practical and economical, such gates are good heat and sound insulators. They are very easy to install, insulate and wash. Excellent fire resistance properties will ensure the safety of your car in the garage with such doors.
Profiled sheets are also an excellent material for making garage doors. With such an entrance structure you are not afraid of weather conditions and mechanical damage. This is a very durable, beautiful and economical material.

Dimensions
Modern manufacturers of garage doors offer a huge number of dimensional varieties of their designs. Some can even make them to order. Do necessary measurements in your garage it will not be difficult for you.
There is also the opportunity to make an independent calculation using preliminary drawings and diagrams. It is imperative to take into account the specifics of the room, the material from which your gate will be made, and the weather conditions that await them at different times of the year.

Professionals insist that overhead gates can only be installed in rectangular openings. The lifting mechanism also cannot be made differently than what is included in classic models.
A good option is to take ready-made standard drawings of overhead garage doors and substitute your own values there so as not to make a mistake. In this case, the diagram must take into account not only the dimensions, but also the location of the entire structure as a whole. Special attention It is worth paying attention to both the gate leaf itself and the lifting mechanism.


The drawing details what measurements need to be taken and where.
The decryption is quite simple:
- H– the height of the opening into which the gate frame and the structure itself will be installed. It is very important to understand that the total height of the opening and the maximum height of the car that can enter the garage after installing the gate are two completely different things. This distance is measured in order to understand how much gap remains for lifting the gate to the ceiling.
- L– the lintel or depth of the garage and b1, b2 – the shoulder pads are necessarily located in the same plane, but they must have different sizes. In this case, L is always greater.
- B– the width of the opening should be measured with gaps of approximately 2 cm on each side.
- L– the depth of the garage is necessarily greater than the height of the entire gate structure, otherwise the door leaf simply will have nowhere to “go.”

How to do it?
It takes two to five days to make overhead gates yourself. Depending on the desired result.
For example, there are two types of lifting mechanisms:
- Levers + springs. Not the simplest, but the most common and safe way lifting and lowering garage doors of light weight. During installation, special attention will have to be paid to fixing and adjusting the springs and high quality roller guides.
- Counterweights. Typically used in making homemade folding gates heavy weight. The cable is stretched from the lower corners of the canvas, passes through special block and is attached to counterweights located at the other end of the winch.

Determining the lifting mechanisms gives a clear picture of what tools and materials you may need during the production and installation process.
Let's consider the main stages of manufacturing overhead garage doors:
First stage– creating a layout and drawing of the future gate. A little has already been said about this. But when describing the production stages directly, you should start with this.

The second stage involves the acquisition necessary tools and materials for making gates:
- Rectangular pipe profiles 40*20 mm and 20*20 mm. It is very important that they have sufficiently dense walls: at least two millimeters. The former are well suited for making a canvas frame, and the latter - for longitudinal and crossbars and guides.
- Gate leaf. Here the owner needs to decide for himself how he wants to see the entrance to his garage: profile sheet, sandwich panel, wood, metal.
- Wooden beam or metal corner. If you decide to use a lever-spring mechanism, these tools are ideal for securing it.
- Sliding rollers and the gate lifting mechanism itself.
- Insulation if you decide to make your garage warm even in the cold season.
- Kit complex instruments: grinder, welding machine, screwdriver.
- Among the simple ones - only what can be found in the arsenal of any craftsman: a level, a screwdriver, a tape measure, a pencil, a hammer, wrenches.


When preparing the opening it should be taken into account that it must be in the same plane with the walls of the garage itself. This will improve functionality and simplify the operation of the structure.
Let's start leveling the walls, which can be adequately assessed using a construction water or infrared level. But also prerequisite is the strength and horizontality of the floor covering.

So, all the preparatory measures have been completed, we proceed directly to the manufacture and assembly of overhead garage doors with our own hands. And this will be the third stage of work.
Let's make a frame. This is the main element that bears the greatest responsibility and the greatest burden. First, we assemble the box, which will be made from wooden beams or metal corner, as indicated in necessary materials. Main feature manufacturing and installation of the frame box is that its lower part should go 2 cm below the floor level. This is an additional means of fixing the structure.
It is important to remember that it cannot be adjusted using wooden wedges and polyurethane foam. In order to “fit” the frame to the opening, it is necessary to use special metal inserts.

The next step is installing roller bearings. First you need to install the guides. They are sometimes also called roller rails. This point is important because the entire installation process must be accompanied by careful level measurements, otherwise the structure simply will not be able to function.
In the picture the rails and their correct installation to make everything work.


It's time to proceed directly to the gate leaf. Manufacturing options are simple and not very varied.
There are three main types of installation of the gate shield itself:
- wooden frame made of beams, covered with sheets of metal;
- one-piece metal shield;
- metal profile base, on which a solid sheet is also attached.


This back side medals, that is, what will be inside the garage. Of course, I also want to add insulation to our incredibly cold winters. As for external processing, then everything depends on your financial opportunities and aesthetic preferences.


The fourth stage in the manufacture of overhead gates is to install the wicket. If there is an urgent need for it, production front door and its installation is made with greater ease. Suitable for this simple doors, cut from gates and installed on hinges. After all the main structural elements are ready, a full check of the mechanisms, tightness, level and functionality is carried out.


Many craftsmen in their video blogs talk about the possibility of automating overhead gates. The garage owner can also do this on his own. Here you cannot do without three main components: an electronic drive unit (the brain for automatically opening and closing the gate), a radio signal receiver and a remote control.
To install the first one, professionals advise using practically available means, such as a reverse winch or a power window mechanism.

Another important point is installing a lock on the gate. Since such a structure can often be opened with one slight movement of the hand, it will not be difficult for intruders to deal with both the gate and the contents of your garage.

Among the additional accessories that can be installed during the manufacture of do-it-yourself garage doors are more decorative tips: installing windows that increase the amount of sunlight and save energy.

As can be seen from step-by-step instructions By self-production lifting gates, this process is quite labor-intensive and sometimes even complicated. But thanks to the personal participation of the garage owner, it becomes noticeably more economical. For example, average price lifting gates from a domestic manufacturer can reach up to 70,000 rubles. When you do all the work yourself, you save about 60,000 rubles, taking into account the installation of options.
Following all the rules and steps in the manufacture of garage doors with lifting mechanism, you will receive a universal and unique design that will protect your car at any time of the year.

Basic tips and recommendations for operating overhead garage doors come down to the care, adjustment and repair of all components in particular, and the system as a whole. For example, everyone rubber seals require additional periodic lubrication with silicone. This will help avoid cracking or freezing during the frosty season.

The lever system requires constant lubrication so that it does not rust, does not creak, and lasts as long as possible. Rollers, by the way, have the same hidden need. The tension of the springs needs to be constantly adjusted to ensure that the operation of overhead garage doors is as comfortable and durable as possible.
If the tension weakens, then the gate may simply not be opened. But if, on the contrary, the spring is overtightened, then the sash can be overturned and damage the leaf.

In case of mechanical damage to the door leaf, it is no longer possible to correct it. Since it is installed in one whole sheet, it will be necessary to replace the entire main door covering.
After all the basic manufacturing and installation work has been completed, you should worry about security systems. So, it is best to install feet on the rails so that the canvas does not come off the guides during operation.

One of the main tips from professionals and amateurs is timely diagnosis of the condition of the entire structure as a whole. As well as constant monitoring of the condition of its components.
Making your own overhead garage doors is a very complicated process. It requires constant monitoring, increased accuracy and responsibility. When starting work, you need to weigh the pros and cons of this process, and take on it with confidence. Taking into account all the nuances, tips and recommendations, any car owner will be able to produce exactly what he really wanted, but was scared to imagine. All people are the architects of their own happiness and their environment.


