If you carefully analyze the number of available offers for the purchase or sale of garages, you will see that in most cases it is collapsible structures that are bought and sold. Stationary garage options are usually built in capital construction, next to the house or in close proximity to housing. A collapsible garage is most often purchased as a temporary shelter, for example, for a dacha, or in order to “stake out” a successful plot in the immediate vicinity with subsequent registration of the plot and construction capital building. Today, collapsible garages are bought and sold no worse than the cars themselves.
Which design option for a collapsible garage to choose?
The main difference between the collapsible version and all other types of structures is the use of so-called hardware fasteners for assembly, in other words, connections like stud-nut or bolt nut. Perhaps this is not the most good option fasteners, but, unlike self-tapping screws or welding joints, individual components and parts of the garage can be assembled and disassembled more than a dozen times.
All collapsible circuits are divided into four types:

Of all the listed types, the plastic version falls most under the definition of “collapsible”. The manufacturer has thought through the design details and assembly methods down to the smallest detail. The purchased kit of a collapsible garage can be installed and assembled even by a teenager or an adult who has no experience in constructing such structures.
For your information! The cost of a garage made of collapsible plastic in our country clearly does not correspond to the durability and strength of the structure declared by the manufacturer, so such collapsible designs have not gained mass popularity among car enthusiasts.
What is worth disassembling and assembling a garage with your own hands, the secrets of dismountable structures
The main rule of collapsible structures is that if one person assembles it, another can always disassemble it. The structure of demountable garages is practically no different from non-demountable systems; the rules for installation and assembly work are approximately the same. The sequence of assembly and dismantling of the structure must be indicated by the manufacturer in the instructions or assembly drawing attached to the passport.
Often, experienced car enthusiasts with considerable experience in car repairs neglect the manufacturer’s recommendations and perform assembly or disassembly collapsible frame at your own discretion. And completely in vain.
Advice! The manufacturer specifies the sequence of assembly and disassembly work specifically in such a way as to avoid deformation of long garage structures and make the process safe.
For example, collapsible metal garages can be manufactured in two types: in the form large-panel or stacked construction. The latter type will require the ability to carefully and accurately read the drawing, since it will be necessary to assemble the frame, roof and install a large number of bolted connections, without confusing the posts and load-bearing elements as shown in the drawing.
The second type is much easier to assemble. In fact, this version of a collapsible garage consists of several main large-sized units - three walls, a ceiling, a gate and a roof. It is impossible to mix it up, but to assemble the structure with your own hands you will need a good eye and dexterity, since the slightest gust of wind during installation can bend a long wall panel with a propeller or even injure a person.
A collapsible concrete garage is even more stressful to install. The design of such a building is practically no different from any buildings, but there is one feature. The connection of concrete slabs into the building frame is carried out using steel angles welded to the iron reinforcement frame. After arranging the foundation, you will need to use a crane to install the wall slab in an exactly vertical position and get the mounting holes of the corner onto the anchor bolts or threaded rods. Considering the fact that the weight of reinforced concrete slabs and beams is very large, violation of the rules and assembly procedures can lead to the destruction of the frame.
How to make a collapsible garage with your own hands
The easiest way is to make a collapsible garage from rolled metal and sheet iron. The technology for constructing such structures has been developed over the last 50 years of the existence of the domestic automobile industry. You can use the typical layout of a metal garage with a gable roof, but use two-point bolting instead of welding joints.
Assembling the frame of a collapsible garage
Unlike the standard design of a welded metal garage, as an option, you can add standard diagram Several improvements to make it easier assembly and disassembly garage designs:
- Experts recommend making wall frames using a tent design. Instead of individually assembling individual wall frames, the easiest way is to make a garage base frame with round sockets - couplings, into which pipes will then be installed vertical racks frame. To complete the assembly of the walls, you just need to attach them to the installed racks top part frame;
- Considering the fact that the rigidity of a welded connection of two metal beams or tubular racks is approximately twice as high as a bolted one, in order to ensure the necessary strength of the frame, it will be necessary to use a large number of additional spacers and gussets made of thick sheet metal;
- Ceiling elements are attached to assembled walls The frame of the future roof is mounted. The tubular frame of a collapsible garage can be sheathed with sheet metal.
All bolted connections During the assembly process, they should be installed so that the fastening nut is inside the garage, and it is recommended to grind the outer part of the connection - the bolt head - with a grinder until round shape. This eliminates the possibility of unscrewing the connection and removing the garage cladding sheet.

To install the gate on the front wall of the garage, you will need to install additional vertical posts on which canopy hinges will be welded or a door lifting mechanism will be installed.
Advice! The frame of a collapsible garage can be installed on metal skids. Often the assembly of the structure has to be carried out at a distance from the place where it is planned to be installed; this technique will make it easier to move the finished garage to the prepared site.
The garage frame must be secured to the ground or mini-foundation. The easiest way to secure a steel base is with four screw anchors, screwed into the soil to a depth of at least 50-60 cm. The head of each will need to be welded to the base of the building.
Features of insulation and finishing of the building
The most troublesome part of working with a collapsible garage has always been the process of applying insulation. Unlike a conventional room, in a collapsible design it is necessary to take into account the possibility of dismantling the structure without significant damage to the heat-insulating layer. In its simplest form inner surface steel sheets are simply blown with polyurethane foam, after which the insulation layer is covered with cladding made of plastic panels or wooden lining.
When dismantling the structure, the cladding is removed, and the layer of hardened foam is carefully cut with a knife along the border of the steel sheets. Next, during the assembly process, it remains to restore the position of the sheets with insulation on the frame; if cracks appear along the cut line, they can be sealed with polyurethane foam.
In some cases, owners of collapsible garages prefer to use polystyrene foam boards glued to a wooden sheathing instead of polyurethane foam. This method allows you to effectively insulate the room, but is much more expensive.
The average cost of manufacturing a collapsible metal structure will be about $800-$900, which is comparable to the cost of used garages of a similar type sold on the market.
In a big city these days, having your own garage for your personal car is incredible luck. But for owners of suburban areas not to have a reliable shelter for their car is simply a shame. It is clear that those who visit their summer cottages occasionally, only on weekends, they are often limited to just a parking area, sometimes supplementing it with a light canopy. Well, those car owners who spend most of their time outside the city or permanently live there are simply obliged to build a real garage to protect their car from precipitation, dust and dirt blown by the wind, bird marks, etc. And you can sleep much more peacefully, knowing that your car is locked up in a shelter.
Of course, nothing can compare in terms of reliability with a permanent stone (brick) garage, but this is quite an expensive undertaking, the construction process is quite lengthy, and the ability to carry out such large-scale construction works Not everyone has it. It's okay - you can get by with more simple option by building a metal garage with your own hands. With high-quality assembly and well-carried out insulation, it will also become a completely cozy “home” for the car. The costs in this case are significantly lower, and the vast majority of Russian men must have basic skills in general construction, plumbing and carpentry.
Which metal garage to choose for construction?
This question is important from the point of view that everyone’s financial capabilities are different, and so is the degree of accessibility of a particular metal garage.
 A ready-made, factory-made collapsible garage is convenient, but, alas, expensive
 A. Probably the most convenient option from the point of view of construction is to purchase a ready-made factory kit containing all the parts necessary for assembly. To assemble such a metal garage with your own hands, with the help of two or three people, using only the simplest plumbing tools - spanners, screwdrivers, pliers, hammer, etc., is not difficult and will take very little time. Of course, if the kit is really high quality, manufactured at modern equipment, and all the parts fit exactly together.

Such kits for constructing a metal garage are necessarily accompanied by detailed assembly instructions; a responsible manufacturer provides a guarantee on the quality and fit of their product. Another convenience is that you can “personalize” the order, that is, give the manufacturer the exact dimensions that correspond to the site allocated for construction and the needs of the owner. On websites of some companies that engaged in the manufacture of such metal products, there are often special built-in calculators - just enter the dimensions - and the optimal design option will be offered.
Video: assembly of a ready-made garage kit "Zhiguli"
It would seem that this is the solution to the problem! But only if If you look at current prices, the desire to purchase such a garage may immediately disappear. It will be a great success if you can find an option of thousands for 70 ÷ 80. As a rule, a standard-sized garage in the basic configuration can cost no less than a used domestic car, going “off scale” at a price of a hundred thousand. It is clear that not every average car owner can afford such a purchase.
 “Garage calculator” on the website of one of the manufacturers
 B. You can, of course, go the other way: look for advertisements for the sale of used metal prefabricated garages – they are found in fairly large numbers. The price here, of course, is already lower, but it can also be considerable, sometimes reaching 40 ÷ 50 thousand rubles. But, besides this, the buyer may also have some other “surprises”:
 Purchasing a metal garage that has already served for a considerable period of time and installing it in a new location is a very risky business.
 — The phrase “used collapsible metal garage without space” is usually found, and the new owner is most often also entrusted with the responsibility to dismantle and remove all metal structures himself. But disassembling is not so easy - over several decades of operation, the fastening elements can become very rusty, and if you use the “force method” or cutting, there is a high risk of deforming the parts.
— The next thing is that metal parts have probably already received a certain deformation simply “from time to time,” as internal stresses affect so-called “metal fatigue”. This means that you can already forget about accurately fitting them together - a lot of problems will probably arise during assembly. This will certainly affect the overall strength of the newly assembled structure.

— And finally, statistics show that fraudulent schemes are often used in this market segment, when criminals sell an old garage to which they do not have ownership rights.
Thus, you need to think through all the little things very carefully before purchasing an old collapsible garage.
IN. Finally, we come to the option completely. Here everything will depend on the capabilities and abilities of the owner. He himself is free to choose and purchase at a reasonable price the material for constructing the frame. It is possible that some parts can be made from “old stocks” left over after the construction of a house or cottage.
 Metal garage you can completely build it yourself - from “A” to “Z”
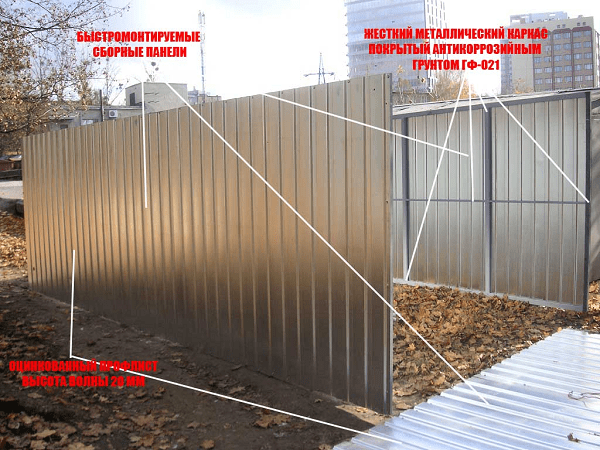
 It is possible to vary the material for wall and roof cladding. If the garage will be under almost constant supervision, then it is quite possible to limit yourself to metal corrugated sheeting. In cases where a more reliable structure is needed, I use a rolled metal sheet 2 ÷ 3 mm, which, of course, is much more expensive.
It is also important that the owner himself plans the configuration of the garage, its perimeter dimensions, height, roof type - all this allows him to precisely “tailor” his project to his existing financial capabilities. If a factory garage kit is purchased at once, then nothing prevents gradual accumulation necessary materials in order to then begin construction. It is possible to independently determine the construction technology - whether this structure will be assembled with threaded connections, or whether it is better to use welding, if you have the appropriate skills and equipment.
In a word, why not try to do everything yourself? Yes, it is certainly more difficult, but with due diligence everything should work out.
Base for metal garage
The place for the garage has probably already been determined, but it requires appropriate preparation.
First, it is necessary to carry out markings, which means to decide on exact dimensions future construction. It all depends on whether the garage is considered as a narrow, cramped box that only allows you to drive a car in and open the side door, or whether elements of a “garage interior” will be provided there - a workbench, shelving or a cabinet for spare parts and tools, etc. Most the owners will certainly choose the second option, and in this case the optimal dimensions seem to be 6 × 4 meters.

The height of the gate is from 1.8 to 2 m, taking into account the height of the owner, in order to prevent head injury.
The structure must be installed on a level and solid base. The optimal solution would be to build a special foundation. Large loads from the garage itself are not expected, that is, strong deepening is not required.

- Very often preference is given to strip foundations. It will be enough to deepen the tape into the ground by 200 ÷ 300 mm, the height of the base and the width of the foundation are also about 200 mm. This option is convenient because after the garage has been built, you can additionally install an inspection hole or even a cellar inside, and then install any type of garage floor.
There is no point in considering all the nuances in this article - all this is presented in much more detail and more clearly in a special publication of the portal.

- Another commonly used option is the so-called floating or slab foundation. In this case, the poured monolithic slab becomes not only the basis for a garage structure, but also a subfloor onto which, in principle, you can drive a car.
Whatever type of concrete foundation neither used, it must be carefully leveled horizontally - this will greatly facilitate the further assembly of the garage. It is recommended to fill the tape or slab once, within one day, in order to achieve the required solidity.
Very important question– advance installation and embedding of embedded parts in concrete. These can be reinforcement pins with a diameter of 16 mm, protruding 150 ÷ 200 mm above the foundation, or special embedded anchors with a threaded upper part are used. The lower chord (piping) of the garage frame will be attached to these parts by welding or threaded connections. Thus, they must be installed and very precisely positioned at least at the corners of the structure, and if there is such a need, additionally along the line of the walls.
- Sometimes a metal garage is placed without a foundation at all, for example, on an existing asphalt or concreted area. In this case, the fastening of the strapping belt can be done using driven anchors.

- Another option is when the garage is not attached to the surface at all. Thus, some craftsmen install their design on wide runners made from pipes with a diameter of more than 100 mm. On both sides of the skids, bends are made from a short piece of pipe installed and welded at an angle, or from a bend of the appropriate diameter. Such a garage can be placed on any hard surface, for example, on a layer of filled and compacted crushed stone. True, the inside will additionally have to be made of thick boards that can support the weight of the car. And besides, it will be necessary to think over the entrance ramp, since the gate will rise above the ground level.
Garage frame
Required materials and tools
The key to successful construction of a metal garage is a reliable and stable frame. The material for its manufacture can be used - they use corners, profile rectangular pipes, and even galvanized profiles, which are usually intended for plasterboard structures.

Still, it would probably be optimal to use profile pipes - with a relatively small mass, they have excellent bending strength, and the design will be reliable. Their convenience lies in the fact that both welding and threaded connections.
About the design. Here precise recommendations It’s difficult to give - it all depends on the size of the building, the type of roof - single or gable, cladding material and other parameters, including material capabilities.

On the Internet it is very easy to find many diagrams and drawings that can be taken in their entirety or as a basis. This publication will discuss the process of installing a lightweight frame made from two types of profile pipes. It is assumed that the owner does not have welding or he - the entire assembly will be carried out on threaded connections. Thus, necessary tools– a standard plumbing kit, open-end and socket wrenches for 10 and 12, an electric drill with a 6.5 mm drill, a grinder with wheels for cutting and grinding metal, a screwdriver. In a word - everything that, as a rule, is in the “home arsenal” of the owner country house. Too much physical effort is not required, so the work can be done alone, but it is still better to enlist an assistant, since there are quite long and bulky parts to be installed.
The structure of the garage frame is shown in the figure:

The red lines show the main load-bearing parts. A pipe profile of 50 × 25 mm was used for them. Blue color - four frames that strengthen the roof structure. The material is the same, 50 × 25 mm.
Green color – additional support posts and cross members. For them you can purchase a 40 × 20 mm pipe. The same pipes are used to make the diagonal ties at the corners of the side walls - shown with brown lines. This is an additional element, which may not be used.

Total for the frame you will need:
Pipe sections 50 × 25 mm:
– 6 m – 8 pcs. (4 pcs. – horizontal crossbars of the side walls);
– 4 m – 7 pcs. (4 pcs. - crossbars of the front and rear walls, 3 pcs. - for the base of the gable rafter triangles).
– 3 m – 8 pcs. (for longitudinal sides of roof frames).
– 2 m – 12 pcs. (4 pieces - corner posts, 8 pieces - vertical posts and crossbars of double-leaf gates).
- 2.1 m - 6 pcs. (rafter legs).
– 1.9 m – 8 pcs. (for roof frame crossbars).
Pipe sections 40 × 20 mm:
– 6 m – 2 pcs. (additional lintels on the side walls).
– 4 m – 1 pc. (horizontal reinforcing bridge of the rear wall).
– 2 m – 8 pcs. (reinforcing racks on the walls).
In addition, you will need M6 bolts 40 and 60 mm long with washers, nuts, grommets, etc.
At current 2015 prices, it is quite possible to purchase such a kit at a metal warehouse for 10 ÷ 12 thousand rubles.
If everything is prepared, you can begin assembling the frame.
Carrying out installation work
| Illustration | Description of the technological operation |
|---|---|
 | All cut to size are delivered to the location where the frame is assembled. |
 | You can immediately check the completeness by laying out the pipes around the site in accordance with the assembly drawing. If there is no fear that they might be kidnapped, then it will be convenient to thaw them and leave them in their places - less time will then be spent on selecting the necessary parts. |
 | Assembly of the side walls begins. The crossbars, upper and lower, are attached to the racks (blue arrow). Assembly is carried out using 6x60 bolts. |
 | The bolt is tightened first, until the installation of the frame is complete, for now by one nut. Then, when the frame is assembled and carefully aligned at the corners, it will be possible to make the final tightening with the installation of lock nuts. |
 | After securing the top and bottom crossbars to the posts, a reinforcing jumper is placed in the center between them. There is a caveat - it is impossible to insert the washer and nut inside the pipe, so you have to use another method. You can go through both profiles and take a longer bolt. Another option is to use roofing screw on metal. In this case, it is advisable to make a through hole only in the upper wall of the upper profile. In the lower wall (shown by the arrow), as well as on the second profile, a hole is made either of a smaller diameter, or only outlined (the wall is weakened for good and reliable passage of the screw). The central vertical support post is installed in the same way, in the center of the structure. |
 | When both sidewalls are ready (blue arrow), they are connected by horizontal jumpers (red arrow). This is how a general, already three-dimensional design is formed. |
 | IN general outline the shape of the garage frame is given. His stability is clearly not enough yet. It is imperative to check the right angles on each side. Building level in this matter there is no help for us - there is no guarantee that the base below is strictly horizontal. The best option is to measure and compare the diagonals - they should be the same in length. You can fix the rectangle by installing inclined ties (shown by arrows). |
 | Tightening more close-up. Their installation will certainly increase the overall strength of the structure, but will also require additional parts - for example, they do not appear in the above list of blanks. |
 | You can also add rigidity to frame rectangles using scarves cut from metal 2 mm thick. They can be inserted into the connecting node by slightly loosening the screw fastening. Then it is tightened, the diagonals are aligned, two holes are drilled in the gusset on each side, and it is finally attached to the structure, securely fixing the angle. |
 | We proceed to the assembly of triangle trusses, which will create rafter pairs and unique floor beams. Here, installing the parts on an overlay is not very convenient, since difficulties will arise during the further cladding of the gables with metal. It is better to make a cutout on one of the rafter legs in the ridge part, and then insert one into the other, finally securing it with a bolt or a shaped metal plate. |
 | Do the same at the junction of the rafter leg with the horizontal beam. The corresponding cuts are made with a grinder (shown by the arrow), and then the parts are driven into another and secured with a bolt or self-tapping screw. |
 | After these triangles are assembled, they are installed and bolted to the horizontal crosspieces of the front and rear walls. The picture clearly shows the mutual interconnection of the parts - the rafter leg and the beam inserted into each other. |
 | The same connecting node from a different angle - top view. Then the same structure is attached in the middle of the longitudinal side walls of the frame. The only difference is that you can install the triangle according to a simplified scheme, with an overlay - in this place this does not really matter. |
 | You can immediately start making preliminary preparations for installing the gate. To do this, hinges are mounted to the side posts of the frame itself on its front side. A vertical post of the gate leaf is attached to the opposite half. |
 | The design itself garage doors may be different. In this case, the simplest scheme is shown - with two symmetrical doors, which are rectangular frames from the same profile pipe. Then, when facing metal sheet or wood, and when insulated they can be reinforced with strings or jumpers. |
 | All that remains is to complete the roof structure. For this, four frames are prepared that will fit between the rafter legs on both slopes. To ensure that all sides of the frames are in the same plane (this is necessary for a tight fit of the roof structure), the parts are connected not in an overlay, but “in a quarter”, that is, grooves are first outlined and cut out... |
 | ... and then the parts are connected and secured with a bolt. |
 | The assembled frames (shown by the arrow) are inserted between the existing trusses and bolted to the rafter legs. In total, four similar frames have to be assembled and installed. |
 | This is what the connecting node in the ridge part of the garage gable will ultimately look like. |
 | In essence, the frame assembly is complete. However, it is worth making one more clarification - the photograph shows the assembled structure, which then nevertheless underwent minor changes. We are talking again about inclined puffs. The operation of such a frame has shown that horizontal spans that are too long (3 meters and even 4 at the back) are not too good decision. Therefore, in the final version, additional vertical posts were used, two on each side and on the back. It is this option that is shown in the drawing above. |
If the garage will be placed on a foundation, then the frame is knitted in a convenient way with embedded anchors or pins. At the same time, do not forget that waterproofing must be laid between the concrete foundation and the metal structure - several layers of roofing material. Then all that remains is to finally tighten and secure all connections with locknuts and process all the parts anti-corrosion soil - and you can move on to covering the walls.
Wall and roof cladding
Actually, the most difficult stage of construction is already behind us. If a high-quality frame is ready, then carry out external cladding walls and laying a roof will not be difficult.

Installation of walls can be carried out both on (but only when using rolled metal sheets) and on threaded connections. You can use bolts by drilling through holes for them in vertical and horizontal parts, and then tightening the fasteners from the inside. When corrugated sheeting is installed, special screws for it are also quite acceptable. True, we should not forget that such a fastening will be easy for an attacker to dismantle without opening the garage door, so this option is used with a certain degree of caution. Rivets are often used to fasten corrugated sheets.

The cut sheets are driven as closely as possible to each other (if rolled sheets with a thickness of 2 mm or more are used), or laid overlapping, with obligatory fixation, including along the overlap line. When using corrugated sheeting, the task is simplified - there the sheets simply overlap in one wave, thereby aligning vertically.
In the frame version that was discussed in the article, it will probably also be necessary to install vertical posts on the outside wooden slats(boards) - so that all the parts are on the same plane. The slats can be secured to profile pipes with self-tapping screws.
The frame structure of the roof allows you to make any type of wooden sheathing on it (solid or with a certain pitch) for fastening roofing material. You can do it even simpler - attach sheets of corrugated sheets directly to metal parts. True, in our case they are spaced far enough apart that the sheathing still won’t hurt. It will be even more necessary if, for example, slate or soft roofing is planned.
When installing the roofing, you should not forget about the eaves overhang, at least 150 ÷ 200 mm - this will to some extent protect the walls from direct rain. It’s even better if you install gutters on both sides. Since the option under consideration has a gable roof, a ridge profile will also be needed to cover the junction of the two halves of the roof.

Practice shows that an entire garage on a metal frame (which was described in the article), completely covered with inexpensive corrugated sheeting, will cost about 25 thousand rubles. This cost, of course, does not include the “zero cycle” and insulation measures. But even when purchasing an expensive prefabricated garage, the buyer also pays only for the metal box.
Insulation of a metal garage
In fact, after sheathing the walls and installing the roof, hanging the gates and installing locks, the work of assembling a metal garage can be considered almost complete. If, if necessary, the entrance is equipped and a reliable one is installed (there is a special publication about this on the portal), then you can safely drive a car into it
However, a caring owner will not be lazy take action to protect your four-wheeled pet as much as possible from the winter cold or from metal walls scorching hot in the summer sun. In short, it is advisable to immediately address the issues of thermal insulation of the garage.
Before carrying out insulation, it is imperative to inspect the surface of metal walls from the inside. If this is bare metal, then it is necessary to treat it with anti-corrosion primer.
Conventional polystyrene foam blocks with a thickness of about 50 mm are often used as insulation. They are placed between the frame posts, and the foam can be fixed with glue directly to the surface of the walls. To insulate the flow, you can make a light “lining” of beams to the existing transverse beams, supplementing it with a rough surface (on top) from second-rate boards. It will also be easy to lay insulation blocks between the beams of such a ceiling frame.
 Insulation with polystyrene foam in a garage is a rather risky solution
 - Expanded polystyrene, of course, has high thermal insulation qualities, is cheap and very convenient to use. But it also has qualities that cast great doubt on the advisability of its use in the garage. First, it is not a non-flammable material, and proximity to flammable liquids will in itself pose a certain threat. In the event of a fire, such insulation will become one of the hot spots. And the second is the chemical instability of the material to many technical liquids (for example, organic solvents), often used in garages, especially if there is also a mini-workshop here. And the likelihood of such chemicals getting on the walls, although small, is still there. And lastly, with strong heating (for example, from red-hotin the sun of metal walls) Low quality polystyrene foam can emit a rather pungent odor. It will be very unpleasant if this smell permeates the interior of the car.
 Mineral wool is the best option in the triad “safety - quality - price”
 - In terms of practicality and safety, mineral wool will be the undisputed leader in these conditions. ITS rolls (mats) are rolled out between the frame posts, or for insulation, a wooden sheathing is specially mounted on the walls inside. The pitch of the guides and their thickness should ideally correspond to the width and thickness of the mineral wool roll. Temporarily fixing the insulation will not be difficult by stretching a nylon cord in a zigzag pattern between adjacent guides.

- The most reliable solution would be to spray liquid onto the inner surface of the garage walls. It quickly takes on a voluminous shape and hardens in a continuous layer, leaving no “cold bridges”. This approach to insulation has one drawback - it is impossible to carry it out independently, without special equipment and skills, and services for such thermal insulation are very expensive.
Prices for thermal insulation materials
Thermal insulation materials
Video: insulating a garage with sprayed polyurethane foam
The insulated surface of the walls and ceiling is covered finishing. Most often, either plywood is used for this, or, which is much better, sheets. After such cladding, you can move on to arranging garage furniture, installing lamps (if they were provided), hanging shelves or cabinets, etc.

The issues of garage insulation are discussed in great detail in a separate publication on the portal. True, it is more dedicated, but in the case of a frame metal garage, the technology is absolutely the same.
That's all, all that remains is to put the final polish on, if necessary, paint the outside of the garage with durable atmospheric metal paint - and you can “celebrate the housewarming”!
Video: a simple version of a light metal garage or shed
A metal garage is affordable, simple in design and not difficult to install, and is also convenient to use, in particular when it is necessary to move it from place to place, repair or rebuild. It is he who is most often found on summer cottages and enjoys in great demand from car enthusiasts. The only significant drawback is the rapid heat exchange between the interior and environment, which cannot be eliminated without reliable and high-quality thermal insulation.
How to make a metal garage with your own hands? By design, metal garages can be prefabricated, folding and welded, by type of roof - single-slope or double-slope, and by operating conditions - stationary and mobile. Regardless of the type of roof and type of structure, mobile garages include “boxes”, the supporting part of which is attached to the site using anchor bolts sunk into the concrete. Accordingly, stationary garages are buildings in which the base has a rigid, permanent connection with reinforcement elements and concrete.
Folding and prefabricated garages are available in a wide range in almost every region. They come with detailed assembly instructions, so there is no point in focusing on this. It should be noted that they are installed on a pre-concreted area with anchor bolts installed around the perimeter in the places where the holes for landing the garage base are located. What is important here is not only the precise installation of anchor bolts along the axes of the connections, but also a perfectly aligned plane along which the site is poured, including those equipped with an inspection pit. Even a relatively small difference between any corners of the site can lead to skewing and deformation of the gate, as well as walls and roof elements.
To avoid this, a simple and proven method is used without the use of precise geodetic instruments. First, four pegs are driven in external corners future building. Two pegs on the side of the gate are connected with twine, establishing the actual height of the screed, then carefully check the horizontal position using a water level. Exactly the same operation is performed on one of the sides of the site, taking the already specified height on the first pegs as a control mark.

Next, from the received mark on the third peg, 3 - 5 cm are laid upward and a string is tied at this place. This will give optimal slope 2 - 3° for the site. All that remains is to determine the mark on the fourth peg. To do this, stretch a diagonal from the third peg to the first peg, and from the second - to the fourth. Tie the string to the fourth peg, when the stretched diagonals touch each other - this will be the mark for the fourth peg. By connecting all four pegs along the marks, they get a perfectly flat plane for pouring the site without distortions, remove the diagonals and align the formwork box to the height of the stretched strings.
Displaying horizontal floor level marks
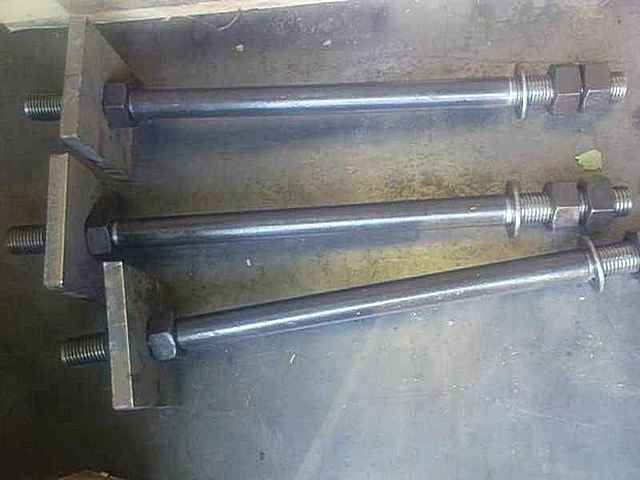
As for the anchor bolts, they are installed before the concrete pouring and screed, and their usual length (25 - 40 cm) allows for strong and reliable shrinkage of the “anchor” into the ground: 5 cm for the stroke of the nut, 10 cm for the thickness of the screed and the rest under the “anchor” fill. Pouring is done into a hole with sides of 20 cm and a depth of 20 - 35 cm, that is, the lower end of the anchor should be located 10 cm above the bottom of the hole.
Installation of anchors in place begins with the corners, and then along the sides. For convenience, the back and side walls are laid on the corresponding sides of the site, and string is pulled between the corner anchors, after which the dimensions are successively transferred to the installation site. To accurately match the holes in the base of the structure, measurements are taken not from the edges of the holes and the bolts themselves, but along their axes. When the concrete in the holes has set firmly enough and nothing will lead to the displacement of the anchors, they begin to equip the inspection pit and fill the site along the previously exposed box. Follow the assembly instructions for the purchased product.

Installation of a prefabricated garage
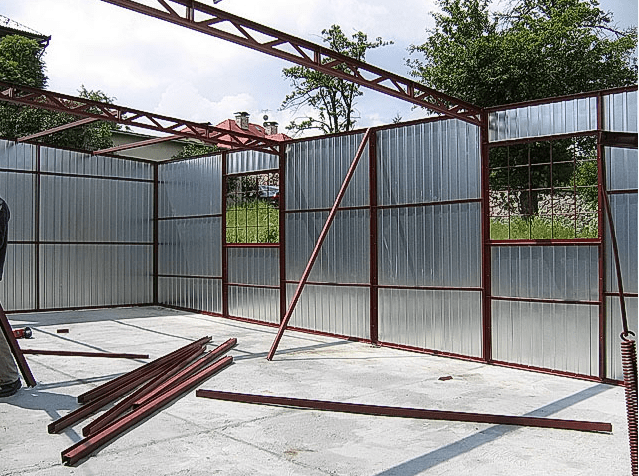
You can install welded garages yourself if you have the skills to work with welding equipment. According to rough calculations, this costs two to three times less than purchasing ready-made garages. We will offer the most economical in materials and optimal strength design with side dimensions of 4.5 × 6 m.
The preparation of the site is carried out as in the previous version, only the anchor bolts are installed along the center line of the future walls 30 cm from the corners and with a pitch of about 40 - 60 cm from each other, but not at the corners and not in the space between the gate posts. Subsequently, channels are placed on them with the open side up with advance drilled holes under the anchors. At the joints, the ends are cut at an angle of 45° and welded together. Channels 40 - 50 cm long are also installed on the gate side - all of them, including those for the gate posts, have a standard size of 100x50 mm and a thickness of at least 5 mm. It is recommended to make the remaining parts of the frame from a corner 50x50 mm and a thickness of 5 mm or more.

After the base of the frame is securely fixed, begin welding the corner posts. If you are planning a garage with a gable roof, then cut identical racks (including intermediate ones) 2.2 - 2.4 m long. When constructing a garage with a pitched roof, racks 2 m long are made on the lower side of the slope, and 2 m long on the high side. 4 m; intermediate posts are cut by pulling the cord between corner posts from the side, having a slope.
Next, intermediate posts are welded in increments of no more than 90 cm - in our case, there are three more on the back side, and four more on the sides. Then all the tops are tied together with a corner around the entire perimeter, keeping them vertical. On the side of the gate, another corner is welded horizontally to a height of 2 m from the ground. Racks are attached to it and to the ends of the channel, and the remaining space above the gate is sheathed with a zigzag (corner scraps).

When the frame is completely ready, we begin to manufacture and install the trusses, which will have 50 cm outlets on both sides of the walls. For pitched roof make a rectangular truss with a height of 20 cm, and for a gable truss - a triangular truss with a height of at least 80 cm. The total number of trusses is determined based on the installation in increments of about 60 cm, and their inner space must be lined with a zigzag.
Assembly of a welded garage
Having completed the installation of the trusses, they proceed to covering the roof and the outer sides of the walls with metal sheets or profiles. Here it is advisable to use materials with a thickness of about 2 mm, which is due to several points. Firstly, you can make better welds without burning through them. Secondly, it provides sufficient reliable design without the use of additional parts for jibs, veins and cross members both on walls and on roof elements. Third, thin sheets practically unstable to corrosion; at the slightest manifestation of it, through holes can form.

On final stage construction of metal garages, including buildings with prefabricated and folding structures, carry out anti-corrosion and thermal insulation measures. Absolutely all types of these buildings have high heat exchange with the environment and low resistance to atmospheric influences. The lower part of the base, where moisture usually accumulates after rain and melting snow, is most susceptible to rust, so this is the part that needs to be given special attention. After extensive painting of all metal surfaces from the inside and outside, the blind area and base are poured in at least two or three layers.

Sections of cement-sand protection of the base of a metal garage from corrosion
Blind areas, cement-sand screed along the perimeter of the garage they are made about 40 cm wide with an angle of inclination of 10 - 15 ° and a thickness of about 5-10 cm, and from the entrance side, if the platform is not poured, the blind area is reinforced with a poppy net. In addition, a base is also poured into the corner between the garage wall and the blind area. He can be rectangular shape about 10 cm wide, 30 - 40 cm high (slightly above the maximum snow level) with a cut top at 45 - 60 ° or triangular 20 - 30 cm high and an inclination angle of 45 - 60 ° (for regions where the snow cover thickness exceeds 35 cm). After completely dry The base of the concrete is also painted in two or three layers, paying special attention to the junction of the concrete pouring with the garage wall.

Click Class
Tell VK
Dear visitors, dear friends!!!
In previous topics:
- DIY metal gate. How to properly cook by welding,
- Welding at home. Swing-your-own hands made of metal,
— You have already become familiar with the technology of welding metals with an electrode and welding assembly, therefore, in general, there is no point in raising such issues again in this topic. The only thing that will be discussed in this topic is the design of a metal garage, its stiffeners, ceiling, garage floor covering and choice of location.
First of all, we ask the question:
How to build a garage
What kind of garage to build is an individual choice for each of us. For example, you can build metal carcass garage and interior lining made of any choice from the following material:

plasterboard fiberboard


Chipboard trap lath


laminate ceiling wooden slats
Selection of material for interior decoration there is a large one on sale and each of us chooses the material at our own discretion.
The construction of a metal garage consists, as you understand, in the availability of the necessary metal, as well as other building materials. A variety of materials have their own names, and not every one of us knows the name of any particular material. I think that initially we need to become partially familiar with the range of metal profiles required for the construction of a garage.
Metal profile for garage
When working with welding, welding any structure, the name of the materials is simply necessary to know. Here we present exactly the products from which it is quite possible to build the frame of a metal garage.


profile pipe steel reinforcement steel


round steel pipe (hollow) steel equal angle


steel channel steel I-beam


single-T steel beam (tavrik) unequal steel angle
It was the scraps of this material that were used when welding metals for the construction of the frame, or more precisely, the scraps of the listed metal profile. Before construction, you need to decide on a place for the garage.
Garage space
The garage space is selected based on garden territory(private house, dacha) taking into account preliminary planning land plot, that is, it is necessary to take into account where the construction of the bathhouse, house and other buildings will be carried out.

Next, preparatory work for pouring the foundation for a garage. During construction, it is necessary to approach it from an economic point of view. T0 - in this example, it was decided not to pour the foundation of the garage completely along its perimeter, but to make only small concrete supports at the corners of the garage structure and along the center of the length of each side.
Garage floor
First, I will describe how the concrete supports were made (photo 2):
A small hole in depth was dug in the ground, concrete was poured into it, a metal cylindrical container without a bottom was placed on top of the concrete, concrete was poured into this container and then, after the concrete had hardened, a lid was welded to the top of the container.


If you just visually pay attention to the structure of the garage support (photo 2), it may seem at first glance that the corner of the structure is installed on a metal empty container, but in fact, the container is filled with concrete (as already mentioned) in an inextricable connection with the base concrete in the ground.

Why is this convenient? supporting structure for each corner of the garage? This design is convenient in that the base or floor of the garage can be easily aligned in a precise horizontal plane using a building level.

building level
During construction, tools were also used, such as:


construction angle construction plumb line

This photograph clearly shows (photo 3) how a corner of the structure was welded to the support post, the sides of which were butt welded together.

The intermediate distance between the support posts is lined with half-brick masonry. There are ventilation holes along the perimeter of the garage on both sides. This was done to ensure that the floor (flooring material made from boards) was constantly in a dry state.

Support posts made from a profile pipe were welded along the length of the garage perimeter, and stiffening ribs were welded between the corners.
garage roof
For additional stability of the structure, a slope was welded between the rack and the lower crossbar (photo 6).

The upper crossbars along the perimeter of the roof are welded from a corner (photo 6). Construction material metal beams are used for the roof, such as:
- round steel pipe (hollow),
- steel channel.

As you noticed from the photographs, the structure as a whole is built from rusty metal scrap metal profiles (photo 7; 8; 9).

Initially, various rusty metal profiles were assembled and ultimately all this was useful in the construction of the structure.
For any car owner, having a garage is a necessity. To reduce construction costs and do it yourself, you should pay attention to metal constructions. Even without much construction experience, it will not be difficult to assemble a metal garage with your own hands. The construction process includes several stages: design and marking, construction of the foundation, installation of the garage box and insulation of internal surfaces.
Before starting construction, you need to draw up a drawing of the garage and prepare the place where it will be installed. A metal garage can be of two types - stationary and on metal skids. The first option is considered more reliable and protected from car theft. To secure the supporting parts of the box, either welding or bolts are used.


When drawing up a project, you should take into account not only the size of the car, but also the space for tool cabinets, vices and a workbench. At this same stage, it is worth deciding whether there will be an inspection hole in the garage.
The foundation for such a garage is made of strip or slab. It should rise above ground level by about 10-15 cm so that melt water does not flood the floor.
For construction you will need:

When all the tools and materials have been prepared, they begin to clear the area. They remove tall vegetation and stones and mark the boundaries of the foundation. Using a tape measure, a square, twine and wooden pegs, markings for the foundation are made. The standard parameters of the base are 3.5x6 m, but may vary depending on the project.
Construction of a foundation for a garage
Square slab foundation usually exceeds the building area by 20-40 cm around the entire perimeter. Such a base is suitable only for those garages where there is no inspection hole. If a pit is necessary, the foundation must be strip.
According to the markings, they dig a pit 40-50 cm deep. The bottom is covered with a layer of sand, then there is a layer of crushed stone or gravel. A two-level lattice is knitted from reinforcing bars and laid on crushed stone. The edges of the grating should not touch the walls of the pit. They knock down formwork 30-40 cm high from boards and place it along the inner perimeter of the pit. From the outside, the formwork is reinforced with timber spacers. Height reinforcement cage should be 2-3 cm below the height of the formwork.


In each corner of the foundation you need to do additional fastenings for garage frame. To do this, pieces of reinforcement with a cross-section of 16 mm are inserted into the corners between the grid cells so that they rise above the surface of the foundation by about 30 cm. Then a concrete solution is prepared and the foundation pit is poured. To avoid cracks and delamination of the foundation, pouring must be done at one time. The base should dry for about a month; at first, the surface should be periodically moistened and covered with a film from the sun's rays.
The inspection hole is dug at the same time as the trench under the foundation. The width of the trench should be at least 20 cm, depth from 50 cm. Formwork made of boards is covered with film and installed on both sides of the trench. The height of the formwork above the ground surface is about 20 cm. The bottom is covered with a sand-crushed stone cushion, and a reinforcement frame is mounted on top. Vertical rods are placed in the corners to a height of 30 cm from the surface of the foundation. Mix the ingredients for the solution and pour the formwork. The top of the foundation is covered with film and periodically moistened with water.

An inspection hole is dug at a distance of at least 1 m from the walls of the garage. Its width, taking into account the thickness of the walls, is 1 m, the length is equal to the length of the car, but may vary slightly. The depth of the pit depends on the height of the owner of the car, but on average it is 1.5 m. While the foundation dries, the walls of the pit are lined with bricks or poured out of concrete.

To make a strong and level floor in the garage, the area inside the foundation is leveled, covered with sand and compacted well. A waterproofing film or roofing felt is laid on top, a reinforcing mesh is laid and filled with concrete mixture. Using a long lath, the solution is distributed over the site and the surface is leveled.

Step 1. Installation of load-bearing beams
After the foundation has dried, you can begin installing the frame. First, the lower frame is welded from 4 metal corners of large cross-section and at the same time welded to the reinforcing rods protruding from the foundation. The rods must be located inside the perimeter. Pipes for vertical beams are cut to the height of the walls, placed in the corners and temporarily fixed with spacers. If the roof in the garage is single-pitched, the front pillars are made 20-25 cm higher. Next, the support pillars are leveled using a plumb line and welded to the lower frame, and then the structure is fastened at the top, connecting the pillars to each other with corners.

Step 2. Installation of jumpers

To strengthen the frame, additional corner posts are attached around the perimeter of the garage. The distance between the posts should not exceed 1-1.2 m. Reinforcing rods are welded diagonally as stiffeners. You can fasten the jumpers with bolts, replacing the diagonal rods with horizontal angles or profile pipes. In the front part of the frame, support posts for the gate are installed on the sides. There should be at least 20 cm between them and the load-bearing vertical beams. The gate posts are strengthened with pieces of reinforcement, welding them at an angle to the lower and upper frames.
Step 3. Roof installation


The roof for a metal garage can be single-pitch or gable. To install a pitched roof, the front and rear parts of the frame are connected with steel corners, which are reinforced with jumpers every meter. For gable roof longitudinal beams made of profile pipes are installed above the upper frame. Then triangular rafters are mounted from the corner and fixed to the floors in increments of 1 m. After this, all the rafters are connected with one continuous corner, welding it to the very top of the structure.


The finished frame must be sheathed correctly steel sheets. The sheathing can be secured by welding or bolts. If corrugated sheeting is used as cladding, fastening is carried out using the second method, since welding destroys the protective polymer coating. Sheet steel is first cut with a grinder to the size of the walls, and then welded spot welding to racks and jumpers. On the roof, the sheets are laid overlapping by 15 cm, starting from the bottom and leaving overhangs on the sides of the garage. When completing the sheathing, be sure to weld all the joints. If fastening is done using bolts or self-tapping screws, the side sheets are also overlapped, fixing the joints along the entire length.


Gate installation


The frame for the gate is assembled from a corner, reinforced with horizontal and diagonal jumpers, and spacers made of rods are welded in the corners. After fixing the hinges, the frame is sanded, wiped off dust and coated with an anti-corrosion compound. Then the gates are painted, and when the paint is dry, the doors are sheathed with metal. Having installed the lock, deadbolt and handle on the gate leaf, they are installed in the opening and secured on the hinges.
Any non-combustible material is suitable for thermal insulation of a garage space. It is more convenient to work with slab insulation: the slabs are adjusted to size and inserted between the support posts. Using mineral wool Do not compress or crumple the corners of the material too much, this increases the thermal conductivity of the material. To completely isolate cold bridges, an aluminum profile is installed at regular intervals between the lower and upper frames along the perimeter of the walls. Having filled the space between the support posts with insulation, lay the second layer of mineral slabs, pushing them behind the profile.

If the garage is insulated with polystyrene foam or polyurethane foam boards, the material is completely glued to the wall surface. The joints should be very tight, all gaps and holes should be filled with foam. The top of the insulation can be covered with plaster or sheathed sheet materials– galvanized, plywood, chipboard and others. After the walls, the ceiling is insulated using the same materials, and if desired, the gates can also be insulated.

Ventilation device

To avoid the formation of condensation on the walls and the accumulation of harmful gases and fumes in the garage, supply and exhaust ventilation is necessary. Making it yourself is not at all difficult. A small diameter through hole is cut out in the back wall at a distance of 15 cm from the ceiling. A piece is inserted into the hole ventilation pipe and covered with bars on both sides. Now a similar hole is made in the front wall at a height of 20 cm from the floor for air flow. If the garage has large area, supply openings are made on both sides of the opening, and exhaust openings are made symmetrically in the corners of the rear wall.
Video - Ventilation device
Final finishing

When interior work completed. Start finishing the exterior of the garage. If the walls are made of plain metal, they must be primed and painted to protect them from corrosion. The corrugated roofing does not need painting, so external work consists of installing ebb and flow sills, outdoor lighting, and wind slats for the roof. For a car to enter, a platform is concreted along the width of the gate opening, and it should be located on a slope.

Video - DIY metal garage


