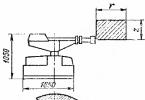
dimensions lamps, mm: 337x559x419 (width x depth x height)
Form the base
Free forms of base parts give good opportunity practice constructing contours using the method of enlarging on a scale grid, since these details should first of all look expressive, and the accuracy of the dimensions in this case is not too important.
1. Enlarge all templates to the specified sizes. From 19 mm material, cut two blanks for base A and one bracket B. From 10 mm planks, make two blanks for racks C. Fasten the blanks of the base and racks in pairs with double-sided tape.
2. Using spray adhesive, attach the paper templates to the blanks. Use an awl to mark the center of a 6mm hole on one of the C posts. Then cut the pieces along the outline, leaving a small allowance on the outside, and sand to the line. Save the 19mm scrap to make spacer D shown in fig. 1.
3. Now remove the templates, separate and sand the parts. Planing or grinding  Align the edges of the halves of base A that will be glued together. Mill out lamella nests in both edges and glue the base, squeezing the parts with your hands for several minutes until the glue begins to set; then carefully place the adhesive on flat surface for drying. Once the glue is completely dry, sand parts A, B and C with 220-grit sandpaper.
Note. When grinding pillars C, maintain the previously marked center of the hole. If necessary, deepen the hole with an awl.
4. Take the scrap saved for spacer D and transfer the contours of the pillars C onto it (photo A). Then mark the height according to the dimensions shown in the figure. 1. File the spacer to its height and sand the top and bottom edges. Apply glue between the lines on both sides of the spacer (photo B) and clamp the part between the posts, aligning it with the marked contour lines.
Note. When gluing the posts, make sure that the intended center of the hole is located on the outside of the glue.
Once the glue has dried, saw off the protruding parts and sand the spacer flush with the edges of the posts.
5. Stick the piece double sided tape on the bottom edge of the glue C/D and attach it to the base A (photo C). Do the same with bracket B, aligning it with the center of the hole in the posts (photo D). Then drill and countersink pilot holes through the base and secure the B/C/D assembly with screws as shown.
6. Drill a 6mm hole through the posts and bracket at the marked point (photo E) and glue a wooden dowel into the hole. When the glue has dried, cut off the protruding ends of the dowel and sand it flush with the surfaces of the C posts.
Remove the screws from the base, separate the bracket with the posts and remove the tape. Then re-attach the assembly to the base with screws, adding a little glue.
 Make a wooden lampshade
We made the lampshade using two devices: a compass (for band saw) and milling (described in the “Tip of the Master”).
1. Using a compass, mark a center and a circle with a diameter of 158 mm on a 6 mm board. Drill a 3mm hole in the center, cut out a disc and sand the edges. Mill an annular groove on the underside of disk E,.
2. For shell F, saw off a 1 mm thick strip from the edge of the workpiece measuring 25x32x485 mm.
Note. Install an anti-splinter insert into the table of the sawing machine and saw off a strip with outside to avoid dangerous kickback.
Sand the strip and cut it to final length.
3. Mark the overlap line of the ends of the strip. Then glue the shell F (photos F and G). Once the glue has dried, carefully sand the outside of the piece to make the overlapped edge invisible. Glue the shell to disk E (photo H) and leave to dry.
4. Countersink the hole with inside disk E and attach the lampshade with a screw to bracket B. Apply any finishing coating. (We sprayed semi-matte nitro varnish three times from an aerosol can.)
Compact LED luminaire with magnetic base is easy to install and provides easy access to replace batteries. Secure the mounting plate with small button head screws. Then simply insert the batteries and turn on the lamp to make the world a little brighter.
DIY wooden table lamp - drawings
 Born pretty, holographic dip powders for nails, gradient dipping glitter...
0.7 rub.
Free shipping★★ ★★ ★★ ★★ ★★ (4.80) | Orders (1924)
Original designer lamps made of wood. Homemade lamps made of wood photo.
If you like to do everything with your own hands, we recommend to your attention a selection of the most original lamps made from wood made by designers. But to make such lamps you don’t have to be a designer at all, just look at these photos, show a little imagination and you will succeed.
Wood is a unique material, it has been used for home improvement since the time of our ancestors, wood has positive energy, it's completely environmentally friendly pure material. In this article we will look at the most original options making lamps from wood.
Ceiling lamps made of wood.
Original hanging chandeliers wood lamps.


Homemade chandelier flower garden.

Chandelier ball, made of rope. To make such a chandelier, an inflated balloon, which is wrapped with rope, then the rope is covered with glue, when the glue dries, the ball is blown away and the result is a structure from which you can make a pendant lamp.


Lamp from a pallet. Wooden pallet sawn into pieces which are used to make lamps.

Original solution.

A lamp made from ordinary kitchen graters.

Wicker lamps. Here a basket is woven from a thin vine and hung from the ceiling.

Table lamps made of wood.

Night light made of wood.


One day you will want to be transported to an atmosphere of harmony and peace. Nothing decorates interiors more than using natural wood. This trend will always be fashionable, the most favorite material of designers for decorative and finishing works. Looking for proper lighting For your home, feel free to choose wooden chandeliers. You can hang such an “antique thing” both in a country mansion and in a museum, restaurant, or apartment.


Peculiarities
Whatever style you are a fan of, wooden chandeliers will harmoniously fit into the atmosphere of bedrooms, living rooms, and halls. Japanese, Chinese, vintage or eco style are most suitable to embody your design idea. Despite their massiveness, wooden chandeliers bring a feeling peace of mind to any room.


Wooden lamps represent a somewhat rough, clumsy work of a craftsman. You can successfully combine cart-shaped models, wheels with lamps that imitate candles. There is a colossal amount of LED lamps and incandescent lamps for them. Country or antique stylized cafe, bathhouse, hotel reception, as well as home interior, will instantly be transformed with such an accessory.
You can choose beautiful pendants, ceiling structures. An absolute must have are huge castle, large and miniature models. They can be made entirely of wood, have only a few metal elements and vice versa
The obvious advantages of wooden chandeliers are:
- environmentally friendly, non-toxic natural material;
- a large assortment of collections made of wood of various species;
- ease of processing and installation;
- instant transformation of interiors even in modern styles (kitsch, loft, urban chic, etc.);
- combination with many materials (metal, glass, textiles).

Despite the increased flammability of wood, poor “contact” with rooms where there is an excess of humidity, frequent temperature changes, a wooden chandelier is still popular. It “wins” over other devices with its aesthetic qualities.
Special impregnations help to avoid delamination, deformation of wood, the appearance of insect pests, and accidental fire.
Reliable and practical lighting pendant device became real symbol of luxury. It is he who sets the general mood of the room and successfully emphasizes strengths interior


Combination of materials
Particular attention should be paid to the combination of wood with other materials. Feel free to combine natural wood with metal, glass, stone, paper, all kinds of draperies, and acrylic. Depending on the chosen “tandem” you will achieve certain touches in the interior decor.
They have proven themselves to be excellent during the operation of the product. from beech, oak and pine. They combine perfectly with metal elements. With such a device, the notes of Gothic, Middle Ages, and strict classics will sound in your home. Glass and solid wood construction will evoke loft, country and rustic motifs. Provençal “duets” made of wood and textiles bring special comfort, romance, and touching.


When buying a wooden chandelier, pay attention to what its components are made of:
- decorative fittings (models come with forging, with wooden hoop, carved, they can be decorated with both textiles and bronze);
- diffusers (plafonds, lampshades);
- fastening type (metal hook, durable bar, can withstand heavy weight);
- the lamps themselves, their shape, size, etc.

In style interiors Baroque, Rococo, Bourgeois, Empire chandeliers made of aged wood have proven themselves excellent. Even the smallest models will become the main accent of the interior, setting the right mood for guests and owners of an apartment, house, or restaurant.


Picking up wooden lamps from hardwood wood, you will enjoy the beautiful texture and color scheme of the entire model range.
By giving preference to pine, you will receive a dizzying aroma of pine needles, have a real device for relaxation in your home and healthy sleep. Luxurious pine products provide comfortable lighting the entire space of the room.
The chandelier itself can be made of high quality plastic with wooden frame. This is a bold attempt to combine several stylistic trends and even eras. Such products will harmoniously fit into modern styles interior (minimalism, eclecticism, kitsch, country, etc.).


A wooden chandelier on chains adds a special charm to the room. It can represent an elegant wenge-colored beam, a barbell, or even a ship’s steering wheel. There are a huge number of varieties of shapes and sizes.


Models and types
The desire to live in a pirate room, to feel the spirit of the Middle Ages or the avant-garde is a matter of taste. So, 3-horned ones will look elegant ceiling lamps with textile lampshades, pyramid-shaped products, etc. Before purchasing a wooden chandelier, decide on the type of model:
Suspended structures must be equipped with a suspension in the form of a chain or cable. The product cannot do without a durable metal hook. Similar view You can purchase a wooden chandelier for rooms with a ceiling height of 2.5 m.


- Ceiling models will be attached above the head due to mounting plate. You can choose designs made entirely of solid wood or with some wooden elements.
When did you find best option for the ceiling, it is also important to choose the right type of light bulbs. To avoid fire, it is better to opt for LEDs or energy-saving fluorescent products. Fireproof, they will not heat up during operation.

- Textiles look perfect in combination with natural wood. Lamps with lampshades- a symbol of warmth, comfort and hospitality. The overall atmosphere of the interior will depend on what print you choose for them. Checks, polka dots, abstract patterns, small floral patterns, strict geometry - try to combine the colors of furniture, curtains and other elements with the color scheme of the chandelier.


- Among the wide variety of models you can find exquisite wooden sconces for the bedroom. They are made in any form and add mystery and some mysticism to the interior. For the children's room, it's time to “arm yourself” with a funny model in a pirate style. A flat “anchor” chandelier in wenge color goes perfectly with wooden furniture, floor coverings from the board.


- In the kitchen, living room you can choose classic chandelier no frills. Three- and five-horn model with faceted or frosted glass, fabric and paper lampshades give special comfort to the most “angular”, eclectic interiors.


Current styles
Designers consider the main styles into which a wooden chandelier fits harmoniously oriental, eco, country, classic and modern. But this does not mean that such an element cannot be hung in a room where the spirit of rustic, Provence, vintage, Gothic or Baroque reigns. Decor masters recommend adding notes of antiquity to offices, spacious halls and modest living rooms.
The chandeliers will fit perfectly into the concept of country, eco, and Oriental styles. Feel free to choose branchy ones, models in the form of a cart wheel, as well as products suspended on ropes or chains from the ceiling.


There are also antique options that can recreate a picture from the times of the avant-garde, romanticism, and the Middle Ages. They will look original wooden chandeliers flat shape. They should have lamps that imitate candles. You can add notes of simplicity and comfort using rustic style and chandeliers in the form of bars on a rope. It looks great in the interiors of kitchen-dining rooms and living rooms.


Japanese style involves the use of a wooden chandelier in combination with a material such as silk. Forged inserts and fashionable engraving add richness to the accessory. Any easterly direction uses the correct geometry so your lighting fixture must be clearly square, rectangular shape and also be symmetrical.

Antique chandeliers take you back to the past and add illusory, special magic to the room. They are perfect for designer styles chalet, Provence, retro. Try hanging vintage designs in your bedroom or living room for instant peace and tranquility. Natural material is distinguished by its environmental friendliness. It transfers heat well and is flexible different types processing.


Experiment with styles and shapes of models. Now is the time to install such a structure in a cottage, country mansion, sauna or bathhouse. You won't spoil general form room, if you hang a product made of coniferous or hardwood from the ceiling in the form of:
- several bars or planks;
- branches intertwined;
- boards neatly laid in a row or perpendicular to each other.


Many modern models fit harmoniously into the Art Nouveau style. Most often, designers add glass, metal or textile elements to wood. Strict and restrained options will complement the classic atmosphere, more intricate shapes will decorate the room in eclectic, eco, kitsch, etc. styles.


Pay attention to products with built-in solid wood spotlights. They will not only emphasize your excellent taste, but will also become a practical, functional appliance in the home.


The most beautiful modernist chandeliers are considered to be models with frosted glass inserts. They will create a complete composition together with other elements of the room: upholstered furniture, baseboard, floor and wall covering, other finishing materials.
Color solutions
Partially color range try not to go too far from natural shades. The wood should retain its unique texture and emphasize your love for eco-themes, classic elegance and avant-garde things. For spacious rooms, it is better to select a visible “spot” of a dark color. The black base and shades add sophistication and elegance. This option is especially suitable for offices and will emphasize the status and prestige of its owner.


Striving to classical motifs, look at the color of the wooden chandelier, like cherry, wenge, bosse, oak or walnut. But in modern interiors Cylindrical or spherical lampshades in shades of Karelian birch, cedar, mahogany, and mahogany will look original.
Light palette adds sophistication and brings a relaxed, romantic mood to the atmosphere.
Provence style can’t do without elegant designs made of vine and walnut twigs. The shade you choose should be associated with sophistication, grace and lightness. Experts advise lovers of Gothic style to “arm themselves” with models with the effect of aged wood, forged parts and openwork elements. All this should be placed in the background wooden base in dark color.


Fans loft premises, attic style, most likely, use chandeliers in the form of bars and boards. In addition to lamps and light bulbs, they can be installed glass jars, flower pot, wicker basket. It would be preferable to choose the color of mahogany, brick or dark brown. In this case, it is worth using ergonomic fluorescent or LED bulbs with long service life.

Shapes and sizes
Among the colossal variety of shapes and sizes, the most popular wooden chandeliers are round and angular. A more complex “geometry” is suitable for luxurious mansions, spacious halls, halls and will not fit into a cozy, modest kitchen, living room, or bedroom. It's worth taking a look at the ceilings here. hanging structures in the form of a wheel or steering wheel with lamps beautifully arranged around the circumference.


For classic, gothic, medieval style, use a candle lamp with imitation of fire in the wind. And minimalism, constructivism and even techno can be decorated with the help of a square lighting fixture.


Rectangular chandeliers made of wood with uneven edges can consist of boards and bars. These elements are often connected to each other by nails, ropes, ropes or chains.


Large bulky chandeliers evoke a feeling of well-being and luxury. With such an accessory you will always feel in your comfort zone, and your life will look like a royal one. Practice shows that the place of massive lamps is in spacious rooms(restaurants, country houses, hotel halls, etc.).


Small chandeliers will fit well into the interior of an attic, loggia, small living room or dining room. Interesting solution There will be 3-arm models, options with shades made of fabric to match the furniture set, upholstery, curtains or wallpaper.


Review of manufacturers
Among popular manufacturers of wooden chandeliers, the Italian brand is considered the top seller Velante. In her collections you will find both floor lamps, sconces, and tabletop appliances, spots, LED chandeliers with original casings made of quality material. Such models can add charm to any interior.
Wood has been used by people for a long time to make household items.
This is an environmentally friendly material that is easy to process. It is available, its price is not high, and the texture is very beautiful when finished correctly.
Exactly because of this reason ceiling chandeliers made from wood, made by yourself, will never go out of fashion.
We create beauty ourselves
Product made from driftwood
Each snag that you find in the forest has its own individual and unique shape.
It is perfect in every curve, because it was created by nature itself. The main thing is not to spoil it all during processing, to cut off the excess, but not to disturb the natural beauty.
It is necessary to clean the surface of bark and damaged wood and dry it well. Then you need to sand it thoroughly using sandpaper.
The next step is to select the type of lamps and purchase the appropriate components.
Note. Since wood is a highly flammable material, it is better to use energy-saving or LED lamps. They heat up slightly.
In order to route the wires, you can use a long, thin drill to make a series of holes.

Having laid the wire, the holes can be filled with putty by selecting putty of a suitable color. You can use a chisel with a narrow blade to select grooves for the wire on the upper (facing the ceiling) side of the branches.
Lighting sockets are attached to the ends of the branches.

The driftwood can be hung from the ceiling using chains. All wooden parts are varnished in several layers.
Lamp made of boards and cups and saucers

This design is attached to the wall, but it can also be hung from the ceiling.
Manufacturing instructions:
- A suitable board (oak, ash, but also pine) must be treated with stain and varnish.
- Holes are made in the bottoms of cups and saucers using a diamond glass drill.
Note. If you use thin, translucent cups, decorative effect higher.
- Wires are connected to the electric sockets (see), passed through the holes in the cups and saucers, and everything is attached to the board.
- On the back side, the wires are connected in parallel to each other and the supply wire.
- The board is suspended from the ceiling using chains or a twisted cord.
If you artificially age the board and use clay pots instead of cups and saucers, the design becomes completely different.
Country style
Several boards irregular shape, processed using the brushing technique, covered with stain and varnish, a coil of hemp rope, several meters of chain and lampshades with sockets - that’s all that is needed to create a designer lamp with your own hands.
Making your own lamp is not difficult
Another design, made independently, in the video:
Previously, candles were used to illuminate rooms. They were installed on the rim of a cart wheel suspended from the ceiling.
Wooden ones in the form of a stylized wheel with candle-shaped light bulbs are often found today.

Very often, forged parts are used together with wood to emphasize the style.

Forging and embossing in finishing. This is what lamps are like in the house.
Lampshade made from clothespins
People with imagination and skillful hands don’t make crafts from anything! Ordinary clothespins, varnished or painted and attached to a frame made of wire or metal mesh- here is the lampshade for a completely unusual look.
Lampshade made from clothespins
Plywood lace
From thin high-quality (preferably birch) plywood using hand jigsaw you can create real masterpieces of applied art.
The manufacturing technology is very simple:
- The drawing of the parts is transferred onto a sanded sheet of plywood using carbon paper.
- Parts of the structure are cut along the contour.
- A hole is drilled inside each piece to be removed with a thin drill (1 mm).
- All internal parts are cut out.
- Clean the edges with small files of various shapes.
- The product is assembled using glue.
- Cover with varnish.
Advice. PVA glue turns yellow over time. It is necessary to carefully remove its residues on visible parts of the product (it is better to use special wood glue).
If you use incandescent lamps, their power should not exceed 40 watts. They must be located as far as possible from wooden parts to avoid overheating and fire.
Carved and turned chandeliers
In the Middle Ages, chandeliers were made of metal (copper, bronze or silver) and were very expensive. It was then that wooden carvings with a coating imitating metal appeared.

Ceiling wooden chandeliers are often made on the basis of turning products.

Parts are made on a lathe, photo
Lamps in oriental style
For a room decorated in Japanese or chinese style, metal is not used in the construction of wooden lamps (see). The shape is usually rectangular, and frosted glass is used instead of rice paper.
Chandeliers can be suspended or fixed to the ceiling.

In oriental style.photo

Ceiling lamp, photo
Design solutions made of veneer or wooden plates
Often for making wooden products use veneer valuable species or bars and plates various forms and sizes.


If you hang it from the ceiling, it will be a chandelier, photo
Wooden chandeliers can be matched to any interior style precisely because wood is a universal material.
Photo
In the design of private houses, wood is most often associated with antiquity. Therefore, lamps made of wood have an ancient appearance. The most popular designs are chandeliers in the shape of a cart wheel.
Diagram of a wooden table lamp.
How to make a lamp with your own hands from wood?
Advantages and disadvantages of wooden structures
A design of this type has the following advantages:
- if you place candles evenly, the design will give equal illumination to all elements of the room;
- the knitting needles will practically not create any obstacles to the light.
Modern stylizations have the same advantages, but today lamps are used instead of wax candles and splinters. In most cases, such designs are made in the form of a candle.
Wood structures have the following advantages:

Diagram of a round wooden lamp: 1 - segments for the rim, 2 - turned spoke, 3 - hub.
- The material is environmentally friendly. Not only will he not highlight harmful substances, but will also saturate the air with aromatic resins, which make people’s breathing easier.
- Wood can be easily processed. If for the production of plastic or metal structure If you need special tools, you can make your own wooden lamps using a minimal set of accessories.
Disadvantages of wooden structures:
- Wood is a flammable material. It is not recommended to place elements made of this material next to incandescent lamps. If the contact in the lamp socket burns out, the structure may catch fire.
- Wooden ceiling lights are susceptible to attacks by beetles, fungus and other pests. Suffer least from rot and pests conifers trees. For hardwood, it is recommended to use antiseptic agents that can reduce the flammability of the material.
- Wood is a hygroscopic material. It absorbs moisture from the air, as a result of which, during the drying process, the material can change volume, shape or crack. In order for the structure to serve for a long time, it will need to be provided with constant temperature and humidity.
Related article: Relay voltage stabilizer
Nuances to consider when making wooden structures
In the process of constructing wooden lamps, the following nuances must be taken into account:

Scheme for assembling a lamp from wooden rings.
- The structures must be of such a shape that all heating elements are removed from fixtures made of wood. The lamps must face upwards, since only in this case is the upward air flow will not cause wood deformation.
- Rules fire safety It is prohibited to place wooden chandeliers under flammable elements.
- A wood lamp is great for a bedroom or living room. IN kitchen area or the bathroom, where there is enough a large number of pair, such structures are not allowed.
In the event of a phase short circuit, you can easily get an electric shock.
Making a lamp in the shape of a coffee service
To make a lamp with your own hands, you will need to prepare the following elements:

LED wooden lamp diagram.
- Dry board made of any type of wood. Can be used as common pine or birch, or ash. Oak, which does not need to be painted or varnished, is also suitable.
- Several translucent coffee cups and saucers to go with them.
- Several cartridges for a small base with fasteners for them.
- Required number of light bulbs. In this case, it is recommended to use LED elements.
- A small number of rubber gaskets. Their number will depend on the method of securing the cartridges.
- Two-core copper wire of small cross-section and short length. It is best to use a wire with a cross-section of 0.75 mm.
- A thin chain or twisted cord. These elements will be used to secure the product to the ceiling structure.
- Required number of screws with rings. The lamp will be suspended using these elements.
- Electric drill.
- Drill bits for working with wood and tiles.
- Pliers.
- Screwdriver or screwdriver.
The manufacturing process of the structure is as follows:
- The planed board is processed with sandpaper (first coarse, then fine).
- Next, you will need to drill several holes in the places where you plan to place the cartridges.
- If noble types of wood are used, then further processing of the material will not be necessary. If other types of wood are used, the material must be coated with stain, then dried and varnished in several layers. On outdoors nitro varnish will dry for several hours, because this process won't take much time.
Related article: DIY extension cord. How to make an extension cord?
- On next stage You will need to drill holes in the coffee cups and saucers, but it is very important not to damage them. In this case, you only need to use a drill for working with glass and tiles. Great efforts are not allowed. You need to drill at a low speed, and during the process you need to make sure that there are no distortions. If you press too hard on the electric drill, the bowl or saucer may break.
- Wires must be attached to all existing sockets. At this stage, they should not be fastened to each other.
- The entire structure is screwed together into a single unit. If the cartridges will use platforms with holes for fasteners, then they need to be pulled to the board through the holes in the saucers or cups. If there is a threaded pipe and a nut at the end of the cartridge, then they must be passed through the cups, saucers and board. Between metal and glass elements it is necessary to install rubber gaskets. You can make such a device yourself from an unused inner tube from a bicycle or car.
- You will need to screw screws with rings into the back of the board.
- The cartridges are connected in parallel. There is no need to leave twists that are wrapped with electrical tape. Care must be taken to make even that part of the lamp that no one can see. To fasten the wires you will need to use a block.
- The block must be fixed to the back of the board using any method: a small amount of adhesive mixture or screws. In it you need to clamp a piece of wire that will be connected to the wiring.
- On the back side, chains or cords are attached to the rings. The second end of these elements is fixed to a hook in the ceiling. The wire must be routed through one of the circuits. Finally, you need to install the light bulbs.
Plywood lace design