In order for bath procedures to bring only benefit and pleasure, two conditions are necessary:
- high level of temperature and humidity in the steam room;
- the presence of sufficient oxygen.
These seemingly mutually exclusive tasks are solved by ventilation in the bathhouse in general and in the steam room in particular. Despite the fact that high humidity and temperature must be maintained in the steam room of a Russian bath, it is impossible to do without access to fresh (cold) air: oxygen is processed by our lungs, partially burned out by the stove, and carbon monoxide (CO) gradually accumulates in the steam room. chemical formula carbon monoxide).
How to properly ventilate a bathhouse. In the figure, red arrows show the movement of hot air, blue arrows show cold air.
If you do not organize the replacement of “exhausted” air with fresh air, instead of improving health and increasing performance (this is what we go to the bathhouse for), you can get, at best, lethargy, weakness and headache, and at worst - a hospital bed or even a place in a cemetery.
Properly arranged ventilation ensures air circulation, while oxygen is supplied in sufficient quantities, and carbon monoxide and carbon monoxide are released into the atmosphere. After completing the bath procedures, with good ventilation, the vapor is actively removed outside the building, and the rooms that previously had high humidity dry out. If this aspect has not been given enough attention, after a couple of years in the steam room, and then in other rooms, the lining rots, the smell of mustiness and sweat appears and gradually intensifies, and the wood turns into dust. Now, I hope, it is clear whether ventilation is needed in the bathhouse...
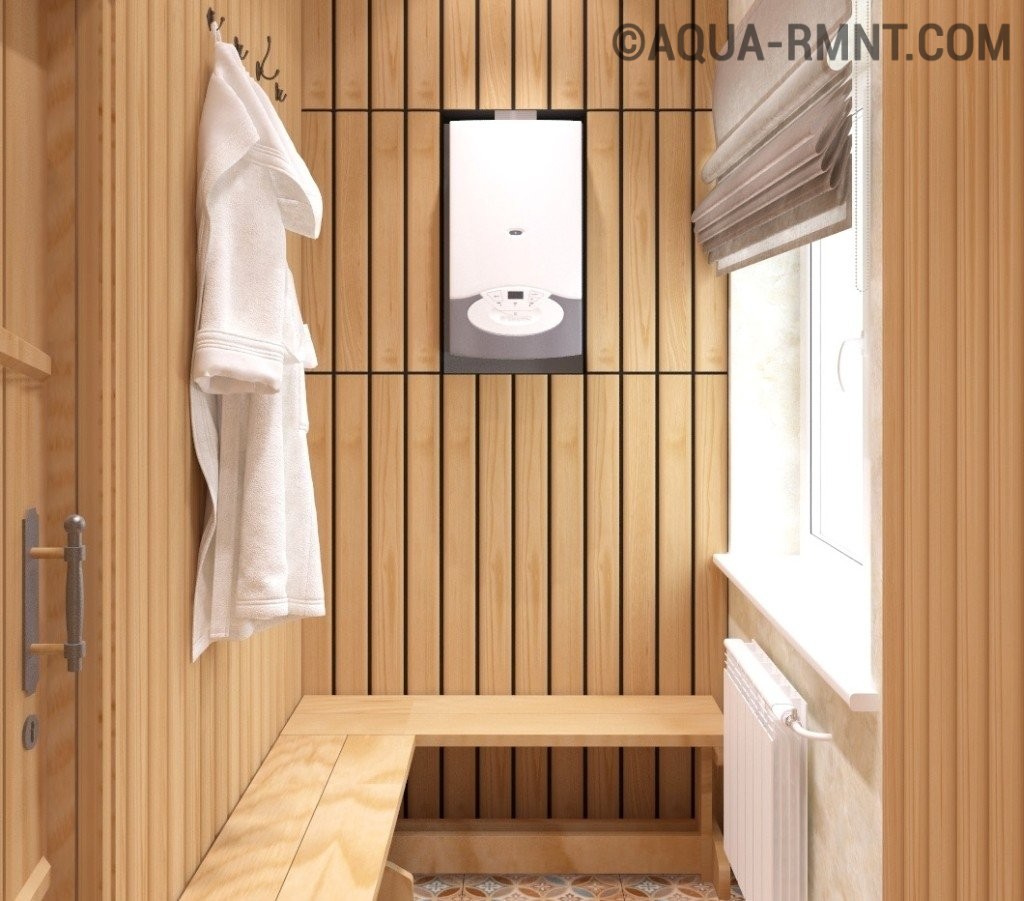
 Warming up and ventilating the bath. Please note that the exhaust vent is located at a small height from the floor - usually no higher than 50 cm. With this scheme, exhaust steam is released into the atmosphere. Moreover, the floor in the steam room warms up well
 Ventilation in a bathhouse is not needed only in one case: if it is all built of wood and has not been insulated anywhere - neither from the inside nor from the outside. In this case, air exchange occurs due to the fact that the wood “breathes”. In this case, they also talk about the presence of natural ventilation in the bathhouse: any wood has pores and cracks through which air flows out/flows and temperature and humidity are regulated. But if the bathhouse is made of rounded logs or has insulation or moisture/steam insulation, then the creation of additional ventilation holes is necessary.
There are three types of ventilation:
- Mechanical ventilation. In this case, the inflow and outflow of air masses occurs due to artificially created air movement. Air parameters are controlled by technical means.
- Natural ventilation: circulation occurs due to the difference in pressure inside and outside the room. This method is only possible if there are “breathing” walls or thoughtfully arranged ventilation vents.
- Combined ventilation: simultaneous use of the natural movement of air masses and technical devices(in the simplest case - fans).
The video below shows the combined ventilation option.
In a specific case, aluminum foil with a thickness of 100 microns was used in the construction of the ventilation duct.
Ventilation device in baths
In the very simple version, the ventilation system of a steam room or bathhouse consists of two (sometimes more) openings in the walls and/or foundation: supply and exhaust. The trick is in choosing the location of these holes and their sizes. Sometimes, to ensure more active air exchange, fans can be installed.
 Warming up and ventilating the bath. In the simplest case, the exhaust vent is located near the ceiling
 There is no single ventilation scheme for a bathhouse: they are too different, depending on design features, and the materials from which they are made. But there are general rules and several of the most common schemes, following which you can choose the optimal ventilation specifically for your case.
The size of the ventilation holes is calculated based on the volume of the steam room: per cubic meter of ventilated area, the size of the holes should be 24 cm 2.
Despite the fact that the main task in the bathhouse is to maintain high humidity in the steam room and a sufficient temperature level, the ventilation holes should not be made too small: they will not provide the necessary level of air exchange. Exhaust ventilation openings must correspond to the size of the supply ventilation openings: if the proportions are not correct, the air exchange will also be insufficient. In some cases, to speed up the removal of exhaust air and speed up the drying of the bath, you can make two exhaust holes.

To ensure the required air conditions when heating the steam room, special covers/plugs are made on the ventilation ducts, which can be opened/closed from the steam room, thereby regulating the humidity/temperature/air exchange. Generally speaking, it is a must to have plugs or covers on any vent opening to the outdoors: in winter cold air actively strives for a warm room and the presence of covers or regulators to delay it is necessary.
Where can there be supply and exhaust openings?
Most often, it is at least partially located in the steam room. In this case, the supply hole is made near the stove at a distance no higher than 30 cm from the floor. The incoming cold air quickly heats up from the stove and rises. It's quite popular, but not the most The best way organizing ventilation for the bathhouse. Ventilation is much more effective when the supply openings are located in the foundation under the floor (to prevent rodents from entering through them, the openings are equipped with metal gratings). This option solves two problems at once: it delivers fresh air to the bathhouse, and also effectively dries the floors and walls after completing the procedures. The floor boards, in this case, are not laid closely, but with a small gap for free passage of air. If you don’t want to leave gaps in the floor (although this is very good for a bathhouse), you can make several ventilation holes in the floor, closed wooden gratings. In this case, the air movement will not be so active; more powerful fans may be needed, but the circuit will remain operational.

When planning supply ventilation holes in the foundation, keep in mind that air into the bathhouse should come from the street, and not from the underground, otherwise it will have a musty smell. To organize air intake from the street, a box made of wood (often homemade), plastic or metal (ready-made) is placed in the hole, and it is also taken out near the stove. Typically, the inlet openings are located in an area that is protected by a metal or asbestos sheet from coals and firebrands.
Ventilation holes in the foundation are provided at the planning stage. If the foundation is already ready, but there are no holes for ventilation, you can ventilate the floor in the steam room differently: lay the floor boards on the joists, but not close to each other, but with a gap of 0.5-1 cm. In the gap between the rough (earth/concrete) floor and the finishing floor, an outlet is installed, which goes into a ventilation pipe that discharges exhaust air to the roof (but not to the attic). This option provides for the presence of only one supply hole, which is usually located below the heater. The exhaust pipe under the floor is installed on the opposite side of the room (but not opposite, but diagonally).
It is impossible to make an exhaust pipe in a steam room from plastic boxes for ventilation - they cannot withstand high temperatures, but it is permissible to use them in a locker room or washing department.
With this ventilation scheme in the steam room, cold air warms up near the stove, rises, then, cooling, falls down, seeps under the floor through cracks in the floor and is discharged through the outlet pipe. These two options effectively remove moisture after a bath; they can also be considered floor ventilation schemes in a bath.

Exhaust openings can be located on the wall opposite the supply opening (if both of these walls face the street) or on the same wall, but in the opposite corner. There is a scheme in which they are located at the top on the opposite wall (30 cm from the ceiling), sometimes they are located at the bottom (30 cm from the floor). If the exhaust vent is located below or on the same wall as the supply vent, a fan is needed to create air flow.
To ensure that ventilation in the bathhouse remains effective, you must not:
- make ventilation vents smaller than the calculated ones;
- Place the supply and exhaust openings one opposite the other - this way the incoming air is removed almost immediately without releasing oxygen, a draft is formed, which is contraindicated for a bath.
Steam room ventilation schemes
Let's consider several of the most common ventilation options in a steam room:


These are the most commonly used ventilation schemes for steam rooms in a bath; there are many more variations and combinations of them. Based on these four options for organizing ventilation, you can develop a scheme for your steam room.
Ventilation in the washing compartment of the bathhouse
In a washing room, high humidity is common, and to prevent the lining from rotting or bad smell, it is necessary to provide floor ventilation. It is arranged similarly to floor ventilation in a steam room: an exhaust hole is made between the rough and finished floors, which can be equipped with a fan. The exhaust pipe leads to the roof.
With this floor ventilation scheme in the washing compartment, the coldest exhaust air is removed, and the warmer air is lowered in its place. upper layers. In this way, an increase in the comfort of the people staying here is also achieved.

The principle of ventilation in all other rooms of the bathhouse is the same. You need to decide on the optimal ventilation system specifically for your conditions and select/develop the most suitable scheme. Ventilation in the washing compartment differs only in that due to more low temperatures air, you can use plastic ventilation ducts here (which you cannot do in a steam room) and you can install fans that are not heat-resistant, but only those that can withstand high humidity (moisture-proof).
Ventilation of brick and Turkish baths
When planning a ventilation system for a brick bath, you need to take into account that its efficiency should be many times higher than that of a wooden one. Indeed, in this case, you will have to dry not only the inner lining of the steam room/washing room/locker room, but also the walls: brick is a very hygroscopic material. To remove all moisture, it is necessary that the inflow/outflow of air during drying be very active, and the vents have reliable dampers that allow you to regulate the intensity of air movement.
When installing ventilation with its 100% humidity, exhaust ventilation must also be very effective: in an hour of operation it is necessary to ensure a six-fold change of air in the room. In addition, it is necessary to provide for the possibility of removing condensate, which forms during cooling in large quantities. This problem can be solved in two ways: install an air dryer in the pipe, which discharges condensate into the sewer system, or provide ventilation pipe a channel for draining condensate (it also goes into the sewer).
Conclusion: it is necessary to plan ventilation at the bathhouse design stage, placing inlet vents in the foundation. If necessary, you can make vents in finished walls, but this is quite troublesome and complicated.
Without good ventilation in the steam room, you won’t get real pleasure from the bathhouse, and for people who cannot boast of good health, going to such a bathhouse is completely dangerous. In this article we tell you how to make ventilation in a bathhouse and analyze the “classics without ventilation ducts”: how our ancestors ventilated the steam room and what it might look like in a modern solution.
- Burst ventilation in a Russian bathhouse
- Are additional ventilation holes needed in a Russian bath?
- Do-it-yourself installation of proper ventilation in a bathhouse based on the experience of our portal participants
Burst ventilation: proper ventilation in the steam room
In the classic Russian bath, two ventilation schemes were usually used:
- burst ventilation providing sufficient quantity air while vaping;
- ventilation for drying the steam room after use.
Burst ventilation is carried out through an open door and window. We emphasize: we're talking about about wet steam bath, and not about the sauna.
Building for myself Member of FORUMHOUSE
I had to quarrel with the customer and insist that an opening for a window be cut into the 500 mm thick wall.
To obtain breathing air in the steam room, a window next to the shelf and a door to the dressing room are enough. The window and door need to be opened between visits while we rest. Then we return to the steam room, close the window and door and steam again.

To dry the steam room, a small vent is made in it (there are different options: some make it in the far corner under the ceiling, others, on the contrary, under the shelf). After use, the baths are opened:
- this little bastard
- a window in the washing room or dressing room.
This creates an air flow that ventilates the room and removes moisture from it.


In the photo: the bathhouse of our user with the nickname Vasisdas.
FORUMHOUSE user with the nickname KochevniK has ventilation in the bathhouse done like this: air flow is under the furnace firebox, exit diagonally under the ceiling. Usually everyone steams with the hood closed, but sometimes it is opened, “if the steamer is not extreme,” and in this case natural ventilation works.
When you want to freshen the air in the steam room after several visits, the hood opens and a shock dose of boiling water splashes into the heater.
Nomad
All the old steam is thrown out of the hood window. After that, I wave the doors a little, creating an additional flow, put in new wormwood, close the window, and the steam room is as good as new, as if they never steamed there.
The "grandfather's" method
There is also an interesting method of ventilating a bathhouse, handed down from our ancestors, which EsKor, a member of our portal, saw in the bathhouse of “one gray-haired grandfather.” In this bathhouse, the only specially made means of ventilation was an vent a meter from the floor, under the shelf. What is the point of such an outlet? It turned out that the gray-haired grandfather “refreshed” the air in the steam room in almost the same way as Nomad, only he prepared a bucket of ice water in advance and poured it onto the shelf either a moment before or immediately after a shock dose of water was charged into the heater.
EsKor
Grandfather explained that cold water, which falls onto the floor from the shelf, pulls the steam down towards itself, and it takes stale air with it and flies away into the vent. There is no mysticism, physics explains this matter well.
Cold water cools the steam, condensation occurs, the decrease in pressure causes an increased flow of air above the steam layer, and the steam literally falls from the ceiling.
It is clear that this method is not suitable for dry-air baths and steam rooms with a solid floor and no drain.
Different ventilation schemes for a Russian bath
Let's look at how such a ventilation system works using examples of several bathhouses of FORUMHOUSE participants.
Here is the bathhouse of our participant with the nickname Vasisdas.

Vasisdas
Everything ingenious is simple! Heater stove, door, window and solid wood. Learning to use this is a matter of technique.
How a window is made in a steam room: a double-glazed window on the side of the facade of the bathhouse, a ventilation gap as thick as the wall pie, a decorative window on the side of the steam room. This avoids unnecessary heat loss and is simply beautiful.

Our participant has a nickname I'm building for myself a small combined steam room and washing room, 2.5 by 2.1 and 2.1 m high.

The ventilation system includes:
- the window at the shelf is 300x300mm along the frame, the opening itself is 200x200;
- vent in the upper crown under the ceiling 150x150mm;
- vent near the floor under the shelf 150x150 mm.
The top vent is always closed; it is opened only to dry the steam room after use. Also, our user sometimes opens it to create a softer mode for his wife and daughter.

All openings are closed during vaping. The height of the window is chosen well, the heat is not blown out of the steam room.

During vaping, two types of ventilation are used:
- simple ventilation: you leave the steam room, open the window and leave the door ajar.
- quick ventilation through the window in the steam room and the window under the shelf.
To dry the steam room, all openings and windows are opened.

I'm building for myself
Air from the street through the window of the dressing room goes along the floor into the lower vent under the shelf (draft), partially heated by the still hot stove and rises above the shelf into the upper vent. There is a draft under the floor from the vents in the basement. In winter, I close them while steaming.
Our user considers such “old methods” of bathhouse ventilation, without installing ventilation ducts, justified and quite sufficient for a heat-intensive stove.
This is how the ventilation in the bathhouse of our participant with the nickname Mikhalych Titov is arranged. The inflow is made through a half-brick hole in the side wall.


If you look from the street, it looks like this.

The downward branch into which the condensate goes is closed with a screw plug. The entrance from the sink is made under the stove.
When building a bathhouse, a member of our portal with the nickname Chagav attached particular importance to ventilation. In the relaxation room he installed forced ventilation (one supply vent and two exhaust vents), and in the steam room there was natural ventilation.


If desired, air enters the steam room from the street - pipes are poured into the foundation, it passes through the stones of the stove corrugated stainless steel. It opens and closes with a latch.
High-quality ventilation system – required element steam rooms The absence or improper organization of ventilation in the bathhouse is dangerous to human health. A properly equipped system will protect people from carbon monoxide and improve the comfort of staying indoors. We will talk further about the features and technology of installing a ventilation system in a bathhouse.
Characteristics of proper ventilation for a steam room
Proper ventilation in a bathhouse performs several functions at once:
- provides the room with oxygen;
- improves the comfort of staying in the steam room;
- removes carbon monoxide;
- allows for economically efficient use of firewood;
- distributes air flow evenly;
- protects the building from the formation of mold or mildew.

The most best option The ventilation in the bathhouse is supply and exhaust. For these purposes, arrange:
- inlet opening - an influx is organized through them fresh air in the steam room, a fan with a ventilation tube is installed, additional air flow is provided open windows or through the door;
- exhaust hole - removal of heated air from the room, through a firebox, blower or devices that improve draft.
To improve the supply exhaust system ventilation uses various methods. We invite you to familiarize yourself with one of the most effective ventilation systems:
1. The supply openings are located at the bottom of the room, next to the firebox.
2. Exhaust holes are strictly on the opposite side from above. It is possible to organize two holes at once for better air control.
3. The height of the exhaust opening determines the level of draft. If the ventilation opening is low, further strengthen the system with a ventilation pipe.
4. Using special dampers, the air supply from the room is controlled.
5. The air in the steam room is renewed every 2-3 hours.
In addition, the individual parameters of the ventilation system are determined by the type of room and bathhouse option. For example, in a Russian bathhouse, periodic ventilation will help to renew the air. In addition, the size and installation location of the firebox is taken into account; in relation to this parameter, two types of ventilation are organized.

How to make ventilation in a steam room with a separate firebox
We offer an option for organizing ventilation in a steam room, the firebox of which is located in an adjacent room. This scheme is popular in ordinary Russian baths. A furnace tunnel is used to lead the firebox into the adjacent room. Among the advantages of this arrangement of the furnace, we note:
- no trash in the steam room;
- the door to the room opens only upon entry;
- possibility of installing heat-resistant glass for admiring an open flame.
To install supply openings in a room, two methods are used:
1. Arrangement of a ventilation duct in the underground space. Bringing it out in front of the furnace room, installing ventilation grilles on the duct.
2. Floor ventilation supply.
Install the hood on the opposite wall, diagonally in relation to the supply opening.
The main quality of organizing proper ventilation is that the supply openings must coincide in area with the exhaust openings.

Ventilation diagram in a steam room with an indoor firebox
If the stove-heater is located directly in the steam room, then the organization of ventilation occurs differently. In this case, air flows through the ashpit solve the issue of natural ventilation. This method is appropriate if the fire in the stove is constantly on.
If chimney is absent in the bathhouse, and the stove operates in short-term mode, they use a more advanced ventilation system. Familiarize yourself with the technology of arranging a ventilation system in a steam room:
1. Build a special brick podium on which the stove is installed. With its help, a ventilation duct is connected to the stove.
2. Lay the ends, build another box of bricks. As a result, the first structure was installed at the top of the stove channel, and the second - to the steam room door.
3. On the wall adjacent to the regular room, build doors where the masonry passes through. They warm up the next room, if necessary.
4. A stove is installed on the podium; it can be mounted on a corner or on steel pictures. Finish the oven with brick, install a brick screen with two convection valves.
5. The exhaust ventilation system operates due to the furnace firebox.

Correct installation of the ventilation system is based on its correct adjustment. General rules ventilation system control:
- at the beginning of the furnace fire, all openings, both supply and exhaust, are closed;
- wait until the temperature increases, then adjust the ventilation holes with the valves;
- if it is necessary to increase the volume of oxygen in the room, open the inlet;
- Upon completion of work, open the doors for better ventilation of the steam room.
Steam room ventilation photo:

To determine the temperature and humidity in the room, use special instruments. An alcohol thermometer or electric type. Please note that the use of the mercury version is strictly prohibited. Use a hygrometer to determine the humidity level.
The operating principle of the ventilation system is based on the following factors:
- by heating the oven, the air gradually heats up and exits through the convection door;
- the bottom door remains open until the oven is completely warmed up;
- close the door from below and work with the top hatch;
- during the vaping process, only the blower installed on the box opens;
- After using the steam room for its intended purpose, ventilate the room well.

Do-it-yourself ventilation device in the steam room
The main functions of the ventilation system in the bathhouse:
- air supply during bath procedures;
- high-quality room drying.
The ventilation system in the bathhouse should not:
- violate the temperature of the room while taking bath procedures;
- separate temperature flows, that is, cool air is closer to the floor, and warm air is located above;
- remove unexhausted air from the steam room.
In addition, the lack of ventilation leads to the appearance of unpleasant air in the room, the formation of mold and mildew, which are harmful to human health.

Let us highlight three main types of ventilation in the steam room:
- natural option - serving air flow through pressure difference;
- mechanical option - air supply using special mechanisms, when measuring these characteristics with instruments;
- combined option - creating artificial pressure with fans and hoods.
There are two types of air transportation in a room: supply and exhaust. For these purposes, equip a hole located diagonally with respect to the inlet.
It is not recommended to install an exhaust vent in the steam room on the ceiling; this ventilation system increases the time it takes to warm up the room. It is rational to install the hood under the ceiling, additionally equipping it with a damper to regulate the draft.
In addition, provide a ventilated floor in the bathhouse. Thus, the life of the floor covering increases, since it is in constant contact with water. Recommendations for arranging floor ventilation:
1. During the installation of the foundation base, ensure ventilation of the floors and build vents from the basement.
2. Build ventilation holes on opposite walls to ensure air flow. Install grilles on them to prevent rodents from entering.
3. The finished floor should be slightly higher in level than the ash pit is located. Thus, it will function as a hood.
4. Install wooden boards with a small gap, at least half a centimeter.
5. After taking bath procedures, ventilate the room well and dry the floors.
Another way to organize a ventilation system in a bathhouse is “According to Bast”. In this case, fresh air enters the room from the furnace space, and exhaust comes from an opening located near the door. For these purposes, build an exhaust duct made of wood, lined with foil inside.
Build a ventilation duct under the floor next to a metal sheet to prevent heat from entering it. The size of the structure should not exceed twenty percent. Adjusting the flow of fresh air through such a system is quite simple. It is enough to open the ventilation hole and the blower. In addition, it is possible to avoid the accumulation of unpleasant aroma in the steam room. This method of organizing ventilation is appropriate if the firebox is located directly in the steam room.

DIY methods for organizing ventilation in a steam room
Install the inlet hole under the stove 50 cm from the floor, and the outlet on the opposite side, 30 cm from the ceiling. Forced movement of air masses is provided by a fan. Thus, it is possible to ensure uniform heating of the air. The height of the first hole regulates the draft force of natural ventilation.
Two ventilation holes are located on one wall, always opposite the stove. The inlet is installed at a distance of thirty centimeters from the floor, and the outlet - thirty centimeters from the ceiling. Install a fan in the outlet, the cooled air entering the room collides with the stove, heats up and goes outside.
Place the inlet hole behind the stove, at a distance of about twenty centimeters from the floor. The inlet is installed at the same height, only near the ceiling of the opposite wall. A hood is installed in the second hole. The principle of operation of the system is based on cooled air entering the steam room, passing through the oven and being drawn out by a second hole.
This method is relevant for a steam room with a floor that has holes for water drainage. The inlet is installed behind the stove, and the outlet is a drain pipe through which air is discharged outside.
Relevant for a bathhouse with a constantly running stove. The inlet hole is arranged opposite the stove, and the vent with chimney act as an outlet
If you need to increase the temperature in the steam room, just close all the plugs. After taking bath procedures, they are removed. It is quite possible to organize these ventilation schemes yourself, without purchasing expensive devices and special material investments.

How to make a vapor barrier for a steam room with your own hands
Vapor barrier in the steam room allows you to maintain the optimal room temperature. They will help you create a high-quality vapor barrier special materials in the form of vapor-proof films, insulation and waterproofing. The film protects the insulation from the penetration of water vapor, while not allowing moisture in the hot air to pass through.
A well-equipped vapor barrier and ventilation system increases the service life of the room itself and its exterior finishing. Since hot air rises upward, first of all, properly vapor barrier the ceiling.
For these purposes, use racks, boards, about 6 cm thick. They are covered on top with aluminum-based foil, high-density cardboard or wax paper impregnated with drying oil. After fixing one of these materials, the ceiling is finished with clay and insulated.
In addition, it will help to vaporize the ceiling edged board. Cardboard impregnated with drying oil is installed on the boards, which is then lined with wooden clapboard.
Expanded polystyrene boards are a modern replacement for soft clay and have good thermal insulation and performance characteristics.
The following are used as vapor barrier materials for steam room walls:

Glassine and roofing felt are rarely used for thermal insulation of steam rooms. This is explained by the fact that when heated strongly, they release toxic substances and unpleasant odors. The steam room is vapor-insulated with special foil materials. There are combined methods of steam and heat insulation. For example, NPP polypropylene, among its advantages we note:
- excellent resistance to moisture;
- resistance to increased temperature;
- laminated coating prevents the development of mold and mildew;
- combined thermal vapor barrier.
In addition, it is possible to use rolled vapor barrier in the form of rolled foil or fiberglass boards. For sealing joints between vapor barrier materials, use foil tape.
The plates are installed on the ceiling with a small compensation gap of 20 mm. This reduces the impact of moisture on these areas. Please note that the vapor barrier in the steam room must be securely hidden behind the main finishing material, and a high-quality ventilation system is its complement.
Do-it-yourself ventilation in the steam room
Baths, saunas and swimming pools A high-quality ventilation system is an essential element of a steam room. The absence or improper organization of ventilation in the bathhouse is dangerous to human health.
Ventilation in a bathhouse with your own hands: how to do it right
Why do you need to worry about how to properly ventilate a bathhouse? Not only the maintenance of a comfortable temperature in the dressing room, washing room, steam room, relaxation room, but also the safety and service life of the building and its parts depends on how correctly the ventilation in the bathhouse is arranged. When designing a bathhouse and starting its construction, you should remember that ventilation in the bathhouse with your own hands must be done taking into account certain subtleties and nuances. With your own hands, using instructions, photos and videos, you can complete all stages of installing ventilation in a bathhouse and steam room.

Properly arranged ventilation in the bathhouse will ensure comfortable temperature inside the steam room and will extend the life of the wooden elements
The principle of operation of the ventilation system in the bathhouse
The operation of the ventilation system is based on well-known physical laws, and its design is simple and understandable. For continuous air circulation, two types of openings are required:
Supply openings are needed to allow fresh air to enter the room. With proper ventilation in the bathhouse, they should be located as close to the floor and near the stove as possible. With this arrangement, the incoming air quickly heats up and a high temperature is stably maintained in the bath.

The direction of movement of air masses inside the steam room
Exhaust holes are designed to remove superheated humidified air and carbon monoxide from the steam room. They should be installed as high as possible, that is, just below the ceiling level, and located opposite the supply openings in order to create and maintain constant air exchange.
Advice! An exhaust vent in the ceiling will quickly cool the room, so this location is undesirable.
There are no difficulties with the fundamental localization of supply and exhaust openings when installing ventilation in a bathhouse with your own hands. But the task of maintaining a high temperature in a steam room while simultaneously effectively removing exhaust air and carbon monoxide from it is not easy.
You also need to pay attention to maintaining a temperature that is comfortable both for sanitary and hygienic procedures and for relaxation in all parts of the bathhouse: dressing room, washing room, relaxation room. And if you have to create and implement a ventilation scheme in a bathhouse with your own hands, you should think about performing the work correctly.

Diagram of proper air circulation in the bath
Types of ventilation
There are two types of ventilation:
Which one to choose when installing a ventilation system with your own hands depends on the design of the bathhouse and the volume of its premises.

Ventilation system with electronic control unit
Natural ventilation
This type of ventilation works due to the difference in temperature and pressure inside and outside the room. The efficiency of its operation depends on the placement of the air inlet and outlet holes. Most suitable solution– the supply openings are located near the floor, at a height of 250-350 mm, next to the stove, and the exhaust openings are on the wall opposite them, 150-200 mm below the ceiling level.
 The best photos of finishing the bathhouse inside and a description of the stages of work. Sequence of actions when repairing a sauna. Recommended materials for use and installation rules. Waterproofing and insulation of walls.
Natural ventilation systems are not suitable for ventilating a steam room or steam room, since the cold air in this room collects near the floor, and the hot air in the upper part. Setting up the movement of air flows is accompanied by difficulties, but with the correct arrangement of ventilation elements in a Russian steam bath, it is possible to cope with this problem with your own hands.

Natural ventilation is not suitable for a steam room; it is advisable to arrange it in a relaxation room
Forced ventilation
For this type of ventilation in the steam room of a Russian bath or sauna, two subtypes can be distinguished:
- Ventilation using special electronic systems that control air temperature and humidity, automatically regulating its flow and filtration. Such systems are quite expensive, and their use is often beyond the budget.
- A combined ventilation system, when, through the use of fans, the effect of natural ventilation is obtained.

Location of ventilation ducts inside the walls of the bathhouse
Dependence of the bathhouse ventilation system on the type of building
Natural ventilation, provided that the vents are correctly located and their sizes match the volume of the premises, functions well in a Russian bathhouse assembled from logs or timber.
The frame building is a sealed structure. It is advisable to use forced ventilation in frame baths. The supply opening in the outer wall of the steam room should be additionally equipped with a blower fan.
In a building made of brick or foam blocks, only forced ventilation is possible.

The type of ventilation system is selected depending on the materials from which the bathhouse is built
Planning a bath ventilation system: subtleties and nuances
Before you start choosing a ventilation scheme in a bathhouse and arranging its structure with your own hands, you need to understand the subtleties and nuances of design.
Fact! Even small errors in the layout of the supply and exhaust openings lead to undesirable consequences. In the steam room, the constant air temperature will either decrease or the concentration of carbon monoxide will increase.
When building any bathhouse, the ventilation of the bathhouse and its circuit diagram are laid out during the construction process. The question “how to make ventilation in a bathhouse” should be resolved at the design stage.
Ventilation ducts for the dressing room, washing room, steam room, rest rooms and openings for the influx of fresh air and removal of a mixture of carbon monoxide with waste wet and hot air masses must be laid at the appropriate stages of construction. Valves and grilles for regulating the sizes of supply and exhaust openings and sections of ventilation air ducts are installed already at the stage finishing premises.

Planning the ventilation system must be carried out at the stage of developing a design project for a bathhouse
Basically, the functioning of bath ventilation depends on two factors:
- the dimensions of the ventilation openings - both supply and exhaust - which are determined by the volume of the room, be it a dressing room, washing room, steam room or relaxation room;
- relative position of ventilation holes.
Vent Sizes
The size of the ventilation holes depends on the volume of a particular room: dressing room, steam room, washing room or rest room. Both accurate calculation of the size of these openings and the ability to change it are very important. To adjust the gaps in the openings, gates and grilles are installed.

Ventilation hole with slider to regulate the volume of fresh air inflow
It is necessary to take into account that with large ventilation windows it will be difficult to heat the room to the correct temperature. There will either be a danger of constant excessive consumption of fuel and electricity, or difficulties in adjusting the cross-section of the ventilation ducts, that is, the distance to which each opening will need to be opened with your own hands.
Advice! The area of the ventilation opening is determined at the rate of 24 cm² per 1 m³ of the volume of the ventilated room. For good draft of fresh air from outside, the exhaust hole must be larger than the inlet.
If the area of the ventilation openings is insufficient, the temperature, air humidity and carbon monoxide concentration in the room can rise to critical values.

The optimal size of the ventilation opening is calculated at the rate of 24 sq. cm per 1 cubic meter of room volume
Relative position of ventilation holes
The operation of any ventilation system is based on the replacement of masses of heated air that move under the pressure of air coming from outside - colder and heavier. It is important to provide the ability to regulate the direction of the heat flow emanating from the stove installed in the bathhouse. Ventilation in a steam room is often equipped with not one inlet, but two precisely for this reason. To localize heat flows, it is enough to use valves to create a gap of a certain width in one of them or in both.

Layout of ventilation holes inside the steam room for the influx of fresh air and removal of contaminated air
Ventilation in a Russian bath
The quality of the ventilation system of a bathhouse, designed and installed with your own hands, is laid down at the project stage.
The air currents circulating in the rooms will have different temperatures, but the discomfort from this should be felt as little as possible.
Advice! Comfort in the bathhouse depends not only on the absence of sudden changes in temperature “horizontally,” that is, when moving from one room to another: from the rest room to the dressing room or from the steam room to the washing room. A gentle movement of air masses vertically is necessary: the air temperature near the floor should not be much lower than the temperature at the level of average human height.

The microclimate in the bathhouse directly depends on the number of ventilation holes, their size and location
The uniformity of the intake, mixing and removal of air masses depends on the number of supply and exhaust openings, their sizes, location relative to each other and heating devices, as well as equipped with additional control devices.
Basic diagrams of ventilation in a bathhouse
Any sauna ventilation scheme is developed with one purpose - maintaining temperature, humidity and fresh air in the steam room. The bathhouse premises, and especially the steam room, are exposed to water and steam, and therefore require periodic ventilation and drying. But ventilation and drying will be ineffective if proper ventilation is not organized in the bathhouse. Proper and constant ventilation of a steam bath significantly reduces the consequences of wood absorbing moisture.

The main task of sauna ventilation is to maintain temperature, humidity and air freshness in the steam room
Floor ventilation in the bathhouse
Air exchange in bath rooms The installation of a ventilated floor helps.
Wooden floors that are in constant contact with water become unusable after 5 years. Requirements necessary for floor ventilation:
- to create a flow, make small vents in the foundation of the bathhouse;
- lay the floor, leaving gaps of up to 1 cm between the boards;
- lay inlet openings in parallel walls (not forgetting to protect them with bars from rodents);
- In order for the furnace to operate with an additional hood, lay the finished floor above the level of the blower;
- After using the sauna, leave the doors open until the floor in the room is dry.

Diagram of the ventilation system in the sauna
Ventilation in the sauna dressing room
With your own hands, if you have photo and video instructions, it is easiest to do ventilation in the relaxation room of the bathhouse and in the dressing room, since there is no direct contact with water. Natural or combined type of ventilation is used, when fresh air enters through the supply duct and is removed using a fan through the exhaust duct of the steam room, vestibule or bathroom. It is also possible to install ventilators, which will require direct access to the street and a power connection.

The dressing room can be equipped with natural or combined type of ventilation
Ventilation in the washing bath
For air exchange in the washing room, a system is often made forced ventilation, which is driven by an electric motor. Air flows are directed towards the vestibule. The supply and exhaust ducts are made of the same cross-section, the inlet of the first is installed above the ground level (2 m), and the outlet of the second is above the roof.
Ventilation in the steam room of the bath
The microclimate requirements for the steam room are special. It must warm up quickly and be maintained optimal level humidity and no drafts. Therefore, the correct position and dimensions of the supply and exhaust channels, which are laid during construction, are relevant for the steam room. To regulate the inflow and outflow of air, valves in the vents are sufficient, but if the room is large, a blower or exhaust fan may be needed.

Scheme of ventilation arrangement in the steam room
The general principles outlined above for designing ventilation in a bathhouse, videos and photos, attached to instructions from online or other resources, should help those wishing to build a bathhouse with their own hands to bring this desire to a concrete embodiment.
Ventilation in a bathhouse with your own hands: how to do it right
Ventilation in a bathhouse with your own hands - why you need ventilation in a bathhouse, how to make ventilation in a bathhouse yourself, design principles, diagrams, instructions, photos, videos.
Do-it-yourself ventilation in the bathhouse
In the process of arranging a bathhouse Special attention it is necessary to pay attention to the issue of organizing high-quality ventilation. Without proper air exchange, it will simply be impossible to use the steam room normally. If desired, all work on installing the necessary systems can be done with your own hands. You just need to understand the order of installation and connection of the main units and do everything in accordance with the instructions.
Why is ventilation needed in a bathhouse?
Why is ventilation needed in a bathhouse?
Ventilation in the bathhouse is very important. To avoid lengthy and not very interesting explanations, you can consider everything using a specific example.
The bathhouse visitor is in a room filled with a large amount of hot steam. A person inhales this vapor. It is known that people breathe oxygen and exhale carbon dioxide. In the absence of sufficient air exchange, after some time a person will simply burn out.
That is why ventilation in the bathhouse should be as efficient as possible and made in full accordance with technology. There are several types of ventilation systems. Study the features of each option and choose the method that is most suitable for your case.
Ventilation in the steam room
Ventilation systems are installed to solve two main problems, namely:
- ensuring the flow of clean air into the bathhouse;
- removal of exhaust air from the steam room.
Additionally, ventilation ensures faster and better drying of the steam room. It is necessary to study the features of existing ventilation systems and understand the order of their installation in order to obtain the most efficient and high-quality air exchange.
It is important that during operation of the ventilation system the characteristic characteristics of a bathhouse are not disturbed. temperature regime. Air exchange must be organized in such a way that there are no disturbances in the distribution of temperature flows in the bathhouse. Cool air in the steam room can only be located near the floor. And the higher you go to the ceiling, the higher the air temperature should be.
Ventilation should not remove clean air from the bathhouse. A properly equipped system supplies fresh air to the room and removes exhaust air. Errors during installation of the system will lead to extremely unfavorable consequences for both the bathhouse and its visitors.
Mold damage to wood
Main types of ventilation systems
There are several types of air exchange systems suitable for use in a bathhouse, namely:
- natural ventilation. The operating principle of such a system is based on the use of the pressure difference inside the bathhouse and outside. The simplest and least effective option;
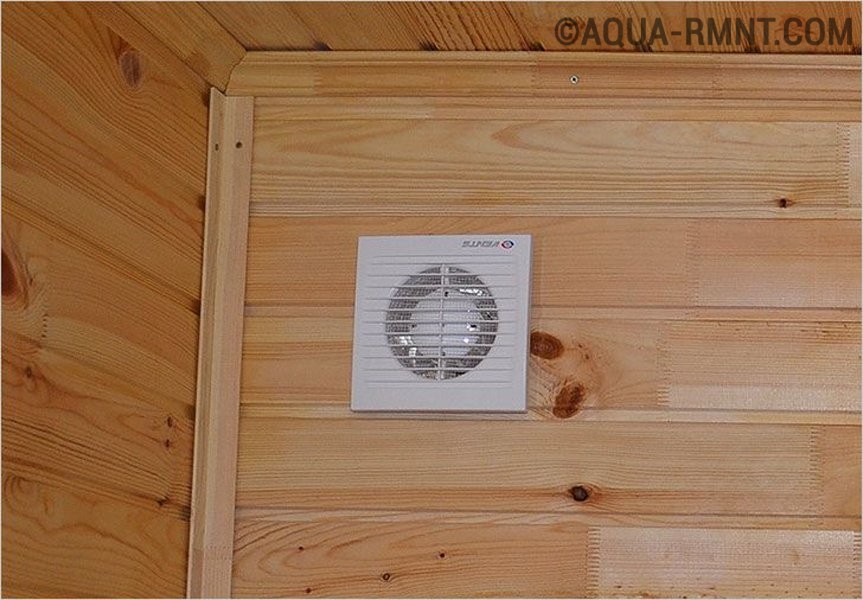
Exhaust fan from steam room
Exhaust air is removed from the bathhouse through a special ventilation duct. The air exchange installation technology requires that the box be installed diagonally to the supply opening through which fresh air enters the bathhouse.
Take care of ventilation in all areas of the bathhouse, and not just in the steam room. The dressing room, rest room and other areas of the bath should also be well ventilated.
What you need to know about floor ventilation?
Quite often, bathhouse owners forget that the floor of the steam room must also be well ventilated. Such forgetfulness leads to very rapid deterioration of floor structural elements and a general deterioration in the characteristics of the bathhouse.
Floors are constantly in contact with water. Without properly organized air exchange, the floor will collapse very quickly, and the floor covering will have to be replaced after 2-3 years.
You need to think about floor ventilation at the bathhouse construction stage, because... In a ready-made room, it will be much more difficult to create high-quality air exchange.
First stage. Make small vents in the opposite walls of the basement. It is best to provide these vents at the stage of construction of the concrete base of the bathhouse. Creating any holes in an already finished structure will lead to some reduction in the strength of the building.
Ventilation in the steam room
Second phase. Make one ventilation hole in opposite walls of the room being served. Through them, clean air will flow into the room. The holes must be through. It is recommended to close the finished channels with special ventilation grilles. Such protection will not allow entry into the bathhouse. various kinds rodents and other pests.
Ventilation in the bath
Third stage. When building a stove, make sure that its vent is slightly below the level of the finished floor. Thanks to this placement, the oven will also start working in exhaust mode.
Fourth stage. Lay floor boards. When laying them, you need to leave gaps about 7-10 mm wide. Water can flow down through these gaps. If the liquid lingers on the floor every time, the boards will rot very quickly.
Quite often, floor ventilation is arranged “according to Bast”. According to this technology, fresh air comes from under the stove, and waste oxygen is removed through an opening under the ceiling.
In accordance with fire safety requirements near sauna stove there should be a sheet of metal. It is near this sheet that a hole is created to supply fresh air to the bathhouse.
To provide such air exchange, a special exhaust duct is required. You can buy a ready-made box or assemble it yourself from boards. Inner surface The exhaust duct must be covered with foil. The size of the box should be approximately 15-20% larger than the diameter of the chimney.
Ventilation “according to Bast” is the best option for those cases when the stove is located directly in the steam room. In such situation ventilation ducts You can even arrange it directly on a brick podium.
Pay attention to the installation location of the sauna stove. If the stove is located directly in the steam room, it means that natural air exchange is present initially. You just don’t need to rely solely on it - such ventilation only works when the stove is running.
The most optimal option for installing ventilation is to install air exchange channels on opposite walls of the bathhouse. They should be at different heights.
It is not recommended to place ventilation holes too high. Although in most other cases it is recommended to make an exhaust hole directly under the ceiling, slightly different rules apply in bathhouses. If you place the hood directly under the ceiling, hot air will escape from the room very quickly.
For baths optimal height The placement of ventilation holes is at a level of 1-1.5 m.
Installation guide for ventilation in a bathhouse
There are several simple ways to organize effective air exchange in a bathhouse. Study each of them and choose the best one for your steam room.
First way. Create a hole to supply fresh air. It should be behind the stove, about half a meter from the floor. Make a hole for exhaust air exhaust on the side opposite to the inlet hole, at a height of approximately 30 cm from the floor level. Install the fan into the outlet.
Create a hole for fresh air
The lower you place the exhaust ventilation duct, the more intense the air exchange will be.
However, there is no need to be too zealous either. Try to make holes at the recommended height, because... such values are the most optimal. It is recommended to close the holes with ventilation grilles.
Second way. With this air exchange, both ventilation holes will be on the same wall. Work will be carried out with a wall located parallel to the stove. The exhaust duct is created at a level of about 30 cm from the floor, the exhaust duct is created at the same distance from the ceiling of the bathhouse. The exhaust vent is equipped with a fan. Open channels close with ventilation grilles.
Third way. Make a hole behind the sauna stove for air intake. Place the suction duct at a level of about 20 cm from the floor surface. The exhaust duct is made at approximately the same height, but in the opposite wall. The exhaust vent is equipped with a fan. Close open channels with ventilation grilles.
Fourth way. This air exchange option is perfect for baths, the flooring of which is laid with slots for water drainage. Make an inlet hole behind the stove unit at a distance of about 30 cm from the floor surface. In the case of such ventilation, an exhaust hole is not made - the exhaust air will leave the bathhouse through the cracks of the floor covering, and then be vented outside through a common ventilation pipe.
Ventilated floors in the bathhouse
Fifth way. This ventilation is ideal for baths with a constantly running stove unit. Install the inlet channel opposite the stove, about 30 cm away from the floor. The hood function will be performed by the oven.
Thus, the procedure for arranging ventilation is practically the same in all the considered methods. Each of them involves the creation of one or two holes; only the location and height of their placement change.
You can also make the holes yourself. Brick walls they can be easily passed through with a hammer drill, and logs with any suitable tool for this purpose, for example, a wood drill. It is recommended to insert plastic pipes into the finished holes. Don't forget about protective ventilation grilles. In the future, you are unlikely to be happy with uninvited guests in the form of rodents.
Ventilation in a bathhouse with your own hands - step-by-step instructions!
Find out in what order the ventilation in the bathhouse is connected with your own hands. Detailed Guide with a description of all stages of work. Photo + video.
The sauna is a great place to spend free time and improve your health.
However, a quality stay in it can only be ensured thanks to ventilation.

During the construction of a steam room, a special role is always given to proper ventilation of the sauna.
This is explained by the following reasons:
- Provides fresh air supply.
- She is the one who is capable distribute oxygen throughout the room heat it evenly and evenly.
- Will contribute to rapid removal of accumulated carbon dioxide, which will facilitate the process of staying in such a space.
- Due to ventilation in the steam room, proper air circulation, which avoids excessive moisture deposition on all wooden surfaces. As a result, the tree will last longer, it will not become covered with a layer of mold and harmful to human body fungus, will not rot.
- Correct the operation of the stove also directly depends on air exchange.
- Eliminates the possibility of suffocation, because quite often a group of people gather in the steam room and can drink alcohol to improve their mood. Without an influx of fresh air, within 30 minutes it will be almost impossible to breathe in such a room.
- The entire room can be well ventilated and thoroughly dried, which is important for a comfortable stay in it.
Paying attention to all the above arguments and asking yourself the question:
Is ventilation needed in a sauna? There is, of course, a clear answer - yes!
The main thing is to do it in a timely manner and correctly, in order to avoid the processes of wood rotting, drafts and unpleasant odors in the future, which will not please visitors to the steam room.
Proper ventilation of a sauna or bathhouse
 Access to fresh air and maintaining a constant, high temperature can only be achieved thanks to the presence of ventilation in the Finnish sauna. It cannot exist without exhaust and inflow.
The exhaust in the sauna is needed to remove carbon dioxide from it, and the influx creates all the conditions for pure oxygen to enter the room.
Before you start construction, you need to know about the constant rules and regulations for creating it in a bathhouse.
- After 25-30 minutes of using the sauna, it often becomes difficult to breathe in it, your head begins to feel dizzy and hurt. The reason for this lies in the fact that there is an incorrect change in the musty air filled with steam and human sweat. According to SNIP, air in such closed spaces should be updated at least 5-6 times per hour. Moreover, its speed can be at least 20 cubic meters for 60 minutes.
- The exhaust pipe should not be very narrow. It is better to make its diameter the same as that of the inlet.
- Inlet openings may only be placed at the bottom. The permissible height from the floor cannot be less than 20 cm. Install it strictly behind the stove. Otherwise, the cold air will not have time to heat up, which will lead to drafts and uncomfortable feelings for people staying in such a closed space.
- To know what pipe cross-section you need to purchase, you should take into account certain norms and rules: per 1 cubic meter of the room being equipped there must be a pipe with a cross-section of at least 24 centimeters.
- The inlet and outlet openings cannot be opposite each other.
- It is imperative to think about the possibility of adjusting the air flow, reducing or increasing it. This can be done using valves that are installed in the vents of the bath.
- Often in a sauna there is a gap between the bottom of the door and the floor. due to the absence of a threshold or its very low height. Need it for natural exhaust in the Finnish sauna.
The oxygen flow pattern will look correct only if there is more than one hood in the room in question. Paying attention to where the inflow is located, the first exhaust hole is installed strictly on the opposite side of it at a height of up to one metre. The second must be done directly under the ceiling. The main thing at this stage of work is to connect both openings with a single box leading into the chimney or common exhaust duct.

Let's look at the operating principle of a Finnish sauna:
- Before starting the steam room, it should be thoroughly ventilated, which will freshen the air.
- Close the outlets and doors using valves, which will allow the air in the steam room to heat up quite quickly.
- The inlet valve remains open. This is done in order to avoid air thinning.
- After waiting for the room to completely warm up, we monitor proper ventilation in sauna. To do this, open the lower channel slightly. This is how the gradual movement of oxygen begins. At the same time, you need to remember that the upper channel should not be opened, so as not to lose well-heated air from the bath. Fresh, cool air, after entering through the supply channel, is slowly warmed up by the stove and immediately begins to gradually displace the air that has already become stagnant.
Such a system will not be noticeable to people if its preliminary installation is carried out correctly, adhering to all the advice and recommendations of specialists. While in it, vacationers will not even feel discomfort and will enjoy a pleasant temperature and comfortable humidity.
An equally important role is played by the stove, which is installed either in the steam room or in a separate room. It is made of metal and lined with brick on the outside. Performs the following functions in the sauna:
- Heats the total area of the room.
- Heats up the water.
- Produces steam.
When choosing this device, you should be guided by the following criteria:
- Size is great if the oven is small, which will save space.
- Must be reliable and safe.
- Have the ability to heat up quickly.
- Have a low cost.
- Must have a long shelf life in order to constantly withstand heavy loads and temperature changes.
- When choosing a stove, first of all, consider its power and size relative to the size of the sauna.
Kinds
Today, there are three types of sauna ventilation. Let's look at each of them in more detail.
Natural
Occurs due to pressure differences indoors and outdoors. Characterized by low costs installation work, as well as ease of operation. This is done in the following ways:
- Due to wind pressure, which seems possible only in buildings made of logs. Air pressure inside a room arises due to powerful gusts of wind, which create a significant vacuum of air on the leeward side. The movement of air in and out occurs through the gaps between the logs.
The disadvantage of this type of ventilation is that it is impossible to regulate it, which directly affects the temperature inside the bath.
As a result strong wind drafts are possible, which also causes no less inconvenience for vacationers.
- Thanks to aeration. Its meaning lies in the penetration of air masses directly from the street through the bottom of the room, in which there are special vents. Street air, entering the sauna, squeezes out a hot stream from above and directs it into the air duct. This sauna ventilation system is perfect for rooms with very hot air and a lot of steam. Oxygen circulation occurs very quickly here.
Mechanical
Set up only when supply ventilation It is impossible to do this in a sauna. That is why it is also called forced. It consists of quite expensive elements: coolers, heaters, fans and air filters.
To achieve the exit of treated air from the room, forced ventilation in the sauna is used exhaust fans, on which filters must be installed. 
This type of ventilation is used in very large rooms where there are swimming pools, showers and a huge number of visitors. It makes the air clean from steam, sweat and unpleasant odors in a short time.
Using mechanical ventilation, a forced flow of oxygen is used. This is achieved through a very complex system, which has the following components:
- Supply chamber.
- Mechanisms that reduce noise.
- Diffusers.
- Check valves.
- Distribution grids.
To supply air was comfortable when entering the room; it was pre-cleaned and heated.
Combined
It is used in baths only if this is directly due to the peculiarities of their structure. Thus, a sauna located in a house and bordering three of its walls with common housing cannot have natural ventilation. In this case, it will not be possible to arrange the inlet and outlet holes according to all the rules. Therefore, in compliance with the standards, it is allowed to equip the supply opening at a height of at least 20 cm from the floor, and the exhaust opening is placed on the same wall at a similar distance from the ceiling.
The principle of operation of such air exchange is that cold air enters the room, passes it through the stove, heats it and circulates throughout the sauna.
Be sure to install valves on all openings to regulate the flow.
The disadvantage of such a system is the rather strong speed and amount of air masses.
In some cases, the supply channel is mounted not under the heater, but above it. The outlet is placed on the opposite side a few centimeters higher. This will reduce the air flow, but there is rice that does not have enough air flow. To avoid this, a fan is additionally installed in the outlet channel.
Ventilation system diagrams

There are three device schemes:
- Express consists of installing the supply channel strictly behind the stove at a level of 20 cm from the floor. Be sure to place an exhaust vent on the opposite wall at the same distance, inside which a fan is placed.
The street air entering the room is instantly warmed up by the stove, which is already hot at that time. Then it rises to the ceiling, cools down a little, lowers it down and is taken out of the bathhouse. Thanks to this air flow, the most comfortable temperature for the human body is achieved, because all air masses are mixed gradually and evenly.
- If the sauna is located inside already existing premises and it has only one wall bordering the street, the inlet and outlet channels are mounted on this surface. Main conditions: they are located at the same distance from the floor and ceiling (20 cm) directly opposite the stove. So, there is a forced outflow at the top, and an inflow at the bottom.
With this scheme, the air entering the room is immediately directed to the stove and gradually heated, after which it is discharged outside.
- The mildest heating of air masses is achieved through the use of this scheme. Its principle is to locate the inlet channel behind the stove at a height of 60 cm from the floor, and the outlet channel with a fan just on the opposite wall at a height of 20 cm from the floor.
Outdoor oxygen, penetrating into the room, heats up and rises. Already slightly cooled air masses leave the building. Thanks to the slower flow, staying in such a sauna becomes very comfortable.
Ventilation device in the sauna
When planning to make ventilation in the sauna with your own hands, you should not forget that you need to ensure high-quality air exchange for the floor of this room. Otherwise  the room will quickly become unusable, and the flooring will not last more than 3 years.
Floor ventilation involves the following stages:
- During the construction of the concrete base, install vents on opposite walls of the base. If the foundation has already been built, then any interference with its integrity can significantly affect the quality of the entire structure.
- In opposite walls, cut through holes for air intake, which are recommended to be covered with metal grilles. This will prevent various rodents and insects from entering the room.
- When arranging the stove, the vent should be slightly below the upper floor level, which will allow it to work as a hood.
- When installing floor boards, it is necessary to leave small gaps between them, the size of which should not exceed 10 mm. This will allow the water to drain naturally through the floor.
Let's look at how to make ventilation in a sauna depending on its location.
Ventilation in a sauna with an electric heater:
- Be sure to leave a height gap of up to 5 cm under the door.
- The inlet channel is placed under the stove.
- Exit holes are made on the opposite wall: one above the floor, the other under the ceiling.
- For proper operation, the holes are connected with a duct, which is discharged into the chimney or the entire ventilation system of the house.
- Shutters are installed on the air ducts, which makes it possible to regulate the flow.
Ventilation of a sauna in a private house requires the presence of ideal waterproofing material in such a room.
Most often it is placed near the bathroom, because it already has its own hood, which facilitates the process of connecting two air exchanges.
Ventilation in the sauna in the basement is connected using ducts to common system Houses. In these types of baths, an electric stove is installed on the floor or hung on the wall.
- We should also not forget about ventilation errors in a home sauna:
- Air duct diagrams need to be thought out in advance.
- Lack of clearance under the door and an opening for inflow can lead to suffocation.
- Creating a hole only for air outflow results in a lack of air circulation.
- The absence of valves results in an inability to regulate flow.
- The input and output channels are placed opposite each other at the same level, which leads to the presence of drafts.
- For ventilation, you should not use too expensive equipment, because constant temperature fluctuations will quickly require repairs and, possibly, renewal of some components.
How much does it cost
When planning to make ventilation in the sauna with your own hands, you need to know that its cost will cost approximately 24-38 thousand rubles. Everything will depend on the cost of components.
- A ventilation valve can be purchased for 650-1500 rubles.
- A grill for 300-400 rubles.
- Supply and exhaust system for 18,500 rubles.
Creation quality system Air exchange is an important part of the operation of a sauna, so the selection of its components, as well as the installation process, must be approached thoughtfully and in a timely manner.
Proper organization of air exchange in a bathhouse is a serious task that requires a professional approach. It is not enough to build a bathhouse, finish the interior, install heating equipment and furniture. It is important to ensure effective ventilation of the bathhouse premises, to create a favorable microclimate that allows you to enjoy water procedures and contribute to the long service life of the finish, as well as the entire structure.
Ventilation in the bathhouse is the key to comfort
Relaxing in the bathhouse will be a pleasure if the room is easy and comfortable to breathe.

The air temperature in the steam room is very high, so if there is no ventilation in it, you can suffocate or get heatstroke
If proper air exchange is disrupted or there is no ventilation at all, it will be difficult to breathe in the steam room and impossible to stay in for a long time.
A ventilation system that ensures the flow of oxygenated air and removal of “spent” air masses.
Traditional layout bath complex provides a dressing room, a washing area, as well as a rest room, and everywhere it is important to ensure effective air circulation.

A favorable microclimate in the relaxation room will allow you to relax after visiting the steam room
Increased moisture concentration does not give pleasure as in the process water procedures, and during rest. The human body is sensitive to lack of oxygen and high humidity.
The conclusion is clear: in the bath you need to do good ventilation so that it would be pleasant and comfortable not only to steam, but also to relax.
Poor air circulation or lack of ventilation causes:

Types and principles of ventilation arrangement
For any type of bath (Russian, Finnish sauna, Turkish hammam), ventilation is provided, which can be done in different ways.
Natural air exchange
The principle of the formation of convection air flows is based on the difference in temperature and air pressure from the street side and inside the bathhouse.

Temperature differences promote air flow
Maximum efficiency of air exchange is achieved thanks to the correct location of the supply and exhaust ventilation lines.
For ventilation of Russian bathhouses and saunas, a traditional arrangement of air channels is used. The supply air duct is located at a distance of 0.2–0.3 meters from the floor, and the exhaust line is located at the same distance from the ceiling. Adjustment dampers in the room should be provided to optimize air flow and ensure comfortable temperature conditions.

The damper allows you to regulate the flow of air into the room
Natural ventilation should provide air exchange, maintaining the room temperature and not creating discomfort during rest. The advantages of natural air exchange are simplicity and low costs associated with the absence of the need to purchase expensive equipment.
Combined option
The method of organizing the movement of air masses in a room using a fan that provides circulation is called combined. At the same time, there is no pattern in the location of the ventilation ducts.
The ventilation scheme is determined individually and provides for the installation of an vent and a duct equipped with a fan, which is mounted on the supply line or exhaust duct and creates the necessary pressure difference.
Providing air exchange in bathhouses using a combined method is convenient and economically justified.
Forced circulation
A forced air exchange system is also called mechanical. The system is equipped with automatic elements that control temperature conditions, regulate humidity and the intensity of circulation of air masses.
Forced air exchange provides the maximum level of comfort.
Increased costs associated with the purchase and installation of equipment, as well as difficulties in maintenance, limit the use of mechanical air exchange systems in small bathhouses.
For rooms with increased area use forced circulation, if natural or combined air exchange is not effective.

If the bathhouse premises have big sizes, they need to have forced ventilation
The following types of mechanical ventilation are used:
- An exhaust system equipped with a filter element and a fan. This type of ventilation ensures effective removal of unpleasant odors and polluted air masses from rooms with swimming pools, washing departments and recreation areas. The use of an exhaust system requires ensuring the flow of fresh air necessary to compensate for the vacuum created by the fan.
- Supply air, providing oxygen-rich air. Vapor-saturated air masses, due to increased pressure, leave the room through ventilation ducts, as well as through existing gaps in doors and windows. Combining the supply line with the heating device allows you to supply fresh heated air. The design of the supply air exchange is more complex.
- Supply and exhaust, combining the principle of operation of the supply and exhaust ventilation. Using this principle of ventilation in a sauna room requires preliminary calculations. The intensity of circulation is determined based on the fact that the volume of incoming air must correspond to the volume of displaced air. In order to prevent the penetration of air from the bathroom into the recreation area, the ratio is deliberately violated. This allows you to create a reduced pressure in the toilet room and direct additional flows into it.
Principles of air exchange organization
When planning a ventilation device, follow these recommendations:

It is important to correctly calculate the area of the ventilation lines. The cross-section of the vent and the air duct is determined by the size of the steam room, for each cubic meter of volume of which it is necessary to provide 24 cm 2 of ventilation duct area.
For a comfortable stay in a heated steam room, ensure the possibility of more than five times air exchange (the air in the steam room should be renewed 5 times per hour). The layout of the supply duct and exhaust air duct, as well as their number, should facilitate easy circulation of masses in the steam room.
Effective air exchange will increase the service life wooden floors. To ensure it you need:

The correct ventilation device will allow you to fully enjoy the steam room and get great pleasure from your bathing holiday.
Video: ventilation in the bathhouse
How to make ventilation in a bathhouse with your own hands
The organization of air circulation in each room has individual characteristics.
Waiting room ventilation
The vestibule or dressing room is used as a locker room. The department is located away from areas with high humidity and temperature.
The ventilated locker room will always be dry and comfortable
Usage front door promotes the flow of fresh air and reliable ventilation of the locker room.
The placement of a ventilation grille with a valve in the upper part of the wall will ensure natural air exchange and control the volume of incoming air masses.
When constructing a building, it is necessary to provide vent. If there is no air channel, then you need to make it yourself:

Air exchange in the washing room
The washing compartment in which the shower is installed is ventilated due to the natural circulation of air flows moving from rooms with high humidity to ventilation vents or small windows.

The easiest way to ventilate the washing room is with a window.
To increase the efficiency of ventilation and reduce humidity, it is advisable to equip the shower with an exhaust fan.
Install the fan according to the following algorithm:
To ventilate the washing room, use fans with an operating voltage of 220 volts and a low power of 20–100 W.
When purchasing a fan, pay attention to the ability of the device to operate at elevated temperatures and humidity, as well as the degree of protection, which should not be lower than IP44.
Organizing air circulation in the steam room
To ventilate the steam room, create 2–3 channels intended for air exchange. One line will ensure the supply of fresh air, and the rest will allow exhaust air masses to freely leave the room.

The increased size of the exhaust duct allows you to ventilate the steam room faster
Place the channels according to one of the proposed ventilation schemes.

The intensity of air exchange depends on the location and size ratio of the supply and exhaust ducts
Making holes during construction will help maintain integrity finishing materials and make the work easier.
The area of the incoming line must correspond to the size of the output channel. However, a more efficient convection flow can be achieved by slightly increasing the diameter of the exhaust line.
A prerequisite is the installation of adjustable valves that allow you to change the intensity of air exchange.

IN wooden bath it is better to make the valve from the same wood that was used for interior decoration
Carrying out measures to arrange canals is not difficult:

Video: ventilation in the steam room
Creating a microclimate in the rest room
Comfortable temperature conditions and optimal air circulation in the rest room are achieved thanks to natural air exchange.

An air channel at the top of the wall ensures sufficient fresh air flow
It is important to provide an air channel equipped with an adjustable valve or ventilation valve. This will allow, if necessary, to increase the intensity of air mass movement.

To organize fresh air access, you can use a window instead of a ventilation duct
Drilling a hole and installing a valve is not difficult.
Video: making a ventilation valve
Options and layouts of ventilation channels
In the bathhouse, you can use different options for the location of ventilation communications, providing for natural air circulation and the use of a fan.

Various ventilation device options differ in the location of the channels, but provide high air exchange efficiency
One of the proposed natural air exchange schemes, which provides the following options for placing ventilation lines, will ensure a comfortable bathing procedure:

Air exchange schemes that include the installation of a fan allow you to achieve favorable temperature conditions and comfortable humidity:

Remember that the performance of a fan installation is determined by multiplying the volume of the steam room by the air exchange coefficient.
For example, to determine the required air exchange in a steam room with an area of 10 m2 and a height of 2 meters, it is necessary to multiply the volume by the air exchange coefficient equal to 5 (we have already said above that the air in the steam room must be completely renewed 5 times per hour). The resulting fan performance value is 10 x 2x 5 = 100 m 3 /h.
Heated air ventilation
Providing air exchange with simultaneous heating of incoming air is carried out in the bathhouse in various ways. They involve the use of a fan or natural air exchange. For example, by placing certain air channels in the immediate vicinity of a hot stove, you can simultaneously provide an influx of oxygen-saturated air and increase its temperature due to the heated surface of the heating unit.
In order to create a favorable temperature regime, comfortable humidity and smooth heating of incoming air masses, it is necessary to use plugs or gate valves located on the air lines. Carrying out ventilation while simultaneously heating the air is a rather difficult task.
Every heating unit has its own individual “character”. Only as a result of experiments can you select the optimal air exchange mode and ensure a comfortable temperature in the bathhouse.
To increase the temperature of the incoming air masses, you can use an electric heater that heats the air entering the room. This is another option for air ventilation with simultaneous heating.

The air entering through the ventilation ducts can be preheated by a heater
The power of the electric heater is selected experimentally.
Electrical equipment used in bathhouses must withstand elevated temperature and humidity, be reliably grounded and have a protection class of at least IP44.
Combining air ventilation with heating allows you to create comfortable conditions for vacationers, as well as reduce the costs associated with heating the room using heating equipment.
Familiarity with the principles of organizing proper air circulation in the steam room, as well as other rooms of the sauna and bathhouse, will allow you to independently organize the process of effective air exchange. It is important to correctly calculate the dimensions of air lines and optimally place the inlet openings of the channels in the rooms. Remember that the degree of air circulation is additionally affected by the design of the heating device and chimney. By following the recommendations, you can avoid mistakes and enjoy health treatments in a bathhouse with a comfortable microclimate.
Share with your friends!


