Almost every owner of a plot of land, sooner or later, thinks about building a bathhouse. After all, the bathhouse is not just a room for washing, but also an important element country holiday. The construction of a turnkey bathhouse can be ordered from professionals for a tidy sum, or you can try to build a bathhouse with your own hands.
After reading this article, you will be able to choose a project, find out the sequence of the construction process, get acquainted with boiler models and find the best bathhouse option for your dacha.
Before starting construction, it is necessary to develop a bathhouse design. To do this, you don’t have to contact an architect; you can develop a simple project yourself, especially since there are now many computer programs for design.
Think about what size bathhouse will be optimal for your family. What rooms will be located inside the bathhouse? What materials to make the foundation, walls and roof from, do not forget also about finishing the bathhouse. An important point in design, is the placement of the boiler and the method of firing it.
Below you can see popular projects baths:

- The design of the bathhouse is 4x4 meters in size.

- Bathhouse design - 4x6 meters.

- Bathhouse design - 5x6 meters.

- Bathhouse design – 6x3 meters.

- Bathhouse design - 3x3 meters.
Once you have decided on the size and materials for the bath, you need to create a cost estimate.
Foundation
To build a bathhouse, several types of foundations are used. Depending on the weight of the walls and soil characteristics, the following types of foundations are made:

- Slab foundation.
- Columnar foundation for light walls.
- Pile foundation.
- Concrete strip foundation.
As practice has shown, the most reliable foundation for almost all types of soil, there is a concrete strip foundation reinforced with reinforcement.
To make a reinforced strip foundation for a bathhouse you will need:
- Cement.
- Sand.
- Gravel.
- Fittings.
- Formwork.
- Ruberoid.
- Wire.
- Shovels.
- Concrete mixer.
- Tourniquet.
- Stakes.
- Tools (pliers, hammer, tape measure and others).

In the location chosen for building the bathhouse, mark a trench for the future foundation. To mark, use a tourniquet stretched between the pegs. The width of the trenches is based on the weight of the wall material. For one-story bathhouse made of wood or brick, it is enough to make a trench 30-40 centimeters wide. After installing the markup, do the following:
- Using the markings as a guide, dig a trench 50-80 centimeters deep.
- Compact the bottom of the trench and fill it with water to shrink the soil.
- Cover the bottom of the trenches with roofing felt for waterproofing.
- Fill the trench with gravel to a third of its depth.
- Install formwork along the edges of the trench.
- Make a frame reinforcing the foundation from reinforcement bars tied together with wire.
- Install reinforcement cage into the formwork.
- Using a concrete mixer, make a cement mortar in the proportion: one part cement to one part sand and two parts gravel.
- Pour cement into the formwork, being careful not to allow any air voids.
- After the concrete has dried, remove the formwork.

The foundation for the bathhouse is ready!
Walls
The following materials are used for the construction of walls:
- Wooden beam.
- Logs.
- Boards.
- Brick.
- Blocks from various building mixtures(cinder block, aerated concrete, wood concrete, and so on).
Since the construction of a bathhouse from logs or bricks is already quite widely described on the Internet, let's consider the option of building a frame bathhouse from timber 15x15 and 5x10 centimeters and boards with a section of 2x15 centimeters:

- Make the bottom trim; to do this, take bars with a cross-section of 15x15 cm and install them on the foundation, connecting them together with special metal plates and corners. There is another way to connect bars, by cutting out tenons and grooves at their ends and then fastening them with screws or nails. When making the strapping, do not forget to place waterproofing under the bars.
- Install vertical racks from timber 5x10 cm. The distance between the posts is usually 50-60 centimeters. First of all, determine the position of the window and doorways and install the racks that frame them.
- While working, secure the already installed racks with temporary strips so that they do not warp.
- Make the top trim, securing it to the ends of the vertical posts.
- Making final fastening top harness, carefully monitor the position of the vertical posts, checking their evenness with a level.
- Be sure to strengthen everything corner connections diagonal posts, this will help avoid warping of the frame.
- Make the ceiling sheathing.
- After making the frame, make outer skin walls of the bathhouse with a board with a section of 2x15 centimeters. If you do not want gaps to appear between the boards, then make the sheathing - “overlap”, laying the bottom edge of the board on a nailed board. By appearance, this method is reminiscent of decorating walls with siding.

- Having sheathed the bathhouse from the outside, proceed to installing the insulation. Sheets of foam or mineral wool are installed along the vertical posts of the frame.
- On top of the insulation, it is necessary to install a layer of vapor barrier, which is attached to the vertical posts using thin slats.
- After installing the vapor barrier, line the interior of the bathhouse with clapboard or slats.
- Insulate the ceiling by laying vapor barrier sheets on the inner lining, then insulation. Sheathe the ceiling from the outside with sheets of plywood.
Please note that the manufacture and insulation of the ceiling can also be done after the roof has been installed.
Roof
There are three types of roof for a bathhouse:
- Single-pitch.
- Gable.
- Complex - consisting of four or more slopes.
Usually the first two options are used for a bath. Let's look at the option gable roof covered with metal tiles: 
The manufacture of the roof begins with the installation of the Mauerlat. In case of frame walls, the role of the Mauerlat is performed by the upper outline.
- Place the uprights on the bench.
- Connect the posts using purlins and ties.
- Install rafter legs, attaching them to the Mauerlat, purlin and connecting the upper ends to each other. The distance between the rafters should be 50-60 centimeters.
- Install sheets of metal tiles.
- Cover the gables with wooden slats or sheet metal.
For a more visual understanding of the roof fastening, here is a drawing: 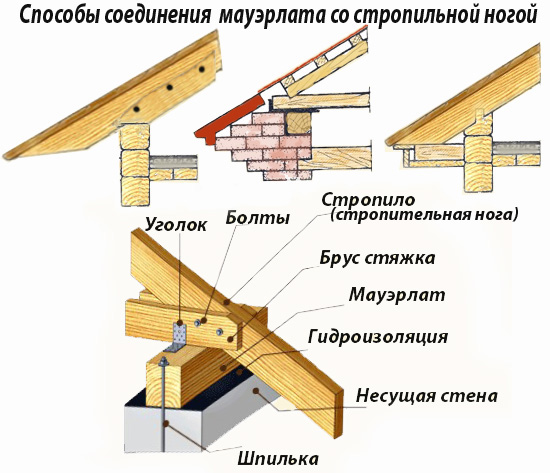
All dimensions of roof elements are given in the list: 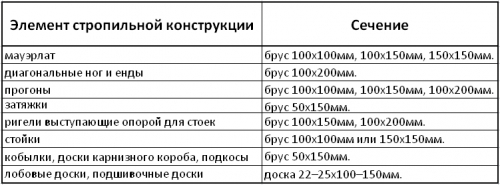
Please note that the less you slope the roof, the more it will bear snow load in winter. Also, a small roof slope can lead to poor water drainage and leaks.
Floors
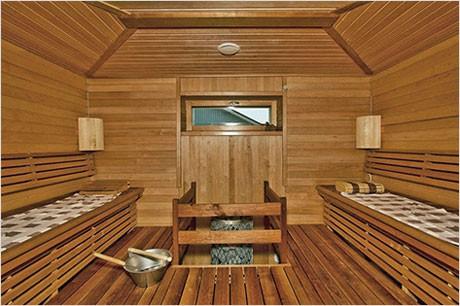
The design of the floor depends on the type of room. In the recreation room, ordinary wooden floors are made. In the wash and steam rooms, the floors are made of two levels:
- The first level is made of concrete and has a slope towards the drain hole.
- The second level is a finished floor made of boards with gaps for draining water.
If you want to make a porcelain stoneware floor or tiles, then they are simply laid on the first level with a slope towards the drain hole. 
In order to make a concrete floor and drain in a bathhouse you need:
- In the center of the steam room and washing room, install plastic pipes 5-10 centimeters in diameter with a bell at the end. The pipes should go out through the foundation to the street and connect to the sewer system.
- Lay down a layer of waterproofing material.
- Spread a layer of gravel 10-15 centimeters thick over the entire area of the rooms.
- Make a cement mortar and pour the floor with a slope towards the hole installed on the drain pipe.
- Install a screen over the drain hole to prevent debris from entering the drain.

At the second stage, wooden floors are made:
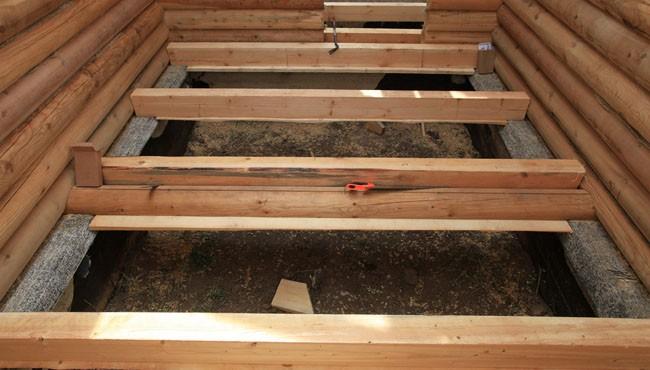
- Install wooden logs in all rooms of the bathhouse. Make the distance between the logs 30-40 centimeters. As logs you can use bars with a section of 3x5 cm or 4x6 cm.
- Nail boards with a section of 2x15 cm or 5x20 cm onto the logs.
- In rooms where water is expected to drain, leave gaps of 0.5-1 cm between the boards.
Do not forget, before installing wooden floors, to treat all parts with wood impregnation. When making floors, keep in mind that they should be higher, or at the level of the upper edge of the foundation.
Boiler
The model of the boiler for the bath will largely depend on your financial opportunities and the fuel you will use for heating. If you know how to use welding, then you can make a simple boiler yourself from thick sheet iron. If you prefer more advanced colas with gas or electricity, you can purchase them from specialized companies.
The boiler in the steam room is installed in such a way that the combustion chamber is loaded with fuel either from the street or from the rest room (dressing room). The boiler itself, for fire safety purposes, is located 10-15 centimeters from the nearest walls. The walls are as high as the boiler and covered with iron sheets. A good decision, will cover the boiler with bricks, thereby reducing its cooling time and protecting the walls from fire.
When installing a chimney for a boiler, pay special attention to the place where the pipe comes into contact with the ceiling. The opening for the chimney should be insulated with refractory material. Also, pay attention to the place where the chimney pipe exits through the roof. This area is usually prone to leakage, so it should be sealed thoroughly. Below are the options for boilers for baths:

- Homemade boiler made from metal sheets.

- A gas boiler.

- Electric boiler.

- Solid fuel boiler.
Arrangement of the bathhouse
After the bathhouse is built, it is necessary to equip it:

- Connect all available communications to the bathhouse - electricity, sewerage, water supply.

- Place a sink, shower stall, light sources, and furniture for relaxation inside.

- Decorate the walls of the steam room with shaped slats and make stepped shelves.

- Buy wooden tubs, buckets, ladles and brooms.
After arrangement, you can safely invite guests to take a steam bath in your personal bathhouse!
You can also watch the instructions for assembling a mini-sauna for a summer house without a foundation in the video:
Options for beautiful and unusual baths
In addition to traditional materials and design for a bath, there are many alternative solutions. Below we present photographs of the most unusual baths:

- Mobile sauna made of clapboard, built on a car trailer.

- Bath in a huge wine barrel.

- Bathhouse made of plastic bottles.

- The dugout bathhouse was built directly into the ground.

- A sauna housed in an iron container.

- Forest sauna made of untreated logs.
![]()
- A beautiful bathhouse made from a gun carriage.

- Bathhouse made of unedged boards.
At the end of the article, I would like to remind you that heating a bath is associated with fire and high temperatures. Therefore, when building a bathhouse from bricks, logs, cinder blocks or boards, pay great attention to fire safety. This warning also applies to electrical wiring, since the rooms inside the bathhouse have high air humidity and the risk of a short circuit due to condensation is very high. 
We hope that reading our article will encourage you to build a bathhouse yourself!
When hiring a construction team, the cost of construction will double, so if you have at least basic skills, it is better to start building a bathhouse with your own hands. First of all, you need to decide on the building plan. You can create your own or use ready-made drawings and choose the design that best suits the size.

Registration of a building
No permit is required for the construction of auxiliary premises on private land. However, after completion of construction, the building must be registered with the BTI.

Regulated distance between buildings
Calculation of the quantity of materials
Most often, bathhouses are built from solid or rounded coniferous logs, thick-walled timber, wood concrete or brick. Last years Foam concrete was also used for construction. However the best material for her a tree is considered. Even in the hottest bathhouse, this is environmentally friendly pure material you will breathe easily and freely.


Rounded logs, regular and profiled timber


Construction of a bathhouse from chopped, rounded logs and timber

Building shrinkage
Assemble the building from timber preferably in winter period. The fact is that in winter the moisture freezes out more slowly, and the deformation of the material occurs more evenly. By the end of summer, the main subsidence is almost over, and it will be possible to begin finishing.

Construction of the foundation
If groundwater in the selected area they are deep enough, it makes sense to use a regular strip foundation. Pile or screw foundation They are erected only when water is close to each other.


Strip and pile foundations for a bathhouse
Laying the first crown
1. The casing (first) crown, which is closest to the ground, needs reliable waterproofing. To do this, 2-3 layers of roofing material or other bitumen-based material are laid between it and the base. Short 15 mm slats, treated with an antiseptic, are placed on top of it in the transverse direction, and only then the logs are laid out.

Direction of laying slats
Corner connections of log houses
The corners between adjacent walls can be connected in log houses in different ways:

Corner connections of log houses
Assembling a log house
1. The logs should fit together as closely as possible. The seams between them are sealed with a sealant: tow or jute. The gap between the casing and the foundation is additionally sealed with brick, polyurethane foam, halves of logs or bars. It is also possible to provide filling multi-level foundation, which will protect against the appearance of cracks.

Foundation with different levels


Jigsaw for windows and grooves in window openings for her
Construction of a bathhouse with your own hands step by step, video, photo
Therefore, if you have at least basic skills, it is better to start building a bathhouse with your own hands
Building a bathhouse with your own hands: step-by-step instructions
Before building a bathhouse, you need to draw up detailed step-by-step instructions for carrying out the work, which should take into account all the nuances of the construction technology bath complex.
Step-by-step instructions that are used in the construction of a bathhouse may differ significantly depending on the materials used during installation and the characteristics of the soil at the site. construction work.
During the construction of a bath complex, a wide variety of materials can be used for work. Depending on the type of foundation, for example, metal and asbestos-cement pipes can be used when laying a column foundation, or cement-concrete mortar and metal reinforcement when constructing a strip foundation. The following building materials can be used to build walls:
The most popular material used in the construction of a bathhouse complex is timber. This material is also considered the most practical and convenient to use.
Using timber can significantly save money on foundation construction. In the case of constructing a bath complex from timber, it is allowed to lay a light foundation. The use of timber allows the construction of a building that practically does not shrink, and during the installation process no additional adjustment of structural elements is required.
Building a bath using step-by-step instructions allows you to avoid almost all mistakes during the installation process and build an excellent bath complex with your own hands, without involving outside specialists. Step-by-step instructions for building a bathhouse greatly facilitate the installation process even for those homeowners who have minimal knowledge and skills in the field of construction.
 Choosing a site for the construction of a bath complex
Step-by-step instructions for building a bathhouse at the initial stage involve selecting a place for work and preparing a construction site. The ideal option is to select a location for the construction of a bathhouse at the stage of planning the placement of objects on a private plot of land. Very often if available small area the bath complex has to be combined with some outbuildings, for example, a toilet and summer cuisine. In some cases, the combination of a bath is carried out with residential building. Bath complexes of this type are quite complex, and their development requires the involvement of professional designers of residential buildings.
When designing a structure and determining the location for its construction, it is necessary to take into account some natural factors that influence both the choice of location of the construction site and the layout of the bathhouse complex:
- groundwater level;
- identification of areas that are flooded during floods;
- location of a natural reservoir;
- prevailing wind direction and precipitation patterns;
The groundwater level is easy to determine on our own. For this purpose, you should dig holes at least a meter deep in the corners of the construction site and, after some time, check whether water has appeared in them or not. The level of groundwater affects the choice of the type of foundation for the construction of a bathhouse complex.
The best option for choosing a site for all construction installation work is a hill located a short distance from a natural body of water.
Building on a hill allows you to avoid flooding during floods. The distance to a natural reservoir should not be less than 15 m, and in the absence of an elevated area, the distance to the reservoir should be at least 30 m.
In the process of selecting a site for construction, it should be ensured that the distance to the site boundary from the construction site should not be less than a meter. In addition, the bathhouse construction site should be located at a distance of 15 m from existing buildings.
 Tools and building materials necessary for the construction of a bathhouse
Before building a bathhouse, when developing step-by-step instructions, after choosing a location for the construction of a structure, you should decide on the materials and tools necessary for construction work.
The most popular material is timber. It has a whole range of advantages. The most convenient type of timber to use is profiled timber. This material is resistant to deformation. When building a bathhouse from timber, you will need to prepare the following building materials:
- timber having a cross-section of 15x15 for mounting external walls;
- timber with a section of 15x10 for installation work on the construction of partitions inside the building;
- cement-concrete mortar for the construction of the foundation;
- reinforcement for reinforcing the foundation;
- building materials for waterproofing;
- crushed stone to create a blind area;
- timber for creating floor joists and floors;
- materials for insulation;
- materials for interior decoration;
- materials for creating vapor and thermal insulation;
- materials for roofing installation.
The list of tools required during the work includes a shovel, a hacksaw, an axe, a hand-held electric drill, a hammer, tools for laying inter-crown insulation and a mallet.
Building a bathhouse with your own hands
The next point in the step-by-step construction instructions for the construction of a bathhouse complex is the construction work itself.
The entire range of required construction work can be divided into several stages. The main stages of construction are the following:
- marking the construction site and preparing the site;
- laying the foundation;
- arrangement of the blind area;
- erection of walls of the bath complex;
- ceiling installation;
- assembly of load-bearing roof structures;
- installation of roofing material;
- installation of hydro-, steam- and thermal insulation;
- assembly of communications in premises;
- flooring;
- installation of finishing material.
It should be remembered that after the foundation has been erected, it must be given time to gain maximum strength. When using a strip foundation, the period for gaining maximum strength with a cement-concrete mortar is 28 days.
Before proceeding with the installation of walls, it is necessary to ensure that high-quality waterproofing is laid on the surface of the foundation between it and the first crown of the walls. High-quality waterproofing will significantly extend the service life of the bath complex building without major repairs.
After completing the installation of the building walls, the assembly and installation of load-bearing roof structures is carried out. Features of the load-bearing roof structure depend on the roof configuration.
When the roof is installed, installation of utilities and flooring in the premises begins; at the same stage, steam, hydro and thermal insulation is installed.
 Carrying out interior finishing and insulation of the bath complex
Insulation of the ceiling of a small bathhouse can be done using a flooring method. Lumber is used for this hardwood. Boards up to 50 mm thick are sewn onto the ceiling, after which a layer of vapor barrier material is fixed to them. Foil material is perfect for this purpose. A layer of insulation is applied and secured on top of the vapor barrier layer. Mineral wool can be used as insulation. After laying the mineral wool, it closes protective layer foil material. The last stage work with the ceiling will include the installation of finishing materials.
If timber of sufficient thickness was used during the construction of the bathhouse complex, then it is possible to do without installing insulation on the inside of the walls of the bathhouse complex. In this case, before finishing, a layer of vapor and waterproofing is strengthened on the walls of the bathhouse, on which the finishing material is mounted. If the thickness of the timber is insufficient, then insulation of the walls inside the bathhouse is carried out in the same way as insulation of the ceiling.
Insulation of the floor in a bathhouse can be done using expanded clay.
For interior decoration bath room It is best to use lining made from wood that does not have structural defects. The material is secured using small nails.
Compliance with their sequence during construction work allows you to build a high-quality structure that will delight the owner for a long time.
Available and step-by-step instruction for the construction of a bathhouse
Step-by-step instructions for building a bathhouse. These instructions will help you avoid problems when planning and building a bathhouse on your site.
Building a bathhouse with your own hands
Do you want to build a bathhouse, but don’t know what material is best to use to realize your idea? Then be sure to pay attention to the timber. A bathhouse made from this material will be environmentally friendly, reliable and durable. At the same time, you can handle the construction of such a structure with your own hands.
Building a bathhouse with your own hands
Advantages of timber construction
There is absolutely nothing complicated about building a sauna from timber yourself. This material has many advantages over its closest analogue - rounded logs (logs). Among the main advantages of timber, the following points should be noted:
- all work on the construction and further finishing of a bathhouse made of timber can be completed without the help of third-party specialists;
- timber gives minimal shrinkage compared to all other wood-based materials;
- building a bathhouse from timber will require a much more modest investment compared to most other popular materials;
- Factory-made timber may initially have fastening connections and all you have to do is assemble the individual elements into a structure of the required size, like a construction set.
However, in order for a bathhouse made of timber to fully demonstrate all its advantages and serve for the longest possible period of time, you must approach the choice of building material responsibly and competently.
What timber can be used to build a bathhouse?
The most important operational parameters of the finished steam room directly depend on the quality of the wood. First of all, make sure that the logs are intact. No cracks or other defects are acceptable. Even minor damage can lead to big problems in the future, causing the wood to rot and collapse.
Profiles of logs and beams
Make sure there are no blue spots on the surface of the wood. Such defects indicate the presence of rot inside the material, the development of which in most cases is provoked by a variety of pathogens. Such material cannot be used for the construction of a steam room or any other building.
There should be no noticeable signs of damage from beetles and other pests on the timber.
High-quality timber has a perfectly flat and smooth surface. It is strongly recommended to refrain from purchasing material with distortions or any other damage - when laying the crowns, all deviations will clearly appear.
Guide to building a bathhouse
Pre-compile your own, order or find a bathhouse design in an open source. Calculate by project required amount building materials and start building a bathhouse from timber. Start by laying out the foundation.
The first stage is the foundation
The finished steam room made of wood will have a relatively low weight, which makes it possible to refuse to install monolithic recessed foundation structures. A structure made of timber will feel great on a regular strip or column foundation.
For arranging the base belt type dig a trench around the perimeter and under the walls of the future building, fill the bottom of the hole sand and gravel mixture, lay the reinforcing mesh, install the formwork and pour the concrete. The optimal foundation depth is 70-100 cm. When choosing a specific depth, be guided by soil freezing indicators for your region.
Strip foundation - construction procedure
Structure of a monolithic strip foundation
The foundation should rise above the ground by at least 50 cm - this will ensure the necessary protection of the lower crowns from excessive dampness.
Place strips of sand and gravel inside the perimeter of the strip base. In the future, you can fill them with concrete or build a wooden floor - choose the specific option at your discretion.
To install a columnar foundation, it is necessary to build supports made of brick or concreted asbestos pipes around the perimeter, in the corners and under the future internal walls of the bathhouse. Under each such support, a concrete “cushion” should first be installed. Place the pillars in 150 cm increments.
Construction of a columnar foundation
Regardless of the type of base chosen, it must be subject to additional reinforcement.
Features of a columnar foundation with a grillage
Varieties of schemes for constructing a columnar foundation
Allow the concrete to gain strength for 3-5 weeks and proceed to further work.
The second stage - waterproofing the foundation
Waterproofing strip foundations with a special compound
Apply molten bitumen to the surface of the base, and a layer of roofing felt on it. Let the bitumen harden and repeat the above steps. As a result, you will receive reliable two-layer moisture protection.
Before proceeding with further work, saturate all wooden elements with an antiseptic. Such processing should be carried out after preparing the notches for fastening the beams, if such notches were not available initially.
The third stage is the first crown
Proceed with laying the first crown of walls. To do this, first lay slats up to 1.5 cm thick, pre-treated with an antiseptic, on a waterproofed base. Lay the slats in increments of about 30 cm.
Laying the first crown of timber
Place the first row of beams on the slats. Thanks to the slats, contact of the timber with the foundation of the bathhouse will be eliminated. This will provide additional protection against wood rotting and will significantly extend the service life of the material.
Assembly diagram of the first crown of a log house for a house made of timber
Lay the first crown without fastening for now. Make sure it is laid correctly and evenly using a square and level.
If necessary, level the bottom crown beams and then attach them to the foundation. There are several mounting methods. The most optimal and frequently used method involves fixing the timber with anchor bolts.
However, quite often developers refuse to attach the bottom beam to the foundation. In practice, the structure stands perfectly well without fastening the lower crown, held by its own weight. The advantage of this solution is that in the future, if necessary, the lower crown beam can be replaced with much less effort.
Fill the space between the first crown and the base with polyurethane foam.
Do-it-yourself sauna made of timber
The fourth stage - the remaining crowns
Perfect for laying out bath walls wooden beam section 15x15 cm.
Cover the first crown of the timber with thermal insulation material. Jute or moss are traditionally used for insulation. You can also use tow. If moss or tow is used, the thermal insulation should be laid out with a 10-centimeter overlap at the edges. In the future you will use the raised edges for caulking.
How to build a bathhouse from timber
How to build a bathhouse from timber
Lay the second crown of timber and secure it with wooden dowels. Pre-drill mounting holes of the appropriate diameter. Typically, the length of one dowel is enough to fasten 2-3 rows of timber.
Lay out the walls to the required height. Every 3-4 rows, check the structure with a square and a building level. Place a sealant between the crowns.
How to assemble the walls of a log house
There is no need to secure the top two crowns. The wood will shrink. Ceiling beams can only be installed after wood shrinkage has been completed. To install the beams, the upper crowns will need to be dismantled.
Fifth stage - door and window openings
How to make door and window openings
There are two options for arranging openings for installing doors and installing windows.
In accordance with the first option, the mentioned holes are created after the construction of the timber bath is completed. To do this, you first need to leave small gaps in the crowns where doors and windows are installed. The dimensions of the gaps depend on the dimensions of the products being installed.
Door and window openings
After completing the construction of the bathhouse, you will simply use a chainsaw to make openings for installing doors and windows.
In accordance with the second method, openings for doors and windows must be left during the construction of the bathhouse. This option requires a more significant investment of effort and time. To implement the task, you will need to use special grooves and bars with end notches.
Stage six - caulking
Leave the finished timber box for “wintering” for 6-7 months. During this time, the wood will shrink sufficiently. During the “wintering” period, cover the timber with boards and slate.
If you used tow or moss as an interventional sealant, you can skip this point in the instructions - your log bathhouse most likely will not need additional caulking.
However, experts still recommend studying the condition of the structure. If you find noticeable cracks, be sure to caulk. To do this, twist the tow or moss into a rope and force the material into the gap, followed by compaction.
You can also use jute sealant to fill gaps. In most respects, this material is superior to tow and moss, but costs a little more.
Seventh stage - roof
The roof should become a reliable protection for your timber bathhouse. Construction of the roof structure can only begin after the wood has shrinked, otherwise the roof will move and become significantly deformed.
First step. Lay down wooden beams over the top frame of the walls.
Second step. Attach rafter legs to the fixed beams in increments of 100 cm. To connect the rafters at the ridge of the roof, cut them at the required angle.
Installation of a gable roof for a bathhouse
Third step. Nail a continuous deck of boards to the rafters (if soft rolled material will be used for finishing) or build a sheathing (if you plan to finish the roof with tiles, slate or other sheet material).
Methods for connecting rafters
Fourth step. Mount the finishing roof covering in accordance with the instructions for the selected material.
How to make a bathhouse roof
Fifth step. Cover the roof ridge with galvanized iron. This will protect it from adverse environmental influences.
Sixth step. Sew up the roof gables with suitable available materials - clapboard, wooden boards or siding. At this point, focus on your individual preferences.
After completing the roofing work, proceed with insulation and other insulation work, interior decoration and arranging a steam room in accordance with your project.
Building a bathhouse with your own hands - step by step instructions!
Find out how to build a bathhouse with your own hands. A detailed guide to constructing a timber structure. Photo + video.
Baths have come to this day from ancient times. Even in the Scythian era, mobile heaters and special tents were very popular. And in our time, even with the advent of the shower and bath, the Russian bath has not become less common. People visit it not only to get satisfaction, but also to cleanse the body of harmful substances, improve overall health and get rid of diseases.
Now there are the most different variants construction of a bathhouse. It is popular to build a bathhouse from foam blocks with your own hands, from timber, frame-panel materials, a log house, or rounded logs.
Before starting work, building a bathhouse may seem like a very difficult task to many, but when a detailed plan is drawn up, it turns out that the step-by-step construction of a bathhouse with your own hands is not anything difficult. There is a lot of work, but if you design the structure correctly and carry out the work one after another (in stages), then over time you will be able to see your dream in reality.
As you know, the bath has enormous benefits for human health. Regular visits to her can significantly increase the tone of the body and improve its health, as well as relieve some diseases. The difficulty of the issue is that if you don’t have your own bathhouse, you have to visit paid establishments. And this involves additional financial costs, you have to adapt to its work schedule, neglect the rules of personal hygiene, because you never know who was steaming in it in front of you and how it was cleaned later. Of course, everything depends on the establishment itself, but still these factors create a certain discomfort among steam room lovers. In this regard, many people have the idea of building their own bathhouse.
Initially, this idea may seem unsuccessful, because a lot of work needs to be invested. But when the first elements begin to be erected, the do-it-yourself bathhouse, the phased construction of which will already be planned, will appear before the eyes of the dreamer in a ready-made image, which will serve as an incentive to continue the path to his goal.
Construction of a frame bath with your own hands
Before you start building a frame bathhouse with your own hands, you should decide on a project that is suitable for bathing procedures, which means that it must ensure heat conservation in the walls of the bathhouse. Then, after constructing the frame, insulation work is carried out.
A bathhouse made of such material has a number of advantages. It heats up quickly and retains heat for a long time if sufficient insulation has been installed. Price frame materials relatively low. This was the reason for the increasing popularity of this type of bathhouse construction.
Construction of a bathhouse from timber
Many people choose to build a bathhouse from timber with their own hands, since the advantages of this material, to put it mildly, inspire confidence.
The raw materials for the material are ordinary trees, which means it is environmentally friendly. In addition, being in such a bathhouse is very pleasant and useful.
The construction process, provided that the foundation is ready, takes a little time, such a bathhouse will serve for many years.
Construction of a turnkey bathhouse from timber with your own hands in Krasnoyarsk.
As a rule, the building is divided into three sections: a room for the guy, washing and rest.
Construction of a wooden bathhouse from a log house with your own hands
The material for construction is rounded logs, which are pre-processed and ready to arrive at the construction site.
Turnkey log bathhouse
Typically, logs are purchased from manufacturers who number them. The builders' task will be to stack the logs in in the right order. The building can be erected according to either a standard or an individual project.
Bathhouse construction plan
Before starting construction, it is necessary to draw up a plan for the future building and prepare drawings. To do this, you must first decide on the size, which depends on the area of the site allocated for construction. Then you can calculate the dimensions of the rooms.
A full-fledged bathhouse includes a dressing room, rooms for the guy and washing (combined or not).
In order to understand the stages of construction and draw up a plan, you can find materials on this topic online. You just need to enter a request, for example: we are building a bathhouse with our own hands, a step-by-step construction demonstration. After viewing the results, everything will become much clearer.
Main stages of bathhouse construction
Step-by-step construction of a bathhouse with your own hands involves completing each new stage after completing the previous one. In this case, a seemingly complex process will seem labor-intensive, but easy.
The best way to understand how to build a bathhouse with your own hands, step by step, is a video from the Internet. Or you have a familiar builder who can show you and give you some advice. In any case, it is not worth starting work without first seeing what is being done and how.
Preparing materials for building a bathhouse with your own hands
The most popular are baths built of wood. They have many advantages over structures built from other materials.
The joists and several lower rows can be made from oak, which will have a positive effect on the durability of the building. Next, four rows are laid out with logs from larch, and the last rows from linden or white spruce.
To build a bathhouse, you need to use the middle part of the trunk, which must be dry and sanded. As a rule, wood is prepared in winter, due to the fact that it is not as wet as in warm seasons and dries faster.
Preparing the foundation for a bathhouse
When building a bathhouse with your own hands, the foundation deserves special attention.
In order to choose what type of foundation to build, you need to determine the type of soil on the site.
A columnar (pile) foundation is constructed on slightly heaving soils. As a rule, pillars are installed at the joints of walls, both external and internal. If the distance between them is more than 2 meters, then another pillar should be installed in the middle. The installation depth should not be less than 1.5 m and protrude another 30-40 cm from the ground.
The distance between the pillars is laid out with bricks, which go deep about 25 cm into the ground.
A strip foundation is poured on heaving soil. To do this, you need to mark the area and dig a trench. Then add a layer of gravel and sand to the bottom. After this, you need to build the formwork and fill it with concrete.
The depth of the trenches should be at least 40 cm, width - 30 cm. The foundation should protrude approximately 15 cm above the ground. When pouring, be sure to use reinforcement.
Waterproofing the bathhouse foundation
The next stage is the implementation of waterproofing and construction of the base. To do this, use brick, roofing felt, pipe, masonry mesh, masonry mortar and mastic.
Bathroom floor installation
For the floor you can use clay, earth, wood or concrete.
IN different rooms bath floors should be on different heights. In the steam room, the floor is 15 cm higher than in the washing room, in which the floors are 3 cm lower than in the dressing room.
The most practical option is to build a concrete floor with a ceramic coating.
How to make a floor in a bathhouse
Sewerage in the bathhouse
For withdrawal waste water From the bathhouse you need to dig a well for it, a pit with a water seal and install pipes. All this must be constructed in accordance with technology to ensure long-term trouble-free operation. The pipes should be plastic, not iron.
Installation of a log house, roof for a bathhouse
If the sauna log was made by professionals, then it must be laid according to the numbers indicated on the logs.
Do-it-yourself construction of a bathhouse roof is done using rafters, which are sheathed with boards and then covered with roofing materials.
How to build a roof on a bathhouse
Caulking for a sauna log house
To seal the cracks between the logs and insulate the walls of the house, you need to apply caulk. To do this you will need hemp hemp, wool felt, flax tow and red moss.
You can also take factory materials, which have their advantages in the form of resistance to fungus and moths.
Installing a stove in a bathhouse
Sauna stoves can be made of brick, cast iron or steel. Depending on the type of heating, they can be wood, electric, gas or liquid fuel.
Heater stoves are equipped with a special chamber in which stones of different weights are placed.
Installation of a stove for a bath, insulation of the ceiling and walls in the bath
Plumbing and electricity in the bathhouse
Water is usually supplied to the bathhouse from a well or borehole.
The electricity supply is practically no different from the supply to a regular house. It is only necessary that the characteristics of the cables and devices comply with fire safety standards and be waterproof, as well as resistant to high humidity.
Interior finishing work in the bathhouse
Partitions in the bathhouse are made of brick or wood.
The ceiling is made in two layers. The first one, which is attached to the joists, is the roughing one, the second one is the finishing one.
The windows in the bathhouse are installed small in size and not very high.
Doors must open outwards. The material for making doors is a tongue and groove board with a thickness of 40-50 mm.
Bath shelves are made of linden, pine, aspen or poplar. There should be no knots, as they become hotter and can cause burns.
If someone is interested in a “do-it-yourself bathhouse building video” that will show how it’s done, you can find it on the Internet without much difficulty and build yourself the kind of building you can only dream of
How to build a bathhouse with your own hands step by step (Video instructions)
A complete step-by-step guide on how to build a frame with your own hands from start to finish, wooden sauna or frame bath. Videos from experts and tips for insulating baths
A sauna is a type of bathhouse, the design of which is based on a mechanism for heating the air in the room. Therefore, the material used to build a sauna must be indifferent to the influence high temperatures. The ideal option for arranging a sauna is in a private house, as an extension.
If you have limited funds to call professionals or you like to tinker, you can make a sauna in your home with your own hands. But to do this, you first need to understand where it is best to place the sauna.
A sauna can be constructed in any indoors with a good, leak-proof roof, without cracks and holes in the floor and walls, the room must be strong and reliable. Determine whether it is possible to square meters remove ventilation and connect water supply and electrical wires.
When calculating the size of the sauna that you will build with your own hands, focus on 2.5-3 cubic meters. m per person, this is quite enough to feel comfortable and relaxed.
What to make the floor from
In this case, a regular wood floor is unlikely to be suitable for a steam room. If you still want to equip your sauna with a plank floor covering, it is not recommended to apply a protective varnish on top. The same goes for walls. The high air temperature in the cabin provokes the dissolution of harmful substances that those in the sauna will have to breathe. Such experiments are not only not useful, but also dangerous to human health - over time they can provoke severe pulmonary diseases.
Therefore, the best option for flooring is considered to be tiles or a heated floor, laid even before fixing wooden structures. Regular tiles used for tiling bathrooms and restrooms will do. The only caveat is that when purchasing, ask what temperature the building material you like can withstand, because the temperature in the steam room can be 120 degrees.
Caring for the tiles is easy and simple - wash the floor every time after visiting the steam room in the house with a disinfectant, remember that failure to comply with hygiene threatens, at a minimum, the appearance of fungus on the feet.
Features of installing vertical frames
 To make a strong and solid sauna, you need to equip inner surface vertical frames:
- Following on brickwork walls, fix the glassine. The glassine is connected to the wall with overlapping slats. If the wall structures are made of a different material, glassine is not required. What properties does glassine have? Having a water-repellent effect, it provides high level vapor barriers. In construction stores, the material is sold rolled in rolls measuring 1 × 20 m, the weight of one package is 15 kg. Glassine can be replaced with lighter and thinner bitumen paper.
- Mount the frames in vertical directions using beams 40 × 60 or 50 × 50 cm.
- Now you can begin installing the ceiling frame base.
- At this stage, it is worth worrying about the arrangement of ventilation and power supply, and fire safety should not be forgotten either. To make the sauna in the house safe for visiting, it would be correct to install a dry pipe inside the room. What makes it special? The dry pipe is equipped with holes made at a special angle. When a fire starts, water streams spray throughout the steam room and extinguish the fire.
Another option for placing pipes is to lay them not around the perimeter, but directly under the ceiling. But then you need to install additional pipes with sprinkler tips.
If you do everything correctly and according to the instructions of professionals, you need to fix the valve on the inner plane of the ventilation, this will help prevent hot air from penetrating into other rooms in the house.
Insulation and foil
An excellent insulating material is mineral wool. The roll is carefully placed inside the frame. Construction foil will preserve and accumulate the entire spectrum of thermal radiation inside the cabin, which creates the effect of a thermos. With foil, it becomes possible to make the sauna in your home quickly heat up and maintain a high temperature for a long time.
What to “plant” the foil on? Use special tape or pushpins to secure it so as not to damage the integrity of the fragile surface, act carefully and slowly.
Cladding
Before cladding with clapboards, it is necessary to install a horizontal sheathing with a cross-section of 30 × 40 mm on the wall, each time retreating a distance of 400 mm, set according to the building level. To avoid destruction of the lining, it is advisable to equip transverse frames with a cross-section of 30 × 60 mm, to which the benches are then attached.
Not only the walls, but also the ceiling are treated with lining. Right now it is envisaged ventilation valve, equipped with a valve measuring 100-150 mm. If ceiling structure has the appearance of a wall-mounted one, it is better to cover the ceiling with clapboard and then lay insulating material.
Which cladding is better to choose?
 Here you can imagine the following options:
- Linden gives a very pleasant aroma; it is believed that it cures lung ailments (it has a slightly pinkish tint);
- alder is an expensive wood, pleasant to the body and very soft, but a mark remains on it, even if you just run it with your fingernail (there are a variety of tones, but the red tint gets dirty too much);
- pine releases pleasant and healing resins into the air, you don’t have to visit the pine forest, but simply go to your favorite sauna in the house and enjoy spending time on your health.
What is the disadvantage of covering with paired pine lining? Resin pockets can cleverly hide inside the wood and then suddenly come out. This means that a drop of hot resin can burn any part of the human body. Therefore, experts advise combining different types of lining - making the benches from alder, and the frame from pine or linden.
Installation of benches and doors
Ideally, the ceiling height should be in the range of 1.9-2.1 m; a higher level will not allow drafts to be avoided. It is better to install the upper benches higher, where the temperature conditions are the most optimal and healing.
Install a frosted glass door on its hinges and enjoy the result.
How to make a sauna at home with your own hands: video instructions
A sauna is a type of bathhouse, the design of which is based on a mechanism for heating the air in the room. Therefore, the material used for construction
Do-it-yourself sauna in the house: Projects with Photos
A sauna in the house is a good option for those who do not want to build a separate building on the site for a bathhouse, but want to be able to regularly bask in own sauna. A compact and inexpensive built-in sauna will be an excellent compromise in this case and, if all necessary conditions are met, can be absolutely safely installed in a house where people permanently live.
The main thing is proper ventilation
According to experienced craftsmen, when arranging a built-in sauna with your own hands, the main thing is to provide high-quality ventilation. The following briefly illustrates what proper ventilation should be like in a home sauna using visual diagrams.
The main condition here is that the air under no circumstances goes outside, but returns back to the same room from which it entered the steam room. The air inlet is always located under the stove, and the outlet is on the opposite wall under the ceiling. Additionally, you can also make a ventilation hole under the shelf and use it instead of the ceiling one. But top ventilation on the wall under the ceiling is provided in any case.
The door must be located on the same wall as the stove. This is very important, because if you place the door opposite the stove, then the flow of cold air entering through doorway will collide with the hot air of the furnace and direct it towards the wall, which will lead to dangerous overheating of its surface and may trigger the overheating sensor.
Examples of DIY sauna projects
Below are some examples of the possible location of a sauna in the house. In the classic case, the installation of a sauna is carried out in the basement, ground floor or in a spacious bathroom, but there are other options.
DIY sauna project in the bathroom
This sauna was manufactured in a fairly spacious room bathroom. The overall dimensions of the steam room were 1240x980 mm, and the dimensions of the bathroom were 3150x2950 mm.
The following photo shows the original state of the bathroom; the sauna is planned to be installed in the right corner.
It is very important, before starting to manufacture the structure, be sure to check where all the hidden communications of the room where the work will be carried out are located. For electrical wiring, for example, there are special devices for detecting hidden wiring.
The technology for installing a sauna with your own hands begins with calculating the location of all the necessary elements. Then the necessary materials are calculated and purchased, after which the manufacture of the steam room frame can begin.
Perforated metal strips are attached on top of the frame, which will become the main support for the basalt insulation layer.
The next stage is the installation of internal vapor barrier. A special foil vapor barrier on kraft paper is ideal for these purposes. It is fixed to a wooden frame using a construction stapler, and all joints and places pierced by staples are sealed with foil tape.
During the installation of insulation, it is necessary to provide holes for ventilation, which are made from a piece of metal pipe, wrapped in foil.
After successful production of a layer of reliable vapor barrier, the steam room is sheathed with wooden clapboard, which is fixed to the lathing pre-fixed to the main frame.
Project of a sauna in the basement with photos of the stages of work
In a private house there was a free basement with dimensions of 5.1x4.9 m. It was decided to equip it with a sauna measuring 2490x1630 mm and with a ceiling height of 2160 mm.
The basis of the structure is a wooden frame mounted on bricks bonded together with heat-resistant glue. The sauna was originally planned, since on top of the wall you can see a ready-made ventilation hole.
Installation of all the necessary layers of the steam room took place in the same order as in the previous example. After construction wooden frame it was sheathed on the outside with metal strips onto which basalt thermal insulation slabs were fixed.
After that, a layer of foil vapor barrier is sewn onto the walls from the inside using a construction stapler - a special heat-reflecting film on kraft paper.
The space near the stove is lined with glass-magnesite slabs for thermal protection wooden surfaces from the heated body and stove stones.
A lathing was installed on the vapor barrier for installation of the finishing interior trim.
Under the ceiling, a hood was made in a plastic box, which was then wrapped in basalt cardboard for thermal insulation and to prevent the formation of condensation in it.
The layout of the walls from the inside to the outside at the location of the furnace is as follows:
- Porcelain tiles
- Glass magnesite (SML) 12 mm thick
- Basalt cardboard 6 mm thick
- Mineral wool insulation slabs in a wooden frame
- Wind protection layer of vapor permeable membrane
- Ventilation gap 10 mm
- Basalt cardboard 6 mm
- Another ventilation gap of 5 mm
- Exterior finishing with plastic panels
Where there is no stove, the inside walls are trimmed with clapboard installed on the sheathing, and under the sheathing there is a layer of foil vapor barrier. The remaining layers of the wall are repeated with the list above.
This is what the steam room looks like from the inside with installed shelves and lamps in the corners of the walls.
The final stage after completing all work with wooden structures is the installation of an electric furnace. Here the choice also fell on a small sauna stove, Harvia.
Glass magnesite sheets are finished with porcelain tiles using a special heat-resistant adhesive. In this built-in sauna design, ventilation is provided at the entrance through ventilation holes in the glass door, and at the exit through an insulated duct in the ceiling, which leads to an opening in the wall.
Do-it-yourself sauna in the house: Projects with Photos - in the bathroom, in the basement
Do-it-yourself sauna in the house - consider projects for a sauna in the bathroom and a sauna in the basement with photos and descriptions of all stages of work.
Do-it-yourself sauna in the house photo projects

You can hardly find private property owners who would not like to have a sauna near (or in) their house. Due to the high cost of such construction, for many of them this dream remains a dream forever. Order the construction of a sauna from construction company or hiring a crew for this is quite expensive. You can save on construction, but if you build a sauna in your home or near it with your own hands. This is not so easy to do, but the result will be worth all the effort and expense.
First of all, you need to decide where the sauna will be located relative to your place of residence. If the house was built a long time ago or bought in finished form, it is quite natural that the sauna building will have to be erected separately. If construction is just underway and the project involves the construction of a fairly large building, a place for a sauna can be provided inside the house. Some owners of ordinary apartments are not at a loss either: they build themselves a small sauna on the site of a former bathroom or even on the balcony.
Design
Depending on the existing conditions, sauna projects are also being developed (photos 1-4).

Any construction project begins with design. If you create a sauna with your own hands in an existing room at home, then it will require simple re-equipment.

When building a free-standing sauna, you will have to start from the foundation itself. The sauna can be made one- or two-story. For small one-story buildings, the projects presented in photos 1 or 2 are suitable.
If the budget allows, the sauna near the house can be made two-story.

On the ground floor it is worth placing the sauna itself, a washing room (or bathroom), a locker room, a swimming pool, a toilet, and a boiler room (photo 3). On the second floor you can make a recreation room or, for example, a billiard room (photo 4).

Interesting projects are offered by some craftsmen who have built a sauna in their private home with their own hands.
Types of saunas
Just 15-20 years ago, owners built with their own hands on personal plots standard bathhouses with a basic set of premises (steam room, wash room, small room rest and vestibule). There is now exceptional diversity in this regard. If you want to build something similar with your own hands, first choose the most convenient and attractive option for yourself. There are the following types of saunas:
1. Russian bath. The temperature in it is quite moderate (about +70°C), but the air humidity is very high. In this type of bathhouse, all existing electrical appliances and communications should be thoroughly insulated, since a large amount of wet steam increases the chance of malfunctions in the electrical wiring, short circuit and so on.
2. Turkish hammam. Suitable for those who need very mild external conditions (hypertension, people with pulmonary diseases, etc.). The humidity in the hammam is high, but the temperature is very comfortable - about +40°C. You can stay in this mode for a long time, carry out all kinds of SPA procedures and generally relax.
3. Directly Finnish sauna. It is characterized by very dry steam and high temperatures. Air humidity usually does not exceed the threshold of 10%, but sauna fans raise the temperature to +130°C.
To create such conditions, the doors in the sauna must be hermetically closed. This requires a special ventilation system and, of course, constant temperature control (for this, a special thermometer for extreme conditions is hung in the sauna).
One of the desirable conditions for a sauna is the presence of a swimming pool. Of course, if a room in an already rebuilt house is converted into a sauna with your own hands, the pool can only be built on the street. In a free-standing sauna building, this part should be planned and included in the project in advance.
If you decide to make a sauna separate from the house, you will have to start with the foundation. Most often, a columnar foundation is created for such a building (photo).

It is relatively inexpensive, and it doesn’t take much time to work. First you need to drill holes at the corners and load-bearing walls of the building (depth = 1.5-1.7 m). Load-bearing columns are installed in them.
The so-called rand beams are laid on top of the pillars, after which you can begin installing the subfloor. A columnar foundation is quite easy to make with your own hands. He's quite reliable. Neither subsidence of the soil nor its heaving are dangerous for a building on such a foundation. But if the sauna near the house is two-story, with many rooms, then it is better to equip a belt or slab foundation. These structures can withstand heavy loads.
Walls and communications
After the foundation of the sauna is covered with a layer of waterproofing, we begin building the walls. You can build them with your own hands from galvanized logs, timber, bricks, foam blocks and other materials. The inside of the sauna walls are always finished with natural wood. Timber, boards or lining made from coniferous wood (fir, spruce, cedar, pine) are ideal, but if you don’t have it, you can also purchase it from deciduous wood (birch, oak).
During the construction of a sauna in a house, you need to approach communications especially carefully. First of all, this concerns electrical wiring. Cables must be laid in dry pipe sleeves. In brick or block walls Special grooves are drilled under them. In wooden buildings, the wiring is hidden in pipes under the lining. Do not forget: the wiring must be arranged in such a way that in case of a malfunction it can be easily accessed. This is a mandatory fire safety requirement both in the house and in the sauna.

The walls of the sauna must be covered with a layer of hydro- and vapor barrier. Bituminous paper, glassine and materials of similar quality are suitable for this (photo above). The joints between the sheets must be glued with construction tape and covered with lathing (beams measuring 50x30 mm). You can insulate the walls using heat-resistant mineral wool, which is placed in the gaps of the sheathing. We do not recommend using polystyrene foam to insulate sauna walls. It does not tolerate high temperatures well and releases harmful chemical compounds.
After this, the ceilings and floors of the sauna are covered with wooden paneling. It is attached with self-tapping screws. In humid and hot rooms, the lining is not varnished! This also applies to saunas. After finishing with clapboard you can fix it wooden shelves. They are mounted to the walls on wooden dowels. In general, in a sauna, where the temperature rises to +130°C, it is better to use natural wood as much as possible without any chemical impregnations. This material will provide maximum comfort during bath procedures.
Sauna stove
In the sauna, you can build a stove from fireclay (fireproof) bricks or install a ready-made stove-heater.

Do not forget that in a regular bath the steam is wet, so it uses stoves with open containers for stones (photo). Those who are steaming pour water on them, thanks to which they get wet and hot steam. In a Swedish sauna, it is better to use a closed heater (photo). It will give off dry heat.

Ventilation
Any bathhouse must have an adequate ventilation system. This also applies to the sauna. The simplest system ventilation looks like this: a small hole is made in the wall (optimal dimensions: 25x25 cm), after which a wooden gag is inserted into it. It should be tightly ground into the hole and it is advisable to have rubber compressor. The vent can lead either directly to the street or to the ventilation system of the house.
Like the walls, all doors in the sauna, together with handles, are made only of wood. They need to be insulated (for this purpose the doors are made with two chambers). Door frame it is sealed around the perimeter so that the door leaf fits as tightly as possible and does not let cold air into the room. You can hang a so-called “canopy” on the top jamb. This is a piece of dense fabric such as felt or tarpaulin, which will further prevent cooling interior spaces saunas.
These are the main points of construction and interior arrangement of a Swedish sauna. Examples of projects can be seen in the photo, and unclear points can be clarified in the video. With proper attention to detail, you will be able to independently build a real Swedish sauna near your home.
Do-it-yourself sauna in the house photo projects
From this article you will learn how to equip a sauna not only in country house, but even on the balcony own apartment. Don't deny yourself the pleasure
How to make a sauna in a private house with your own hands

How to make a sauna in the house with your own hands - this is the question asked by most summer residents and lovers of holidays outside the city. Steam baths have a beneficial effect on the human body, cleansing it of toxins and also relieving fatigue. However, not everyone can afford to build separately standing bathhouse, due to lack of land area or financial capabilities. Therefore in Lately The construction of saunas right inside the house has become very popular. The visible advantages of this choice are versatility and compactness.
Planning and placement of a sauna in a private house
Before you make a sauna in your home with your own hands, decide where exactly it will be located. Since the area of the steam room will depend on this.

Layout of a sauna in a private house
On a piece of paper, make a sketch of your bathhouse, on which you will display the entire layout in the form of a drawing, indicating the dimensions. This will help avoid various mistakes later during construction. In addition, thanks to this plan, you will be able to clearly see your future steam room in the sketch and choose the right place in it for benches and a stove.
The most optimal layout saunas in a private house are a basement, but only if it is well ventilated and it is possible to provide the necessary communications. This option is the most common because it allows you to economically use space in the house.
This article illustrates high-quality photos of saunas in the basement of a private house, thanks to which you can quickly choose an option for yourself. If you follow all the recommendations, you can even create a steam room with your own hands in a high-quality manner and in a short period of time.
Before starting construction of a bathhouse, it is necessary to take into account the material of the walls of the house itself. The fact is that, for example, a sauna in a house made of aerated concrete will great solution, since the porous structure of this material has excellent vapor permeability. Due to this, aerated concrete well regulates the level of humidity in the room, while creating the necessary healthy microclimate.
Construction of a sauna in the basement of a private house: procedure
A sauna in the basement of a private house can be equipped provided that the selected room is dry and has all the necessary communications: sewerage, water supply and electricity. In the event that forced air is not installed in the basement ventilation system, then it will need to be organized here.

Sauna in the basement of a private house
The dimensions of a sauna for a home are selected as follows: in the steam room for each person it is necessary to provide from 2 to 3 m 3 of volume. After making calculations, choosing a project and a location for a home bath, you can begin its construction, which includes the following steps:
- arrangement of floors;
- installation vertical frames;
- thermal insulation;
- horizontal lathing;
- clapboard cladding;
- electric stove equipment;
- installation of benches and doors;
- installation lighting fixtures;
- laying stones in an electric heater.
Sauna floor
The construction of a steam room begins with the construction of the floor. The best option would be to equip the sauna with a tiled and heated floor, which should first be laid out before erecting wooden structures. The tile can be of any quality, but it is desirable that it have a rough surface that prevents slipping. A more expensive option for flooring is natural and artificial stone.
Frame in the sauna
A do-it-yourself sauna in the basement of a private house must have a reliable and durable structure. To do this, you must follow the rules for installing vertical frames:
- glassine is laid on brick or aerated concrete walls, which is necessary for vapor barrier. It has a great water-repellent effect and provides waterproofing to the coating. You can replace glassine with bitumen paper, which has similar characteristics, but its base is much lighter and the material is thinner;
- the glassine must be fixed with an overlap on the wall using ordinary slats;
- along the walls you need to install vertical frames using beams 50x50 mm or 40x60 mm;
- Next, the ceiling frame is mounted, during the formation of which it is necessary to lay and subsequently equip ventilation, power supply and fire safety systems;
- to provide fire safety A dry pipe is installed around the perimeter inside the cabin, in which holes are drilled at a certain angle and in the event of a fire, water will be sprayed throughout the cabin, which will localize the fire.
Thermal insulation
The construction of a sauna in a private house must include the mandatory installation of insulation. Why is it necessary to use basalt-based mineral wool?
The second stage of thermal insulation is the laying of aluminum foil, since it is capable of maximally retaining the entire spectrum of thermal radiation inside the room, while creating the effect of a thermos. The foil is fixed using special tape.
Horizontal lathing and lining
Before the clapboard cladding begins, the construction of a sauna in a private house includes the stage of horizontal lathing. For this, bars with a pitch of 400 mm and a cross-section of 30x40 mm are used, which must be set strictly at level, and their transverse frames with a cross-section of 30x60 mm are fixed for the purpose of further attaching shelves to them. This will allow you to attach the sun loungers not to the lining, but to the frame.

Lathing and paneling of the sauna
At the next stage, the sauna in a private house is covered with clapboards, including all walls and ceiling. Before starting this work, a ventilation valve is installed in the ceiling above the stove to ensure the flow of cold air. A valve with a diameter of up to 150 mm is installed on it, allowing you to control temperature regime in the steam room.
For clapboard cladding, you can use the following types of wood:
- linden – has a pleasant aroma and has a beneficial effect on respiratory system person;
- alder – has low thermal conductivity;
- pine – rich in phytoncidal resins.
Installation and assembly of an electric furnace
An electric sauna stove can not be made by a professional electrician, but it is better to entrust its connection to a specialist. Self-assembly of an electric heater includes:
- drawing up a diagram of the device;
- calculation of the number of heating elements, taking into account the required power;
- The furnace assembly - heating elements must be fixed to the frame and connected with jumpers. As a base, it is recommended to use a steel sheet 3 mm thick, to which the remaining elements are attached using bolts and welding;
- installation of a sauna stove;
- laying stones in a finished frame;
- installation of a protective casing made of steel sheet;
- connecting an electric heater using serial or parallel connection of heating elements;
- checking the functionality of the device.
Installation of shelves and doors
The upper shelves in the steam room are made as high as possible to ensure the best effect for those steaming. But, the distance from the bench to the ceiling must be at least 1 m, and the height of the lower lounger can be 65 cm.

Installation of shelves in the sauna
It is better to install doors to a home bath with glazed ones to relieve tension in the enclosed space of the room. In addition, the sauna in the basement of a private house with glass doors, shown in this article in the photo, proves how laconic this design looks.
The next stage is the installation of lighting fixtures and decorative fittings.
Laying stones
It is necessary not only to think about how to make a sauna in a private home, but also not to forget about ensuring the comfort of your stay in it. So, an important role in this plays correct styling stones, on which the healing properties of the sauna depend. Therefore, smooth round stones are best suited for an electric heater. different sizes, as they facilitate air circulation. Large stones are placed in the lower part of the heater, and small ones in the upper part.
Compliance with all the rules for building a sauna in the basement of a private house will allow you to create a convenient, beautiful, and most importantly, comfortable room in which you can spend time with loved ones with health benefits.
Sauna in the house with your own hands, arrangement and decoration
If your home has a large, unoccupied basement, then building a sauna would be an excellent option for using it. Moreover, you can do it very quickly with your own hands.
Without a steam room, the bathhouse becomes an ordinary room where people wash. It is steam that has healing properties, rejuvenates the body, gives strength and good spirits. At first glance, setting up a steam room is not particularly difficult. This small room has a minimum of architectural delights. However, when arranging it, it is necessary to follow a number of important rules. Only then will the steam room be able to bring real pleasure to lovers of a real Russian bath.
It is necessary to design a steam room before starting construction of a bathhouse. Its dimensions will depend on many indicators.
When making calculations, it is necessary to take into account the following nuances.
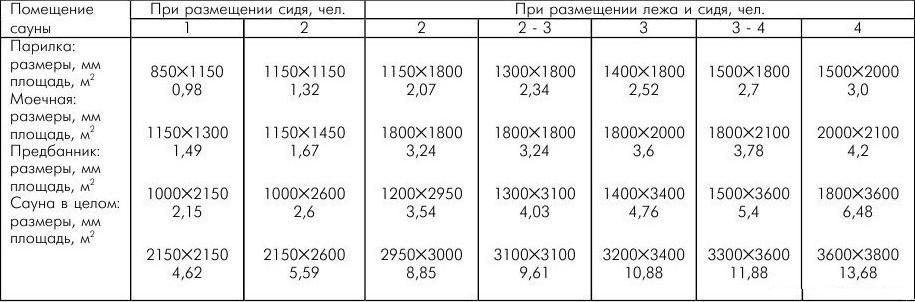

The first sketch below shows a small sauna with a steam room, in which the shelves accommodate seating only.
The other two pictures schematically show more spacious rooms in which you can steam while lying down.

1), 10), 11) Clothes hanger, wardrobe.
5), 7) Benches.
2) Rest room.
6) Shelf.
3) Steam room.
8) Doors.
4) Wash room.
9) Oven.
By schematically depicting the location of the stove and shelves in the steam room, you can calculate its dimensions in advance and avoid annoying mistakes during construction.
Type, power and dimensions of the stove. According to fire safety standards (), the stove in the bath should be located at a distance of at least 32 cm from wooden structures. If the walls are protected by non-combustible materials, then you need to retreat 26 cm from them.
An iron stove has high power, compact dimensions and the ability to quickly heat even a large steam room. However, its surface becomes very hot, and there is a risk of accidental burns in case of careless actions. In view of this. In the steam room, there should be a free distance between the shelves and the iron stove.
 Installation example metal furnace in the steam room

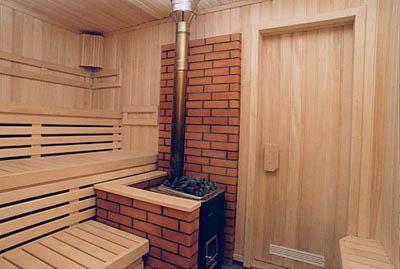
A brick heater does not heat up so quickly and its size is much larger than a metal one. However, it retains heat longer and it is impossible to get seriously burned on it. Therefore, there is no need to locate the oven at a significant distance from the shelves.


When installing an electric heater, it makes sense to make the steam room as small as possible. This will save energy when heating the room.

So, when planning a steam room, you should carefully think through everything at the construction stage. After the walls, partitions and roof have been erected, you can begin directly to work on the internal arrangement of the steam room.
Prices for electric heaters
electric heater
Floor installation
The flooring in the entire bathhouse is done first. The floor level in the steam room should be higher than the level of the clean floor in the wash room.

There are several options for its design.
Wooden floor
The easiest way is to install a wooden floor. To do this, support logs are installed on the foundation.

Planed boards 50 mm thick are screwed onto them at a distance of 5-10 mm from each other.
It is important that there is at least 50 cm between the floor and the ground level, and that there are openings in the foundation for fresh air.
This will ensure good, natural ventilation in the steam room, and the boards will dry evenly after finishing the bath procedures. However, this flooring option should only be used in areas with warm and temperate climates. In northern regions, such ventilation can cause the heat from the steam room to dissipate too quickly.
Video - Floors in a bathhouse on logs with insulation
Concrete floor
A concrete floor in a steam room can last much longer than a wooden one. However, the costs of its arrangement will be slightly higher. In addition, it will be necessary to additionally lay a finishing coating on it.
Before starting installation work cement screed in the steam room and washing room, you should dig a pit 10 to 15 cm deep to drain water. Its walls can be secured with cement or tiles. An iron grate is placed on top of it. Water will leave the pit through drain pipe into the sewer.

As soon as the water drain is ready, you can begin installing the screed.

The clean floor level in the steam room should be higher than in the washing room. Therefore, before starting work, a mark is made on the walls to which the floor structure will reach. And then they put down the distance from it that is necessary to lay all the layers of the screed.


The procedure for arranging a concrete floor
| Illustration | Description |
|---|---|
| the site is carefully leveled, if necessary, the top part of the soil is removed |
| pour a 30-40 cm layer of sand and crushed stone, spill it with water, compact it, making a slope towards the drain hole |
| pour the first layer of concrete 5 cm thick |
| After the screed has dried, strips of waterproofing material (roofing felt, glass insulation) are rolled out over it. |
| ON waterproofing material lay insulation 50 mm thick |
| install a reinforcing metal frame from masonry mesh |
| pour a layer of concrete up to 10 cm thick |
| level the concrete with a board or rule, not forgetting to make a slight slope in the direction of the sewer hole |
| lay tiles or gratings from boards |


Video - Draining the bath
Vapor barrier and ceiling finishing
High-quality insulation of the ceiling in the steam room is of paramount importance, since hot air from the stove rises to the top. Therefore, it is unacceptable to have places on the ceiling through which it could easily go outside.
Ceiling insulation work is carried out in the following sequence.
| Works | Illustration |
|---|---|
| A water vapor barrier is attached to the floor beams. It could be: Foil with a density of at least 100 microns; Foil penoizol with a thickness of 5 to 10 mm; Water vapor barrier membrane “Izospan”, “Megaflex”, etc. For installation, use a construction stapler and staples with a height of 8 to 12 mm. The tool must be well adjusted to prevent breaks in the protective membrane. The strips are fastened with an overlap of at least 20 cm, the joints between them are carefully taped with aluminum tape. At the edges, the insulation should extend 15 cm onto the walls of the steam room. | |
| After attaching the waterproofing to the floor beams, wooden slats 50 mm wide and 25 mm thick are screwed strictly level. The distance between them should be no more than 70 cm. Before installation, they are treated with an antiseptic composition. | |
| Linings made of linden, birch or aspen are attached to the slats. The finishing material is placed perpendicular to the sheathing boards. Installation begins on the opposite side of the door. Fastening is done either with galvanized nails or with clamps. | |
| From the attic side, grooves are made in the floor beams and transverse fasteners for the chimney are inserted into them. | |
| A rectangular opening for the chimney is cut out on the ceiling. | |
| A layer of insulation with a thickness of 150 to 200 mm is laid between the floor beams in the attic. | |
| A wind and vapor barrier membrane is rolled out over the insulation and secured with a furniture stapler. | |
| Then the floor boards are installed in the attic. |
Prices for vapor barrier
vapor barrier
Wall insulation
If the walls in the bathhouse are built from foam blocks or using frame technology, then the steam room requires additional insulation. The inside should be a cold-proof thermos that will perfectly retain the heat emanating from the stove. This will save fuel, which is used for heating and maintaining the desired temperature in the steam room for a long time.
Before starting work, an opening is cut in the wall to install the stove.
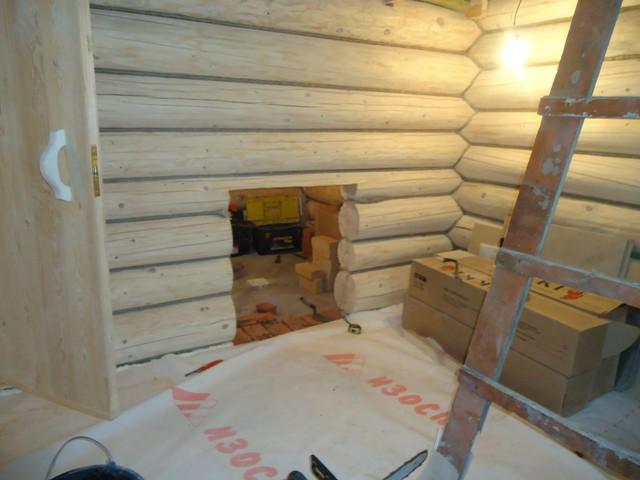
Then a wind and vapor barrier film is attached to the walls.

At the next stage, basalt non-combustible insulation is tightly laid between the bars.

Prices for basalt wool
basalt wool
After this, a water vapor barrier is nailed to the bars with galvanized staples.

The following can be used as protective material:
foil with a density from 150 to 200 microns;
foil foamed penoizol;
waterproofing membrane for baths.
Strips of moisture-resistant material are nailed with staples, overlapping each other by at least 15 cm, and the joints are sealed using special tape.
Then slats 25 mm thick and 30 to 50 mm wide are horizontally attached to the bars using galvanized self-tapping screws at a distance of 70 cm from each other. The sheathing should be installed as level as possible; for this you should use laser level or plumb line. Installation begins with the two outer slats, then a cord is pulled between them. And already focusing on it, they nail down the remaining parts of the sheathing.
At the next stage, the clapboard board is directly attached. To do this, use either ordinary galvanized nails 40-50 mm long, or special clamps.
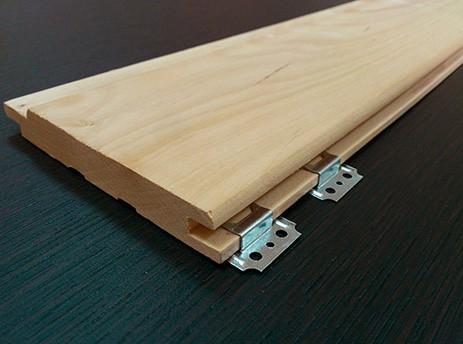 The principle of fastening clamps into the groove of the board
Finally, even holes are cut in the walls for ventilation. They are masked from above with plugs or flaps. If necessary, install a fan in the supply or exhaust opening.
Prices for lining
If the walls in the steam room are made of logs or profiled timber, then they do not require such careful insulation. In this case, it will be enough to attach foil or foil penoizol to them. Then nail the sheathing and install the lining.

Furnace installation
The stove in the steam room can be installed in iron, brick or electric. The location for it should be chosen at the bathhouse design stage. The furnace firebox can be located both inside the steam room and outside it.
Installation procedure in a steam iron stove:

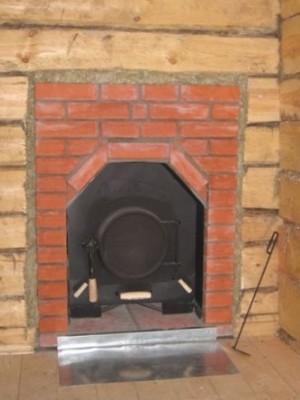


Installed on a pre-prepared platform or hung on the wall using special brackets. It does not require installation of a chimney.
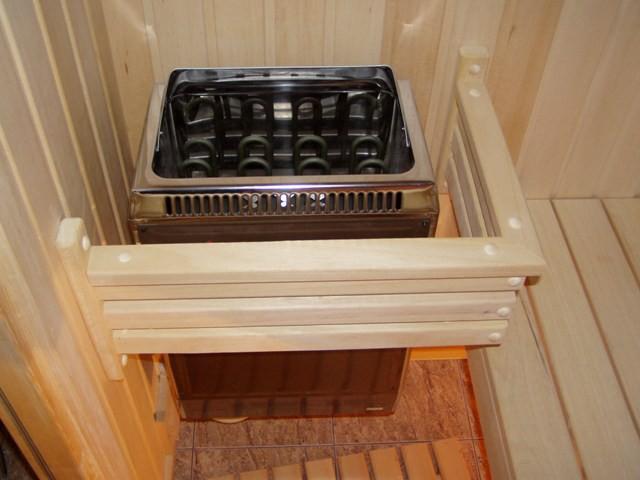


It is imperative to observe the distances specified in the instructions from the oven to the walls and shelves.
Brick oven
The brick oven is laid out at the stage of construction of the bathhouse.


Only that part of it that will contain the stones should go into the steam room. It is best to place the firebox in the dressing room or outside.
Video - Basic mistakes and where to start building a bathhouse
Video - Building a bathhouse from scratch. Main questions
Door installation
The door in the steam room is installed in last resort. It should close tightly and not let heat out. Doors made of solid wood or tempered glass are best suited for this purpose.
Installation wooden door consists of the following steps:

a doorway is adjusted under the casing;
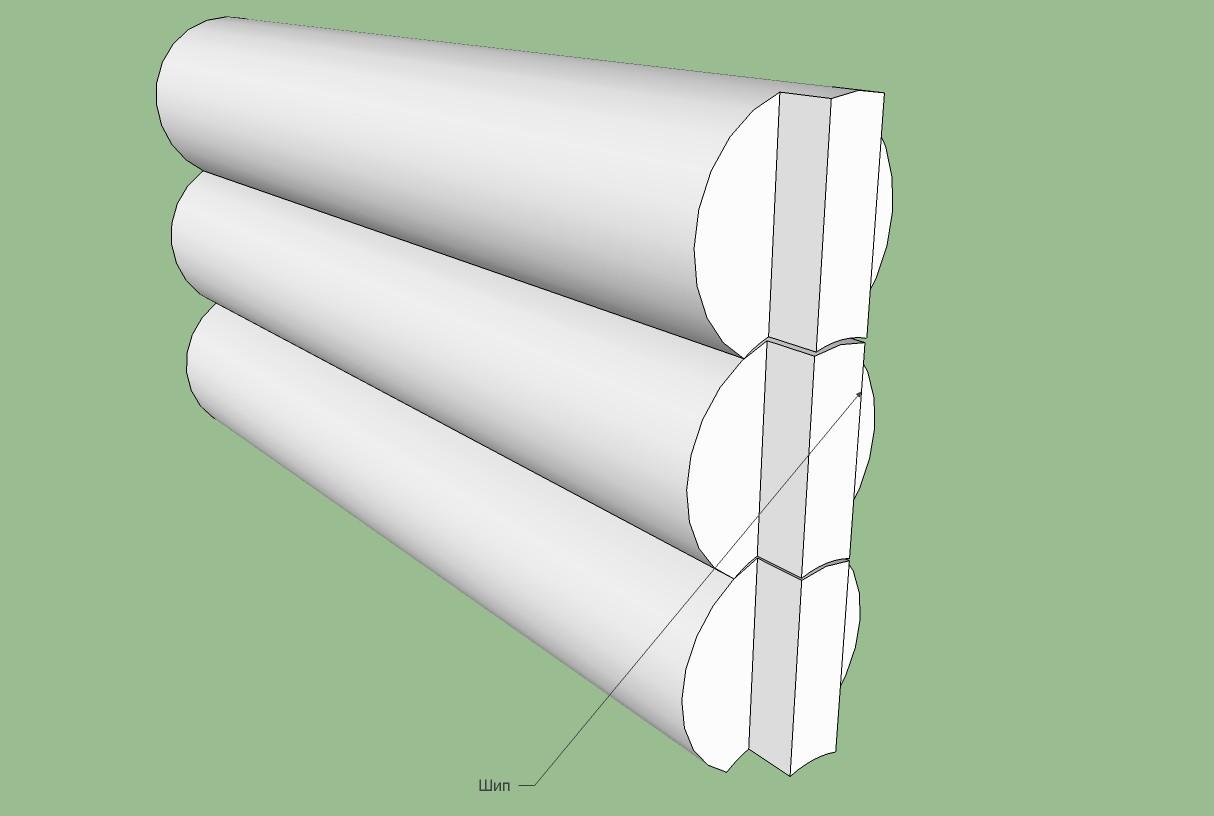


The “casing” cannot be screwed to the beam, it must move freely along the grooves, the gaps between it and the wall are carefully caulked;

Another way to install a wooden door is to cut grooves into the opening.

They install wooden blocks so that their edge does not reach 5-10 cm to the top of the opening. And the door frame is already directly attached to them.

Fixing the frame to the rail and hanging the door
Glass doors are attached to special hinges.


Video - Casing under a plastic window in a log house
Video – Okosyachka (part 1)
Video – Okosyachka (part 2)
Video – Okosyachka (part 3)
How to make shelves correctly
The number of shelves in the steam room depends on its dimensions. Their height is selected depending on the height of the owners of the bathhouse. In the standard version, three-level shelves are allowed, each of which is 35 cm in height. However, it is also possible to have two shelves. In a small steam room, the lower level of the bench can be equipped with a retractable mechanism and can be pulled out as needed.

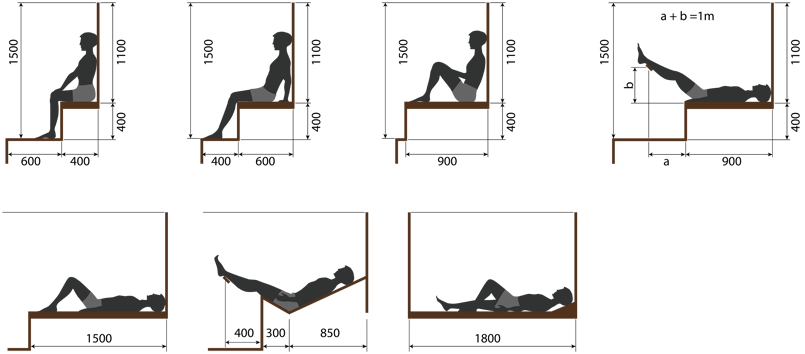
First you need to choose the shape of the shelves and assemble the frame. It is best to make it from larch. There are quite a lot of options for its location. It can be rectangular or angular.


Wooden panels are laid on top of the installed frame.


The boards in them should be spaced loosely, at a distance of 1 cm from each other.
Shields should be made from linden or aspen. Coniferous wood is not suitable for this purpose, since under the influence of high temperatures resin is released from them.
Efficient ventilation
An important stage in arranging a steam room is. In its absence, prolonged stay in the steam room becomes unsafe for human health. And improper installation of air ducts can lead to heat loss and unnecessary fuel costs for proper heating of the room.
You should not make a hole for the ventilation duct directly on the ceiling of the steam room. This will lead to large heat losses, and hence a decrease in the effectiveness of bath procedures.

The most common are several options for the location of ventilation ducts in the steam room.
| Location option | Diagram or illustration |
|---|---|
| The oxygen supply comes from the opening, which is located behind the stove; a fan is mounted into it. The distance from the floor is 25 cm. The outflow is carried out naturally through a gateway, which is located on the opposite wall. The lower it is located, the better. | |
During the actual bathing procedures, the ventilation holes in the walls can be closed with valves. And then open them as needed.

Galvanized or stainless steel pipes should be used as ventilation ducts. Apply plastic structures not recommended in the steam room. The pipes must be secured using special clamps.


It must be remembered that the diameter of the exhaust duct should be slightly larger than the supply duct.
Having decided on the ventilation scheme, you should make holes of the required size in the walls or floor.

Their diameter depends on the area of the ventilated room, but it cannot be less than 100 mm. Then you need to insert ventilation ducts into them.

The remaining distance between the wall and the pipe must be filled with non-combustible insulation. Attach a protective grille on the street side.
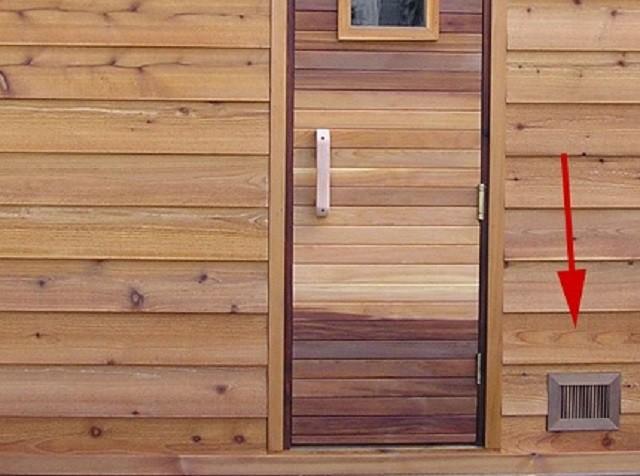
Electricity
At the final stage of arranging the steam room, installation is carried out electrical wiring. All switches and distribution boxes must be located outside the steam room and shower room.
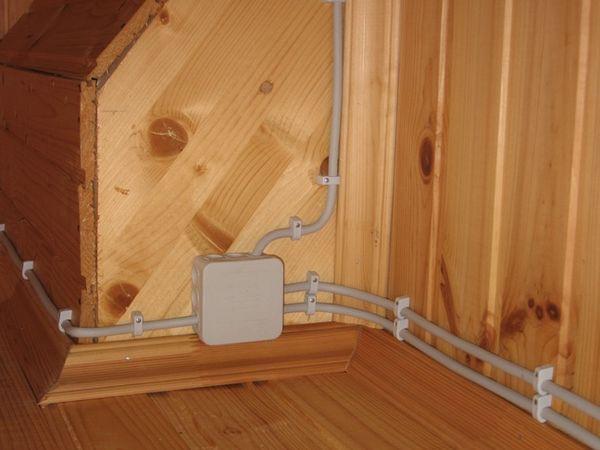
The wires are laid in corrugation on top of the lining.


In the steam room, they are covered from above with wooden plinths.

Lights in the steam room should be protected by wooden grilles.


Video - How to properly decorate a steam room in a bathhouse
Since ancient times, the bathhouse has been a place where you can relax and unwind. These ancient buildings surpass even outdoor recreation in popularity.
How to build a bathhouse yourself?
Building a bathhouse with your own hands is a difficult task and its implementation will require a certain amount of knowledge, which you will soon learn about.

To build a bathhouse with your own hands, you will need to familiarize yourself with the action plan:
- Design a bathhouse;
- Understand the stages of construction;
- Get building materials;
- Connect communications;
- Arrange the bathhouse from the inside.
After familiarizing yourself with the stages of construction, you need to decide on the place where the bathhouse will be located, since a lot also depends on the location.

The best option would be if:
- the bathhouse will be located on a hill, this will significantly simplify the installation of a water drain;
- there will be a river or pond next to the bathhouse;
- The window in the bathhouse will be located opposite the house, which will allow you to observe its firebox.


For a garden house, the distance will be no more than 3 meters, and for buildings such as a bathhouse, this distance should not exceed 1 meter.


It is best to order the design and drawings of the bathhouse from local designers; this will cost about 5,000 rubles. You can also search for ready-made sketches and photos of bathhouses on the Internet that best suit your preferences.

Bathhouse made of brick, stone or blocks
As materials for a brick bath, you can use brick, stone or blocks directly.

To build a bathhouse, you need to dig a pit and fill it with 20 cm of sand, then fill it with water to compact it.

The second step is to lay crushed stone on top of 10 cm thick sand, which then needs to be covered with sand again.

The last step will be to install a system for drainage and drainage of the building.

Bathhouse made of timber
The first layer for the base of the bathhouse will be a 20 cm layer of sand, crushed stone is applied as the second layer, and concrete pouring is laid as the third layer. The key stage will be the reinforcement of the building.

Metal rods need to be inserted into the layers for more robust construction and for additional stability, you need to lay metal plates in the middle, which are tied with wire.

Note!

The next stage of work is the blind area, which is needed to ensure that the foundation of the bathhouse is not washed out with water.

It is best to make a blind area from clay, it is much stronger than concrete, and also does not form cold seams in the process. A layer of crushed stone must be poured on top of the blind area.

Next, you need to install a drain in the bath. First you need to dig a hole and bring its trench to the edge of the foundation of the building, cover the walls of the hole wooden planks with reinforced wire, and then fill everything with concrete.

Frame bath
The foundation for such a bath structure is made using simplified technology, which is the advantage of a frame bath. It is necessary to make a foundation of asbestos-cement pillars, which, after installation, are filled with concrete mixture.

The next step will be marking the walls. Then you need to start connecting the boards using nails. The top and bottom harness. The walls for such a bath are made in a lattice structure.
Note!


The materials that are needed for the walls are bars, insulation, and materials for outside, for example OSB boards or block house, and inside you can use lining.

Materials for insulation and vapor barrier
It is worth insulating a bathhouse from the outside only if there is heating in the building.

For wooden bath it is necessary to make a grid that will be inserted into the insulation. The work will require mineral wool with a layer width of 50 mm.
Bath floor
In case of frame bath, when it remains to insulate the floors, as well as install the floor boards, in addition to this, it is necessary to install logs, a subfloor, and secure the structure for steam removal, then lay the insulation and check the waterproofing.

It is best to make the floor from concrete, as this will allow the bath to dry faster and it will last much longer. Wooden panels are laid on the concrete floor; they can then be taken out to dry and you can easily go about your business.

Note!

DIY bath photo


