A chandelier is a rather expensive item, but technologically not so complicated. In any case, production processes that could not be carried out at home are almost not required for the manufacture of a chandelier, or they can be replaced with similar manual ones, visually and reliably giving the same effect.
Amateurs have made and are making many ceiling lamps for general lighting with their own hands (and these are chandeliers), which do not have analogues in wide sale and sometimes have a very extravagant look, see, for example, Fig. We hope that the reader will not be too busy with inventions. However, unfortunately, in the scattering of images of home-made chandeliers on the Internet, samples that meet the safety requirements and lighting technology of residential premises are rare. Rather, even very rarely.

This article examines, first of all, how to correctly make a chandelier yourself, technologically and lighting technology. There is nothing particularly complicated here; this is something like Moliere's character, who, it turns out, has been speaking prose all his life. But it doesn't hurt to know some of the basics. Moreover, the original harmonious design (which is by no means abandoned) also requires a reliable foundation, otherwise what is beauty to hold on to?
Note: for example, how you can make a chandelier in the living room with your own hands at home, see the video below. By design, it will go into the interior of any style that accepts clear forms, and this is a very wide range, from Chinese Mandarin to fusion.
Video: DIY chandelier from scrap materials
Therefore, the subtleties of design and construction of the main lighting and at the same time decorative elements of the chandelier -; luminaire frame / supports, which are also important as part of the overall design -. It will also not be superfluous to learn about the general lighting design of residential premises. And in this article, we will deal with what they all have in common, plus the electrical part:
- Lighting technology and construction - the very beginning for household premises;
- Electrical fittings, mainly in terms of safety;
- What to make a light armature, with an emphasis on the possibility of making it from scrap materials;
- Features of chandeliers for residential premises for various purposes;
- The choice of light sources for a particular chandelier.
Note: those who doubt why there are any depths, let it be known - homemade lamps are firmly in the top ten for household electrical injuries, fire hazard and as a cause of blurred vision, especially in children.
What shouldn't you be afraid of?
Wood and woodwork. Looking at the curly wooden details of industrial chandeliers, it seems that it is impossible to reproduce them at home. Meanwhile, a completely pretentious frame of a chandelier made of wood can be made in a day or two with your own hands in the kitchen or on the balcony.The fact is that wood, when heated throughout its mass to 150-250 degrees, softens and bends, and when it cools down, it retains its shape. You can heat a piece of wood to such a temperature without charring it with a building hairdryer. You just need to remember to pre-drill the axial holes (say, for wiring an electrical cable), this will be impossible in an already bent part.
Note: the easiest way to bend is light or medium-density fine-grained wood - birch, maple, ash, linden. Bamboo and some species of tropical wood are generally bent heated to 90-100 degrees by steaming in water vapor. Due to the homogeneity of its structure, MDF bends very well and accurately, but requires more heating.
Finally, a completely elegant wooden chandelier can be made of non-bent parts: modern light sources allow such a solution to be realized. Then the ceiling lamp is made in the form of a chandelier-plafond, see below.
What should you pay attention to?

Old Soviet chandeliers and household lamps in general. The USSR, as you know, was a very ambiguous phenomenon, which was especially clearly expressed in Soviet consumer goods. If you have an old home chandelier of "soviet" production lying around in your closet, then its light-scattering / light-transmitting parts are probably made of high-quality glass, and porcelain / earthenware decorative ones are made of the same high-quality material. Let 1 "horn" out of 4-5 be broken, the remaining ones for a new homemade chandelier will be enough. Has the paint peeled off? Now on sale there are any washes and excellent acrylic enamels. Some of the "hangings" are lost? From others, you can also build something very beautiful, there would be fiction and taste.
Lighting and vision
Approximately 10 years ago, the throughput was measured quite accurately according to the information of the optic nerve. It turned out to be 5-6 times less than the amount of information in the picture that the optical system of the eye draws on the retina, and scientists had to finally admit it as a fact: somewhere in the eye lurks something like a video processor... Suspicions about its presence arose 200 years ago, because certain visual illusions do not depend in any way on the physical and mental state of the subject. I had to admit, but now it is a certainty that the picture does not enter the brain raw, but somehow processed. From the point of view of lighting technology and the influence of the nature of lighting on health and well-being, this fact is also important: a good lamp should give light not only bright enough, but also even, soft, allowing you to clearly distinguish details of different colors and not tiring the eye.
Note: Let us remind the reader that the picture on the retina is captured by two types of photoreceptors - rods and cones. The former are the most sensitive, but perceive only the general brightness, so at night all cats are gray. Cones of 3 types, perceive separately the red (R), green (G) and blue (B) areas of the color spectrum. We also recall that the eye is most sensitive to green rays, somewhat less to red and least of all to blue.
Light source spectra
Light with a continuous spectrum is least fatiguing to the eye, pos. 1 in fig: all visible details of the object are more or less evenly lit. If the spectrum is limited, then those that do not fall into it are simply not visible. The processor of the eye does not need to "finish drawing" anything, and this is what most of all tires the vision and spoils it.

The point is that for the "completion" of poorly discernible optics of the eye must constantly and often refocus, and the photodetector system must change its accommodation, i.e. general level of sensitivity. This procedure is in some way analogous to working out details in Photoshop by normalizing levels and "pulling up" thin curves, but those who know how to do this know: a very sluggish initially picture, if you absolutely need to "stretch" the details, coarsens to "tattered". And if we are talking about our own vision, the brain eventually begins to understand the "dud" as a norm, accordingly reconfiguring the muscles of the eye and the algorithms of the visual processor, which leads to visual impairments.
Unfortunately, of the light sources suitable for safety requirements for domestic conditions, only incandescent lamps, conventional and halogen, give a continuous spectrum. First, they are uneconomical according to modern requirements. Secondly, their spectra are thermal and therefore have a strong blockage in the blue region. That is, it is impossible to achieve the correct color perception under such lighting.
Nevertheless, incandescent lamps in household lamps are quite applicable: over millions of years of evolution, the human eye itself has become accustomed to correcting for yellowness, and visual disturbances with such lighting are possible only from insufficient or excessive brightness. As for sodium lamps, which shine only in the yellow region, their light is also harmless for vision, but there is no need to talk about any adequate color perception.
Almost perfect color reproduction allows achieving a synthetic, or additive spectrum, with the lowest possible visual fatigue, pos. 2... There is no need for the eye processor to overstrain: the tops of the R, G and B zones go beyond the optimal illumination level for a given overall brightness, and at their junctions, the restoration of full detail requires a simple addition of partial (partial) pictures in the corresponding colors. As a result, the overall white level is almost linear and details of any color are clearly visible, and the gray tones smoothly merge into each other.
And again, unfortunately: only the screens of good cathode-ray tubes (kinescopes) give an additive spectrum. Fluorescent lamps (housekeepers) with 3-4 layer phosphor, individual samples of LED illuminators and TFT display screens will slowly but surely approach it, however, it is still far from a complete solution of the problem. Therefore, experienced and caring about their eyesight (which in this case is also the main working tool), graphic designers, photographers and artists working at a computer, stubbornly cling to "tube" displays, buying professional ones at ridiculous prices or looking for used ones. shrunken tube.
Note: light from sources with an additive spectrum is usually called extremely soft. In nature, extremely soft lighting - morning with light cloudiness, when the sun's disk shines through the clouds a little.
In everyday life, an acceptable softness of light can be achieved by its sources with an island spectrum, pos. 3... It looks like 3 solid limited ones, but this is the case when quantity turns into quality: having seen 3 zones of primary colors, the eye will definitely try to consider what is in between. In the gaps between the islands, something else can be seen, albeit at a level of illumination that is significantly less than optimal for a given accommodation. The peaks of the islands are also quite strongly lifted up, but also within the permissible limits.
The island spectrum is given by most housekeepers and good LED lamps; how to distinguish them immediately upon purchase from, let's say, not very good ones, see below, in the section on illuminators. It is undesirable to do work in such a light that requires eye strain, but you can read / write 3-4 hours a day.
The island spectrum has 2 features that are important for household lighting. First, it can be significantly softened with the help of light-shaping devices, see below. The second is that the “tails” of red and blue do not go to the IR (infrared) and UV (ultraviolet) regions, but to the edges of the visible spectrum they fall to black. Therefore, if the details of a certain color in the island lighting are poorly visible, increasing the overall brightness will only harm vision. In this case, it is necessary to use local lighting with incandescent lamps or housekeepers / LEDs of a different color temperature, their spectrum islands will be located in a different way.
The most harmful spectrum for vision is the line spectrum, pos. 4... In it, firstly, very narrow zones of primary colors do not overlap. Secondly, in order to create sufficient overall brightness, it is necessary to "lift" the peaks of the lines, especially the blue ones, above the maximum allowable. The light seems to be not very bright, but it hurts your eyes. In general, everything seems to be visible well, but the details are lost somewhere and you can't see it in any way, even though your eyes burst.
This light is called extremely hard. It is provided by cheap LED lamps and some models of housekeepers with a 1-layer phosphor. It is not possible to soften it with light shapers, because in the gaps between the lines, nothing is illuminated at all. With prolonged use of such light, it is possible to develop not only myopia / hyperopia, but also various disorders of color perception (the eye processor is overstrained uselessly, trying to see the invisible), and even retinal detachment.
Electrical fittings
The gross and most often entailing undesirable consequences of violation of the safety rules during the independent manufacture of chandeliers - hanging them by the electric cable: its end is passed into the socket of a light bulb, tied in a knot, so everything hangs on weight. A chandelier, even the lightest, must be suspended on a separate rod, rigid or flexible.
Everyone knows the rigid suspension of the chandelier: this is a tube into which a cable is stretched... Traditional flexible suspension - chain; the cable in this case goes through the links. Now on sale there are also special cables for chandeliers, in them, in addition to 3 wires under a common sheath, there is also a strong rope for suspension. It needs to be taken out and fixed in 2 places: at the top to the hook and at the bottom to the chandelier frame, otherwise the rope may creep out over time and the chandelier will hang on the wires. When hanging on a separate cord, the cable must be looped around it in several turns (and not vice versa!) And secure the ends of the "snake" with tape or, not tightly, with a soft thread.

Abnormal situations with chandeliers most often occur at the place where wires enter the bulb holder, therefore, the cartridges must also be attached to the frame separately. The most convenient for this is the E17 cartridge for a minion lamp (candle lamp) with a screw clamp for the fastening lamella (shown by an arrow in pos. 1 fig.). If the frame is made of tubes, the lamellas are obtained by flattening their ends. Lamellas made of a strip of steel with a thickness of 1-1.5 mm and a width of 10 mm can be attached to the wooden frame with small self-tapping screws.
E17 chucks with end clamp (shank), pos. 2, are less convenient for a home craftsman, because the clamp is secured with a pair of nuts, under which threads must be cut on the tube. If there is enough space in the chandelier, in this case it is better to use the E27 cartridge (regular, "plump") with a side clamp, pos. 4. The clamps can be carefully folded to obtain the desired orientation of the lamps. And, finally, in chandeliers with a single light bulb, it may be more convenient to find an E17 or E10 cartridge (superminion) with lugs for fastening, pos. 5, but the places where the wires are connected to such should be carefully insulated.
Note: Ordinary bakelite cartridges E27 can also be fixed rigidly; for this, there is a special thread in the inlet fittings of their caps. But the same thread must be on the tube to which the cartridge is attached, and there are no hand taps for it on sale.
About installation and connection
It is possible to power a chandelier with a total power of up to 60 W from the mains with a cable with a conductor cross-section of 0.35 sq. mm; up to 120 W - 0.5 sq. mm; up to 300 W - 0.75 sq. mm. A double insulated 3 core cable is used. A "ground" (yellow with a longitudinal green stripe) wire is connected to the neutral wire of the network, and the remaining 2 wires are connected to the phase wires coming from the switches of the chandelier sections.
Note: it is unacceptable to search for a phase with a control lamp by flipping switches! You need to use a phase indicator!
The connection of wires to the terminal blocks of the lamp holders and, in general, the wiring of the chandelier is carried out at the bottom step by step in the following order:
- Make sure with the help of a phase indicator that there is no voltage on the wires and no one can accidentally flip the switch. To do this, their levers can be temporarily sealed with tape.
- From the ceiling ends of the cable, a temporary hut is thrown to the floor from a cable with conductors no less than the standard cross-section.
- The ends of the standard chandelier wires are cleaned, its common input is connected to the temporary house. Don't forget to insulate the connections!
- Disassemble the cartridge.
- Insert the end of the cable into the lid of the cartridge through the standard hole.
- A lock washer is put on it to prevent accidental pulling out of the chuck. As a last resort, they tie the cable into a knot.
- Close up the bare ends of the wires into the terminals. Stranded wires are twisted before termination and, preferably, tinned so that the veins that come out do not arrange a short circuit (short circuit),
- Insert the terminal block into the cover, placing it with recesses on the corresponding projections in it.
- Check if there is a small loop of the cable under the cover and if it is pulled out.
- Holding the terminal block so that it does not jump off, screw the cartridge case onto the cover.
- At the end of the installation, the sections are screwed in the lamps, checked by turning on the acc. switch, are they lit evenly.
- They again block the switches from accidental switching on, remove the temporary hut.
- , connect its input to the ceiling ends.
- They check: it lights up evenly, does not blink - the installation is over, you can use it.
Light armature
The light fixture of the chandelier (light shaping system), firstly, directs the light in a way that is appropriate for this type of room. Secondly, it softens it by reducing the surface brightness of the illuminator. And for light sources with an island spectrum, another favorable circumstance appears.
In school and even general university courses in optics, in order not to confuse students too much, it is believed that when light is scattered, reflected and refracted, its frequency remains unchanged; this makes it possible to visually deduce their basic laws. In fact, there are no absolutely linear media, and a certain fraction of light quanta in these processes is re-emitted, due to which it changes its frequency and, consequently, color. That is, the “tails” of the spectral islands receive a small brightness “feed”, which facilitates the work of the eye processor; this is tantamount to additional softening of the light.
Work processes
The light fixtures of household luminaires mainly use diffuse reflection and scattering of light. Specular reflection is of little use because does not by itself diminish surface brightness or soften light. Refraction is widely used in transparent media: crystal pendants not only give a pleasant play of light, but also significantly soften it without significant loss of luminous flux. And finally, in some cases, for example. in thread lampshades, a noticeable fraction of diffraction takes place in the formation of the luminous flux.

Note: with diffraction and shadows, in general, you need to be careful. The light in the room on the left in the figure can cause a nervous breakdown in an adult, and the thorny rays from the lamp on the right in the same place will not benefit the eyesight. Here the fact is that the light intensity in the peaks of the diffraction pattern can be much higher than on the primary emitting surface.
Forming elements and systems
The softening of light and the formation of its required directional pattern (DP), see below, using refraction in transparent media and / or mirror / total internal reflection requires a large number of such optical acts: in each of them the light losses are small, but the degree of light conversion is also small. flow, because transparent media are transparent because their nonlinearity is manifested to an insignificant degree. Traditionally, this requires many refractive elements with high optical properties; hence, expensive or affordable on a case-by-case basis. Now, amateur craftsmen are rescued by plastics: an original chandelier on refraction and re-reflections can be made generally from waste material, see below. The appearance of such chandeliers is "airy"; service life - 1-3 years.
If crystal pendants are not available, you will have to use scattering and diffuse reflection. The light loss will be greater, but in this case it is possible to do with the materials at hand: it is enough to obtain only 1-3% of nonlinear optical acts in the entire lighting system. A conventional light meter with a set of light filters does not catch such a number of "left" quanta, but it will be enough for the illumination of the gaps between the islands of the spectrum to rise above the "bottom" of the accommodation range and the eye does not work hard.
Light formers based on diffuse optical processes are based on 3 elements: a plafond, a lampshade and a diffuse reflector. Plafond, pos. 1 in fig. - a cap made of frosted glass or a material similar to it in terms of optical properties. Outward, light can come out of it only after undergoing scattering. For the further formation of the luminous flux, the optical properties of the room do not matter or have very little.

Lampshade, pos. 2, part of the primary light is released outward without conversion; not necessarily down. The softening of the primary light spot is achieved by illuminating it with diffused light reflected from the walls and ceiling; therefore, the optical properties of the room in this case are essential. They become decisive for the diffuse reflector, pos. 3, however, this lighting system, by changing the degree of transparency of the reflector (s), their size, configuration and location, makes it possible to form various patterns.
Chandelier light systems are usually built by combining elementary shapers. For example, at pos. 4 is a well-known chandelier of staggered concentric lampshades, complemented by a small, almost flat shade. At first glance, the light loss in it should be great, but remember: to illuminate a school gym with an area of approx. 400 sq. m and with a ceiling height of 6 m, there were enough uneconomical incandescent lamps for a total power of 800-1200 watts.
Among the new lighting systems are the ceiling chandeliers, pos. 3. They are so named because they are both lighting and architectural ceiling shades, see photo. The essence of this type of optics is that in a trap chamber, primary quanta undergo multiple reflections and the light comes out strongly softened.

Materials for light systems
About purchased chandelier elements made of glass or special plastics, you can notice that:
- The glass should be mirrored, colorless or pure white when broken.
- For any light sources, except for incandescent lamps, it is better to take optical parts that are matted not from the surface, but in bulk, the so-called. dairy, the desired degree of transparency.
- It is undesirable to use acrylic computer disks in light systems: a translucent metal layer in them only uselessly absorbs light, and an almost completely transparent and colorless optical acrylic does not significantly transform the luminous flux.

Good homemade chandeliers come from food grade PET bottles... The refractive index and transparency of PET (polyethylene terephthalate) are quite high, which makes it possible to achieve significant softening of light with low light losses. PET bottles are available in various color shades and translucent, due to which the chandelier can be built on the basis of both refraction and re-refraction, and diffuse processes.
In addition to its low cost and availability, a significant advantage of PET is the ease of processing at home and, in skillful hands, good decorative qualities. For example, how to make flowers from bottles, see the master class at the link: //www.youtube.com/watch?v=8TXXoiTLhVA
Floral decor will not only decorate the chandelier, but also, due to the increase in the number of refractive surfaces, will significantly improve its lighting technology. Other options for optically useful and beautiful decor from plastic bottles are possible, but we will leave them for the article on lampshades.
Other plastics for chandeliers with economy lamps are also suitable as reflectors. For them, you need to take the material as whiter and slightly rough as possible or with a satin gloss. Semi-transparent parts made of household plastics are not very good, because most often chalk or talcum powder with coloring additives is used as a filler. Light loss in such will be great, and softening of light - only due to a drop in surface brightness. It is preferable to use propylene, because PVC from light turns yellow pretty soon and becomes brittle.
The second very good and affordable material for the optical system of the chandelier is paper.... If the lamp is LED, then a paper chandelier with it will last for several years: the paper turns yellow and loses light transmission from heating and UV exposure, which LED lamps give almost or not at all.

The light transmission of the paper components of the chandelier is selected by choosing a material of the appropriate density, from 20 to 220 g / sq. m. The reflective properties of modern writing paper are practically flawless: with a whiteness coefficient below 0.8-0.85, it is simply not produced. By the way, some cunning manufacturers operate with whiteness coefficients of 1.05 and even 1.15. By what measurement technique they reach over-unity values of the quantity, which, in principle, cannot be more than 1, who knows. But from the point of view of physics, this is a ridiculous absurdity: I put such a leaf in front of a mirror, between them - a solar battery, once I shone a flashlight, here you have a perpetual motion machine of the second kind. Or a fertile topic of discussions on the forums of technomists. What's wrong with that? Since KB> 1, then a leaf of light and, accordingly, its energy emits more than it receives.
Note: a 60W incandescent bulb can heat up to more than 100 degrees Celsius. Therefore, for chandeliers with shades, lampshades and reflectors made of plastic, fabric, textiles and threads, incandescent lamps of no more than 40 W should be used, and halogen lamps - up to 15-20 W.
Video: a master class on making a chandelier from a rope or thread
Chandelier in the room
The main types of DN for lighting household premises are shown in Fig. A shade forms the cardioid, it is a light for small bedrooms, children's rooms, hallways. The dip at the top is formed by the shadow from the base. A children's chandelier should be equipped with a spherical shade, strongly, but without excessive light loss, scattering light. Especially soft and, very desirable, shadowless lighting in the nursery is necessary so as not to harm the vision that has not yet strengthened. Therefore, the shade of a children's chandelier is best made of paper, and refractive materials for it should be avoided.

An 8-point pattern is obtained using several diffuse reflectors and a well-whitewashed ceiling, for example. drywall. Such light is necessary in a fairly large living room with free space in the center, office, and other rooms where areas are illuminated by local light sources.
A fan-shaped DN is given by a simple lampshade, and a petal one, directed by the aperture (bell) upwards. Petal DN are typical for sconces, which are not quite in the subject here, but chandeliers with fan DN are suitable for a small living room with a dining table in the center or in the kitchen. Especially for the latter: light contributes to the deposition of vapors of organic substances and their bituminization in the liquid phase, so there is no need to illuminate the ceiling here, let it be better for the potential soot to go into the hood.
Note: the most uniform illumination of the floor area with the minimum consumption of electricity for lighting gives the so-called. cosecant-square DN. However, it turns out with the help of very complex lighting devices, the walls and ceiling must be illuminated separately. It is mainly used for lighting large industrial premises, open areas, sports facilities, etc.
Chandelier lamps

Not all manufacturers of household lighting lamps give their spectral characteristics on their websites and in specifications, therefore sellers often do not know them. As for economy lamps, it is easier for an ignorant buyer: the spectrum is unknown - we take on a color temperature of 4300 K. In the worst case, we get a continuous limited spectrum. He will not allow to consider in all its glory a color postcard or illustration in a book, but it will not hurt your eyesight. Visually, this light is almost white with a slight yellowness. The electric power rate of such lamps is 1.8-3.4 W per 1 sq. m of illuminated area depending on the configuration and overall tone of the room design.
Note: phyto lamps for flower shelves, greenhouses / greenhouses and aquariums cannot be used for general lighting. Their spectrum is sharply linear, it is useful for plants for photosynthesis, but not for humans for sight.
LED lamps are selected, firstly, for a color temperature of 2800-3300 K, yellowish. Whites tend to have a linear spectrum, which is immediately noticeable: their light hurts the eyes even in a naturally well-lit trading floor. According to visible design features, you should choose glob lamps with a matte bulb and its deep shank, pos. 1 in fig. If you liked the "corn" lamp, then you need to be guided by the following signs of poses. 2:
- The LED assembly must be covered with a translucent bulb, this first of all guarantees the durability of the lamp. "Naked corn", with luminous structures under a protective film, is sensitive to dirt and, in general, external influences.
- The number of individual emitting structures should be at least 15-20.
- "Kochan", i.e. the shell-holder of the emitting structures must be transparent. In combination with the pre. As a condition, this will give a greater number of reflections inside the bulb, a greater uniformity of the primary light and better opportunities for the formation of a luminous flux.

In order not to "fall" on the line spectrum, one should also avoid imitations for globes and "corn" in the form of lamps with a transparent bulb sitting directly on the base, and a small number of emitting structures, pos. 3. Illumination from them in a small room will be visually uneven, and the spectrum is most often linear. Also, LED lamps of directional light, pos. 4. They are intended for auxiliary / service lighting and are harmful to the eyes with prolonged use.
Sooner or later, the moment comes when the homeowner is firmly convinced that the interior of his apartment needs adjustments and certain changes that will diversify it and place the necessary accents. What, in your opinion, is the most successful interior detail in terms of decorative and functional indicators? Undoubtedly, these are original lighting fixtures. You can realize this by organizing the correct lighting of the room, which sets the sound for the entire interior, an integral element of which are shades for lighting fixtures. They, being the central element of the interior, give the room originality, and the lighting - unusual. If you have not carried out repairs in the room for a long time and have not planned a budget by including the cost of lighting fixtures in it, you can make lampshades for the chandelier yourself. To do this, it is enough to develop an interior concept, choose a lamp design and make it yourself from scrap materials. And so that you can carry out your plans as efficiently as possible, in our article we will tell you how to make a plafond for a chandelier with your own hands.
DIY chandelier shades: a variety of ideas and materials
At all times, hand-made things were appreciated. They will become not only an original interior decoration, but also the best souvenir for your friends, acquaintances and relatives. What is required to create a luminaire? The basis of any handmade product is an original concept. If you have already decided on the concept of the future product, you just need to make an original frame for the chandelier and stock up on materials at hand, using which you can realize your ideas. Fortunately, there are enough such materials. As a decor for a future exclusive product, you can use the most unexpected materials:
- woolen threads;
- wire;
- Balloons;
- lace;
- cupcake molds;
- paper;
- wine bottles;
- glass jars and many other materials at hand.

If you are faced with difficulties when choosing lamps, you cannot choose a shade for a chandelier that suits the interior style, or you have found the necessary model, but its cost exceeds the cost of a crystal chandelier, we offer you a selection of step-by-step instructions for making designer lamps. As you can see, there is a sufficient number of original ideas, and if you asked the question: "How to update the ceiling on a chandelier with your own hands?", We advise you to adopt the ideas proposed by our experts.

Wine bottle chandelier shade
To start implementing some ideas, just a desire is enough. A person who has firmly decided to carry out his plans, without fear crosses the boundaries of the unknown and successfully implements his plans. If you have no experience in constructing a frame for lighting fixtures, but you really want to do it yourself, you will need a sufficient amount of information, which you can find in our article. Below you will find step-by-step instructions for creating designer shades for chandeliers, which were made by ordinary people who previously did not have an idea of how to make them from improvised, at first glance, unnecessary materials.

So, let's look at how to make a shade for a chandelier from wine bottles.
- The first step involves trimming the bottom of the bottle. To do this, draw a straight line on the bottle. It will be required in order to cut off the bottle bottom using a glass cutter;
- In order not to injure your hands with the cut glass later, sand the sharp edges with sandpaper;
- Pull the wire through the neck of the bottle. After it is inside, connect the socket and the lamp;
- Choose a base for fastening and connect the bottles to the selected frame;
- You can decorate the bottle with different materials or leave it intact;
- The number of bottles taken for the chandelier is variable and can range from one to five to seven or more bottles.

Plafond for a chandelier with your own hands from threads and balloons
The simplest lamp can be made from threads. The instructions for making such a lamp are so simple that even a child can cope with it.

- Threads. It can be ordinary jute twine or thick cotton threads, the total length of which is no more than 100 meters. The selection of colors is carried out taking into account your taste preferences and the color concept of the interior;
- PVA glue and a brush, using which you will apply it;
- 2 balloons. You will need one of them for work, and the second for verification. It is recommended to use a round ball, which will ensure the correct shape of the luminaire;
- Petrolatum.

To make a lamp from threads, follow the step-by-step instructions below:
- The balloon is inflated to the desired size. It is important to remember that the finished thread lampshade will repeat the shape of the ball. Use a marker to draw one or two circles (top and bottom). In this case, the circumference at the bottom can be larger. They are necessary in order to delimit the area of the winding of the threads;
- PVA glue is poured into a container and the threads are carefully processed. Using a brush, coat the ball with petroleum jelly.

Important! Do not apply glue along the entire length of the thread. It is best to overcoat as it is wound.
- Taking into account the holes obtained after you have drawn two circles on the ball, wind the threads. Please note that the appearance of your future lampshade depends on the density of the winding;
- After you have wrapped the ball, leave the future chandelier for at least 24 hours until it dries completely;
- After the shade of threads has dried, the ball bursts, and its remnants are removed from the lampshade that has become durable. The result of this work is a solid thread lampshade;
- A hole for the cartridge is cut in the upper part of the ball;
- Finally, check the strength of the lampshade. For this, another ball is inserted into it and inflated. With this technique, you can appreciate the flexibility of the design.

Having made several lamps in accordance with the presented step-by-step instructions, you can install local lighting in the kitchen or hang a thread lamp in the dining area.
Important! As an additional decoration of the chandelier, you can use original coloring, artificial flowers or butterflies, beads. A non-standard idea would be to make several balls, which are held together in such a way that they resemble a bunch of grapes.
Using the considered principle of making lamps, you can create original shades decorated with lace.

Plafond for a chandelier with your own hands photo


Shabby chic chandelier shade
You can create dramatic lighting in a room by making a lamp from fabric or beads. The result of your work will be a chandelier-chandelier or shabby chic lamp.
To do this, you will need the following materials:
- Wire, metal hanging pots, old hoops or garden basket, from which you can make a frame;
- Lamp holder;
- Decorative chains and strong threads;
- Various beads and beads.

The plafond, made according to the technology discussed below, is a two- or three-level structure of several rings, which are located one above the other and connected by wire or chains. Depending on the size of the rings you choose, the style in which your shade will be executed will depend. If you take rings of different sizes, you can create a shade in the style of a vintage classic, and by opting for rings of the same size, you can become the owner of an Art Nouveau lamp.
Important! Before proceeding with the decorative design of the lamp, which involves stringing beads, paint and wind the frame with decorative materials.

Consider the consumption of beads during the implementation of this project:
- In the process of making the lower part of the lampshade, you will need 15 beads with a diameter of 16 mm per thread;
- In the process of making the upper part, you will need beads with a diameter of 12 mm at a consumption of 31-32 pieces per thread.
- By stringing the beads onto a string, you can vary the number of strands and the degree of tension.

Similarly to the described method, you can make a shade for a chandelier made of artificial fruits. To create the effect of subdued lighting, a thick fabric must be used for sheathing the frame. A lampshade made using this technique will become an original addition to a country or Provence style kitchen.

Minimalist chandelier shades
A lamp shade for a chandelier made of plastic cans or bottles will become one of the most original lampshades made of waste materials. By making a plafond in this way, you are betting not only on beauty and cheapness, but also on environmental friendliness.
Due to the fact that for the manufacture of such a lamp shade for a chandelier you will not need additional decorations, such as beads or threads, it will be made in high-tech or minimalist style, and you will not be faced with the question: "How to decorate a chandelier shade with your own hands?" ... In order to make such a shade, which will become the main element of the muted lighting of the room, you only need colored or matte white plastic.

To make it, you will need the following materials:
- Base from a 5 liter plastic bottle;
- A large number of disposable spoons;
- Socket with lamp and wire;
- The glue required for high-quality fixation of the product elements;

To make a lamp from plastic materials in the style of minimalism, you need to cut off the bottom of a plastic bottle, and handles for plastic spoons, and this must be done in such a way that they have a small handle. Using glue, fix the cut spoons to the bottle serving as the base. To achieve the most attractive and organic homemade lampshade, arrange them in an orderly manner, in rows. Each next row must be overlapped, leaving no gaps that can spoil the appearance of the lampshade.

When the chandelier is ready, you will notice that it resembles fish scales. At the same time, it is important to remember that the design of the plafond is characterized by a sufficiently high density, and therefore, the lighting will become so muted that, most likely, you will need to place additional lamps in the room.

The shape of the luminaire can be different. One of the options involves a lotus-shaped lamp. However, other, no less original decorations can be made from plastic spoons.

Another option for lighting fixtures made, one might say, from waste, is a shade for a chandelier made from the bottoms of plastic bottles. It will appear lacy and, at first glance, consist of many small flowers.
Important! A lampshade made of plastic bottles can be not only white, but also colored - therefore, you will need to choose a colored bottle or paint the finished product in the desired color: from gold, copper and steel to pink and black. If you hang a ready-made lampshade in the kitchen above the table, it will be a great addition to the dining area.

A variety of ideas for decorating chandelier shades with your own hands
How to dim the lights in a room?
One of the "tools" for creating an intimate atmosphere in the room is the organization of dim lighting, and the main way to implement this venture are lampshades, which first appeared more than two hundred years ago and replaced their predecessors - dampers for candles and torches. If earlier they were made only of fabric, then today crystal and broken glass are used for their decorative design. Today, the art of design has reached the apogee of its development, as a result of which the decorative design of hand-made products can be carried out using almost any material.
Important! Today, a designer in the process of his work is not limited in the choice of materials for decor - in the process of making lampshades, he can use any details. At the same time, it is important to preserve a sense of proportion and taste by creating harmonious combinations of decorative elements.

A cozy hand-knitted lampshade will be the best gift for a mother or grandmother.
Original lampshades for handmade sconces
Sconces are multifunctional wall lights. Thanks to the diffused and dim light they create, they can be placed in recreation areas and not be afraid for their eyesight. Today there are modern sconces that involve regulating the flow of light into the room. Such models must be installed in rooms, during the operation of which it is necessary to change the direction of light flows. If you want to become the owner of designer, unusual sconces, create them yourself. Hand-made wall lamps, during the creation of which you can show your individuality, will most successfully fit into the holistic concept of the interior of your room.

Sconces made of branches are distinguished not only by their quick and simple manufacture, but also by their original appearance.
The style of hand-made shades can be different and depends on the stylistic concept of the interior in which you plan to place them. In this regard, we can safely say that the answer to the question: "How to paint the ceiling of a chandelier with your own hands?" strictly individual.

If you complement the sconce with the interior of the children's room, you can diversify the room, making it bright and perky. By hanging a sconce in your bedroom, you will make it more comfortable, adding a touch of peace. Dinner in the kitchen decorated with sconces will become more romantic.

The baby's room can be decorated with a sconce in the shape of a birdhouse. To do this, it is enough to fix the birdhouse on the wall and bring a lamp with a shade in the middle.
DIY decorative LED lamps
Due to the growing popularity of LED lamps, they are used not only in work, but also in households. One of the advantages of LED lamps is the ability to make them yourself. To make an LED design at home, you need separate LEDs that are installed in the body of a faulty lamp equipped with a power supply.

To replace a traditional incandescent lamp with an LED one, you do not need to dismantle the luminaire or make adjustments to its design. Self-made LED lamps are most often part of decorative lighting, more often - the central element of ceiling lighting.
A variety of materials can be used to make stylish LED luminaires:
- metal;
- the cloth;
- beads;
- LED Strip Light;
- old lamps.

Variety of LED lamps
LED lights made from fabric can be used to decorate rooms and even clothing displayed at fashion shows. The use of LEDs allows you to place the necessary accents on your tapestry.

This DIY beaded LED lamp will become a work of art, eye-catching and delighting others. Beads can be used to make both small table lamps and large-scale decorative panels with backlit beads.

If you plan to use a handmade lamp as a decorative piece when decorating an interior in a classic style, it is recommended to use metal elements for the base in the process of making it.

The procedure for manufacturing a LED lamp from an LED strip
The LED strip is a flexible board with built-in LEDs and current limiting resistors. You can cut a section of the tape to the required length to make the luminaire. The supply wires are soldered to the contact pads located next to the cut lines. There is an adhesive tape on the back of the board. You can use ordinary scissors to cut the tape.

An old, used lamp can be used as a body for a homemade lamp.
The procedure for making an LED lamp from an old lamp is not difficult.
Disassemble the old lamp by gluing LED strip to its inner surface. A printed circuit board removed from an old lamp can be used as a power supply for a new lamp. The instructions for manufacturing a luminaire presented in our article assume the use of a transformerless power supply equipped with a ballast capacitor.

A lamp made in accordance with the presented diagram is suitable for illuminating the working area.
After completing a selection of circuit elements, place them on the board. In this case, unnecessary parts from the old luminaire must be removed. After that, connect the tape to the power supply, assemble the lamp and connect it to the network.

LED lamps are more relevant than ever. They can become both the central lighting element of the room and its decorative component. After reading our article, you are convinced that making lamps with your own hands is a fairly simple and, at the same time, creative event, and as for the use of homemade lamps, you can find it yourself.
The stores offer a huge range of lighting fixtures for any room. But a do-it-yourself chandelier in the kitchen or in another room will become a truly exclusive option for home decor. You can't find another one like this, but the process itself will bring pleasure.
Materials and safety
In the process of working on a particular model of a homemade chandelier, materials at hand will be used, which means that the total cost of the device will be minimal, but the exclusivity of the product will be maximum. When choosing a material, you should take into account the following points:
- It must be non-flammable. Still, it is used to create an electrical device, and there is a risk of fire.
- Determine what type of lamp will be used. So, fluorescent and LED sources practically do not heat up, but incandescent and halogen lamps - on the contrary.
- Feasibility of use. It is worth remembering that it is not always possible to make a homemade product the first time, the material must be chosen so that its damage is not a problem.
- Since the chandelier will be used in the kitchen, the material of the lampshade and shades should be easy to clean, and the elements of the lamp should be removable.
- A homemade chandelier cannot be suspended from an electric cable, no matter how light it is. For hanging, use chains, special tubes (soft or hard).
Most homemade chandeliers are made in the form of a single shade or closed lampshade. Therefore, you should not count on too much luminous flux. Such a lighting device will definitely become a central element in the kitchen and will attract attention, but it is imperative to provide additional light sources to it.
Homemade chandeliers provide little light, although they can be very themedFrom threads
This material, which is at hand or you can buy it quite inexpensively, will help you create an original light chandelier. If you choose white threads, then the chandelier can be easily painted in any color. The size of the chandelier can be anything, it depends on your desire. The appearance of the product is simple, which will allow it to fit into the interior of any kitchen, but at the same time it is original.
Important! The basis of the lamp is threads; you can use thick cotton, but not woolen.
In work you need: threads, PVA glue, a brush, a round balloon of the required size. Creation order:
- Inflate the balloon, draw a circle at the base of it.
- Pour the glue into a container into which it will be convenient to immerse the threads.
- Wrap the threads on the ball, pre-soaked in glue, in a chaotic manner, bypassing the circle area that was drawn in the first step. To simplify the process, you can pierce the bottle of glue closer to the bottom and thread it there. So it will be evenly wetted with glue.
- When the wrapping is completed, the ball should be suspended and the threads dried. Depending on the size and layer of wrapping, this will take about 24 to 48 hours.
- When the future lampshade is completely dry, it is tedious to remove the ball, having previously blown it off.
- It remains only to choose the size of the cartridge and connect the wires to it.
 Step-by-step production of a chandelier from threads
 Advice! In a large kitchen, 2-3 or even more of these small lamps look good. They can highlight certain areas. It is difficult to obtain a powerful luminous flux from them, but their effectiveness is at a high level.
Using the same algorithm, you can create an original openwork chandelier. The main material is ready-made knitted napkins. They are soaked in glue for 10 minutes, after which they are glued to the ball. They dry longer, about 3-4 days. A similar chandelier can be made from one large round napkin, or from individual elements of any shape. The second option looks very original.
Made of wood
Such chandeliers are extremely simple to create, but their appearance is extremely non-standard. They are not suitable for every interior. It will be possible to fit into the kitchen, decorated in country style, in oriental style without any problems. The kitchen should be large, as it will not work to capture the beauty of this chandelier in a small kitchen.
In the process, you can use both massive beams and vines and even bamboo sticks. Homemade wood chandelier options:
- Shoot down 2 bars together in the shape of a cross and place cartridges on them. This is the easiest option to be implemented, even without special skills in working with wood.
- An old wooden spinning wheel comes in handy. If such a rarity is found, then a chandelier can be created very original. The wheel must be sanded, varnished or painted, and suitable shades must be attached, cartridges must be mounted.
- A ceiling lamp made from untreated branches. A very modern option that can complement any eco-interior. The algorithm of work in this case is similar to the process of creating a chandelier from threads. Only yarn is not wound on the base-ball, but branches are glued. This must be done so that each new branch has a fulcrum on the ball and on the already glued ones.
- Another option from branches. Looking for thin, different lengths. Holes are drilled in them through which the wire passes, with its help, fastening to a round base is carried out. A cartridge is installed in the center.
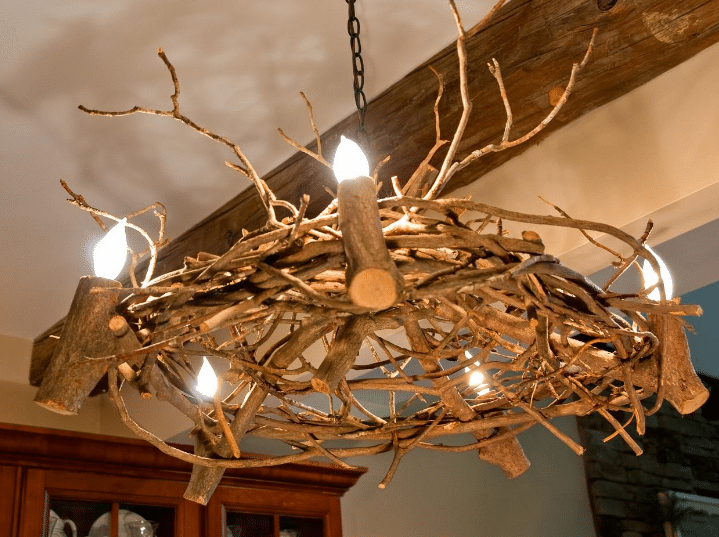 Original chandelier made of branches for country style
 Important! Any wooden elements, be it branches or timber, must be varnished or painted before or after creating the chandelier.
From glass jars
Such chandeliers have an original look and are absolutely safe. Glass is heat-resistant, so even incandescent lamps can be used in such chandeliers. For work, you need jars with screw caps. Step-by-step creation algorithm:
- Make a hole on the lid that is suitable for the cartridge that will be used.
- Insert a socket with a light bulb into the hole and screw the cover.
- Connect.
For such a lamp, you need to provide a suspension, it can be a chain or a rod. A chandelier created according to this algorithm can be:
- With one canopy. Such models are located on the ceiling in the amount of several pieces.
- With several shades. A wooden board or plywood acts as a basis for fixing them. They can also be assembled in a "bundle", which will look even more unusual.
- Glass is easy to decorate. In the process, you can use: twine, a special heat-resistant decorative composition, paints. The latter option will help you create an imitation of stained glass.
 Simplicity and originality - a can chandelier
 Using a similar algorithm, you can make a chandelier from:
- Glass bottles. In them, the cartridge is launched through the neck, the fixing element is a cork plug. The bottom must be removed and sanded so that the edges are not sharp.
- Decanters. The process is similar to the previous one.
- Cups and saucers, plates. For the kitchen, such a thematic chandelier is a real find. Do not forget that ceramic cups are quite heavy, so you need to provide a suitable base and fixing the chandelier itself to the ceiling.
- Forks, spoons. Holes are drilled in their handle, a wire is threaded through them, which is attached along the perimeter to a wooden rectangular or square bar of wood. The cartridges are mounted in the center of the structure.
- Colander, pots, graters, metal bowls, and in general any kitchen utensils that are not in use.
From fabric
Fabric is a comfortable material from which it is possible to create original and intricate chandeliers. The procedure for creating a fabric lampshade for a chandelier is approximately the same, more specifically:
- You need a foundation. It can be an old lampshade, any object of a suitable shape. If the base is metal, then it must be examined for rust spots. If they are, then clean up. If this is not done, the print on the fabric can not be removed or painted over.
- Make glue. We need a composition that is used for gluing non-woven wallpaper. The powder should be diluted according to the instructions, when the glue is ready to immerse the fabric in it, leave for 10 minutes.
- Remove the fabric and place it on the base. It is advisable to make folds along the surface, so the texture of the finished product will look more original.
- Leave to dry completely at room temperature. Depending on the density of the material, this will take 1–5 days.
- The next step is staining. If there are a lot of folds, then it will be inconvenient to paint over with a brush, it is better to use a sponge. Apply several coats as needed.
- It remains only to create the desired decor. In the process can be used: artificial flowers, leaves, branches, ribbons, rhinestones, sparkles. Here, the main thing is not to overdo it, because in the kitchen too decorative chandelier is useless.
 A fabric chandelier can be like this
 Important! Such chandeliers give little light, as their lampshade turns out to be dense. It is convenient to place them on the dining area, this will help to highlight this area. Additional lighting is a must.
Making a fabric chandelier can be much easier. Ready-made lampshade frames, rings, hoops of their metal will come to the rescue. Wrapping them with fabric is no more difficult than wrapping a gift. Using a light tulle, it will be possible to create an original effect and light diffusion.
From beads or beads
You can create a beautiful chandelier from ordinary wooden beads or seed beads. Order:
- Prepare a frame made of metal or other material. In this case, you can even use a frame from an old lampshade. Its state does not matter, since it turns out to be easy to decorate.
- Beads or seed beads are strung on a fishing line or dense strong thread. If beads are used, then it is better to take multi-colored and different shapes, so the lampshade will come out more interesting.
- It remains to fix the threads on the base and attach the cartridge. The threads are fixed with tension or with free sagging, depending on the idea.
Such chandeliers look very original, which imitate large crystal of the last century. Such chandeliers are suspended, a chain is used as a connecting element with the ceiling.
 Chandelier made of beads in the interior
 From plastic bottles
If a lot of plastic bottles have accumulated, they can be used very useful.
The first option is weaving. In the bottle, cut off the neck and bottom, cut the middle into thin strips. The more colors of the bottles, the better, they will also turn out to be colored. Now the base is taken - a metal frame, with rims to pull dense fishing line or pieces of plastic and fix it. Further, the process is creative - weaving according to the principle of creating a wattle fence. You need to weave tightly so that the lampshade keeps its shape.
The second option is a decorative chandelier. Creation order:
- Prepare bottles in the same way as in the previous version.
- Cut leaves, flowers or any geometric shapes of different sizes.
- Finish the edges with a soldering iron so that they twist slightly. You can draw veins to make them look more natural.
- Make branches from copper wire, fix the leaves on it.
- Fasten the branches to the frame.
- The light from the bulb will shine through the foliage to create an interesting effect.
 The process of making a chandelier from a plastic bottle
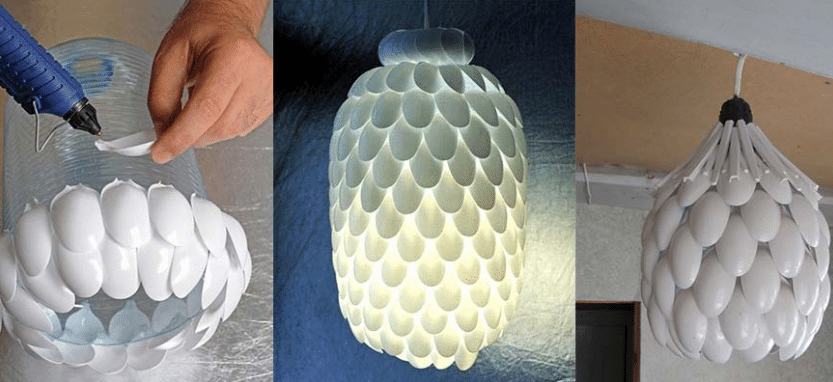
 The third option: from a plastic bottle and disposable spoons. In the process you need: a 5 liter plastic bottle, disposable spoons, a glue gun. Process of creation:
- Trim the bottom of the bottle.
- Cut off the handles of the spoons, only "scoops" are needed.
- Apply glue to the bottle and glue along the rows of the spoon, starting from the bottom. The spoons are placed with the convex side outward.
The result is such a scaly chandelier. It can be painted or left white.
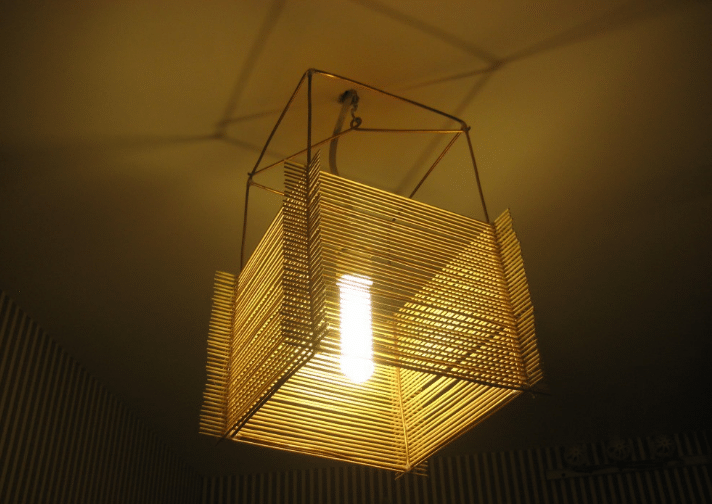
From barbecue sticks
An original country-style chandelier can be created from wooden barbecue sticks. In addition to them, you will need glue and organza tape. Which shape you can choose yourself. The simplest option is a square one, when the skewers are folded like a "house". Fix each stick with glue. Alternatively, you can make a star, hexagon, or come up with another shape.
In the process, it is important that the sticks lie flat on top of each other, otherwise the chandelier will look sloppy. The size of the structure can be of any size. After the glue dries, you can decorate the chandelier with tape. It is threaded through the sticks in any suitable place. It is recommended to varnish or paint over the wooden structure.
 Ready-made chandelier made of wooden sticks for barbecue
 From laser discs
From this material, it will turn out to create an original chandelier with a lively light effect. It can be made in the form of a ball, on the same principle as with a string chandelier. Another option is to cut small elements and string them on threads, which are fixed on the frame.
Discs are a convenient and easy-to-use material, so you should turn on your imagination with them and then it will turn out to create an original decor element.
Important! Whatever idea comes to mind, it is worth remembering that such a chandelier will not be able to fit into any kitchen interior, but perhaps created in high-tech style.
From cardboard, paper
Oddly enough, but even from such materials you can make a very beautiful and original chandelier. It is easiest to make it out of cardboard, for this you need:
- Find a suitable stencil. The outlines of classic-style chandeliers look beautiful. Make 2 identical parts out of it, cut them so that, when connected, they create a volumetric structure.
- Paint the cardboard if necessary.
- Collect parts, reinforce with wire or thread. To do this, pre-make holes.
- It is suspended on chains, a cord is threaded through it. The cartridge is fixed at the bottom.
Using the same algorithm, it will be possible to make a chandelier out of plastic or hardboard. Such materials are much stronger and more durable. In addition, the operation of such a chandelier in the kitchen is more convenient. The elements of the chandelier will have to be cut out with a jigsaw.
Master class for creating a paper chandelier:
- A base is required, it can be an old ceiling chandelier, a circle of plywood or wood.
- Cut butterflies from thick white paper. In this case, it is convenient to use a cardboard template. In the finished product, butterflies of different sizes look original.
- It will fix butterflies on a dense white thread or fishing line. It is convenient to do this with glue, you can also string them through 2 holes on the workpiece.
- Fasten the threads with butterflies to the frame. Moreover, these threads can be of different lengths, which creates the effect of movement.
- If desired, the chandelier can be additionally decorated with beads, rhinestones, individual butterflies can be painted.
 Paper chandeliers: options
 Advice! You can cut not intricate butterflies, but circles, they look no worse.
Lamp and socket selection
When making a chandelier, it is important to use suitable electrical materials. The first essential element is the cartridge. In most cases, you need one in which there is a ring for fixing the lampshade.
For some of the models presented, a cartridge is suitable, which is rigidly fixed to the base with two self-tapping screws. It can be fixed on any surface. As for the type of cartridge in the size of the base for it, it is better to use standard ones. This will eliminate the problem of finding non-standard bulbs.
Regarding the light bulb, it is better not to use incandescent bulbs, they get too hot and consume a lot of electricity. LED and luminescent products are the optimal solution both in terms of performance and economy.
How to choose the right chandeliers for stretch ceilings
Handmade items fill the house with special warmth and comfort. In addition, they turn out to be exclusive. We offer an overview of lamps that will completely change the atmosphere in the room, turning into an object of envy from the groans of friends and relatives. Moreover, they are made from everyday objects that are usually thrown away.


A cardboard bag for juices or other drinks is common in most homes. Most often it is thrown away. But Malay design Edward Chu spent a lot of time to cut them into hundreds of strips and build amazing lamps from them without a drop of glue, a simple origami principle.

Yaroslav Olenev proposed to make lamps from disposable plastic spoons and became the winner in the Ecology and Design nomination from the Future Now magazine.


Natalie Simpson found no less original application for ordinary wooden hangers. But they look amazing in the form of a chandelier.


Kevin Champeny needs to be given credit, not everyone has the strength and patience to string 14 thousand bears to get a chandelier.

Tyra Hilden and Pio Diaz have their own vision of the problem of lighting housing. Thanks to their lamps, the room becomes like a forest. All walls come to life and turn into trees.

The talented welder Matt Ludwig also turned out to be an excellent designer. For JJ's Red Hots, he made an incredibly original chandelier from an old drum kit.

Texas-based artists Joe O'Connell and Blessing Hancock used old bicycle parts to construct stunning lights and hang them in a tunnel under the track.

It will probably be difficult to find a more original chandelier than a pumpkin chandelier from a Polish artist. It cuts stunning patterns on the peel that do not repeat.

Lampshades made of felt hats from Jeeves & Wooster look original and stylish.

Once Heather Jennings saw an amazing Rhododendron chandelier in the store, but it cost more than $ 800. Then the designer decided that you can do it with your own hands just as well. To do this, she needed paper cupcake tins.
11. Chandelier in the kitchen

A chandelier made of ordinary metal tetrahedral beads will look incredibly beautiful.

Vases and candy bowls made from openwork napkins are still fresh in my memory. Now it's time to knit chandeliers.

Fansua Lego offers a strange option, he believes that the best way to store cutlery is a chandelier.

A large cloud is cut out of wood, but the rest and the switch are made of cardboard.

Several globes can make a wonderful cascading chandelier, a great way to light up a flight of stairs.
Every woman wants to bring originality and comfort to her home. One of the most important elements of the decor is a chandelier, which can transform any interior, and created with your own hands, will give it an atmosphere of home warmth and comfort. In this article we will tell you how to create a chandelier at home, original ideas with photos and videos - to help novice craftsmen.
DIY chandelier materials
Almost any available material is suitable as materials for making a chandelier:
- paper, gift wrapper and cardboard;
- textiles and knitwear;
- ropes, ribbons and threads;
- wood and glass;
- wire, feathers and beads.

You can use an old chandelier as a frame, or buy matching rings and stands from shops that sell handmade materials and tools.
Advice! It is very important to choose the right color scheme of materials for the future chandelier. Lampshades made of light and transparent materials are suitable for a dark room, while denser materials can be used for a light one. Using yellow, orange and red materials will add warmth to the room, while blue and green materials will make the room colder.
Option 1 - Shabby chic chandelier
An original chandelier is easy to make from an ordinary metal stationery paper basket.
Materials used:
- metal wastepaper basket;
- aerosol paint in delicate or pastel shades: pink, peach, beige, cream, lilac, mint, jade;
- a strip of linen textiles in a contrasting color or to match the paint;
- glue gun;
- scissors;
- lamp holder.

Performance:
- Drill a hole in the bottom of the basket for the electrical cable.
- Use spray paint to paint the basket inside and outside.
- Then pass an electric wire with a cartridge at the end through the hole.
- Lay a strip of fabric 8 cm wide in folds and then secure with a glue gun around the top of the basket shade.
- Decorate the textile border with a bow and fabric roses.
Advice! If desired, the border can be decorated with beads, decorative glass stones, shells.
Option 2 - DIY art deco chandelier
For a living room or bedroom, you can make a simple and spectacular silk fringe chandelier in the form of a cascade.
Materials used:
- 2 wooden hoops of different diameters
- white silk braid with long thick fringe
- white acrylic paint
- line
- glue gun
- scissors
- bulb holder

Performance:
- Paint the hoops with paint.
- Cut 3 identical pieces of fishing line about 50 cm long each, then use them to attach the smaller hoop to the larger one in 3 places, so that the distance between them is 5 cm less than the fringe length. The remaining ends of the line will then be used to attach the chandelier to the power cord.
- Using a glue gun, glue the fringed silk tape, first along the perimeter of the smaller hoop, and then along the perimeter of the larger one. Do not apply hot glue directly from the gun where the line is attached, as this may melt the line. It is better to first apply a little glue to the paper, and then, after cooling down, carefully glue the attachment points of the fishing line.
- Fasten the chandelier with the free ends of the fishing line to the power cord with the cartridge.
Advice! The upper edge of the chandelier can be decorated with pearl or transparent beads using a glue gun. Instead of a white fringe, you can use a silver fringe. If the fringe is not thick enough, it can be laid along the hoops in 2 layers. A cascade chandelier will look very interesting if the fringe is attached to a wooden base in the shape of a square.
Option 3 - DIY country chandelier
Using the frame of an old lampshade, you can make a beautiful chandelier by simply covering it with lace or guipure.

Materials used:
- metal frame from a lampshade of any shape;
- a strip of lace fabric, guipure;
- threads to match the fabric, a needle;
- cord;
- scissors;
- lamp holder.
Performance:
- Measure the circumference of the lampshade at its widest point.
- Cut a rectangle 4-5 cm longer than the circumference of the lampshade and 8-10 cm wider than the height of the lampshade.
- Join the part into a ring, stitching along the short ends.
- Pull the part onto the frame.
- Hem, folded over, bottom edge.
- Gather the free upper edge of the new lampshade, carefully distributing the folds and securing them with a cord.
- Attach the lampshade to the power cord with socket.
Advice! If necessary, the frame can be refreshed by painting it from an aerosol can in a suitable shade. Instead of lace fabric, you can use openwork knitwear or dense knitwear of light colors with stripes or with a pattern of braids, bumps.
Option 4 - DIY Tiffany chandelier
American designer Louis Tiffany used stained glass technology to create his modernist fixtures. With the help of simple materials and tools, you can independently make an exclusive Tiffany-style chandelier.

Tiffany style lamp from a plastic bottle
Materials used:
- 5 liter plastic bottle;
- sealant;
- silver or gold paint;
- paint on glass 5-7 shades combined with each other;
- marker;
- scissors;
- lamp holder.
Performance:
- Cut the plastic bottle in half. To create the shade of the chandelier, we use the upper part of the bottle along with the neck.
- Using a marker, mark the surface of the plastic lampshade into 6 equal segments, drawing vertical lines from the neck to the bottom edge.
- Each segment is symmetrically painted in the Art Nouveau style: you can depict flowers, leaves, grapes, dragonflies, drops, taking as a basis any image of a Tiffany lamp.
- Cut the bottom edge of the bottle along the contour of the pattern applied to the surface.
- Draw the entire surface of the lampshade, including the lower edge, along the contour of the drawing with a sealant, making sure that the lines are neat and not thick. Give it time to dry.
- Gently, using a thin brush or ear stick, coat the surface of the contours applied with the sealant with silver or gold paint.
- Fill the voids of the drawing with paint on glass, arbitrarily combining color shades.
- Carefully cut off the neck of the bottle.
- Insert the power cord with the socket.
To make chandeliers with your own hands, turning on your imagination, you can use any materials, creating unique lamps in different styles. For safety reasons, use energy saving light bulbs for their operation.
DIY thread chandelier - video
DIY chandeliers - photo