The technology for assembling the bench is simple: a metal frame is made step by step using welding, and then wooden blocks are bolted onto it. The timber is pre-planed, sanded, painted or simply varnished.
A profile pipe differs from a simple (round) cross-section: rectangle or square. Profiles are widely used in both public and private households (the foundations of light buildings and trade stalls, car awnings, park and country swing, verandas, fences, wickets and gates, garden benches). This material contains a description and photo - video guide on how to independently make a simple bench from a metal profile and wooden beam, with a wooden back.
Materials and tools
We will consider the simplest and most inexpensive design.
To create it, we will definitely need the tools and materials listed below.
Pipe profile, round head bolts, and wooden blocks, will be useful the simplest machine for bending pipes (see Do-it-yourself pipe bender for a profile pipe).
- Profile-25x25.
- Beam 40x80 – seat.
- Beam 20x60 back.
- Welding inverter, F3 electrodes.
- Angles grinder (grinder), saw.
- Electric drill with polishing wheel, half-round and flat files.
- Bench angle, level and tape measure.
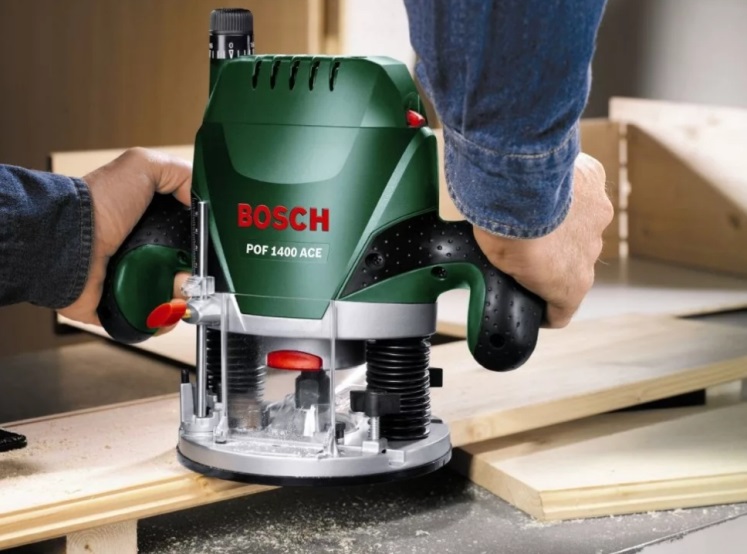
- Plane.
- Brushes, metal paint.
- Wood paint, light varnish.
- Round head bolt, washer and nut.
- Pliers, plumber's hammer.
Basic drawing and parts manufacturing
Making a bench from square profile does not require large expenditures on material and significant time costs.
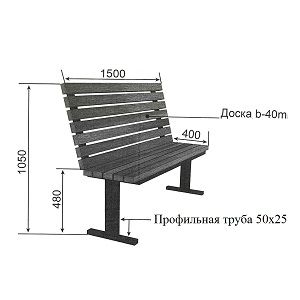
Below are drawings - sketches, benches made of timber and profiles.

To make such a bench, you will need 6 meters of profile - 20x25 or 25x25 mm, as well as bars for the bottom of the bench - 40 mm and bars for the back - 20 mm, 5 meters each.
You need to make a frame from a metal pipe.
- 1 Profile - pipe - 1500 mm (horizontal crossbar between legs).
- 2 pieces of pipe 750 mm long bent at an angle of 30 degrees ( one-piece back and hind legs).
- 2 360 mm pipes (seat).
- 2 400 mm pipes (front legs).
- 2 220 mm pipes (front leg gussets).
- 4 Plates 30 x 30 mm or large washers from Ф 32 mm (nickels for the legs).
- 2 Curved metal strips 4 by 25 and 500 mm (rigidity of the legs and seat on each side)
When making the wooden part of the bench, you will need bars of the required length.
- 3 bars - 1650 mm, width - 80 mm and thickness - 40 mm (bottom flooring).
- 3 bars - 1650 mm, width - 60 mm and thickness - 20 mm (backrest flooring).
The frame should be connected to the board using bolts with a rounded head, washers and nuts - 24 sets.

Step-by-step sequence of assembly of the structure
When all the parts of the future bench are prepared, all that remains is to connect them. You need to start with the seat frame:
- First of all, it is necessary to weld a transverse tube and two 360mm blanks. The transverse profile must be positioned exactly in the middle of two 360mm blanks, at a right angle.
- Then two 750 mm sections of profile, curved by 30 degrees, are welded to the resulting part. Welding point, under the bending point.
- Next, the front legs are welded to the already assembled part. Please note (see drawing) the place where the front legs are welded to the seat is shifted 10cm from their beginning, the connection is made at an angle of 15-20 degrees.
- The front legs of the future bench are connected to the transverse profile with gussets (220mm blanks) for structural rigidity.
- And now the frame is almost ready. It remains to weld 2 arcs (blanks from a 4x25x500mm strip) between the legs and nickels on the legs.
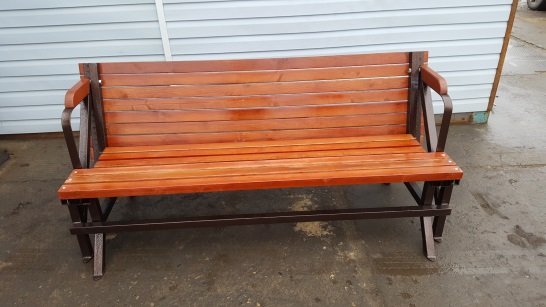
- The finished part is sanded (welding joints and seams), primed and painted with paint for exterior use. At this stage, the country bench made of metal should look like the photo below.
Then all that remains is to symmetrically place the prepared bars for the back and seat on this part. You need to process the bars with a plane, stain them with stain and varnish them, or simply paint them with paint for exterior work on wood. A thicker beam - 40 mm - goes on the seat, and a thin one - 20mm on the back. Fasten the beam using a drill with a metal drill and a pair of bolts on both sides of the beam.

How to make a more complex, but much more beautiful bench yourself is shown in detail in the video.
At the end of this article, it would be reasonable to note that the given example of assembling a bench for garden plot is just a basic option. Having assembled your first bench, you may want to make a more complex design with decorative flourishes and other improvements. The country bench will become a favorite place to relax and unwind outdoors.
Metal profile pipe is a classic material for creating garden furniture. Benches, benches, tables are welded from all-metal or welded profiles according to a previously drawn sketch. Boards or timber are used as cladding coniferous species wood, which is coated with special protective compounds that prevent rotting and corrosion.
A metal profile is a cheap, widely available and easy-to-use material; a variety of garden interior elements can be made from it. Low cost is the first advantage due to which the profile is chosen as the basis for the manufacture of benches and tables.
Versatility and ease of processing are the second advantage of profiled pipes: they can be easily cut, bent, and welded, even if the performer has basic skills in working with power tools. Having high-quality equipment and accurate calculations at hand required quantity material, you can complete the job in a matter of hours.
There are other advantages of a profile pipe:
- resistance to moisture and temperature changes;
- ease of care.
The metal from which profile pipes are made is alloy steel, which can be galvanized or have a special protective polymer layer. Both coatings provide the metal with protection from corrosion and oxidation. But in practice, most craftsmen additionally use special compounds and primers that protect against external influences.
Resistance to loads, high and low temperatures ensures that finished garden furniture made from pipe profiles will last almost a lifetime. The service life of products can be decades, provided that the cross-sectional area and thickness of the products are correctly selected.
Note! To make benches, tables and other garden items with your own hands, it is recommended to use a profile with a thickness of at least 1.5 mm, and ideally 2-3 mm. Thick pipe walls make welding easier and also allow the product to withstand destructive processes longer.
How to make benches, tables and benches with your own hands
To implement the task, three conditions are necessary: accurate drawings, pre-prepared materials and tools. First of all, you need to decide on the model of future furniture and draw a drawing of a bench, table or swing on paper indicating the dimensions of each component (profile supports, vertical and horizontal jumpers, wooden slats etc.) Based on the drawing it is determined required quantity material.
Bench for resting on fresh air should be on any local area. They take it for her different materials, but more often we're talking about about the symbiosis of metal and wood - a strong frame is made from the first, and a flooring for it is made from the second.
Benches made from profile pipes are popular; this material has many advantages, and the result is of high strength and quality.
A simple do-it-yourself metal bench covered with wood
| View of the bench, photo | Description: |
 Bench made of square profile pipe |
With low metal costs, structures of varying complexity can be built. |
 Bench with flower bed |
Metal structures can be different types. Many come up with additional functionality for them, for example, building in a small flower bed in which you can grow real flowers. |
 Bench made of metal and wood |
Metal in garden furniture practically not used. It is usually supplemented with less thermally conductive materials. |
 Bench with backrest made of metal bed |
For this bench, an old iron bed was used. Metal has received a new life. |
Bench from an old cast iron bathtub |
Here an old cast iron bathtub was used for a bench. Original solution. |
 Transformable bench made of metal |
Benches can have a complex and even movable design, allowing them to be folded out from a bench with a back into a bench with a table. |
Benches can be different shapes- with or without a backrest, be wide or narrow, combined with a table into one design. Simple and cheap options can even be welded from rebar or angle steel.


Pros of using metal pipes as a frame
For profiled pipes, low-alloy carbon steel is used, which has good elasticity. She has tall performance characteristics, used for both industrial and private construction.
This material is easy to bend, weld or cut; structures of any level of complexity can be made from it, if you have an idea about the correct construction of frames and have knowledge of the basics of working with metal.
In private construction, such pipes are usually used for arches, fences, gates, stairs, greenhouses, and so on.


The products have the following characteristics:
- Small total weight due to frame structure design - this parameter depends on the size of the profile pipe and the thickness of its walls.
- The dimensions can be any, the main thing is to accurately calculate the possible loads.
- They are much cheaper than analogues made from other materials.
- The structures are durable and resistant to high mechanical loads.
- At proper care and regular updates protective coating metal pipes have a long service life.
Profiled pipes come in different sections: diamond-shaped, round, rectangular and square.
For frame construction Usually the last two options are used, since the process of joining parts is significantly simplified - they can be connected under different angles, making only precise and even cuts.
 Welded frame for future country furniture
 This material is easy to work with if you have the necessary tools at hand.
Connect did welding machine, which means you need the ability to work with it. This process requires compliance with safety precautions, and includes many subtleties that make it possible to obtain products with the correct geometry and reliable connections.
For frames of garden furniture, they are mainly used rectangular pipe cross section 20*40 mm. Her average price per linear meter is 70-80 rubles, with a metal thickness of 2-3 mm.
For a powerful and durable frame you will have to pay no more than 1500-2000 rubles. Finished bench in the store good quality will cost at least 10,000 rubles.
Many people prefer; step-by-step manufacturing instructions with drawings and photos can be found on our website.
Drawings with dimensions of benches and benches made of profile pipes
Before you start making something similar, it would be a good idea to find or develop drawings according to which all the work will go.


When choosing a drawing, you need to focus on your personal requirements. The material is selected so that the design copes with possible maximum loads, fit in the designated space, and I just liked it.


The size of the frame parts must be correlated with finishing material, for which beams, slats and boards are most often used, but plastic and WPC can also be used.
Some people like it completely hardware, but they are not so convenient, because metal conducts heat well and will become very hot under the sun or freeze in winter.
 Benches with a metal back for a summer residence
 Knowing the dimensions of the finish, the parameters of the main parts of the bench (back and seat) are calculated and their shape is set. Data is also entered into the drawings.
 Scheme of a simple bench
 It is necessary to provide for ways to connect parts - at what angles the ends will cut, and so on.
Drawings of other bench options:


Additional materials for the bench
If we talk about the full production of a bench, then you won’t be limited to just metal and wood. There is also a small list of materials and consumables that will be needed. They are listed in the following table.
| Materials, photos: | Description: |
 Primer paint for metal |
The final coating of the metal may vary. Primer enamels are often used, which do not require surface preparation, apart from cleaning it. This paint is applied in several layers. You can even cover rusty areas with it, but we do not recommend doing this, since the service life of the protective layer will be reduced. |
 Grinder circle for cutting metal |
For frame structures metal constantly has to be cut to design dimensions. For cutting, abrasive wheels are used, mounted on a grinder or similar tools. Wheels made of the same material are used for grinding metal and processing welds. |
 Wire brush |
Before painting, the metal must be cleaned. The task is to remove all the rust and expose its shiny surface. On this basis, even primer paint will adhere much better. |
 Degreaser |
Before painting, the metal is degreased. This will seriously increase the adhesion of the material and promote even application of paint layers. Can be used as a degreaser universal formulations, which are ordinary kerosene, or its light varieties, for example, white spirit. |
 Electrodes for welding |
Electrodes are also consumables. Without them, the benches definitely cannot be assembled. |
 Set of metal drills |
You will need to drill a little, but have a few drills in stock required diameter always necessary. Holes are made for bolted and screw connections. The wooden part of the bench is fastened in this manner. |
 Bolts and screws |
Again, necessary to secure the wooden parts of the frame. Sometimes used to connect and metal parts, although welding is predominantly chosen. |
 Wood processing materials |
We have combined them into one line because different options may apply. Note antiseptic impregnations, which significantly increase the service life of wood under open air, impregnations for changing the color of boards (this includes stains, glaze, wax, etc.), protective compounds and paintwork materials that create a waterproof film on the surface. These properties may be combined in some materials. For example, oil from water qualitatively protects and transforms the color of wood, making it more saturated. |
Sandpaper for random orbital sander |
The surface of the wood must be carefully treated to make it smooth, safe and pleasant to the touch. To do this, it is polished with abrasives of different fractions. |
This variety is accompanied by the following set of tools:
- Bulgarian.
- Carpenter's square.
- Electric drill.
- Sander.
- A hammer for knocking down scale after welding, and indeed this tool is always required.
- Clamps for preliminary fixation of parts.
- Brushes or a small roller for a more even application of paint.
- Welding machine.
- Tape measure, pencil, marker.
- To create curved parts, a pipe bending machine is required
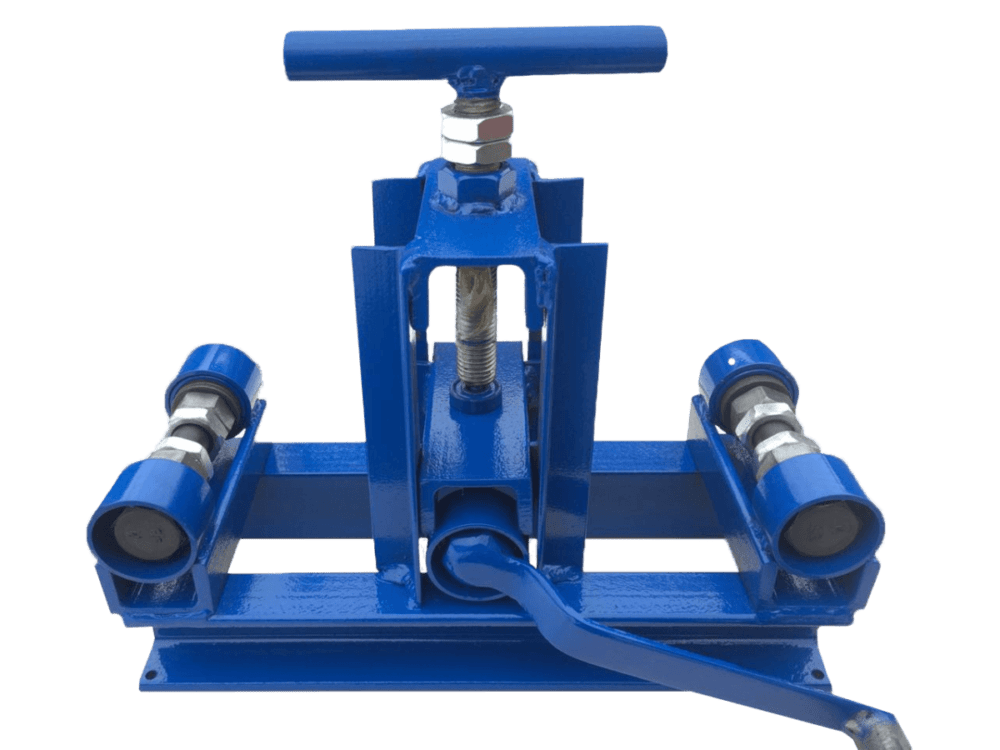 Pipe bending machine
 Other small things can also come in handy, which you will learn about yourself when you start assembling your bench.
DIY metal bench
Frame assembly
In the example under consideration, the master used a 20*40 mm profile pipe bent into an arc as the main material, which remained unused after assembling a small polycarbonate gazebo. Here's how it happened.
 garden bench with your own hands from a profile pipe - raw material for making benches
 The use of bent parts made the final result interesting and elegant. If desired, several figured forged elements can be included in the structure.
First of all, it is necessary to cut off the crease that forms after the pipe bender from the bent tube. You can also cut off the second end of the pipe, which remains straight.
 Trimming a crease from the end of a pipe using a grinder
 Next, marking and cutting of the parts from which the base will be made is carried out. As you can see, this required a section 1 m long. By the way, in fact, the pipe section will be longer, since the tape measure is installed without taking into account the rounding.
The cut of the pipe must be clearly perpendicular - to mark it correctly, use a carpenter's square. First, one part is made, after which it is used as a template to measure the second.
 Marking the meter base part
 Shorter parts are noted - there will be 4 of them, exactly 40 cm long. Keep in mind that you now need to measure the length of the pipe clearly along the radius, and not directly, as was done earlier.
We assemble the side parts of the bench frame from the obtained parts, as they will be installed after welding. At this stage, you can adjust the position of each element, achieving the most convenient one.
 This is what the base of the frame will look like
 Let's take on again measuring tool and Bulgarian. Now we need to check the length of the front legs, which in the example under consideration was 46 cm. In your case, you may get completely different values, since they will be influenced by the steepness of the bend of the pipe and in general your own dimensions, maybe you are 2 meters tall and an oblique fathom in shoulder
After the described manipulations, the fitting of the joined parts begins. The main difficulty is to make cuts under right angles, otherwise ready product may be fragile and even behavioral.
Working with curved parts, it is impossible to use special tools for these purposes. You have to rely only on your own eye. An example of work is shown in the following photo.
 Marking the connection of metal parts
 We advise you to measure and cut the parts one by one. Before you take up the grinder, double-check it several times, not forgetting the well-known saying. After making sure that there are no errors, we try to make the adjustment. In some places, part-time work may be required. We’re not afraid to make them while we’re assembling the first side, now we have a lot of more possibilities for maneuvers. The second part of the base will have to correspond exactly to the first.
This is what happened in the end.
 Parts ready for welding
 Parts of the first side of the base are used as templates for the second. The parts are made identical, otherwise there will be irreversible distortions during installation.
The parts of the base are welded exactly according to the markings. It is recommended to first secure them with clamps.
First, spot welding is done in order to only grab the joints without allowing the metal to warp. After this, the seams are completely welded.
We remind you that when performing welding work, you must protect your eyes and skin. Clothes are used only with long sleeves, since due to the abundance of excreted ultraviolet radiation the skin gets unpleasant burns. We work in a mask, not glasses.
 Carrying out welding work
After welding, the metal must be prepared for further work. Parts are cleaned and polished. Scale is knocked off the weld seams, and untidy deposits of metal are removed with a grinder. The main thing here is not to overdo it and not to damage the integrity of the seam.
The rest of the surface is processed wire brush. In principle, such processing could have been carried out in advance, since some faces of the structure may be inconvenient to access.
Next, two pieces of 155 cm each are cut from a straight profiled pipe. With their help, both sidewalls will be connected to each other with a plow. The details will give the bench the necessary rigidity. They are welded front and back to form a closed frame, as shown in the following photo.
 Frame assembly is almost complete
 Welded joints also need to be cleaned of scale and made as smooth as possible.
The boards will be installed on top of this frame. The outer ones will be supported along the length of the metal frame, while the central ones can sag. To prevent this from happening, you can weld one short cross member in the middle, or two, dividing the frame into three equal segments.
The back in the middle should also be strengthened. Fortunately, there is still a piece left for this bent pipe. The reinforcement is installed without legs.
The tops of the backrest also need to be connected with a piece of profiled pipe. We measure its length after the fact and weld it into the almost finished structure.
 Reinforced with jumpers both seat and back
 Since the seat and the sides are connected by only two points on each side, there is no need to talk about the reliability of the bench yet. To increase strength, it is worth adding at least one bevel. They are also made from bent parts, if you still have any at your disposal.
Plates should be welded to the legs to increase the stability of the structure. To create them, you can take cut out walls of the same pipe, but it is better to find metal of a larger area.
In our situation, the master showed ingenuity and used old brake pads, ground to evenness, as thrust bearings.
 Thrust bearing made from the metal part of the brake pad
 Frame covering
To cover the frame, profiled boards 25 mm thick were purchased. If you want to save money, you can use any convenient lumber, but then you will have to spend a lot of time processing it.
 Trying on the board - if the calculation is done correctly, everything falls into place
 All that remains is to estimate the position of the boards and screw them on; when working with rough lumber, perform the following steps:
Let's return to assembling the bench. Having completed the preliminary layout, we accurately mark the position of the boards so as not to accidentally displace them. We drill holes with an electric drill, simultaneously going through the thickness of both the metal and the board. It's easier to mark a tree with a pencil
We leave 10 cm overlaps of the board along the edges of the bench. This way it will look more beautiful and the usable seating area will increase.
We do the same with the back - the gaps between these boards may be larger, since there will not be such a load on them as on the seat.
Further processing of metal and wood
When the parts are ready, the bench needs to be disassembled, so there is no need to tighten the bolts in advance - they are simply inserted into the holes. We do this for the convenience of painting both the frame and the wooden parts of the structure.
- The last metal treatment that was performed was wire brushing. Next, it should be washed with a degreaser. To do this, the composition is poured onto a soft rag and rubbed over all parts of the structure.
- Then the metal frame is painted. The paint chosen is hammer paint, which means the coating will be durable and aesthetically pleasing. The composition must be applied in two layers, allowing time for intermediate drying.
 Painting the bench with hammer primer-enamel
 The advantage of paints with a hammer effect is that it creates not a simple one-color coating, but an iridescent surface, somewhat reminiscent of granite. This can be seen upon closer inspection.
 Hammer paint finish – beautiful and durable
 Next we process the boards. They can be coated with dark varnish, which will give the material a noble shade. If you want a deep color change, we advise you to saturate the wood with stain before applying varnish, which will color it thicker.
 Lumber transformation
 A profile pipe is a pipe made of carbon or low-alloy steel with a cross-section other than round: rectangular, oval, diamond-shaped or square. Such pipes are widely used in industrial and private construction (frames of small buildings and kiosks, carports, garden gazebos and a swing, fence, gate or bench made of profile pipe). This article provides a description of how to make a simple bench from a pipe without a back and with a back.
Making a bench with your own hands is not at all difficult. The difference between profile pipes and pipes with round- increased resistance to physical activity. Furniture from steel pipes usually not exposed to excessive loads, and therefore thin-walled pipes with a thickness of 1-4 mm are taken for its manufacture. Such pipes are easy to work with, they are inexpensive, and the resulting structure is light in weight. As for the thickness of the pipe, it directly depends on the functionality future design and the expected load on it. So, during production garden swing for adults, the thickness of the pipe will be at least 2 mm, and when producing a bench, 1-2 mm thickness is sufficient. To make furniture, pipes with a cross section of 40x25 mm or 20x20 mm are taken.
It is quite difficult to make an elaborate and complex bench without the appropriate experience, but a bench of a laconic design can be done even by those who have never had experience working with a welding machine or a bending device.
What is needed to make a bench.
Steel profile pipes

Regardless of which particular bench model will be made, the following materials and tools will be required:
profile pipe of the required diameter,
boards for making a seat,
welding machine and electrodes (diameter 3 mm),
grinder or hacksaw for metal,
file, drill with polishing attachment or grinder,
building level,
meter and square,
plane (if the boards are not planed),
anti-corrosion paint,
wood paint or stain,
round head bolts and nuts,
hammer, drill and pliers.
Bolt for benches

Benches made from profile pipes can be decorated with bent elements. To do this, you will need a device designed for bending pipes. In this capacity, a “Snail” mini-machine, a bench vice, or a bending tool made from old brake discs for a car are usually used.
To ensure that the bending of paired parts is identical, a plaza is used, made from a piece of plywood with the outline of the future part applied to it. To obtain smooth and graceful curves, you may also need blowtorch- with its help, the bend points are heated.
Before flexible pipe are densely filled with sand, so its availability should be taken care of in advance. The bending procedure is simple: sand-filled pipes are placed on the machine between the stop and the central protrusion, and then bent under the right angle hands. Below is a drawing of a pipe being bent on a machine made from a car wheel.
The principle of bending steel parts on a machine

For the manufacture of bent parts, preference should be given to round or oval pipes - they are easier to bend.
How to make a bench without a back
A bench without a back is a structure of supports in the form of three metal rectangles connected to each other by two pipes forming a seat. Below is a drawing of a bench made from a profile pipe.

Bench details
To make such a bench you will need a square or rectangular profile pipe with a cross section of 30x30 mm. A total of 11 meters of pipe are needed, from which blanks are cut using a grinder or a hacksaw:
2 pieces of 2.3 meters each (long parts of the seat, fastening the supports);
6 sections of 0.6 meters each (long parts of rectangular supports);
6 sections of 0.45 meters each (short parts of the rectangular supports).
From wooden boards you should prepare 8 rectangular wooden blocks 6 cm wide. To connect the wooden blocks with metal frame You will need bolts and nuts (24 pieces).
Fastening bolts should be selected with a rounded, flattened head that does not leave defects on clothing. Alternatively, the bolts can be recessed into wooden canvas, however, this makes the wood more vulnerable to moisture in the fastening areas.
Sequencing
This bench made from a pipe is quite simple to assemble with your own hands: first you need to weld 3 metal rectangles, and then connect them with two guides that form the seat frame. It should be remembered that:
Long sections of rectangular supports will be placed horizontally, and short sections - vertically.
When welding sections, the angles of the supports should be controlled: they should be 90 degrees.
The length of the bench, as well as the width, can be changed. If the length of the bench increases, the number of supports will need to be increased.
After welding the supports, all seams on them are cleaned using a grinder or file, and then primed.
After connection metal supports, 8 holes are drilled symmetrically on each of them for attaching wooden boards.
The frame of the bench is covered anti-corrosion paint.
Wooden boards for seats are pre-varnished or impregnated with stain.
The boards are attached to the frame last.
Bench on two supports

Wooden slats for the seat can be replaced with rectangular profile pipes. In this case, they are simply welded to the frame, and then the entire structure is covered with paint.
For aesthetic purposes, iron slats can be placed in a metal frame, which will hide the sharp end parts. This will require an additional 1.2 meters of pipe. Such a bench can be placed autonomously - in a park or in a garden, but in rainy weather it is recommended to cover it with film or place it under a canopy.
Pipes made of duralumin cannot be welded. Such pipes are connected by bolting.
How to make a bench with a back
A bench made of a profile pipe with a back will require more time and materials, but these are the models of this garden furniture that are more convenient and loved by vacationers. Below is a drawing of a bench made of a profile pipe with a back.
Drawing of a bench with a back

Bench details
To make such a bench, you will need 8 meters of profile pipe with a cross-section of 25x25 mm, as well as boards for the seat (30 mm thick) and backrest (25 mm thick). From metal pipes frame parts should be prepared:
1 piece 1550 mm (crossbar between supports);
2 bent sections with a span of 100 mm and a height of 780 mm (for the back and rear of the supports);
2 pieces of 350 mm each (for the base of the seat);
2 pieces of 390 mm each (for the front part of the supports);
2 pieces of 200 mm each (to strengthen the front supports);
4 metal plates 40x40 mm (for a stand on supports);
2 bent metal strips 450 mm (for connecting supports on each side).
To create a seat, you also need to prepare boards of the required length:
3 boards 1600 mm long, 60 mm wide and 30 mm thick (for the bottom of the seat);
3 boards 1600 mm long, 60 mm wide and 25 mm thick (for the back).
To connect the frame with wooden planks You will also need 24 round-head bolts and nuts.
Sequencing
After all the details of the future bench are prepared, all that remains is to connect them. You should start with the seat frame:
First of all, the crossbar and two 350 mm sections are connected to each other. The crossbar should be located exactly in the middle of each segment and perpendicular to them.
Next, 2 bent sections of 780 mm each are welded to the resulting structure. The place of welding is at the bend of the pipe.
On next stage The front parts of the supports are welded to the frame. In this case, the junction of the front supports with the base of the seat is 9 cm from their front part.
The front supports are connected to the crossbar by pipes - for the strength of the bench.
The frame is almost ready. All that remains is to weld two arcs between the supports and linings on the ends of the legs (supports).
The resulting structure should be sanded (welded areas), primed and painted with anti-corrosion paint. At this stage, a garden bench made from a profile pipe should look like the one shown in the figure below.
Skeleton of a bench made of profile pipe

After this, all that remains is to symmetrically place the boards for the seat on this frame. The boards should be treated with a plane and coated with varnish or stain in advance. Thicker boards go to the bottom of the seat, and thinner ones go to the back. Fastening is carried out using two bolts on each side of the board. Below is what it will look like in finished form DIY bench made from a pipe.
Garden bench with backrest

If desired, the boards can be coated with colored paint, and also replaced with metal rectangular pipes.
The excellent physical characteristics of profile pipes make them universal material for the manufacture of various designs. With a relatively low weight, they have high values of resistance to bending and compression, and excellently withstand constant and multidirectional variable forces. Profile pipes are much easier to weld and cut than traditional round pipes, and they also look more attractive. From such pipes you can make a convenient and a reliable bench, spending very little time and effort on the work.
Types of benches
Benches and benches are considered a familiar attribute at all personal plots, in parks, squares and just near commercial and government agencies. They may have additional elements decor from forged or cast parts that are installed in various places of the structure. Benches made with my own hands, have no repetitions. These completely exclusive products delight not only the master, but also everyone around him. In total, there are two large groups of benches made of profile pipe.
Table 1. Types of bench design.
| Bench type | Brief description of design features |
|---|---|
| The simplest products require only a few hours to make. They are used for short-term recreation, most often such structures are installed in places of stay large quantity of people. The length is not regulated; the width must take into account the anatomical features of the body structure of vacationers. |
| The most suitable design for proper rest, it relieves the load on the musculoskeletal system. Often has comfortable armrests, which further increases comfort. Such products are very often used in special areas for relaxation and complete relaxation. The frame made of profile pipes is decorated with forged or other elements. |


It is recommended to start with more simple models, and only after acquiring the necessary skills begin complex structures. Keep in mind that nothing will be superfluous, there is a use for any bench, both simple and complex ones will definitely find their place in your garden.

What you need to have for work
Of course, desire comes first, but in addition to it, you need to prepare tools and equipment. We will give practical advice according to the nomenclature, while we will try to use the minimum and most budget set.
Table 2. Tools for making a bench.
| Tool name | Technical characteristics and purpose |
|---|---|
| A very popular tool in any household, it is used for grinding hard-to-reach places, cleaning and grinding various materials and products made from them. Popularly called a grinder. For an angle grinder, you need to have a set of accessories: diamond discs for cutting, abrasive wheels of various thicknesses for grinding metal, brushes for cleaning rust, special rubber wheels with a set of emery cloths. This tool is mandatory, without it it is impossible to make metal benches. |
| Also available in all tool sets. For this you need to have several sets of high-quality drills for metal, concrete and wood. If you are doing handmade crafts often, you need to buy special drills for drilling complex holes with different diameters and depths in one pass. | |
| If almost everyone has the first two tools, then only real masters have this machine. You can buy it ready-made, which will be quite expensive, or make it yourself. The first option is suitable professional craftsmen for whom making various objects with their own hands is not a hobby, but Full time job. For amateurs it is enough to have the simplest homemade device, if desired, it can be done within one day. |
| Today there are quite cheap, reliable and economical semiconductor devices available. They are easy and safe to work with and produce excellent quality seams. Many people have such a unit; it is not worth buying it to make one bench. You can borrow from friends or rent. If you plan to increase the volume of welding work, you will have to purchase your own equipment. |


There is no need to list measuring tools, screwdrivers, pliers and other small items.
Prices for angle grinders (grinders)
Angle grinders (grinders)
Making a simple bench
First, we will give step-by-step instructions for making the easy option. After mastering the technology and acquiring practical skills, it will be possible to begin more complex designs.
Preparation of wooden elements
Step 1. Draw a sketch of the parts indicating dimensions. As an example, we will indicate conventional sizes; they are chosen taking into account the structure of the body; we recommend using them for your models.
- The height of the legs is ≈ 40 cm. This size can be changed only within minor limits, otherwise it will be very uncomfortable to sit on such a bench.
- The height of the back is approximately 35 cm, the height of the rear element is respectively 40 + 35 = 75 cm.
- Seat width 35 cm.
- Bench length 150 cm.
To manufacture you will need only 3 meters of square pipe.
Practical advice. Adjust the dimensions a few centimeters in one direction or another. By doing this, reduce the amount of material used and minimize unproductive waste.
To make it you must have metallic profile 25×25 mm with a wall thickness of 1–1.5 mm, 100×20 mm boards for seats and backrests. The boards are fixed to the frame with metal bolts with countersunk or semicircular heads. We will prepare the lumber ourselves from 150×50 mm timber. Due to the fact that it was stored in improper conditions, the surface has become a little wobbly; the planks will have to be leveled.

Step 2. Saw the timber into boards of equal thickness, glue them in pairs and pass them through a surface planer for leveling. We specially glue them - the benches are located on the street, and ordinary lumber warps in such conditions. Gluing is done taking into account the location of the fibers, which almost completely eliminates the possibility of deformation of the planes.
Step 3. Drill holes in the boards to attach to the metal frame of the bench. After this, tighten them with clamps and round off the ends on a jointer.

Step 4. Remove the clamps and round each board around the perimeter - they should have the same size and appearance.

Step 5. Sand surfaces thoroughly grinder or by hand and coat them with varnish. You can work with an ordinary brush or a pneumatic spray gun. In the first case, the loss of varnish is minimal, but the quality of the coating is worse. The second method increases the adhesion strength of the varnish to wooden surfaces by increasing the depth of penetration. The varnish is rubbed into the boards with great energy and penetrates into the smallest cracks to the maximum depth.
That's it for preparation wooden parts completed, you can begin assembling the metal frame.
Practical advice. If you do not have the listed woodworking machines and equipment, then you can buy ready-made lumber at a specialized store.
Prices for popular brands of portable welding machines
Portable welding machine
Manufacturing of metal frame
Step 1. Saw the square pipe to the dimensions of the parts, drill holes in them to fix the boards.
Such holes are required on the back and seats; working much faster with a jig. In addition, such a device completely eliminates the possibility of errors during notes; all holes will be positioned perfectly symmetrically. The conductor is made in several stages.
- Cut a 25 mm wide strip from the board; this size corresponds to the parameters of a square pipe.
- Accurately measure and drill holes in the rail, the distance between them should correspond to the sketch data.
- Attach two pieces of plywood to the sides of the slats with self-tapping screws or nails. They will fix the pipe in the desired position.
The conductor is ready, insert it into it metal blanks, align the end and drill holes. Use a Ø 8 mm drill to ensure that the connecting bolt sits tightly in both the board and the metal frame.

Step 2. Make long supports for the backrest. They need to be bent; this is done very simply with the help of a grinder. Mark the bend on the workpiece, secure it in a vice and cut the pipe along three edges, leaving only one intact. Now square pipe bends at the cutting site without any problems. The bend angle depends on the width of the slot. If it needs to be increased, then a thicker abrasive wheel must be placed on the grinder.

Step 3. Install all parts of one side of the bench onto welding table and secure their position with clamps. The table should be smooth and clean; use any available material with suitable characteristics for the tabletop.

Step 4. Check the dimensions and angles, everything is normal - proceed to stitching. Experienced welders strongly recommend making only tack welds at the first stage. After they have cooled, check the parameters of the product again and only then begin to apply continuous welds. Make sure that the metal is welded to its entire thickness. The fact is that the upper protrusions are then ground off; if the welding is incomplete, then the assembly does not have sufficient strength. The consequences are very unpleasant.

For such pipes, it is necessary to use electrodes Ø 3 mm; the current strength is adjusted by the master depending on the state of the arc. Eat general rule: The diameter of the electrode should be twice the thickness of the parts to be welded, always follow this.
Step 5. Carefully boil the leg on both sides and clean it with a grinder. Now it needs to be used as a template for making the second one. Weld washers on the bottom large diameter, they will reduce the load on the ground. The open ends of the pipes must be plugged; use any pieces of steel. If there are none, then cut the plugs from the square pipe.

The bench elements are prepared, proceed to assembly.
Surface finishing and assembly
We recommend painting metal surfaces with hammer enamel. When dry, this composition does not level out like an ordinary one, but foams and contracts. But the surface forms tubercles and depressions that cover even small through holes. Hammer enamel contains metal and polymer inclusions that increase strength.

Prices for various types of hammer paint for metal
Hammer paint for metal
It is necessary to apply two layers, the first primer of small thickness, the second the main one. It is this that creates the orange peel effect on the surface and perfectly hides all small flaws on metal surfaces. After the coating has dried, begin assembling the bench.

Step 1. Insert one mounting bolt on both sides of the board. We have already said that the diameter of the hardware is 8 mm, the bolt should only be made of stainless alloys or galvanized. It is better to choose second hardware, they are much stronger.

Step 2. Insert the bolts into the holes of the bench legs, attach them with nuts from below, be sure to use washers. Continue installing all the boards on the seat and back in the same manner.

Step 3. Once all the boards are in place, tighten the nuts firmly. The bench is now ready for use.

If you still have the desire to make benches from profile pipes, then you can start working on more complex options.
Profile pipes bend well with the simplest homemade bending devices. There are two bending methods, each of them has its own characteristics.
Curvilinear parts are manufactured various sizes and simultaneously perform load-bearing and decorative functions. Come up with patterns yourself, any of them will be completely original. It is their exclusivity that attracts attention to homemade benches.

Prices for finished benches
Benches
Video —
Making benches from a profile pipe does not take much time only under one condition - you have it at hand full set metalworking tools and equipment, including a welding unit. But not every summer resident can boast of such a set, especially welding. But most owners have basic carpentry tools country houses. We suggest they make a bench entirely out of wood; the design is no worse than the one described above. detailed instructions on production is on the pages.


