Bitumen shingles or as they are also called flexible tiles can be used even on the steepest roofs, even on vertical ones; moreover, its cost is quite affordable for many, which gives it additional advantages when used.
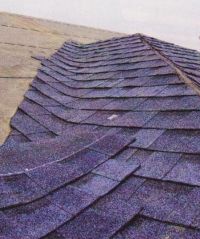
Once installed, asphalt shingles create a continuous, sealed carpet on the roof. Many colors and shapes bitumen shingles allow you to choose the desired option, but in general, the final texture of the roof from afar will resemble snake scales or a spotted camouflage robe :)
Soft tiles are a beautiful and quite elastic material; moreover, they are not afraid of frost, heat, or other atmospheric influences. It does not absorb moisture and does not “make noise” during rain, is not subject to rotting, corrosion and does not accumulate static electricity. However, like all roofing materials, asphalt shingles also have their drawbacks.
The main advantages of bitumen shingles:
- high levels of noise insulation and tightness;
- slight surface roughness prevents avalanche-like snow falling from the roof;
- light weight and flexibility;
- possibility of installation on roofs of any geometric complexity and slopes, even vertical;
- high impact resistance;
- lack of windage;
- minimum waste during installation.
The main disadvantages of bitumen shingles:
- increased requirements for the quality of the base (the need to create a solid base from OSB or plywood increases the total cost of the roofing system and creates additional load on the rafter system);
- quite complex and time-consuming installation;
- frost resistance - about 50 cycles (significantly inferior to many other roofing materials);
- price (1 m² of roofing, approximately 2 times more expensive than metal tile roofing).
Composition, shape and color of bitumen shingles
Bitumen shingles consist of several layers and their structure is very similar to modern roll roofing materials, since one of its basic components is bitumen (in general, hence the name).
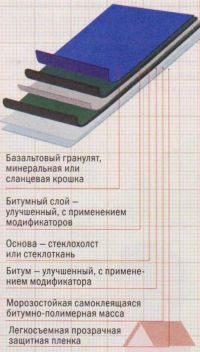
Fiberglass fabric is covered on all sides with oxidized or modified bitumen, thus obtaining the base of bitumen shingles. The thickness of the tiles reaches 3 mm. As a rule, special polymer additives are added to the bitumen coating, giving it durability, elasticity, heat resistance and resistance to ultraviolet radiation. A self-adhesive bitumen-polymer mass is applied to the entire base of the tile or part of it, which, when installing bitumen shingles, ensures the connection of the tiles (shingles, shingles) to each other.
|
|
Structure of bitumen shingles with granulate |


The front surface is covered with a layer of mineral or stone chips (granulate). It is both of these materials that make the coating resistant to atmospheric influences. In addition, it is the stone chips that create the color variety, and its rough surface prevents avalanches of snow from falling off the roof.
IN Lately Bituminous shingles are becoming increasingly popular, front side which is coated with copper, zinc-titanium or aluminum. Such options significantly increase the capabilities of designers, but also significantly increase the cost of coverage.
From point of view geometric shape bituminous shingles are small sheets (shingles) with a curved bottom edge. On one such sheet, 1 m long and slightly more than 30 cm wide, there are three or four tiles.
The standard size of a sheet of bitumen shingles is 1000 x 337 mm.
Bitumen shingles are produced in the form of fish scales, honeycombs, triangles, ovals, hexagons and rectangles of different sizes, which are usually symmetrically placed on the sheet. In addition, there are wavy bitumen shingles, but they are not suitable for finishing eaves and ridges. The color of the shingles can be either a single color or a combination of several different shades of the main color (this is clearly visible in the picture below). Using such a coating, you can achieve a beautiful melange effect on the roof (an interconnected combination or interspersed with different versions of one shade).
This color variety is further emphasized by the resistance of bituminous shingles to ultraviolet radiation, due to which they do not change their color over time, that is, they do not have to be repainted or tinted.

Secrets of successful operation of bituminous shingles
Firstly, in order for bitumen shingles to serve you for a long time, you need to choose the right manufacturer, since this is precisely the case when the difference in the quality of material from different manufacturers can be simply colossal.
Secondly, and no less important perform the installation correctly, strictly following the recommended technology for laying bitumen shingles from a particular manufacturer and it is very advisable to use the recommended components.
When installing bitumen shingles Special attention attention should be paid to ventilation of the under-roof space - the service life of the roof largely depends on the durability of the rafters.
Quite often, problems when laying bitumen shingles arise in winter, when a special installation technology is not used (it is necessary to thoroughly warm up each petal of the tile), in which case it is difficult for the tiles to be hermetically connected to each other, as a result of which they can be lifted or torn off by a strong gust of wind.

Properties and scope of application of bituminous shingles
The scope of application of bituminous shingles is very wide; it is also used for ordinary pitched roofs, and multi-slope, and absolutely any, even very complex configuration with an angle of inclination of more than 15°, and sometimes even as a covering for vertical walls.
Even at the stage of choosing a specific brand of bitumen shingles, check its frost resistance and fire resistance. As a rule, not ordinary, but modified bitumen is used for its production. There are only two most common modifiers:
- APP (atactic polypropylene)
- SBS (styrene-butadiene-styrene).
APP-modified bitumen is resistant to high temperatures, but its elasticity is lower.
SBS-modified bitumen can be said to be the complete opposite of the previous one. Its degree of elasticity at negative temperatures is higher, which prevents cracking of the material in winter period, but its resistance to melting is lower.
Therefore, the conclusion is obvious - it is desirable to use bitumen shingles based on APP-modified bitumen in areas with warm climates, and bitumen shingles based on SBS in cold climates.
According to fire classification, various brands bituminous shingles can belong to both the group of high flammability and moderate flammability. But, since a roof made of flexible tiles with a continuous adhesive layer allows you to block the access of oxygen to the combustion source for a long time, experts usually classify flexible tiles as low-combustible materials. But still, we must not forget that bitumen shingles burn.
To make it easier for the buyer to navigate the assortment, sellers of bituminous shingles have identified four price categories:
- Economy class
- middle class
- elite class
- premium class.
As an example, we can definitely say that bitumen shingles coated with stone chips will be more expensive than bitumen shingles with a mineral coating, the cost of multi-color tiles will be higher than the price of single-color ones, and imported bitumen shingles are more expensive than domestic ones. Finnish-made copper-coated bituminous shingles are considered one of the most expensive.
Set for bituminous shingles
The bitumen shingle roofing kit includes: ridge-eaves tiles and valley, underlay carpet, metal components (cornice strips, drips), end strips, connections, fasteners (glue, nails) and ventilation elements.
Konkovo - cornice tiles serves as a starting strip for installation roofing or divided into three parts and used as ridge tiles.
Valley (lining) carpet seals the internal corners of the roof, as well as the junction points with the walls and chimney. The basis of this material is polyester. The underlay carpet is sold in rolls measuring 1 x 10 m and has a thickness of 4 mm. For small slopes it is used over the entire roof.
Cornice strip laid on a lining carpet along the entire length of the cornice.
Droppers protect cornices from moisture, prevent them from swelling and delamination. The roofing carpet does not extend beyond the eaves overhang. Therefore, if there is no drip, water flowing over the surface roofing material, falls on the wooden frontal board of the cornice.
End strip protects the material at the ends of the building from wind loads, prevents the wind from lifting and tearing the tiles.
Metal connection used for additional mechanical fastening of the valley carpet at the joints with walls and chimney.
Ventilation elements made of frost-resistant plastic and designed for installation of ventilation hoods on the slope and ridge.
Glue — bitumen-polymer mastic in buckets of 3 and 10 liters, as well as in multifunctional cartridges weighing 310 g.
Roofing nails - special stainless steel nails with a wide head.

Features of installation of bituminous shingles
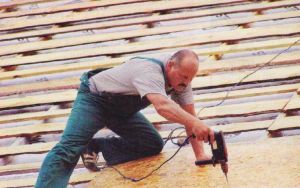
The main feature of preparing for the installation of bitumen shingles is the need to create continuous sheathing. But at the same time, the design of the roofing “pie” is the same as that of other types of roofing. It consists of wooden rafters, between which insulation is laid, covered with a vapor barrier film on the side of the room. On top of the rafters wooden beam fill the counter-lattice with a thickness of 30 - 40 mm. This allows you to ventilate the under-roof space. A continuous sheathing is laid on the counter-batten, to which the tiles are subsequently attached. The sheathing is made of moisture-resistant plywood, OSB boards or edged tongue-and-groove boards 15-20 mm thick. Sheets of plywood or OSB boards should be laid with joints spaced apart. The base for installing a roof made of bitumen shingles must be strong, smooth and dry.
Before laying the covering, an underlay carpet is laid on the continuous sheathing and, in parallel, bitumen shingles are lifted onto the roof in small batches. Lay it from bottom to top and from right to left. To do this, remove the shingles from the wrong side protective strip, under which is adhesive layer, and heat it with a hair dryer. The tiles are attached to the continuous sheathing not only with glue, but also with nails, placing the tiles overlapping. Subsequently, the upper shingles fuse with the lower ones under the influence of solar heat, forming a continuous waterproof coating. Having reached the ridge line, the upper part of the shingle is bent over it, laid on the lining carpet and fixed on the opposite slope.
Then rectangular ridge elements. It is advisable to install a bitumen roof when outside temperature not lower than +5 °C. To cover the valleys, a lining carpet is used to seal the internal corners of the roof, as well as a metal connection for its fastening. The same device is used for laying tiles at the junctions with walls and near chimney. To install such a roof, no special tools are needed. In addition, bituminous shingles are quite economical material- its waste is only 3-4%.
If you decide to supervise your workers, then follow the following stages of installation:
- side faces must be well glued;
- when installing sheathing you need to use only dried boards, since over time the wood will begin to dry out and undergo “torsion,” and this may damage the roof;
- Cardboard-based roofing felt cannot be used as bedding materials , even if this significantly reduces the cost of the roof (the cardboard will swell during use and the roof will become covered with bubbles).
Shingles, like other roofing materials, need to be installed correctly. Otherwise, it may not provide adequate protection for the home from moisture. In general, laying bitumen shingles occurs in several stages:
Correct installation of bitumen shingles will allow you to forget about the necessary roof repairs for a long time.
- installation of the base under the roof;
- installation of the lining layer;
- installation of cornice, valley, end parts;
- connection device;
- installation of flexible tiles on the ridge of the house.
Installation of the base under the roof

To properly lay the tiles, you need to prepare the base. Flexible tiles can be laid on a regular sheathing, which can be solid or lattice. Most often, the sheathing, like the rafter system itself, is made of wood. If the sheathing must be lattice, then boards are perfect. In this case, it is best to use planed boards made of softwood with a thickness of about 20-25 millimeters.
For constructing a continuous sheathing with your own hands, moisture-resistant plywood may be suitable, moisture-resistant chipboard, edged and tongue-and-groove boards and other materials. All of them are attached to the rafters using ordinary screws or nails. When laying the sheathing, remember that a couple of millimeters must be left between the individual materials. This is necessary in order to compensate for the expansion of the wood during the drying process. Such gaps can only be left if all the wood has undergone technical drying. It is also worth noting that to increase the service life of wooden elements, they should be impregnated with an antiseptic, which is more convenient to do before installation.
It says that it is necessary to calculate in advance the installation pitch of the rafters, as well as the thickness of the board that is used for the sheathing.
If the installation step is 60 centimeters, then you can use a board 20 millimeters thick. With a step of 90 centimeters, a board 23 millimeters thick is needed, and so on.
Roof ventilation device
Bituminous shingles are made using a ridge. It is laid on a special ribbed profile. However, it often turns out that its bandwidth is simply not enough. In this case, it is necessary to install special ventilation elements on the roof surface.
All plastic ventilation elements are a profile with ribs, which are located in increments of two centimeters. They are nailed to the base of the roof after laying the tiles on the slopes.
Calculation of the number of ventilation elements

Sheets of tiles must be from the same manufacturer and the same packaging, for a uniform color for all roofs.
If the slope lies in the range from 15 to 40 degrees, then the ventilation area is calculated as the quotient of the slope area and 300, and if the slope lies in the range from 41 to 85 degrees - as the quotient and 600. Let the total roof area be 50 square meters. The roof slope is 35 degrees, and the ventilation element has a cross-section of 258 square centimeters.
You can calculate the required ventilation area as 50/300 = 0.167 square meters, or 1670 square centimeters.
Then required amount ventilation elements is equal to: 1670/258 = 5.
The number of ventilation elements on the ridge is equal to half of their number on the slopes, that is, 3. The same is the case with the edge of the roof.
Installation of the lining layer
During the installation of this layer, it is necessary to understand that its main purpose is to protect the house from moisture in the event of possible leaks of flexible tiles. According to current building standards, if the roof slope is equal to or greater than 18 degrees, that is, a ratio of 1 to 3, then the waterproofing should be located parallel to the end and eaves edges of the roof. These are the places that are considered the most likely places for leaks.
Therefore, the technology for installing this waterproofing layer with your own hands involves laying it no less than 40 centimeters from the very edge. The best option will be when you bring it to the very facade with your own hands. In addition, it is necessary to waterproof the ridge. The installation technology involves laying a lining layer of 25 centimeters or more on each side of the ridge.

By installing a ridge in the roof, ventilation is obtained.
Things are different if the roof has a smaller slope. In the case when it is equal to a value from 12 to 18 centimeters, an additional lining layer must be laid over the entire surface of the roof. At the same time, when installing the lining layer with your own hands, it is better to move from bottom to top. The layers must overlap each other.
The waterproofing material can be secured with special nails that have an enlarged head and a galvanized surface. Nails should be driven in at a frequency of 20 centimeters.
Installation of cornice, valley, end parts
Everything needs to be strengthened, which can be done using metal strips. They should be stuffed on the ends and cornices on top of the lining layer. During the installation process, you need to use special roofing nails, and the pitch should be approximately 12 centimeters.
After this, you need to lay a special self-adhesive tile, which you can also do yourself. Before starting work, remove from the tiles protective film. Next, the tiles are glued close to each other along the entire cornice. After laying, the tiles should be nailed.
If the roof structure has an element such as a valley, then a special carpet is laid in it. It is attached on both sides. It would be a good idea to coat the edge of this carpet with bitumen mastic after fixing it.
Installation of tiles
Often, when laying tiles with your own hands, the same mistake is made, which leads to the fact that the roof has a different color shade in their different places. This is a consequence of the fact that in different packages the tiles may be from different batches, and therefore their color is different.

To prevent such situations from arising, the DIY process should be carried out using several packages at once. In this case, the color of the roof will be unequal, but uniform.
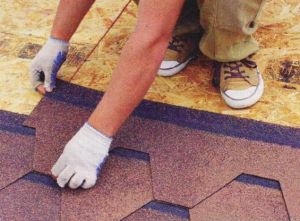
The installation process should begin from the bottom of the center of the cornice, that is, from the middle of the slope. In this case, bitumen shingles are laid in vertical rows, moving from the center to the fronts. The first row is laid in such a way that provides a gap of 2-3 centimeters between the eaves tiles and the lower edge of the shingles. The outermost part of the second vertical row of tiles is cut, usually in the center, to form a beautiful pattern and overlap the fastening of the first row. Elements of flexible tiles should be cut exactly along the edge of the gable eaves, if necessary. The cut edges must be treated with bitumen glue. The width of the adhesive strip must be at least 10 centimeters.
When laying tiles, remember that they require additional fastening. The tiles are fastened with nails, and the nails are driven in when laying two adjacent rows. Thus, when you hammer a nail into the first row, you nail the second one at the same time. Approximately 4-5 nails are needed per shingle. This is enough, since under the influence of solar heat the bitumen tiles themselves will stick together and also stick to the sheathing.
Connection device
Very often, during the installation of roofing material, one has to deal with such difficulties as various objects to which the roof adjoins. The most elementary such object is a pipe stove heating. At the junction of the roof and the pipe, a gap always forms, which becomes a place through which moisture flows directly onto the roof.
To completely eliminate this drawback, it is necessary to properly attach the shingles. First you need to hammer the batten into the angle between the pipe and the roof surface. It is desirable that it be triangular in shape, like a regular wooden plinth. Next, the tiles need to be placed on this rail and a little on the pipe itself. After this, the valley carpet is laid on top of it, starting from the pipe. It should cover the pipe at a height of about 30 centimeters from the roof surface. After this, the pipe, or rather only its lower part with carpet and tiles, is placed in a special metal apron, that is, it is lined on all sides with sheets of painted tin.
In order to avoid the accumulation of snow behind the pipe, it is necessary to arrange a groove there, that is, install a pyramid with two edges close to the pipe. Thus, and rainwater, and the snow, falling on the slopes of the gutter, will flow down the roof, flowing around the pipe.
Sometimes some communication pipes have to be routed through the roof. In such cases, it is best to use passage elements that are made specifically for tiles. They are attached to the base of the roof using nails. Such elements reliably protect the roof from leaks.
Attaching bitumen shingles to a ridge
This type of work does not require anything special. To lay tiles on the ridge, special flexible tiles are used, which are called ridge tiles. Each individual element of such a tile has perforation, which conditionally divides it into three parts. The ridge tiles are laid with an overlap of approximately 5-6 centimeters. The short side of the shingles should be parallel to the slope lines. Such tiles are fastened with nails.
An example of calculating the amount of roofing material
So, let there be a gable roof. It has the following indicators:
- height is 4 meters;
- length 6 meters;
- slope 32 degrees.
Then the total area is:
- 4*6*2 = 48 square meters.
One package of bitumen shingles is enough for 3 square meters (as a rule, the covered area is indicated on each package). Then all you need is:
- 48/3 = 16 packs.
It is worth noting that DIY technology is such that there is always waste, cut parts, and so on. therefore, you can safely add another 10-15 percent to the calculated amount.
Flexible bitumen shingles are quite popular. This is due to its unique performance characteristics. Among the well-known manufacturers are the companies "Tegola", "Siplast" and "Shinglas". Bituminous shingles are used in almost any climatic conditions.
Tools
Sheets or boards are laid parallel to the ridge and joined on the rafter board. At the same time, make sure that there are no several joints of sheathing sheets of adjacent rows on one board.
Preparatory work
After preparation of the base is completed, a special underlay carpet is placed on it, sand side up. It can be purchased where you buy your shingles. It simultaneously performs two functions: it levels the surface and gives it waterproofing properties. In addition, when using a backing layer, bituminous shingles receive better adhesion to the surface. It is nailed in increments of 20 cm.

Slopes with an inclination angle of up to 30 degrees are completely covered with roofing felt in several layers. In the second case, there is only an overlap with a margin of 150 and 80 mm vertically and horizontally, respectively. The ridge is decorated using special ridge-eaves tiles. It is divided into three parts along the perforation and alternately nailed on both sides at the junction of the slopes. Before the procedure, you should remove the protective film from the material.
Laying bitumen shingles: rules and features
When calculating the required amount of material, it is important to take into account certain nuances. For example, it is intended for roofing coverings whose inclination angle is in the range of 15-85 degrees. The instructions indicate an angle of 45 degrees. Deviation from this indicator leads to an increase or decrease in the amount of tiles consumed. For example, than fewer topics more material will be required.
Achieving high-quality results is possible only if you follow the basic rules:
- the material is stored in closed packages indoors;
- the lining carpet is stored in a vertical position;
- Manufacturers recommend installing bitumen shingles at a temperature of at least 5 degrees;
- Before laying the material in the cold season, it is first placed in a heated room (for at least 24 hours).

Soft tiles are laid without using a torch. It is used for bitumen fused roofing. WITH inside The protective film is removed from the material, after which it is laid on the prepared coating. When the outside temperature is high enough, the adhesive surface of the shingles will adhere tightly to the substrate without assistance. In cold weather, a hot air gun is used for a similar effect. The material can be further strengthened using special glue.
Bituminous shingles in different packages may have different shades. Therefore, it is recommended to use separate packaging for each slope. In the case where the slope area is large enough, several packages are used. The elements of the material are mixed, so that the shades are distributed evenly throughout the entire coating.
It is important to remember that at high temperatures the tiles become soft and are easily susceptible to mechanical stress (may be deformed). Therefore, in such conditions, roofing work is moved using ladders or other devices.
Fastening material
Each individual tile element must be secured separately. To do this, use screw or rough nails, as well as staples. The latter are used when bitumen shingles are attached to the base without a backing layer.

Nails must be made of metal pre-treated with anti-corrosion substances. 4 nails are driven into individual shingles at a distance of 2.5 cm from the sides and 14.5 mm from the bottom line of the tile.
The nails are driven in until their heads are at the same level as the shingles. If they protrude, the material laid above may be damaged, and if they are pressed in, moisture will accumulate in the resulting recess, and the fasteners will collapse over time.
The intended purpose of bitumen glue is additional strengthening of material elements in difficult places: joining of tiles to walls, on a ridge, in valleys. It is also used at low temperatures environment. Canned glue is spread with the help of and squeezed out of the cylinders with a special gun. If the temperature outside is low, then the bitumen glue is preheated (it hardens already at 10 degrees Celsius). The glued sheets are pressed against the base with force.
Gaunts
The first stage is fixation on lining layer cornices and using nails or screws. The nails are driven in in a checkerboard pattern along the entire length of the plank in 10 cm increments.

After this, the shingles for the eaves are laid on top of the mounted strip. The installation of bitumen shingles depends on its type. Some manufacturers recommend leaving a 1cm margin between the bottom edge of the shingles and the cornice. In other cases, an overhang of 1-1.5 cm of tiles is made above the eaves. Manufacturers often do not provide special eaves shingles. In this case, you should cut off the usual ones and lay out the first line of material from them on the cornice, gluing them end-to-end.
Installation of the material is carried out from the cornice. The shingles are laid from the center line of the slope to the sides (left and right). The second row is laid so that the interval between the lower edges of the cornice row and the second line is 1-2 cm. This will create a visually straight line when viewed from the ground.
If the house whose roof will be covered with bitumen shingles is located in an area characterized by strong wind, then the interval between shingles decreases. This will make the coating more reliable.
How to achieve a beautiful roof?
Knowledge of the intricacies of the material and practical experience- what bituminous shingles require. You can organize it with your own hands attractive design roofs, but for this it is important to understand it design features. For example, when going around protruding roof elements, the interval between adjacent shingles should be a multiple of 1 m. This is done so that subsequent rows can be installed correctly.

Before starting to lay the material, a slope is drawn along the lining layer (bedding) using ordinary chalk, and its center line is indicated. In addition, marks are made for every 4 rows of tiles. In the case when there is a chimney or other structural element, vertical lines are marked from them. If the technology is followed, a roof made of bitumen shingles will have an aesthetic and attractive appearance.
Ventilation
To allow air to escape freely from under the roof, holes are made in it, the diameter of which corresponds to the installed aerators. They are secured with nails or glue. After this, tiles are placed on top of their aprons, the ends of which are cut out.
Skates and valleys
At the ridge, the shingles are cut along the ridge line. Once the skate has been done ventilation gap, the upper edge of the roof is covered with regular or cornice shingles. It is important to remember that bending the shingles without heating them can lead to the formation of cracks in it. The joints between the ridge covering and the roof are covered, that is, they are waterproofed.
It is also important to remember to waterproof the valleys: each shingle that ends up on the gutter is cut and secured to the other side of the gutter using nails or glue.
Soft roofing is a type of covering that has long been familiar to most people. Not so long ago, one of the most widely used materials for roofing various designs was ordinary roofing felt, which also belongs to this category of roofing sheeting. To be fair, it is worth noting that the old roofing felt was not particularly durable and had high performance characteristics, so it required periodic repairs.
Today, thanks to new technologies, soft roofing material has undergone significant modernization. It is produced in various versions, including in the form of bitumen. Such coatings already have a long service life and combine high quality, excellent waterproofing characteristics and very elegant appearance. Therefore, many do not realize that modern soft roofing is still the same roofing material, only produced in improved variations.
Laying technology soft roof made of bitumen shingles - is quite complex and requires a large number of different materials, since the design of such a coating consists of several layers, which is why it deserves the name “roofing pie”. Therefore, if a decision is made to make self-installation coatings made of this material, you must carefully study all the recommendations that should be followed when performing work.
Distinctive features of soft roofs
Before deciding to choose a soft roof, you need to have an idea about this material and evaluate its advantages and disadvantages.
Advantages of soft roofs

There are different types of soft roofs, but they all have very high physical, technical and operational characteristics:

There are several points that can be called disadvantages of this roofing material, but, to be honest, they are very arbitrary. So, such “disadvantages” include:
- The installation of a “roofing cake” is quite complex, requiring strict adherence to all technological recommendations.
- Any soft roof is laid only on a solid solid base. And this, in turn, will entail additional work and, accordingly, expenses.
However, as can be seen, negative aspects in the arrangement of a soft roof - much less, and therefore, more and more often, the owners of mansions opt for it.
Various types of soft roofs
Soft roofing includes several types of materials that can easily be found on the Russian market - these are flexible bitumen shingles, rolled soft roofing various types, and euroslate (ondulin).
Rolled soft roofing

Roll roofing materials are divided according to several criteria. Thus, the following types of coatings are produced:
- Baseless and having a base for coating.
- Basis for roofing roll materials can be used - fiberglass, asbestos fiber, cardboard, polymers, or several materials can be used in combination.
- Roofing material can be equipped with various protective layers– fine-grained or coarse-grained mineral chips, dusty or scaly powder.
In addition, roll coverings can be divided according to the type of base and installation method:
- Self-adhesive coatings. This material has a layer of adhesive applied to the back side of the canvas and protected by a special membrane, which is removed immediately before installation of the coating.

- Glue-on sheets. These coatings are glued to mastic different ways which are called hot and cold. But in any case, the material is heated to a certain temperature during installation.
- Weldable coatings. This type of covering is fixed to the roof surface using gas burners. The burner flame melts the composition applied to the back side of the soft roofing material, after which the coating is rolled. This type of coating, properly laid on the prepared roof surface, makes it practically airtight and resistant to leaks. In addition, this type of material is considered the most durable of all roll options.
Membrane roll roofing

Membrane coating is a high-tech material that can be made on various bases: polyvinyl chloride (PVC), synthetic rubber (EPDM), thermoplastic polyolefin (TPO).
Soft roof

- The PVC membrane, reinforced with ether fiber and containing plasticizers, has high elasticity and resistance to temperature changes. In addition, the material does not fade in the sun, is fire-resistant, comes in an assortment of colors, and can be easily and quickly mounted on a surface. However, this coating has its drawbacks - it is not resistant to organic solvents, bitumen and oils. In addition, when heated, PVC coating can release substances that are toxic to humans into the air, since it is not environmentally friendly.
- EPDM membranes, made from rubber and reinforced with polyester mesh, have high elasticity and resistance to various solvents.
The negative qualities of this material are that it is installed using glue, and the joints may diverge over time under the influence of external factors, which means the roof will begin to leak as the coating loses its tightness.
- TPO membranes made on the basis of thermoplastic polyolefin can be reinforced or produced without it. Polyester or fiberglass is used to reinforce this material. The material sheets are welded together using hot air, and a fairly strong and reliable seam is formed at the welding site. Therefore, the coating has a long service life, high strength and resistance to negative temperatures, reaching up to -60 degrees.
The disadvantages of this coating include its low elasticity and rather high cost compared to other membrane materials.
Briefly about the principles of laying membrane roofing material
There are four main ways membrane roofing- this is ballast fixation, mechanical fastening, gluing and hot air welding.
- Ballasting used if the roof has a slight slope not exceeding 15˚.
In this case, the canvas is laid on concrete base flat roof or on a layer of laid thermal insulation. Then the material is stretched, secured around the entire perimeter, and the joints of the sheets are connected using welding or special glue.

Then, ballast made of pebbles, gravel or crushed stone is placed on top of the membrane.
- Mechanical fastening is carried out if the supporting structure is not designed to support the weight of ballast.

The basis for installing the membrane in this way can be wood, concrete, profiled sheets, as well as any other material.

A layer is laid and secured onto the base insulation material. Most often, high-density mineral basalt wool, specially designed for this application, is used for this, on top of which a membrane is spread and fixed. To fix materials to the base, disk or telescopic fasteners are used, which are installed at the joints of sheets overlapped by 80÷100 mm.
- Membrane gluing produced with high quality adhesive mixtures, characterized by good strength. The material is glued only along the perimeter of the canvas, at the joints and in problem areas eg around chimneys, on ribs, valleys, etc.
- Membrane welding with hot air- this method more often It is generally used for fastening sheets of membranes.

The work is carried out using a special apparatus that compresses two overlapping sheets using a roller and hot air, the temperature of which reaches 600˚C. The welded joint can be from 20 to 100 mm wide, which ensures the reliability of the connection and guaranteed sealing.
Euroslate or Ondulin

Another option for roofing material, which can also be classified as a soft roof, is ondulin or euroslate. This is a lightweight and reliable wavy material made from a bitumen-fiber mixture with the addition of mineral and polymer additives. Roofing sheets are easy to install and usually have a very long service life. The material is produced in various shades of calm tones, from which you can always choose the one suitable for a specific facade design.
Find out the nuances of technology, how to lay, from new article on our portal.
Installation of this material can be carried out not only on a solid base, but also on a lathing made of boards 150÷170 mm wide, fixed in increments of 200÷250 mm.
Ondulin is the only material from the soft roofing category that has a fairly rigid relief structure, and therefore can be attached to the sheathing.
Flexible tiles

Installation of ondulin, like any wavy roofing material, is carried out from the eaves. The upper rows are laid with an overlap on the lower ones by 250 ÷ 300 mm, and adjacent sheets located in the same row are mounted overlapping, on one wave. Ondulin is fastened with special screws with waterproofing gaskets and special covers. They are screwed into each wave crest along the cornice and ridge, and in the middle part of the slope - in increments of two to three waves.
Flexible bitumen shingles

Bituminous shingles can easily be considered one of the most popular types of soft roofing, as they are distinguished by their aesthetic appearance, variety of shades and shapes, strength and durability.
The tiles are produced at fiberglass base, which is impregnated with high-quality bitumen, on top of which mineral chips of various colors are applied. The top mineral coating performs not only a decorative function, but also a protective one, as it prevents mechanical damage to the softer lower layers. used to cover houses with pitched roofs any size and configuration of any degree of complexity.
Since the most popular material in the soft roofing category is bituminous shingles, its installation will be discussed in more detail.
Installation of roofing with bitumen shingles
First, it’s worth understanding the roofing “pie” that needs to be mounted under the flooring soft tiles. It is very important to do this work correctly, otherwise the roof will not be reliable and will not last for a long time, and it will be impossible to maintain a comfortable microclimate in the rooms underneath it.
Approximate sequence of work
To ensure that the sequence of installation of all elements is observed, it is best to make a list of all work in order:

- The first step is the installation of the rafter system.
- Next, a vapor barrier membrane is attached to the rafters from the attic side.
- On top of the vapor barrier, also on the attic side, a timber sheathing is attached to the rafters. It is needed for subsequent installation internal lining attic space, fixing the membrane and creating a rigid base for laying insulation.
- Next comes the installation of insulating mats between the rafters. Typically, mineral basalt wool is used for this.
- The insulation is covered with a waterproofing roofing membrane. It is fixed on
- The membrane is pressed against the rafters using counter beams.
- Next comes the installation of sparse sheathing - the basis for laying a solid base.
- Sheets of moisture-resistant plywood or OSB are fixed to the sheathing.
- The solid plywood sheathing is covered with a lining carpet.
- Next, soft bitumen shingles are laid.
- Consolidation drainage system, covering the eaves overhang with mosquito netting, and then with lining or PVC soffits can be carried out at various stages of installation work - as will be more convenient for the craftsmen.
Calculations of the lathing system for a soft roof
Now knowing the approximate sequence of installation of the “roofing cake”, there is a need to consider them in more detail, since there are nuances that are important to take into account when performing these rather complex technological operations.
The first thing that needs to be determined is what parameters the elements of the rafter system and sheathing should have, and with what step they are installed.
Let's start with the rafters. The cross-section of the timber from which they are made depends on the steepness of the slope, possible external loads on the roof and on the installation pitch of the rafter legs. The dependence is expressed as follows.
External loads include the weight of the structure itself, with insulation, sheathing and roofing material, the mass of possible snow deposits in winter and the impact of winds. Both snow and wind loads strongly depend on the steepness of the slope, and with an increase in the angle of inclination, the importance of the snow load gradually decreases, but the wind load increases.
The total load, expressed in kilograms per square meter, must be evenly distributed over rafter legs. And this, in turn, depends on the step of their installation - the more often they are located, the less load falls on each linear meter of the rafter beam, and the smaller its cross-section can be. If the value of the distributed load is known, then using the table it is easy to determine the parameters of the required material.
There is a fairly complex physical and mathematical algorithm for calculating the distributed load on rafter legs. But we will not bore the reader with an abundance of formulas and tables, but will suggest using a convenient calculator. The initial data for the calculation will be:
— Region of construction;
— Steepness of the roof slope, degrees;
— Roofing material;
— Features of the location of the house on the ground and its height.
In the last paragraph of the calculator you will need to indicate the expected installation step of the rafters. By changing this value up or down, you can determine the optimal load distribution. And then, according to the table, knowing the length of the rafters, select the required cross-section of the beam (log).
Attached to the calculator are two schematic maps that make it possible to determine the zones of the construction region based on the level of snow and wind load.
Calculator for calculating the distributed load on rafter legs
So, to begin with, we determine the zones using maps and diagrams:
underlay carpet


Now let's substitute known values into the calculator - and get the result
Everyone knows that laying roofing material will have a positive final result only if you strictly follow the installation instructions and follow the recommendations of specialists. This applies to all roofing materials, including bituminous shingles. And if you decide to use this particular material for roofing own home, then you will have to make sure that the installation instructions become a Talmut for you during the work.
Stages of covering a roof with bitumen shingles
Let’s immediately make a reservation that bitumen shingles can be used on roofs whose slope angle is at least 11.5°. This is approximately a 1:5 ratio.
Stage number one - preparatory
Preparatory in the sense that it is necessary to prepare the roofing system, or, more precisely, the roof sheathing, for the bitumen shingles. So, the sheathing for this roofing material should only be solid, so the elements here will be either moisture-resistant plywood or OSB boards, or edged tongue and groove boards. As for the boards, they must be very dry, humidity should not exceed 20%.

It is very important to secure the sheathing tightly; it must be very strong and fairly level. A small difference in plane can be covered by bituminous shingles. There are several serious issues in the construction of sheathing.
- The joints of two adjacent elements should only be on load-bearing elements roofing structure. That is, in the rafters.
- If boards are used as sheathing, then one board should cover two spans in length, that is, it should lie on three rafter legs.
- Again, regarding the boards. Rafter system is subject to changes in temperature and humidity, so it is necessary to leave a small gap (2-3 mm) between the boards. This is compensation for changes in board sizes.
- Such a roof, covered with bituminous shingles, must be equipped with ventilation system. Therefore, even at the stage of constructing the roof, it is necessary to leave gaps at the eaves and at the ridge.

Stage number two - laying the lining layer
What is underlay carpet? This is a rolled bitumen-polymer material, which is covered with sand on top and a plastic film is attached to the bottom. Laying is done sand layer up.
It is necessary to pay attention again to the slope of the roof slopes. If this is not less than 11.5°, then there is no point in laying underlay carpet over the entire roof area. The main thing is to close the refractions of the structure and the extreme planes that are most subject to loads. These are valleys, ridge, cornice, gables and junction points.

Attention! At the corner of the valley, the lining roll must be laid lengthwise, and the overlap between two adjacent strips must be glued and secured with roofing nails.
It is better to apply several strips of glue. But glue cannot be applied under the entire plane of the laid roll.
All other areas are covered with strips of lining material and secured to the sheathing with nails. The overlap of the elements with each other is 10 cm.
If the covering of the lining layer is continuous, then the installation can be carried out either parallel to the cornice or perpendicular to it. As shown in the photo below.

In this case, each laid strip must first be laid out, allowed to straighten out a little, and then pulled lightly with your hands. On the surface of the slope it should look like Smooth surface without bubbles or distortions. The strips are mounted overlapping with an offset of 10-15 cm. Fastening every 10 cm is done with roofing nails.
Now you need to install and secure the metal strips that are mounted along the edges of the roof slope. Namely, at the eaves and ends of the roofing system. Specialists often call these strips cable strips. All metal strips are laid on top of the lining layer with a slight offset along the direction of laying. Offset - 20 mm. The planks are fastened either with roofing nails or self-tapping screws. The fastening line is a zigzag, installation points are every 10 cm, as shown in the video. The gable ones have a special shape with a side that serves as a stiffener and drainage of rain and melt water.
Attention! If the cornice of your house has a curved shape, then the metal cornice strips are installed in small pieces (segments), forming a curved line. The length of the element must be determined by the roofer himself, who will cover the roof with bitumen shingles.

And one more very important point. After the entire roof plane has been covered with lining material, another strip is installed at the valley locations. Its edge at the cornice should cover the installed metal strip and be glued there. In this case, fastening along the installation is carried out only with nails every 10 cm (see video).
As for the roof ridge, here the lining material is laid overlapping relative to different slopes. That is, along one slope, the upper edge of the lining is spread, not reaching the edge of the roof by 5 cm. In the second slope, the roll passes through the ridge to the first slope to a depth of 15 cm. It turns out that the overlap creates a continuous layer that completely covers the ridge. This can be clearly seen in the photo below.

Stage number three - laying bitumen shingles
All preparatory stages passed, you can proceed directly to covering the roof with bitumen shingles. The installation instructions state that installation should begin from the bottom, moving upward, as, in principle, with all roofing materials. But asphalt shingles have one point regarding the beginning of this construction operation. So the instructions say that the roofing elements are laid end-to-end along the eaves, and overlapping along the rest of the area.
In this case, the eaves tiles must be laid slightly deeper into the slope, approximately 2-3 cm. Installation must be accompanied by aligning the edges of the material strictly along the eaves. Doing this with an open cornice line will not be difficult. The elements are fastened with nails closer to the cut point of the roofing material (see video). Before installing the strips of bitumen shingles, do not forget to remove them from reverse side protective plastic film. The same will apply to elements that will be installed in the main areas.

It is necessary to begin the installation and fastening of sheets (shingles) of bitumen shingles from the middle of the slope, placing them further to the edges of the roofing structure. The first row is laid so that it completely covers the cornice row. In this case, the petals of the top row should cover the perforation of the cornice row. The element must be secured with four nails, positioned 4-5 cm above the perforation point. If the angle of the roof slope exceeds 45°, then it is recommended to add two more nails to one shingle and hammer them in upper corners roofing element.
The outermost elements of the shingles that will cover the gable strips must be cut exactly to size. And these edges must be glued. The glue is applied in several strips 1-2 mm thick. The length of one adhesive strip is at least 5 cm. After that, the glue is spread over the surface of the lining material with a brush, and the edge of the shingle is pressed with your hands with little force. The element must be secured with a roofing nail.

We return to the valley. On the laid lining material, two parallel lines are drawn from the corner of the valley on both sides at a distance of 15 cm on each side. This can be done with a marker using a ruler or colored thread. You just need to make marks at the lower and upper edges of the valley, connect them together with a thread (pull it well, which will require two people), lift it and release it, a clear line will be drawn on the surface of the valley material.
The edges of the material must be cut along the lines. It's better to do it construction knife, having previously placed a small board under the material and the knife blade. Now the bitumen shingles are laid in place, and the intersection of the shingles and the backing strip is marked on it. The tile element is trimmed along the resulting line. Now the bitumen shingles themselves need to be fixed, for which you need to use glue applied to the lining along the edge of the cut to a width of five millimeters. Must be done additional fastening roofing nails.

The most difficult operation in this entire installation process is laying bitumen shingles at the junction points (see video). For example, to stove chimney. There are several positions that you need to know and strictly follow.
- It is necessary to install along the entire perimeter of the pipe at the bottom of the junction wooden slats with a triangular cross-section. Size: 50x50 mm. You can use a cornice for these purposes.
- The underlay carpet is laid on top of the installed batten.
- After which a row of bitumen shingles is installed adjacent to the vertical plane of the chimney.
- Now on top installed elements fits valley carpet. It should cover the pipe itself in height by 30 cm, and in width protrude beyond the perimeter of the junction by 20 cm.
- A metal junction strip is installed on top of the laid valley carpet, which is fastened with self-tapping screws to the surface of the chimney. Be sure to fill under the bar silicone sealant, which will ensure complete sealing of the joint.
- On the side of the pipe, ordinary bitumen shingles are laid on top of the valley carpet, or can be laid under it.
And the last element of the roof is the ridge, which is also covered with bitumen shingles (see video). To do this, a strip is cut from the valley carpet, the width of which should be such as to cover the ridge and slopes to a height of 50 mm or more. Fastening is done with nails. After that, shingles under this element are laid on the ridge itself, which are called ridge shingles. In principle, for this you can use cornice elements that are simply cut under required size. The ridge tiles must be secured with nails, which will be covered by adjacent shingles, because the installation is done with an overlap (5 cm).

Attention! If it is covered with bituminous shingles hip roof, then the installation of ridge panels begins from the lower edge of the rib near the cornice. IN gable roofs installation begins from the middle of the ridge.


