If no one has any questions about the plaster that is familiar to us, then the combination “decorative plaster” can cause a number of contradictions for many. How can a layer of hardened finishing mixture be on the outside and serve a design role?
This kind finishing material combines, on the one hand, properties that protect the walls of the apartment, and perfect interior characteristics, on the other. You can imagine how a master of decoration in the Middle Ages dreamed of the appearance unique composition, which can be applied to the wall without hassle, and which does not require additional decoration.
Today, such plaster is not one of the most common finishing compounds, no matter how the Internet “shouts” about its popularity.
But the apartment, decorated modern material, which today is a new development, only benefits from this. After all, rarity is one of the first factors of value and attractiveness. Moreover, when the material has both self-sufficient beauty and uniqueness.
Decorative plaster differs in composition, application technique, properties, but most importantly - appearance in the final result. Now turn to your imagination:
Cracked gilding torn edges The polygonal shapes of which reflect the glare of light, slightly protruding above the blackened veins of the ruptures, causing an irresistible desire to touch the mysterious surface.
Matte smooth surface of cream color with a subtle fibrous pattern, like unsanded Ivory, covers the wall in smooth drips, creating the illusion that it is slowly draining.
A dark brown texture, formed by many small folds imitating natural leather, covers the niche of the walls from one pilaster to another.
This is just part visual techniques, which can be realized.
Some of its types resemble the texture of a cut tree or its bark, others resemble stone chips. Bark beetle plaster is especially popular. A wall treated with this material really resembles the result of exposure to this bug. But these are not all options. Today you can imitate almost any surface. The texture looks rich, imitating such noble fabrics as velvet or silk. Decorative coatings are reliable tools for interior designers. With their help, you can turn the most ordinary room into a work of art, since it creates not only a variety of textures, but also three-dimensional panels with a plot.
How about a chic wall hanging?
Designing a panel requires artistic skills, so it is better to turn to specialists for this task.
In fact, this type of coating came to our country exclusively as decorative material, no instructions for artistic use. Design work is not cheap, but it is original. This is the case when creative efforts and financial expenses pay off in full.
More and more often you can find houses that are decorated with panels. Skilled craftsmen create them using decorative plaster. They have a three-dimensional shape and due to this they look alive. If you look at such a panel for a few minutes, you can recreate the whole world. From a distance the impression is not as strong as up close. The panel looks like a painting.
It is advisable to decorate living and dining rooms with similar elements. To make the panel look more impressive, it is necessary to additionally illuminate it from below and from the sides. The contrast of light and shade gives the plot volume and reality. And of course, you should think about the design. If the room is large enough, you can place large paintings in it. In a small room, a panel covering the entire wall will not look good.
To prevent the panel from getting lost in the interior, it does not need to be surrounded by furniture or other decorative elements. It is viewed only as an independent element of the interior.
The “decoration” for a custom panel is applied very painstakingly. The first layer is applied to a dry, cleaned surface, onto which, after complete drying, the next layer is built up, one after the other, until the plot or ornament is completely achieved. The master works according to a pre-created sketch. Paper tape acts as a fixing element for the volumetric parts of the panel. Volume is created gradually. To build it up, plasterboard inserts or pieces of polyurethane are often additionally used.
Types and differences of decorative plasters
Before looking into the composition of plaster, you should divide it into types, since this affects the list of components that form its structure.
So, the entire range of this finishing material can be classified according to its properties:
Textured (creates an imitation of the surfaces of natural materials, usually natural stone; especially attractive for interior decoration of apartments);
Structural (consists of a base and filler in the form of stone chips of various fractions);
Venetian (has special artistic properties; application involves the use of techniques that affect the final result).
Don't forget about the wide price range wall coverings– from “budget” to “business class”. The answer to the question - “how much does decorative plaster cost per square meter? - does not yet give a complete idea of the upcoming costs... The full costs will also include the cost of finishing the walls and preparing the base (of course, if this is required). Prices for decorative plaster of walls depend on the complexity of applying the effect you like and range from 300 to 1,200 rubles per square meter.
Its types are also distinguished based on their composition:
Silicate;
Silicone;
Acrylic;
Mineral.
In order not to unduly complicate the classification, we note a list of materials that may be included in the composition and how they affect it.
Most products are based on viscous water-soluble liquids, such as:
Acrylic, silicone, latex are vapor-permeable components that allow the walls to “breathe,” wear-resistant and washable;
Silicate liquid glass, capable of repelling moisture and dirt, therefore practically does not swell and does not get dirty;
Mineral fillers (marble, quartz flour) – give the surface a pearlescent sheen, radiance, and signs of stone;
Gypsum and lime are responsible for the strength and hardness of the coating.
Other components such as natural pigments, thickeners, cellulose fibers, stone chips, silver and gold threads provide color, consistency, structure and special properties.
Usually already sold finished product, i.e. decorative plaster in buckets, which just needs to be painted.
Cost of application work per sq.m.
Our salon presents samples of decorative plaster of hundreds of textures and shades, including in large formats - so you can easily choose your decor option. But buying plaster for walls is only half the battle; it is important to apply it efficiently and artistically. The application work consists of several stages - preparation of the base, application of the base, finishing and protective layers. This process can take up to a week or more (depending on the area of the room), since the quality of the final decorative coating directly depends on the drying time between layers.
The price for applying decorative plaster per m2 is indicated on the page of each design effect to the right of the texture image. It depends on the degree of readiness of your walls, the chosen application technique and the type of materials used (for example, the composition of the binders - natural or acrylic).
Some types of textures require particularly careful alignment of the walls and more layers to be applied - in this case, the final price per m2 will be higher. In general, the price range for application work is from 700 to 1,600 rubles. per sq. meter. An accurate estimate can be made after inspecting the walls at the site.
Convenience
Decorative plaster is not only beautiful, but also resistant to moisture, does not fade in direct sunlight, is easy to maintain, environmentally friendly, and is not a flammable substance. In order to remove dirt, you do not need to use special products. Traditional ones are fine detergents. The durability of plaster may vary depending on the specific composition, but if the requirements for application, care and operation are met, it can exceed a service life of 15 years.
You can buy decorative plaster for walls both in Moscow - in the Stena-Clavel company showroom, and from regional dealers in many Russian cities, as well as through an online store.
Decorative plaster not only looks very attractive, but also significantly expands the capabilities of craftsmen in interior design. Cost of finished construction mixture For decorative finishing the walls are quite high, which significantly limits the possibilities of its use. In some cases, experts reveal their secrets of craftsmanship and show with examples that do-it-yourself decorative plaster is in no way inferior to ready-made solutions.
It is to such a master that I would like to express special gratitude for clear and accessible video instructions that allow us to implement various ideas for decorating premises. The review includes the combined experience of the masters, which is collected in a separate publication. The recipe and tips will help you endlessly experiment with decorative design in any room where each wall can acquire a unique appearance.
Decorative plaster in different techniques
Versailles plaster from ordinary mixtures
How to make decorative plaster with your own hands like the walls in the Versailles apartments? It turns out that a similar texture can be achieved using regular dry starting material. gypsum plaster And finishing putty, which, when mixed and applied, give an attractive texture with light inclusions of the middle fraction. This finish requires the use acrylic varnish, metallic paint and glitter. Detailed master class from the studio "REDecoration" is shown in the video at the end of the publication.
Sequence of work on applying Versailles plaster:
- cover the perimeter of the future coating with plaster tape;
- prime the surface with quartz primer, which will ensure good adhesion and allow you to work longer with the model mass. For these purposes, Ceresit “Primer paint for thin layer plaster and paints";
- The model mixture for decorative plastering work is mixed with water in a 1:1 ratio of finishing putty and starting gypsum plaster. The manufacturer of the mixture is not important, but you can use, for example, dry mixtures G-Start and Satenpro;
- the mixture is mixed with a mixer twice, the first time immediately after adding the mixtures, the second time after the mass has stood for several minutes;
- the plaster is applied to the wall in a layer of 2-3 mm using a spatula and trowel, making random streaks to create the desired texture, special attention is paid to the corners and the space near the ceiling molding and door;
- the model mass is applied in an even layer to the wall, and then an additional “textured” layer is made using a plastic trowel, which creates the desired volume;
- after the plaster has dried, the resulting unevenness is smoothed out and sanded using a spatula, a paint float and sandpaper (No. 60), the result is a beautiful smooth coating with a pronounced but shallow texture;
- on next stage a deep penetration primer is applied, thoroughly covering all irregularities and avoiding smudges;
- after priming the surface is painted, for this purpose it is mixed White paint with any selected dye, it will take about 2 hours for this layer to dry;
- the next layer is to paint the wall with metallized decor, silver is diluted on the primer in a ratio of 1:1, then applied with light movements foam roller on the first layer of paint, without filling all the irregularities (pay attention that there are no traces left from the roller);
- The finishing layer of the surface is made with varnish with the addition of glitter. First, the varnish is diluted with water by 30% to avoid a varnish “crust” on the finished coating, then glitter is added at the rate of 1 tsp. for 1 l. While working, the varnish must be stirred regularly to “lift” the settling glitter.

Obviously, in this way you can make plaster in any color, finished with metallic paint of any shade and decorated with colored and plain glitter. You can also change the manner of applying plaster, creating different textures. The varnish gives the coating quite high strength and protects the wall from fading in the sun; both matte and glossy varnish coatings can be used for the coating.

Flemish plaster - two-color tinted in mass
Working with Flemish plaster differs from the above Versailles and the Venetian way application and finishing, it is also made from ordinary putty based on the model mass, the recipe for which is given above. The approximate consumption of such plaster is 80 g per 1 sq. m.

The key difference between this coating is that the finished decorative putty is tinted in the mass, that is, the dye is added specifically to the finishing plaster mixture, and is not applied as a separate layer. The video tutorial uses yellow-brown and coffee plaster, which is applied with a large spatula to the prepared surface in a back-to-back motion, thus creating a beautiful two-color texture.
At the next stage, the wall is smoothed using a trowel or spatula. There is no need to achieve perfect smoothness. The main goal is to mix two colors of plaster and create an interesting two-tone finish.
Flemish plaster is applied in three layers using spatulas different sizes, decreasing their size from layer to layer. On the second and third, you can use a 20 cm tool. Subsequent layers are applied in such a way that a texture is formed on the wall and irregularities are formed inside the smooth surfaces. The size of the “islands” will depend on the volume of the mixture used in one putty application cycle. The more model mass there is on the spatula, the larger the “islands” of a smooth surface can be made on the wall. Last layer can be applied with a Venetian trowel according to the “press and smooth” pattern, in this case a different texture is obtained.
After applying the plaster, the wall is painted with a deep penetration primer. After completely dry The plastered area is covered with glaze using a trowel. The mixture can be prepared according to the following recipe (consumption 120 g per 1 sq. m):
- glue for non-woven wallpaper, diluted according to instructions - 2 parts;
- panel varnish – 1 part;
- paint “Silver” – 0.5 parts.
In its structure, glaze is a regular wax, which is used to cover plaster as a finishing layer. Please note that in the recesses the wax is not completely removed, resulting in a texture with areas of varying degrees of silvering. Instead of silver, mother-of-pearl or gold can be used to prepare azure, which allows you to achieve different lighting effects.
If desired, the wall can be additionally decorated with varnish, which will give the coating durability. For wet rooms, yacht varnish or waterproof facade plaster can be used.

Prague plaster
Prague plaster or, as some masters call it, “Venetian fresco” is applied to a pre-tinted surface. To do this, façade paint and color are added to the soil. desired color. The main task is to create a colored base layer at the same time as applying the primer. When applying the primer layer, it is not necessary to achieve uniform “covering”.

To prepare a model mass of decorative Prague plaster, any acrylic putty, 1/10 of the sand and color are added to it (preliminary consumption 1.5 kg per 1 sq. m). The first layer of putty is applied with a Venetian trowel, forming an uneven surface in the form of “islands”. The sand results in a more voluminous texture and a richer finish.
The second layer of putty is applied to the wall using the trowel trimming method. The movements involve pressing the trowel with the mortar against the wall in a chaotic manner. Please note that the required two coats are applied one after the other. First, approximately 1 sq. is done. m of surface and the first layer is applied, then the same area is decorated with texture using the trimming method.

The next area is covered with the solution in the same way. After this, you need to return to the previous area and smooth the plaster “along the tops” using a 20-centimeter spatula, removing the remaining mortar from the tool. After about five minutes, the finished surface needs to be polished with a Venetian trowel, without applying much effort. The degree of readiness of the coating for this operation can be determined by touching your hand; the putty should not stick to your fingers.
On final stage the finished surface is painted after applying a layer of deep primer and allowing it to dry completely. For the finishing coat, a special paint composition is used based on Venetian plaster, diluted with water (consumption 150 g per sq. m). Using Venetian plaster as a paint will result in a more interesting, slightly shiny surface.
At the final stage, the lined surface is covered with special wax for decorative plasters; this is done using a plastic wallpaper spatula. For these purposes, the so-called Parmesan blue can be used, which gives a very beautiful effect of noble shine.

Decorative plaster for finishing facades and fireplaces - stone finish
The proposed method of decorating surfaces can also be used for finishing facades and fireplace portals, but other mineral fillers are used for these purposes. A good option The choice of stone-like finishing can be considered dolomite plaster, but, unfortunately, its price is quite high for finishing a facade.

To reduce the cost of the original decorative mixture, use dolomite flour, which is added to a stylor-acrylic dispersion (UCAR™ Latex DC 640) for external work, which has a high water-repellent ability, or acrylic putty (Sniezka Acryl-Putz) for internal work. IN ready material dye, metallized filler, glitter or mother-of-pearl are also added.
Dolomite putty must be applied to the fireplace in two layers, first in an even layer with a large Venetian trowel, then a painting layer is made by trimming the surface, followed by smoothing using the same trowel.
The surface is lightly sanded with sandpaper No. 150, primed and then decorated with Venetian plaster. It is applied diluted with water like paint using a regular roller. After application, the plaster is polished with a trowel.
The natural texture of stone is always distinguished by shiny inclusions, so the dolomite-like surface is also decorated with a coating with a metallized filler. To do this, copper is added to the wax and it is applied along the texture of the surface, bypassing the smooth areas of the cladding. At the final stage, the surface is covered with wax without glitter and polished with a soft trowel. Two-color stone-like plaster can be obtained using the Flemish application method described above. As can be seen from the examples, making a decorative stone on any surface with your own hands is not at all difficult and it will not cost much, and the effect will exceed all expectations.

Facade decorative plaster
After gaining experience in applying decorative plaster for interior work, the question arises about exterior finishing. For this purpose, you can use liquid glass, with which you can make a waterproof version of plaster:
- first apply a primer layer using a diluted solution liquid glass;
- a model solution of waterproof (hydrophobic) plaster is mixed in following proportions: ready-made solution is used plaster mixture in a ratio of 7:1 to liquid glass or prepare 1:2:5 plaster from liquid glass, cement and sand.
Video instructions for applying decorative plaster
In conclusion, we provide examples of how to make decorative plaster with your own hands, video using all the mentioned methods. Good luck. The examples given will help you make expensive repairs in your home at low cost.
Decorative plaster solutions, or decorative textured coatings, do not require further processing or surface finishing. They can be applied to walls and partitions made of any material - be it brick, concrete, plasterboard, wood or ordinary plaster. But the plaster hardens very quickly, so it is quite difficult to carry out finishing work with its help on a large surface.
In addition, the use of decorative plaster for wall decoration requires mandatory careful preparation surfaces (treatment with primer, putty, grouting materials).
Typically, decorative plaster is produced in the form of a dry or ready-to-use thick mixture. The basis of such materials includes a polymer binder, filler (marble or granite chips, sand, lime), on which the texture of the future coating depends, as well as a liquid base - water.
Dry plaster in packages
Decorative plaster often includes other additives that provide additional properties (different surface structure, protective shock-proof properties).
There are also special, separately sold additives for giving decorative plaster a particular color.

Plaster with color additives
If the coating is made in the form of a dry mixture, it must be diluted with water in the required proportion. The plaster is applied quite quickly: first with a brush, and then with a spatula or other tool, or with a special tool immediately (which one should be indicated in the instructions for using decorative plaster). Such a tool can be a roller, brush, trowel, or trowel.

Stretching plaster is always applied using a trowel, working from the bottom up. This plaster is characterized by a denser grain structure. Externally, it is very different from ordinary plasters.
The use of decorative plaster provides many possibilities. For example, using various molding tools, you can additionally create different types of texture.
Plaster consumption is measured in kilograms per square meter of surface and usually ranges from 1.5 to 3 kg.
Decorative synthetic plaster is also used for finishing as interior walls, and facades. Depending on the graining and direction of grouting of such plaster, you can create an individual structure for the walls of the interior. This plaster is usually used as a finishing coat, but can be additionally coated with paint.

Decorative plaster in the room
Grout mineral plaster is characterized by a high content of natural grains and does not contain artificial resin. It has a high ability to transmit water vapor. Used for external and internal work.
Before covering the walls with decorative plaster, apply a preparatory layer of ordinary plaster, consisting of spray and primer, along the beacons. The surface of the preparatory layer is scratched, giving it roughness for better adhesion to the decorative layer. A coating of decorative mortar is applied over a well-seasoned preparatory layer. Moreover, it can consist of two, three or more layers.

First, a spray of decorative mortar is applied to the preparatory layer, then a layer or layers of primer and, if required, a cover of the same mortar.
Creating decorative plaster from ordinary
Decorative plaster “Wave”
A variety of textures for future painting can be “depicted” on ordinary plaster. For example, “waves” look great on lime-sand plaster.
To reproduce them on the surface, apply a second layer of mortar in straight or curved strips to fresh or previously rubbed plaster, notched and moistened with water, and smooth it with a spatula. This way a wavy surface is obtained.

Plaster "Wave"
Plaster "Traverine"
To create travertine (lime tuff) on the wall, a thin layer of colored mortar is applied by throwing to the prepared plaster surface. After this, smooth it with a spatula or steel trowel. The result is raised islands on a smooth, worn-out background - the so-called decorative “stones”.

Plaster "Traverine"
About the process of applying this type of joke, watch the video:
Stone plaster
To create a “boulder-like” texture, apply a plastic colored solution to the ground, quickly level it with a trowel and then trim the surface with a hard hair or bristle brush. When trimming, the brush should be held strictly perpendicular to the surface. A hard brush is needed because only it gives clear, sharply defined “boulders”.

Stone plaster
Plaster "Dune"
Under the dunes, the colored solution is also first leveled with a trowel, and then a grater is applied with slight pressure and immediately torn off. The solution sticks to the grater and, together with it, is pulled away from the surface, causing roughness to form on the surface. Externally, these roughnesses are very similar to sand dunes. If you want the dunes to be wavy, you can not tear off the grater directly, but slightly move it to the side. To obtain the texture of small dunes, the solution is first allowed to set a little. After this, it is lightly rubbed, a grater is placed on the surface and it is torn off.

Plaster "Dune"
Watch how to apply Dune to a wall in a short video:
Plaster “Furrows”
The “furrow” texture is obtained using a grinder with semicircular teeth, which is made from a steel strip or wood. It is up to 30 mm wide with gaps between the teeth of 10-15 mm. The teeth of the hammer are sharpened in one direction. Apply a slow-moving solution to the prepared soil, quickly level it with a trowel, then take it into left hand rule and apply it to the solution that has not yet set. Now you need to place the small bit on the rule with your right hand and guide it with the sharpened side of the teeth forward at an angle of 45° to the surface. This way, even furrows are obtained. Their size and shape, naturally, depend on the shape of the teeth of the bait.

Plaster “Furrows”
Plaster “under a fur coat”
By spraying, throwing the solution through a mesh, shaking the solution from a broom or brush.

Methods of applying plaster “under a fur coat”
Spraying through a mesh and from a broom is carried out with any solution (even with coarse aggregate). Only a solution with fine aggregate is suitable for spraying with a brush. To get a dense spray without skipping, repeat it several times until there are no areas left on the surface not covered with the solution. Can also be used special device for spraying (outwardly it resembles a fan).

Spraying plaster under a fur coat
Spraying on the mesh is done like this. Stretch a mesh with cells from 2.5 to 10 mm (the specific size depends on the size of the texture) onto a wooden frame measuring 100 x 100 or 100 x 50 cm. Stretch the wire diagonally from the back of the frame. It is necessary to ensure that the mesh does not bulge or vibrate during operation. Attach the mesh to the wire and tie it. To ensure that the frame is always at the same distance from the wall, nail strips 10-25 cm thick to it.

Spraying plaster “under a fur coat” through the mesh
The frame is placed against the surface of the soil and the solution is thrown through the mesh with a spatula from a falcon. Passing through the mesh, the solution remains on the surface in the form of tubercles. To ensure that your texture is the same, try to apply the solution with the same force.
When spraying from a birch broom, hold it with your right hand, and in your left take a round stick with a diameter of 4-5 cm and a length of 50-60 cm. Scoop the solution onto the broom and hit it on the stick, shaking it onto the wall surface. The size of the resulting texture will depend on the thickness of the broom rods, the thickness of the solution and the force of shaking. While working, stir the solution from time to time so that it does not separate.

Spraying plaster “under a fur coat” with a broom
To get a finer texture, spray with a brush. It is better to use a stiff hair brush or (the best option) a bristle brush. The brush is held with the left hand and, having been dipped into the solution to half the height of the hair, is brought to the surface with the bristles up. Then they pass along the bristles with a stick or board (it is held in right hand), and the solution flies off the brush onto the surface to be plastered. A thick texture will remain on the wall, similar to the pile of a fur coat.

Brush for applying plaster “under a fur coat”
To obtain a texture similar to snow flakes, spraying is done with flakes of a creamy plastic solution. The wall will be especially impressive if flakes of white mortar are applied to colored plaster. In this case, the colored solution is first applied, leveled and rubbed, and then sprayed over it. This must be done without waiting for the plaster to dry.
To create a texture with a sponge, apply a solution of a creamy consistency to the soil, quickly level it and immediately apply face blows to it with a sponge. After this, a relief remains on the surface of the plaster, the appearance of which depends on the shape of the pores of the sponge. To prevent the solution from sticking to the sponge, it must be moistened with soapy water and lightly squeezed.

Instead of a sponge, you can use a relief roller
To obtain relief patterns on an unhardened plastered surface, you can use special stamps or any convex objects: shells, dense leaves, branches, etc. Pieces of stone, brick, multi-colored glass fragments, shells can simply be pressed into the still soft plaster. It will harden and hold the mosaic together.

To give relief to the plaster, you can use a variety of objects.
Sgraffito plaster
Another method of decorative wall decoration using plaster is called “sgraffito” (scratched). This technique involves scraping thin layers specially applied colored plaster. If there are several such color layers, the resulting pattern will be voluminous and multicolored, reminiscent of a fresco.

Wall finishing using the sgraffito method
Now let's move on to considering techniques for decorating walls using terrazite plaster. This type of plaster consists of a large amount of fluff lime mixed with white cement, white sand, marble chips, glass, mica and other materials. What makes terrasite plaster special is the addition of mica and anthracite fines (up to 10% of the volume of cement).

A type of terrasite plaster
Plaster-hatching
The “hatched” texture (straight or shifted strokes) with irregularities from 2 to 5 mm is obtained from fine-grained mixtures using a freshly applied solution. The solution (in the interval from 1 to 6 hours after application) must be processed by notching with nail combs or toothed scrapers. Inflicted cement mixture can be treated with Troyanka or scarpel. Work on the hardened mortar begins no earlier than 6 days after its application.
Plaster "Rock"
The rock-like texture resembles crushed stone, and is made from hardened mortar with coarse aggregate, hammered with a chisel or tongue. The tongue and groove is driven into the mortar, thereby knocking out pieces and leaving indentations that form a uniformly grained surface. If the processing is carried out with a chisel or a scarpel, cutting off pieces of mortar, the surface will have the appearance of torn or chipped natural stone.
Technology of application and texture of stone plaster
Before processing, the surface of stone plaster is divided into separate “stones”. To do this, using a chalked cord, lines of rows of “stones” or rusticated “seams” are punched, as well as straps and other straight parts. After this, they begin to finish the plaster to suit one or another texture.
Texture “under a fur coat” performed with different tools. If you perform notching with bush hammers with large teeth, the result will be a coarse-grained texture, with small teeth - a fine-grained texture, and when forging with a tongue and groove, a particularly coarse-grained texture will be obtained. Keep in mind: with large and long spikes of bush hammer teeth, the texture is deeper and larger.

Under shading The work with grooves is done with a bush hammer, only instead of teeth it should have blades. The depth of the grooves will be determined by the size of the teeth. The first forging is carried along the line marked with the cord, and the subsequent ones are parallel to it. To obtain a texture with the entire surface divided into strips, you need to use a trojan or gear.

Bouchard and Trojan
Texture “under the dunes” on stone plaster it is done with a chisel. First, the surface of the wall must be cleaned with steel brushes or rubbed off with stones. And then from a well-compacted and rubbed surface of the plaster, you need to cut off a thin layer so that small depressions are formed.

Types of chisels
Under torn stone or roughly chopped sandstone invoice made with tongues, chisels, scarpels. First, apply a solution to the surface in a layer of 4-6 cm, compact it and divide the surface into “stones”. When the solution has set, they cut through or perform rustications, and then treat the surface as necessary to obtain the texture. A chisel or dowel is driven into the applied hardened plaster and pieces of the mortar are broken off in different places to form large irregularities. If you want to get the texture of hewn sandstone, use a chisel to chop off small pieces of plaster.

Fur coat finish and torn stone finish
Coarse-grained and fine-grained textures received in two doses. First apply cement mortar- in small or large throws, - then prepare a solution for stone plaster and apply it in a layer up to 10 mm thick over the set layer of soil. The top texture can be fine-grained or coarse-grained, depending on the filler.
Application of Venetian plaster
For achievement best result The surface to be covered with Venetian plaster should be as smooth as possible, plain (white) and non-absorbent. You cannot apply plaster to wood and metal - over time, the coating will crack.

Tools for Venetian plaster
To prepare and cover walls with Venetian plaster, you will need the following tools:
- two brushes - maklovitsa and flute,
- roulette,
- long ruler
- level,
- pencil,
- syringe dispenser,
- measuring cups,
- containers for mixing materials,
- mixer,
- ladder,
- bucket with water,
- sanding paper (no. 120 and 220),
- sanding float,
- two ironing boards from of stainless steel width 250 and 200 mm,
- wide and narrow spatulas made of forged polished stainless steel.
It is advisable to round off the working edges of the tools and polish them with fine-grained sandpaper, completely removing scratches, burrs and other defects.
Before applying Venetian plaster, make sure the base is thoroughly prepared. If the base is not properly prepared, cracks may appear on the surface that cannot be repaired.

Stages of applying Venetian plaster
The depth and transparency of the coating is achieved special equipment application.
The master applies several thin layers of coating to the wall, consisting of randomly located spots of material. The combination of many such spots and their layers creates the illusion of depth in the pattern of natural material. The number of layers varies from 2 to 10, but the total thickness hardly exceeds 1 mm. Each layer must be smoothed (pressed) manually with a spatula, float, or grater until a completely flat, smooth and glossy surface is obtained. Even an experienced specialist takes almost an hour to work with 1 m² of one layer.
The first layer is usually made of a material that contains finely ground marble chips. It is applied to the surface with a steel trowel or spatula in the same way as putty. After 4-6 hours, covering and glazing layers can be applied to this layer, which will create the texture of the coating pattern.

Applying the first layer of plaster
If you need to get a matte finish, then the second and subsequent layers are made of the same material as the first. The glossy surface is obtained using a finely dispersed material mixed with the selected dye.
When starting work, use a spatula to apply a small amount of material onto the work surface long ironing iron. Now start working with any top corner. Proceed in the same way as when applying finishing putty, applying the mixture in an even layer. Cover areas near the floor using a bottom-up motion. Press the trowel firmly against the wall, holding it at an angle of 10-15° to the surface. Make sure there are no gaps.
When the first layer has dried, begin applying the next one.
First, mix the coating material: add dye to it (if you bought a “semi-finished product”) and mix everything thoroughly again.
Next, apply a small amount of material along the edge of the short trowel with a narrow spatula and spread it in random strokes using short arc-shaped movements. Each movement should be approximately equal to the length of the iron. If a swell forms on the wall at the end of the movement, disperse it rectilinear movement at an angle to the sag line. Alternate the movements of spreading and accelerating and randomly change their length and direction. Apply the coating on the floor using arcuate movements, starting from the bottom. Finish when an area of approximately 0.7 x 0.7 m is covered with the second layer.

Stage of applying Venetian plaster
Now level the coating in this area with long strokes of the trowel in random directions. Every 2-3 strokes, clean the ironer and wipe it with a damp cloth. Increase the pressure and tilt of the smoother plane to 20-25°. The result should be a uniform thin layer.
After 10 minutes, begin to smooth the coating with the edge of a wide (200 mm) spatula. Movements with a spatula from top to bottom should be slightly crossing. As gloss appears (this occurs from heating and polymerization of the material), release the pressure on the spatula. If this is not done, the resulting crust may be damaged.
To finally polish the surface, you need to smooth it with a clean trowel. At the same time, it is pressed firmly with both hands and held at an angle of 5-12° to the plane of the wall. When polishing an area near the floor, direct the strokes of the trowel from bottom to top and slightly cross them.

The next stage of applying Venetian plaster
When finished, proceed to apply the second layer to the next area, repeating all stages of the operation sequentially.
The pressure on the stroker is released at the beginning and end of the movement (as when scraping). This allows you to change the thickness of the material layer. When smoothing and glossing, the movements of the trowel should cross the boundaries of adjacent areas. To get the desired texture, change the size of the trowel, the length of the strokes, the spaces between them, as well as the force of pressure on the tool.
When working in corners, openings, ledges and other difficult places, direct the spreading movements from the border line into the area. If necessary, use a spatula instead of a smoothing iron.
While the second layer is still wet, begin applying the next layer in randomly placed spots. At the same time, the entire finishing cycle is repeated in sections. Apply as many layers (moleno of different colors) as needed to achieve the desired result.
If you accidentally damage the surface, use a narrow spatula to apply the first layer of material to the area and around it. When it dries, repeat the entire operation of applying the next layer.
You can use the room after all the work is completed within a day, but it’s better not to rush. The walls will dry completely in a week.

Venetian plaster
After all layers have dried, you can cover the walls with natural beeswax. It will enhance the shine of the coating and give the feeling of an optical illusion. Waxing gives the coating additional moisture resistance. There is no need to apply wax to some plasters produced today: all the necessary components are already contained in the material.
Wall decoration with decorative plaster: 10 types of textures with your own hands
With the help of decorative plaster it is easy and simple to create expressive and unique patterns on the surface of the walls. Admiring the effectiveness of the facade, we can conclude that only specialists can perform such a task. However, it is not. The main role in creating original reliefs is played not by the skill of the specialist, but by the material he uses: decorative plaster.
Types of decorative plaster
It contains special substances: fillers. They help create a beautiful drawing. No special or expensive tools are required for this. But it is necessary to choose the right plaster mixture and know the technology of its application.

The composition of decorative plaster mixtures differs from the composition of conventional ones not only by the presence of filler. If the material is intended for facade (exterior) work, it also includes additional components that ensure increased resistance of the facing surface to moisture, temperature changes, and ultraviolet radiation.
Pattern effects that can be achieved using special techniques for applying decorative plaster:
- aging;

- cracking;

- adding volume;

- rough surface texture;

- "silk";

- planes with different relief depths.

There are three types of decorative plasters:
- mineral;
- textured;
- structural.
They all have their own characteristics, both in terms of composition and application rules.
Mineral decorative plasters

The basis of mineral plasters is natural. Crumbs and dust of various types are used as filler. valuable species stone: granite, marble, onyx, malachite. Includes quartz sand of different grain sizes. Cement and gypsum act as binders. Plasters on cement based classified as façade. Mixtures with a gypsum binder are used exclusively for interior work.

Mineral decorative plaster “Bark beetle” 2 mm. Premium quality. For outdoor use

All types of mineral plasters must be prepared for use by adding the dry mixture to water in the proportion specified by the manufacturer.

The finished mixture can be applied to the wall in several layers. The final stage of work is finishing with wax or painting. Wax serves as a protective and decorative coating.

Since all types of mineral plasters are diluted with water, they do not have a long “lifespan” of the mixture. Therefore, it is recommended to prepare enough mixture so that it can be worked out before it begins to harden. One of the advantages of mineral dry plaster compositions is that they have much more low price than ready-to-use acrylic ones.
Textured plasters

Textured plasters are dough-like mixtures that can be tinted to any color during the mixing process, or coated with paint after the finishing layer has been applied and hardened. This type of plasters is characterized by unsurpassed plasticity, which allows you to create real masterpieces on the walls.

This effect is achieved due to the mixtures of natural fibers included in the composition, which can be cotton, linen, or wood. Some manufacturers use ground brick as a filler. Using mixtures of this type, you can create relief paintings, bas-reliefs and panels.

The popular “Venetian” plaster is not a separate type of decorative plasters, but belongs to the category of textured mixtures. It is called “Venetian” because of its special composition, which allows the use of a special application technique, which provides a spectacular wall pattern.

Structural plasters
Plasters of this type are heterogeneous granular masses. The binders are potassium silicate (silicate plasters), synthetic latex (latex plasters), and cement-lime composition. There are two types of structural plasters:
- on water based;
- solvent based.
Hence the classification of these mixtures: water-soluble and organo-soluble. The main representatives of this type of finishing mixtures are “Bark Beetle” and “Shuba”.


They are the ones most often used in finishing facades. The reason is simple: these mixtures are easy to apply, form an attractive surface pattern, and have excellent wear resistance. In addition, they have one more advantage: reasonable price.
To dilute solvent-based mixtures, white spirit is mainly used. It should be noted that it does not dissolve anything in the plaster mass. He dilutes it to the desired consistency. Therefore, experts call any liquid added to the finishing composition not a “solvent”, but a “thinner”.

Acrylic plaster "Ceresit"

Pebble plaster "Ceresit"
Among structural mixtures, acrylic plaster is the most popular. Its distinctive feature is that it is ready for use immediately after purchase. These mixtures do not require dilution with water or solvent. This fact is their undoubted advantage. In addition, acrylic plasters are much more elastic and durable.
They have higher adhesion rates (adhesion to the base) than mineral and solvent-based structural ones. Acrylics can be applied to almost any surface: wood, brick, concrete, aluminum.
In sealed packaging, acrylic plasters retain their properties from 6 months to 1.5 years. Some manufacturers produce mixtures with a shelf life of up to 2 years. Another advantage of acrylic compounds is that walls treated with them can be painted.

“Small bark beetle”, decorative acrylic plaster for exterior and interior use

The only drawback of these mixtures is their lower vapor permeability than mineral ones. However, it is sufficient to use this material to construct a “wet” facade, which is also a heat insulator.
Specifications
Prices for various types of decorative plaster
Decorative plaster
Techniques for applying decorative plasters
Mineral plasters must be prepared for use by diluting with water. On average, up to 30% liquid is required. All manufacturers indicate the required proportions on the product packaging. Mineral mixtures are applied in two layers.
The use of any plaster compositions requires careful surface preparation. The walls must be inspected for the presence of deep cracks, and make sure that the load-bearing surface is strong enough and does not require major repairs.

The next stage of work is priming. To perform this task, use deep penetration primers intended for external finishing work.

Plastering of the facade begins from the corner of the building. The work is carried out in stages, gradually applying the mixture to areas small area. The first layer is the base layer. It is applied with a spatula so as to avoid overlaps and obtain as smooth a surface as possible. For leveling, you can use a spatula with a wide blade or a rule.

The main work on decorating the facade occurs at the next stage of work: when applying the second layer.

Tools for creating a decorative surface
To apply decorative plasters, special textured rollers are used. They differ from ordinary ones only in that they are equipped with rollers with a textured surface.
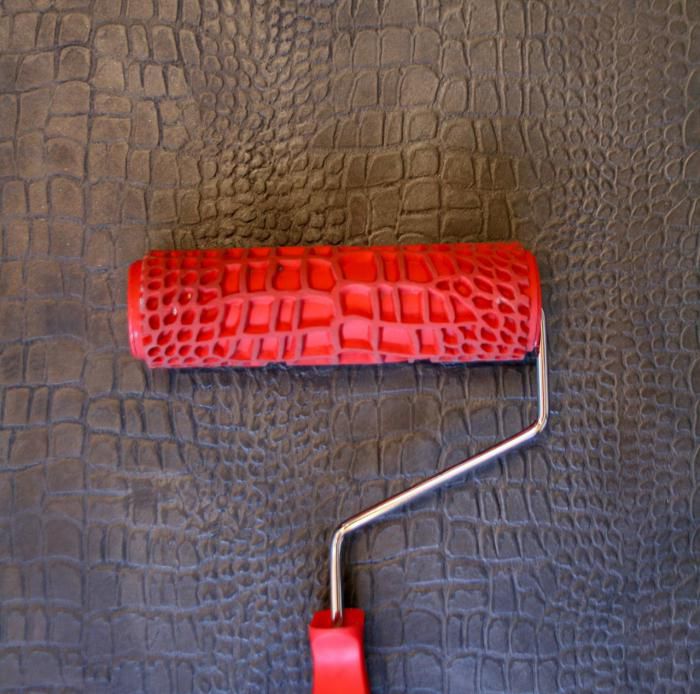

Depending on the material the roller is made of, there are several types of rollers:
- wooden;
- rubber;
- plastic;
- leather;
- pile.
Standard sizes:
- with a roller width of up to 30 cm (short rollers);
- with a roller width of up to 50 cm (medium length);
- with a roller width of 50 cm (long rollers).
All types of rollers can be roughly divided into textured and structural. The latter have a more relief surface than the former. Textured ones are designed to create an imitation of marble, natural stone, textiles. “Bark beetle” and “Shuba” plasters are applied using textured rollers.
Structural rollers are designed to produce a pronounced relief pattern, consisting of a repeating rather complex pattern. Externally, it creates the effect of voluminous wallpaper. The decorating technique using these tools is more complex than when using textured rollers.

Working with structural ones requires extreme care and attention. The rollers of these tools are usually made of wood or plastic. The use of such rollers requires compliance with several rules.
- Surface decoration is carried out using a base layer that has already hardened and leveled. For application use a liquid mixture. If you work with a dense composition, the recesses of the relief texture of the nozzle will quickly be filled with the mixture, so it will not be possible to obtain a pronounced pattern.
- The pattern is applied in stripes by rolling the roller in the direction from bottom to top or top to bottom.
- Each subsequent strip should fit tightly to the previous one, but not overlap it.
- When decorating walls, they try to avoid putting pressure on the roller. In this case, the relief of the pattern will be of the same depth.
- During work, the wall surface is moistened using a sprayer or a paint brush.
- The roller is periodically dipped into a container of water, washing off the adhering plaster mixture from it.
Prices for textured rollers
Textured rollers
How to get the “Marsiniada” invoice
To obtain the “Marsiniada” texture, structural plasters are used. Using this technique, they create a stylish and effective pattern that is suitable for decorating walls indoors and outdoors.

According to the instructions, the structural mixture Desan Versagele is required for plastering. However, the surface pattern is obtained using a special technique, and not due to any features of the composition. Therefore, to create the “Marsiniada” texture, you can use any suitable structural plaster.


Execution technique
Step 1. Open the container with wet plaster and thoroughly mix the composition with a spatula.
Step 2. Using a trowel or stainless steel spatula, apply the mixture to the wall, trying to obtain a uniform layer up to 5 mm thick.

Step 3. Immediately after applying the plaster, it is covered with thick plastic film. Smooth out all the waves with your hand so that the film sticks to the plaster mixture.
Step 4. Perform a series of movements with the palm, trying to displace part of the film without leaving a fingerprint. In this way, a thin layer of plaster is spread over the entire surface of the wall. Make sure that no air bubbles remain under the film.


Step 5. Wait for the relative hardening of the plaster mixture (at least 12 hours).
Step 6. Carefully remove the plastic film.

Step 7 After the walls have completely dried (after 24 hours), treat the surface with fine-grained sandpaper.

Step 8 Using a dry paint brush or rag, remove dust from the wall.
Step 9 Apply a layer of finishing primer with a brush or roller.
For more reliable protection On a plastered surface, you can apply a layer of varnish or paint to the wall. To perform this task, use any most convenient tool: spray gun, roller, paint brush.

An important point: rub the varnish or paint over the plaster with a soft foam sponge until it dries. This allows you to fill all the recesses of the relief pattern and gives the surface a finished look. While working with a sponge, periodically rinse it thoroughly with water and wring it out. You can apply several layers of varnish or paint. In this way, the desired shade of the façade color is obtained.

How to get the “Corals” texture
To obtain the “Corals” pattern, structural plasters with fine or medium-grain filler are used.
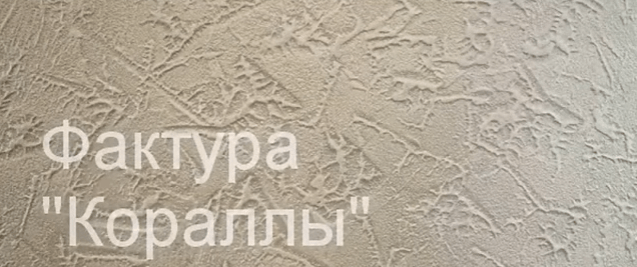
Step 1. Open the container with the composition and mix it thoroughly.
Step 2. An even layer of plaster mixture is applied to the wall. Use a trowel, trowel or stainless steel spatula.

Step 3. Smooth out the applied layer using a spatula with a wide metal blade.
Step 4. Take a spatula with a rectangular blade and gently press it against the wall surface. This is an important stage of work, so you need to be extremely careful.

To obtain a drawing, follow the following technique:
- apply the spatula to the wall with the entire area of the sole;
- remove the spatula with a jerky movement;
- apply the spatula to the wall, changing its direction: perpendicular or oblique relative to the previous imprint;
- tear off the stuck trowel sole from the plastered wall.
Step 5. After 15-20 minutes, use the same tool to slightly smooth the pattern, leveling its relief.

Step 6. After 24 hours, the wall is treated with fine-grained sandpaper.

Step 7 Apply protective composition: finishing primer, varnish or paint.


This way you get a beautiful relief pattern “Corals”. The print density can be any. But the most effective pattern is one without overlapping prints.

Video - How to apply decorative plaster with your own hands
Video - Decorative plaster, granite chips based on natural stone
Those who want to save money on wall decoration cash are faced with the question of how to make decorative plaster with your own hands. This is not only fashionable, but also practically profitable.
The main advantage of decorative finishing is breathability. Undeniable dignity its advantage is that it allows you to hide all the unevenness of the wall. In case of contamination, it is easy to clean. Making plaster with your own hands is very simple. By mastering several techniques for applying putty, you can achieve amazing results in the decoration of your home. The work done will satisfy any taste, decorate the room with panels and compositions made.
This type repair work is relatively cheap if you do everything with my own hands, buy only the necessary materials for the composition of the plaster.
The walls must first be thoroughly cleaned of the old coating. Using a level, the evenness of the base is determined. If necessary, the surface is leveled by applying a layer of putty. After drying, it is primed. Now you can start applying the plaster.
Mixtures for decorative works can be purchased in the form ready solution in the shop. But it is best to use a self-made composition of dry putty. You can use gypsum mixture, PVA glue. The composition should be diluted at the rate of 200 g of glue per 6 kg of gypsum with water in an amount of 2 liters.
A mixture for plaster is a pasty mass made up of a base and various fillers. For the first, use regular dry putty. It is cheaper, and based on it you can independently prepare the desired composition. This method is justified by its cost-effectiveness. Dry putty is diluted in a container with water and work begins.
Types of decorative plaster
Depending on the effect that will be obtained after plastering and the components used when mixing the composition, the following types of plaster are distinguished:
- structural (with additions);
- textured (to obtain a smooth coating);
- Venetian (to create antique effects).
- flock plaster
Structural plaster

Structural plaster is made on the basis of a cement-lime composition ( mineral base) and synthetic latexes with the addition of granular elements:
- pebbles;
- granules;
- wood fiber.
For interior decoration, it is more convenient to use water-based structural plaster. Its distinctive feature is that it is more hygienic and leaves no odor. The plasticity of the composition makes the process of applying such plaster convenient. It is sold ready-made, it does not need to be diluted, the consistency has the necessary concentration. It is not necessary to thoroughly level the walls for structural plaster, because it will hide all its defects after application to the surface. The main condition is that it is dry and clean. Before plastering works Be sure to prime the wall and dry it. After this, you need to apply the composition with a spatula to the surface in a thin layer. After 3 days, the plaster will dry, but final hardening will be achieved only after a week. Therefore, during this time you need to be careful not to damage the plaster.
Textured plaster

With the help of textured plaster, it is possible to create a relief surface of the wall with an imitation of some material: burnt paper, wood, stone. Certain techniques for applying the composition are used. The basis of the plaster is a lime mixture. Wood fibers, granite, marble, and quartz chips are added as fillers. Using polymer materials as a base allows you to create a more stable relief coating that will not crack. How to make textured plaster with your own hands?
Before applying the coating, the wall surface should be prepared. To do this, it is primed and a layer of paint and sand is applied to better bond the plaster to the base. Then a thin layer is applied with a spatula. Depending on the intended pattern, the number of layers may be greater. It should be noted that the more layers, the thinner the thickness of the coating. You can buy the putty mixture ready-made in the store, but it’s better to make it yourself. Dry putty powder must be diluted with water and mixed. You can immediately add paint to the solution to obtain color in a ratio of 1:10, or after applying the plaster, you can apply a layer of paint with a brush, roller or sponge. The second option is preferable to achieve the effect of uneven coloring.
If a composition with filler is used for plastering, it should be noted that the larger the grains of the filler, the more putty composition is required for the job. It depends on what kind of drawing will be done. Rough terrain requires the choice of coarse filler.
Texture decorative surface can be given various instruments. A striped texture can be created with a brush or spatula. Here you can show your imagination by making movements on the surface. To repeat the design, it is convenient to use a stamp or applicator. If, after applying the plaster, you rub it with a plastic trowel, you can achieve effects such as “rain”, “lamb”, “carpet”.
“Rain” is formed when moving up and down. By changing the angle of inclination diagonally, you can get slanting rain. “Lamb” is performed with circular movements, during which circular grooves are formed, reminiscent of lamb’s wool. The “carpet” comes out after alternating transverse and longitudinal movements.
Before painting, let the plaster dry for 24 hours. Apply a layer of paint to the dry coating layer with a brush or roller. The advantage of this method over tinting is that after this operation the surface can be leveled with sandpaper
To give the surface the effect of dark grooves, you must first go over the wall with a layer of darker paint and let it dry. And then apply a light layer of paint on top with a semi-dry roller. You will get spectacular dark grooves.
In order to fix the color and prevent the surface from staining clothes, you need to cover the plaster with a layer of varnish.
Venetian plaster

Venetian plaster allows you to create the effect of marble stone using a transparent composition made from marble flour. It is made on the basis of lime and water emulsion. This finish requires a perfectly flat wall surface. But the effect of creating a marble mosaic exceeds all expectations. The marble surface made in this way is distinguished by its beautiful appearance, water resistance, and wear resistance.
How to make decorative plaster yourself so that it looks like marble? To do this, you need to clean the surface of the wall, level it, and apply a special primer. Add the desired color to the plaster mass, stir and apply with a spatula to the surface in several thin layers. Sand the dried surface using sandpaper in a circular motion. Clean off small particles with a dry cloth. Apply a layer of wax on top with a damp sponge. It needs to be rubbed until it appears Smooth surface. This is a labor-intensive process that requires patience and care to avoid erasing the design.
Flock - plaster

The method involves creating a surface with the effect of velor, leather, wood, stone by spraying small particles. Initially the wall is painted. After the paint has dried, a layer of glue is applied with a roller. And while the glue is not dry, you need to apply the particles to the wall using a sprayer. The operation is carried out in pairs with a partner: one applies glue, the second sprays particles with slow circular movements. Excess should be removed with a brush after drying. Finally, the surface is treated with varnish.
The simplest and most accessible tools for creating drawings are a spatula, a roller, brushes, a stencil, and ordinary cellophane. The stripes are created with a notched trowel.
With the help of a roller, the effect of fluffy velor is created; to do this, just go over the roller once. How to make plaster to get unusual effects? To do this, you can use a variety of available items.
Unusual colorful effects are obtained by rubbing with cellophane. You can create an unusual design using a sponge. You need to apply diligence and maximum imagination to get beautiful decorative plaster.
The final step for all types of plaster is to apply the paint with a brush or roller and coat it with varnish so that the surface is reliably protected and the paint lasts longer. Covering walls with decorative plaster is not like that difficult process, as it seems. You just need to know the sequence of work. And to create beautiful walls it is not at all necessary to call in craftsmen. After studying the training material, you can cope with this task on your own. Each master creates a unique look for the room. Do-it-yourself decorative plaster in the interior gives freedom creative imagination and maximum conditions for the implementation of a wide variety of ideas. There is a large selection of materials for plastering work.


