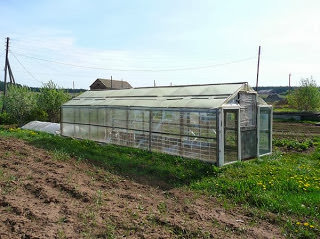
We love gardening; this tradition has long-standing national roots. But our climate is harsh, and often the cold and short summer is not enough for the plantings to bloom and bear fruit. Therefore, we definitely need greenhouses for normal farming. You can also buy ready-made greenhouses. They are very different and sometimes very beautiful, made of metal, wood and plastic; covered with glass, film, plastic. But they are quite expensive, and it is often difficult to choose the most suitable greenhouse for your needs. Therefore, you can easily and quickly make a good greenhouse, simple in design, and here many possibilities open up: for example, move away from the usual plastics and pipes and build a greenhouse from completely waste material, which is in abundance everywhere. From plastic bottles.
Strange choice? Not at allPlastic bottles are made from polyethylene terephthalate (PET). It is absolutely neutral and suitable for drinking liquids.
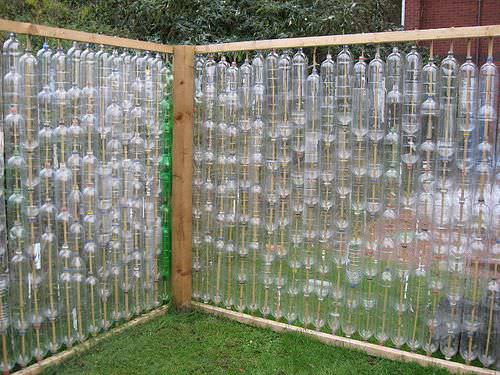
Plastic bottles are an inexhaustible storehouse for various crafts; single bottles are used as flower pots and tiny “greenhouses” for seedlings. Drainpipes are made from a large number of them. And sometimes it’s serious engineering structure: deep drainage on the site. Our “Kulibins” went further and came up with a new use for bottles: fences and greenhouses. Moreover, empty bottles Everyone has a lot, and you can always ask friends and neighbors for more.
Application options for plastic bottles (photo gallery)Mini-greenhouses made from plastic bottles  Drip irrigation using plastic bottles
  Growing flowers using plastic bottles
  Crafts from bottles - desk lamp
  Flowerpot made from a bottle and several bottle bases
  Drainpipes from bottles
  The trench with bottles is prepared for filling with drainage material - there will be deep drainage of the area
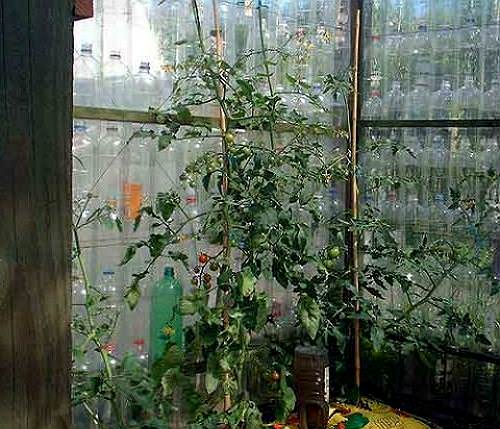
A greenhouse made from bottles is durable, strong, easy to assemble, does not require maintenance, is incredibly cheap, and its components are easy to replace. And most importantly, it is much warmer than its “competitors”. Because everyone knows from a school physics course: air is the best heat insulator, and bottles create the effect of a thermos.
There is simply no warmer greenhouse like this. Experienced gardeners They assure: for early sowing and growing seedlings while still in the cold, there is no need to additionally heat the greenhouse from bottles from the inside.
Now let’s decide what we should call the future structure.
Greenhouse or greenhouse?There is still confusion both in everyday life and in the press; they are too similar in design and tasks. Both here and there - a frame base and a coating that transmits ultraviolet radiation and does not allow cold to pass through.
A greenhouse is a protection for semicircular beds, often a very long structure, and always low. Made from metal and plastic pipes or wooden slats. But often equal lengths of plastic pipes or metal fittings they just stick into the ground. The greenhouse is usually covered with a light film, which in warm weather or to care for plants is simply folded back.
A greenhouse is a more capital and tall structure. There you can enter full height. The greenhouse frame is made of wood, metal pipes, metal corners, plastic pipes different composition and quality and, finally, the entire greenhouse can be made from ready-made aluminum double glazed windows window type. To protect from rain and snow, cold and wind, the frame is covered with polyethylene sleeve film, reinforced with polyethylene film, bubble film, nonwoven materials, cellular polycarbonate and even glass.
Having weighed everything, we will still call our structure a “greenhouse”, despite the capital frame.
Plastic bottles as a material: advantages and disadvantagesAdvantages:
- durability: it is clear that plastic bottles do not wear out, fungus does not grow on them, and if a defect occurs, it is enough to just replace a bottle or two;
- availability: a greenhouse made from plastic bottles is cheaper than all other possible materials;
- ease and simplicity of making a greenhouse from bottles: you don’t need to be a super ace in construction for this;
- the ability to make any greenhouse design from bottles: a house, a lean-to, an arched structure, and so on;
- ease of installing a greenhouse anywhere in the garden and moving it to this place without disassembling its components;
- versatility: a bottle greenhouse is suitable for a variety of tasks, from growing seedlings to maintaining heat-loving plants in the cold season;
- temperature stability (bottles can withstand significant temperature changes from -50 to +130°C and do not heat up);
- environmental friendliness: the bottle material is chemically neutral and harmless to humans, earth and plants;
- beauty: you can choose the color of the bottles so that the greenhouse becomes a real work of art.
There are only two disadvantages:
- it is quite difficult to collect the required number (minimum 300–400) bottles for a greenhouse;
- It’s quite difficult to find the time to painstakingly assemble a greenhouse from bottles.
First of all, we need to understand what size greenhouse we need. Considering the complexity of collecting components, there is no need to make it too large.
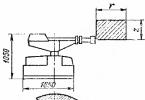
Let our design be on wooden base, in the form of the most primitive small house. We assume the dimensions of the base are 2x3 meters, the height of the greenhouse walls is 2 meters, the height of the ridge is 1 meter.
We draw the drawing by hand, set the dimensions and estimate how much timber, slats, screws and corners we need to purchase.
Drawing of a greenhouse, sketched in haste
For the frame we will need a thin pine beam 40x40x6000 mm.
To connect it into the structure - metal corners.
For connecting bottles into thin pipes wooden slats 20x20x3000 mm.
To fix the parallelism of the walls, use three rolls of thick fishing line.
To cover the roof - a piece of hose film.
When we calculate the required amount of materials, we will be pleasantly surprised at how cheap our project is. It’s funny, but the most expensive thing is not even the timber, but the strip needed to be threaded into the bottle “pipes” to create stiffening ribs. in fact, you can do without slats, or thread a wire or wire into the “pipes”. And the bottles will not cost anything at all - except for the labor of collecting enough of them.
Bottle preparation Required Tools
 | Position | Name | Specification | Quantity | Unit price | Price | Notes |
| 1 | Edged pine beam | 40x40x6000 mm | 6 items | 95 RUR/piece | 570 rubles | |
| 2 | Equal-sided galvanized mounting bracket | 40x40x60x2.0mm | 25 pieces | 35 rub/piece | 875 rubles | |
| 3 | Planed pine slats | 20x20x3000 mm | 50 pieces | 35 rub/piece | 1750 rubles | |
| 4 | PET bottles (plastic) | capacity 2 liters | 400 pieces | |||
| 5 | Fishing line calibrated 1.00 mm | 1.00 mm x50 m | 3 skeins | 90 rubles | 270 rubles | |
| 6 | Polyethylene film 80 microns | width 3m / sleeve 1.5m | 4 meters | 20 rub/m | 80 rubles | |
| 7 | Antiseptic impregnation (and optional paint) | As needed, but small quantities | ||||
| 8 | Adhesive tape transparent wide technical | 75 mm x 50 m | 3 skeins | 49 RUR/skein | 147 rubles | |
| 9 | Self-tapping screws | About 2 kg | As needed | |||
| Total | 4412 rubles (excluding the cost of screws, impregnation and paint) | |||||
Such a greenhouse has a large windage, so you need to think about it not being exposed to strong wind pressure. There are some rules, but in practice it is extremely difficult to follow them all.
 Designer pastoral house made from bottles
  Greenhouse made of bottles for early seedlings
  Horizontally laid “pipes” - this also happens
  An example of a complex greenhouse construction
  A greenhouse with a simple ornament
Organized waste recycling in our country is just beginning to gain momentum, so large cities are surrounded by huge landfills. The lion's share of the waste produced is made up of plastic bottles. What we are used to throwing in the trash can still serve a good purpose. Regular plastic soda bottles can be used as a base.
Such a greenhouse has many advantages. The most important thing is its cost. This is one of the cheapest options. At the same time, it is much stronger than polyethylene film. Lightweight, unbreakable. It is always easy to repair by replacing the damaged element. Retains heat perfectly.
There is also a serious minus. It will take some time to collect required amount bottles And it takes a lot of patience to assemble the structure. True, all this will pay off handsomely when you proudly contemplate your brainchild and catch the intrigued glances of your neighbors.
ADVICE
You can pick up bottles in a short time in places of public recreation. On the beach or at a city festival. You can include your friends and neighbors in the gathering, who will be interested in participating in an unusual experiment.
Almost any material is suitable for the frame. You can choose metal, wood or plastic.
The metal profile will last for many years. Metal will provide the greenhouse with strength and durability. All that is required is just to paint it from time to time and wash it from infection at the end of the season. But to assemble such a frame, some skills in working with metal and special tools are required. It is most convenient to weld the metal frame.
Preparatory workBefore starting the construction of a greenhouse from plastic bottles, it is necessary to develop a project for the future structure. All dimensions are plotted on the drawing, and it is calculated how much material is needed. Be sure to take into account stiffeners, which will make the greenhouse more durable.
On preparatory stage need to dial sufficient quantity bottles For one greenhouse you need at least 400-600 pieces. They try to take bottles of the same size, preferably 1.5 and 2 liters. The label is carefully removed.
ON A NOTE
To make it easier to remove the paper label from the bottle, you need to soak the empty container in warm soapy water for several hours, and then rub it with a metal brush.
When everything is ready, choose a place for the future greenhouse. buildings should be well lit.  It is better to locate the greenhouse on the southwest side from other buildings and tall trees. For uniform heating, the building is oriented from east to west.
The greenhouse is placed on a prepared one. The simplest option is to make a base from a wooden beam, which is placed directly on the ground. This is suitable for lightweight structures made of wood or plastic.
For construction metal frame It’s better to make a solid foundation. A trench 25 cm wide is dug along the perimeter of the greenhouse to a freezing depth of up to 50-80 cm.
Stacked on the bottom sand and gravel cushion 10 cm. Formwork is made and cement is poured. The foundation is made flush with the ground, and about 5 rows of brickwork are laid on top.
By the same principle you can do columnar foundation. The distance between the posts is set to 1 meter.
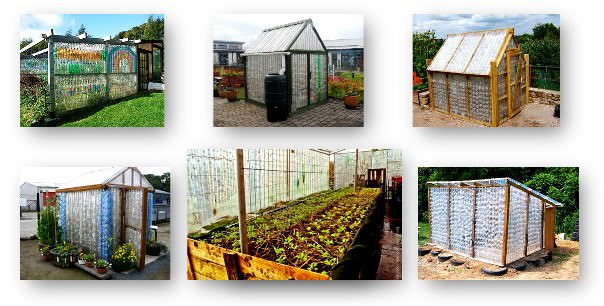
PhotoYou can see greenhouses made from plastic bottles in the photo below: 


Resourceful gardeners have come up with several ways to build a greenhouse from plastic containers. The main ones: greenhouses made from whole bottles or plates. Let's look at both options.
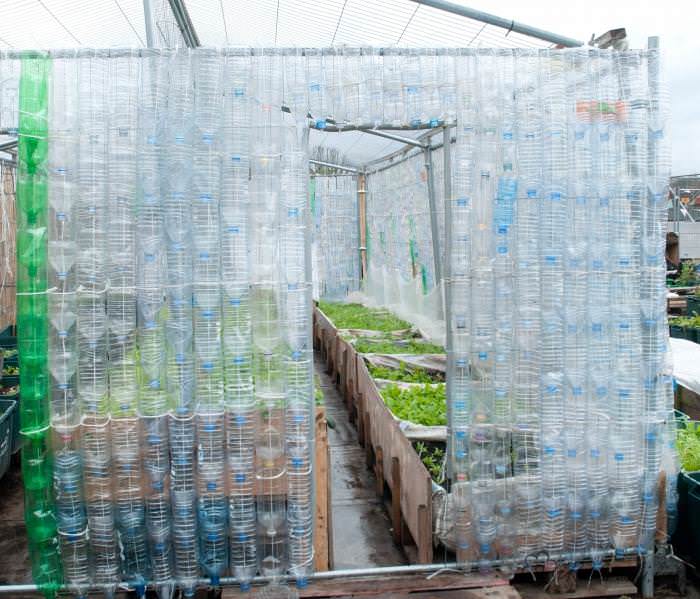
Greenhouse made from whole plastic bottlesFor such a greenhouse, bottles are placed one on top of the other in the form of a plastic log. Air is retained inside, so this greenhouse provides good thermal insulation.
To make the walls and roof of the greenhouse in this way, it is necessary to cut off the bottom of each bottle in the place where the bottle begins to expand. Thus, the hole will be slightly smaller than the maximum diameter of the bottle. Then they are pressed one on top of the other as tightly as possible. A thin strip is inserted into the middle for strength or twine is pulled.
The finished block is installed vertically or horizontally into the wall, secured with self-tapping screws. The roof is made in the same way.
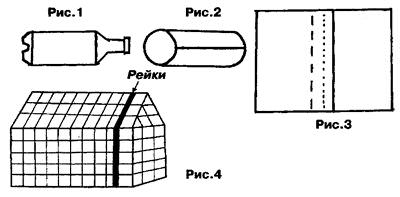
Greenhouse made of plastic platesFor this design it is necessary to cut each bottle. If you look closely, there are two transverse lines on the bottle separating its flat part, and one longitudinal seam. An even rectangle is cut along these lines (see Fig. 1 and 2). 
For cutting, it is convenient to use a stationery knife or simple scissors. Rectangular plates are sorted by size: from 1, 1.5 and 2 liter bottles.
To level the workpiece, it can be placed under a press. But this is not necessary, they will already align in finished product. It is not advisable to iron them with a hot iron, because the plastic is greatly deformed by temperature.
The rectangles are sewn together overlapping with fabrics of no more than 150 cm (otherwise it will be inconvenient to work with). A little more than 1 cm departs from the edge of the plate (Fig. 3). It is important to do this stage as carefully as possible so that the cover is dense. There are several ways to stitch:
- on sewing machine, if you don't mind;
- using a furniture stapler;
- using an awl.
Let's take a closer look at the last method.
BY THE WAY
You can cut long thin ribbons from bottles not only with scissors, but also with a homemade bottle cutter. Lawyer Egorov’s simple bottle cutter is made from a piece of ordinary aluminum channel. A plastic tape always useful on the farm as a durable heat-shrink rope.
 The finished canvases are fixed to the frame using a strip and self-tapping screws or nails with wide heads.
The canvas needs to be stretched well so that it does not sag. The roof and door are also covered. Since the greenhouse turns out to be very warm, it is necessary to provide vents for ventilation.
Using bottles different color, can be adjusted inside the greenhouse. And decorate it with some ornament. But it is better not to overuse dark bottles or use them to cover the northern wall. This is especially true in the northern regions of the country, where there is not enough sun.
But in the south, where there is plenty of sun, colored bottles will help protect plants from burns.
A greenhouse made from plastic bottles is strong enough to withstand the weight of snow in winter period. The main thing is to have a strong frame. With high-quality assembly, such a shelter will last at least 10-15 years. At the same time, the cost Supplies minimal, since the main part is made literally from garbage. You just need to show a little hard work.
Useful videoYou can find out how to make a greenhouse from plastic bottles in the video below:
If you find an error, please highlight a piece of text and click Ctrl+Enter.
The use of improvised means and recycled materials gives excellent results in the manufacture of greenhouses. Most often, windows and the roof of a structure are replaced, those elements of the structure that are exposed to greatest influence environment. At the same time, special requirements are imposed not only on materials, but also on the method of their processing - preparation for recycling.
This article will tell you how to make a greenhouse from plastic bottles with your own hands. Several types of structures are described and recommendations for their installation are given.

The material that is most suitable for this is PET - polyethylene terephthalate; most types of packaging containers for liquid products are made from it. Considering that this polyester is used in the food industry, it does not contain dioxins and halogens, and is not soluble in acetone and other organic solvents.

Polyethylene terephthalate and blanks, pictured are preforms for plastic bottles
Methods for recycling bottles and greenhouse constructionDespite the external variety of forms, several types of greenhouse designs made from plastic bottles are widely practiced.
How to make a greenhouse from plastic bottles with your own hands, video tip:
One option is to use a bottle, leaving its entire shape, only connecting the elements together. This variety retains heat better inside the building, but transmits the sun's rays worse. The second option is to “cut” the bottle and use only the middle part.

Photo of a greenhouse made of plastic bottles, in the photo a finished structure made of whole (not cut) elements
Important! The most difficult thing is to remove labels from plastic containers without damaging the coating. It is necessary, if possible, to remove any remaining glue with soapy water so that dirt does not stick to it, reducing the light transmittance of the material. Method No. 1 - “kebab”To build a small greenhouse from plastic bottles with your own hands, you will need about 1000 pieces. for 1.5 l. The dimensions of the structure will be 2x2 with a height of 1.9 m. The sequence of actions is as follows:

Ends gable roof DIY greenhouses made from plastic bottles
This type of construction of a greenhouse from bottles is more labor-intensive, but in the end the covering material differs little in operational characteristics from monolithic polycarbonate.
Operation of a greenhouse made from plastic bottles, video:
How to make such plastic material? To do this you need to do the following:

Straightened blanks are sewn together with nylon thread
The plastic material is attached to wooden frame using a construction stapler.
conclusionsBy building a greenhouse from plastic bottles at your dacha, you get not only a reliable, durable and cheap design, but also contribute to preserving the ecology of the planet.
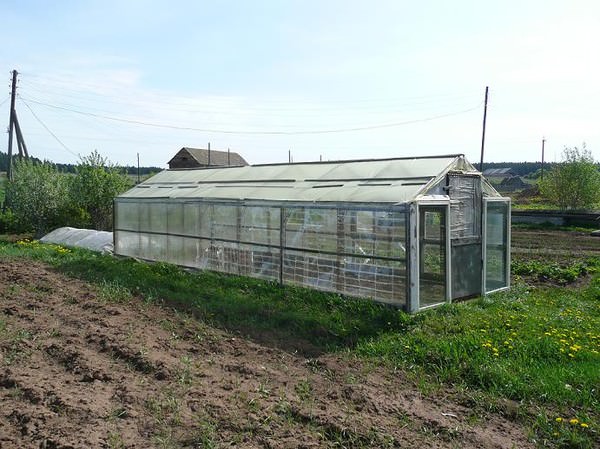
To the greenhouse in Novgorod region 600 plastic PET bottles were used. In the village of Proletary they came up with their own method of recycling. Greenhouses are made here from ordinary bottles. Albert Andreevich Abrosimov spent more than 600 plastic bottles on his greenhouse. He “spotted” the original “technology” from his neighbors. Albert Andreevich improved the technology. Although the base is still the same plastic container. It was collected by the whole family. It takes several hours to assemble one frame. There are more than 20 such frames here.
A combination of dark and light bottles makes the greenhouse more elegant. But the main thing is not beauty. The main thing is durability. There is hope that it will last not five or even ten years, but much longer. This means that Albert Andreevich and Valentina Petrovna will not have to spend money on plastic film and every spring pull it onto the frame. Neighbors and even visitors look with curiosity towards the unusual structure. They ask about technology. So, perhaps, the experience of the proletarians will soon spread throughout the entire region. Not only gardeners will benefit from this, but all of us - it will become much cleaner around us. How to make material for a greenhouse, here is MK.. 


The bottles must first be prepared, namely, cut off the neck and bottom, making a longitudinal slit, to obtain a rectangle that must either be rolled into reverse side and fix (leaving it like that for about a day) or straighten it using a press.
Try to keep all the fragments the same size, then it will be easier for you to fasten them together.
Previously, a soldering iron or sewing machine(which failed much faster due to the heavy load) But now there is a more successful way of fastening, this is a Furniture Gun with copper staples, with the help of which the process of making such a greenhouse is accelerated significantly.
After making such sheets, you can insert them into a subframe; this greenhouse will last from 10 to 15 years. How do you like this saving? Now you know how to make a greenhouse from plastic bottles with your own hands.
Here are some more greenhouses made from bottles...


Everything seems simple, but that’s why people still have questions. Every man knows how to make a frame for a greenhouse. The whole problem is how to sew 1 elastic strips into a single fabric. This is how I do it.
I wash the bottles, cut off the neck and bottom. There are two vertical stripes on the flat part of the bottle. I cut one of them and align the top and bottom - it turns out to be a rectangle. I sort the blanks by size and roll them up. I use bottles with a capacity of 1 liter, 1.5 liter and 2 liter, but not “tightened”. It's better, of course, when they are the same size. There is no need to correct the workpieces: they will straighten themselves during the work process.
I start work by making a strip for the length of the workpiece, which depends on the height of the greenhouse frame. If the length (from the ground through the roof to the bottom of the other side of the greenhouse) is more than 7 m, then it is better to make not one panel, but two. I do it with a margin - 20 cm on both sides. After this, I calculate how many rectangles need to be taken, taking into account that each rectangle will have 1.2-1.3 cm for sewing the panel together. I don’t throw away necks with hangers from bottles (1.5 l). Using scissors, I cut a strip 2-3 mm wide for sewing rectangles. Then I prepare the tools: an awl, several knitting needles or syringe needles, old tweezers.
I combine 2 rectangles with their narrow sides so that one lies 1.2-1.3 cm on top of the other, and make a puncture with an awl at a distance of 1-1.5 cm from the edge. Taking out the awl, I insert a knitting needle into the puncture. I do the same on the other side. When one pair of rectangles is fixed in this way, I make the next one, etc. I warm up the tweezers on gas stove and make 2 or 3 pairs of holes on a couple of rectangles in the place where they overlap. I pull a thin strip through the holes, tying knots at the beginning and end of the work. Connecting the rectangles into pairs, and the pairs together, I gradually sew the entire strip together. Then I figure out how many strips are needed for the entire width of the panel for the greenhouse. Although, based on personal experience, it’s not worth making the panel wider than 150 cm (it’s inconvenient to work with).
When several strips are sewn, I place a stool near the stove, and on it a box of kitchen table(for spoons and forks), and on top - a grill from the refrigerator. This is a very convenient and simple device for stitching strips.
I try to sew the rectangles in one direction so that they fit closer to each other. I place one strip on the grill, straightening the right edge (the left one hangs to the floor). I place the second one next to it with a spade, level it and fix it in several places with hot tweezers (you can tie it for reliability). I make a couple of holes, constantly moving and aligning the panel. When the holes are made to the end of the strips, I return the work to its original position and begin stitching thin stripes. Sewing strip by strip, I type the required width panels That's all the wisdom.
A greenhouse made from bottles constructed in this way minimum costs It turns out to be very durable, able to withstand the loads of fallen snow, so you can use it even in winter. In addition, it quickly warms up inside, while the heat accumulated during the day is well retained inside, which allows you to do without additional sources heat. However, with warming, this advantage turns into a disadvantage, since the danger of overheating of plants increases. Therefore, when planning, it is necessary to provide a window. Or better yet, several to improve air exchange and ventilation conditions.
Another way:
http://teplicy-samara.com/poleznoe/teplitsa-iz-plastikovykh-butylok/
Plastic bottles are considered trash, but not among summer residents who know how to find a practical use for everything. And, if earlier we used bottles to create small greenhouses for germinating seedlings, today we decided to use them.
Many will say that this is real nonsense, but we are ready to argue with this now, since we are convinced from our own experience that it is possible to realize the idea. What’s most interesting is that there are even several methods for installing the structure.
Why do you need a bottle greenhouse?Indeed, why is it necessary if there are prefabricated structures made of profiles and glass, greenhouses made of polycarbonate, pipes, film or, in general, old doors? Why reinvent the wheel if everything was invented a long time ago? But there is always an answer.

A plastic bottle greenhouse is real savings funds, because for its construction you only need to order timber according to size, buy nails and collect bottles. For an average building, 400-600 containers may be enough, and believe me, this is not so much, because according to statistics, the average family throws away up to 30 of these plastic containers per month.
This design is very strong and, oddly enough, durable. It has been experimentally established that plastic bottles wear out almost 30 times longer than ordinary bottles.
In addition to all that has been said, the bottle greenhouse retains heat perfectly due to the thermos effect (the cavity inside the bottles). Experienced summer residents claim that for early spring sowing it is not even necessary to warm up the structure, of course, depending on the region.

There are a lot of similar arguments - the light weight of the greenhouse, simple assembly and replacement of broken walls, incredible strength of the material, durability, cost, excellent appearance and others, but is there any point in discussing anything else when it is necessary to take and build...
Do you think it's difficult? You are mistaken, because simply by learning the technology and the correct algorithm, even a schoolchild will be able to build this structure in a few days. If you get ready small company Like-minded people, at least 2-3 people, can complete the project within a day.

To work with the installation and assembly of the frame, as well as the installation of walls made of bottles, we will need an awl, cutter, hacksaw, hammer, nails, nylon thread, tape measure, level, pencil and paper.
To implement the project, you will need plastic bottles (the quantity depends on the size of the greenhouse), wooden beam and mounting rail.

There is no need to spend much time on the project here; it is advisable to only indicate on the drawing the height, width and length of the greenhouse, the frequency of installation of carriers, the shape of the roof and other little things. This is exactly why you need to know exact dimensions, which can be transferred to paper.

You and I know very well where the greenhouse should be located - on the south, south-east or south-west side of the buildings in order to provide normal lighting and high-quality protection from cold winds. If the greenhouse is installed in an open area, then you will only have to think about the location of the beds inside, but this already depends on the type of crops to be grown.
Preparing the area for placing the structure is very simple - cleaning the soil surface from various growths and debris. In addition, you will need to properly mark the territory.
We do not need a foundation for the greenhouse, since our structure is very light. The only thing that is required is to raise the base slightly above the ground surface to protect it from moisture. For example, you can install the structure on cinder blocks, logs or thick beams.
If there is a ready-made foundation from old greenhouse, you can use it, but here it is important not to forget about replacing the soil and disinfection old building from past plant diseases and infections.
Now we build the frame. To do this, we need to lay a rectangular base of thick bars, say 10x7 cm. Next, we need to install vertical load-bearing beams from the same timber, in increments of 1-1.2 m, assemble a frame under the roof, tie everything in the middle with timber, for example, at a height of 1.5 m from the ground. This is necessary to strengthen the structure and give it stability.
To assemble the greenhouse, we use a hacksaw to cut wood, a hammer and nails, or a screwdriver and self-tapping screws for the assembly itself.
When the frame is ready, you can move on to the most important thing - building walls from bottles.
DIY bottle greenhouse (video) Building the walls of a bottle greenhouseTo assemble the structure correctly, you only need to follow a few basic rules:
- You should immediately cut the bottom of the bottles with a cutter so that you can put them on top of one another, but the cut should be made at the bottom of the bottle, where there is a transition from the bottom to the wide part, so that the fastening is more complex and high-quality;
- Now you should install the first row of bottles on the warp. They should have a bottom, but with a cut off top, so that through the emptiness of the bottle, it can be nailed or screwed with a self-tapping screw to a wooden frame;
- Next, we assemble the columns from the containers, stringing them on top of each other with a cut of the lower part. Try not to skimp and assemble the columns tightly by pressing;

You can build the structure in a slightly different way, starting not from the bottom row, but from the side, and installing ready-made columns assembled from bottles into the walls.
Roof of the buildingThe roof can also be built from bottles, in exactly the same way as the walls, only you will need to work with ready-made columns. It will be necessary to install more frequent sheathing to construction material did not fall inside the greenhouse due to its own, albeit not great, weight.
For tightness, the roof is tied with tape or can be covered on top with polyethylene oilcloth. It will take a little, just to prevent moisture from penetrating inside and to ensure that water and snow drain from the roof.
We build a greenhouse from plastic bottle platesLet's change the technology a little, but only in relation to plastic material. Now we will build not from whole containers, but from plates made on their basis.
- To do this, you will need to cut off the top and bottom of the bottle, and cut the resulting so-called pipe. As a result, we get a fairly durable plastic rectangle.
- We sew all the resulting rectangles together with thin wire or a special cord thread, after making holes with an awl. The main requirement is that the stitching is not end-to-end, but overlapped, so that one plate overlaps the other.
- Fastening finished material, that is, canvas made of bottle plastic, is applied to the frame very simply - on one side, the canvas is pressed against the frame with a lath and seated on nails or screws. Next, it will need to be tensioned and secured in the same way on the other three sides.

There are several other ways to construct such structures - from large plastic bottles, from glued bottles, and so on, but we believe that the most reliable and high-quality greenhouses will be those built using the technologies described above.
Secrets of building a structure- It is worth collecting material for the greenhouse in advance, perhaps from the very end of summer, in order to collect required quantity for next spring.
- You can always buy additional bottles or ask neighboring summer residents who don’t need them.
- The material can be fastened together with thread, fishing line, wire, or it can be glued, slightly melting the edges over the fire.
- For construction and comfortable work the right decision will collect identical bottles. 1.5 liter containers are most suitable for comfortable construction.
- If you are worried about the strength of the walls and their stability, there are many ways to ensure these qualities - stretch nylon threads on both sides of the greenhouse more often, install thin sheathing, but every two or three bottles, install on both sides metal mesh, the thinnest, just tight.
- If it’s inconvenient for you to build a roof this way, you can always just stretch an inexpensive film. The main thing is that it lasts for one year, and the next year you can always buy a new one, because it will cost a penny.
- The door to the greenhouse can also be made from a bottle, but in order not to torture yourself, a frame door made of wood covered with film will be enough.

Choose a plastic bottle greenhouse and you will never regret it. Durability, strength, simplest assembly and minimal maintenance, quick replacement of spoiled elements, and most importantly - the ridiculous cost of the greenhouse. Agree, great idea!!!
Greenhouse structures made from plastic bottles (20 photos)


Oksana Dmitrievna 10/23/2014
Hello! I share mine interesting experience obtaining a rich harvest. I got it interview with Doctor of Agricultural Sciences Mikhail Chursin and inspired by the article, I decided to use his recommendations, and you know, I was right.. All summer we ate cucumbers and tomatoes from the garden, and also prepared zakat for myself and my family for the winter. For those interested, here it is Gleb 07/02/2014
Thanks for the detailed article! I also suffered with the film and have already started collecting windows from those who replaced wooden ones with plastic ones, I want to build a greenhouse out of them. I never even thought about building something out of plastic bottles. Although there is a lot of this “good” lying around. Now, after reading the article, I decided to try building one out of bottles. And I’ll get rid of the trash and the greenhouse will be built!
Oksana Vladimirovna 01/14/2016
This a budget option greenhouses. But it’s still better to take it from polycarbonate. Plastic bottles somehow don’t look very aesthetically pleasing. It will be even more difficult to fit such a greenhouse into general form dachas, especially to suit the style.
Vera Vladimirovna 03/14/2017This is some kind of nonsense! Where can I get so many bottles? If you buy so many yourself, then a polycarbonate greenhouse will cost less. Moreover, without a foundation, it will fly away in gusts of wind.
Lera 11/29/2017
This is the first time I’ve seen a greenhouse made from just such a material, it looks very strange. I think it's pretty good economical option, but it is not suitable for building a large greenhouse.
Add a comment