The content of the article:
Wall painting is a way of decorating a room, allowing you not only to decorate it, but also to realize yourself as a creative personality with aesthetic taste. Handmade has long been considered the ideal way to create a unique interior. A huge selection of styles and genres guarantees a realistic and mesmerizing result. Artistic painting, which in ancient times covered the ceilings and walls of palaces and temples, is today accessible to most inhabitants of houses and apartments, although it can hardly be called a cheap pleasure.
Types of wall painting
The wall painting concept includes many ways of creating images. There are two main types of it: traditional painting technique and modern. Each of them is divided in turn into subspecies.
The traditional wall painting technique is wall painting done by hand. There are several types of it:
- Fresco. This is one of the old wall painting techniques. It was originally mastered by masters Ancient Greece, but it gained its greatest popularity during the Renaissance. The art of Hellas was a success among representatives of the wealthy classes and was considered the best way to decorate ceilings and walls. The unique technology of those times preserved the works of ancient masters for posterity. It involved applying paints diluted with lime water to wet plaster. This method made it possible to create paintings that retained the brightness of their colors for centuries. Modern fresco masters perform this work, as before, only with artistic brushes. Paint brushes are not suitable for it. The drying plaster is periodically moistened during the painting process.
- Encaustic. One of the unusual and most interesting techniques. The paint here is melted wax with color pigments added to it. The special naturalness of this material allows it to be used for painting walls even in a child’s room. The composition is applied only to dried plaster. This technique recommends the use of non-porous hard brushes, as the paint is very soft. To make a drawing accurately, it is better to draw it in pencil in advance. Very often the image is initially applied to wooden panel or canvas, and then the material is glued to the wall.
- Alsecco (a secco - “dry” Italian). This technique of painting walls is similar to creating frescoes, only it is done on dry plaster. The advantage of this method is that there is more time for drawing. To prepare the composition, acrylic paints need to be ground in a mixture of lime, raw eggs and vegetable glue. The result will be something similar to tempera. Paints can be applied in several layers. Such a painting requires a frame to aesthetically fix its borders at the junctions with the walls and ceiling.
- Sgraffito (sgraffito - “scratched” Italian). This is a very labor-intensive technology for painting walls, which involves scratching the image. It was founded by the ancient Greeks and became widespread during the Renaissance. Artistic painting using the Sgraffito technique is performed using layers of colored plaster, and their number and scale depend only on the artist’s imagination. However, in this technique it is still not recommended to use more than 4 colors, so as not to complicate the picture too much. Layers of plaster are applied to each other sequentially, each of them must dry. Upper layer- this is the background of the picture. A sketch of the future image is made on it. After this, in the right places you should scratch the coating to the depth of the required color. This technique requires extreme care, since if an error occurs, it will be impossible to correct it.
- Grisaille (“gray” French). Drawings made using this technique strongly resemble black and white photographs or pencil sketches. Today this design has become especially fashionable. The elegance and realism of the images is simply mesmerizing, but painting walls with your own hands using this method is very difficult, especially for a beginner in this business. Grisaille is done on a whitewashed wall. The paint is tempera, which should be applied with a hard, thin brush in strokes similar to drawing with a pencil. Small details of the drawing can be done with ink.
- Airbrush. It's simple and modern technology wall painting, which allows you to create realistic images and even 3D effects. It is performed using cans of paint intended for small details of drawings and airbrushes for large images. When using airbrush, it is not at all necessary to pre-prepare the wall surface. The paint adheres easily to similar material, wallpaper and plaster. This opens up great opportunities for implementing design ideas.
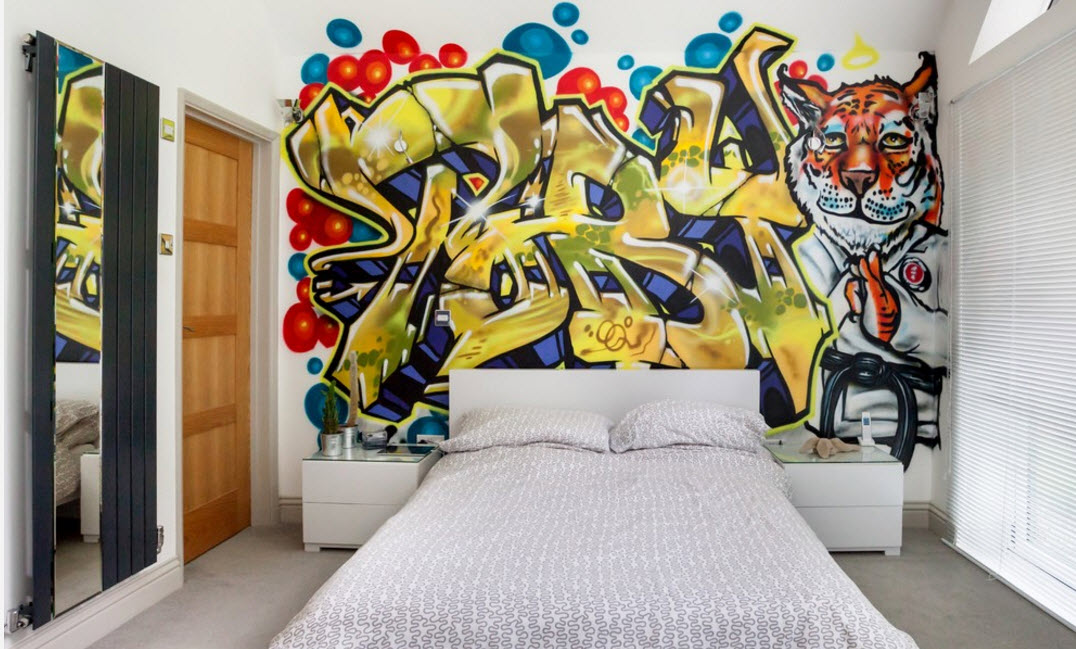
- Graffiti. This is another one modern direction artistic painting walls, which are dotted with many courtyards of our cities. Some consider it hooliganism, others skillfully use it in design. This painting is applied using cans of aerosol paint. The surface can be any: plaster, wallpaper, etc. The only condition is that you should “paint” only on dry walls.
- Stencil painting. This is a long-known method of drawing. It is simple, cheap and does not require practical skills. The main thing here is to choose the right stencil for painting the walls and the color of the image, which should be successfully combined with the general background of the interior. You can make a stencil yourself from vinyl or cardboard, buy it at hardware store or an art workshop, or select a design on the Internet, print it out and cut it out. Then it is laid on the prepared wall and paint is applied on top with a brush, sponge or spray. After removing the stencil, a design remains on the surface.
Basic styles of wall painting

In order to have an idea of your future interior, you should familiarize yourself with the most popular styles of wall painting:
- Classic style. It is always relevant, in demand and not subject to the whims of fashion. The pillars of classicism are simplicity, straightness of form and symmetry, harmony and restraint. Classics are able to organically convey national flavor, combine with non-standard modern materials and elements, without losing their “main line”, aimed at harmony of color and shape.
- Baroque style. It marked the next round in the development of classicism and became the embodiment of its time. The ornaments of this style contain ornate plant motifs: large flowers, tree branches or large leaves. No less in demand are images of half-naked bodies in physical effort, the tension of struggle or strong movement. The interior, designed in Baroque style, is dominated by rich play bright colors, light and shadow, which gives the room luxury and pomp.
- Empire style. It harmoniously combines classical severity with impressive decor. The perception of color here is built on a combination of tones of Bonaparte’s symbolism: gold, purple and blue. The ornaments of the style are found in a combination of their conventional and naturalistic elements. When painting walls in the Empire style, flower garlands and triumphal and pompous wreaths are actively used. Some ornaments are taken from the culture of Egypt, so in the Empire style interior you can see sphinxes, winged lions or griffins.
- Art Nouveau style. It is easily recognized by its growing, living and breathing abstract forms. Characteristic feature style is a complex system ornament with large flowers and curved wavy stems. Sometimes fairy-tale creatures are also depicted in modern art: mermaids, elves, as well as strange plants that form characteristic curved lines. The color scheme of the style is dominated by natural shades. Everything in modernity strives for rationalization and simplification, but without sacrificing elegance. The interior in this style is not distinguished by excesses and manifestations of status, but implies the unobtrusive presence of nature. Characteristic of modernity harmonious combination functionality and decor.
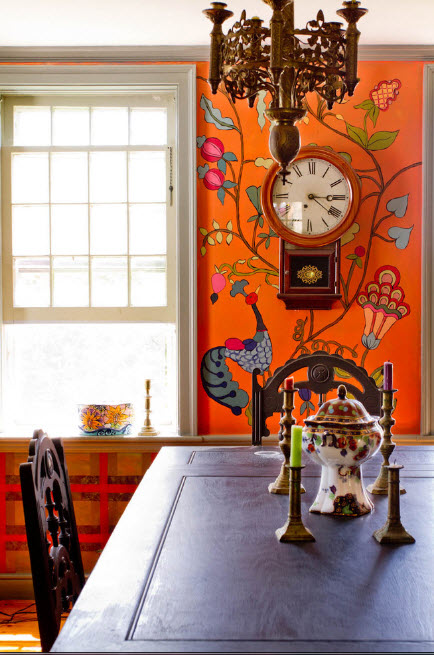
- Arabic style. This is not just an interior, but a whole worldview formed under the influence of Islam. The main differences between wall painting in this style: richness of color, unusual solutions, originality, magical and mysterious atmosphere. The style intricately combines stylized Arabic script, geometric figures and plant motifs, resulting in bright and sophisticated patterns that are repeated on the walls in a certain rhythm. Thanks to a large number complex patterns on the walls become like luxurious Arabian carpets. Rooms decorated in this style have a warm and cozy atmosphere.
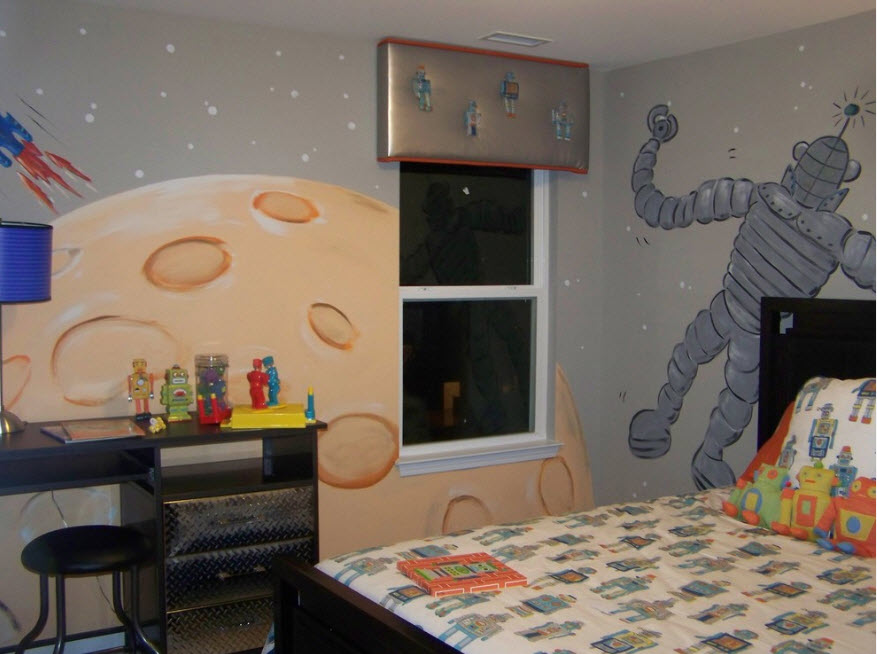
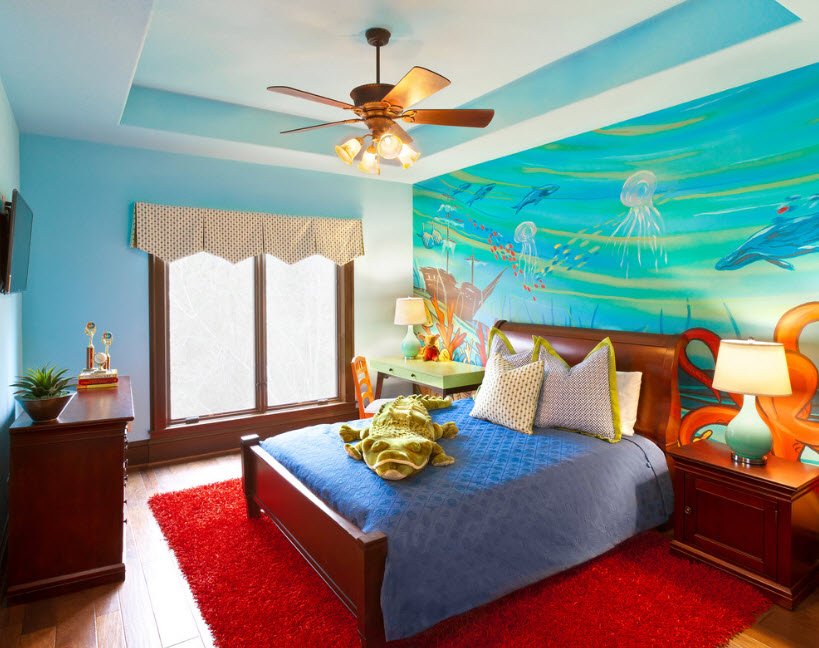
- Anime style. It originated in Japan and quickly became popular not only in its own country, but also far beyond its borders. Japanese animation characters have become in demand among numerous fans of this genre. Anime style wall painting looks harmonious in Japanese design rooms. The combination of its functional and laconic forms with bright images of “cartoon” characters can become a source of special pride for any owner. Interior design in this style is ideal for a children's room.
Technology for hand-painting walls
Before applying images to the wall, it should be properly leveled and treated with a primer. The resulting surface must be dried and, if necessary, painted, creating a background on it that will successfully highlight the future drawing.
Preparatory work before wall painting

For painting walls, water-based acrylic paints are most often used, which can be glossy or matte. They are sold in sets, which greatly simplifies their selection. Subjects, for example, with plant themes, require colors of yellow, brown and green. Mixing them gives all the necessary natural shades.
Must be included in the set White paint, since it is able to regulate color saturation. Watercolor or gouache can also be used, but the finished images will have to be varnished.
Brushes for work should have artificial bristles and vary in size - from No. 0 to No. 10. Foam brushes will also come in handy. They are convenient for decorating flowers and leaves.
In addition to paints for wall painting and brushes, you may need containers for mixing paints, a pencil, double-sided tape, a can of aerosol varnish, a clean cloth, a table or stepladder. All further actions are gradual in nature.
Initially, you should determine the places on the walls that need to be highlighted with the help of painting, and then select images, and they should be in full accordance with the functional purpose of the room.
If you have little or no experience in artistic painting, you should not immediately plan complex scenes or multifaceted landscapes on the walls - you can come to this later. For now, you can limit yourself to simple drawings: for example, a tree or a sakura branch.
After printing the selected image and preparing brushes and paints, you can begin making a sketch. First, you should apply the drawing on paper that has previously been repainted to match the color of the wall. As a sketch, a mini copy of it or a small fragment made in life size.
The process of making a sketch will help you get better at this and master the determination of proportions for mixing paints in order to obtain the desired shades.
Marking the wall before applying paint

At this stage of the work, it is necessary to make a pencil sketch on the wall, which will allow you to create a clear and beautiful drawing in the future. In this case, it is worth considering one nuance: for the sketch you should use colored pencils in accordance with the drawing, since traces a simple pencil are difficult to wash off and can leave dirty streaks on the coating.
The image should be placed within the pre-designated boundaries of the wall section: left and right side, top and bottom. The ease of working with brushes will depend on how detailed the sketch is in pencil.
When marking an image on the wall, you need to often move away from it at a sufficient distance, since defects may not be noticed up close.
If confidence in own opportunity There is no way to correctly transfer the proportions of the picture to the wall; it is recommended to use the method of applying the image in cells. Another option is to use a projector for this. Unnecessary marking lines are removed with a soft eraser.
Creating a composition on the walls

Once the pencil sketch is ready, you can begin to create the composition. To do this, in a container made of plastic, you need to slightly dilute with water and thoroughly mix the paint of the main color until it has the consistency of thin sour cream. This composition will provide the material with sufficient density so that it does not flow or lie unevenly if it is excessively thick.
Coloring the image should begin with a large brush. Then more is added light shade. The hand should make smooth movements. You need to periodically monitor your work away from the wall, and after completing the main part of the drawing, it is recommended to give your eyes a rest.
In the process of artistic wall painting, you need to carefully work out all the details of the composition, using thin brushes and adding shades for this. The borders of the image should not stand out too much from the general background, so it makes sense to tone them down a little. This can be done with a foam rubber stamp brush: dip it into the background paint and smooth out sharp edge transitions.
After finishing the work and drying the paints, it is recommended to cover the images with a colorless protective varnish.
How to paint walls - watch the video:
In general, wall painting is very interesting activity, which requires responsibility and special inspiration. If you put a piece of your soul into it, the result will delight the eye for a long time, filling the home atmosphere with a festive mood. Good luck with your work!

The other day I finally did what I had been planning for a long time: I drew a picture with lettering and doodles on the wall of my Moscow apartment, which we were preparing for rent. This was my second experience of drawing on a wall - for the first time I tried to do it in Thailand, and although I was not very happy with the results, I realized that I like drawing on walls :) I decided to summarize the information in a post - in case you, too, decide to draw on the walls and Will you have the same questions and problems as me?
HOW TO PREPARE A WALL
Before you draw anything on the wall, you need to make sure that the wall:
a) flat
b) painted
If you have a wall with wallpaper, you need to tear it off, level the wall, prime it and paint it. If it’s already painted, you can paint right away if point “a” is followed. And yes, when talking about evenness, I mean not so much horizontal and vertical deviations (the drawing will really help to hide this and it’s not so critical), but smoothness. If your fingers and tights don't cling to the wall, that's ok :) If the wall is lumpy, then in theory you can still draw, but get ready that it will be difficult, you'll spend more ink, and the result won't be as wow-worthy as you'd like. Well, yes - most likely, you will spend more time on the drawing than if you did do the alignment.
I’m telling you from my own experience: the wall I painted on in Thailand had a “crap with pebbles and sand” texture. You know, this kind of thing can be found in Russian entrances, often painted green. I didn’t begin to correct it, because redoing it scared me more at that moment, and I thought that it would do just fine, but then I regretted it very much and for a long time: it was impossible to draw a straight line.
The wall in Moscow was delivered by the developer painted in White color, you could take a black marker and start drawing. But I wanted a black background (because simple ways are not for me), so before painting, I painted the wall black. I chose chalkboard effect paint from Siberia, because at that time I had not yet finally decided what I would use to paint on the wall and was considering regular chalk. I applied the paint myself with a roller and brush at the joints with the walls and ceiling (covering them masking tape), nothing complicated.
On the advice of Siberia representatives, they did not cover the wall with anything additional before application. After the first layer, the wall didn’t look very good - there were a lot of bald spots, but after the second everything evened out, the wall became pleasantly black, and, what I liked, slightly rough and completely matte. I tried to paint on the wall with chalk - the sensations are a little strange, it seems that the chalk is not perfectly washed off from the paint, but, alas, I have nothing to compare with yet, so this is a review about how this paint works specifically under chalk board I can’t formulate it yet. For my purposes, the paint suited me 100%.
WHAT TO DRAW: MY CHOICE OF MATERIALS
If nothing comes into contact with the wall, you can paint it with anything: even with a pen, even with CD markers - the main thing is that you are comfortable working with the tool and the line thickness/color suits you. But if someone or something touches the wall, everything becomes more difficult, especially if the goal is for the drawing not to be erased (if it is erased, a combination of chalk and slate paint will save you :)).
In my case, the matter was complicated by the fact that I planned to apply the drawing to kitchen apron, which is supposed to be washed at least sometimes. I can already see you clutching your head and shouting: “How can I scrub off the fat?!” But first things first.
I considered the following options:
- Draw a picture with chalk, cover with glass
- Draw a picture with a brush and some kind of indestructible paint and do not cover it with anything
- Paint with indestructible paint + cover with glass
The glass option didn't really appeal to me because it extra expenses, and not small ones, and I don’t really like the way glass looks on part of the wall, but doing it on the whole wall is a little crazy. Therefore, the idea with chalk was quickly crossed out and I went looking for indestructible paint.
Here I planned to do a big review of a variety of markers and materials, but the truth is that when I went looking for something that was convenient to draw and difficult to erase, I came across only one brand everywhere: Molotow. They make markers with very powerful ink that won't wash off easily. And, alas, no one paid me for this publication (comrades from Molotov, I will not refuse free markers, if that happens;)).
Molotov has several types of markers, I was interested in acrylic ones - they are erased only until they dry, then they can’t be washed off with ordinary water, only with a solvent (at least I couldn’t wash them off, but I rubbed a lot). Acrylic markers are different sizes and have different tips, detailed review I'll definitely do it somehow I'll write on Instagram . I liked the 4mm round tip the most, I would prefer larger size, but I couldn’t find any more round ones, and I don’t like the beveled ones. The markers are refillable, which means that when the ink runs out, you can add more. The tips can also be changed (they are erased), but you need to know which tips will fit which marker.
As a slightly cheaper alternative, I considered buying regular white acrylic paint and painting with a brush - the effect is almost the same, but in terms of convenience it is much inferior, plus I wanted to get a line of equal thickness.
The bottom line is this: I’m very pleased with the chosen tool - it’s easy to use, economical in consumption, the line is dense and bright, and yes, the design doesn’t wash off! I rubbed furiously at one area for several minutes, the line didn't go away. And for those who are worried that greasy drops will remain, let me tell you that there are very cool and cheap grates for frying pans that save you from splashing, plus working surface Ours turned out to be 10 cm deeper than the standard and, accordingly, the slab does not stand closely. Well, if the tenants stain the wall so much that it cannot be washed, I won’t be too upset - I’ll paint it over it and apply a new design;)
WHAT TO DRAW
For a long time I was tormented by the question of what to draw. On the one hand, I wanted to do a lot of lettering, on the other hand, I wanted to do a lot of different lettering, on the third, doodles have firmly entered my life and it’s a pity to leave them behind. Also, the apartment was being built for rent, and the drawing was in the kitchen; I wanted the final picture to be quite neutral, but at the same time appropriate.
At some point, I decided that I needed to put my self-expression at the forefront, that is, draw in the style in which I would like to draw to order. This means that these are doodles + lettering. But I added a little challenge to myself: I decided that my objects would not be located separately and on their own, as almost always happens in my drawings, but would stick out a little from each other, overlap and flow.
I decided that I would have equal rights between lettering and doodles, that is, I would not highlight the lettering with complex decor and fill it with color, I would draw everything in the same thickness, without giving anyone the main role.
And then I thought about the sketch for a couple of weeks and even drew several approximate options.
Follow the evolution ;)
At first I wanted to do lettering in Russian and Cyrillic to practice, but then I hit a wall called “I can’t find funny, but short and meaningful quotes that would look appropriate.” Either I’m so picky, or the Cyrillic alphabet is still too obliging and attracts attention. I changed everything to English and felt relief - after all, working with the Latin alphabet is much more familiar and easier for me.
Then I tormented the doodliks for a long time - in the original version there was a lot of things not about food - clouds, rainbows and all that, but by the final version I decided that the kitchen is not a place for clouds, I need more sweets, vegetables, cutlery and everything related to food . Therefore, I took the last sketch as a basis and redid it on the fly on the wall.
HOW TO TRANSFER A DRAWING TO A WALL
If you have a sketch and want to transfer it from your notebook/iPad to the wall, there are three main ways to transfer it.
Method one: by eye
The most banal, obvious and does not require additional gadgets. Look at the picture - try to repeat it on the wall. This is exactly the method that I used, because I had no time to organize the other two. It will work if it is not very important for you that the picture is repeated exactly, if you know how and are ready to improvise, and if you are not annoyed when the picture on the sketch and on the wall stop matching :) I decided for myself that it is easier to draw directly on wall without a sketch than to “peek”, because it is more annoying than helpful.
Method two: squares
This method allows you to transfer the image quite accurately, but it takes time. The idea is this: draw your sketch into squares, then draw the same squares on the wall and transfer the picture, using this grid as a support. That is, they schematically transferred the contents of one square, then the second, third, and so on. This still does not guarantee perfect accuracy and you will still need to adjust, but in theory it is easier than without squares. I didn't have the patience to draw the squares.
Method three: projector
The most convenient, but at the same time the most expensive method, which, alas, I also only know about in theory, because I had to wait three weeks for the chosen projector model and I haven’t bought it yet. There are two types of projectors: directly for artists, for transferring pictures onto the wall, and ordinary ones, with the help of which you can also watch films.
The most famous projectors for artists are produced by the American company Artograph. Most models are designed as follows: you put a sheet of paper with a sketch, put a projector on top and it projects the picture onto the wall. In my opinion, there are many disadvantages to this approach: the sketch must be clear enough and of a certain size so that, on the one hand, it fits into the space under the projector, on the other, it must show sufficient quantity details. Well, it's not very cheap.
A projector that can also be used as a home theater is, in my opinion, a more reasonable solution. But here you need to understand this: not every projector that can show movies will be good for projecting pictures on the wall. There are a million all sorts of murky parameters, which are very well described in this note, here are the main ones to keep an eye on:
- the projector must be short-throw, that is, it must have a parameter relating the distance to the image size; the smaller the better. Conventionally, 0.4:1 or 0.8:1 (means that to project a meter of image you need to move the projector 40 or 80 cm from the wall, respectively). A lot of projectors fall off here, because if a 1.55:1 ratio is absolutely fine for showing a movie, then when you try to paint a 2x3 wall using this in a small apartment, problems will arise because the length of the room is not enough :)
- the projector must have high contrast and show well even in bright room(because it is not always possible to curtain all the windows, and drawing at night is a dubious pleasure), so you need to monitor the parameters of the lamp power (from 200 W), contrast (from 10,000: 1), and lumens (from 3000).
- convenient if you can connect a flash drive
- Well, the most tricky parameter, which is rarely available, but is very useful: vertical and horizontal image adjustment. A projector with these two parameters can be placed not exactly opposite, but a little to the left-right-higher-lower and twisted so that the image does not skew.
Unfortunately, I cannot recommend a specific model to you, because I myself was confused in the choice and have not bought anything yet. If I find time, figure it out, buy it and test it, I’ll definitely write additionally. Judging by the Yandex.market, models that combine all the above qualities cannot be found cheaper than 50,000, but rather you should count on 80-90, so the pleasure is not cheap. I definitely wouldn’t take it for a one-time painting.
Wall painting in the interior has been widely used for many centuries. Medieval frescoes, antique paintings, modern paintings on the walls - all this testifies to the sophistication of the room and the high sense of taste of its inhabitants.
You don't have to be the owner big house with columns to use interior decoration as wall decoration. A small drawing can be used to decorate a wall in a nursery or any other room. Modern materials and technologies make it possible to turn a dull, monochromatic surface into a real work of art. And most importantly, you don’t need to be a professional artist or designer to do this.
The article will describe the simplest and most accessible ways to enliven a living space, make it more interesting to perceive and cozy. Anyone can use them, the main thing is the desire to decorate the room with your own hands so that it looks like a masterpiece from a professional designer.

Choose an artist
Today there are many specialists who are ready to paint the interior, a separate room, using any, even the most incredible, techniques.

Naturally, the more complex the work, the more the specialist will charge for its implementation. But the problem is, not everyone can create a drawing that meets all the customer’s requirements. But you still have to pay decent money for the work. And sometimes you want to decorate a room with your own hands. And let painting a wall in the interior not become a work of art. But with what sense of pride you will look at the surface you painted yourself.

This work can also be done collectively. For example, a child will always be happy to paint the interior of a nursery. Of course - if his age allows him to hold a brush in his hands. And the luxurious wall painting will instill romantic feelings if you do the painting together.
The main thing is to believe that there is nothing difficult in painting walls with your own hands. It's the 21st century, modern materials have high quality characteristics, allowing you to create a beautiful picture on the wall even for those who don’t know how to draw at all. The main thing is not to neglect simple rules when painting walls.

Wall painting techniques
Fortunately, modern artists have ample opportunities to create incredible designs on walls. Once upon a time, only one, very complex technology was used - frescoes. Now you just need to buy a few cans of acrylic or water-based paint at a hardware store and start painting on the wall.
Related article: Spectacular design walls with photo frames

Have you decided to create a masterpiece yourself, but have no real experience in this field?
This means that you should pay attention to the following painting techniques:
- stencil;
- simple outline drawing;
- drawing a picture according to the projection of the slide.

Stencil – great way paint the walls in the interior with your own hands, apply a simple monochromatic or multi-color design to the wall. In the children's room, your child can help you, because to apply a picture, you just need to attach the stencil to the wall and walk over it with a brush or roller. Using a stencil, you can apply not only an ornament of identical elements to the wall, but also other images.
Drawing along the contour is quite simple. The main thing is to find something simple, but beautiful image and using a regular soft pencil, reproduce it on the wall. If something doesn’t work out, you can easily wipe the contours with a damp sponge and draw everything again.

Even a person far from mastering the fine arts can cope with the work. When the contours are drawn on the wall, it is enough to decorate the drawing with interior paints. The technology is ideal for decorating a nursery, especially if the child loves to draw.
If you have a slide projection machine, you can use it to apply the design to the wall. For example, reproduce the desired image on the wall surface, redraw its contours onto the wall, and then decorate it.

Select a pattern
Artistic painting of walls in the interior is easy.
It is important to choose the theme of the drawing for a specific room:
- Have you decided to paint a wall in your living room? Flowers, trees and natural landscapes are ideal. Only a professional can paint a forest or mountains on a wall. But it’s not so difficult to reproduce lilies, dandelions or snowdrops yourself. You can use a simple stencil to apply ornaments.
- The optimal solution for the kitchen is to paint the walls in the interior with still lifes of fruits and vegetables, images of any food. Many will be able to draw a plate of fruit or a wheel of cheese. The main thing is to choose a simple drawing.
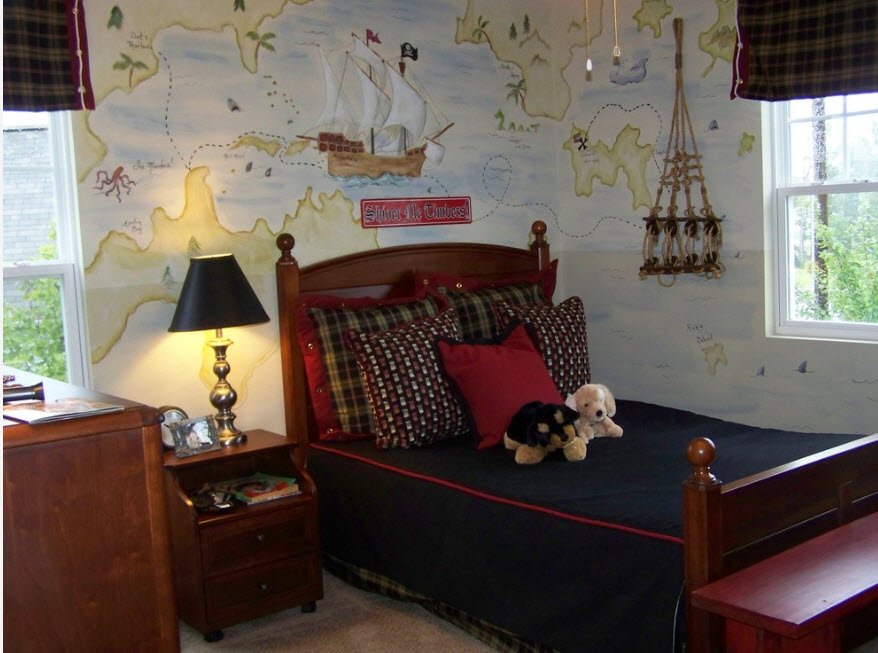
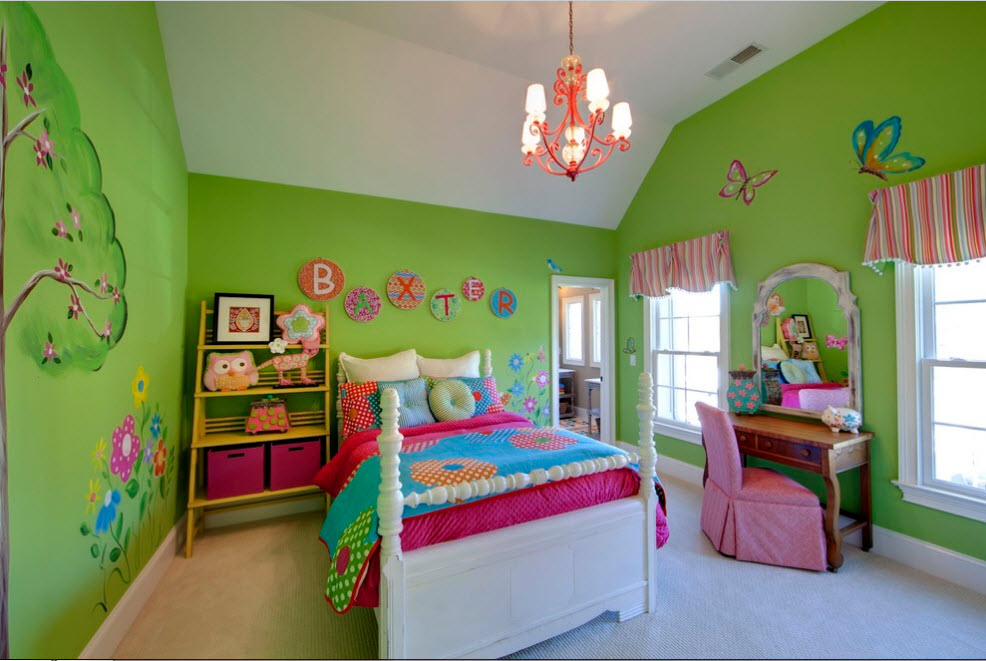
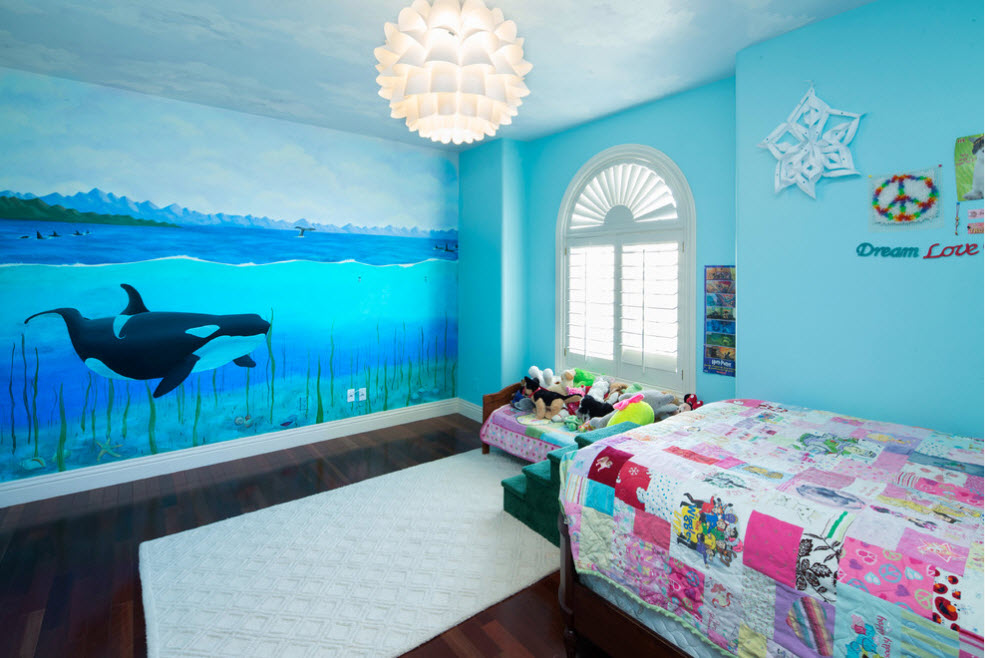
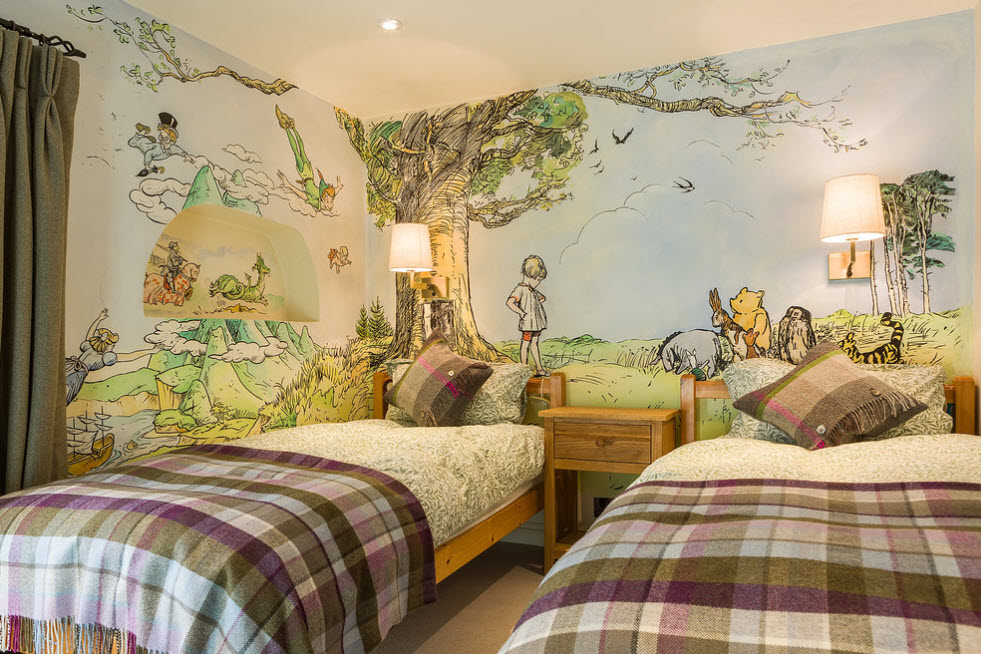
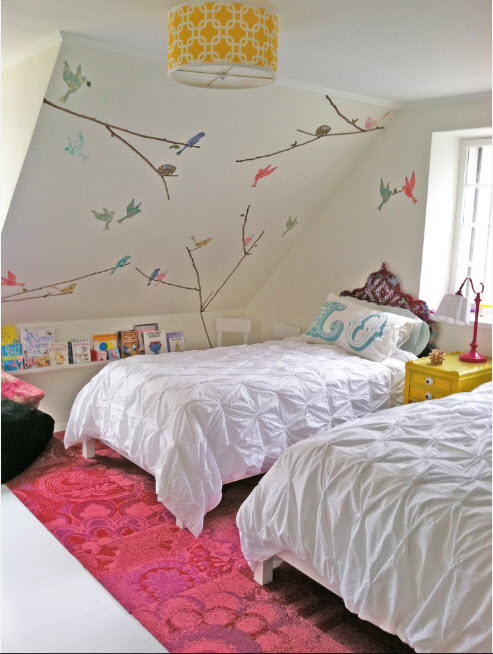
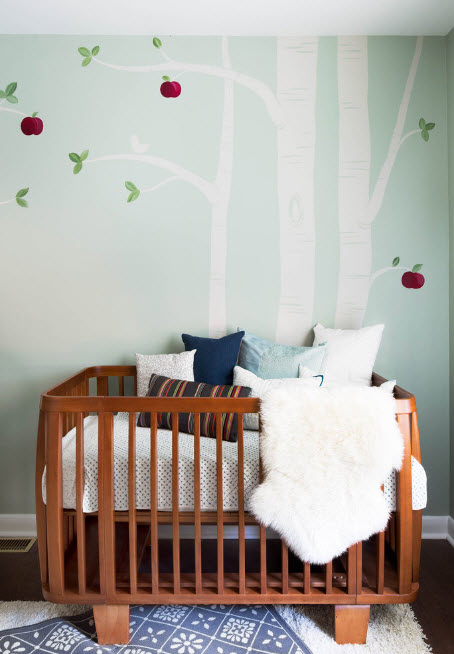
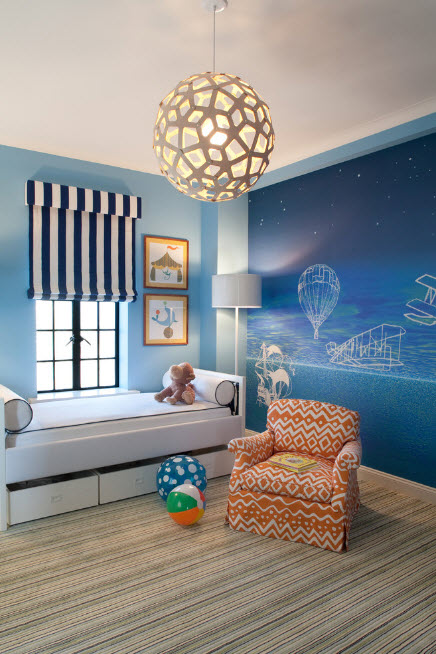
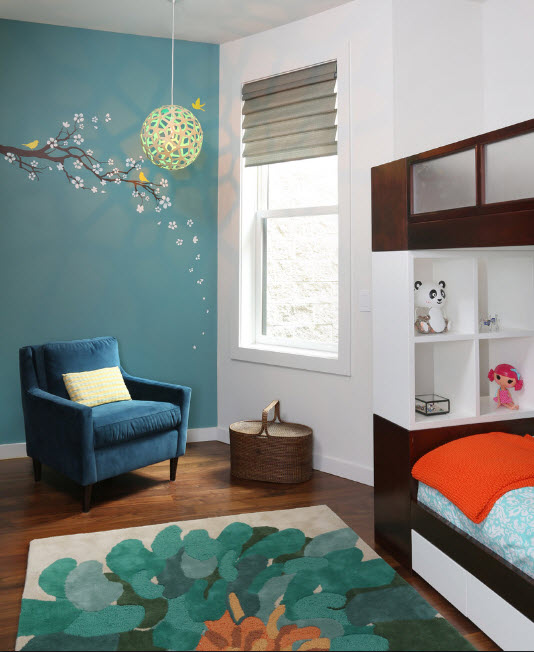
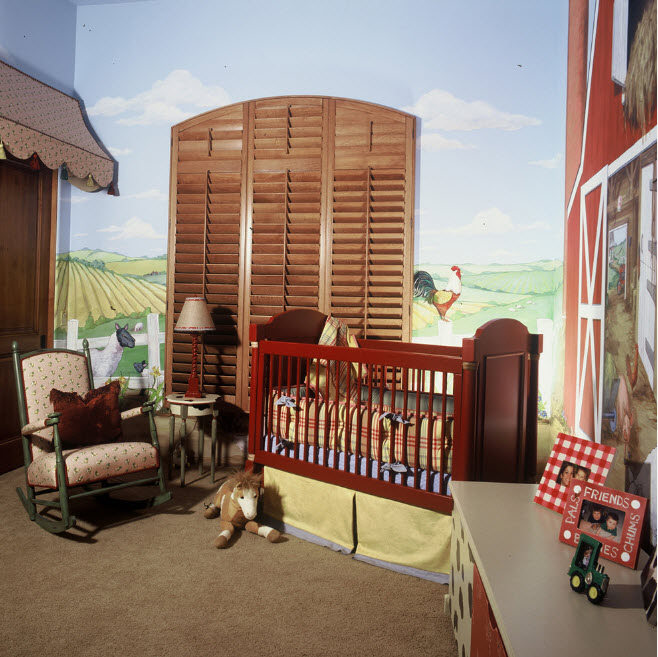
- In the nursery you can depict cartoon characters. For a girl, images of flowers, butterflies, and a fairytale castle are suitable. Need to decorate the walls in a boy's nursery? Images of superheroes and cars are suitable. When both a boy and a girl live in the nursery, the room is different walls you can depict various pictures. Clouds or starry skies are a universal solution for a child’s bedroom.
When painting the walls in the bathroom, you should pay attention Special attention by type of paint. The bathroom is different high humidity. Can be used in another room water-based paint, for the bathroom it is better to take acrylic. Images of waterfalls, Roman baths, the ocean floor, and fish are suitable for the bathroom. Is this too difficult for you? This means that an image of large soap bubbles on the wall will do.

Technology of drawing on the wall
The wall will be painted in the bedroom or another room; you should adhere to the technology of applying paint to the wall. Wall painting is the decoration of a room. But all work begins with leveling the wall.

It is not necessary to apply plaster or level the walls with drywall yourself. You can entrust this process to professionals.
If you decide to carry out this work yourself, it should include the following steps:
- leveling the wall with plaster or drywall;
- a layer of starting putty;
- a layer of finishing putty;
- painting the wall in the background color.

A primer should be applied to plaster or drywall, as well as layers of putty, otherwise it will begin to peel over time. After applying the design to the wall, it is opened with transparent varnish. This measure allows you to make the image as resistant to mechanical damage as possible, and the colors will not fade or fade for a long time.

Where to place the drawing
Have you chosen a pattern for the wall? Have you bought the paint and prepared the walls? Now you need to decide on the location of the image. First you need to plan the entire design of the room. Do-it-yourself wall painting in the interior should not contrast with the color of the furniture; it should correspond to the style and purpose of the room. To avoid unpleasant surprises as a result, you need to put a plan of the room with furniture on paper, and depending on it, look for a place for the drawing.
With the help of paint and improvised means that can be found in every apartment, you can change the interior beyond recognition. And there are many ways to paint walls that will not only transform the space, but also bring a lot of pleasure to those who will participate in this process.Escape boredom

Using paint on the wall you can create an exclusive design that is not found on wallpaper. This allows you to make the interior special and different from others. You can experiment with colors and shades, shapes, textures. When using several colors, it is worth remembering that in this case it is better to combine:
Different shades of the same color;
Related shades;
Contrasting colors that go well together. 
Gradation, blots and mold

Today it is fashionable to experiment not only with color scheme. Increasingly, designers are trying bold wall design options. For example, they age a wall, create the effect of mold or a damp wall, but use blue, pink, green shades. Large blots, stains and stains look bold and extraordinary. It is appropriate to use such decor on one of the walls to highlight a certain area in the room or make it the compositional center of the interior.


Bold DIY effects
To create such effects you don’t have to be a professional designer, artist or painter. Yes, and special tools are not needed in this case. You can make a wall unusual using an ordinary sponge, a clothes brush and a rag. To create textured reliefs, it is recommended to use adhesive or glazed paints. You need to work with them only after the base paint has completely dried.


Marker and chalk to help
Increasingly in modern interiors walls and furniture painted with slate paint appear. This allows you to make notes on the surface and draw all kinds of images. So the interior is always updated depending on the mood of its owners.
Innovative types of coatings also include marker paint. After it has completely dried, which occurs within seven days, you can draw on such a surface with dry erase markers.


Using stencils
In an unusual way, you can paint a wall using stencils, buying them at a hardware store or making them yourself. For self-made For the stencil, thick paper or cardboard will be useful. You can also get an interesting effect if you wrap a piece of rolled rag around a roller and paint the wall with it.There are no barriers for a modern designer in terms of realizing his most bold decisions and fantasies. The experience of generations, combined with advanced technologies, allows us to use skills and techniques to create unique design projects. Wall painting is one of the most original and multifaceted design techniques for creating a truly unique interior. At the same time, today, wall painting means not only the use of classical techniques for creating complex, multi-layered compositions, but also the use of techniques accessible to most Russians, such as screen printing, print drawing and other street art methods. Wall painting can radically change the image of your home without the use of any constructive alterations. To create an accent or highlight the most advantageous area, visually change the parameters of a room or disguise unsuccessful architectural features or finishing flaws - wall painting can cope with all these tasks perfectly. We invite you to familiarize yourself with our large selection of design projects various rooms, in which the mural painting technique was used and get inspired for your own achievements.
Features of the design technique
First of all, it is necessary to decide what is currently understood by such a design technique as “wall painting”. Ancient art, which takes its origins from Egyptian and Sumerian civilization, has not lost popularity today. But, of course, not only the techniques and materials used to create images on the walls have undergone changes with the course of history - the very principle of decorating a home (and public buildings) has changed radically. Nowadays, artists (designers) do not need to leave messages to descendants in the form of wall paintings; this technique is used exclusively for decorative purposes.


Many homeowners who are planning renovations or minor alterations in their homes believe that there is no point in spending time and money on creating unique wall paintings, because there are plenty of incredibly realistic photo wallpapers on sale with high quality printing images. And they are partly right - finding a suitable theme on photo wallpaper in a store will not be difficult. But the interior created with their help will not be unique and will not carry a piece of the artist’s warmth. And if you do the wall painting yourself, then your individual view on aesthetics, on the way of decorating your own home.


These days, an incredibly wide range of themes and themes are available for interior wall painting. stylistic decisions. Using modern materials and the individual eye of an artist (which may be you), you can create unique masterpieces - from traditional murals to graffiti-style inscriptions.


Of course, the following criteria will influence the choice of theme and color palette of the image on the wall:
- belonging to the room (if in a children’s room it would be logical to depict cartoon and fairy-tale characters, a landscape or abstraction would look impressive in a living room or bedroom, then in the dining room you can depict bright fruits and berries to increase appetite);
- the size of the room and its layout (the number and location of door and horse openings);
- the location of the room relative to the cardinal directions and, as a result, the level of natural light;
- interior design style (it would be strange to depict a classic fresco in a room with modern design and graphic handprints of family members as a composition in a room with a traditional style);
- your personal preferences in image execution style and choice color solutions.


Wall painting in the interior: stylistic solutions
In order to navigate the variety of themes for painting the walls of a modern home (we omit options for creating images for public buildings), it is necessary to at least superficially familiarize yourself with stylistic solutions.


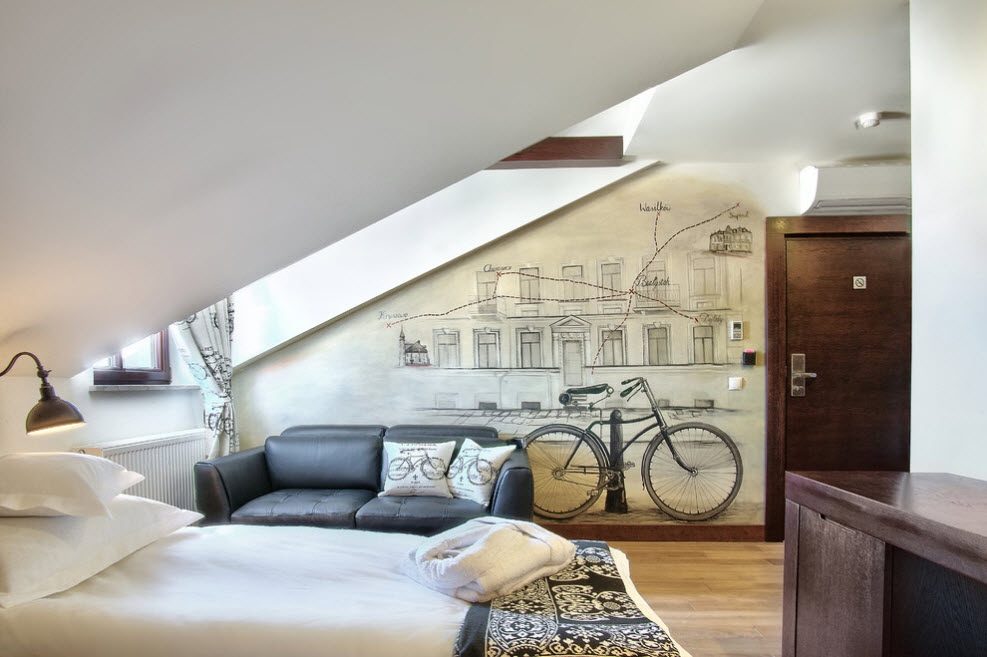
 Classic direction. Classic interior design will never go out of style. It is not for nothing that this direction in the design of spaces is considered traditional - harmony of shapes and lines, color combinations and materials. In wall painting, this is most often reflected in the depiction of an ideal landscape - it is as realistic as it is a reflection of the dream of a “golden age”. By choosing a classic style for wall decoration, you leave behind banality and monotony. This is surprising, but these days classic wall painting looks more relevant than hi-tech, minimalism or loft. What is typical is that to perform painting in a classical style, you can use the most modern materials and techniques.


Baroque and Empire. These are two opposite lines in the development of classicism. If Baroque strives to demonstrate luxury and extensive decoration, then Empire tries to join laconicism, the use simple solutions. Both directions are relevant for use in painting residential spaces. But a lot depends on the general style of interior design, the size of the premises and, so to speak, the general scope.


Art Nouveau or Art Nouveau. This style of painting is easy to recognize - the predominance of “lush”, “living” and literally “breathing” forms. A characteristic feature is the use of compound floral ornament with a predominance of wavy lines. The color palette mainly consists of natural shades; bright, flashy tones are used extremely rarely.


Japanese style. Currently, the Japanese style when painting walls is manifested not only in the application of traditional oriental landscapes, images of sakura or small courtyards with a characteristic landscape design. The Japanese style in wall painting is also anime, replete with details and characteristic attributes that allow even an ignorant person to unmistakably recognize the style of this hobby that has captivated many people. In our country, plant motifs, depictions of landscapes, and sometimes fragments of oriental nature have become more widespread.


Minimalism and primitivism. The name speaks for itself - a minimal set is used to express the artist’s thoughts color combinations, lines and shapes. It may be just one stripe or figure, executed in a contrasting color, but thanks to the balance, the pattern becomes a symbol of the designer’s imagination.


Wall painting: a decorative component in various rooms
In addition to the obvious decorative component, wall painting can also have quite specific functional purposes. For example, with the help of wall painting you can visually change the architecture of a room - make it wider, “deeper”, “raise” the ceiling or completely “erase” the boundaries of space. Wall painting can also act as a zoning element, delimiting the functional segments of the combined room. Wall images are able to focus attention on a particular area of the room, highlighting the most advantageous elements of the interior, “pulling” attention away from the unsuccessful ones.
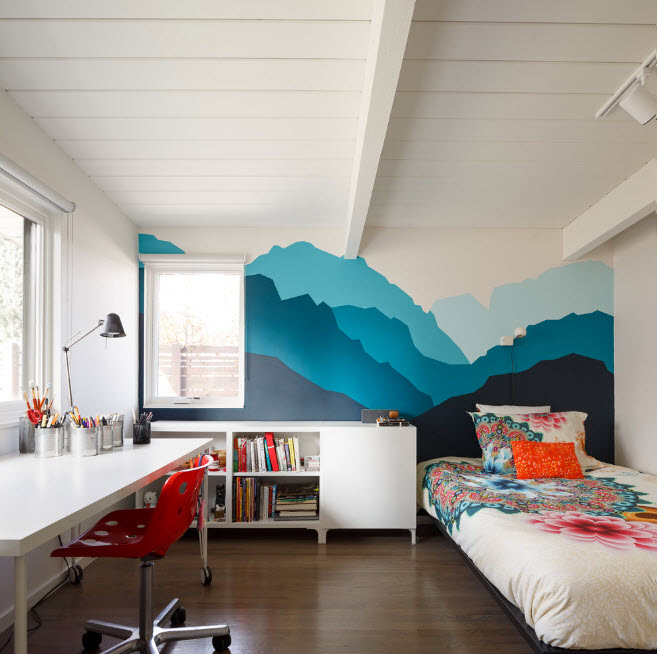

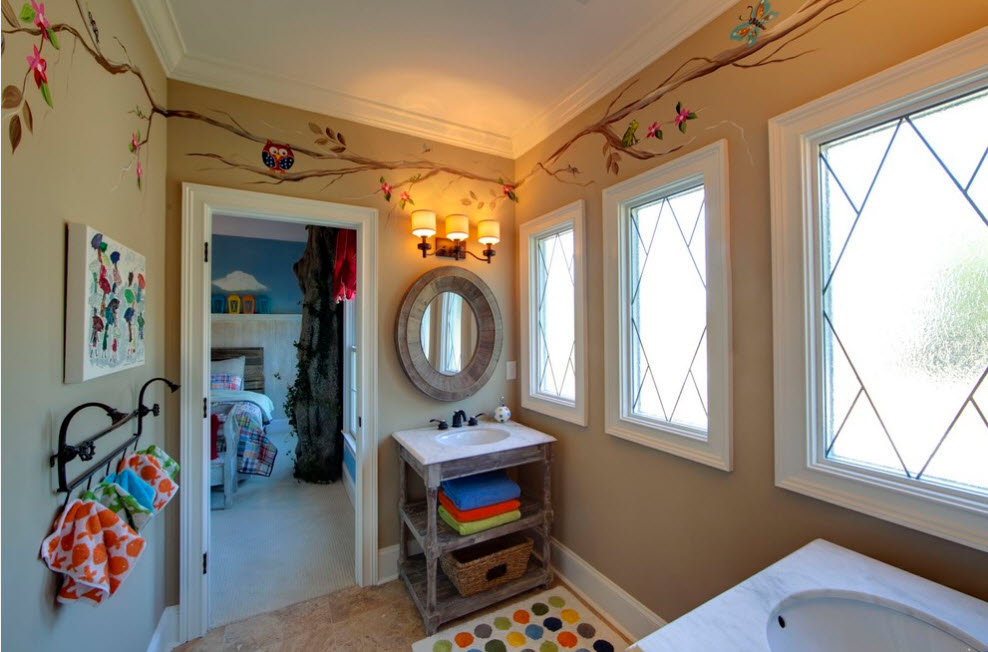


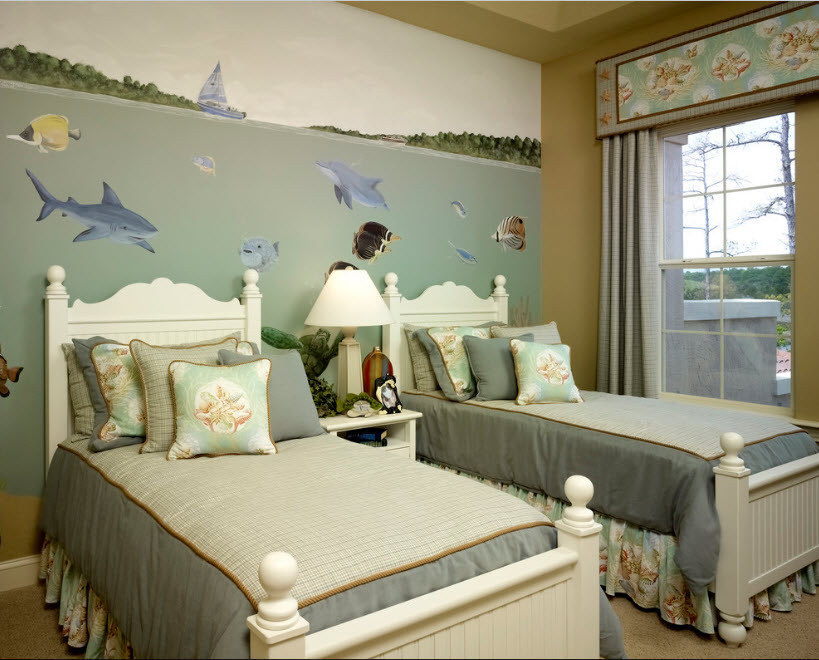
Children's room
Currently, the undisputed leader in creating wall paintings is the interior of a children's room. And this is not surprising - it is for the child that we want to create amazing world, in which it will be interesting for him not only to sleep, play and spend time, but also to develop, gain new knowledge and skills. And everyone knows that any knowledge is perceived by children much easier and simpler if it is presented in a playful form. With the help of wall painting you can create any of the options for fairy-tale worlds. Of course, there are photo wallpapers and interior stickers that will cost several times less, but, firstly, it is not always possible to find decorative material suitable for a theme that is interesting to the child, and secondly, hand-painted walls will always come first in exclusivity , and artistry.


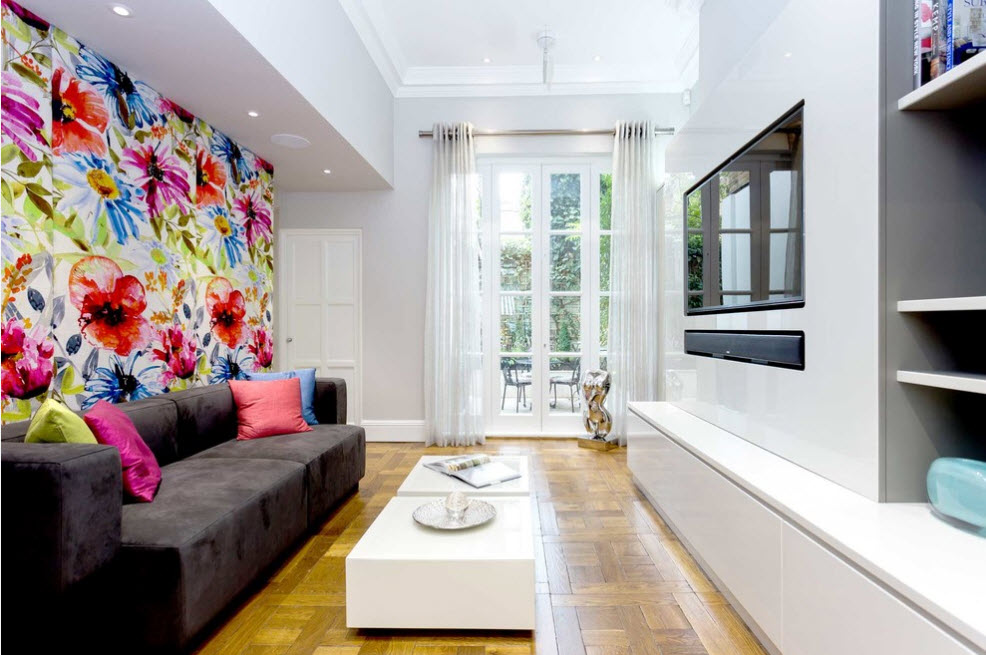
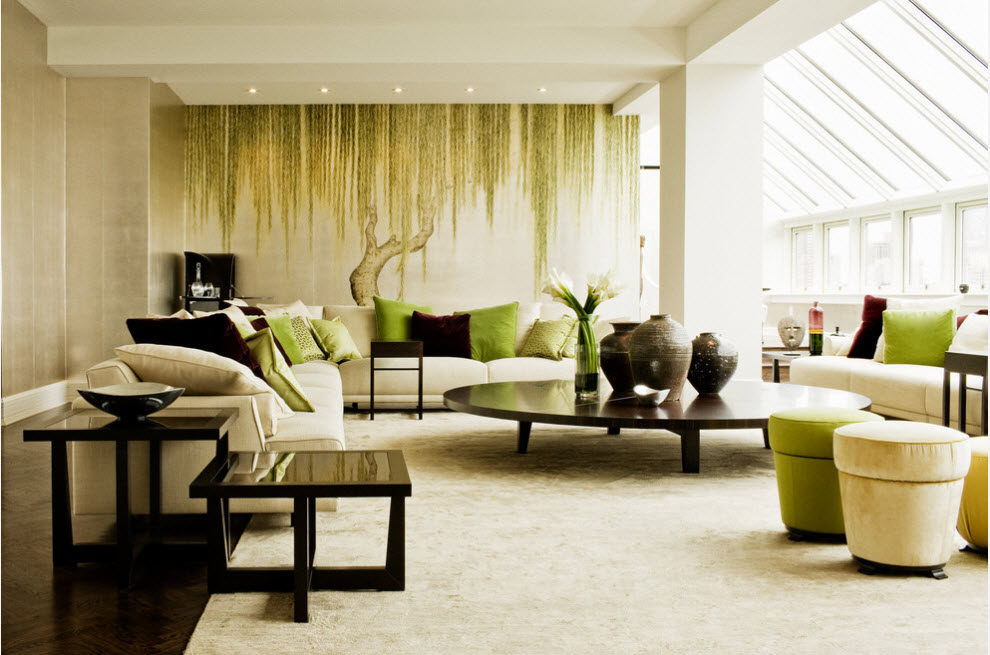
Living room
Painting the walls in the living room will not only create a highlight of the interior, increase the exclusivity status of the room, but also create a certain accent. At the same time, this design technique is relevant both for small rooms, and spacious living rooms, in which several functional segments are connected. But the dimensions of the space, of course, must be taken into account when choosing an image to create an artistic painting.


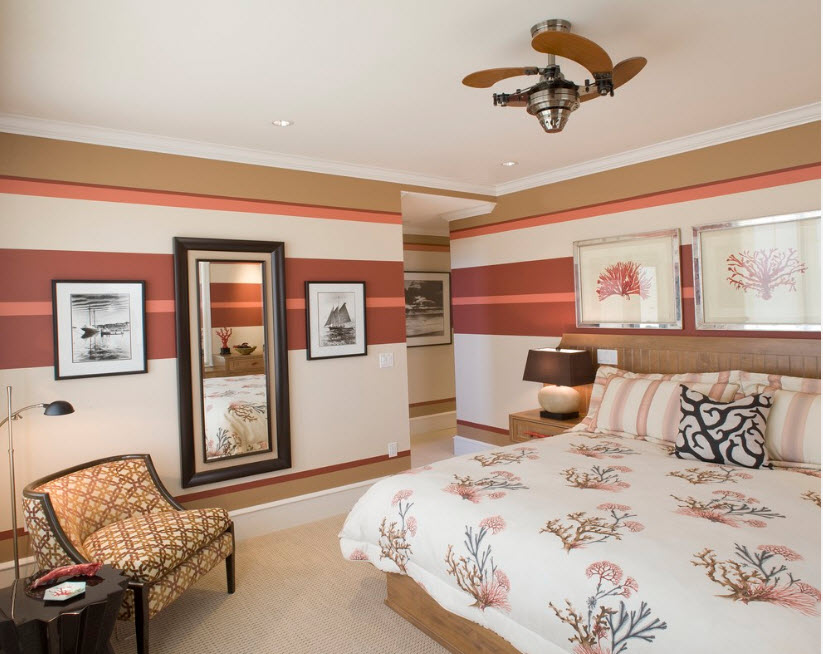
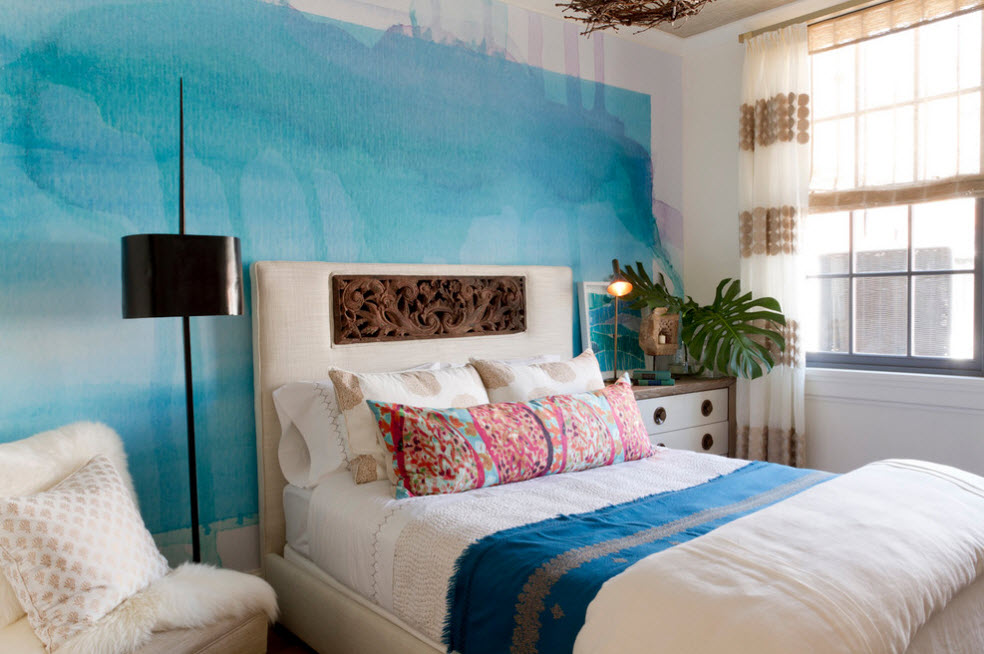
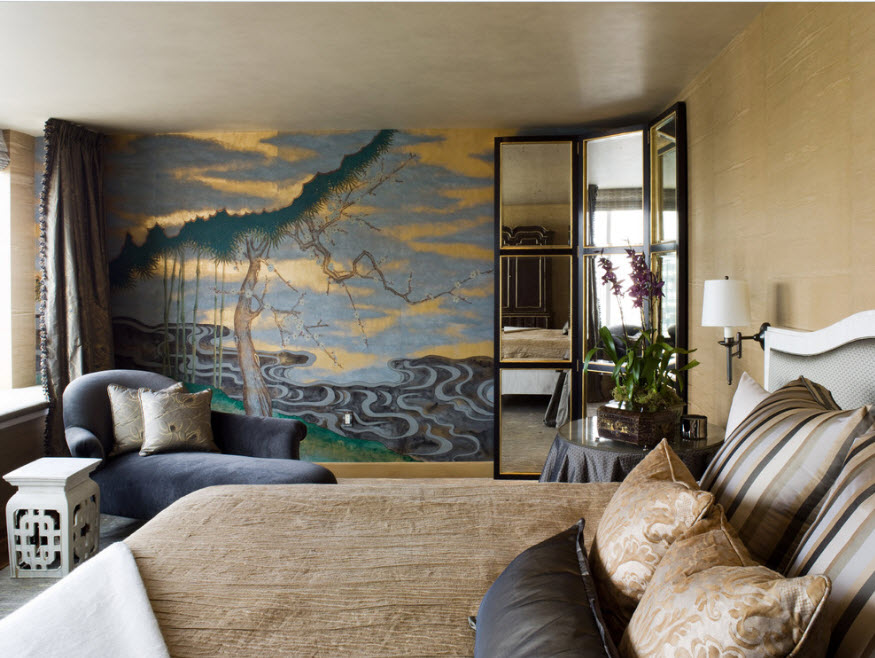
Bedroom
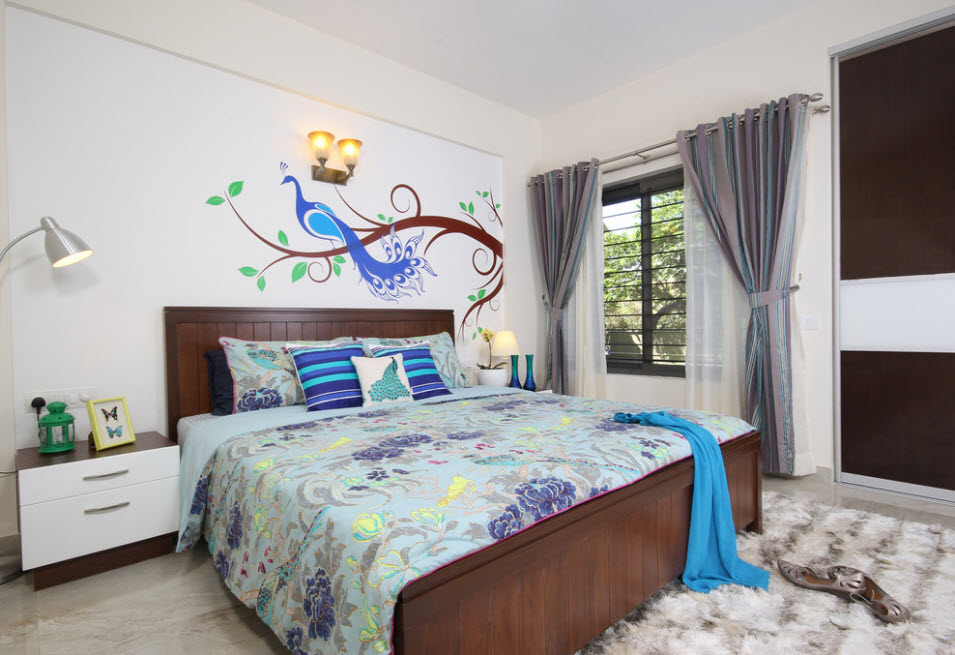
Most often, a romantic style of design on the walls is chosen for bedrooms. Most of us try to create the most relaxing and soothing atmosphere in the room for sleep and rest. Therefore, subtle shades in the image floral motifs or light landscapes become the central theme in the bedroom interior.


Techniques used to create wall paintings
U modern designers There are practically no restrictions in the choice of techniques for creating wall paintings. They have the experience of generations, modern materials and available tools at their service. The image can be applied either to a perfectly smooth surface or to a textured one - the weight depends on the goal. Most often, when creating images on walls, modern artists use:
- oil;
- acrylic;
- fluorescent paints.


A very popular tool for creating original wall paintings is the airbrush - ideally flat surface you can create a drawing without traces of brush strokes and sharp transitions between color schemes. Let's look at the most popular techniques used for painting walls in modern homes.


Airbrush
This is a fairly popular technique at the moment. If we translate this expression literally, it means “I write with air.” Air indeed plays an important role in the use of an airbrush tool - an airbrush. By using compressed air the paint is sprayed onto the previously prepared surface. The images are light, literally airy, with barely noticeable color transitions.


Fresco
The oldest technique, based on painting on wet plaster, is relevant at all times. The characteristic texture of this technique is recognizable in any version. The resulting image is highly wear-resistant - it is not without reason that many examples of ancient frescoes have survived to this day. Currently, the fresco technique is used both to create examples of modern painting and to imitate ancient wall images (for this they resort to artificial aging of the surface, patina).


Painting with fluorescent paints
It’s easy to guess that the technique is based on the use of fluorescent paints that glow in the dark. A unique image can be created using various colors of these special paints. But greatest distribution I received the equipment to decorate the ceiling in the form of a starry sky. In addition to the fabulous effect, a feeling of dimensionality of space is created.


With the help of volumetric painting, you can visually erase the boundaries of the room, make the ceiling “higher” and the room “wider”. Of course, on design features The painting does not affect the premises, but visually creates the effect of some curvature of the volumes of space. Designers like to depict staircases that go into the distance and seem to have no end, or open windows, behind which a beautiful landscape opens.


Using stencils
For those who want to express themselves artistically, to literally “leave an imprint” on the walls of their own home, stencil technology is the ideal way. It does not require special skills, because it is based on applying images using ready-made stencils that you can create yourself or purchase in a store.


Painting with acrylic paints
Usage acrylic paints is incredibly popular nowadays and is due to a number of advantages of these materials for applying images to a wide variety of surfaces:
- quick drying;
- no odor;
- high environmental friendliness;
- ease of application;
- Possibility of use on surfaces with different textures and textures;
- UV resistance.